Updated: Some macOS processes, such as Windows server, Finder, or corespotlightd consume an abnormally high amount of CPU or memory in macOS Monterey, also known as memory leaks. The macOS 12 upgrade also bricked some old Mac models.
Are you indecisive about downloading and updating to macOS Monterey, or have you encountered issues with the newly updated macOS Monterey? This post discusses some common macOS Monterey problems and solutions to fix them.
Here are some examples of the problem you may face with Monterey: you can't download/install macOS Monterey, Mac keeps crashing after the Monterey update with the "Volume Hash Mismatch" error, apps won't work, Touch ID is not working on Mac, “Cloud is not available, Finder springs back horizontal scrolling, Chrome keeps crashing on Mac, Mac won't recognize external monitor, or you have connectivity issues with your Wi-Fi or Bluetooth on macOS Monterey.
Warning: This post will include multiple macOS Monterey problems, and some severe problems like 'Mac not booting after update' could cause data loss. Therefore, it is highly recommended to recover data from a Mac that won't boot with iBoysoft Data Recovery for Mac first.
Read below or use the sidebar to find the solutions to fix macOS Monterey problems.
You meet the questions mentioned above too? Then share this post to help more people.
Should I update my Mac to macOS 12 Monterey?
macOS Monterey is so tempting to upgrade, but you may still sit on the fence and wonder:
- Is macOS Monterey stable to use on My Mac?
- Should I upgrade to Monterey?
- Will macOS Monterey damage or slow down My Mac?
There's no simple answer to these questions, but here is something that may give you a hint.
- It's safe to say that macOS Monterey is more stable than it was first released on October 25, 2021, as several small updates have been launched to bring bug fixes and security patches. Reasonably, many Mac users whose Mac models are supported by macOS 12 have taken the leap with the upgrading.
- It's worth updating to macOS Monterey when you want to access its new features mentioned in Apple WWDC 2021 like the Shortcuts app or when your current macOS no longer support the software you want to install. If you received the error - (null) can't be installed on "Macintosh HD" because macOS version 10.15 or later is required - when trying to install software like Microsoft Word in App Store, it's time to upgrade your operating system.
- An upgrade may result in a slow Mac if it's incompatible with your hardware. But if you are using an M1 Mac or a comparatively new Intel Mac, you shouldn't worry too much.
If you finally decide to update to macOS Monterey, remember to close all your apps and back up your Mac before starting.
How to install macOS Monterey?
The installation of macOS 12 Monterey has no difference from the installation of other previous versions.
- Back up your Mac with Time Machine.
- Go to the Apple menu and then open System Preferences.
- Click "Software Update."
- Click "Update Now." You will update the operating system and existing apps (if there are any updates available) at the same time.
- Click "Restart" after the installation file finishes downloading.
- Use your Mac after it reboots.
Or, you can directly download the Monterey installer from the macOS Monterey download center.
If you've experienced macOS Monterey problems after installing it, keep reading to resolve them.
Can't install macOS Monterey on Mac
Typically, you can directly install macOS 12 to an Apple SSD from Software Update or sign up to the Apple App Store to download and install the macOS Monterey 12.
But you could encounter macOS Monterey problems while downloading or installing it, such as the error "The requested version of macOS is not available," "macOS Monterey cannot be installed on Macintosh HD," An error occurred preparing the update. Failed to personalize the software update. Please try again," "The target volume does not have enough free space to install," "A required firmware update could not be installed," etc.
Here are some common reasons why you can't install macOS Monterey on Mac and troubleshooting tips:
Unstable internet connection. If you are updating your Mac via Wi-Fi, you need to ensure that it has a fast and stable connection. You can test your Wi-Fi's speed and stability using online tools or switch to an Ethernet connection. (An internet connection is required to install macOS?)
Firewall blockage. If you have turned on Firewall and configured it to block all incoming connections, it will stop the macOS Monterey installer from running on Mac. To ensure the Firewall settings are set to allow built-in software, navigate to the Apple menu > System Preferences > Security & Privacy > Firewall. Then uncheck "Block all incoming connections" and check "Automatically allow built-in software to receive incoming connections."
Space shortage. If you are suffering from an unsuccessful installation of macOS 12, you probably need to check if you have enough space on the drive or volume to download the macOS 12 installer. The macOS 12 update will take more than 11 GB in total. Learn how to optimize Mac space.
Incompatible software. Space is enough, but the macOS installation couldn't be completed still? Well, you can boot your Mac into Safe Mode to isolate incompatible software that prevents you from updating the system successfully. Then you can continue updating macOS 12.
Startup Disk corruption. Though it's not common, your startup disk (Macintosh HD) may be corrupted, thus popping up the "macOS Monterey cannot be installed on Macintosh HD" error message. You can run a check on it in the Recovery mode using Disk Utility.
If you are running a slightly older macOS like Catalina, you may experience some Catalina to Monterey upgrade issues, such as the "An error occurred while installing the selected updates" or "Storage system verify or repair failed. : (-69716) error. These errors are more common on Macs that replaced the original Apple SSD with a third-party one. If you are running an outdated macOS, for example, a 2012 MacBook Pro, which cannot update to macOS Monterey directly through Software Update, you may wonder how to install macOS Monterey on an unsupported Mac.
If you want to install Monterey to a non-Apple SSD, you need to reinstall the original SSD, install macOS 12 on it to get the EFI update, then switch back to the non-Apple SSD. However, if you are using an Apple SSD, to resolve these Catalina to Monterey upgrade issues, you are recommended to upgrade to Big Sur first, then Monterey. It's also advisable to uninstall antivirus applications as they may cause trouble.
If you're asked to authenticate a selected volume as the startup disk, read this post to bypass it: Fix 'You must provide authorization for this volume' (macOS Monterey)
If nothing works, the last resort is to perform a clean reinstall by erasing your Mac and then downloading and installing Monterey from the beginning. You might also want to contact Apple Support for help. If you want to solve other macOS Monterey installation problems, keep reading.
Mac stuck on checking null when installing macOS Monterey
If you find your Mac stuck on checking "(null)" when upgrading from High Sierra or Mojave to Monterey/Big Sur, it could be caused by an incorrectly named hard drive or issues with the "Install macOS Monterey" app. The checking "null" error on Monterey is also one of the common Mojave to Monterey upgrade issues.
To fix the checking "(null)" error on macOS Monterey, one of the following solutions will do the trick. It's advisable to keep a copy of your Mac as some solutions will erase all data on it.

Trash the 'Install macOS Monterey' app
A simple fix to get rid of the checking "(null)" error on Monterey is to open the Applications folder, drag and drop the "Install macOS Monterey" app to Trash, and then download Monterey again from the App Store and install it as usual.
Rename the Hard disk as Macintosh HD and reinstall macOS
- Shut down your Mac.
- Boot in macOS Recovery Mode.
On Intel Mac: press and hold Option + Command + R when restarting to install the latest macOS version (Monterey for now).
On M1 Mac: press and hold the power button to install macOS Monterey. - Select Disk Utility > Continune.
- Choose your Mac hard disk from the left side and click Erase.
- Change the name to Macintosh HD and keep the Format as APFS.
- Tap on Erase > OK, then exit Disk Utility.
- Select Reinstall macOS Monterey and follow the instruction to install it.
Install Catalina first
Since it's a Mojave to Monterey upgrade issue that's likely related to skipping subsequent macOS versions, you can try updating to macOS Catalina first, then Install Monterey, as some Mac users succeeded by doing so. This way, it won't pop up the checking "(null)" error when installing macOS Monterey.
Steps are helpful? Share it right now!
macOS Monterey could not be verified
After downloading the macOS Monterey installer, you might see an error message reading "macOS Monterey could not be verified" or "Unable to verify macOS." It usually results from cached content with your user account or incorrect date and time settings in System Preferences.

How to fix macOS Monterey could not be verified:
- Click the Apple menu at the upper left and open System Preferences.
- Click "Sharing."
- Click the lock to make changes at the lower left.
- Select "Content Caching" at the left sidebar and ensure it is turned off.
- Select "All Content" in the "Cache" menu.
- Restart the Mac and download macOS Monterey once again.
If you are still unable to verify macOS Monterey, try using the method below.
- Click the Apple logo at the upper left and choose System Preferences.
- Find Date & Time and open it.
- Select the Date & Time panel and Click the lock at the lower left to make changes.
- Uncheck and then recheck the "Set date and time automatically" option and save changes by clicking the lock.
Then restart the computer and download the update once again through Software Update. Hopefully, it will resolve the issue of the macOS update not being verified.
Problem solved? Let's share right now!
This copy of the install macOS Monterey application is damaged, and can't be used to install macOS
Some may fail to update to macOS Monterey because the installer keeps showing the error " This copy of the install macOS Monterey application is damaged, and can't be used to install macOS." Often, changing your Mac's date can fix whatever is causing this copy of macOS Monterey damaged.

Here are the steps you can follow to discard the message indicating macOS Monterey is damaged:
- Open the Apple menu > System Preferences > Date & Time.
- Click the padlock to make changes.
- Enter your password.
- Uncheck "Set date and time automatically."
- Set your time back to just after the release date of macOS Monterey.
Since the release date is October 25, 2021, you can set it to November 25, 2021. - Re-run the installer.
The update volume could not be mounted for the target
If you receive an error message such as "the update volume could not be mounted for the target" or "the volume is not mounted" when updating to macOS Monterey, it's likely that Macintosh HD is not mounted or corrupted. What you need to do first is to boot into Recovery Mode and manually mount the volume in Disk Utility, then install macOS Monterey again.
If you still get the "the volume is not mounted" pop-up on the macOS Monterey installation, try using the First Aid feature in Disk Utility to check and repair your startup disk. You can also try to reformat your startup disk and rerun the whole process of updating.
macOS Monterey runs into low disk space during installation
Sometimes, even though you have very few personal files on this Mac and space appears to be enough for macOS Monterey, you may still fail to update to macOS 12 with a low disk space warning.
Even worse, the free storage space fluctuates frequently every time you restart your Mac. As a matter of fact, it's one of the common macOS Monterey problems many users would face.
How to Fix:
You can fix the low space issue by deleting some local APFS snapshots taken by the system previously. You can either temporarily turn off Time Machine backup or delete one (or) all of them with Terminal.
How to delete local snapshots with Terminal to free up storage space for macOS Monterey:
- Open Terminal in the Application folder.
- Run the command:tmutil listlocalsnapshots /
- You should be presented with something like this com.apple.TimeMachine.2020-06-01-002010 (the number will be different) depending on when the snapshots were taken.
- Run command to delete snapshots. Remeber to replace the number with the snapshot number you see on your computer.sudo tmutil deletelocalsnapshots 2020-06-01-002010
Deleting local snapshots also helps to fix macOS Monterey problems relevant to space shortage.
Can I install the macOS 12 alongside macOS Big Sur?
The short answer: yes. If you want to switch between macOS Monterey and macOS Big Sur, you can run macOS Monterey alongside your current macOS 11.
You can split your hard drive into two systems and install macOS Monterey on a separate partition. It is feasible because macOS Monterey will reside itself in a read-only volume, and you can do this with these steps:
- Open Finder and click Go at the upper left of your desktop.
- Go to Utilities and choose Disk Utility.
- Select the internal/startup hard disk and select Partition at the top.
- Click Partition and click on the plus button +.
- Fill in a name (macOS Monterey is suggested for easy recognition), choose APFS format, and choose a size.
- Click Apply to create a new partition.
- While installing macOS Monterey, choose this newly created partition as the installation destination.
To switch between two operating systems, you can access System Preferences by clicking the Apple logo at the upper left of the desktop and selecting Startup Disk. Then click the lock at the lower-left corner to make changes, and put in the admin password as the system asks. Finally, choose the system you want to run and restart your Mac.
Mac won't boot/turn on after installing macOS Monterey
If you breeze in the newest macOS and install it to your lovely Mac computer, only to find that your Mac won't turn on, or is stuck on the loading bar after the macOS software update.
This is most likely to be seen on older Mac models before 2017 including MacBook Pro/Air, Mac mini, and iMac models. Apple confirmed that a macOS update might cause power failure in very rare circumstances and then an unresponsive Mac and suggested impacted macOS Monterey users contact Apple Support.
To fix a dead or bricked Mac after the macOS Monterey upgrade, you need to restore or revive firmware, which requires a second Mac and boot the Mac in DFU mode.
Before you jump into DFU mode, you can try the following solutions first to see if you have the luck to bring the Mac back to normal. Make sure you have a full Time Machine backup or conduct data recovery beforehand because some solutions might cause permanent data loss.

How to fix when MacBook Air shows black screen?
dA complete toturial to fix iMac, Macbook Pro/Air that won't turn on black screen issue. Read more >>
Stay calm and try the following solutions to fix this unbootable Mac after the macOS update.
- Solution 1: Reset PRAM/NVRAM
- Solution 2: Reset SMC
- Solution 3: Repair startup disk with First Aid in Recovery Mode
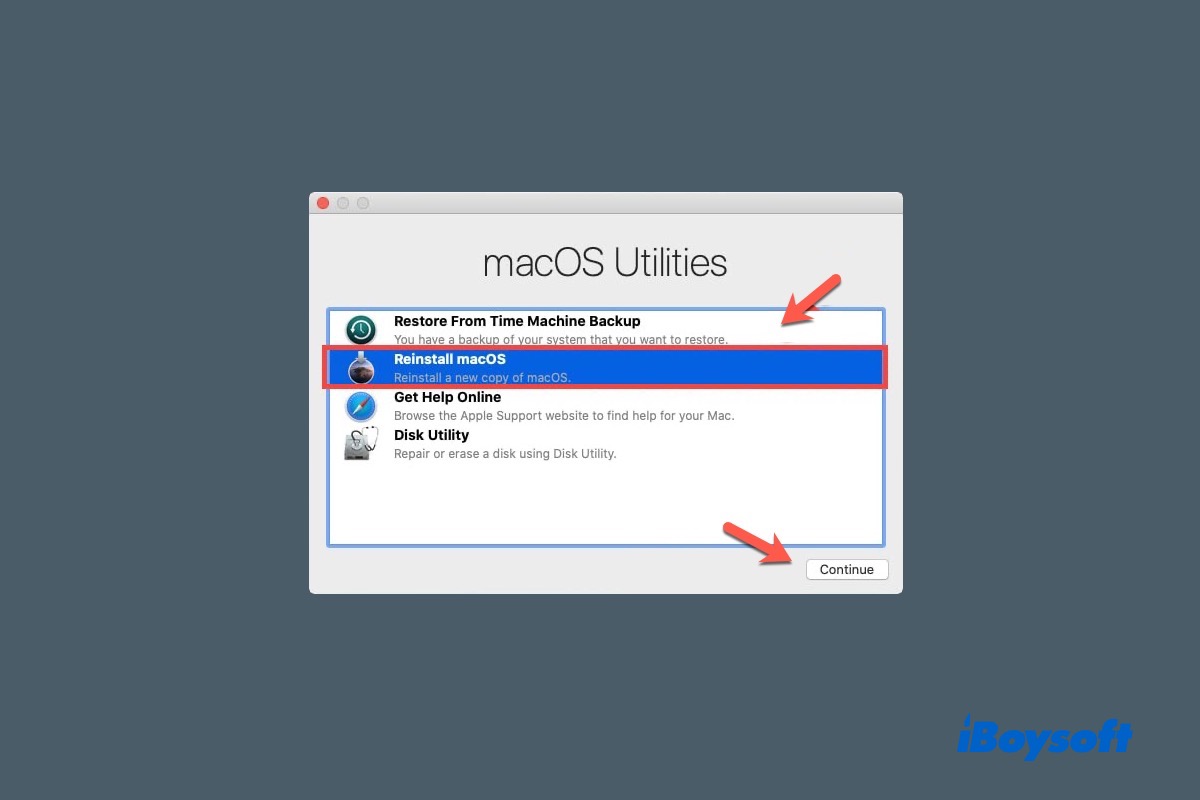
- Solution 4: Uninstall macOS Monterey
Uninstalling macOS Monterey from your MacBook Pro will restore your Mac to a workable OS. Follow these steps to uninstall macOS Monterey:
- Completely turn off your computer.
- Boot your Mac to macOS Recovery Mode. On an Intel Mac, restart the Mac while pressing down Command + R keys and let go of them until you see macOS Utilities window. On an M1 Mac, press the power button and hold it down until you see startup options. Select Option and click Continue.
- Choose Disk Utility and click Continue in Recovery Mode.
- Choose the Startup Disk (labeled Macintosh HD usually) and click Erase.
- Format it as APFS and click on Erase.
- Back to macOS Utilities menu and choose Reinstall macOS.
- Click Continue and then agree to any terms and conditions. When it is completed, your Mac will restart and get back to the macOS currently running on your Mac.
How to clean reinstall macOS from Recovery Mode?
This article tells all ways to reinstall Mac OS X or macOS using Mac Recovery mode, including clean reinstall macOS without losing data. Read more >>
macOS Monterey update stuck/frozen
macOS updates have become larger and larger, so it takes longer to install than usual. However, if the installation of macOS Monterey has taken hours and seems to be frozen, it is abnormal.
The update usually is stuck on "Checking for updates", "Setting Up Your Mac," Screen time, or other processes. It is a very frustrating situation, especially after you have run out of patience by waiting for the downloading and updating.
If you have waited for it for a very long time, but nothing is making any progress, you can cancel or force quit (use Ctrl-Alt-Delete on Mac) the process and active apps, then restart the installation again. Or read this detailed guide on how to fix macOS update stuck.
Windows can't be installed on M1 Mac
Boot Camp Assistant is a feature that helps users to install a Windows partition on Mac's startup disk and supports dual boot at startup. However, this software only works on Intel-based Macs.
Macs with an Apple M1 chip don't support installing Windows operating system on Mac anymore (at least not now). Even though Microsoft rolled out Windows 10 ARM version, Apple has not officially supported Windows 10 on M1 Mac models. When you launch Boot Camp Assistant, an error message pops up telling you it cannot be used.
If you do need to be able to use Windows, the best way is to install Mac virtual machine like Parallels Desktop for Mac to help you accomplish some tasks that need a Windows environment.
Sidecar Errors: Service Not Supported
Sidecar not working on macOS Monterey is another issue Mac users complained about after they installed macOS Monterey. Sidecar is limited to working on some Macs/iPads. That's to say, Sidecar may not work when you mirror macOS Monterey to iPadOS.
If you receive the error saying "Sidecar errors: Service Not Supported," you need to update your iPad to iOS 13 or later. Then check the following list to see if your Apple device is compatible with macOS Monterey 12.
Macs that are compatible with macOS Monterey:
- iMac (late 2015 and later)
- iMac Pro (2017 and later)
- MacBook Air (Early 2015 and later)
- MacBook Pro (Early 2015 and later)
- MacBook (Early 2016 and later)
- Mac Pro (Late 2013 and later)
- Mac Mini (Late 2014 and later)
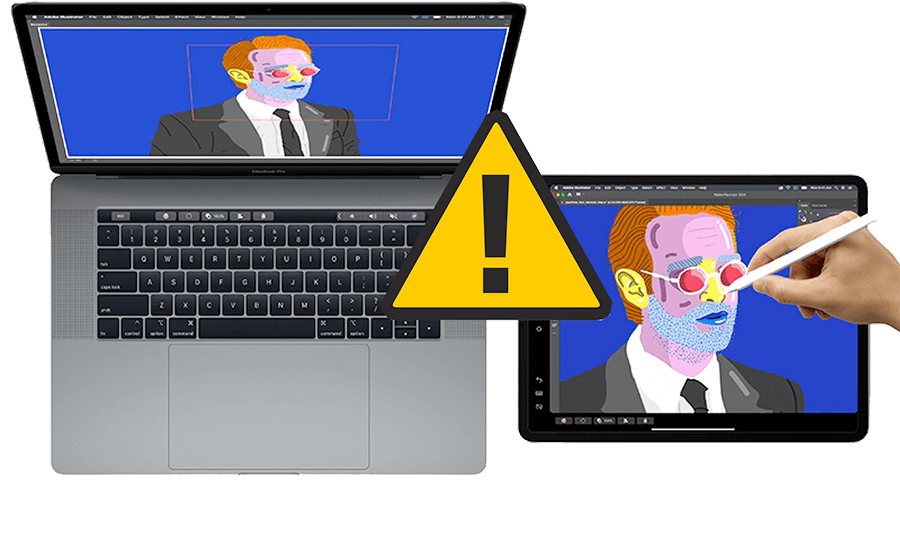
Apps won't work in macOS Monterey
It is possible that you install macOS Monterey on your MacBook Pro, only to find that your Mac is frozen, some apps crashing, or software like Microsoft Word 2011 or Adobe Photoshop Elements won't run or even open in macOS 12 at all.
Instead, you may receive a message like the below to inform you that your app is not optimized for your MacBook Pro and needs to be updated.
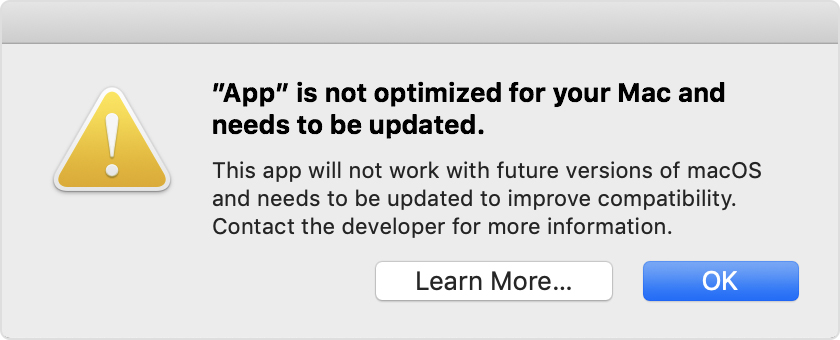
Why? Actually, it is because macOS Monterey doesn't support 32-bit apps anymore. Apple has been phasing out 32-bit software for the last 10 years, and macOS Mojave is the last one that supports 32-bit software.
How do I check if my app is 32-bit on Mac?
By default, macOS will tell you that the app is not optimized for your Mac or something like that when you attempt to open a 32-bit app in macOS Monterey.
However, if it doesn't give any warning but the software just won't open, you need to find the conflicting apps and update it to the 64-bit version manually with these steps:
- Click on the Apple logo at the top left corner and select About This Mac.
- Click on the System Report….(the location has been changed on macOS Ventura)
- Scroll down the context menu in the sidebar until you see the Software section.
- Click on the Applications option under Software to show your applications on this Mac.
- Find the target app, and you will see a section titled 64-Bit (Intel).
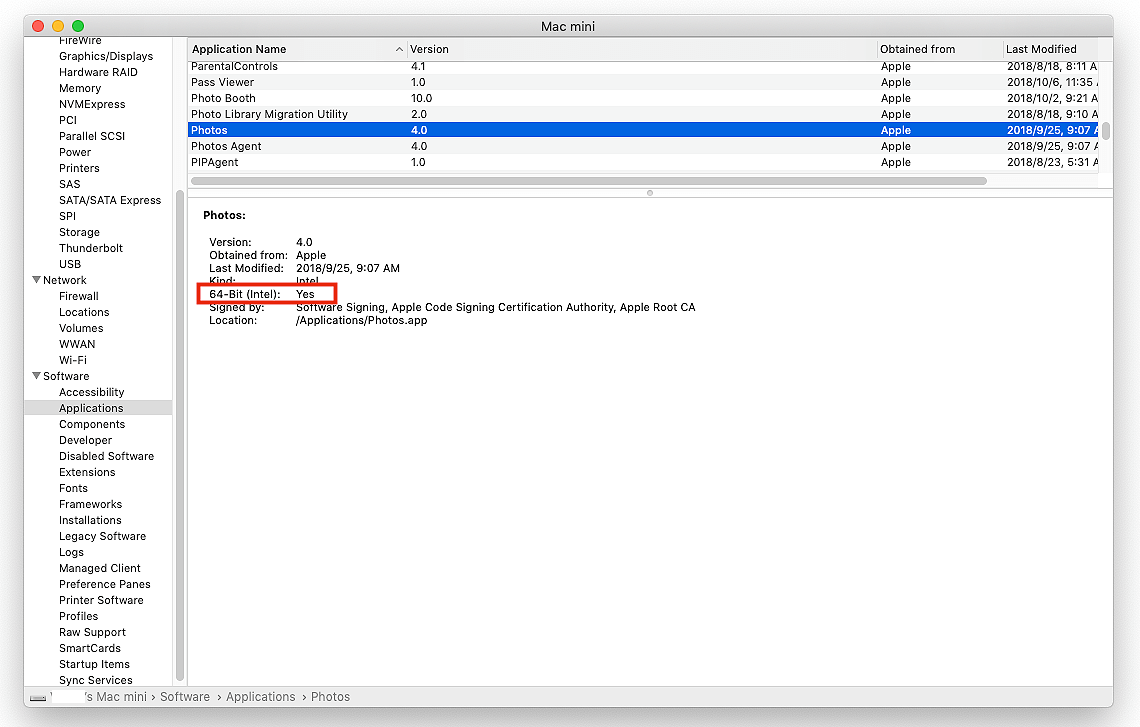
Next to this section is either Yes or No. "Yes" means the app is 64-bit, and "No" means the app is 32-bit and must be updated.
How to fix:
Since macOS 12 Monterey upgrade can't co-exist with 32-bit apps, you have three options in this case depending on your needs.
- Upgrade this software to a newer 64-bit version.
- If there is no 64-bit version available for this app, find an alternative that does the same work but is compatible with macOS 12.
- Not to run macOS 12 but macOS 10.14 for 32-bit software.
If the Mail app is not working on Monterey, you need to disable its Mail privacy protection by opening the Mail app and clicking Preferences > Privacy.
macOS Monterey keeps asking for Apple ID
Suppose you have installed macOS Monterey, and you find that your MacBook Pro or MacBook Air keeps you asking you to update the Apple ID settings. It's only reasonable to do what it says. However, your attempts to fill in the passwords for your Apple ID and account are always to no avail, as the message will reappear a few minutes later.
How to fix:
You can solve these macOS Monterey bugs by saving your keychain to iCloud drive because iCloud will automatically save and update your passwords.
1. Click on System Settings.
2. Choose Apple ID at the top and then choose iCloud in the context menu. It will show what is using the iCloud.
3. Scroll down this menu and choose Keychain.
4. Enter your Apple ID and your computer password a couple of times as asked.
Apps icons go missing in the Finder
You may notice macOS Monterey rendering some icons of your system-installed apps disappearing in Finder's Application folder. It is common because macOS Monterey doesn't install a few apple apps by default. You can download these apps easily through App Store.
If you notice the login screen icons are bigger than before, you can make the login screen icons smaller in macOS 12.
Top Menu Bar Does Not Show Up on Mac Monterey, How to Fix It?
This post explains why your top menu bar does not show up in macOS Monterey, Big Sur, or Catalina and tells how to get the Mac toolbar back in Mac full-screen mode or on the Mac desktop. Read more >>
Wi-Fi/Bluetooth is not working on macOS Monterey
Can't access the Internet after installing macOS Monterey? Wi-Fi/Bluetooth is not working or not available? Check the following methods to fix such common macOS Monterey issues.
How to fix macOS Monterey Wi-Fi not working issues:
- Method 1: Click on Wi-Fi in the menu bar and turn Wi-Fi Off. And then wait for 10-15 seconds and reconnect to it.
- Method 2: Shut down your MacBook Pro or other Mac model and wait for a few seconds before a restart.
- Method 3: Create a new Network Location:
- Click the Apple icon at the upper left and choose System Preferences.
- Find Network and then create a new Network location which usually shows as Automatic.
- Choose Edit Locations, click on the + button to create a new location, and click Done.
- Re-join a known working Wi-Fi network.
How to fix macOS Monterey Bluetooth issues:
- Open Finder, click on Go in the top menu and then click Go to Folder.
- Type in /Library/Preferences and click Go.
- Find the file com.apple.Bluetooth.plist, copy this plist file to another location and then delete the original one.
- Restart your Mac and reconnect to your Bluetooth device.
You should also check if the batteries of your Bluetooth devices are fully charged or working properly. If the issue persists, you can reset the Bluetooth module by following the steps below:
- Open Terminal.
- Paste the following command and press Enter.sudo pkill bluetoothd
- Enter your password.
Some may also their Macs will drain the battery in sleep mode if they have a Bluetooth device connected. That's because the Bluetooth accessory keeps waking up your Mac from sleep mode; thus, you should disconnect all Bluetooth devices before putting your Mac to sleep mode.
Share these solutions to help more people who are trapped in the same question.
Apple TV Airplay not working on macOS Monterey
In some cases, Mac can't see Apple TV as the airplay device after updating to macOS Monterey. If that also happens to you, you need to ensure that your Mac and Apple TV are connected to the same internet connection. Then update Apple TV by opening the Apple TV settings > System > Software Updates > Update Software. Check whether you can connect your Mac with Apple TV.
iCloud is not available after macOS update
As you know, iCloud is extremely helpful for sharing folders between different Apple devices. Sometimes, it can even restore some lost files after an update.
After your MacBook Pro has updated to macOS Monterey, you might see the message "Couldn't connect to iCloud" when creating a new Pages, Numbers, or Keynote document in a shared folder.
When confronted with this problem, you can simply close this document and then reopen it.
Furthermore, you could meet some other iCloud issues.
- iCloud Drive fails to automatically download all files after macOS Monterey was installed
- Multiple empty Application libraries within iCloud Drive after update
How to fix:
- Download the desired files from the iCloud drive manually and individually.
- Safely remove the empty folders from iCloud.
- Log out of iCloud, restart your device and log in to iCloud again.
External hard drives/mouse/keyboard is not working in macOS Monterey
It is reported that Mac won't recognize the external hard drive after installing macOS 12 Monterey. What's worse, this issue also leads to some accessories like keyboard, printer drivers, and Apple Mouse not working. Why?
For the most part, it is still the 32-bit driver that renders your external drives not working.
How to fix:
- Update these drivers in App Store.
- Contact the developer on their support page to ask for a driver update.
This issue has been spread to most models and even on the macOS 12.0.1. So if your work needs a USB hub or USB port, it is advised to wait until the bug is fixed.
macOS Monterey makes Mac slow/overheating
There are many macOS Monterey problems users have reported. What may disappoint them most is that Monterey has slowed their Mac down. What's worse, it makes their MacBook Pro overheat, and even causes some battery problems.
It is annoying, especially for some game geeks and office workers who need a fluent computer eagerly. Luckily, there are a few fixes you can try to calm your Mac down.
Solution 1: Uncheck Login Items as many as possible
Too many unnecessary items at login will make your computer lag. Besides, these login items could make your Mac stuck on the loading bar when you boot your Mac.
To disable them as the following steps:
- Click on the Apple logo at the top left corner and select System Preferences.
- Choose Users and Groups in the menu and click on your account in the left sidebar.
- Click Login Items in the right column to show a list of programs that automatically start up when you turn on your MacBook Pro.
- Select as much software as you can and click on the minus - button at the bottom of this window.
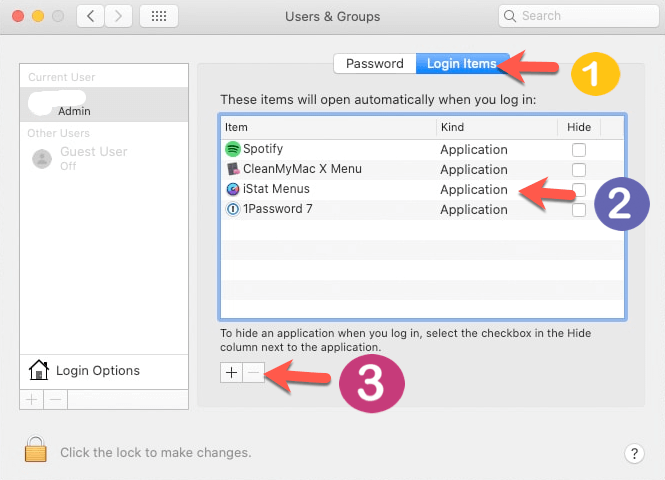
If this doesn't fix your problem when you restart your Mac, try the next solution.
Solution 2: Reset System Management Controller (SMC)
Resetting the System Management Controller (SMC) is a feasible solution to macOS Monterey problems regarding power and hardware. Here is a list of macOS Monterey problems that can be fixed by resetting SMC.
- Mac overheating
- Power management and battery problems
- Video and external displays not working
- Mac doesn't respond when you press the power button
- General performance and functionality problems
How to reset SMC on an Intel Mac:
- Shut down the computer completely and make sure your Mac is connected with power.
- Using the built-in keyboard, press and hold the Shift + Control + Option + Power Button keys at the same time for about 10 seconds. If you have a MacBook Pro with Touch ID, the Touch ID button is also the power button.
- Release all the keys together and press the power button to start up your computer.
- The boot time after resetting a machine's SMC will be a bit longer than usual, that is normal. When the computer is booting up, you can customize your Mac settings according to your need again.
If the fixes above don't solve your problem, you can ask for help from Apple Support.
Files, documents, or folders get lost after update
You may lose files after the macOS update. Some MacBook Pro users' desktop becomes empty, and some other people find that they can't locate some photos in the Photos library.
You can try these 3 solutions to get them back.
Solution 1: Recover files from iCloud
Actually, if you're using iCloud Drive to sync Desktop & Documents folders, it is rather easy to restore documents, photos, etc. Just visit www.icloud.com and sign in with your Apple ID to recover your files now.
Solution 2: Recover files from Time Machine backups
No data backup in iCloud? Don't worry because you have another feasible way to recover lost/disappeared files.
If you have backed up your Mac with Time Machine before the update, it's easy to recover lost files. Now, let's see how to recover files from Time Machine backups.
- Connect this Time Machine backup external hard drive to your Mac.
- Click on the Apple logo at the top left corner and select System Preferences.
- Find Time Machine, open it, and then check Show Time Machine in the menu bar.
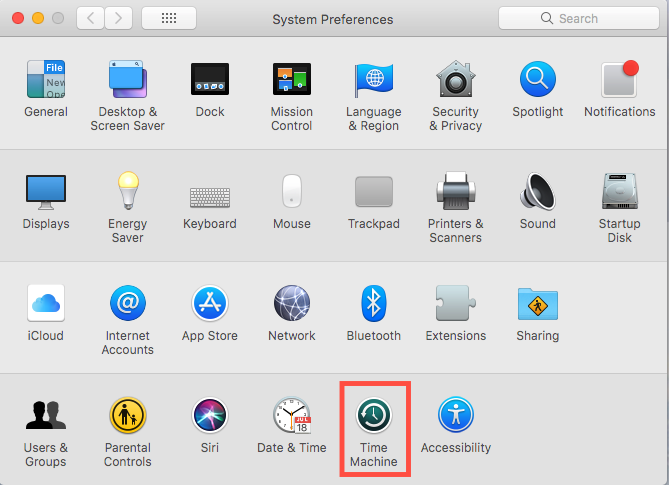
- Locate Time Machine in the upper right menu, click its icon and choose Enter Time Machine.
- Look through the Time Machine backup folders in the left sidebar and locate the target files according to time.
- Select files you want to recover and click Restore.
Solution 3: Recover lost data with Mac data recovery software
If you haven't backed up the lost/missing files with Time Machine, you can look for a Mac data recovery tool to recover files from the Mac computer after the macOS Monterey update.
You can use iBoysoft Data Recovery for Mac to recover lost data from Mac computers.
iBoysoft Data Recovery for Mac is user-friendly Mac data recovery software that can recover deleted Word files, photos, videos, music files, emails, etc., from Mac computers. It is one of the most powerful APFS data recovery tools that can recover files from formatted, corrupted, unreadable, unmountable APFS partitions/drives.
Tutorial to recover lost data from macOS Monterey with iBoysoft Data Recovery for Mac
1. Download iBoysoft Data Recovery for Mac on your Mac and launch it.
2. Select the drive/volume you lost data from and click Next to scan for files on this drive.
3. Select files you want to get back. You can preview the target files by double-clicking.
4. Click Recover to get lost/missing files back.
External drive is read-only in macOS Monterey
Another one of the macOS Monterey problems many Mac users are facing is that external hard drives are read-only in macOS Monterey. This could also include SSDs, USB flash drives, SD cards, etc. As a result, you will be unable to write to, transfer, edit, or delete files on the read-only drive in macOS Monterey.
As a matter of fact, this problem results from the NTFS file system that Apple does not officially allow write support. It occurs not only in macOS 12 Monterey but also in other Mac operating systems.
How to fix external drive read-only in macOS Monterey:
If your storage device is NTFS formatted, you can download a free NTFS for Mac driver like iBoysoft NTFS for Mac. This tool can mount NTFS drives on Mac in read-write mode, granting you full access to NTFS drives in macOS so that you can create, save, copy, paste, delete and modify files on this drive.
Get a warning that the system has run out of application memory
After you have upgraded to macOS 12, you keep getting a warning saying that 'Your system has run out of application memory" and displays a Force Quit menu to quit offending apps even though your Mac is in minimal use.
You can view background apps and processes in Activity Monitor to check the culprits taking dozens of GB of memory that they shouldn't.
This issue, known as a memory leak, is widely reported on Macs of all models, including the 2021 14-inch and 16-inch MacBook Pros. The culprits are found in macOS Control Center, pre-installed apps, and third-party software.
To get rid of the warning, you can force quit the app or restart the Mac to reset the memory. If the warning still reappears, you probably should downgrade macOS to or stay on macOS Big Sur and wait for the second version of macOS Monterey.
If the macOS Monterey problems you are dealing with are not covered in this article or you have other tested and trusted solutions, kindly update us via [email protected].

How to Completely Factory Reset MacBook Pro/Air? Step by Step
If you don't want macOS 12 anymore, you can either downgrade to macOS Big Sur or restore your Mac to factory defaults to have a fresh machine. Read more >>