Generally, after a Mac-compatible hard drive is connected to a Mac computer, you can open it and have full read and write access. However, you are not allowed to write to an external hard drive on a Mac when it shows read-only. Why is your hard drive read-only? Mainly 3 causes result in this issue:
- The external hard drive is the NTFS file system
- Disk permission is changed to read-only
- The external hard drive is corrupted
What is the cause of your external hard drive problem? You can quickly diagnose it via the symptoms below. Meanwhile, the corresponding best fix is attached, as well.
| Symptom | Likely Cause | Best Fix |
| Able to read files on Mac; unable to rename, duplicate, or move files to trash. | NTFS external hard drive | Use NTFS for Mac |
| Enter admin password when writing to external hard drive; read-only disk permission in Get Info | Permission issue | Change permission to read & write |
| Error report in First Aid, unstable drive mounting | Corruption | Recover data first and repair it then |
📖 Toshiba external hard drive read-only on Mac
Check the detailed reasons and solutions below after you diagnose your case.
If you find this article helpful, please share it.
Case 1. It's an NTFS External Hard Drive
Most external drives and SSDs are previously formatted with Microsoft NTFS for Windows platforms. However, NTFS is one of the read-only file systems on Mac, which makes your Mac only read the NTFS drive, not write to it. Even on the latest macOS Golden Gate 27, NTFS writing is not supported.
If you try to copy files from a Mac to an NTFS external hard drive, you'll see a greyed-out forbidden symbol as shown in the picture below. You can't add files to an external hard drive on a Mac.
How do I know if my external hard drive is an NTFS file system
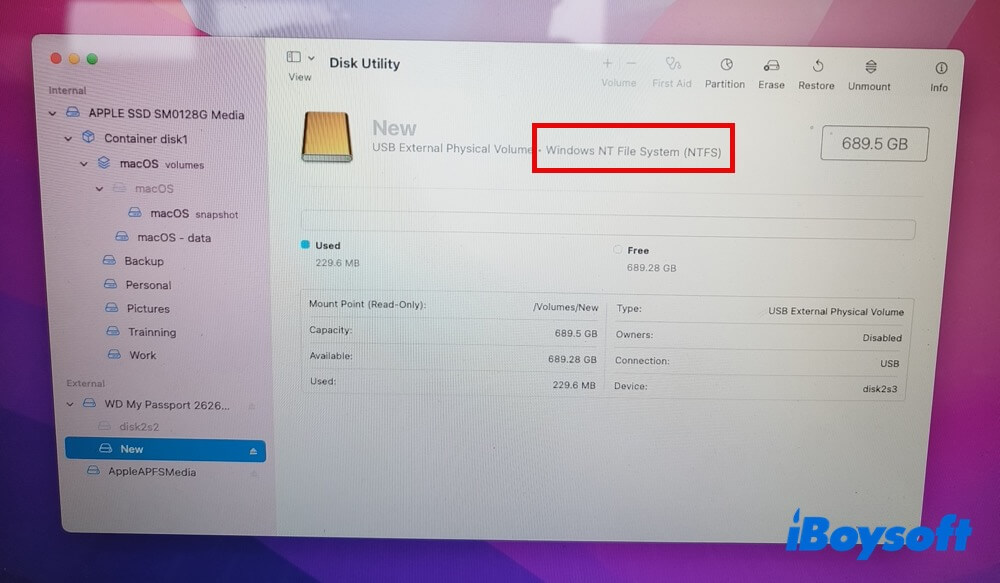
Normally, you can check file system information by viewing its disk information in Disk Utility.
Check file system info in Disk Utility
- Click Launchpad in your Mac's dock and choose Other in the menu.
- Choose Disk Utility among these utilities and open it.
- When it launches, click the drive where you have a read-only error within the left sidebar. You will see an obvious "Windows NT File System (NTFS)" in the right column.
How to fix NTFS external hard drive read-only on Mac issue
Once you've confirmed that your external hard drive is read-only on Mac due to the Windows NTFS file system, you can go ahead to fix this problem by either using an NTFS for Mac app to make external hard drives compatible with Mac and PC or formatting the external hard drive for Mac.
Solution 1. Using the NTFS for Mac tool
If you have important files on the drive and frequently work across Windows and Mac, formatting should be your last resort. That's because formatting the disk will delete all files. To read and write to an NTFS hard drive on a Mac without formatting, using a cross-platform NTFS driver for Mac is the best choice.
You can try iBoysoft NTFS for Mac. This easy-to-use NTFS for Mac software can auto-mount your NTFS external hard drive in read-write mode without formatting. Thus, you can duplicate, rename, delete, edit, and transfer files in Finder like native volumes, read-write speed up to 130 MB/s for HDD USB 3.0, 400 MB/s for SSD USB 3.0, and 950 MB/s for SSD Thunderbolt 4.
How to use iBoysoft NTFS for Mac to make a hard drive compatible with Windows and Mac without formatting:
- Free download and install iBoysoft NTFS for Mac on your computer.
- Connect the NTFS external hard drive to your Mac and launch iBoysoft NTFS for Mac.
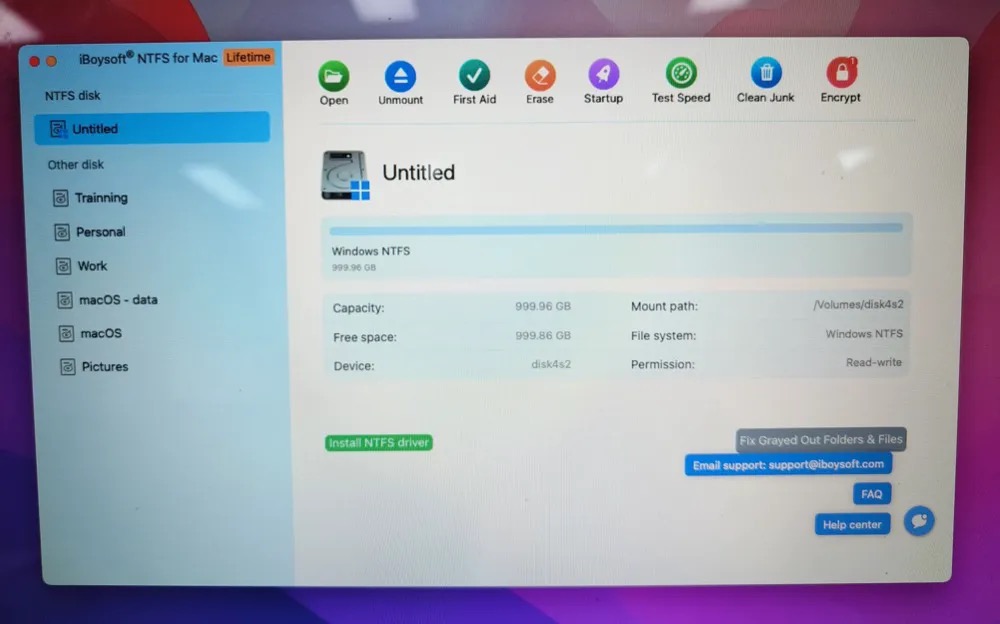
- Write to the NTFS external hard drive after the external hard drive is mounted in read-write mode successfully.
Note: If you can't write to your NTFS drive after installing the software, you need to install an NTFS driver by iBoysoft and enable System Extensions as the pop-up indicates. Then, the NTFS disk will be mounted in read-write mode.
Using NTFS for Mac is the easiest way to solve the NTFS read-only on Mac issue. Let others know, too!
Solution 2: Enable NTFS write support with Terminal (Not recommended, not available on macOS 13 & later versions)
Here is another method to transfer files from a Mac to an external hard drive without formatting. You can enable NTFS write support with a command prompt on your Mac.
This method is experimental, and all attempts are at your own risk.
Warning: Do not use this method as a long-term solution to solve Mac external hard drive read-only mode, especially on drives that contain important files. Meanwhile, be careful with the command line. If you input an incorrect command, it may cause unexpected damage to your Mac and drives.
How to use a Seagate external hard drive on a Mac without formatting:
- Click Go at the upper right of your desktop and go to Applications > Utilities > Terminal.
- Input "Sudo nano /etc/fstab" to edit the fstab file (supply your password when prompted).
- Type "LABEL=DISKNAME none NTFS rw, auto, browse" in the editor window for the fstab file. (Be sure to change the word DISK NAME to the name of your drive)
- Press Control + O to save the file, followed by Control + C, and then Control + X to exit.
- Unmount your NTFS drive and attach it again.
Solution 3. Erase an external hard drive to exFAT/FAT32 on Mac
If your NTFS external hard drive is empty or has already been backed up, formatting it to a Mac-compatible file system is a good idea.
How to format an external drive on a Mac? You can just go to Disk Utility and erase it. Several file system formats are available. The right one for erasing the disk depends on how you plan to use the drive.
- APFS: If you plan to use the drive on macOS Golden Gate, Tahoe, Sequoia or earlier version (10.13), you can format it into APFS for better read-write speed.
- HFS+: Also known as Mac OS Extended, use this Mac file system if you are going to open this external drive on macOS Sierra and earlier Mac operating systems.
- FAT32/exFAT: Best option if you need to view files and transfer files to external storage devices between Windows and Mac.
Did you fix the problem? We would appreciate it if you could share the post.
Case 2. You Have Read-only Disk Permission
Users can set up file permissions to determine who can delete or modify a file or program copied to a certain drive. Thus, it is no surprise to see a message informing you that your Mac external storage device is read-only when saving changes, given that you don't have permission to write to the external hard drive on Mac.
You can right-click on the icon of your disk, choose "Get info", and scroll down to check the disk privilege you have. If it says "You can only read the external drive", you don't have permission to write to the external hard drive on this Mac.
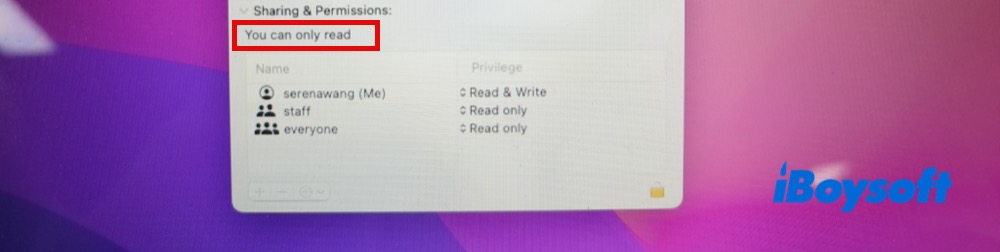
You can either use another Mac or use this external disk on Windows to bypass the issue. Is no second computer available? Try to change permissions on Mac for the external storage media.
Solution 1. Change read-only permission on Mac external hard drive with admin privilege
To solve Mac external hard drive read-only error due to limited permission, you can easily alter it if you are an administrator.
How to change Mac external hard drive Read-only permission to Read & Write:
- Open the Finder and find your external storage media in the left sidebar.
- Right-click on this drive or volume, choose Get Info, and then scroll down to Sharing & Permissions.
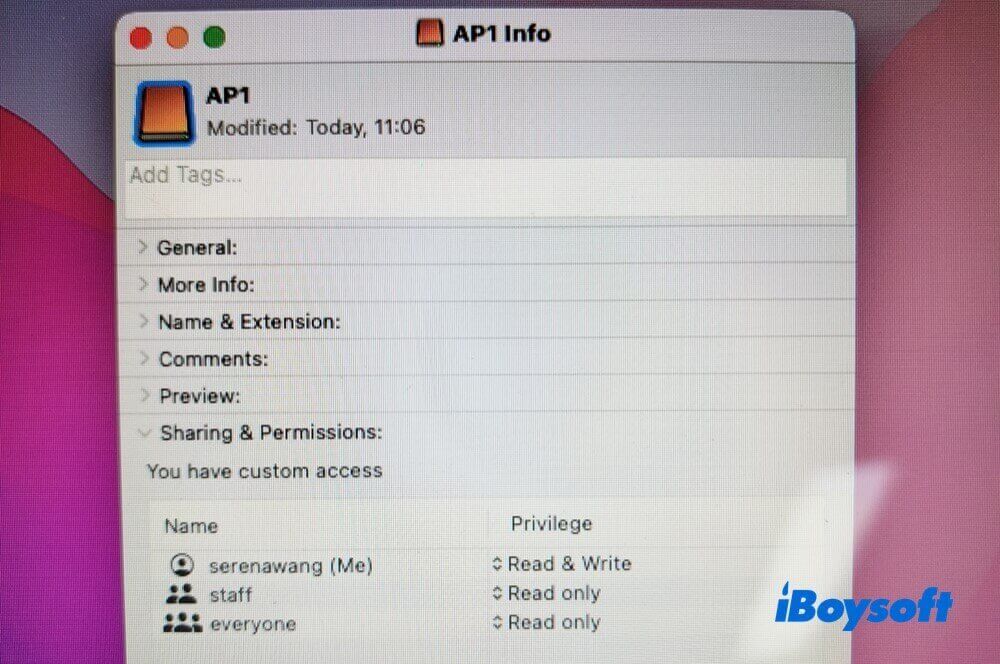
- Extend this column by clicking on the triangle symbol, and then click on the Lock icon.
- Input your admin username and password, and click Read-only, then change your privilege to Read & Write in the right column.
- Click the gear button (Action menu) at the bottom of the window, choose Apply to enclosed items, and then click OK to confirm the action.
- Click the Lock icon to save changes.
Note: You still can't solve your external hard drive read-only issue by changing permissions if your drive is NTFS file system. For NTFS drives, you're suggested to resort to NTFS for Mac in Case 1.
Solution 2. Ignore Permissions on an external hard drive in the Finder
Mac operating system includes a setting to allow an administrator to ignore permissions on Mac's external drive, so all files should be fully accessible regardless of their permissions settings. Here are the steps to ignore the permissions on an external hard disk without formatting:
- Select the drive in the Finder sidebar, and then press Command + I to get information about the drive.
- Click on the Lock icon with the admin password and then click on the arrow by the Sharing & Permissions tab near the bottom of the window.
- Check the box to Ignore ownership on this volume.
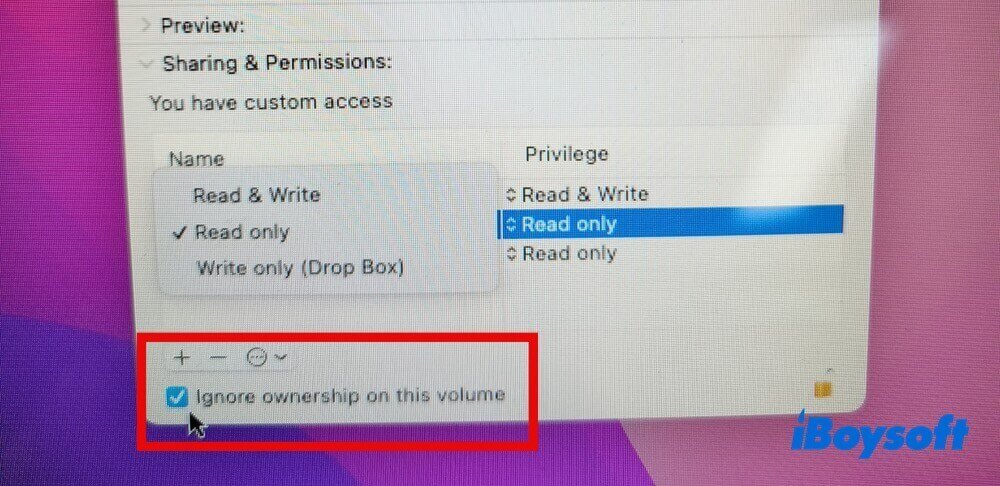
- Click the Lock icon to save changes.
Case 3. It's a Corrupted External Hard Drive
If your Mac still cannot write to an external hard drive, the cause may be internal disk logic errors. These errors prevent the system from writing or changing file permissions to avoid further corruption.
In this case, data security comes first. The primary thing you should do is to recover data from your corrupted hard drive to prevent data loss if it contains significant data. Then, resort to Mac's built-in free disk repairing tool in Disk Utility named First Aid to check and fix minor disk corruption errors.
Recover Data from a Corrupted External Hard Drive
To restore your data from the corrupted external drive, you need a professional yet reliable Mac data recovery software - iBoysoft Mac Data Recovery, which can help you restore data from corrupted drives, as well as unmount/formatted drives in APFS, HFS+, FAT32, or exFAT format. Here is how it works:
- Download and install iBoysoft Data Recovery for Mac on your Mac computer.
- Connect your corrupted external hard drive to your Mac and fire up this Mac data recovery utility.
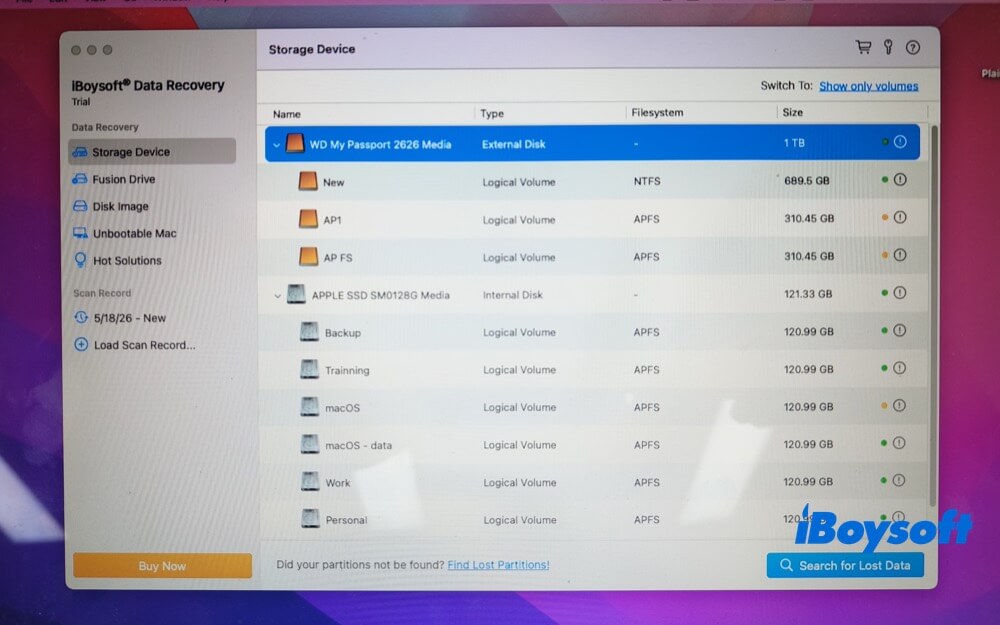
- Opt for the corrupted drive and tap Search for Lost Data to scan for all the recoverable files.
- Preview the recoverable files.
- Click Recover to begin recovering file data from your corrupted drive. Please make sure the recovered data is saved to an intact storage device rather than the corrupted one.
- After the data recovery and backup are completed, you can proceed to repair your corrupted drive without data loss concerns.
Repair Hard Drive Errors with First Aid in Disk Utility
Follow the guide below to fix the external hard drive read-only Mac without formatting in Mac's Disk Utility app.
- Open Disk Utility from Launchpad and Another folder.
- Select the disk from the sidebar that is read-only.
- Click First Aid at the top and choose Run.
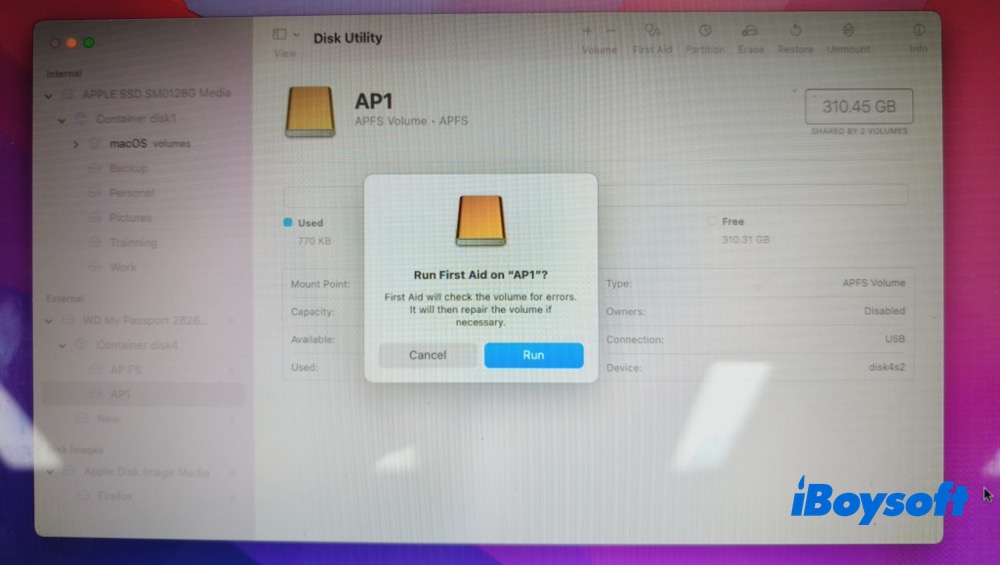
- Wait for a short time and see what feedback you get from running the tool. If it returns with a "First Aid process is complete" message, click Done to close the window.
Then unplug the problematic external hard drive and reconnect it to the computer to see if you can open it and copy files from the Mac to it. If it doesn't make any difference, check the troubleshooting tips on the "Disk Utility First Aid failed on the external hard drive" issue. In case First Aid still doesn't work, the last workaround is to reformat your external drive.
Reformat External Drive in Disk Utility
Again, make sure your significant data has been backed up before starting. Afterwards, let's get started.
- Choose the external hard drive from the left sidebar of Disk Utility.
- Select "Erase" at the top.
- Opt for a format: APFS, exFAT, or FAT.
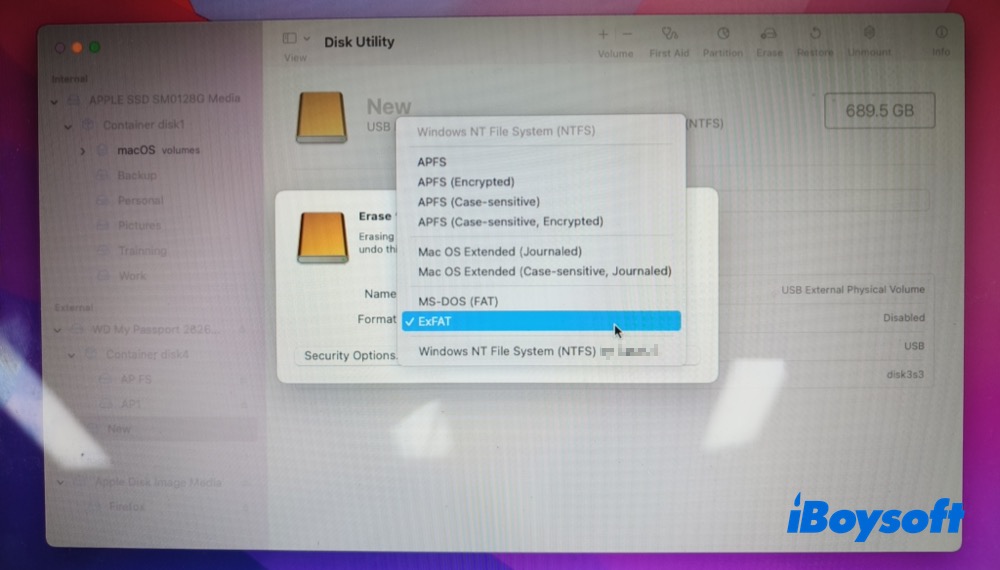
- Click "Erase" again to confirm. Wait for the reformatting completion.
- Tap Done when it's finished. Now you can reconnect your external drive to Mac to test if the read-only issue gets fixed.
Conclusion
Generally speaking, when you are unable to write to an external hard drive on a Mac, the possible causes include an NTFS-formatted drive, read-only disk permissions, or corrupted disks. You can fix it through the above-mentioned methods.
By the way, a free download of iBoysoft NTFS for Mac is the most efficient way to solve Mac's external hard drive read-only error due to the Microsoft NTFS format.
FAQs about External Hard Drive Read-only on Mac
- QWhy is my external hard drive read-only on Mac?
-
A
This mainly resulted from 3 causes: NTFS file system external drive, read-only permissions, and corrupted hard drive.
- QCan I fix external drive read-only on Mac without formatting?
-
A
Yes, you can. Use NTFS for Mac by iBoysoft to auto-mount your external NTFS drive in read & write mode without formatting. Or fix this issue without formatting by dint of changing permissions to read & write, or repairing your corrupted disk via Disk Utility.
- QCan permissions fix NTFS read-only?
-
A
No, they can't. Mac doesn't support NTFS drive writing by default. You need to install an NTFS driver to fix NTFS read-only on Mac issue.