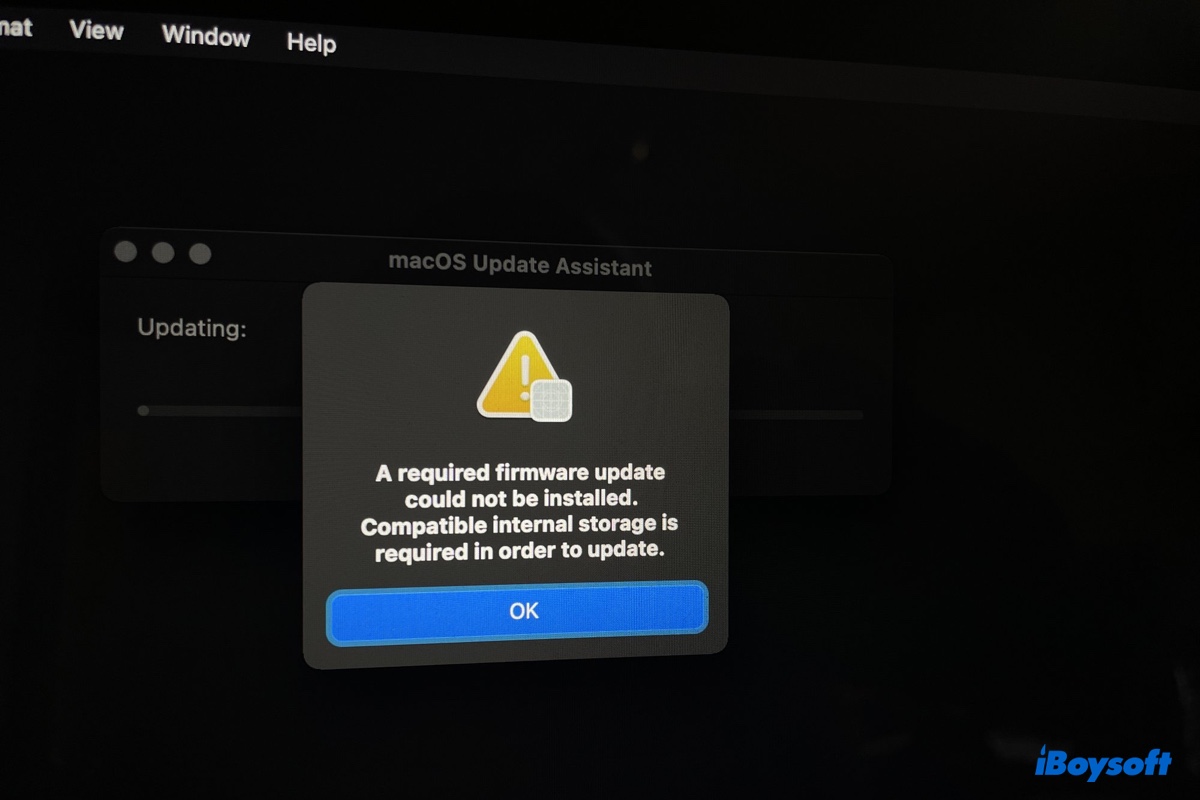
You may fail to install macOS Tahoe on Mac Studio or other models and receive one of the following firmware update errors:
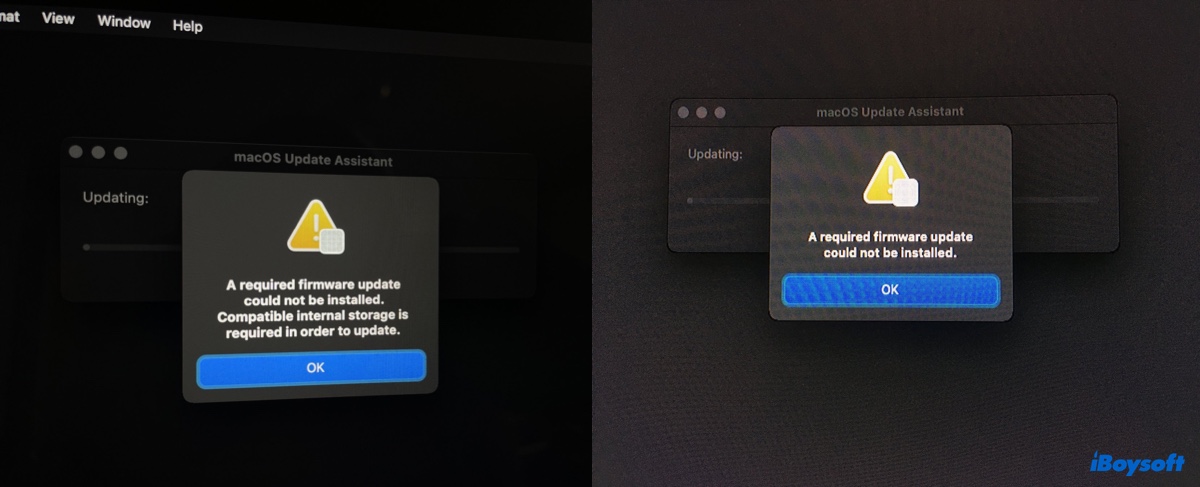
- A required firmware update could not be installed. Compatible internal storage is required in order to update.
- A required firmware update could not be installed.
In most cases, the error is caused by not having the original Apple hard drive installed on your Mac. But that doesn't mean it won't happen on Macs with the original Apple hard drive. In fact, it does, and it also occurs on Hackintosh computers. In this post, we'll provide the solutions to help you fix the error "A required firmware update could not be installed."
Tips: It's also a good idea to follow this fixing guide - Fix "can't update to macOS Tahoe", or download the macOS installer and create a bootable drive to install or upgrade macOS.
How to fix 'A required firmware update could not be installed' on Mac?
This section will show you what to do when receiving the error "A required firmware update could not be installed" on a Mac with or without the original Apple hard drive.
Use the original Apple hard drive
As a necessary step to install or upgrade to macOS Monterey, an EFI update is required, which won't install unless there's an original Apple hard drive.
So, before allowing you to upgrade to macOS Monterey or its successor, macOS Ventura, the EFI Boot ROM included in the OS will verify your hard drive to ensure it's original. If it can't find the original drive, the installation will fail with an error like "A required firmware update could not be installed."
Accordingly, if you're not using the original Apple hard drive, you need to switch to it and install the macOS update on it to get the firmware update. Then reinstall your third-party SSD and repeat the installation process.
Note: Make sure you research how to replace the hard drive of your Mac model before taking off the lid if you decide to do it yourself. Otherwise, visit a local technician or a genius at the nearby Apple Store. They may also be able to provide a genuine Apple hard drive if you don't have one. Besides, you can purchase one from eBay, or ask if the manufacturer of your third-party hard drive can loan you one.
If your original Apple hard drive still contains an operating system and can boot up your Mac regularly, you can just plug it in and do the update. However, if it was erased and no longer has the operating system, take the following steps:
- Create a bootable macOS installer with the macOS DMG file you want to upgrade to.
- Back up data on your Mac with Time Machine.
- Shut down your Mac.
- Open your Mac, take out your current hard drive, and insert the original one.
- Connect the bootable installer with your Mac.
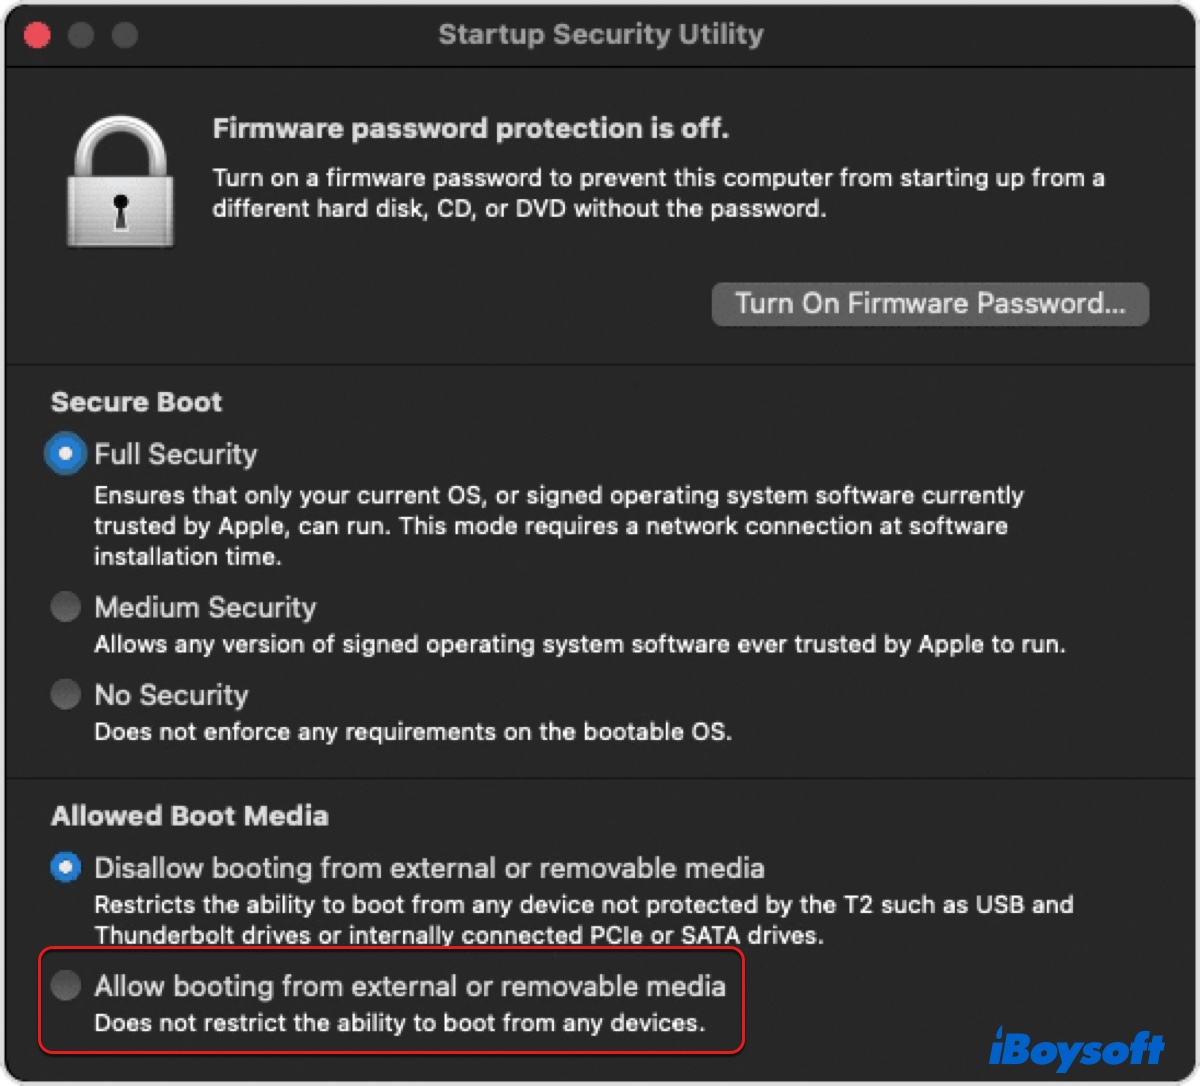
- Allow booting from external media or storage in Startup Security Utility if you have a T2 Mac.
- Turn on your Mac, then immediately hold down the Option key.
- Select the bootable installer and click the Up arrow.
- Select Disk Utility and click Continue.
- Click View > Show All Devices.
- Choose the top-level disk and click Erase.
- Name your drive, set the format to APFS and the scheme to GUID Partition Map.
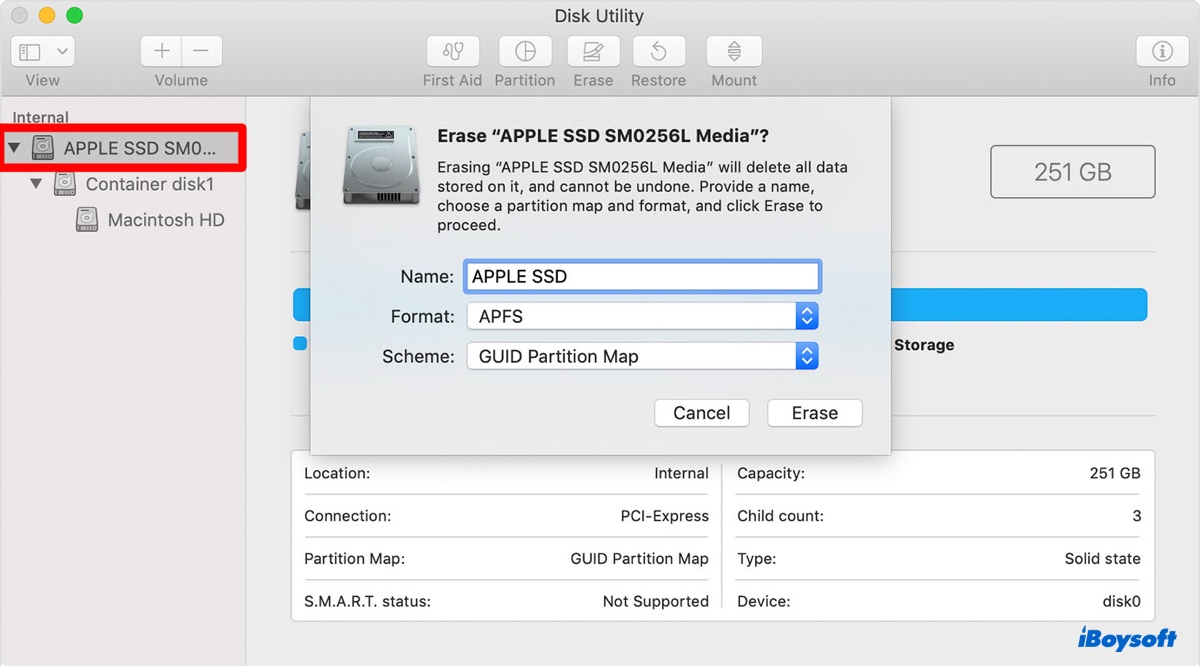
- Click Erase again.
- Exit Disk Utility, then click "Install macOS (version)."
- Turn off your Mac, and replug it with the third-party hard drive.
- Update your Mac.
This time, you will be able to complete the upgrading without the error "A required firmware update could not be installed".
If you're not sure whether your Mac has an Apple hard drive, follow the steps below to verify it:
- Press Command + Space to activate Spotlight Search.
- Type "system information" and hit Enter.
- Select Storage from the left sidebar.
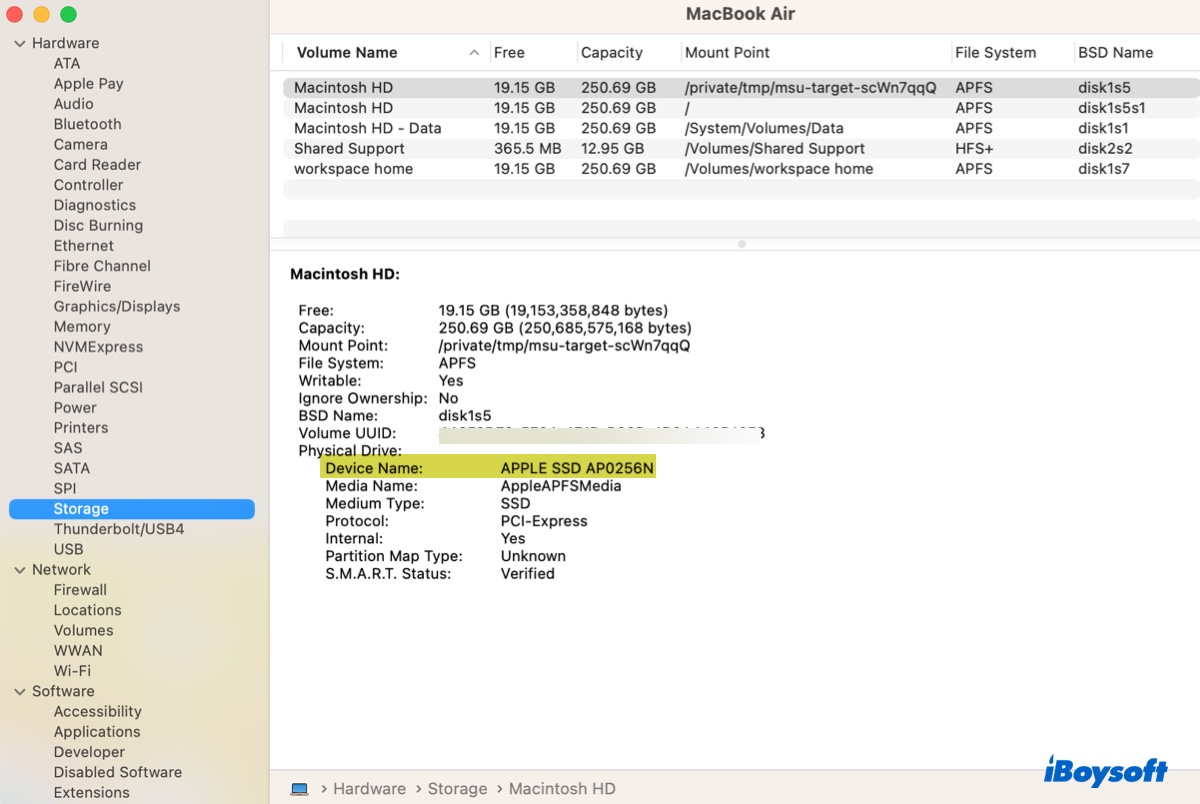
- Check the value next to "Device Name." An original one should say APPLE SSD with a model number if your Mac was produced in 2015 or later. Otherwise, it's labeled with the manufacturer's name.
Manually update the firmware
If you don't have access to the original Apple hard drive, try manually updating the firmware and then update your Mac. Apple enabled firmware updates through third-party SSDs with firmware version 195.xxx. Therefore, if your Mac has firmware version 195.0.0.0.0 or later installed, it's possible to manually upgrade the firmware using the EFI firmware file found in your target macOS version, Monterey or Ventura.
Here's how to check your current firmware version and model identifier:
- Press Command + Space, type "system information" and press Enter.
- In the System Information app, ensure the Hardware section from the left is selected.
- Check the value after "Model Identifier" and "System Firmware Version."

Then, follow the steps below to install the EFI firmware update for macOS Monterey.
Fix "A required firmware update could not be installed" on macOS Monterey/Ventura:
- Download a macOS Monterey full installer from the App Store.
- Boot into macOS Recovery.
- Launch Terminal from Utilities at the menu bar.
- Execute the command below to disable SIP.csrutil disable
- Restart your Mac.
- Find the "Install macOS Monterey app" in your Applications folder.
- Right-click the app and select "Show Package Contents."
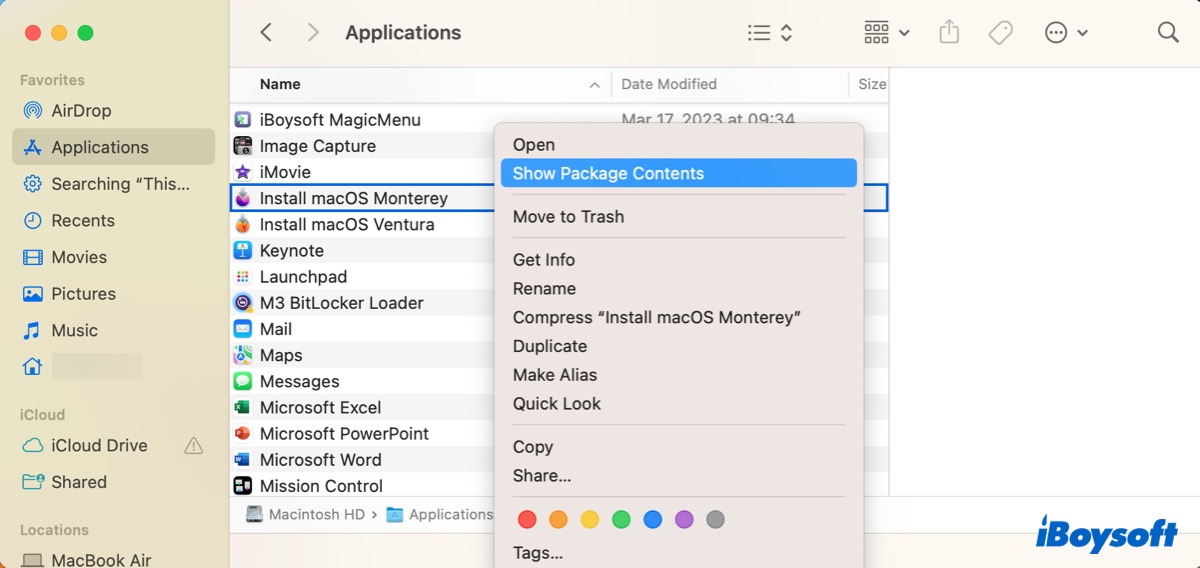
- Navigate to Contents/SharedSupport and double-click the SharedSupport.dmg file to open it.
- Open the folder labeled com_apple_MobileAsset_MacSoftwareUpdate.
- Double-click the only .zip file to extract it.
- Open the extended folder and go to AssetData/boot/EFI/EFIPayloads.
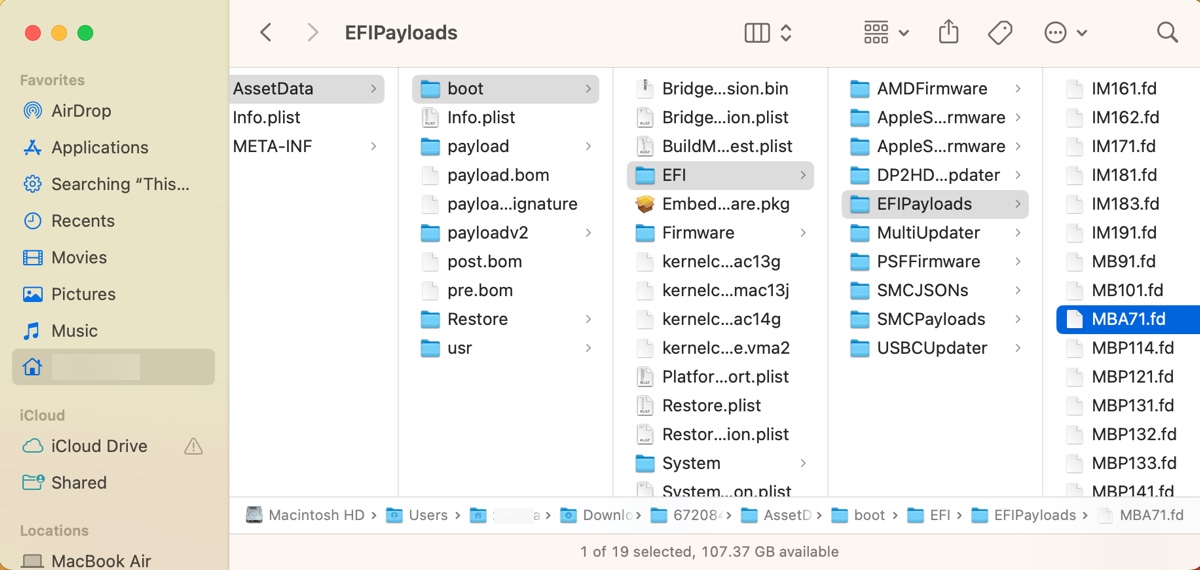
- Locate the firmware file named with your model identifier from the list of EFI firmware files that macOS Monterey contains.
IMxxx.fd = iMac
MBxxx.fd = MacBook
MBAxx.fd = MacBook Air
MBPxxx.fd = MacBook Pro
MMxx.scap = Mac Mini
MPxx.scap = Mac Pro
(E.g., if you have a MacBook Air, the correct firmware file should be MBAxx.fd.) - In Terminal, run the command below to update the firmware.sudo bless -mount / -firmware file_path --verbose -recoveryEnter sudo bless -mount / -firmware, leave a space, drag and drop the firmware file to Terminal to acquire its path, leave a space, then type in --verbose -recovery and press Enter. (An example of the final command: sudo bless -mount / -firmware /Users/Jenny/Downloads/6720846488b2906dca01954bbc617f325974658b\ 2/AssetData/boot/EFI/EFIPayloads/MBA71.fd --verbose -recovery)
- Enter your administrator password and hit Enter. (The password won't echo to the screen.)
- After the command is executed, shut down your Mac.
- Wait a while and reboot your Mac. (It may take some time and restart several times.)
- When your Mac is booted again, you can check if your firmware is updated in Software Information.
- Boot into macOS Recovery again to reenable SIP.csrutil enable
- Update your Mac to Monterey.
Use OpenCore Legacy Patcher
Another solution to try if you're unable to use an original Apple hard drive is to update your Mac with a bootable installer created by OpenCore Legacy Patcher (OCLP). It's a boot loader that enables users to install macOS versions on unsupported Macs or PCs. Although your Mac is eligible for the macOS releases you want to install, using it can help you eliminate the firmware update error.
To create the bootable installer, you need to prepare an external drive like USB with more than 16GB of capacity. Be reminded that this external drive will be erased, so ensure data on it is backed up or not important.
- Back up your Mac with Time Machine. (The following steps won't erase your Mac but it's best to back it up in case of accidents.)
- Allow booting from external media or storage in Startup Security Utility if you have a T2 Mac.
- Plug in your external drive.
- On a working system, download OpenCore Legacy Patcher to your Mac.
- Double-click the zip file to expand it.
- Open the OCLP app from your desktop. (Then jump to step 9 if you haven't downloaded the installer to your Mac. Otherwise, continue with step 7.)
- Select "Create macOS installer" and allow the app to access files on your Mac.
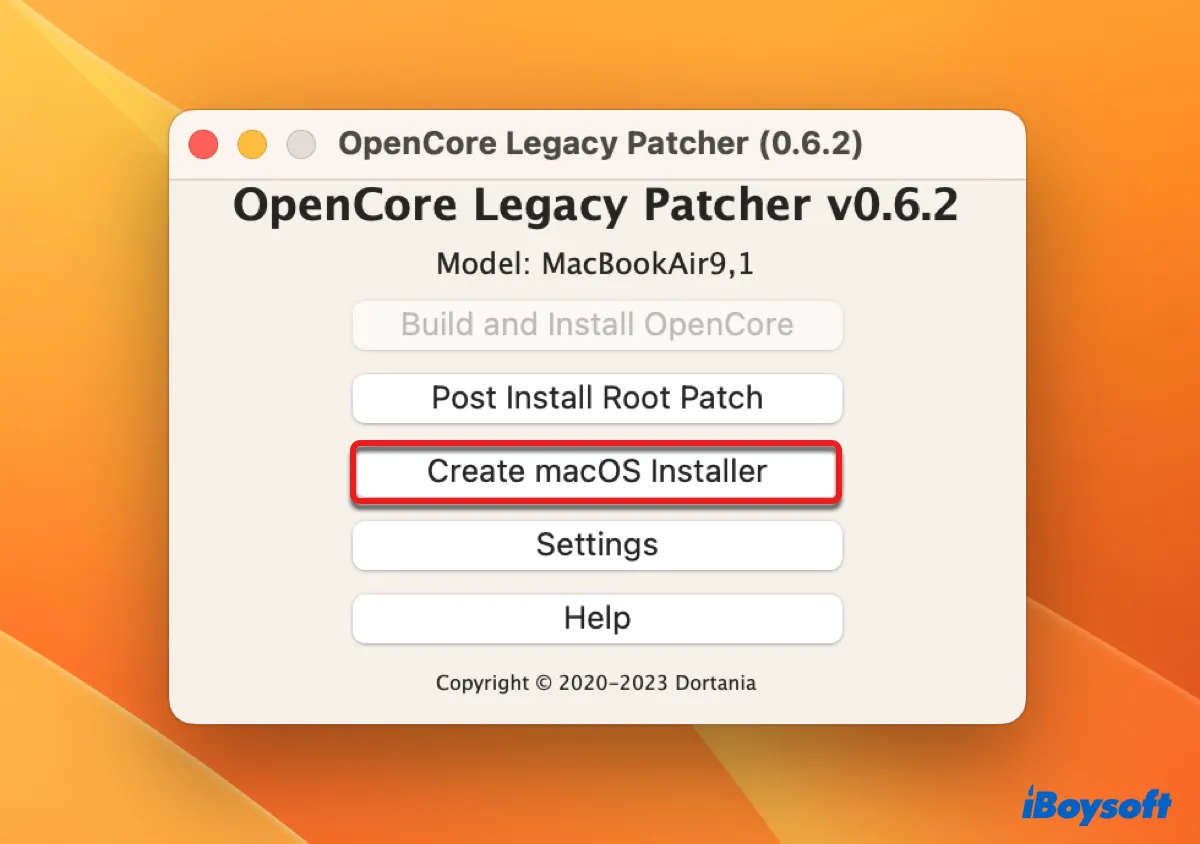
- Click "Use existing macOS Installer." (Then go to step 12.)
- Select "Create macOS installer" > "Download macOS installer."
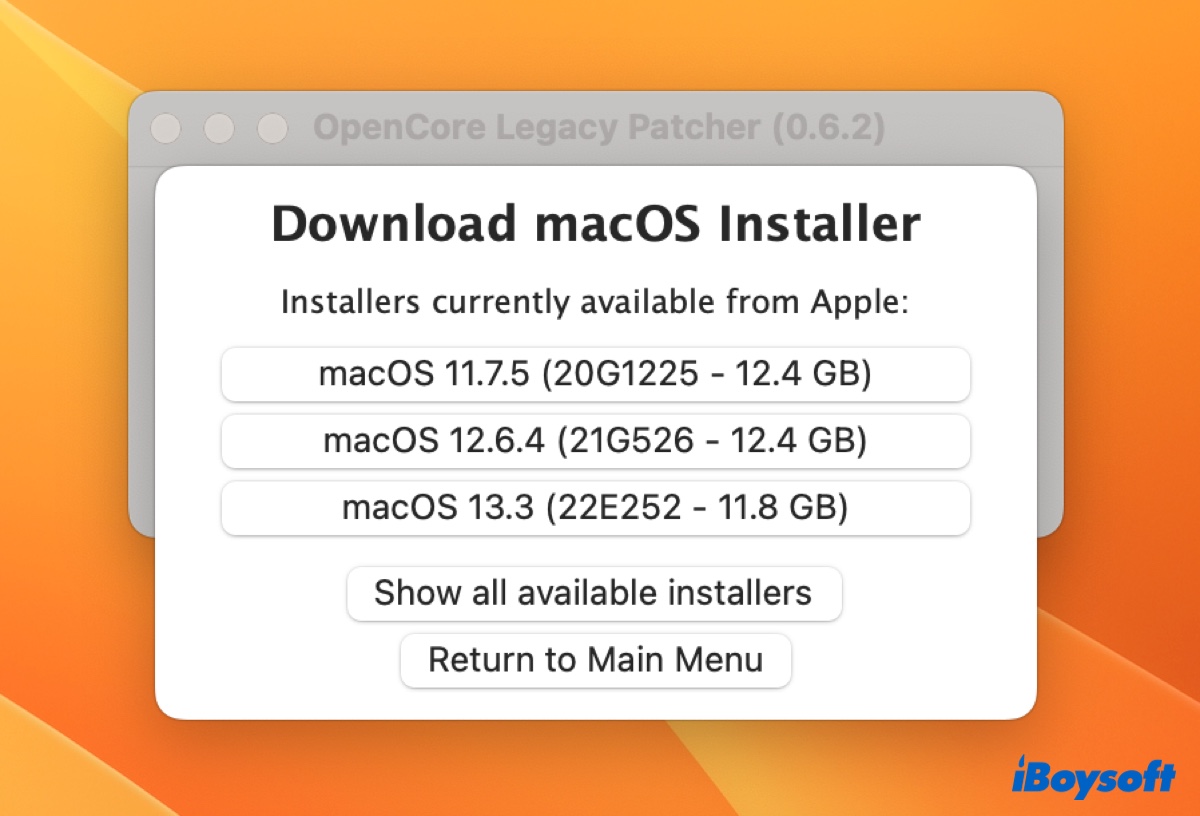
- Select the macOS version you wish to install.
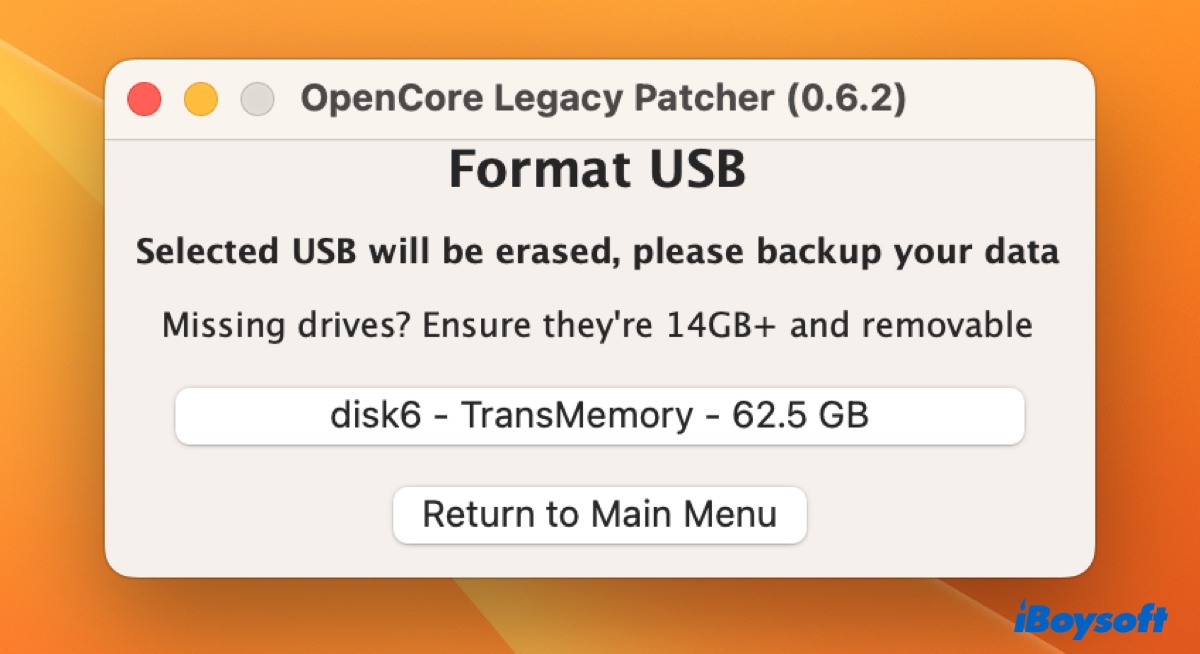
- Once the download is complete, click "Flash Installer."
- Select your installer and the external drive.
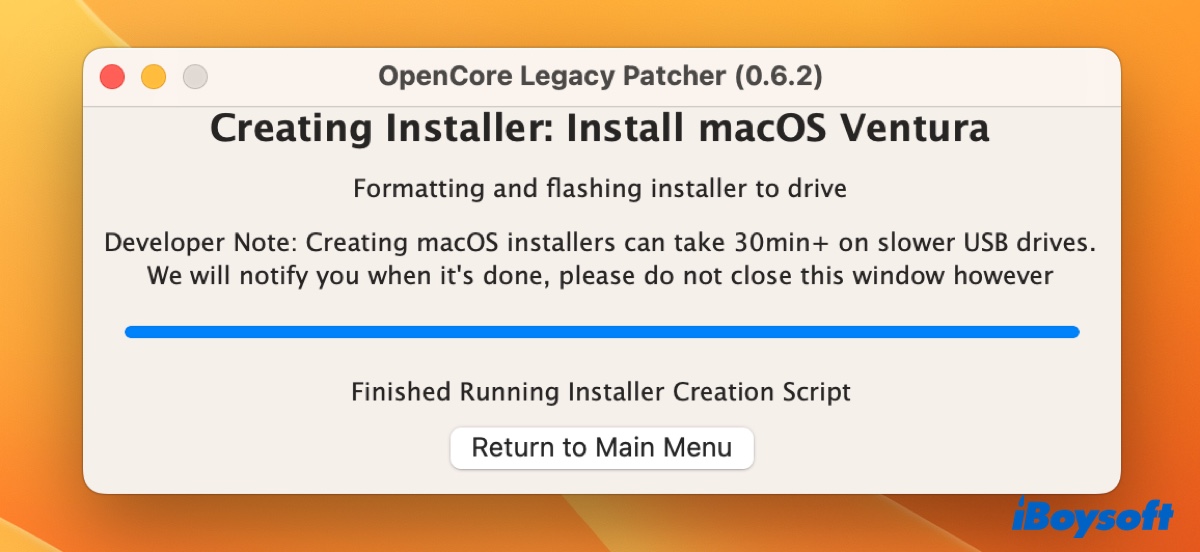
- Wait while the app is creating the installer.
- Once the installer is created, click "Return to Main Menu" and select Settings.
- Click "Allow native models" and select Yes.
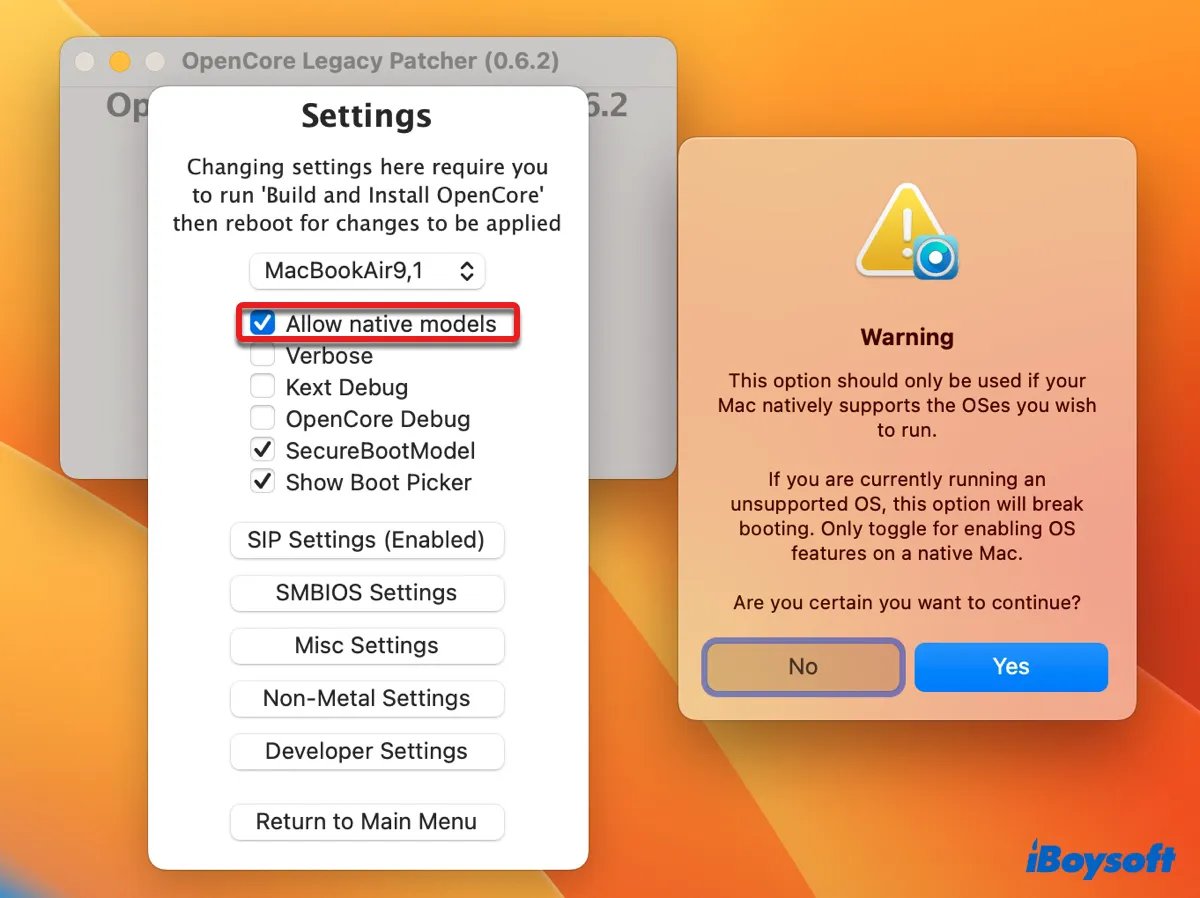
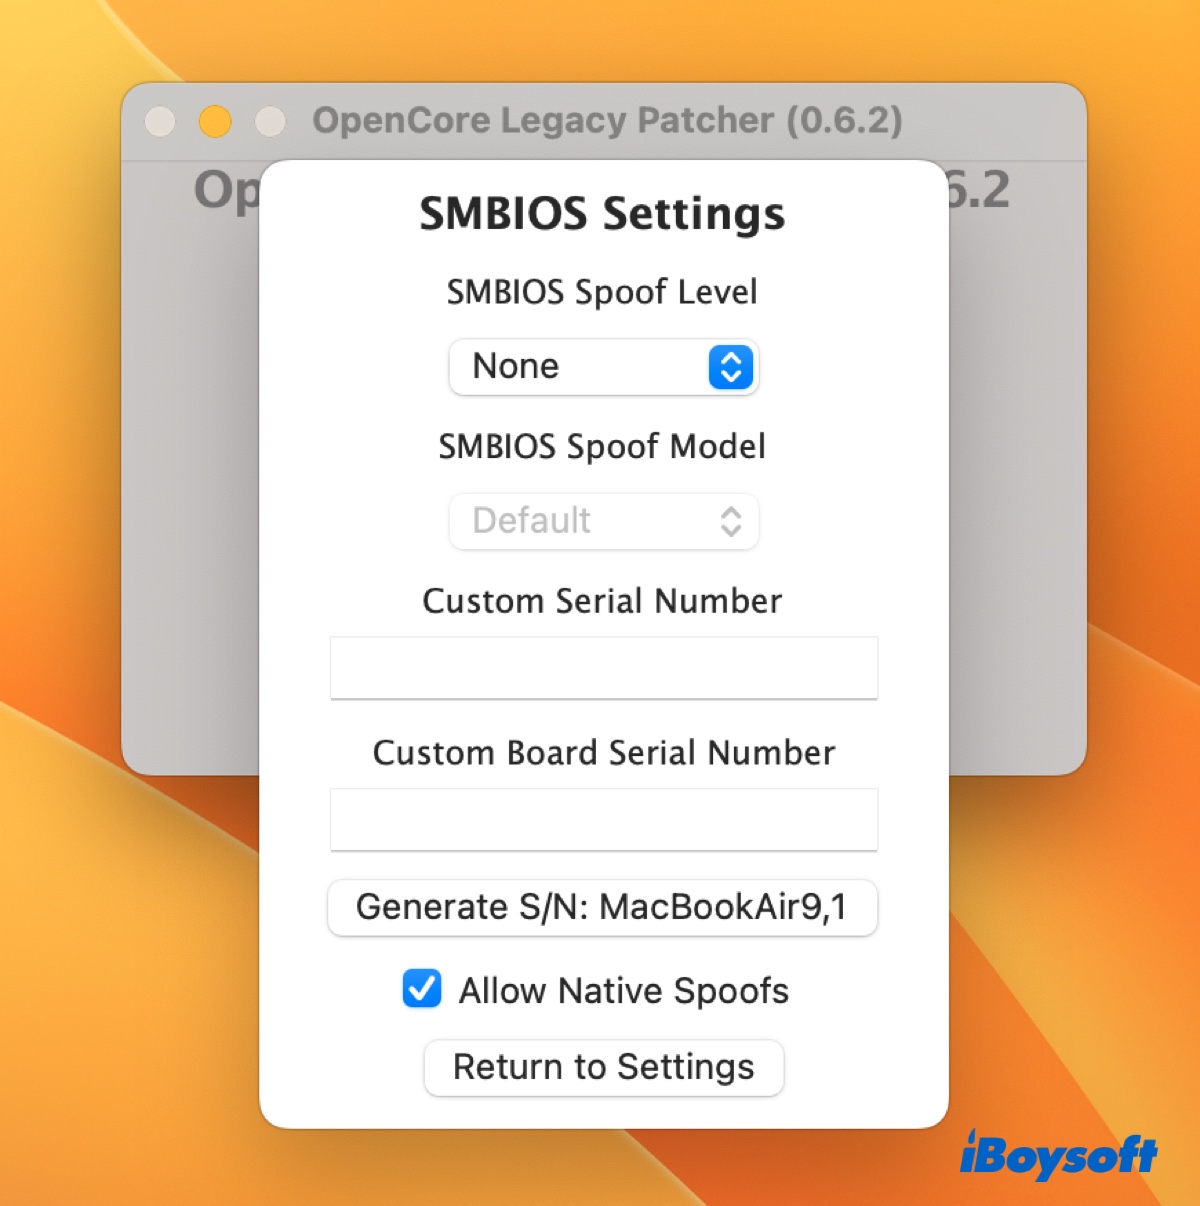
- Open "SMBIOS Settings."
- Set "SMBIOS Spoof Level" to None and select "Allow Native Spoofs."
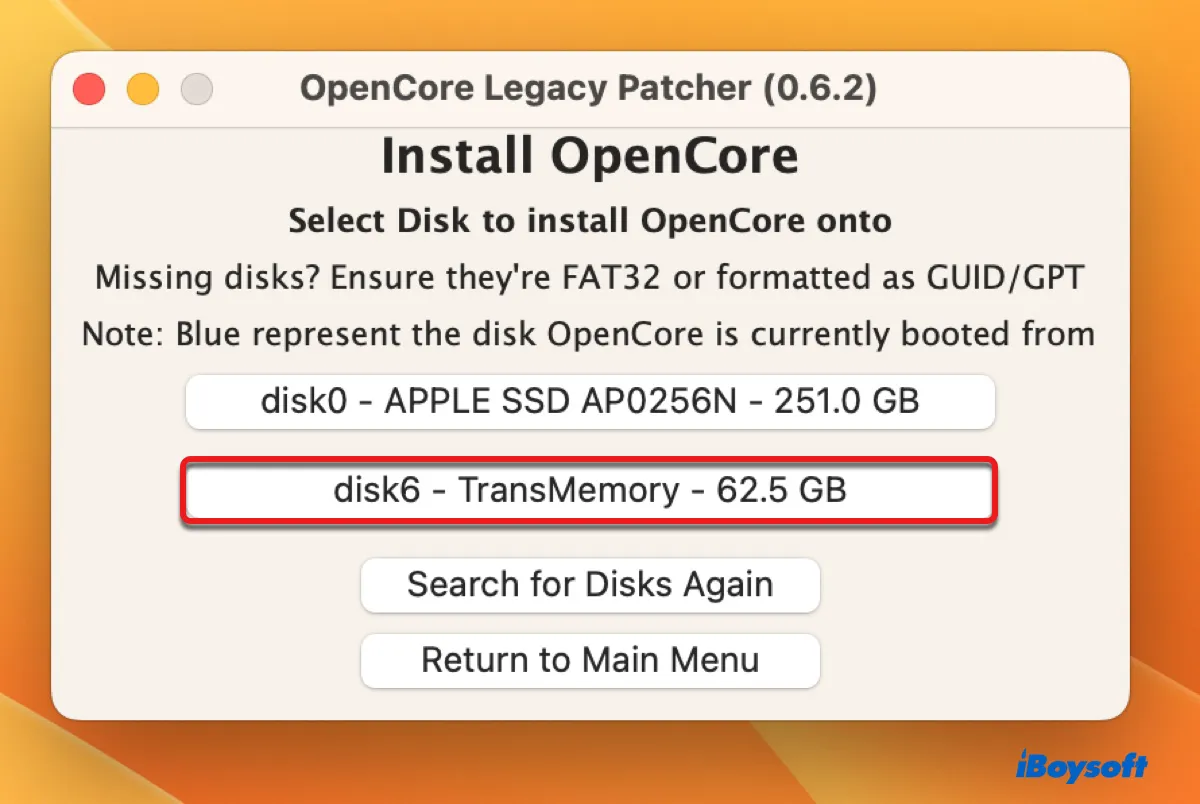
- Return to the main menu and click "Build and Install OpenCore."
- Select "Install to disk" and select your external drive.
- Click Reboot when asked, then immediately hold down the Option key when your screen turns black.
- Select the "EFI Boot" drive with the OpenCore icon and click the arrow.
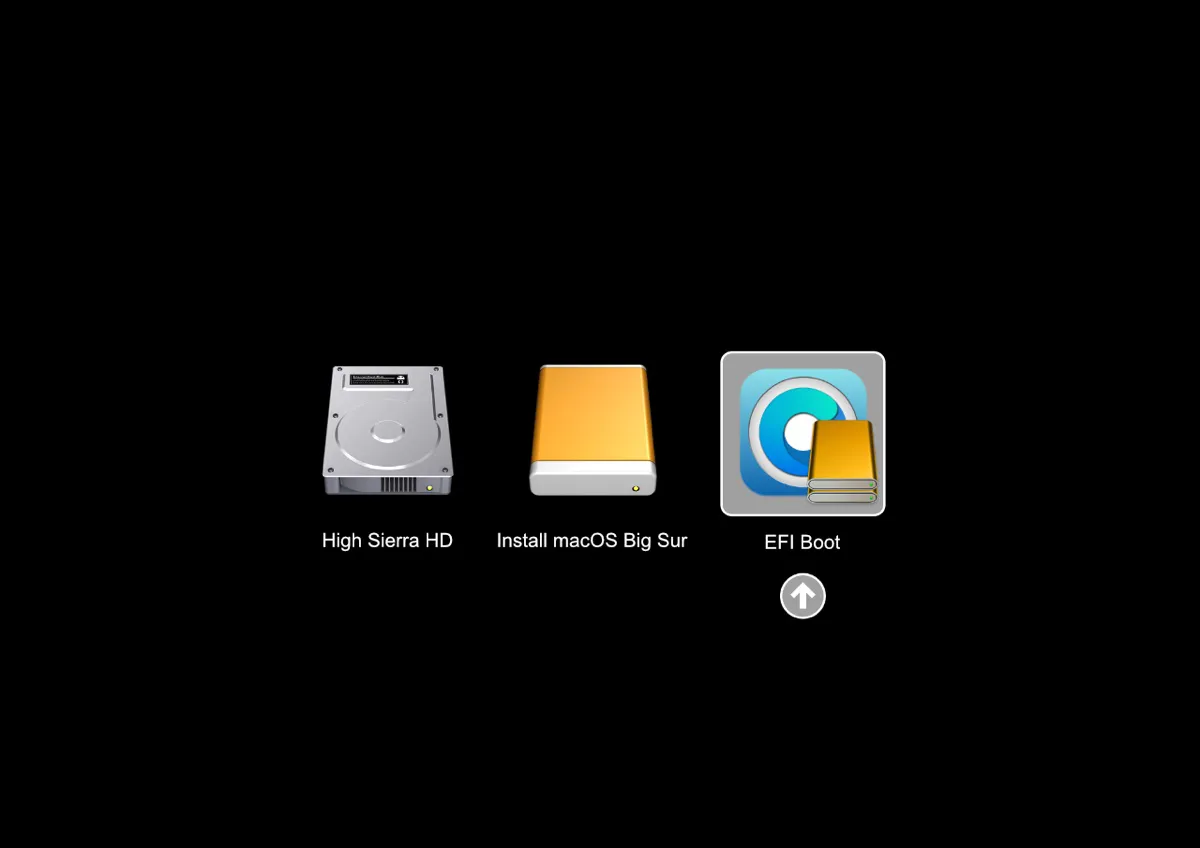
- Select the "Install macOS" app and click Continue.
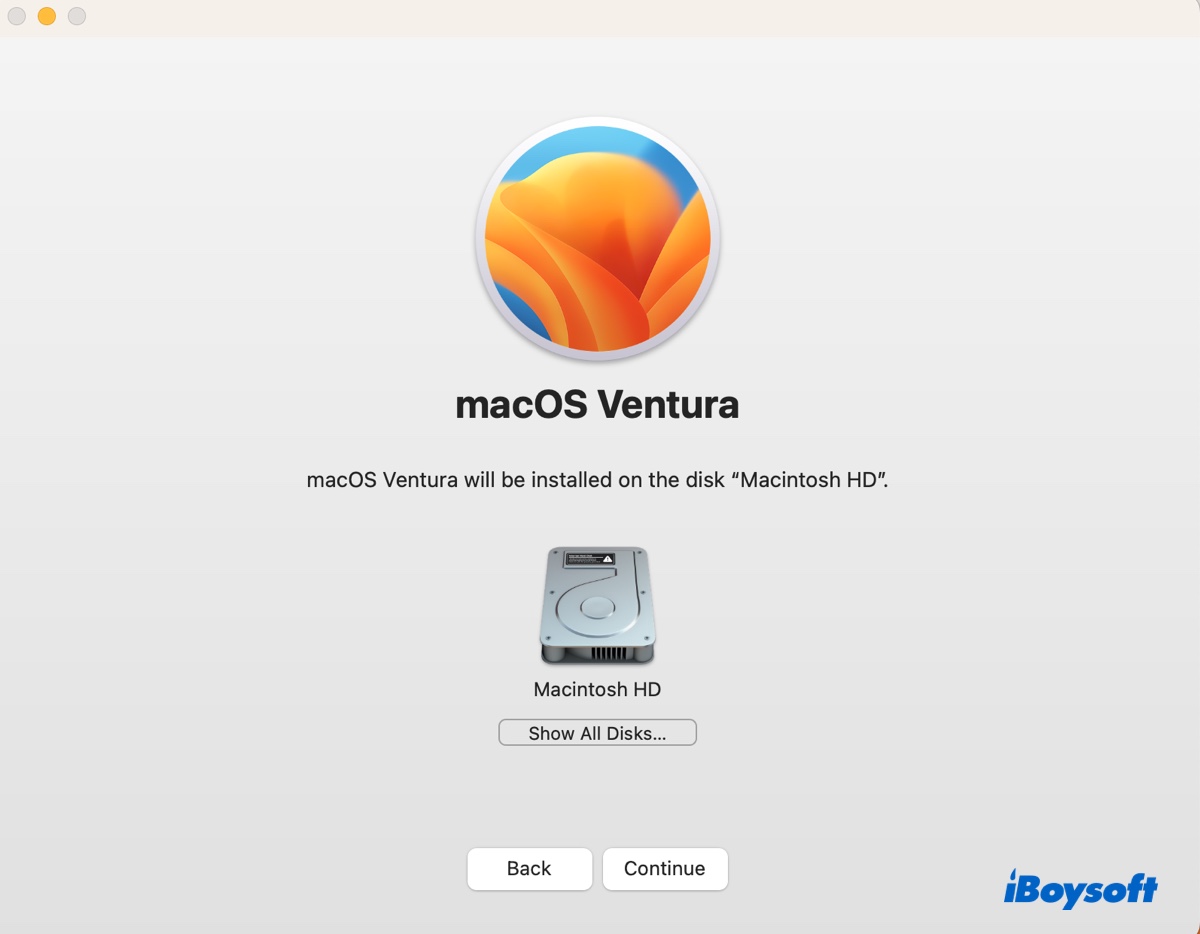
- Go through the process to install macOS on your Mac.
After the OS is installed, you need to make sure your internal hard drive is selected as the startup disk. Otherwise, you may get a folder with a question mark at reboot. It's worth mentioning that these steps won't update the firmware.
To change the startup disk on macOS Ventura: Open the Apple menu > System Settings > General > Startup Disk, then click the icon of the disk you want to use and click Restart.
To change the startup disk on macOS Monterey: Open the Apple menu > System Preferences > Startup Disk, then tap the yellow lock to unlock the preference pane and select the disk intended as the startup disk and click Restart.
If the error persists, continue with the other fixes below.
Install macOS on your external drive first
Some Mac users without the original Apple drive were able to update to macOS Monterey by installing Monterey on an external SSD on another Mac that runs Monterey and booting from it. If you have an SSD or another external storage media with enough space, you can give it a try.
- Make sure you have downloaded the macOS installer to your Mac.
- Find a Mac with macOS Monterey installed.
- Connect your external SSD with your Mac.
- Open Disk Utility and click View > Show All Devices.
- Select the external disk and click Erase.
- Name it and set the format to APFS and scheme to GUID Partition Map.
- Click Erase.
- After the drive is formatted, run the macOS installer from your Applications folder.
- When it asks you to select a destination disk, click "Show All Disks" and select your external drive.
- Wait for the installation to finish.
- Restart your Mac, then press the Option key when the screen turns black.
- Select your external drive and click the Up arrow.
- When your Mac boots up, download the macOS installer you wish to install from App Store.
- Run the installer from your Applications folder.
- When asked where to install macOS, select your internal Mac hard drive.
Update your Mac from App Store
Alternatively, you can update your Mac by running the full installer downloaded from App Store. Note that you need to delete the failed-to-update installer and empty the trash first if there's an "Install macOS (version)" application in the Applications folder.
How to update macOS from App Store to bypass the "A required firmware update could not be installed" error:
- Open App Store on your Mac.
- Type the target macOS in the search box, such as macOS Monterey.
- Click Get to download the installer.
- Wait for the installer to be downloaded.
- Run the installer from the Applications folder.
Upgrade to an earlier version first
If you're upgrading from an older macOS version, consider updating to macOS Mojave or another version that's later than your current OS but earlier than the version you want to upgrade to first, then upgrade to your target macOS. Besides getting the installer from App Store, you can also follow the steps below to install other updates available to your Mac.
- Open System Preferences > Software Update.
- Click the blue text that says "More info…"
- Choose the software update you wish to install.
- Click "Install Now."
Clean install macOS from Recovery Mode
Your Mac's EFI partition may be having issues, preventing the installer from checking the firmware. So, another potential solution to the "A required firmware update could not be installed" error is to erase your Mac to create a new EFI partition.
To erase your startup disk, you need to enter macOS Recovery. If you have an Intel-based Mac, we suggest you use macOS Internet Recovery instead, as it allows you to install the latest macOS version available to your Mac, which basically updates your Mac. If you have an Apple Silicon Mac, you can reinstall the macOS lastly installed on your Mac and update it afterward.
- Back up your Mac, as erasing your Mac will delete all data.
- Turn off your Mac after your important data is secured.
- Boot your Mac into Recovery Mode.
Intel Mac: Turn on your Mac, then immediately press and hold Option + Command + R until seeing the spinning globe.
Apple Silicon Mac: Press and hold the power button until seeing "Loading startup options," then click Options > Continue. - Select your account and enter the password if asked.
- In the macOS Utilities window, select Disk Utility > Continue.
- Click View > Show All Devices.
- Select the top-level disk and click Erase.
- Name your internal hard drive, set the format to APFS, and scheme to GUID Partition Map.
- Click Erase again.
- Close Disk Utility and select "Reinstall macOS (version)."
- Follow the instructions to finish the installation.
If that doesn't do the trick, Intel Mac users can try reinstalling the OS that came with their Mac or the closest that's still available by pressing and holding Shift + Option + Command + R while startup to enter Recovery Mode. Then update to the desired macOS in Software Update, from Apple Store or an external bootable installer.
Have you managed to resolve "A required firmware update could not be installed" on macOS Monterey? Share this post to benefit others.
FAQs about 'A required firmware update could not be installer'
- QHow do I force a Mac to update firmware?
-
A
Firmware updates are patched inside macOS updates. So, if you want to update the firmware on your Mac, you need to update the operating system.
- QWhat to do if firmware update failed?
-
A
Firmware update failure is often caused by using third-party SSDs or damaged installers. If it's the former, you can reinsert the original hard drive and update macOS on it to get your Mac the required firmware update. If it's the latter, try other ways laid out in this post to update macOS.