The best way to avoid data loss is to keep your Mac backed up so that you have a place to restore your Mac after an accidental deletion or system crash.
Mac Time Machine is Apple's solution for you. It is reliable and easy to use, a solid choice for the majority of Mac users. Here, you will know how to use Time Machine to back up your Mac and how to restore files from Time Machine backups.
Also read: Time Machine Fails to Back Up after Installing macOS Tahoe
What is Time Machine on Mac?
Apple Time Machine is a built-in app in macOS to backup everything on your Mac by creating images or snapshots so that you can restore a specific file or the whole system when needed.
When Apple Time Machine is on, it saves hourly backups for the past day, daily backups for the past month, and weekly backups for data older than a month.
If the drive you use for Time Machine backups is full, Time Machine will delete the oldest backups to make space.
How to backup Mac with Time Machine?
Before using Time Machine, you should prepare a new or clean external hard drive of 2 to 4 times the size of the data you need to back up. If you are using an old disk with a Windows file system such as NTFS, exFAT, or FAT32, back up the important data first, then format with Disk Utility.
- If you are running macOS Catalina or earlier, choose Mac OS Extended (Journaled) as the format.
- If you are running macOS Big Sur or later, choose APFS as the format.
Time Machine will use up all the space on the drive to store the backups by default. If you need the drive to store other files, you can add a partition to it. Follow the steps to back up your Mac to an external hard drive.
Drives you can use with Time Machine on Mac are as follows:
- An external hard drive directly connected to a USB or Thunderbolt port on your Mac
- Apple Time Capsule
- A NAS ( network-attached storage) device that supports the SMB (Server message block) protocol (QNAP NAS, for example)
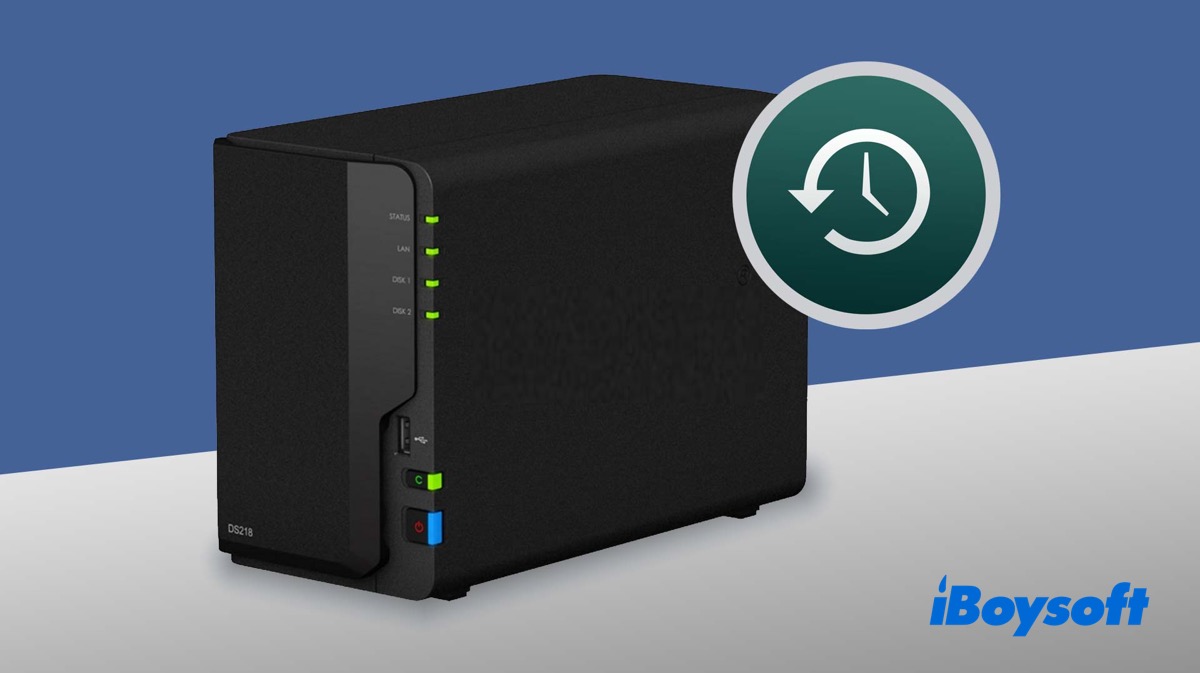
How to Set Up Time Machine Backup to NAS (No External Drive)
In this article, you will learn how to back up your Mac with Time Machine without an external hard drive. You will be able to save your Mac backups to a shared folder or disk easily by following this step-by-step guide. Read more >>
How to set up Time Machine on Mac:
Step 1: Connect an external hard drive such as SSD, HDD, USB flash drive, etc., to your Mac.
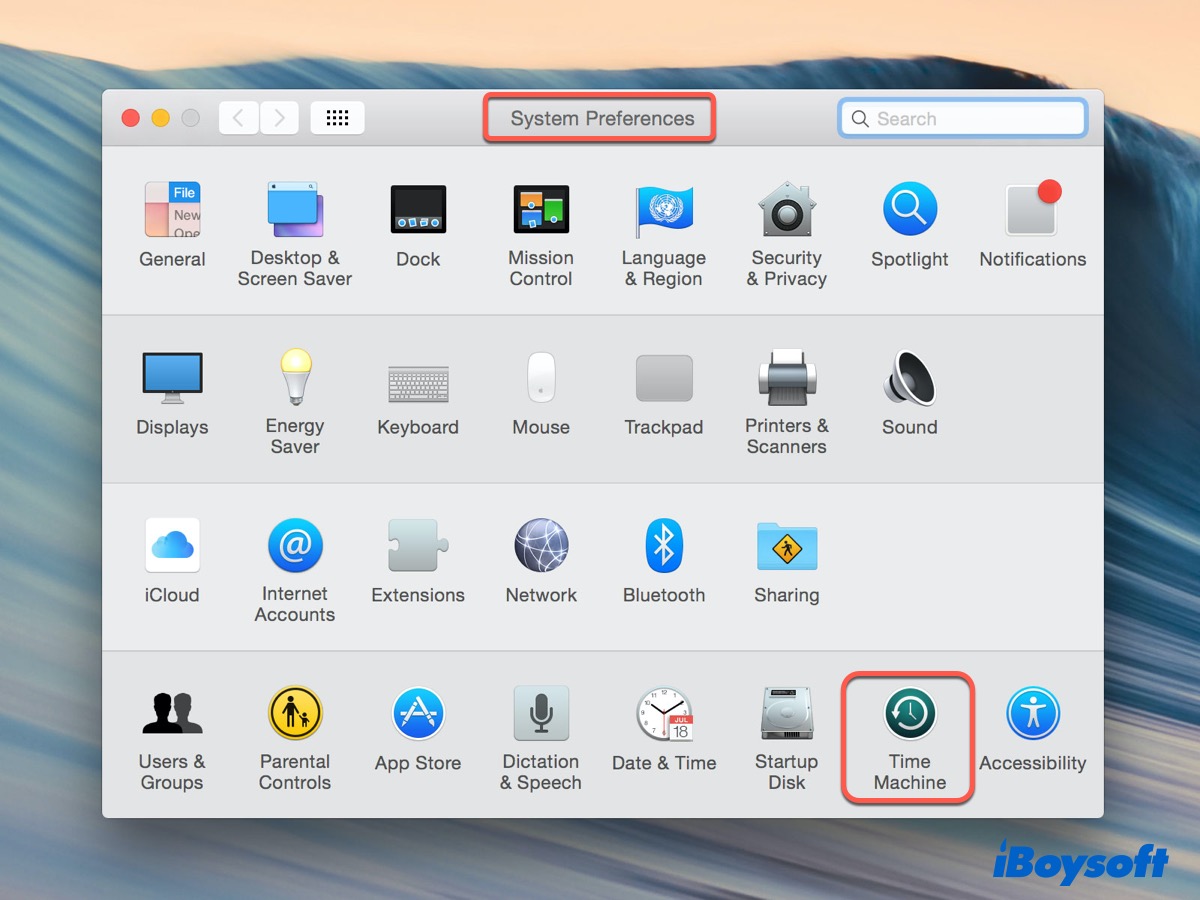
Step 2: Click the Apple logo > System Preferences, then select the Time Machine app.
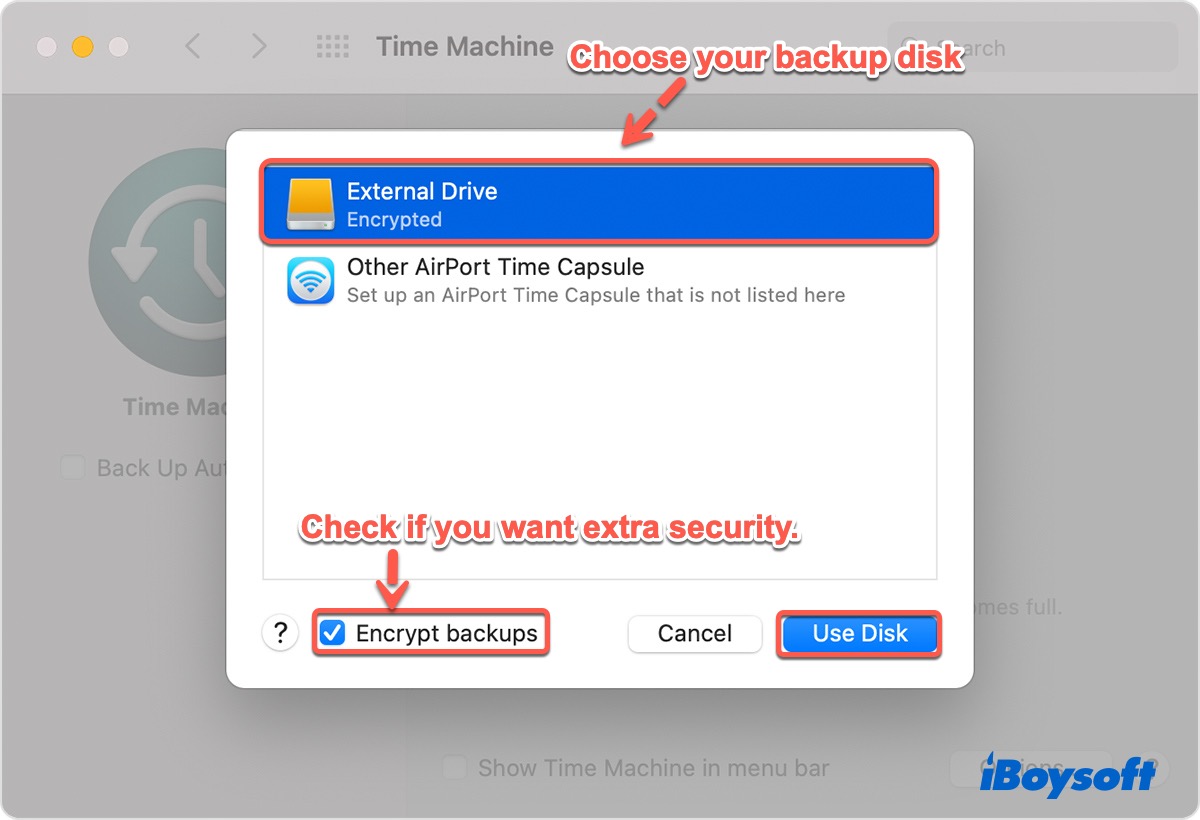
Step 3: Tape on Select Disk... to choose a disk for Time Machine backups.
Select the disk you intend to use, tick Encrypt backups if you want to encrypt Time Machine backups, then click Use Disk.
On macOS Catalina and earlier, you will be prompted to erase the disk if it is not formatted with macOS Extended (Journaled). You can click Erase to reformat the drive.
For Monterey and Big Sur, if your drive doesn't have files stored, macOS will convert your drive into APFS automatically. If you selected Encrypt backups, you also need to erase the drive. Click Erase, enter your password and its hint in case you forget, then tape on Encrypt Disk.
Note: HFS+ Time Machine backups can still be used in macOS Monterey and Big Sur, but you can't convert HFS+ to APFS without formatting it.

Once you select the disk, Time Machine will prepare the disk and change it into a Time Machine backup disk named like Backups of Jenny's MacBook Air.
Step 4: Check the Back Up Automatically box.
Except for macOS Monterey and macOS Big Sur, you need to tick the box next to Back Up Automatically to enable automatic backups. To make Time Machine easier to access in the future, check Show Time Machine in menu bar.
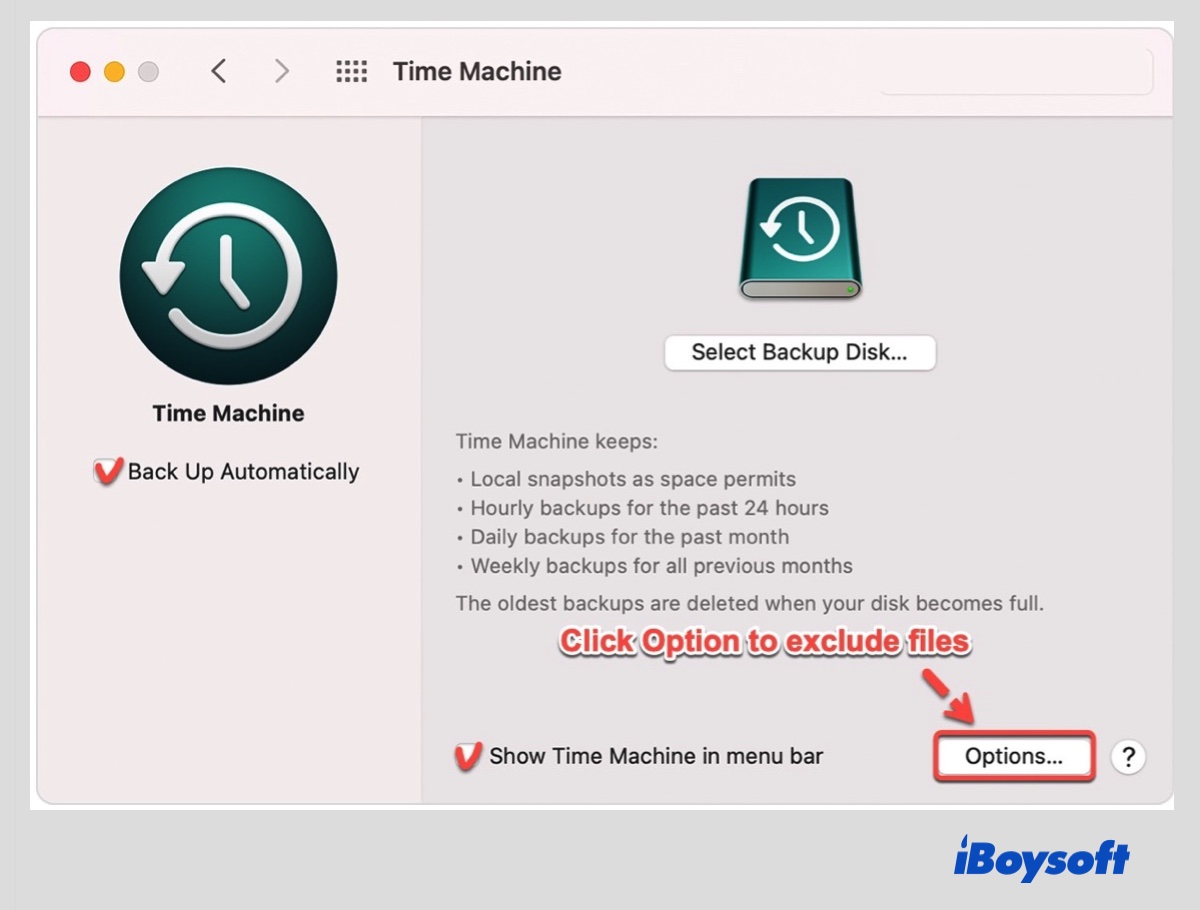
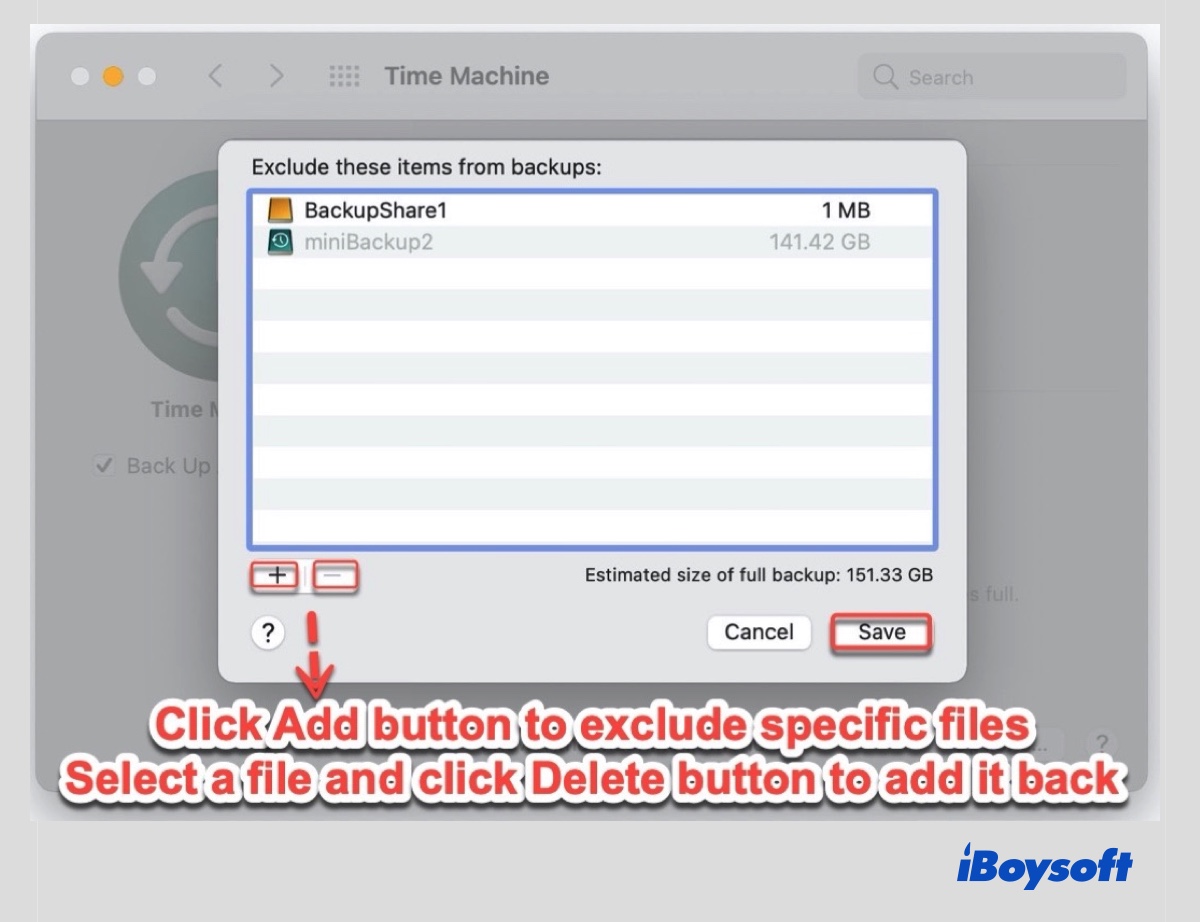
Step 5: Exclude unnecessary data to speed up Time Machine backup.
Click Options to exclude some items. Click Add ( + ) in the pop-up window to navigate to the files you need to exclude, then click Exclude. If you need to remove an item from the list, select it and click the Delete button ( - ).
Step 6: Wait for Time Machine to back up automatically or manually back up the MacBook.
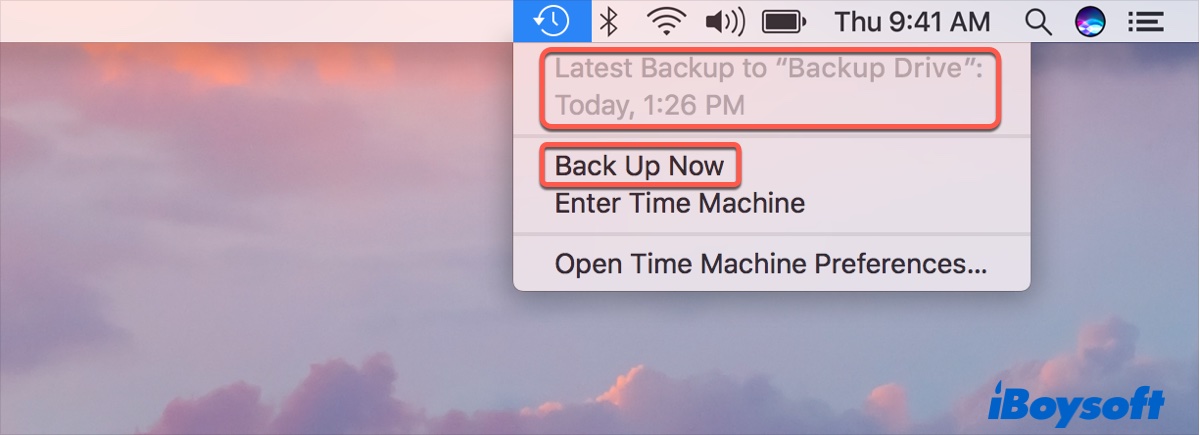
When you are done setting up Time Machine, you can find the time of the Next Backup in the window. You can wait for it to back up MacBook to the external hard drive itself.
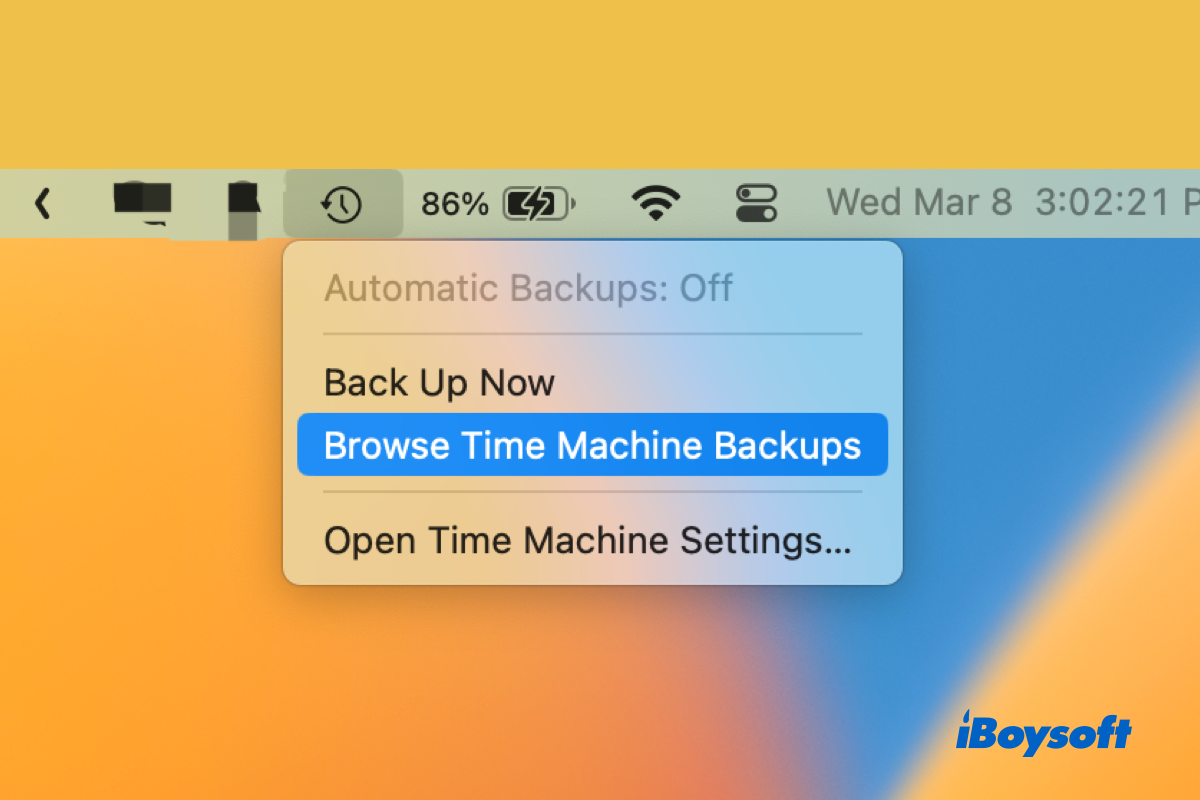
Or start manually backing up by clicking the Time Machine icon on the top-right menu bar and selecting Back Up Now.
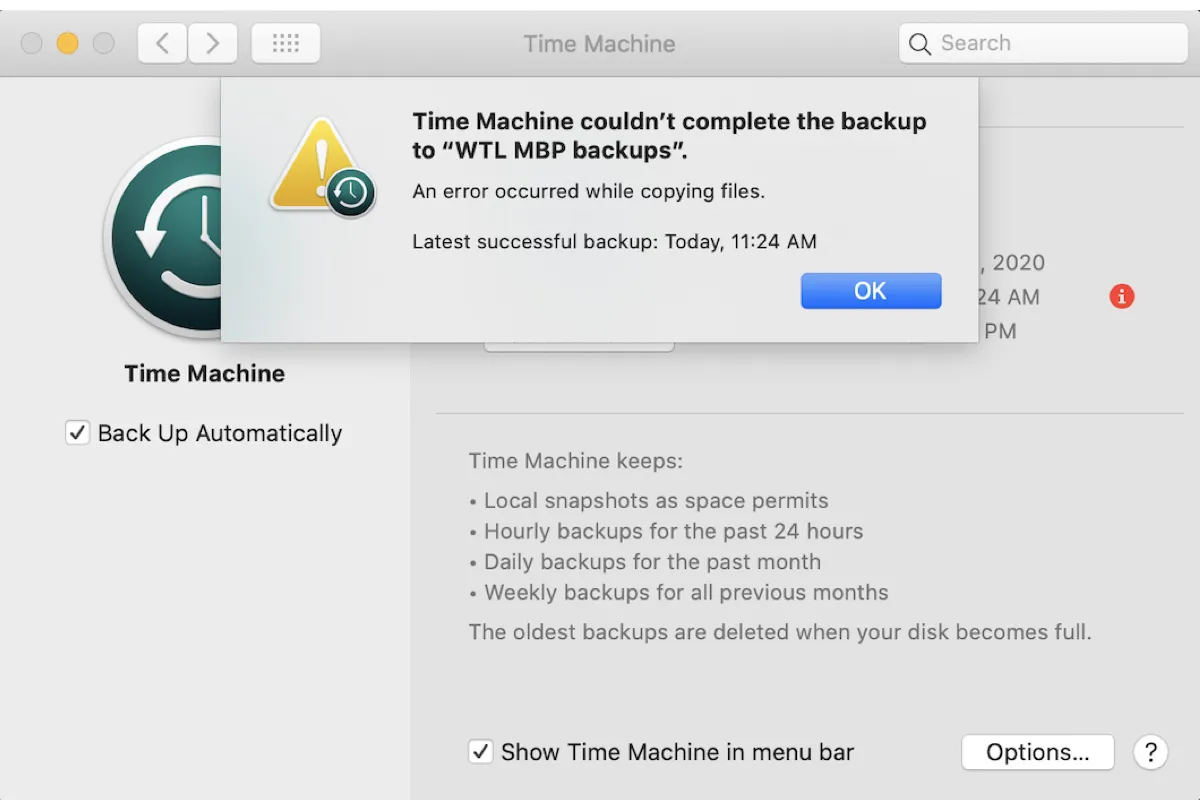
This tutorial covers the solutions to the error "Time Machine couldn't complete the backup." Check it out if you failed to complete the Time Machine backup.
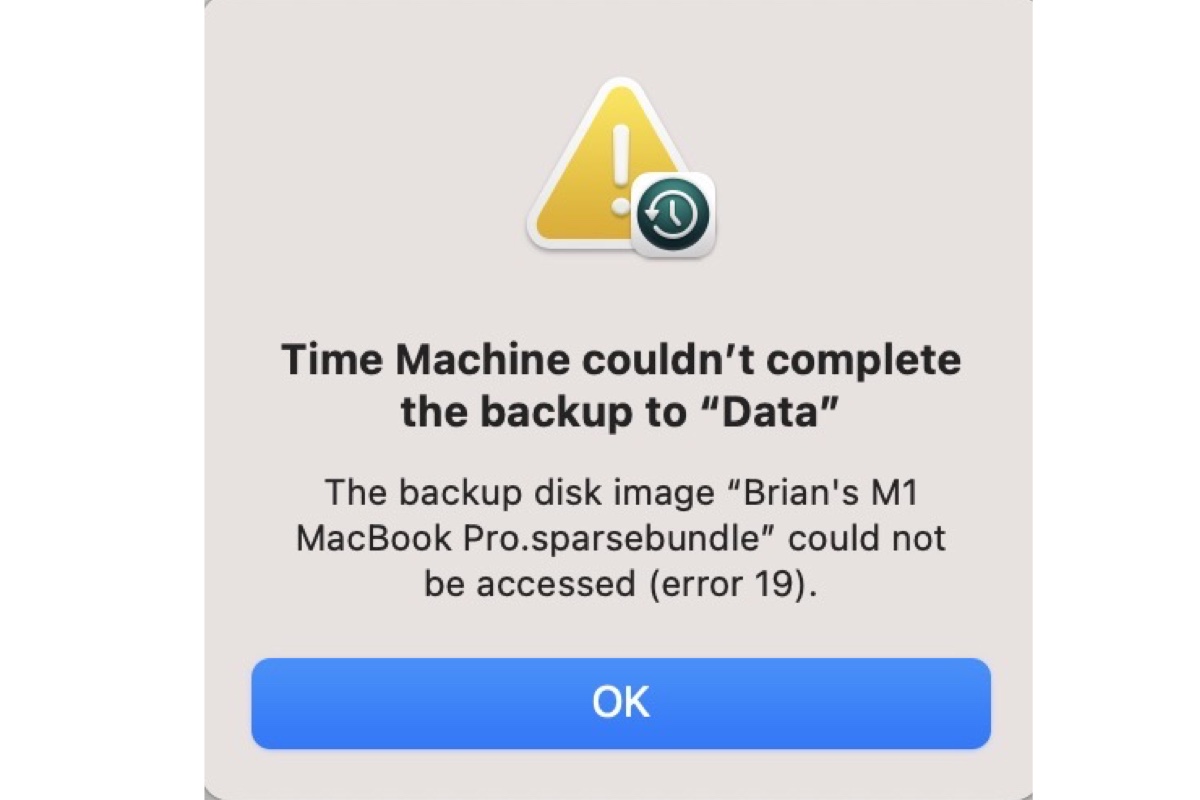
Sometimes Time Machine may fail with the error "The backup disk image could not be accessed" when starting a new backup. If that occurs to you, check out this guide to fix it.
The initial backup is a full backup, so it takes the longest, depending on the amount of data on your drive. After that, it performs incremental backups for new or changed files.
Note: Don't put your Mac to sleep while Time Machine is running. If the Time Machine backup failed, you need to fix Time Machine stuck on preparing backup.
By the way, there is an additional way to back up your files, that is, iCloud. If you're interested in them both, you can digest the difference between them in Time Machine vs iCloud campaign.
[3 Ways] Speed Up Time Machine Backup on Mac
Time Machine backup takes too long? This article offers step-by-step instructions to help you speed up Time Machine backup on your Mac. Read more >>
How to restore files from Time Machine?
If you deleted files by mistake, follow the steps below to get them back.
Step 1: Connect your Mac to the Time Machine backup drive. Enter the password if required.
Step 2: Open a window of the folder where your file was stored. (optional)
Step 3: Click the Time Machine icon in the menu bar > Enter Time Machine.
Step 4: Scroll over to find the specific file you need to recover from the Time Machine or use the Up/Down arrows.

Step 5: Select the desired file and press Space Bar to preview it.
Step 6: Click Restore. You can check the file at its original location.
Note: If you want to restore a single photo using Time Machine, refer to this post: How to Restore A Single Photo from Time Machine?
How to restore a Mac from Time Machine?
If your Mac breaks down, or you need to revert to an earlier version of macOS, here is how to restore your Mac from Time Machine backups. Ensure your backup disk is connected to your Mac, then follow the steps below. Note that you need to pay attention to every step to avoid your Mac won't boot after Time Machine restores.
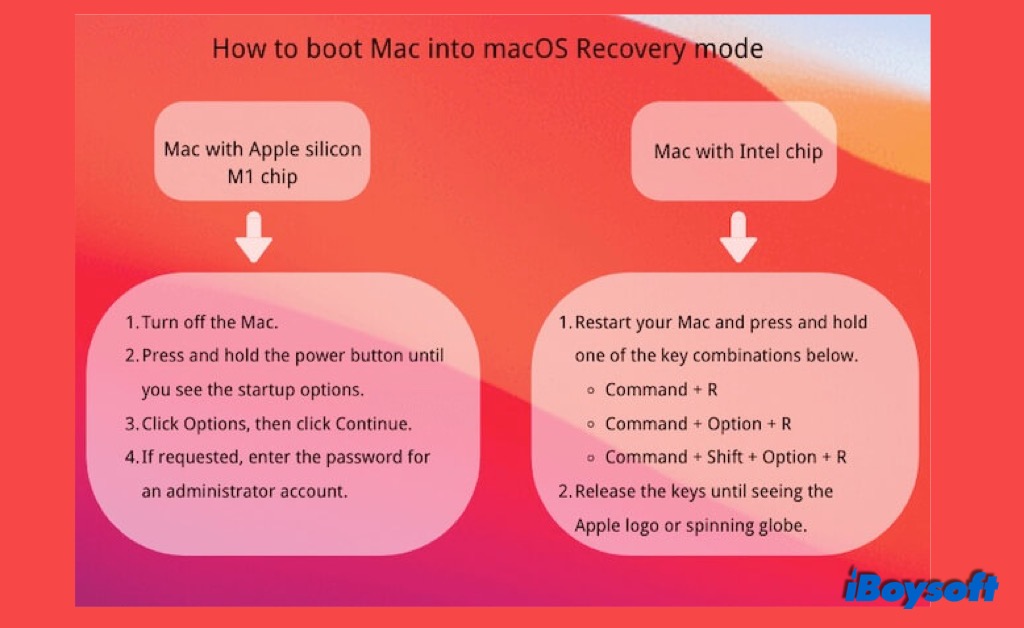
Step1: Boot your Mac into Mac Recovery mode.
Restart your Mac and immediately hold Command + R keys until the Apple logo appears.
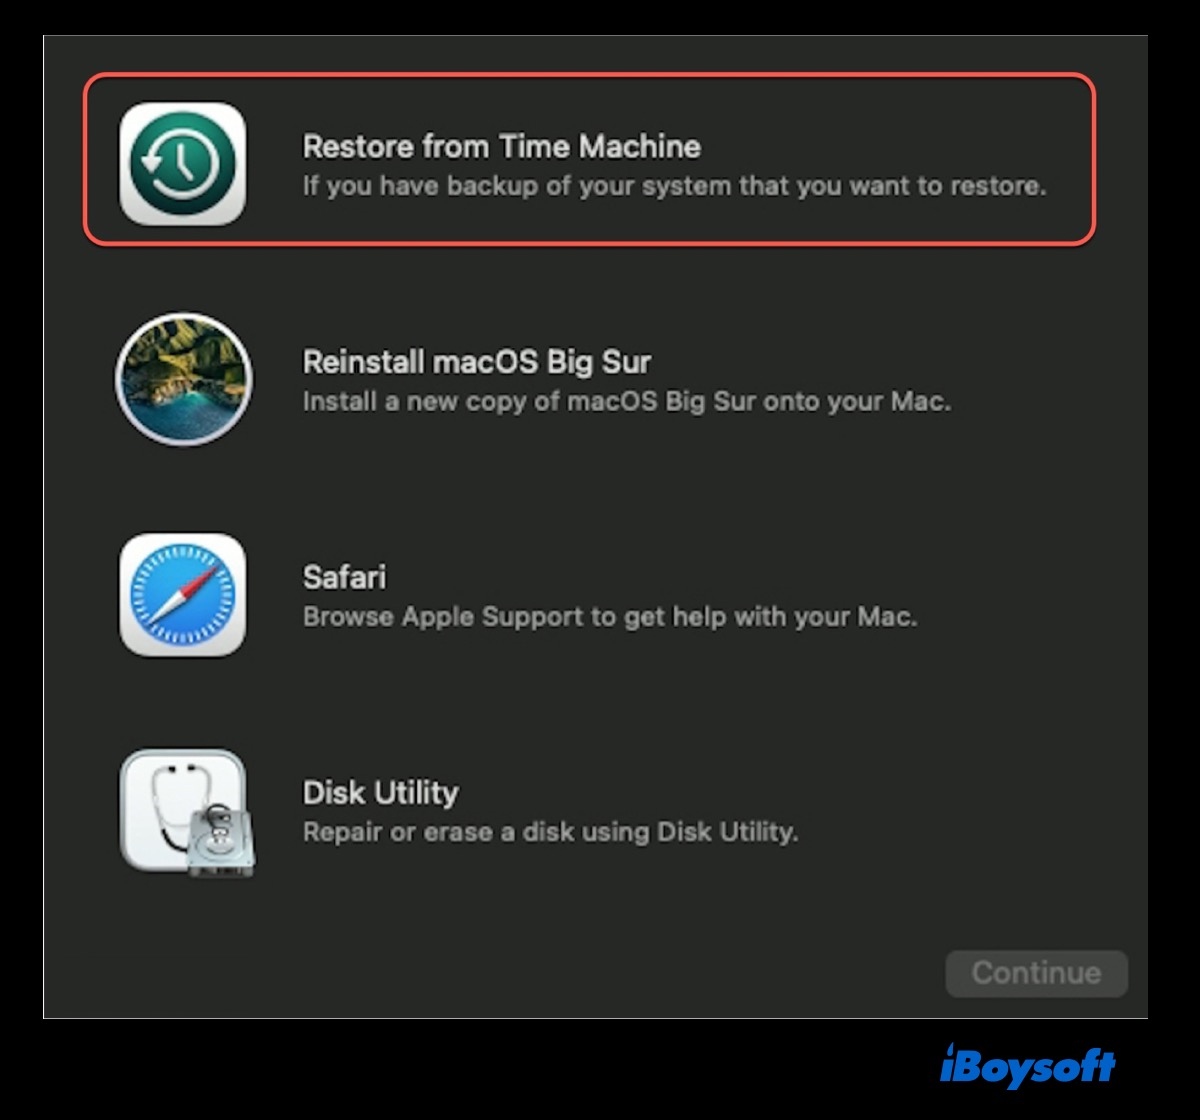
Step 2: Choose "Restore from Time Machine" from the Utilities window and click Continue.
Step 3: Choose the Time Machine backup disk, then click Continue.
Enter the password if the drive is encrypted.
Step 4: Select a backup by date, then click Continue.
Step 5: Select the Mac hard disk to receive the backup content and click Restore.
Step 6: Restart your Mac.
Time Machine Restore Greyed Out? How to Recover Data?
When you need to restore from Time Machine but only to find the Restore button greyed out, read this post for possible reasons and fixes. Plus a Time Machine alternative - iBoysoft Data Recovery for Mac, to restore deleted/lost data. Read more >>
How to restore files from Time Machine to another Mac?
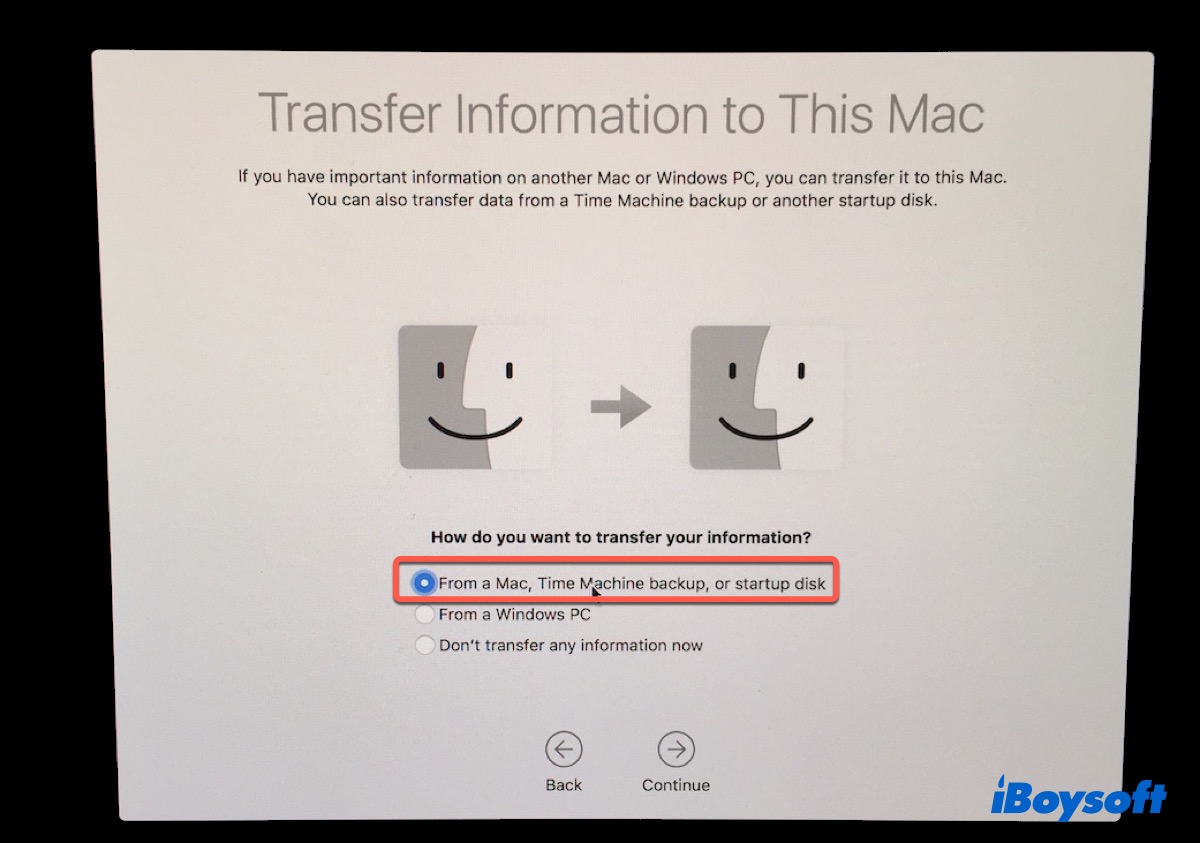
Plug the external drive with Time Machine backups to your Mac. If you use Airport Time Capsule, make sure it connects to the same network as your Mac. Here is how to restore files from Time Machine to another Mac:
Step 1: Select 'From a Mac, Time Machine backup, or startup disk' when signing into your new Mac, and click Continue.
Step 2: Select your backup disk and tap on Continue.
Step 3: Choose the documents you want to restore to the new Mac, then click Continue and follow the on-screen instruction to finish restoration.
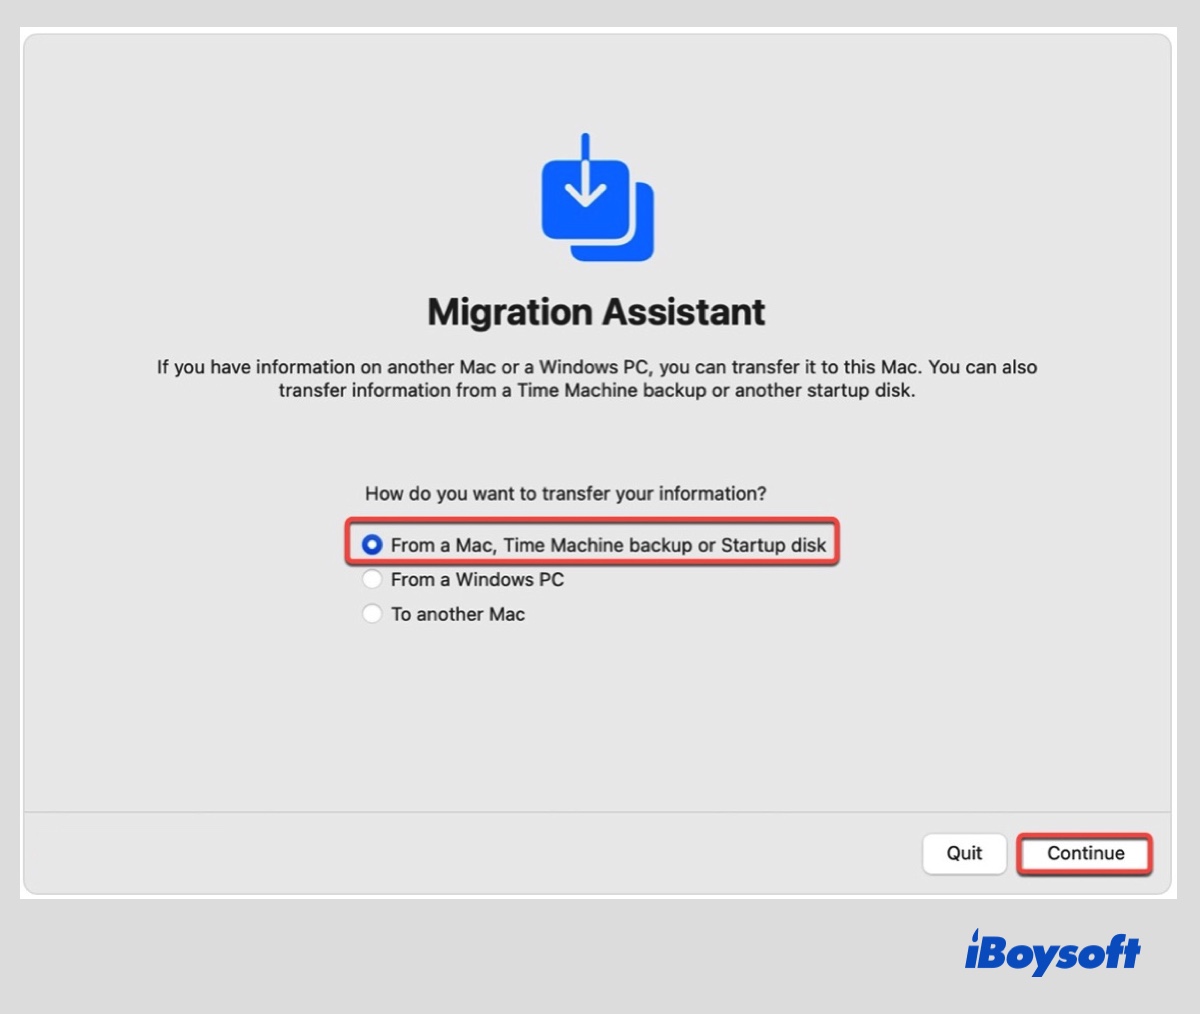
If you have finished setting up, you can use Migration Assistant to transfer all your files, apps, and preferences from the old Mac to the new one.
Step 1: click Launchpad > Other folder > Migration Assistant > Continue, then choose to transfer From a Mac, Time Machine backup, or startup disk.
Step 2: Select the Time Machine backup disk you want to migrate from and click Continue.
Step 3: Select the Time Machine backup you want to use and click Continue.
Step 4: Customize the information you need to restore from the backup by deselecting the unwanted parts.
If Migration Assistant isn't working on Mac, please read this complete guide to fix it: [Roundup] Troubleshooting Migration Assistant Problems on Mac.
Related reading:
• How to fix Time Machine that can't find your backup disk
• Fix the Time Machine "Waiting to Complete First Backup" Error
• [Solved]No Option to Turn Off Time Machine in macOS Ventura?
FAQ about how to use Time Machine on Mac
- Q1. Does Time Machine allow alternating between multiple drives?
-
A
Yes. To allow Time Machine back up on multiple drives alternatively, you can open Time Machine preferences and unlock it to have the option to add a second drive.
- Q2. Should I use Time Machine on Mac?
-
A
Yes, you should use Time Machine as the primary backup tool on Mac because it is free, easy-to-use and allows you to restore files and operating systems when required. It's designed to run in the background, so it won't interfere with your regular operation.
- Q3. Is Time Machine the best backup for Mac?
-
A
Except for that Time Machine backups don't record differences inside a file. It is the best free tool and the easiest solution to backup your whole Mac disk periodically. You can use it to backup everything on your mac, such as operating systems, apps, photos, etc.
- Q4. How do I know if Time Machine is working?
-
A
On the Time Machine window, you will see a progress bar and information indicates the size of data it is working on and its remaining time. When the Time Machine backup is complete, you will receive a notification. You can also click on the Time Machine icon on the top-right menu bar to see your last backup time like Latest Backup to Jenny's backup: September 15, 2021.
- Q5. Does Time Machine backup SD card?
-
A
No, you cannot. Time Machine does not allow the inclusion of an SD Card in a backup. It is automatically listed in the exclusion list and cannot be removed.
- Q6. Does Time Machine backup external drives?
-
A
Yes. Fortunately, Time Machine can back up any locally connected drive, although Apple configures it by default to exclude external drives. You should be able to back up your external drive with the photos by removing it from the Exclude tab in the Time Machine pane in System Preferences.