"Time Machine couldn't complete the backup to "drive_name" is one of the most common errors Mac users may encounter when a Time Machine backup fails. The Time Machine backup failure frequently happens after upgrading to Sequoia and it can also occur on other macOS versions. Here are some of the sample error messages users have received:
- Time Machine couldn't complete the backup to "Airport Time Capsule.local"
- Time Machine couldn't complete the backup to "Time Machine backups"
- Time Machine couldn't complete the backup to "My Passport"
- Time Machine couldn't complete the backup to "Lacie 5TB"
- Time Machine couldn't complete the backup to "My Book"
- Time Machine couldn't complete the backup to "WD MyCloud"
- Time Machine couldn't complete the backup to "easystore"
The "Time Machine couldn't complete the backup" message is often self-explanatory with a description of the cause of the failure. As different solutions are needed to tackle different causes, we'll cover some of the frequently reported Time Machine backup failures and their solutions in this tutorial to help you eliminate the error.
Fix "Time Machine couldn't complete the backup" on Sonoma/Ventura/Monterey/Big Sur/Catalina/Mojave and others:
| ⚠️ Time Machine couldn't complete the backup errors | 💡 Quick Solutions |
| Insufficient free space on the backup disk | ‣ Delete unwanted Time Machine backups ‣ Find & delete the large file ‣ Exclude large files ‣ Empty the recycle bin ‣ Erase Time Machine backup disk and start over |
| The source volume is nearly full | ‣ Delete local snapshots ‣ Repair the Time Machine disk & your Mac |
| An error occurred while copying files/preparing the backup | ‣ Troubleshoot with logs ‣ Use a different cable or port ‣ Disable third-party security or backup tool ‣ Remove the disk from Time Machine & reconnect |
| The backup disk image **.sparsebundle is already in use | ‣ Reboot the Mac ‣ Prevent Spotlight from indexing the Time Machine disk |
| Some files were unavailable | ‣ Stop your Mac and the external drive from sleeping ‣ Turn off the screen lock ‣ Update the operating system ‣ Add unavailable files to the exclusion list |
| Two of the disks to back up have the same name | ‣ Rename one disk ‣ Delete the extra Macintosh HD - Data ‣ Reboot your Mac |
If you receive the error "The backup disk image could not be accessed" when starting a Time Machine backup, continue reading this tutorial for solutions.
What may cause Time Machine backup failures?
Time Machine backup could fail for various reasons. Here are some of the most likely ones:
- USB connection issues
- Insufficient free storage space on the Time Machine backup disk
- Conflicts with other third-party programs
- Not enough free space on your Mac
- Disk errors on your Time Machine disk or Mac
- Corrupted files
- Spotlight indexing files on the backup drive
- Temporary glitches
- Having two disks named the same
In the latest macOS Sonoma, some Mac users receive the error message when using Time Machine: Backup not complete, Some of the files on your Mac cannot be backed up until Cloud Files syncing has completed, click the linked post to get solutions.
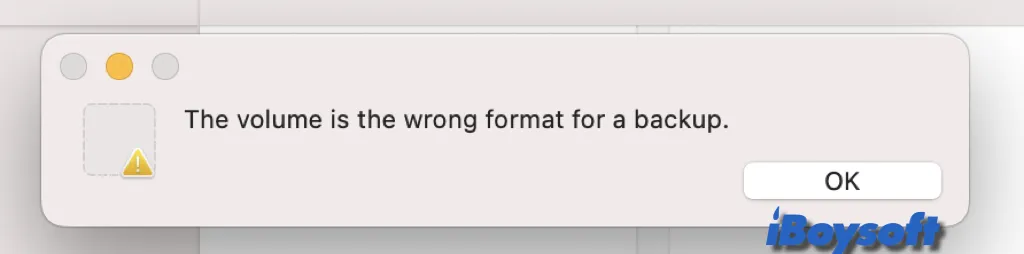
If you encounter the error that the volume is the wrong format for a backup while copying Time Machine backup to a new drive, read this post to know why and how to fix it.
Time Machine couldn't complete the backup insufficient space on backup disk
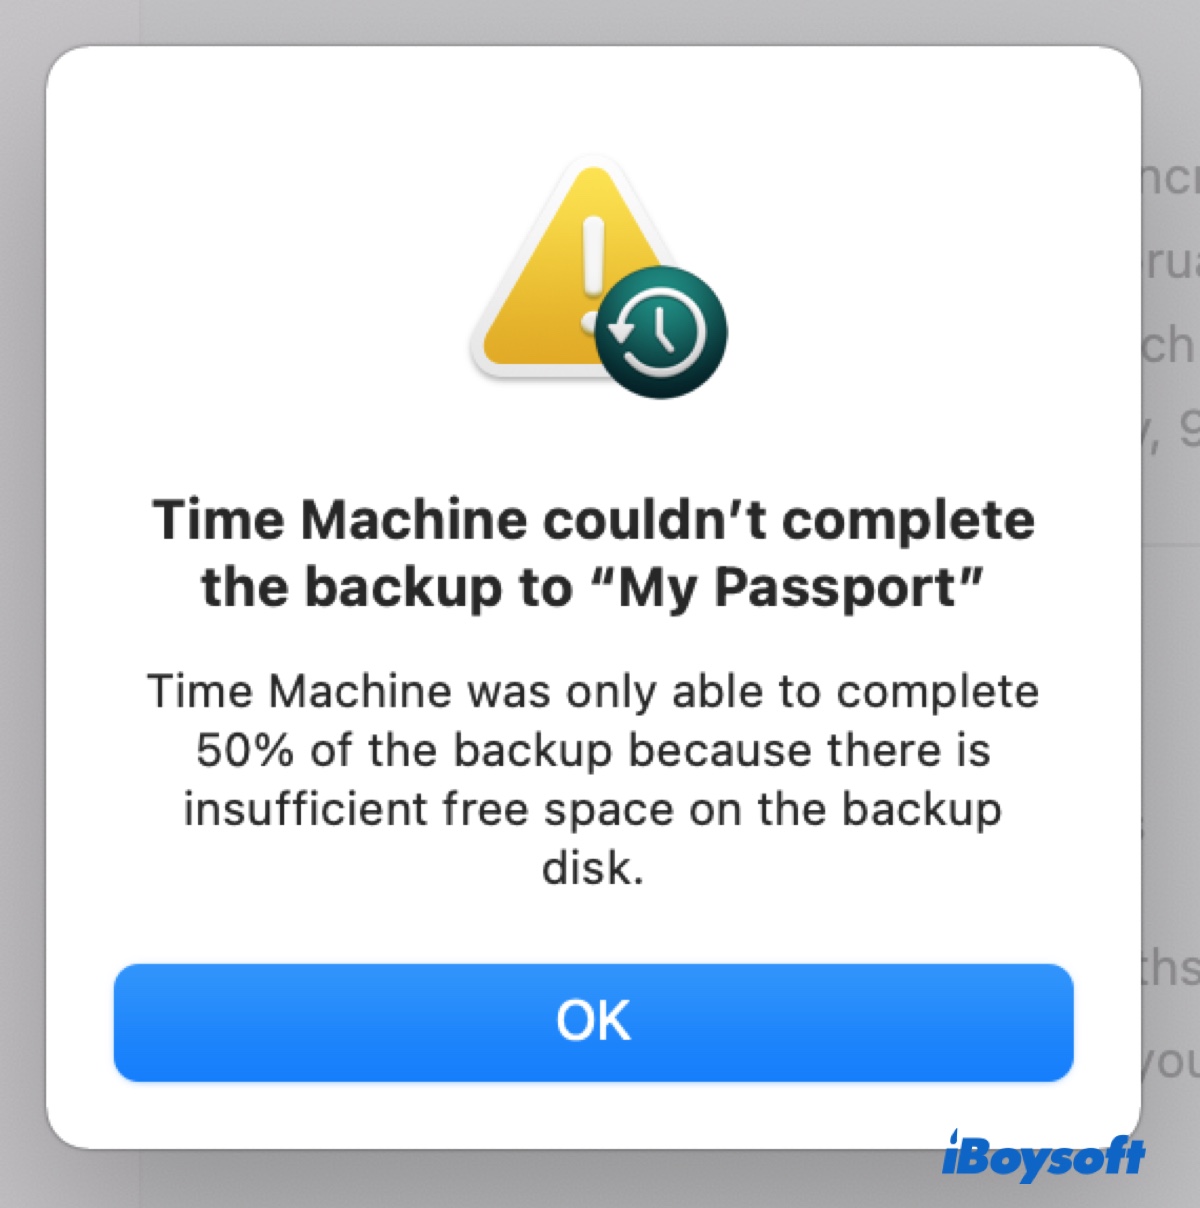
When your backup disk doesn't have enough free space, Time Machine won't complete the backup. Instead, it will send you the "Time Machine couldn't complete the backup" message with details like:
- ・Time Machine was only able to complete 7% of the backup because there is insufficient free space on the backup disk.
- ・The backup disk did not have enough space to complete the backup.
- ・The backup disk needs 250GB for the backup but only 200GB are available. Select a larger backup disk or make the backup smaller by excluding files.
This may seem to be contrary to the general knowledge that Time Machine will automatically delete older backups when your backup disk becomes full. But even with that, Time Machine will eventually fill up as the files increase on your Mac.
Apple's suggestion on this issue is to use a new backup disk. But if you want to continue using your current external drive for Time Machine backups, follow these solutions to resolve the issue: (Ensure your backup disk is connected to your Mac.)
Delete unwanted Time Machine backups
To make more available space on your Time Machine backup disk, you can manually delete the unnecessary old backups. Note that since Time Machine started to back up to APFS volumes, you can no longer delete the backups from within the Time Machine app or delete a single file in a backup.
However, you can still delete a whole backup at a specific time from Finder or using Terminal. Be reminded that the selected backups will be permanently deleted. So, it's best to decide which one to remove before proceeding.
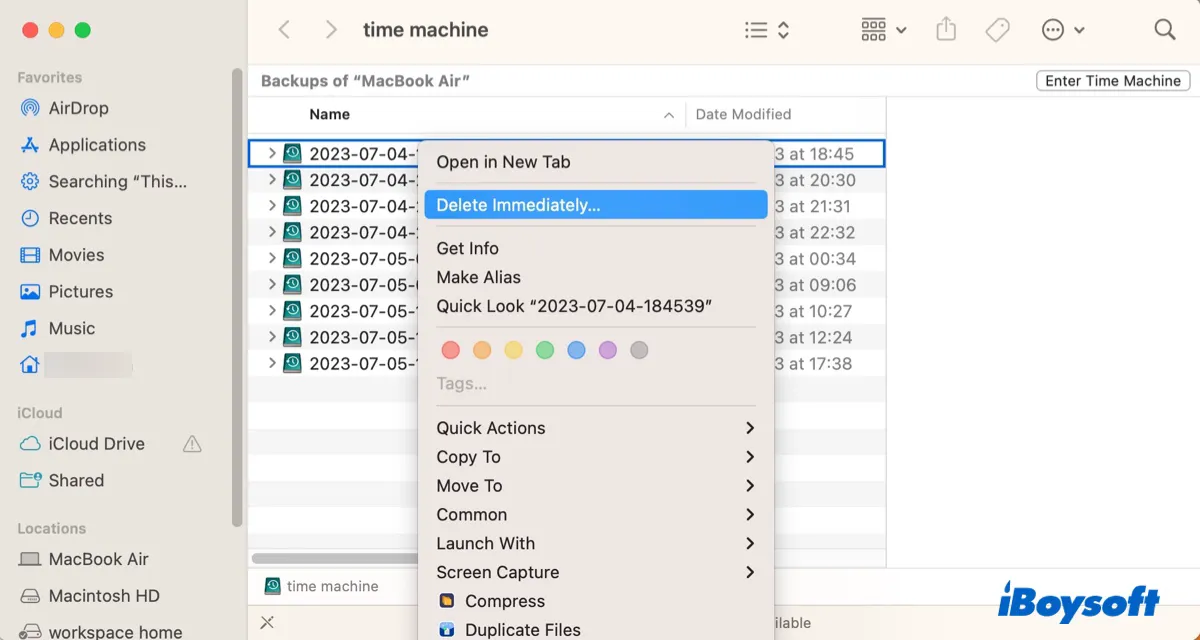
How to delete Time Machine backups on Mac via Finder:
- Double-click the disk icon to open your Time Machine backup disk on your desktop.
- Locate a backup of a specific time, right-click on it, and select "Delete Immediately."
How to delete Time Machine backups on Mac via Terminal:
- Open Finder and navigate to Applications > Utilities.
- Launch the Terminal app.
- Type the following command and press the Enter key to list all Time Machine backups.tmutil listbackups
- Input the following command and hit Enter to permanently delete unwanted backups.sudo tmutil delete -d /Volumes/volume_name -t time_stampFor instance, sudo tmutil delete -d /Volumes/Backup -t 2023-07-05-173850
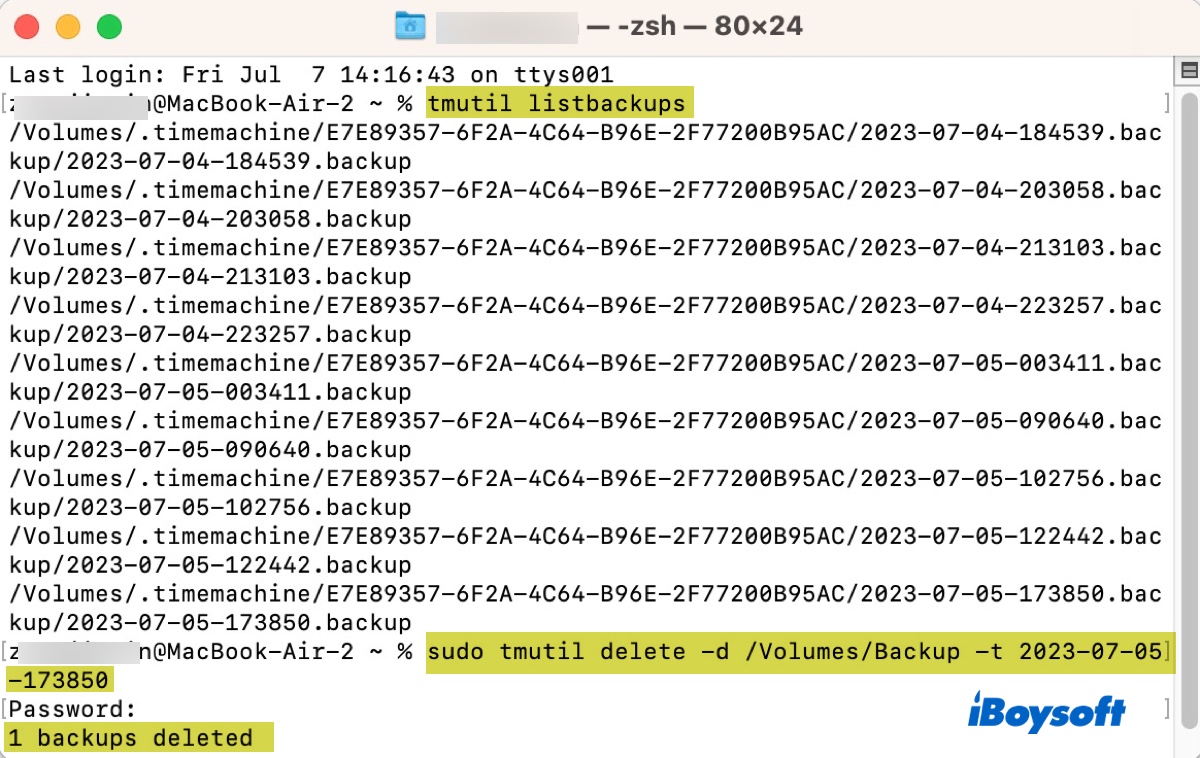
- Enter your administrator password and press Enter. (The password won't appear on the screen.)
- Repeat step 4 to get rid of other backups you don't need.
When the Time Machine backup disk has regained enough space for the new backup, try to back up your Mac again. If Time Machine is not backing up, keep trying the other solutions below.
Find and delete the large file
Sometimes, Time Machine may massively overestimate the size of a full backup. For example, it may ask for 4.5PB for the backup even though the source volume is only 500GB. This is likely caused by a corrupted file that has a spuriously large size.
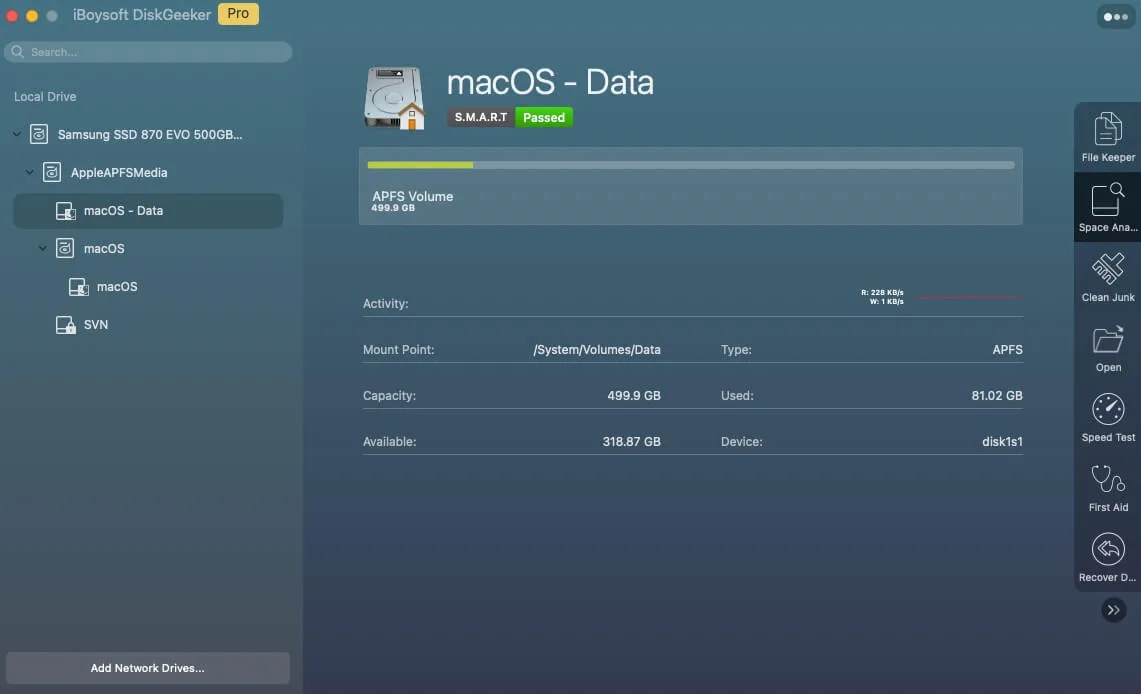
To fix the Time Machine error, you need to find and delete this large file. The easiest way to locate this large file is to use a disk analysis tool like iBoysoft DiskGeeker.
It can analyze the internal and external volumes on your Mac and sort them in size, with the largest file or folder at the top. You can easily spot the suspect file and other large files on your Mac and external drives. It also allows you to easily delete unwanted files without moving them to the Trash.
Apart from disk analysis, this versatile tool can also help you protect files on your Mac, clean junk files, test disk speed, show the temperature of your drive and its health status, manage network drives, password-protect your USB-connected storage devices, encrypt disks with BitLocker or FileVault, unlock and access BitLocker-encrypted drives, read & write to NTFS drives on Mac.
Follow these steps to find large files on your Mac:
Step 1: Download and install iBoysoft DiskGeeker for free.
Step 2: When the disk analysis tool is open, select a volume of your Mac from the left side and click "Space Analyze."
Step 3: Wait for the scan to complete. When it's done, it will list all folders and files on the selected volume from the largest to the smallest. You can close the "Visualization mode" if you prefer to view files in columns.
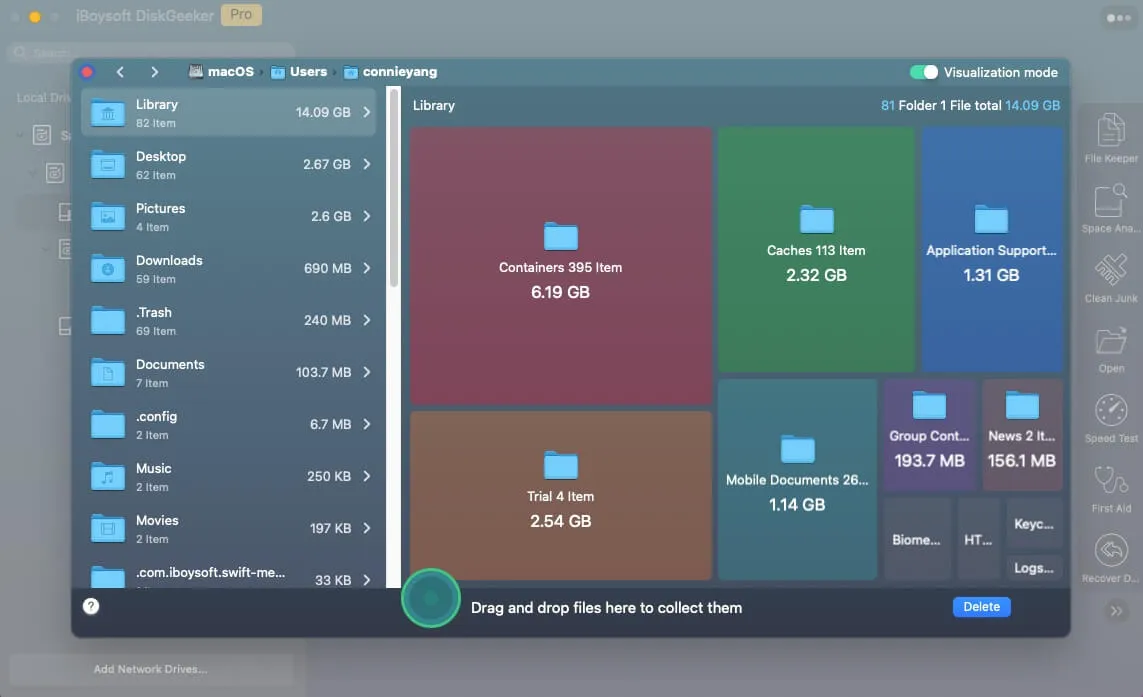
Step 4: Locate the suspicious file, drag and drop it to the green circle to collect it, then click the Delete button. (This will permanently delete the file.)
You can also note down other large files that you don't want Time Machine to backup from the analysis and continue with the next solution if another Time Machine backup failed.
Exclude large, unimportant files from being backed up
You can reduce the amount of data that Time Machine needs to back up to fix the "Time Machine couldn't complete the backup not enough space" error. Considering adding files that are unnecessary and large to the exclusion list, such as your Downloads folder, movies, photos, macOS installers, etc.
- Open Time Machine.
On macOS Ventura or later: Go to the Apple menu > System Settings > General, then click Time Machine.
On macOS Monterey and earlier: Go to the Apple menu > System Preferences, then click Time Machine. - Click Options.
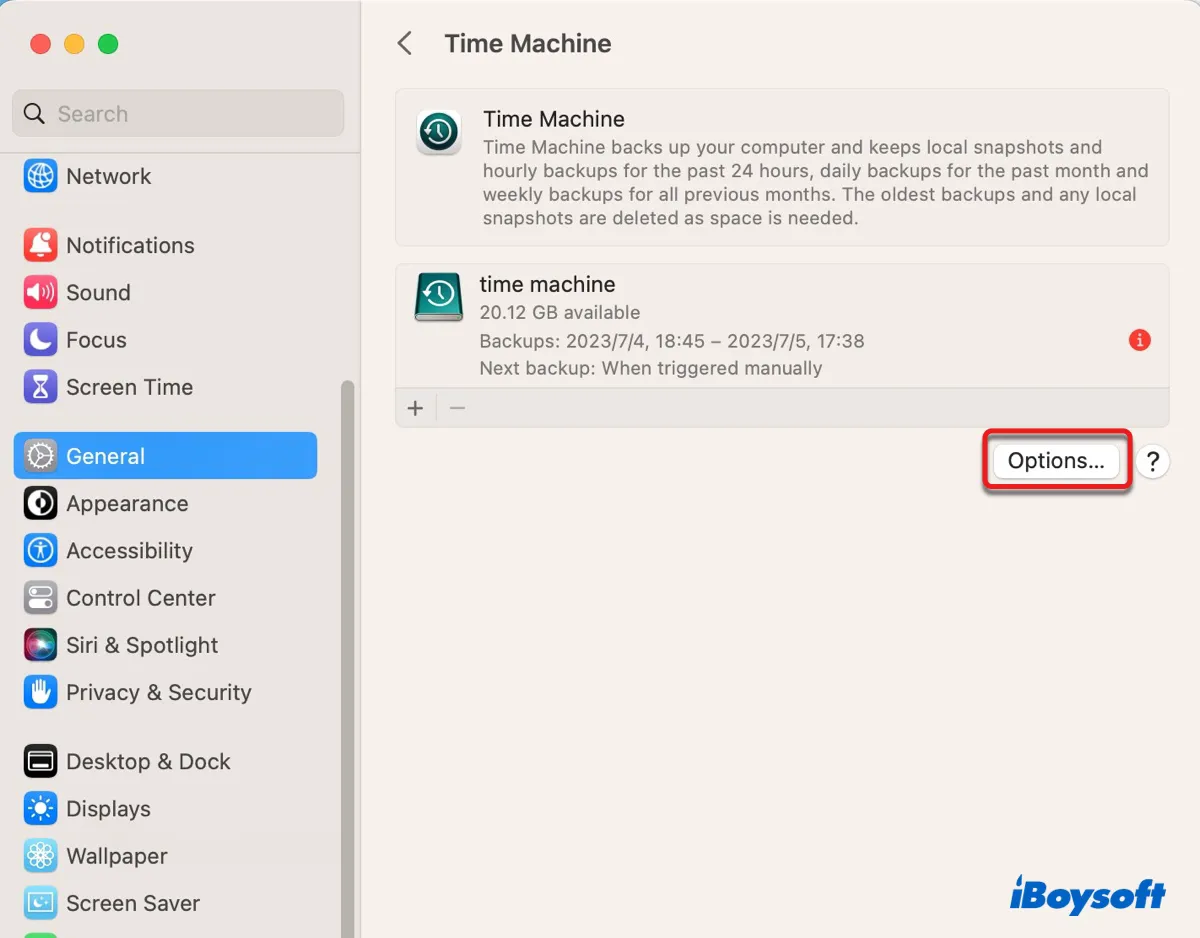
- Tap the Add button to select items you want to add to the list of excluded items. You can drag and drop items to the list as well.
- Click Done or Save.
- Retry backing up your Mac.
Empty the Recycle Bin & Disable it for network drives
If you're using a network-attached storage (NAS) like SD620slim from Synology, it may have a recycle bin that keeps the deleted old Time Machine backups. You need to empty the recycle bin to reclaim storage space and disable the recycle bin to prevent future issues.
Erase Time Machine backup disk and start over
If Time Machine still won't back up to your external drive, you can erase the Time Machine backup disk and start over. Be reminded that this will delete all data on your backup disk.
- Open Finder, then launch Disk Utility from the Applications > Utilities folder.
- Click View > Show All Devices.
- Select the physical disk of your Time Machine backup disk and click Erase.
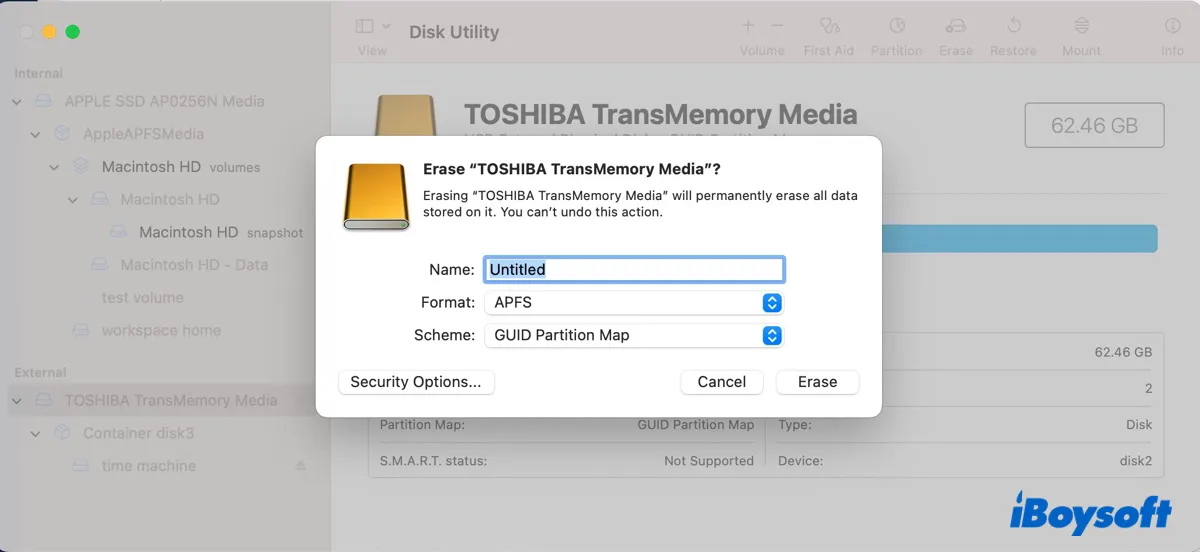
- Give the disk a name.
- Select APFS as the format if running macOS 11 Big Sur or later. Choose Mac OS Extended if running macOS 10.15 Catalina or earlier.
- Set the scheme to GUID Partition Map.
- Click Erase again.
- Go to Time Machine to set up your disk again.
Hopefully, you can now make Time Machine backups. If you find the solutions helpful, please spread the word by sharing this post!
Time Machine couldn't complete the backup because it is nearly full
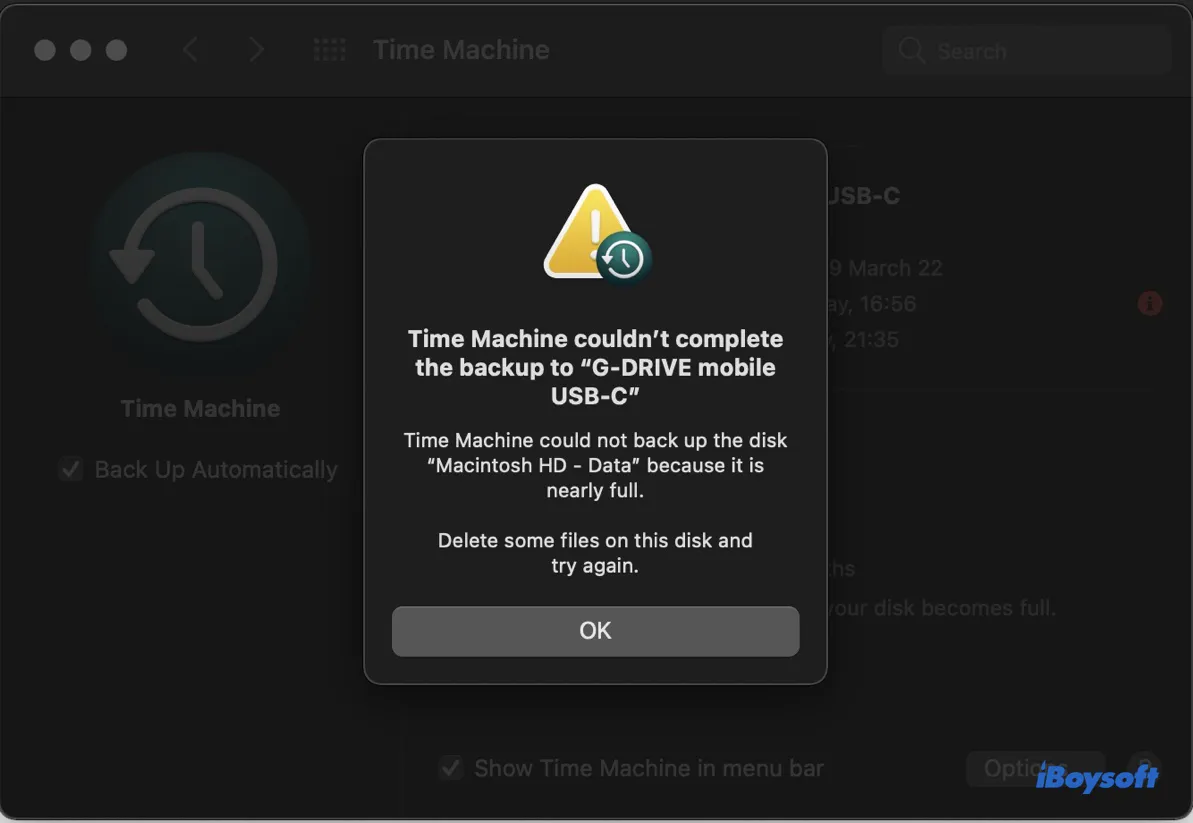
If the source volume you're backing up to Time Machine is nearly full, you'll find Time Machine not working as well. In this case, the "Time Machine couldn't complete the backup" message is often accompanied with messages similar to the following:
- ・Time Machine could not back up the disk "Macintosh HD - Data" because it is nearly full. Delete some files on this disk and try again.
- ・Time Machine could not create a local snapshot to back up from because there was insufficient free space on the source volumes.
Try the solutions below to fix the Time Machine backup failure.
Delete local snapshots on your Mac
Time Machine will make a local snapshot of the data it needs to back up so that any changes made to the data during the backup process are not included in the backup. However, if there's not enough free space for the local snapshot to create on your Mac, it will prompt an error.
The available space specified on your Mac is likely a combination of the purgeable space occupied by previous local snapshots, app caches, and log files or files in the Trash and the real free space. If the purgeable space is too large, there won't be much actual free space left even though the available space seems large.
As Time Machine local snapshots are usually the major component of purgeable space, we'll start by deleting them.
- Open Finder, and launch Terminal from the Applications > Utilities folder.
- Enter the following command and press Enter to list all local snapshots.tmutil listlocalsnapshots /
- Execute the following command to delete a specific snapshot.sudo tmutil deletelocalsnapshots backup_date_and_identifierType sudo tmutil deletelocalsnapshots followed by a space, then copy and paste the snapshot you want to delete and press Enter. The final command is similar to: sudo tmutil deletelocalsnapshots 2023-07-04-154951
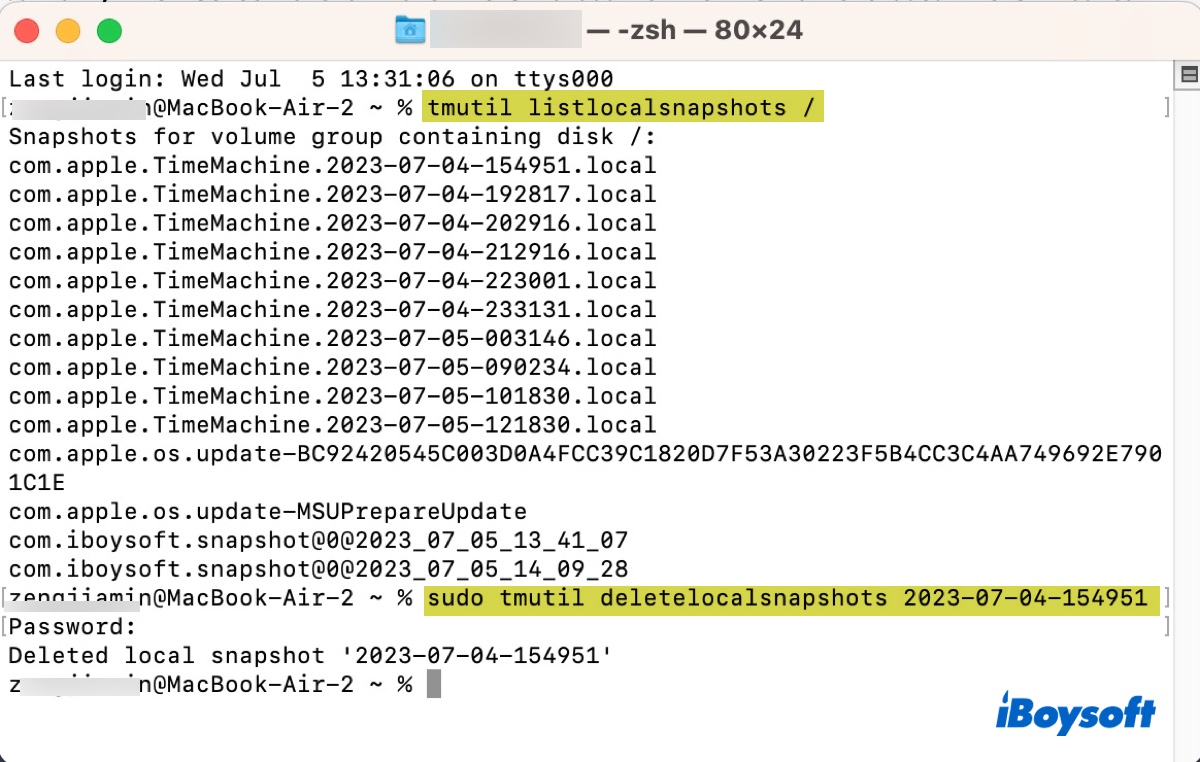
- Type in your admin password and hit the Enter key. (The password won't echo to the screen.)
- Run the following command if you want to delete all local snapshots.for d in $(tmutil listlocalsnapshotdates | grep "-"); do sudo tmutil deletelocalsnapshots $d; done
After getting rid of the local snapshots, it's also recommended to clean the junk files on your Mac. You can download iBoysoft DiskGeeker for free from the button below then utilize its "Clean Junk" feature to remove temporary files, app caches and logs, and other unnecessary files easily.
Repair the Time Machine drive and your Mac
If you've cleared a lot of space on your Mac but Time Machine is not backing up to your external drive, there may be disk issues on your internal hard drive or the backup disk. To check and repair disk errors, you can run Disk Utility First Aid from Recovery Mode.
- Boot into macOS Recovery Mode.
- In the macOS Utilities window, select Disk Utility and click Continue.
- Select a volume from the left side and click First Aid > Run to repair it.
- Repeat the steps until the volumes on your internal hard drive and external Time Machine backup disk is checked.
Find the information useful? Share this post so that others can benefit from it!
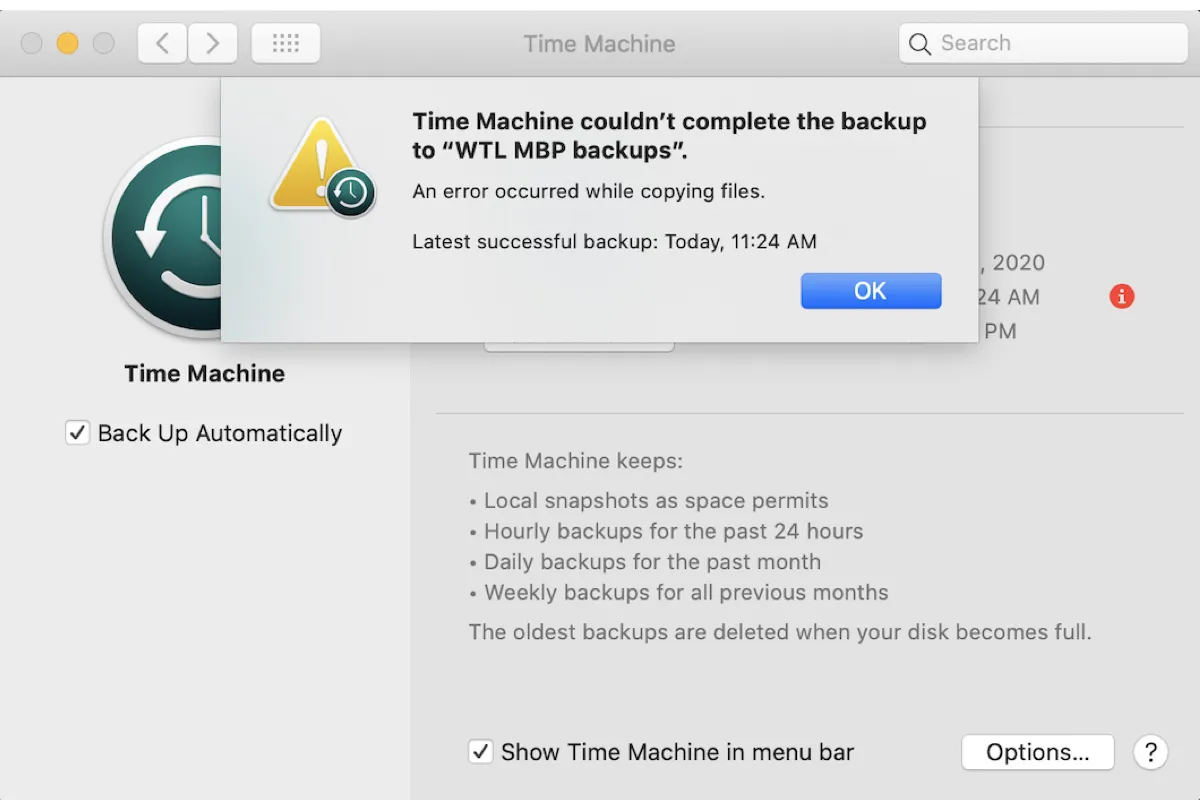
Time Machine couldn't complete the backup an error occurred while copying files/preparing the backup
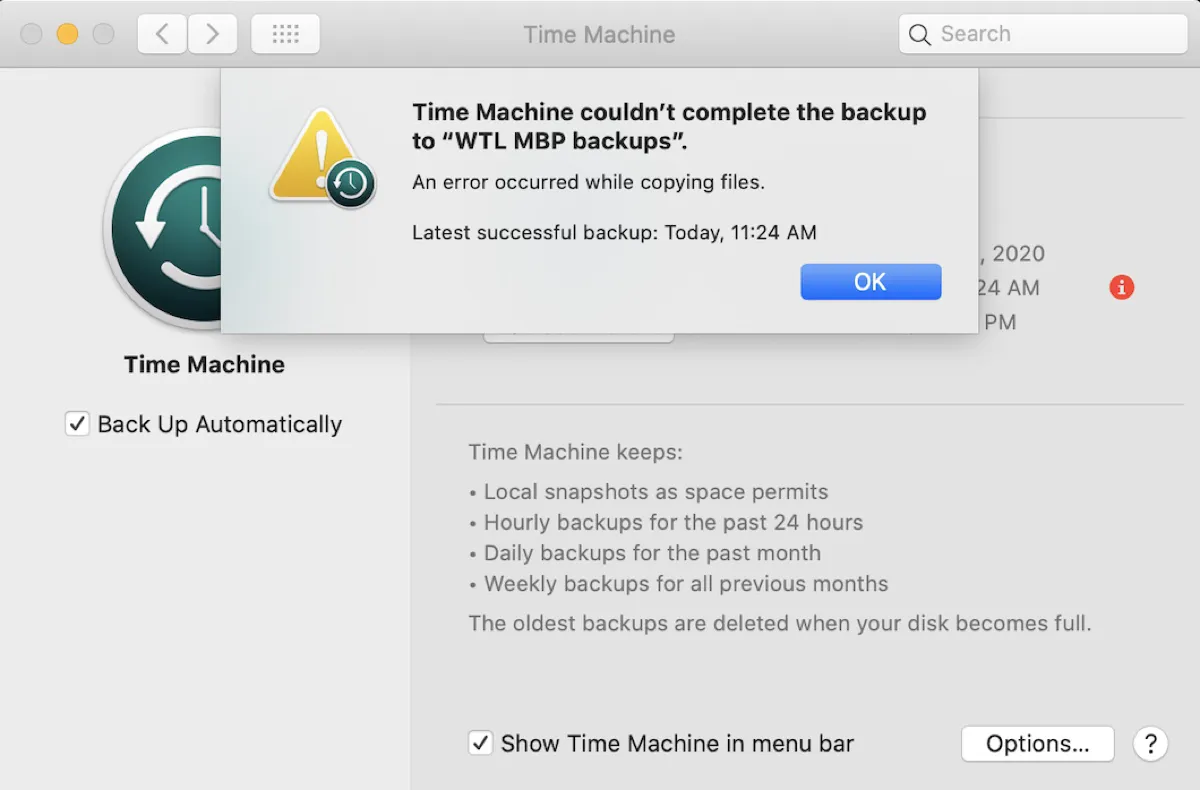
Errors that occurred while copying files or preparing the backup are also a major reason why Time Machine couldn't complete the backup. If your error message is accompanied by the following statements, you can resolve it with the solutions below.
- ・An error occurred while copying files. The problem may be temporary. If the problem persists, use Disk Utility to repair your backup disk.
- ・Unable to complete backup. An error occurred while creating the backup folder.
- ・An error occurred while preparing the backup.
- ・An error occurred while enabling ownership on the backup disk. You may need to repair or erase the disk using Disk Utility. If the disk can't be repaired, select a different disk for backups.
Troubleshoot the issue from logs
The error didn't specify the exact file, folder, or app that's causing the Time Machine failure but you can troubleshoot it with the logs.
Run the following command in Terminal to fetch and display log entries related to Time Machine from the last 4 hours.
log show --predicate 'subsystem == "com.apple.TimeMachine"' --info --last 4h | grep Error
Alternatively, you can digging around the Console app to find the culprit.
- Open Console.
- Select your Mac from the left side.
- Click Start Streaming.
- Run the Time Machine backup and let the error occur.
- Stop the streaming after the Time Machine backup failed.
- Click "Errors and Faults."
- Search for the process backupd.
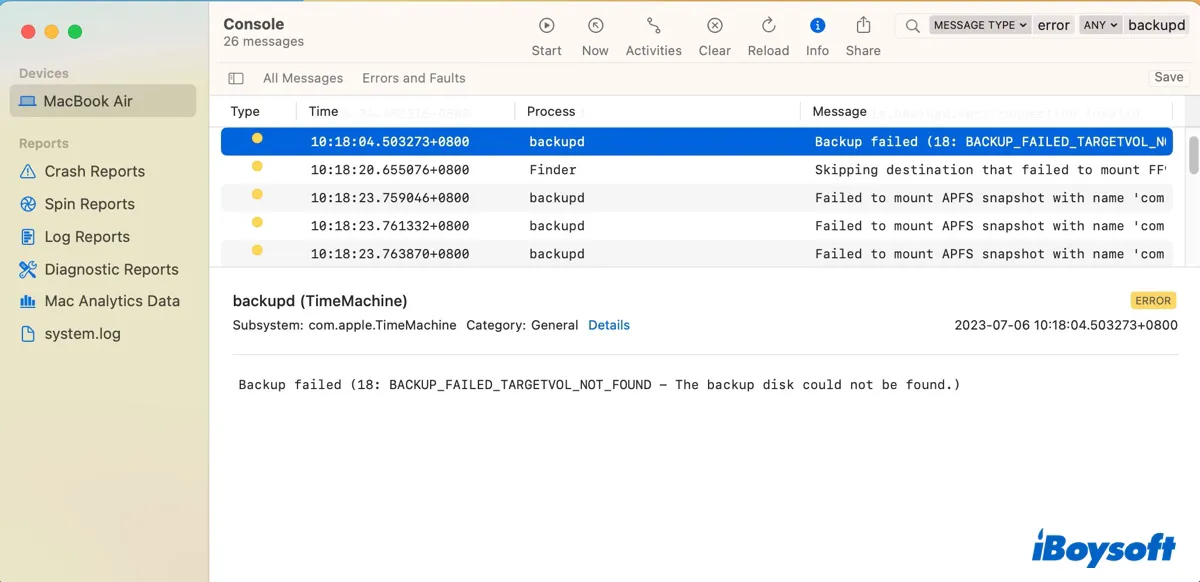
Look for the offending file or folder in the logs. Then you can delete the item and empty the Trash or exclude it from the Time Machine backup. If the file or folder is relevant to an app or a feature on your Mac, you can also uninstall or disable it if it's not essential.
Use a different cable or port
The issue may also be caused by a malfunctioning USB cable or port. It's recommended to unplug the backup disk after safely ejecting it, and then reconnect it to your Mac with a different cable or port.
Disable or uninstall third-party security or backup utility
Third-party backup software like WD Utilities or security programs like an ad blocker, antivirus, or VPN may block the connection from the Time Machine backup disk, rendering Time Machine not working. If your Mac has such a tool, you can disable or uninstall it to see if it resolves the issue.
Note that dragging and dropping the app to Trash won't delete its files. To fully remove the app and its leftover, you can follow the app's official guide or use a tool like iBoysoft MagicMenu.
Remove the backup disk and reconnect it
Some users have found that removing the backup disk from Time Machine and reconnecting it was helpful in setting things right. Take the following steps:
On macOS Ventura and later:
- Go to the Apple menu > System Settings > General > Time Machine.
- Select the Time Machine backup drive and click the ( - ) button.
- Click "Forget Destination."
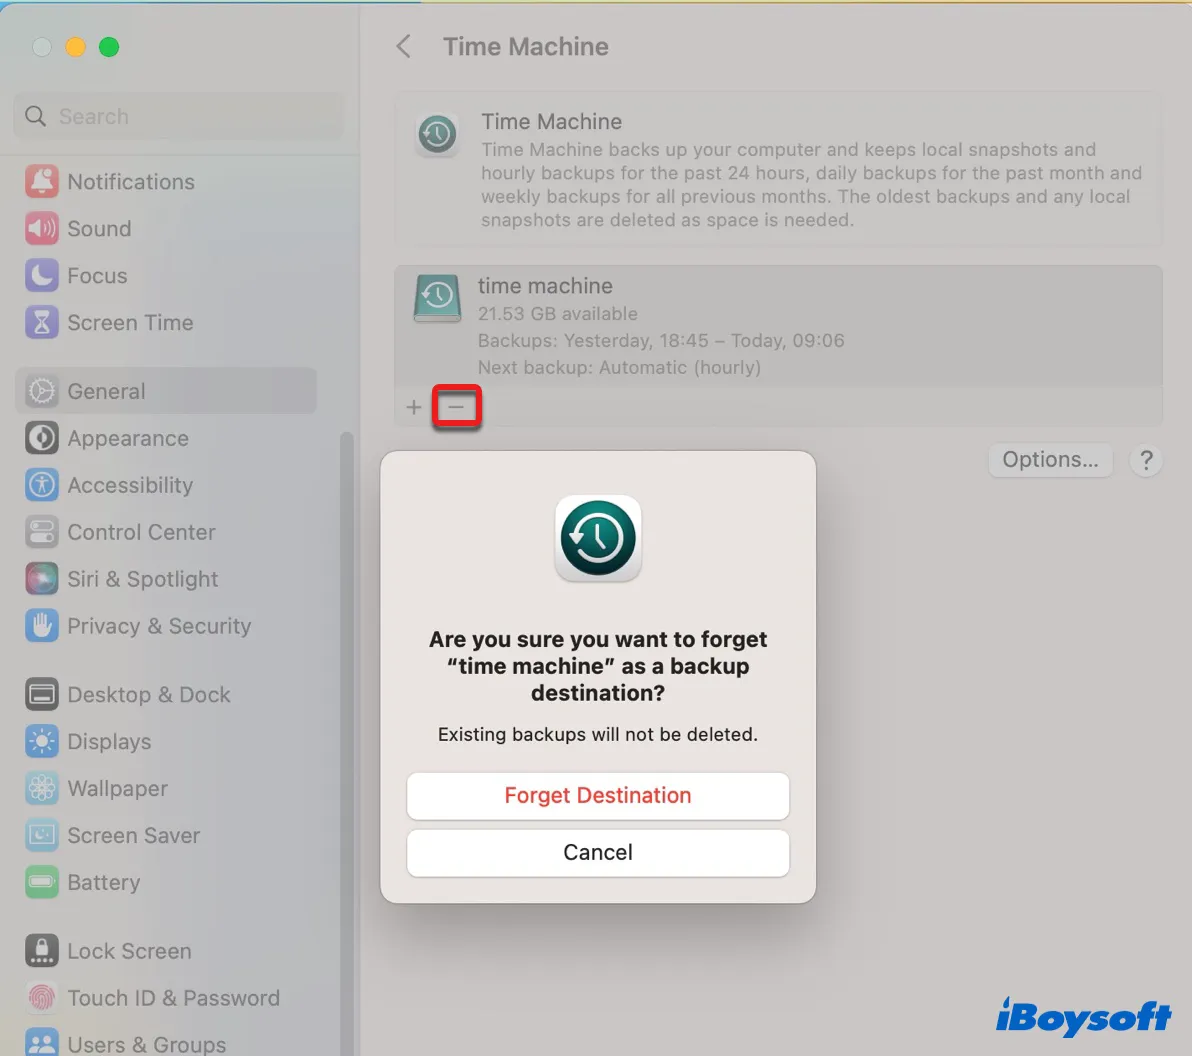
- Right-click the drive on your desktop and select Eject.
- Unplug the drive.
- Reconnect the drive to your Mac.
On macOS Monterey and earlier:
- Go to the Apple menu > System Preferences > Time Machine.
- Click "Add or Remove Backup Disk…"
- Select the disk that's having trouble backing up your Mac and click "Remove Disk."
- Right-click the drive on your desktop and select Eject.
- Unplug the drive and replug it.
Check if Time Machine can back up normally now. If not, erase it in Disk Utility and reconfigure it with Time Machine.
Help others learn the solutions to "Time Machine couldn't complete the backup" on Sonoma, Ventura, Monterey, Catalina, Mojave, and earlier.
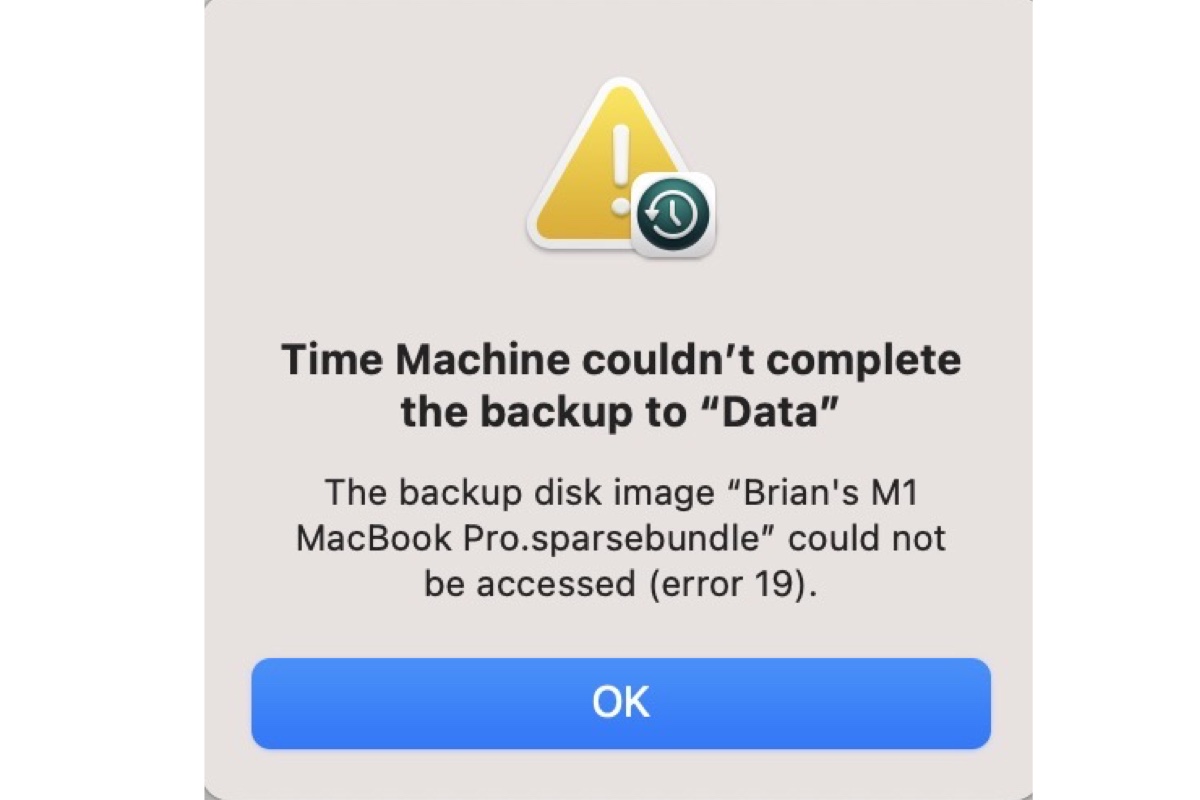
Time Machine couldn't complete the backup already in use
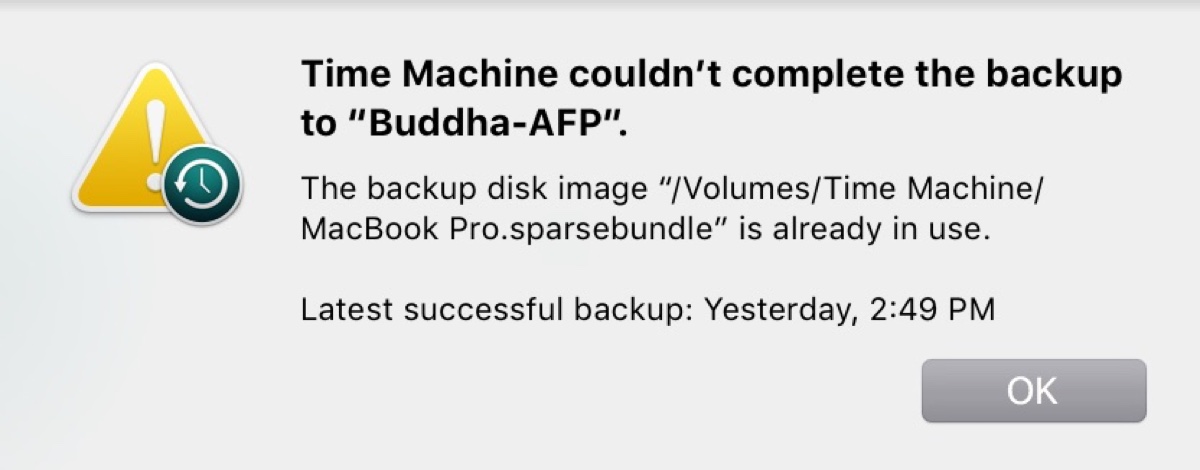
If you receive a message similar to "Time Machine couldn't complete the backup to "WD-NAS". The backup disk image "/Volumes/ TimeMachine Backup/SD MB Pro.sparsebundle" is already in use," take the following solutions to fix it.
Reboot your Mac
A reboot can likely fix many minor issues on a Mac, including the "sparsebundle already in use" error. You can properly eject the external backup disk, then restart your Mac and reconnect it. This has been proven to work for some users. Give it a try!
Exclude the Time Machine backup disk from Spotlight indexing
The sparsebundle file may be in use by Spotlight, as it needs to index data on your Time Machine backup drive. To stop it from being indexed by Spotlight, you can add your drive to the privacy list, as described below.
On macOS Ventura or later:
- Open the Apple menu > System settings > Siri & Spotlight.
- Scroll down and click Spotlight Privacy.
- Drag the drive from your desktop to the list of locations that Spotlight is prevented from searching.
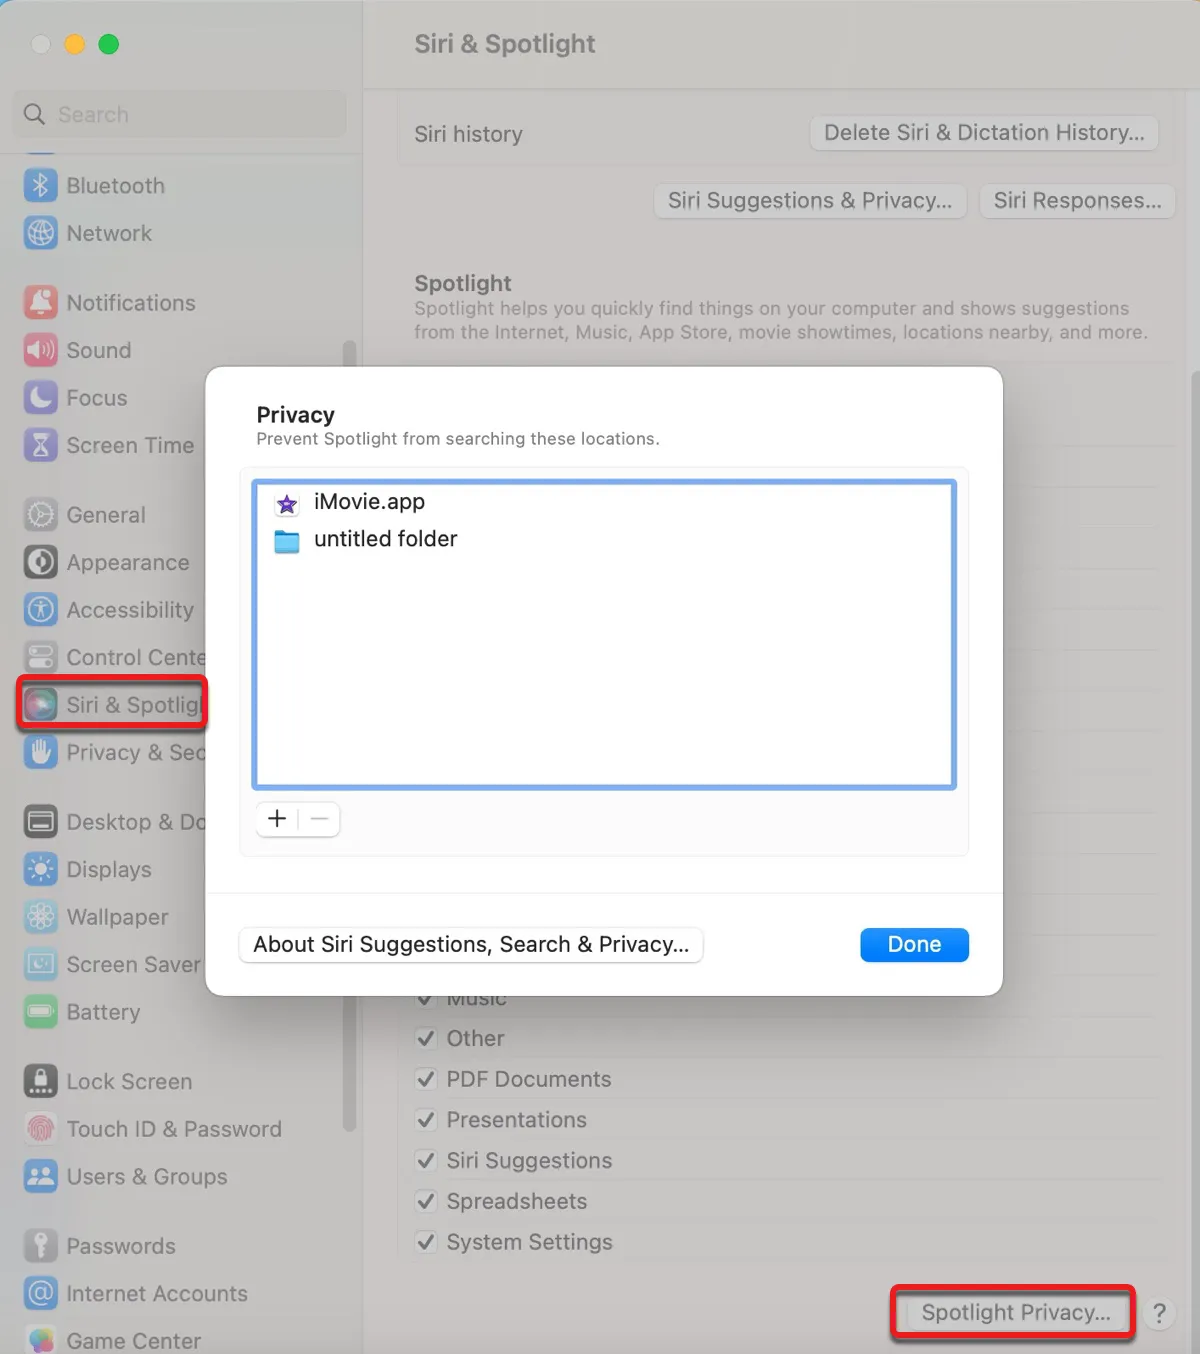
- Click Done.
On macOS Monterey or earlier:
- Open the Apple menu > System Preferences > Spotlight.
- Select the Privacy tab.
- Drag the drive from your desktop to the empty space of the Privacy list.
Time Machine couldn't complete the backup because some files were unavailable
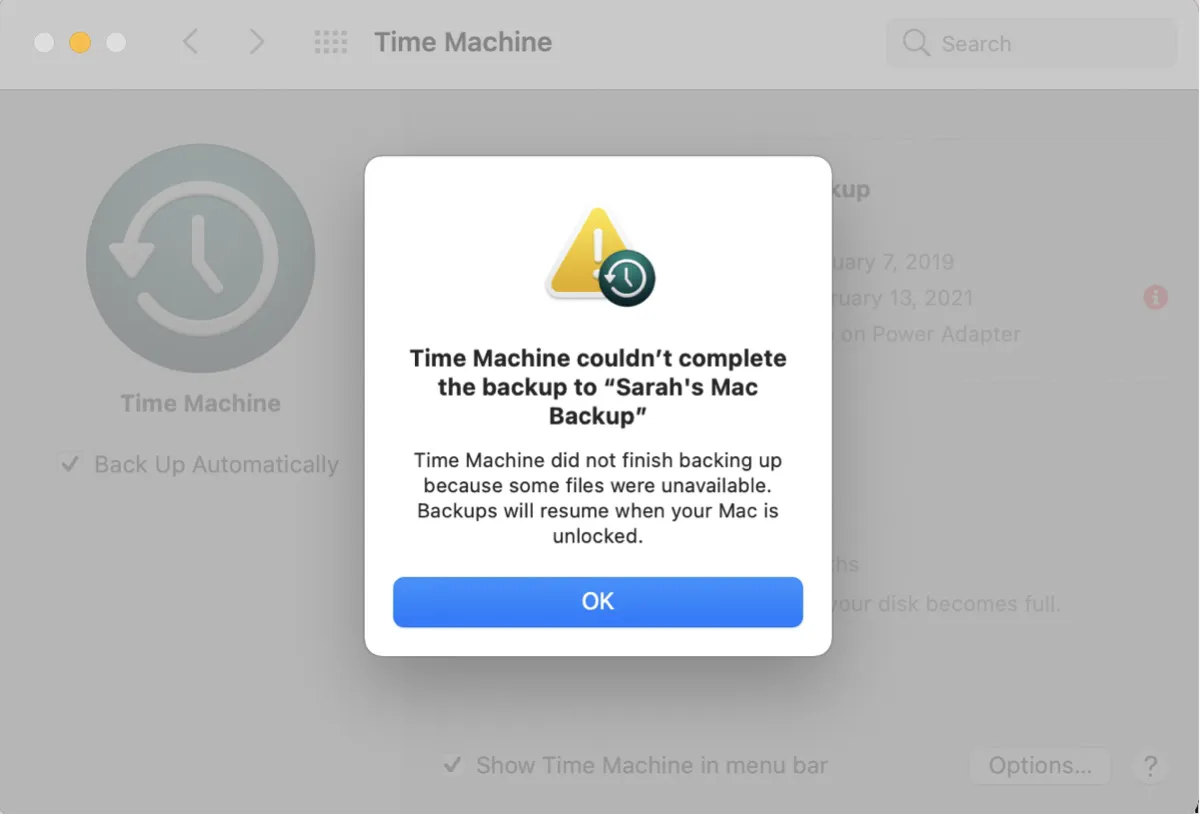
The error "Time Machine did not finish backing up because some files were unavailable. Backups will resume when your Mac is unlocked." often occurs on Apple Silicon (M1 & M2) Macs when Time Machine is close to the end of its backup process. The message indicates that the Mac is locked, which may be referring to the Mac going to sleep.
Here are some potential solutions that may assist you fix the problem.
Prevent the disk and your Mac from going to sleep
Since the issue is likely related to your Mac or the backup disk's sleep setting, our first solution is to change the setting to prevent them from going to sleep. Follow these steps:
On macOS Ventura or later: (The steps below apply to notebooks. Desktop Macs may have slightly different processes.)
- Open the Apple menu > System Settings > Displays.
- Click Advanced.
- Turn on "Prevent automatic sleeping on power adapter when the display is off."
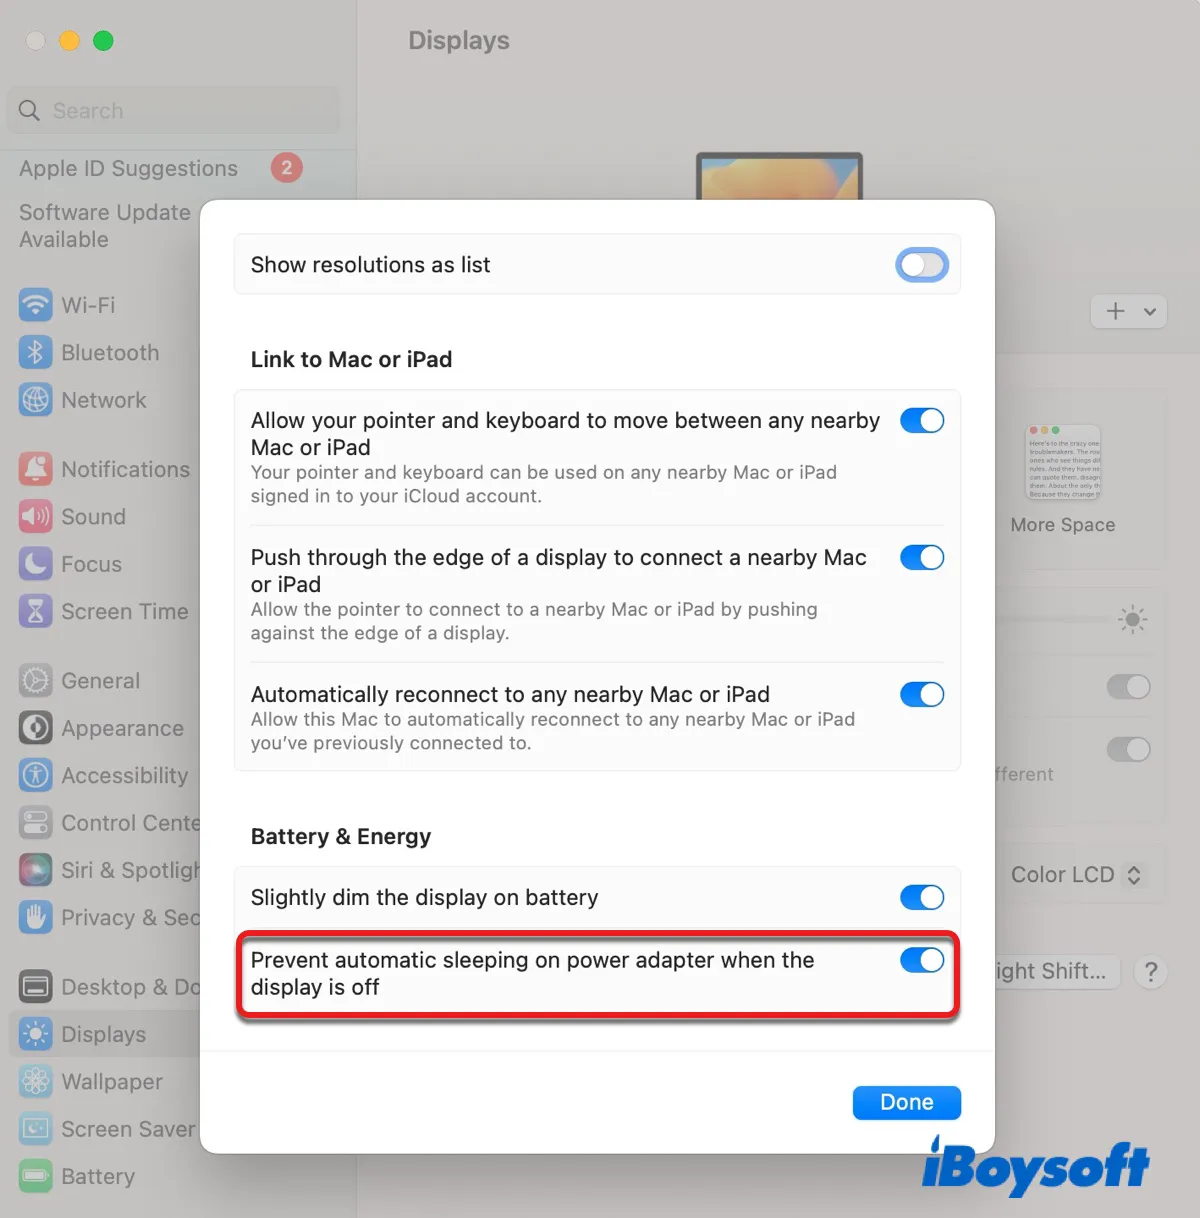
- Tap Done.
- Click Battery > Options.
- Set "Put hard disks to sleep when possible" to Never.
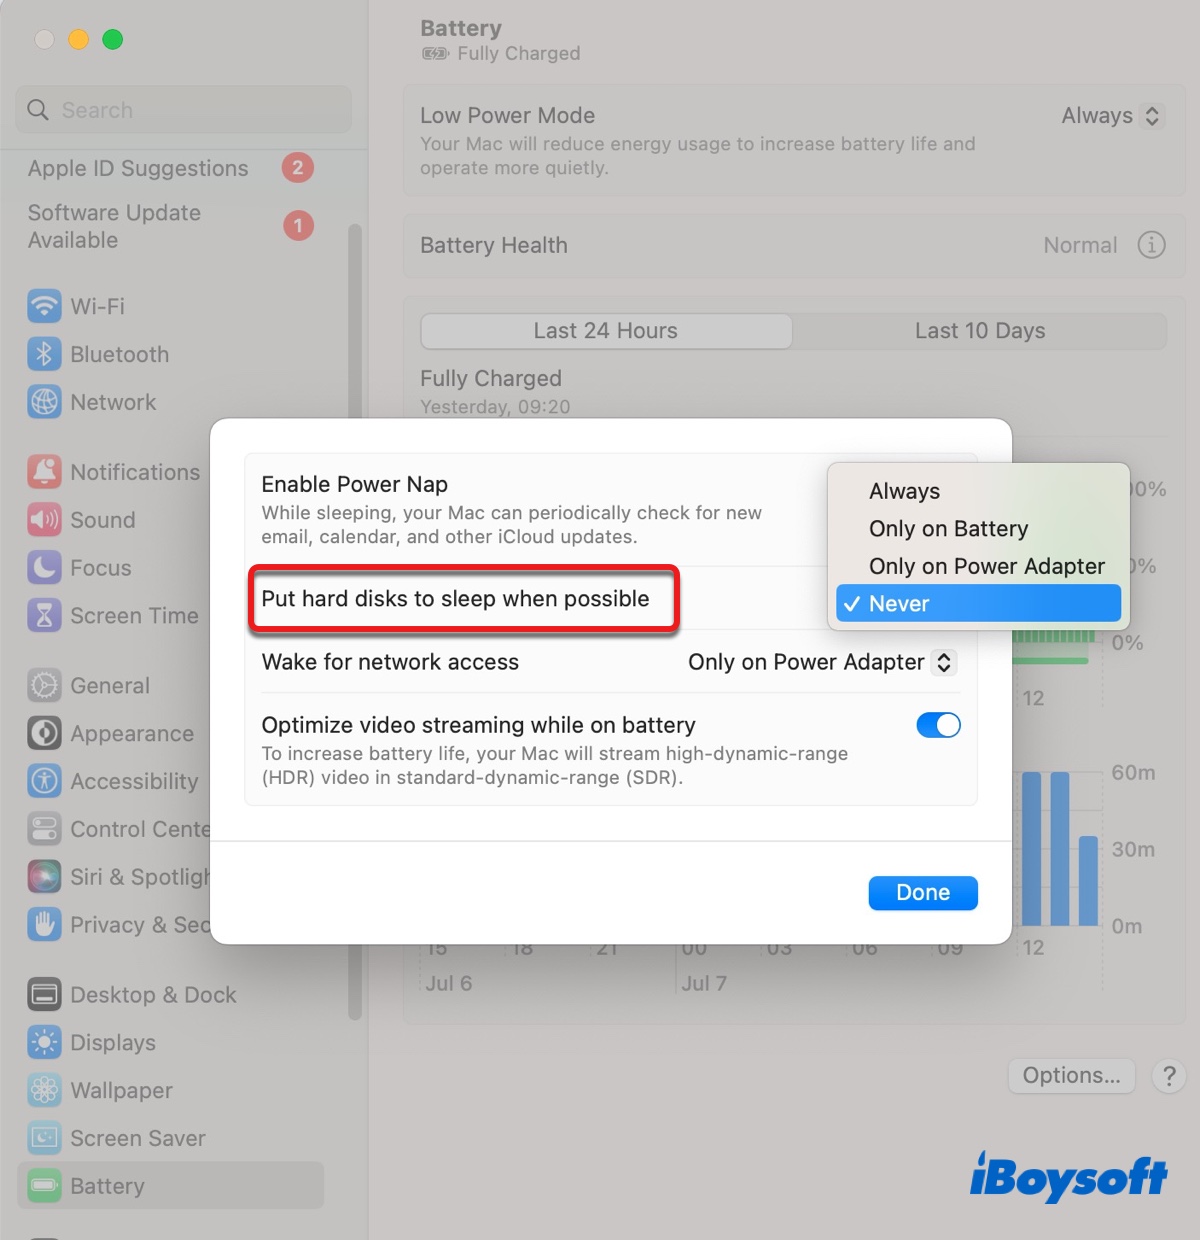
If you are running macOS Monterey or earlier, find the instructions in this article: How to Stop a Mac from Sleeping on macOS Ventura & Earlier? (The "Put hard disks to sleep when possible" option isn't addressed in this post but you can easily find it in the Battery or Energy Saver setting.)
Turn off the screen lock
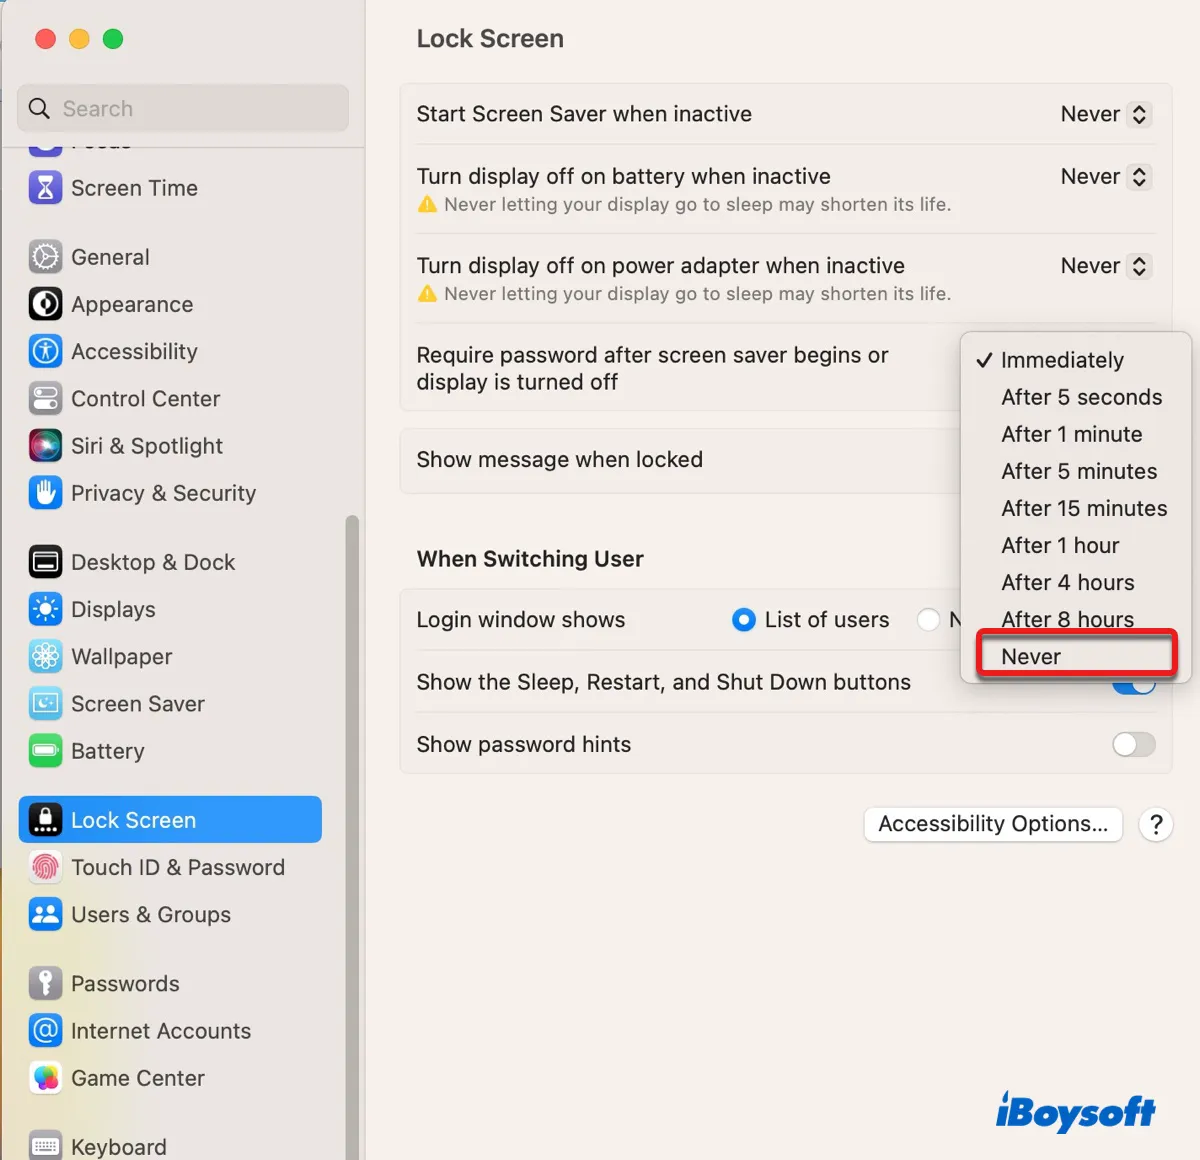
You can also stop your Mac from being locked by preventing it from asking for a password after your Mac wakes up.
On macOS Ventura or later:
- Go to the Apple menu > System Settings.
- Click Lock Screen.
- Set "Require password after screen saver begins or display is turned off" to Never.
On macOS Monterey or earlier:
- Go to the Apple menu > System Preferences.
- Select Security & Privacy > General.
- Uncheck "Require password [X time] after sleep or screen saver begins."
Update your Mac or the DSM for Synology NAS
If you're using a Synology NAS drive for Time Machine, try updating its DiskStation Manager to the latest version. Then try to start a Time Machine backup again. You can also update your Mac if it doesn't have the latest version of macOS.
Add the unavailable files to exclusion list
Since the error mentioned that some files are unavailable, you can find those files and exclude them from Time Machine to eliminate the issue. We've covered on the details to view logs about Time Machine in Terminal and the Console app in the fourth section of this article under the solution "Troubleshoot the issue from logs." You can read it and look for the offending files in the logs.
Share this article to benefit more Mac users!
Time Machine couldn't complete the backup two of the disks to back up have the same name
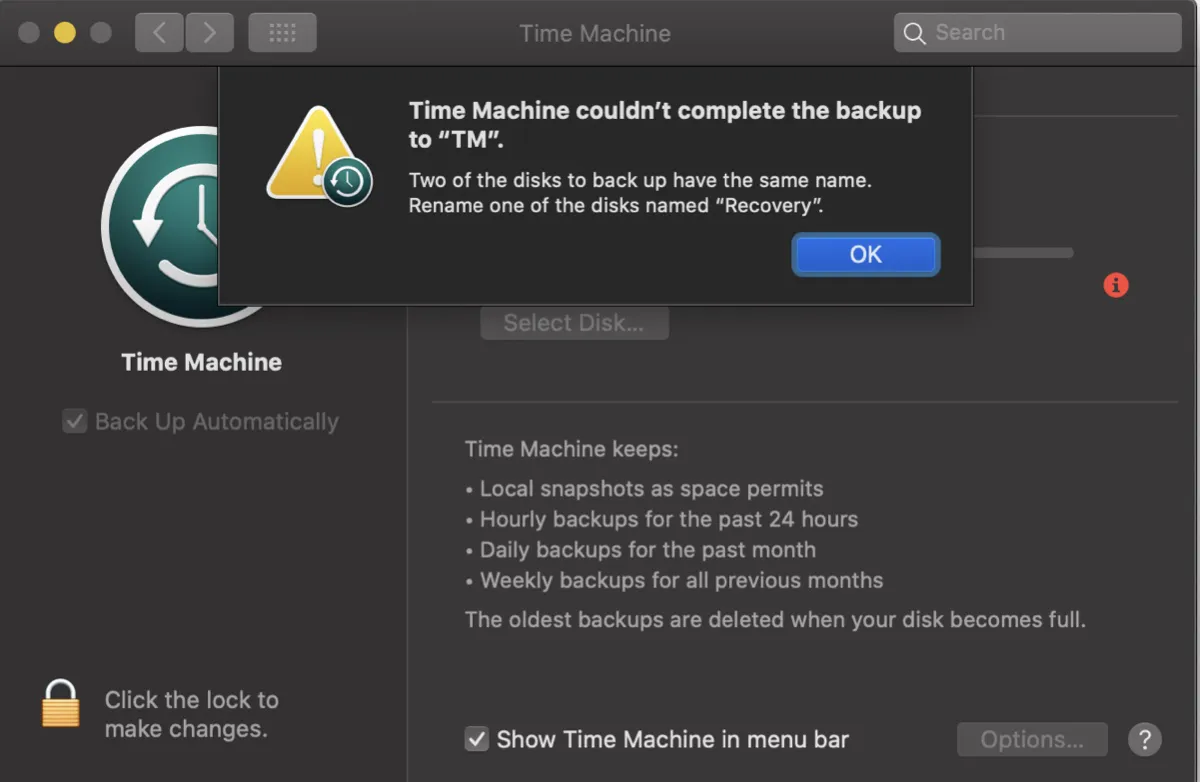
When you have two disks named the same, Time Machine won't back up your Mac. It will prompt you to rename one of the drives and give you the error “Time Machine couldn't complete the backup to "My Passport". Two of the disks to back up have the same name. Rename one of the disks named "Macintosh HD - Data." To fix it, try these:
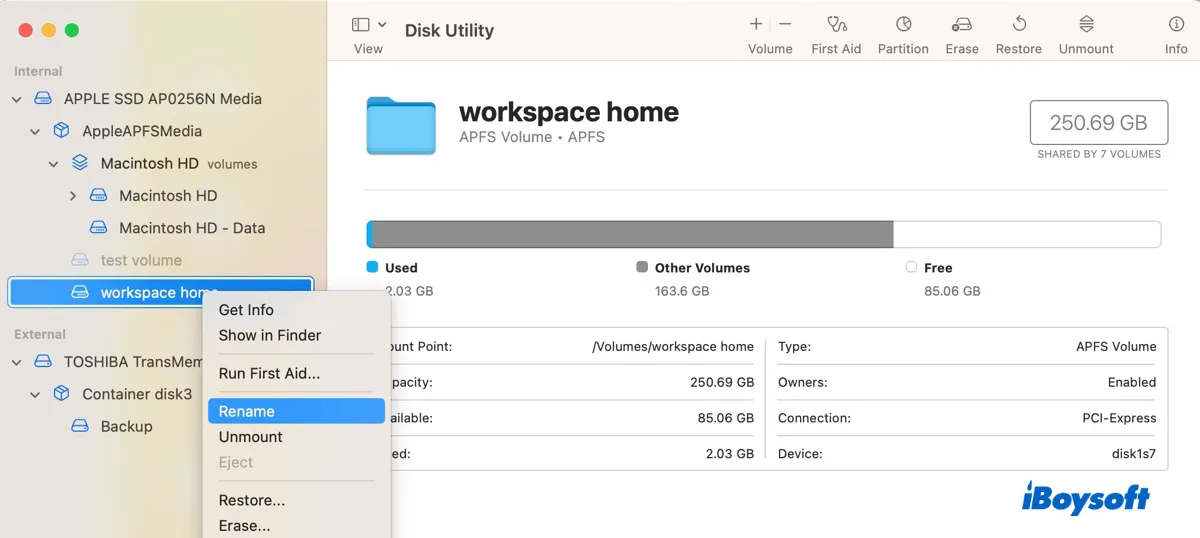
Rename one of the disks in Disk Utility
You can open Disk Utility and select View > Show All Devices to see all drives connected to your Mac along with their physical disks. Now, locate the two disks with the suggested name and rename one by right-clicking it and selecting "Rename."
Delete the extra Macintosh HD - Data volume
If you have two Macintosh HD - Data volumes, that's because you didn't delete the Macintosh HD - Data volume from the last operating system you installed before formatting your Mac and reinstalling macOS. Apart from renaming one of them, you can also delete the unnecessary one, which doesn't have a "Home" icon, to avoid future troubles.
When you are certain that files on the extra Macintosh HD - Data volume is backed up or not important, select it and click the ( - ) remove button to delete it.

Reboot your Mac
Some users do not have two disks with the same name despite what the error message indicates. If that also happens to you, you can reboot your Mac to fix corruption on the system.
Others may need to resolve "Time machine couldn't complete the backup" on Ventura, Monterey, Big Sur, Catalina, Mojave, or other macOS Versions as well. Share this post to help them!
FAQs about the 'Time Machine couldn't complete the backup' message
- QWhy is Time Machine backup not completing?
-
A
Time Machine may not complete a backup due to insufficient free space on it and your Mac, corrupted files, your Mac going to sleep, or third-party software intervention.
- QHow do I fix a corrupted Time Machine backup?
-
A
To fix a corrupted Time Machine backup, you can repair it using the First Aid feature in Disk Utility.
- QHow do I free up space on my Time Machine disk?
-
A
You can free up space on your Time Machine disk by deleting the old backups you no longer need from Finder or with Terminal.
- QCan Time Machine backup external drives?
-
A
No, Time Machine can only back up your Mac internal hard drive.
- QHow do I know if my Time Machine backup is corrupted?
-
A
If your Time Machine backup is corrupted, you'll notice symptoms like the drive not mounting on your Mac. You can also run First Aid on it to see if it has any file system issues.
- QHow do I force Time Machine to backup my Mac?
-
A
If you want Time Machine to back up your Mac immediately, click its icon on the menu bar and select "Back Up Now."