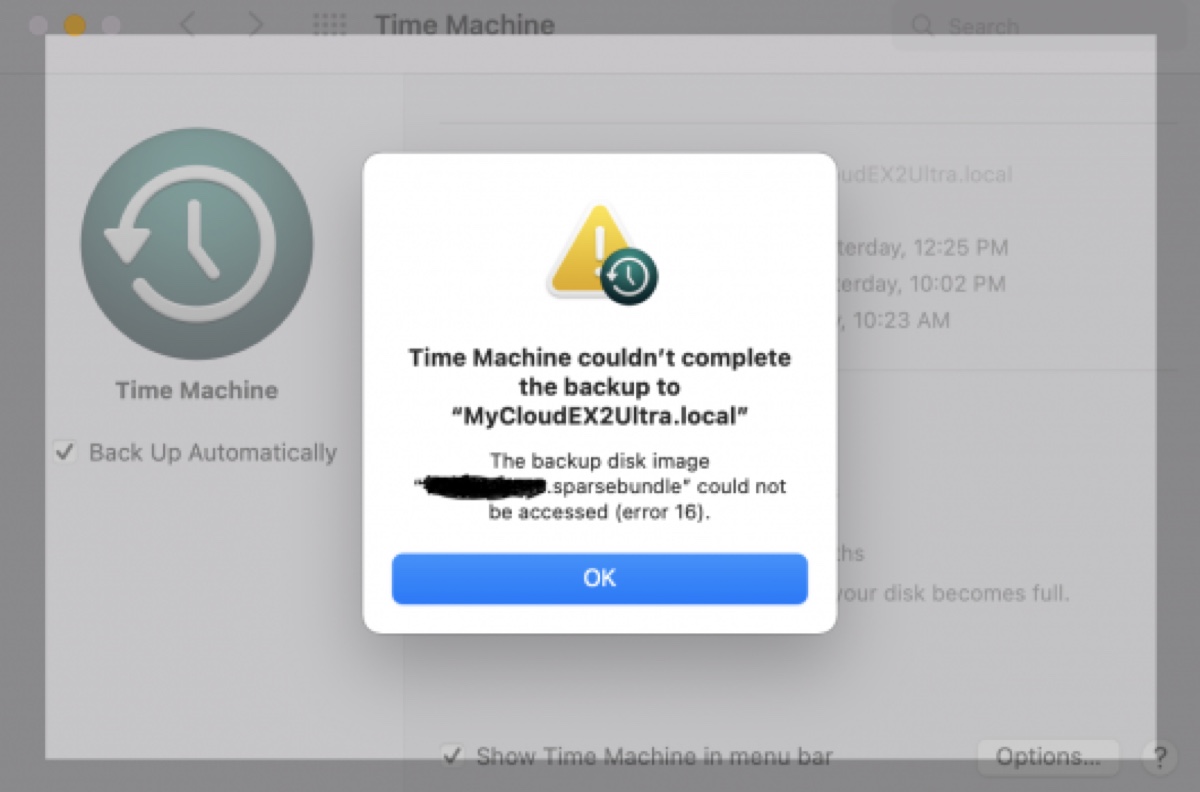
I'm having trouble creating Time Machine backups to a NAS (WD MyCloud EX2 Ultra) on macOS 12 Monterey. It worked fine initially, but after some time, it started to return the error "The backup disk image “WDMyCloud.sparsebundle” could not be accessed (error 16)."
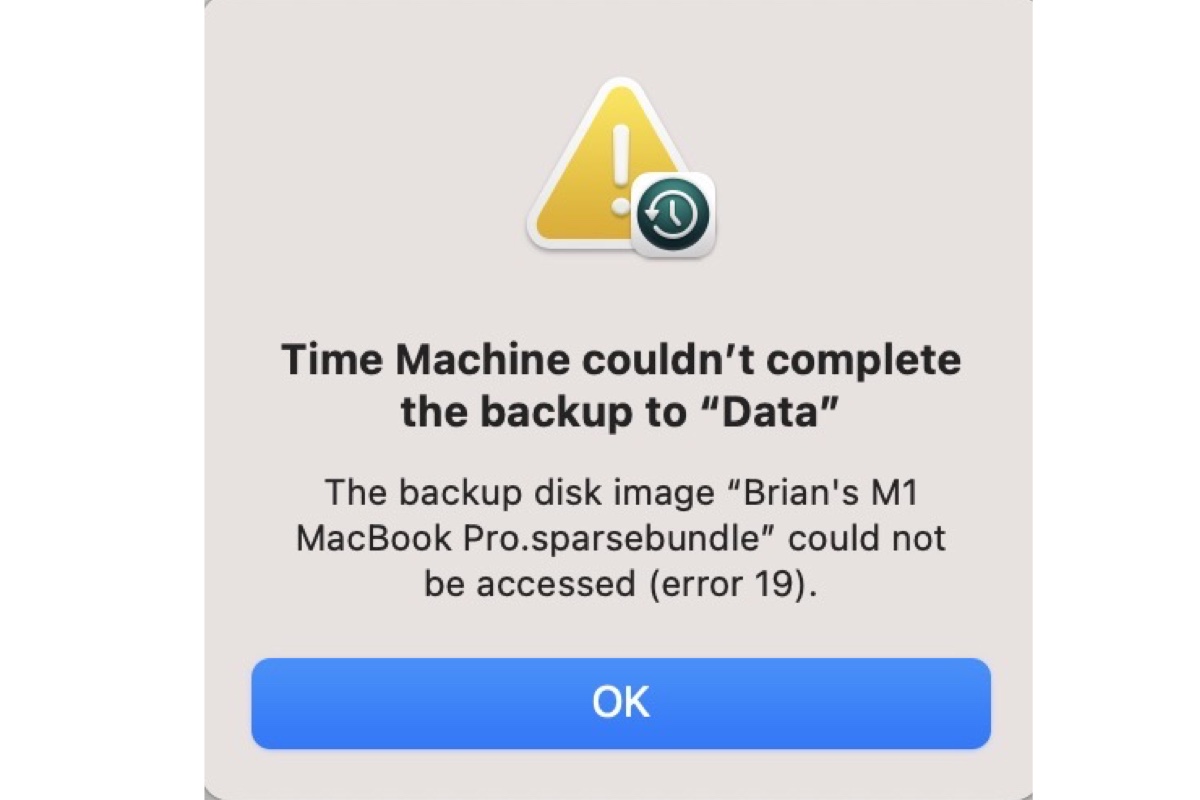
A few days ago, Time Machine stopped backing up to my Mac and gave me the message: "Time Machine couldn't complete the back up to 'MacBook Pro.'The backup disk image "macbook pro.sparsebundle" could not be accessed (error 19)."
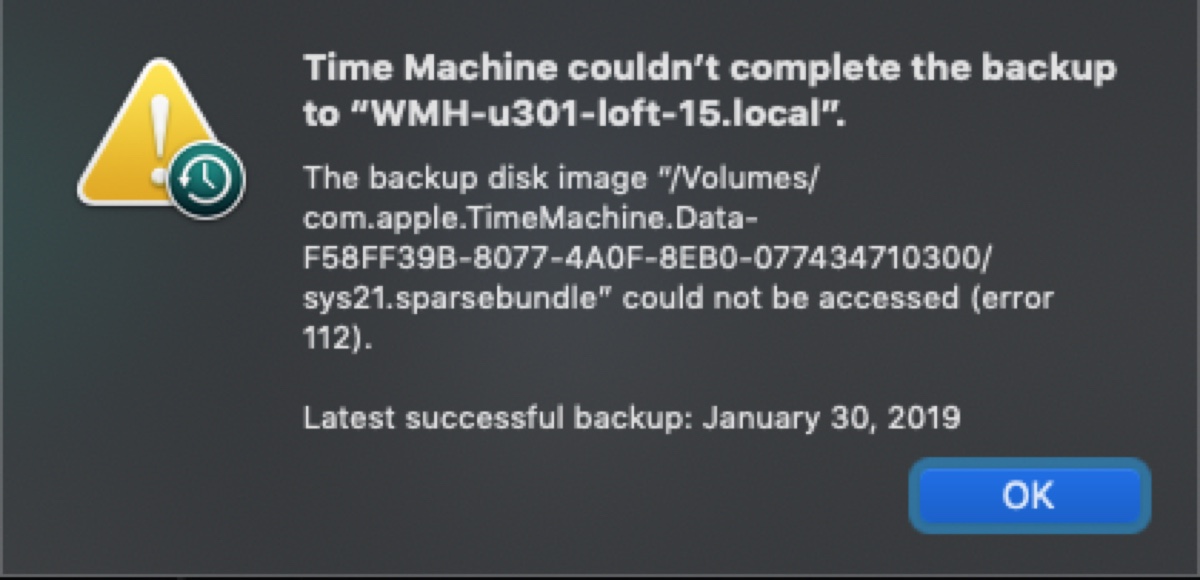
I can no longer back up to Synology after upgrading to macOS Ventura. Every time I start the backup, Time Machine will sit there for some minutes looking for backup disk, then fail with the error "The backup disk image "/Volumes/SynologyNAS/backup.sparsebundle" could not be accessed (error 112)."
Similar to the users above, you may also be experiencing Time Machine errors 16, 19, or 112. It can happen on local external drives and network drives like Airport Time Capsule, Synology, or WD My Cloud, especially after a recent macOS update.
In this article, we'll help you troubleshoot the error and get Time Machine back to life. Here's a quick summary of the solutions:
- Fix 1: Remove the backup disk from Time Machine
- Fix 2: Verify Time Machine backups
- Fix 3: Update the firmware and OS
- Fix 4: Restart your backup drive and reconnect
- Fix 5: Change your network drive settings
- Fix 6: Uninstall anti-virus
- Fix 7: Restore to a previous backup
- Fix 8: Give Time Machine full disk access
- Fix 9: Rename your Mac's localhost name
- Fix 10: Update macOS
- Fix 11: Erase the backup drive and restart
What is error 16/19/112 on Apple Time Machine?
"The backup disk image could not be accessed (error 16/19/112)" usually indicates one or more of the following issues:
- Corrupted backup file: The backup file itself may have been damaged, preventing access.
- Program interference: Another program on your system might be locking the backup file or blocking Time Machine.
- Operating system bugs: Bugs or glitches within your operating system could be causing the error.
- Incorrect settings: Certain settings related to Time Machine or network connections might need adjustment.
How to fix Time Machine error 16/19/112 on Mac?
If Time Machine couldn't back up to your NAS drive or local disk due to the error "The backup disk image could not be accessed (error 16/19/112)," try the solutions below.
Fix 1: Remove the backup disk from Time Machine
The most efficient way to resolve Time Machine errors 16, 19, or 112 is to remove the backup disk from Time Machine and reconfigure it. Here's how to do it:
On macOS Ventura or later:
- Open the Apple menu > System Settings.
- Select General > Time Machine.
- Select the Time Machine backup disk/folder whose backup disk image can't be accessed.
- Click the ( - ) button to remove it.
- Click "Forget Destination."
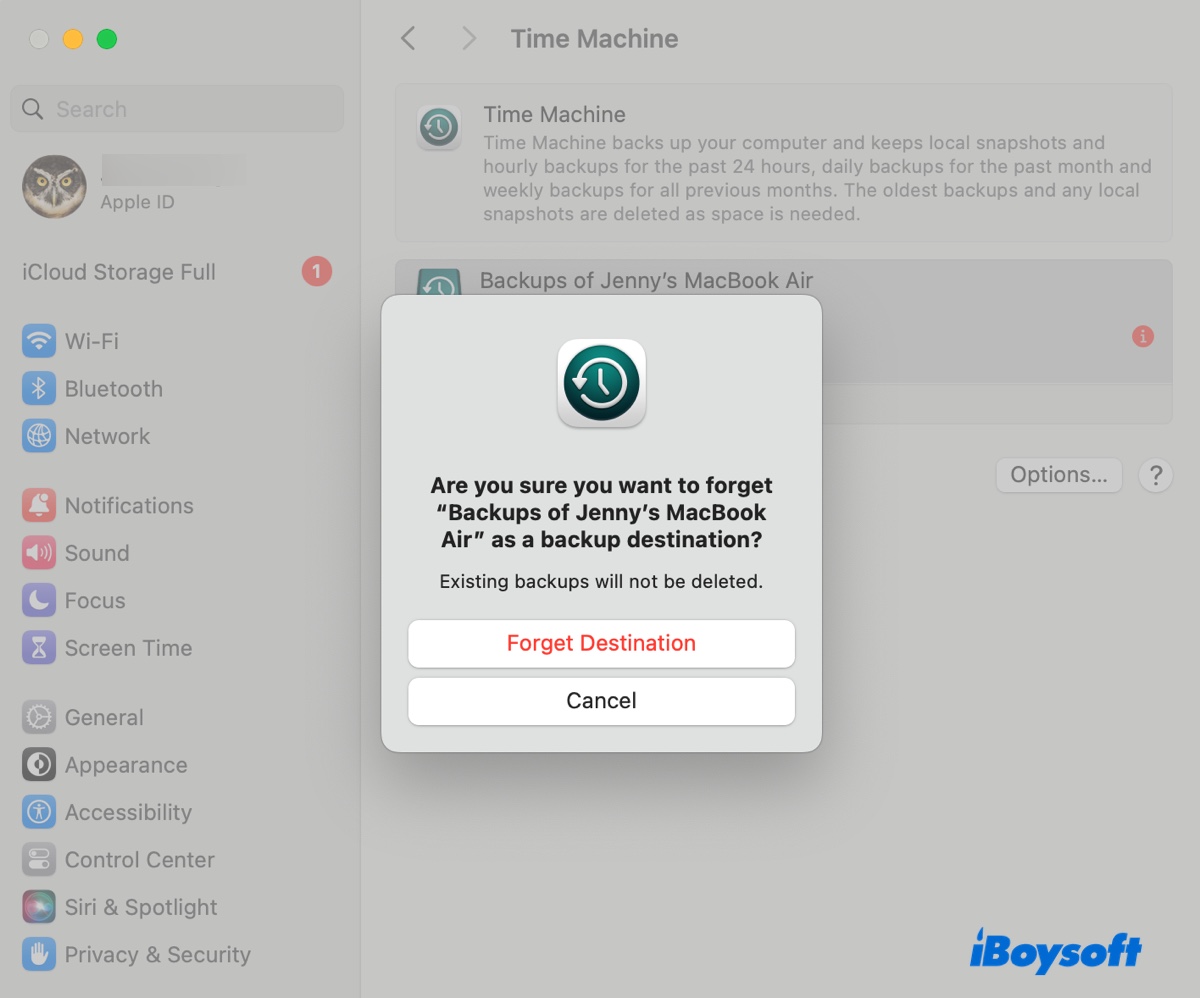
- Restart System Settings.
- Open "Time Machine" again.
- Click "Add Backup Disk" and follow the instructions to re-add your backup drive.
On macOS Monterey or earlier:
- Open the Apple menu > System Preferences.
- Select Time Machine > Add or Remove Backup Disk.
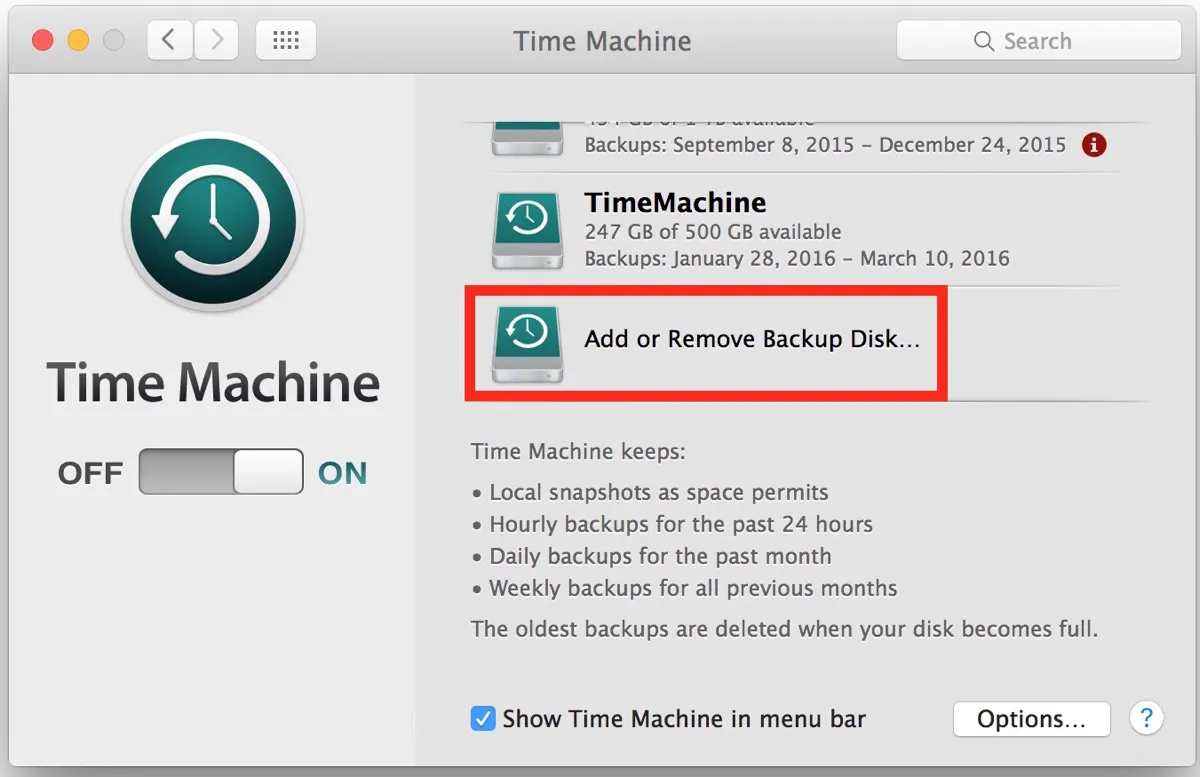
- Choose the Time Machine disk/folder that won't back up.
- Click "Remove Disk."
- Confirm the action by tapping "Stop Using This Disk."
- Restart System Preferences.
- Launch Time Machine.
- Click "Add or Remove Backup Disk."
- Select the disk and re-add it.
Did it work? If you found this guide valuable, please share it with your friends and colleagues!
Fix 2: Verify Time Machine backups
When Time Machine reports issues like "The backup disk image could not be accessed," you can verify the Time Machine backups to identify any underlying problems.
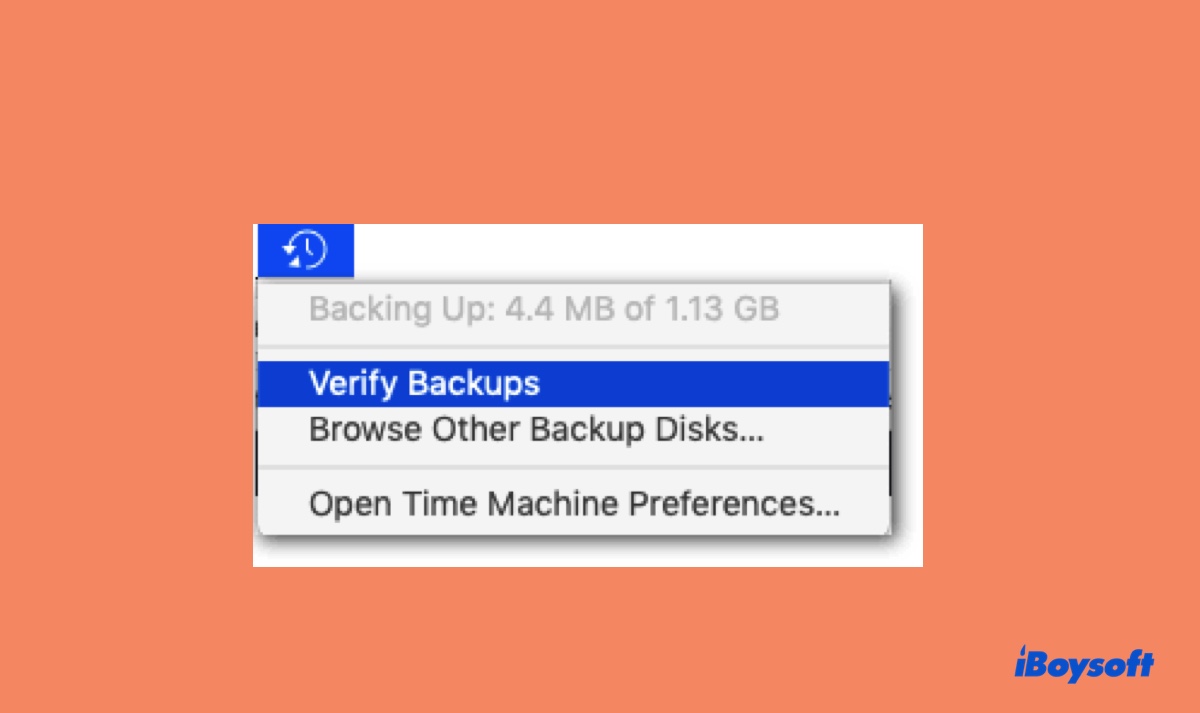
If you receive error 16/19/112 on a network drive like Synology:
- Ensure the network drive is connected to your Mac.
- Select the Time Machine in the menu bar.
- Press the Option key and select "Verify Backups."
If you receive error 16/19/112 on a local disk:
- Ensure the backup disk is attached to your Mac.
- Hold down Command + Space and type "terminal."
- Open Terminal and run the following command:tmutil compare –s
The verification process will take some time, depending on the size of your backups and your computer's speed. When it's done, it will notify you of the problems in the backups, if any.
Fix 3: Update the firmware and OS
Most network-attached storage drives have firmware and an operating system tailored to the specific needs of storage management, file sharing, and other network-related functions.
If Time Machine is unable to access the sparsebundle on your NAS drive when initiating a backup, consider updating the firmware and operating system of the NAS device. Compatibility issues may exist with your current macOS version, especially if you recently upgraded your Mac.
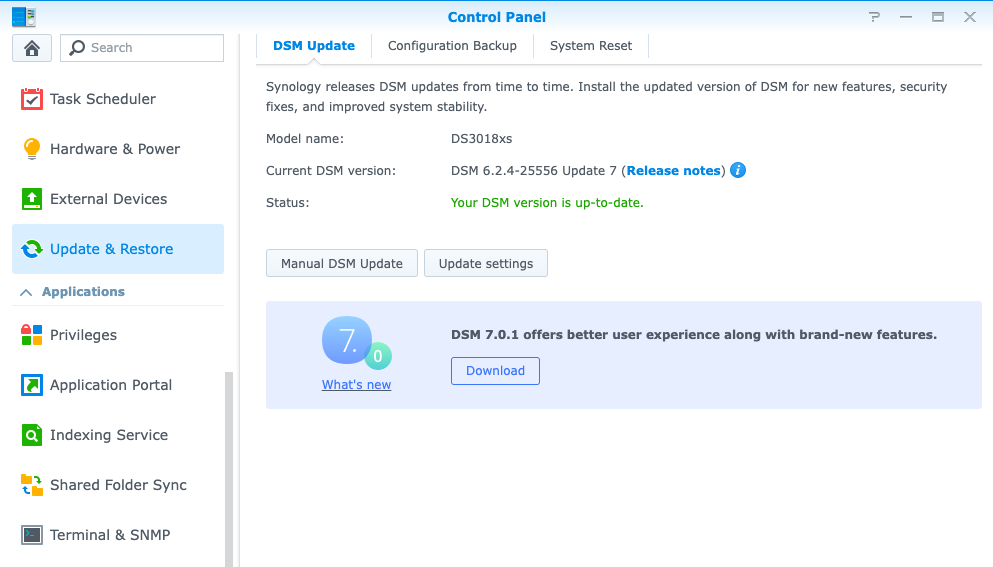
Taking Synology as an example. To update the DiskStation Manager (Sybology's OS), open DSM > Control Panel > Update & Restore, then click Download if a new update is available. To update the firmware, open DSM > Storage Manager, then click HDD/SSD > Action > Firmware Update.
Fix 4: Restart your backup drive and reconnect
You can also restart the NAS device (unplug it from power, wait for 10 seconds, then plug the power cord back.), your router, or simply disconnect the NAS from the router for a few seconds and then reconnect them to allow Time Machine backups to resume.
Fix 5: Change your network drive settings
If your network folder or drive, like Synology, failed to back up due to the error "The backup disk image could not be accessed (error 16/19/112)," try modifying the following settings:
- Disable AFP and enable time machine broadcast via SMB. Enable SMB2/SMB3, then reboot your NAS device and Mac and start Time Machine again. (On a Snology device: Open the Control Panel > File Services > Advanced > Bonjour, then turn on "Enable Bonjour discovery by SMB" (off by default). Also, select the "AFP" tab to dis-enable AFP. When retrying Time Machine, remember to choose the disk with the SMB path.)
- Disable the Recycle Bin.
- Make one folder for each Mac. Instead of having one shared folder for several Macs.
- Disable encryption or checksum when creating the shared folder.
- Turn the “Drive Sleep” option off in settings, if available.
- Set the Time Machine backup share to 100%.
Fix 6: Uninstall anti-virus
A good number of users were able to fix Time Machine error 16/19/112 by uninstalling third-party software Sophos. If you have any antivirus applications, security apps, or VPNs, uninstall them before retrying a Time Machine backup.
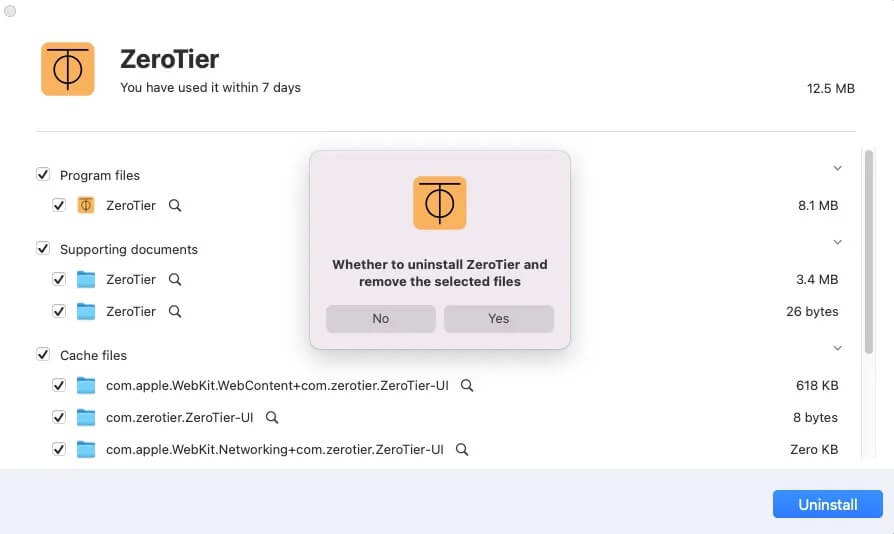
It's worth mentioning that simply deleting the app program from the Mac won't remove all traces of it. If you want to fully uninstall the app without digging through every possible folder where the app may save files, use iBoysoft MagicMenu.
It enables you to right-click the app in the Applications folder and select Uninstall to completely remove it from your Mac.
Fix 7: Restore to a previous backup
To fix the Time Machine error, you can also remove your backup disk as we mentioned in the beginning, restore to a snapshot taken before the most recent backup, and then re-add the disk or folder.
Note that this will replace your current system with a previous version. If you have data created after this backup, ensure to make a copy of it on another drive before proceeding.
- Connect your Time Machine backup drive to your Mac.
- Remove it from Time Machine.
- Restart your Mac and hold "Command + R" to enter Recovery Mode.
- Select "Restore From Time Machine Backup" in the macOS Utilities window.
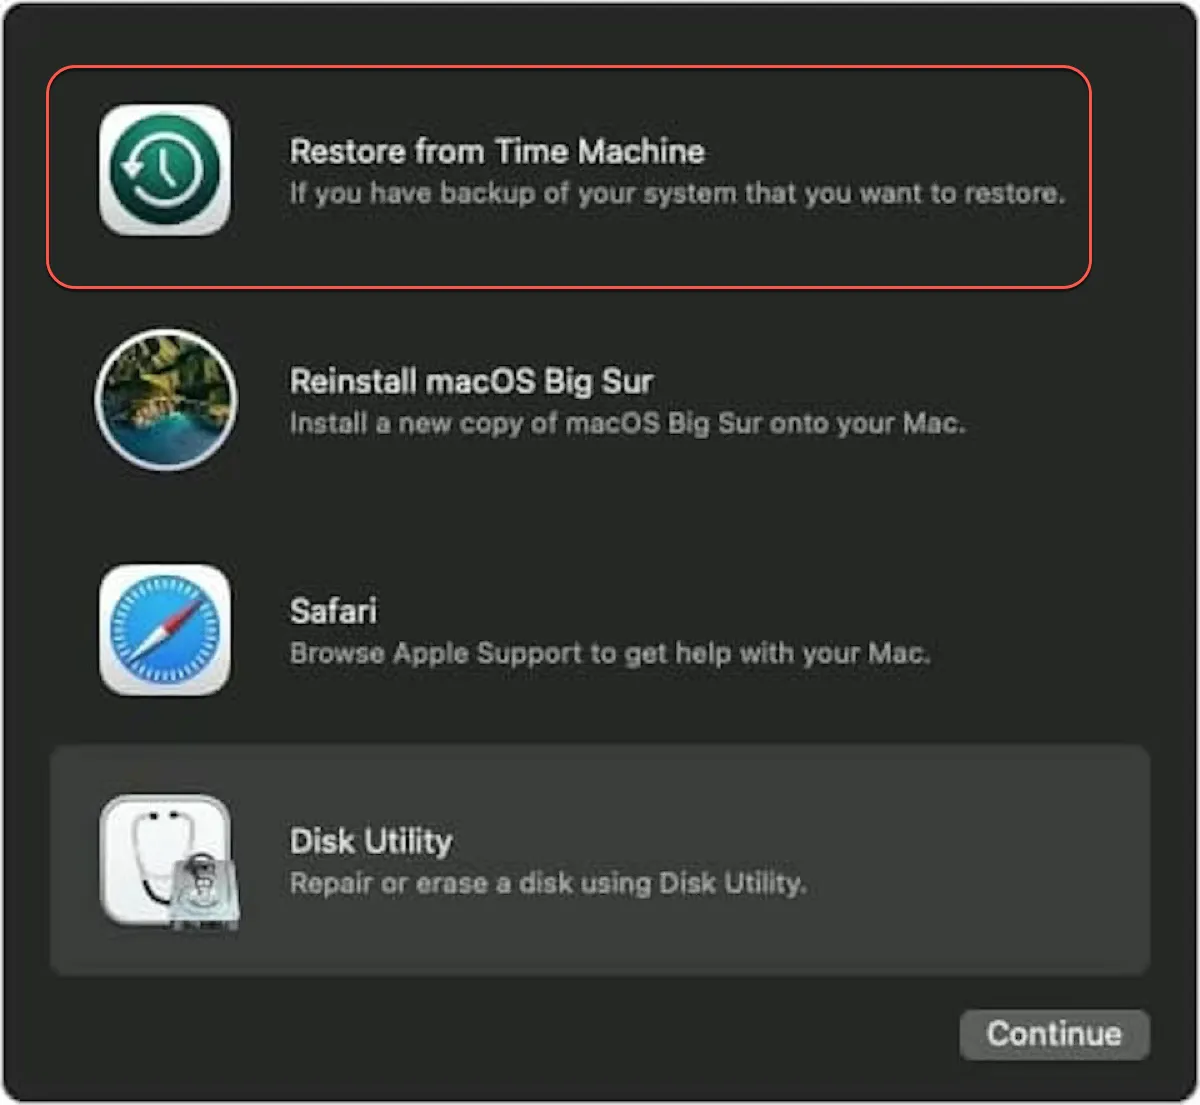
- Choose the backup source and date you want to restore from.
- Select the destination disk for the restoration.
- Wait for the restoration process to complete.
- Attempt to back up with Time Machine again.
Fix 8: Give Time Machine full disk access
Since the backup disk image can't be accessed, it may be helpful to ensure Time Machine has full disk access on your Mac. This way, it has unrestricted access to all files and folders on your system, except those on your exclusion list.
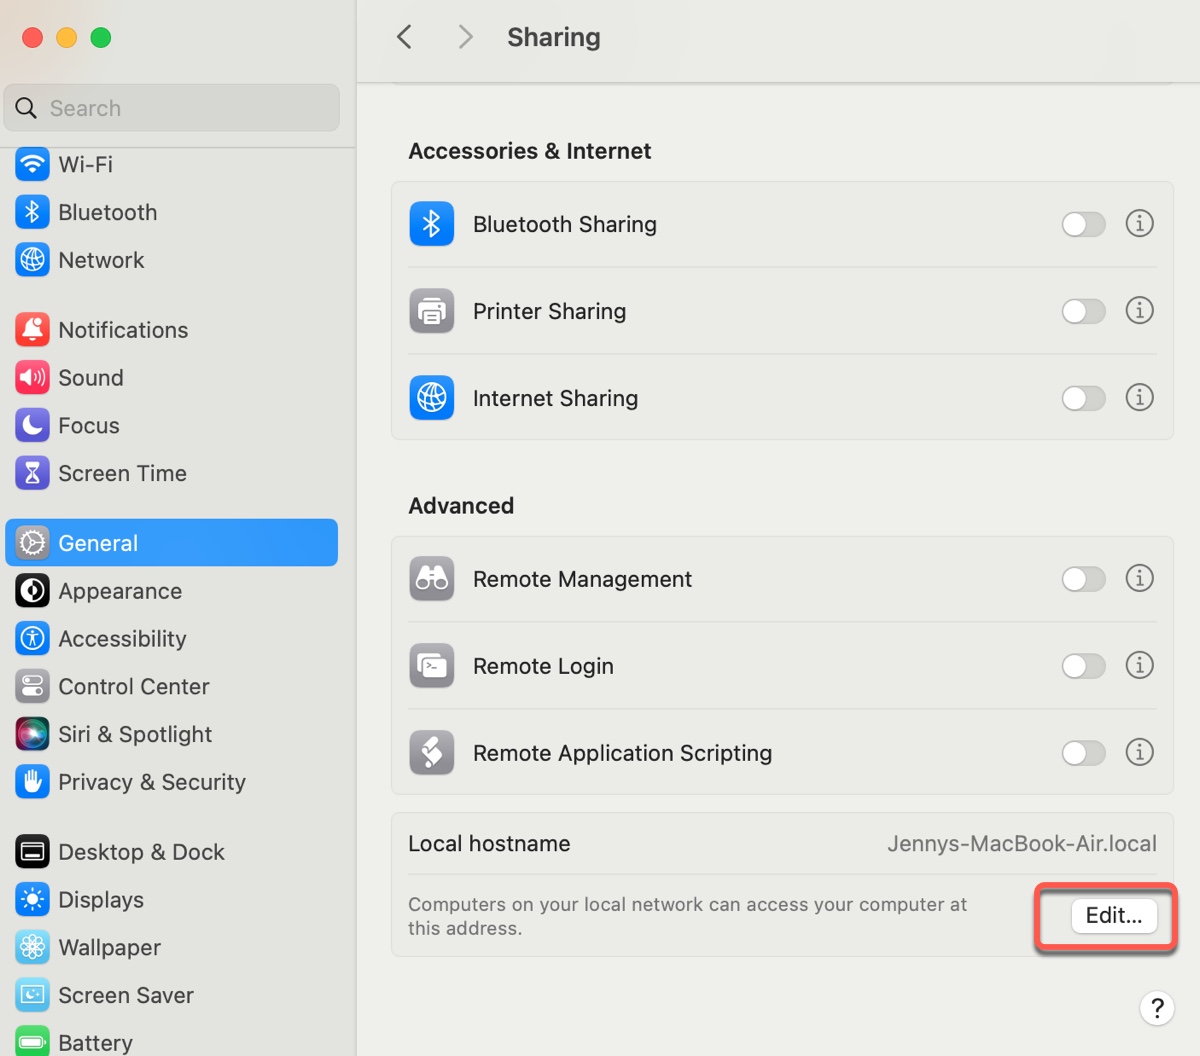
Fix 9: Rename your Mac's localhost name
This may sound irrelevant, but give it a try if you're still at a loss. Your Mac's local hostname is the name that appears on other devices on your local network. Here's how to change it:
On macOS Ventura or later:
Go to the Apple menu > System Settings > General > Sharing, then scroll down and click Edit in the "Local hostname" section, enter a new hostname, and click OK.
On macOS Monterey or earlier:
Go to the Apple menu > System Preferences > Sharing, unlock the preference, click Edit, then enter a new hostname and click OK.
Fix 10: Update macOS
A new macOS update typically includes security patches and bug fixes, which may solve the Time Machine error. If there's a new update available for your Mac, you can install it to see if it helps.
Fix 11: Erase the backup drive and restart
If Time Machine error 19/16/112 persists, consider erasing your backup disk or deleting the problematic shared folder, then setting up Time Machine again. Note that this will delete all the existing backups on your drive.
To erase or delete the Time Machine backup drive/folder, follow these steps:
On a network drive: You can open the management interface of your network drive, delete the offending network folder, and create a new one according to the tips we mentioned in Fix 5.
On a Time Capsule:
- Open Airport Utility.
- Click on the Time Capsule and select Edit
- Switch to the Disks tab at the top of the window.
- Click "Erase Disk."
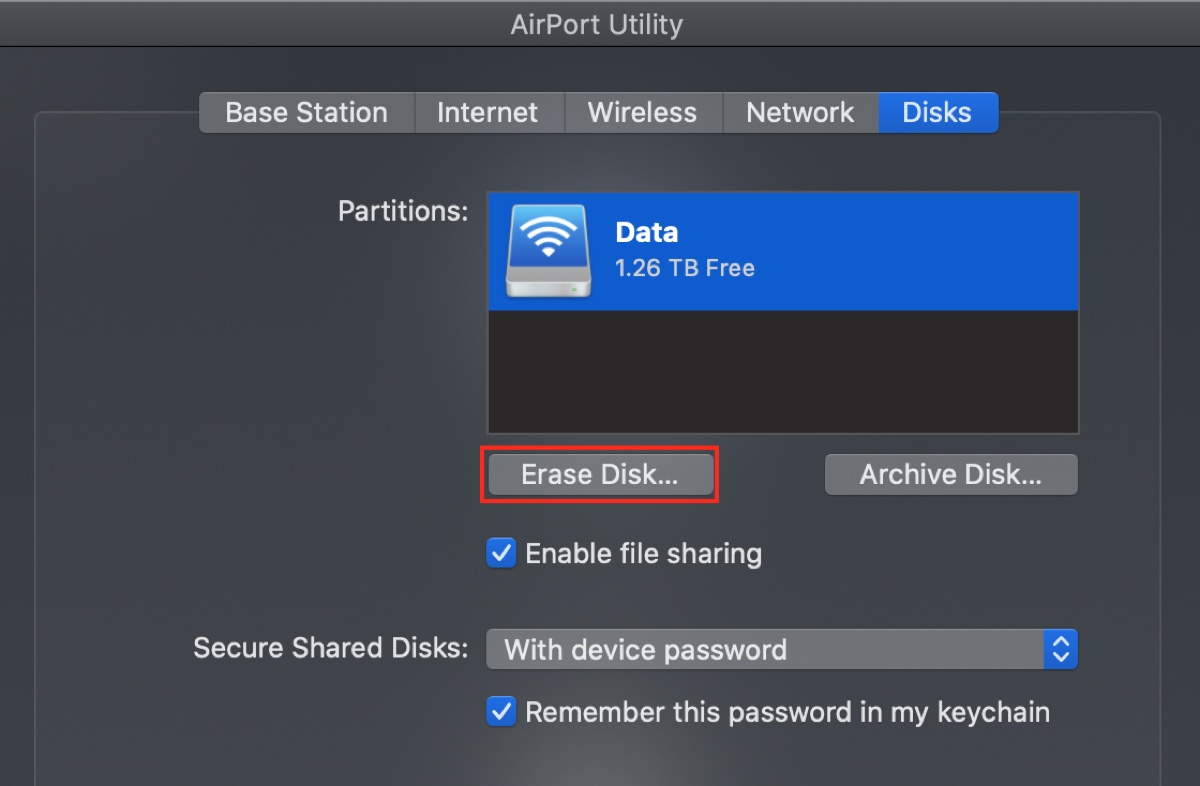
- Give it a name.
- Select the Quick Erase option if it is not already selected.
- Click Erase.
On a local disk:
- Open Disk Utility.
- Click View > Show All Devices.
- Select the physical disk of your backup drive and click Erase.
- Name the drive.
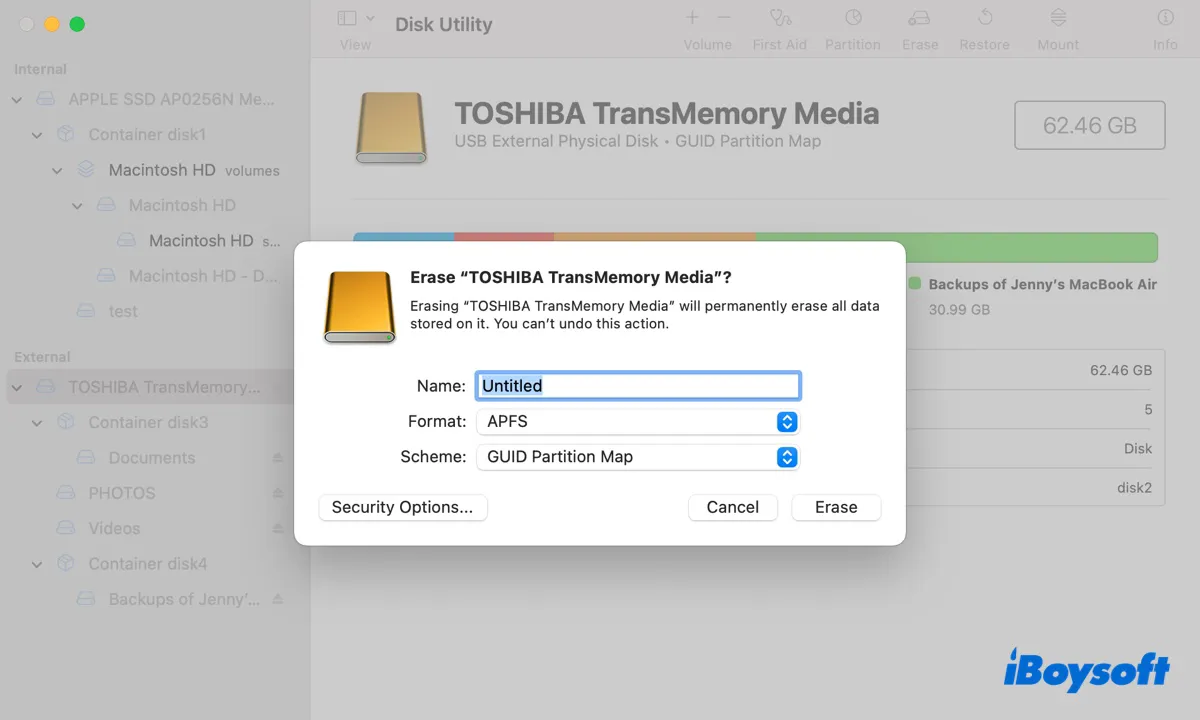
- Choose APFS if running macOS 11 Big Sur or later; otherwise, choose Mac OS Extended (Journaled).
- Click Erase.
Once the backup disk or folder is erased or recreated, reconfigure Time Machine for another journey.
Share this post to help others resolve “The backup disk image could not be accessed (error 16/19/112) on Synology and other drives. Learn more about "The backup disk image could not be created".