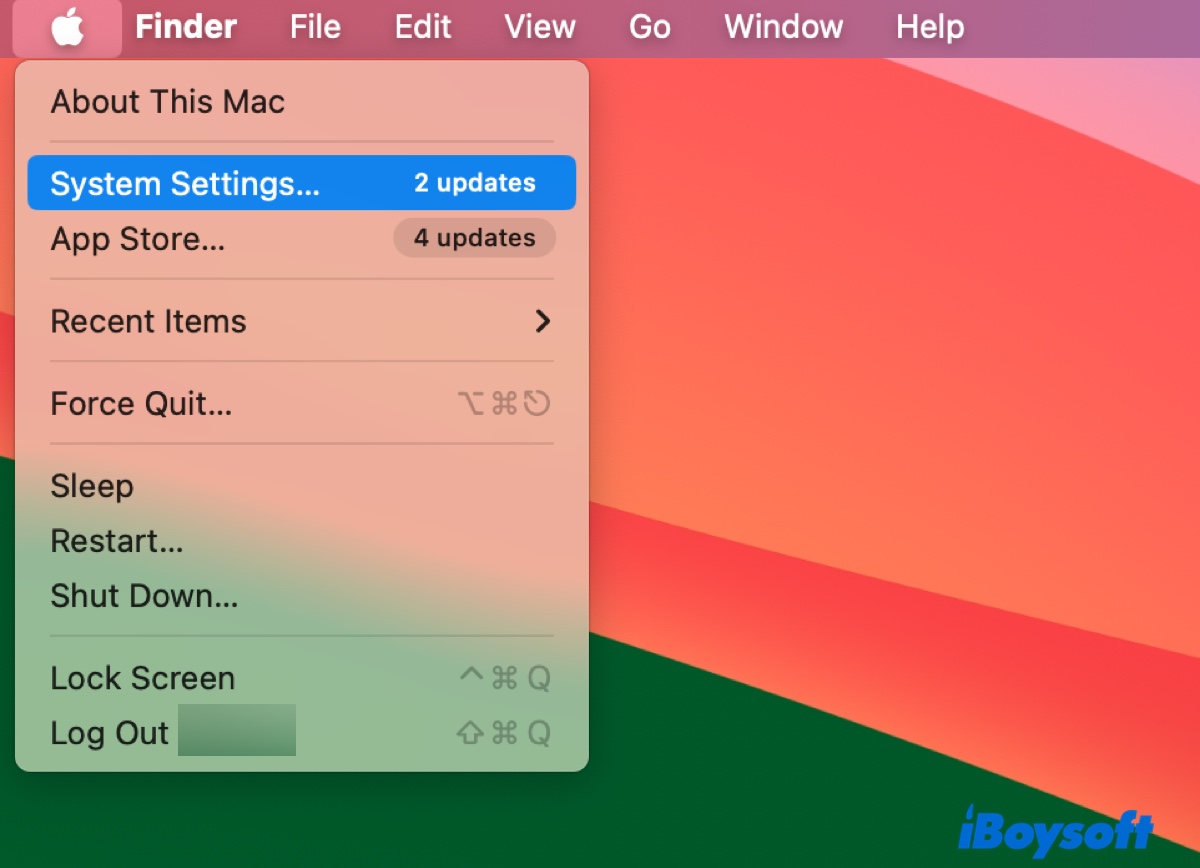
A few years back, I experienced a dreadful situation where I had to erase my Mac to get the system running - I was reinstalling macOS, but it kept failing and wouldn't boot up normally.
The erase removed all of my files, and I had to set up work-related apps from scratch. I was fortunate to get back the most important work files because a colleague had a backup, but I know I won't be this lucky the next time, and it's important to back up my Mac.
Over the years, I've tested different ways to secure data on my Mac, including back up my Mac to an external hard drive with Time Machine, clone the Mac with disk cloning software, save an image of folders in Disk Utility and copying files to the external drive directly.
Before backing up your Mac to an external hard drive
Warning: Note: If your Mac is crashing, freezing, or showing signs of disk failure, skip the cleanup phase and back up your critical files immediately to prevent data loss.
Before you back up your MacBook or desktop Mac to an external hard drive, I recommend you get rid of the junk files first. This can greatly reduce the time and space needed to make a full backup of your Mac and boost your Mac's performance.
Apart from the files you no longer need, many files are hidden from your eyes and are secretly cluttering your Mac. While you can manually hunt them down, it can take a lot of time and there's a chance you may accidentally delete files you shouldn't touch.
So, in terms of security and efficiency, I recommend using the disk manager iBoysoft DiskGeeker. This software can analyze your Mac hard drive and display all of its files in descending order by size, allowing you to easily spot large files you don't want to keep and permanently remove them. On top of that, it can scan your startup disk and find junk files like app cache files, log files, language files, trash files, downloads, etc for you to eliminate.
Follow these steps to optimize your Mac and prepare for a backup:
Step 1: Download and install iBoysoft DiskGeeker for Mac.
Step 2: Open the tool, select Macintosh HD - Data, and click one of the following options.
"Space Analyze": Analyze the selected disk and present files from largest to smallest.
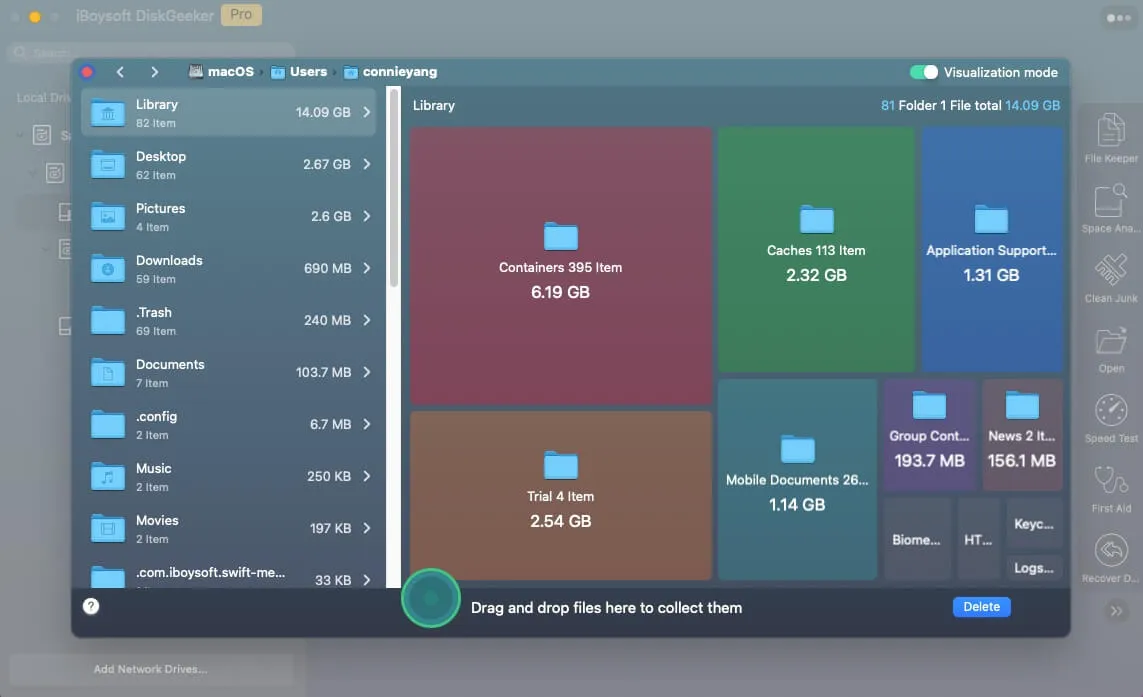
"Clean Junk": Discover junk files on the Mac's startup disk.
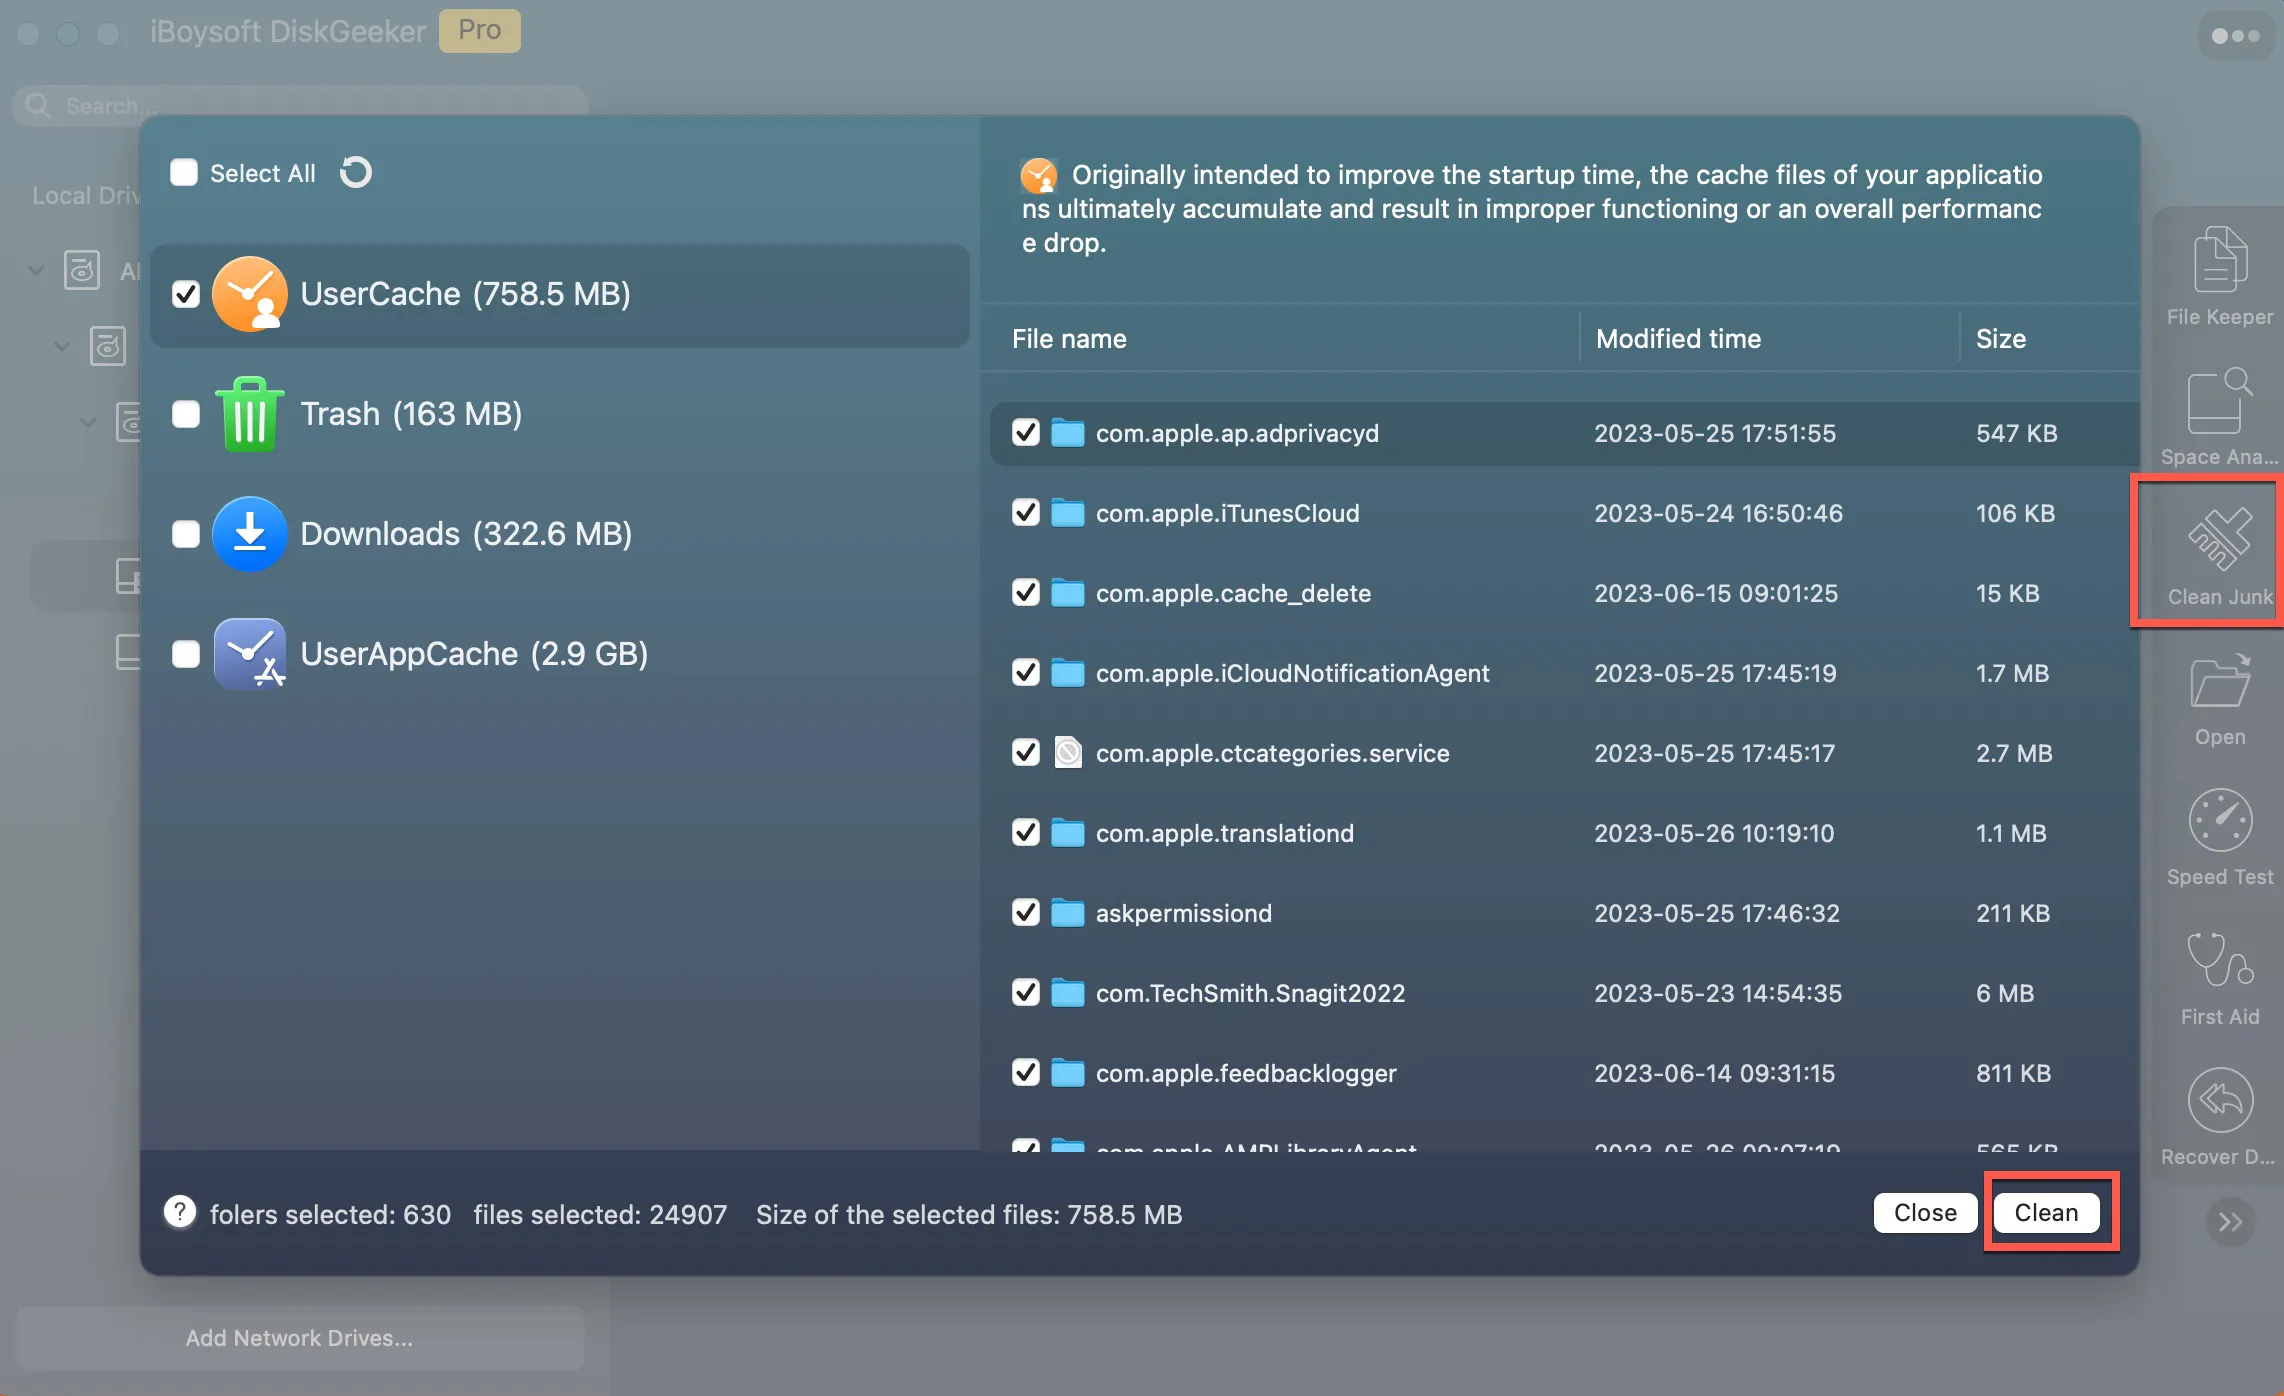
Step 3: Delete unwanted files.
Share the tool to help others prepare their Mac for a backup to an external hard drive.
How to back up Mac to external hard drive with Time Machine?
If you want to transfer all data from your Mac to an external drive, the built-in Time Machine is a good option. It's free and can back up almost everything on your Mac, including apps, music, photos, videos, emails, settings, documents, etc. You can also exclude files and folders you don't want to back up.
Tips: In macOS Big Sur (11.0) and later, macOS runs on a separate, read-only Signed System Volume (SSV). Time Machine does not back up those core OS system files directly, as Apple prefers to reinstall a clean OS image from macOS Recovery during a total restore.
In older macOS versions (Catalina 10.15 and earlier), Time Machine included system files as part of the backup image. But the backup drive itself is not bootable. You cannot select the Time Machine drive at startup to run macOS directly off of it.
On macOS Ventura and later, you can configure Time Machine to back up your Mac automatically every hour, day, or week. Previously, the automatic backups were solely managed by Time Machine, which makes hourly backups for the past day, daily backups for the past month, and weekly backups for all previous months.
It's worth mentioning that the first backup usually takes a long time but subsequent backups will be faster, as Time Machine makes a full backup first and then backs up only the changes made since the last backup. Fortunately, you can still use your Mac while the backup is ongoing.
From my experience, it's essential to get an external hard drive with at least twice the capacity of the Mac in case it runs out of storage soon. Also, start the backup in the evening to complete it overnight.
Warning: The external hard drive needs to be erased to use Time Machine. Ensure all the important files on it are transferred to another storage device.
Optional: You don't necessarily need to format your external drive manually. When you select your drive in Time Machine, macOS will automatically offer to erase and format it for you if needed. However, if you are reusing an old drive with existing files, or if you want to partition the drive for other data, erasing it manually via Disk Utility beforehand ensures a clean setup."
Follow these steps to format the external hard drive:
- Connect the external hard drive to your Mac.
- Open Finder and launch Disk Utility from the Applications folder.
- Click View > Show All Devices.
- Select the physical disk of the external drive and click Erase.
- Name your drive.
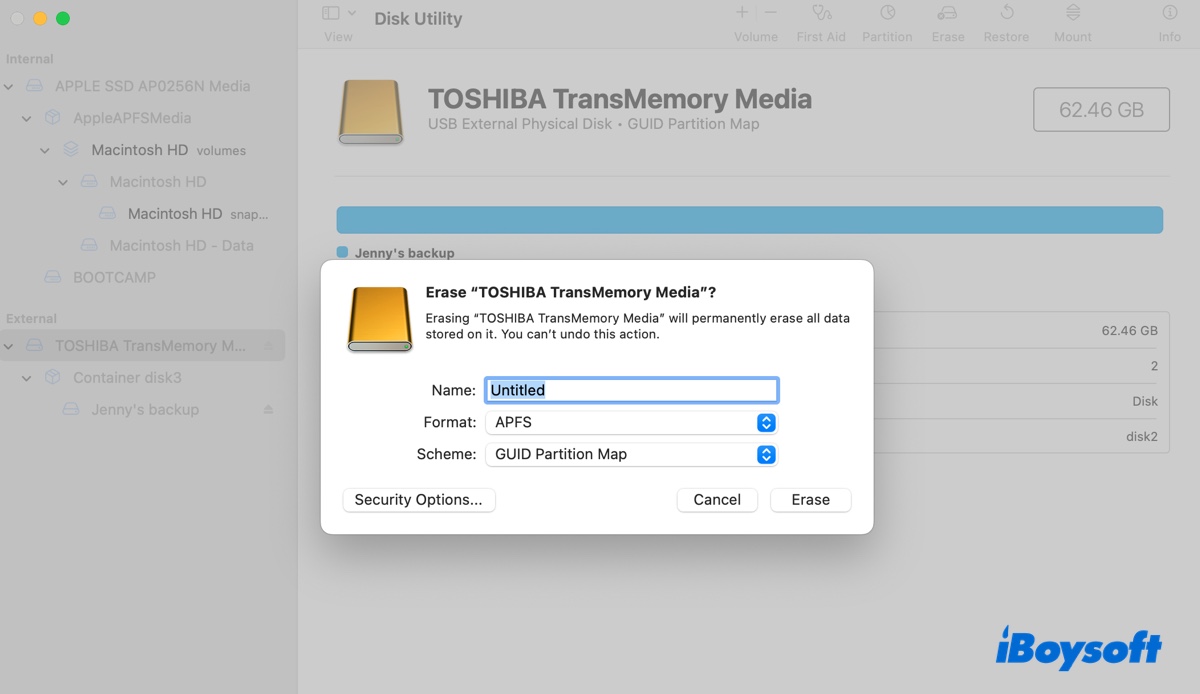
- Choose APFS as the format if running macOS Big Sur or later; otherwise, choose Mac OS Extended (Journaled).
- Keep GUID Partition Map as the scheme.
- Click Erase.
How to backup Mac with external hard drive via Time Machine:
- Open the Apple menu > System Settings > General and click Time Machine.
- Click "Add Backup Disk" or the Add button ( + ).
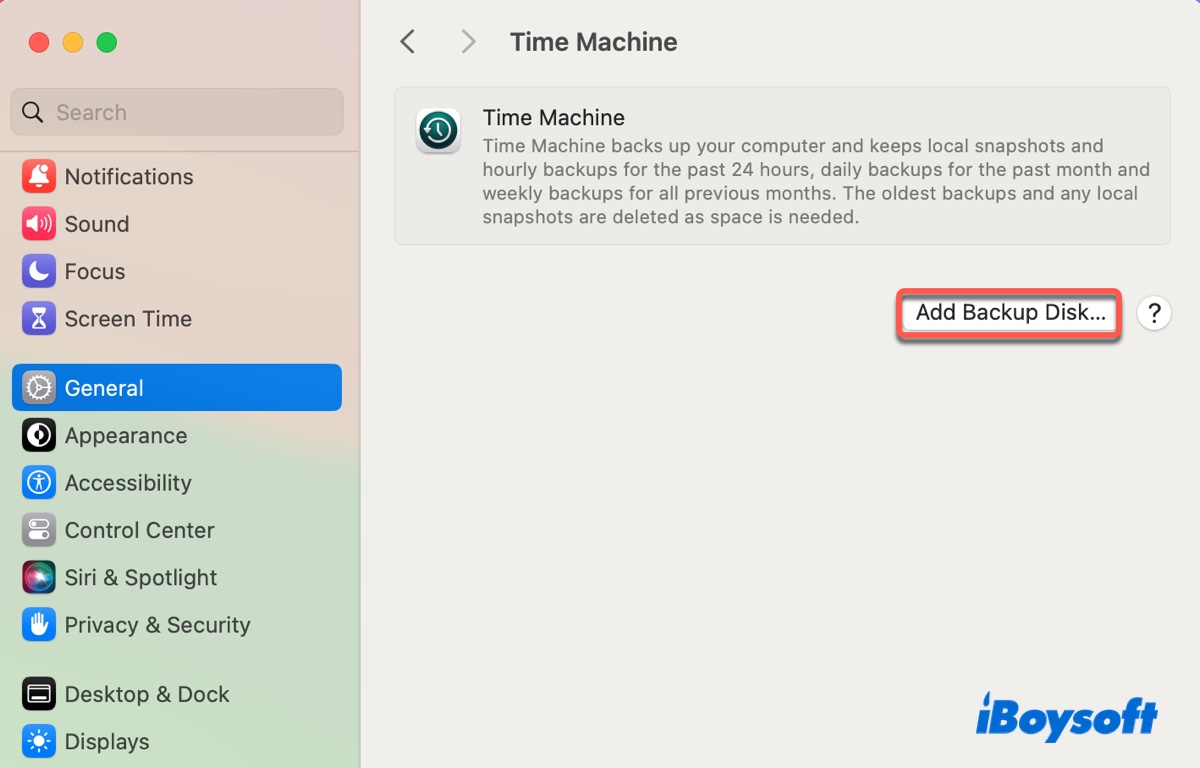
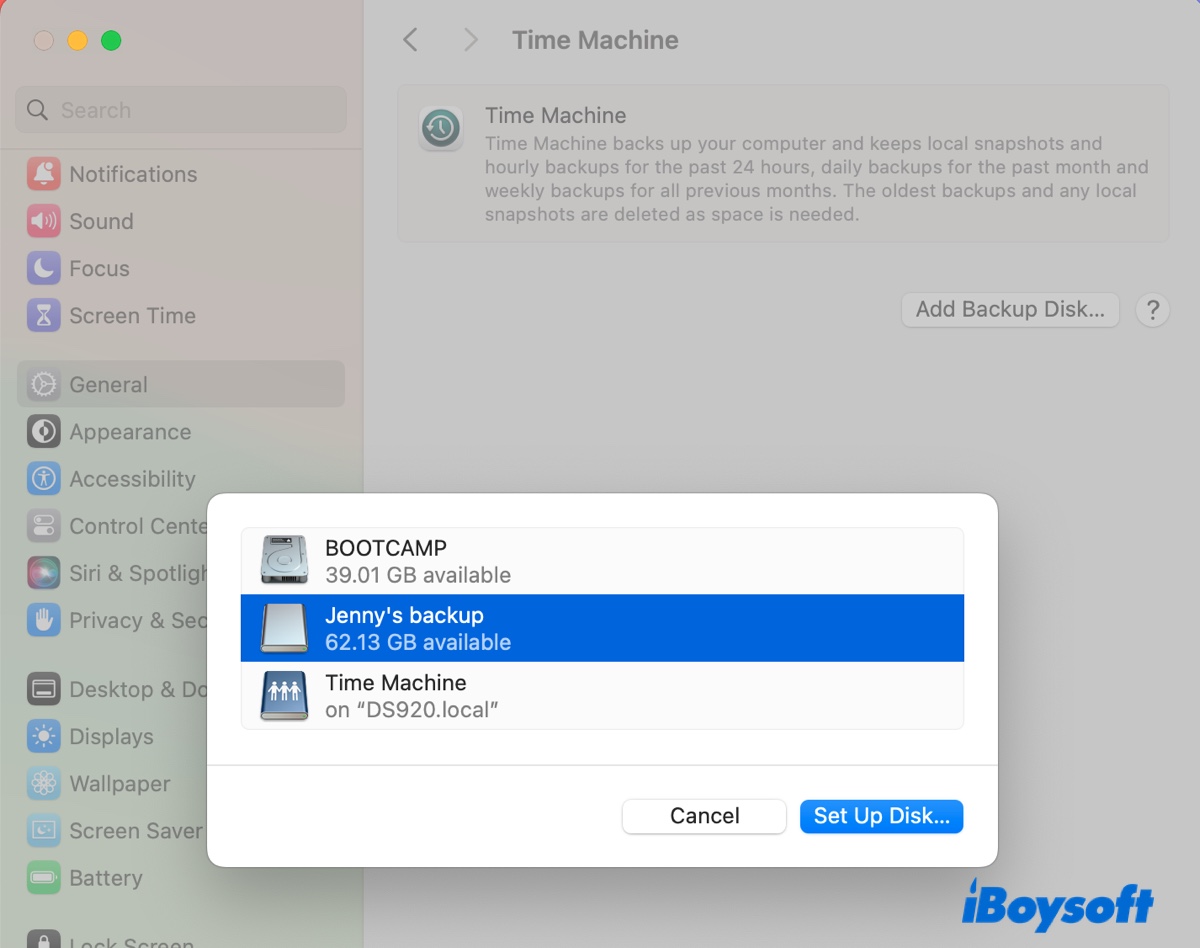
- Choose your external hard drive.
- Click "Set Up Disk."
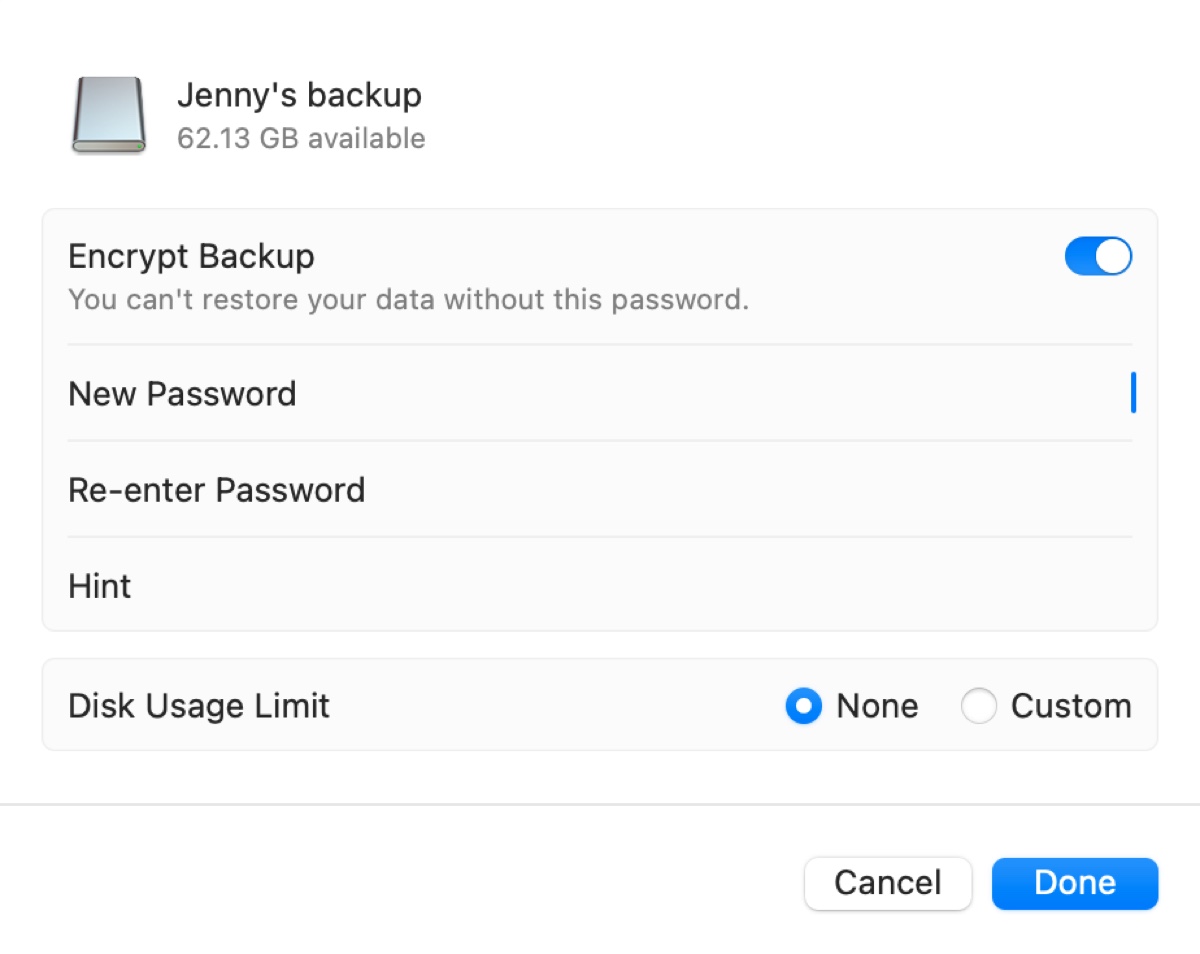
- Choose whether to encrypt the backups or set a disk usage limit and click Done.
- Wait while Time Machine is preparing the backup.
- Click Options.
- Choose the Backup Frequency.
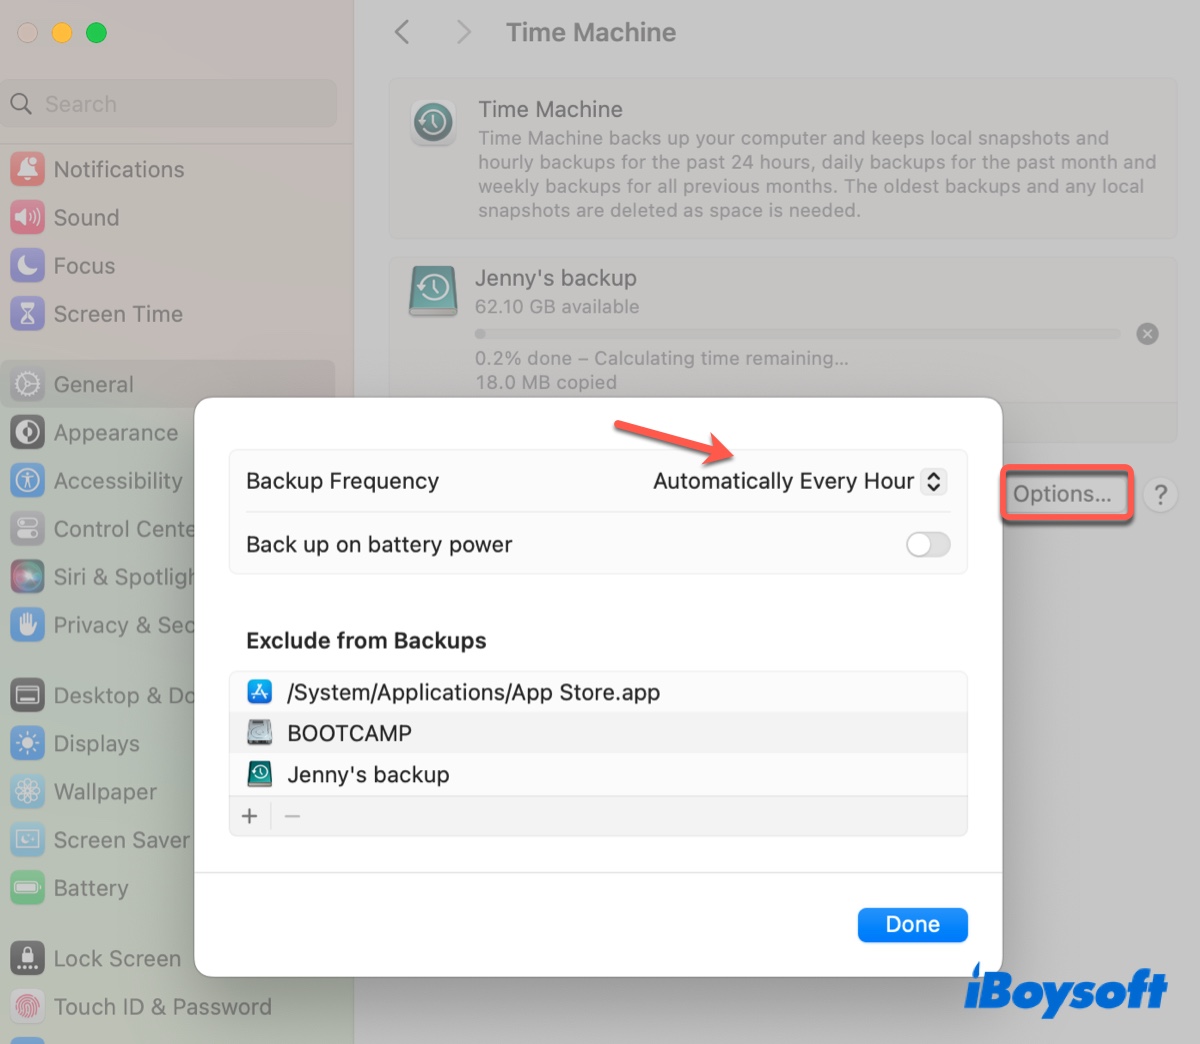
- Click the ( + ) button to add files you want to exclude from the backup and click Done.
- Time Machine will automatically back up your Mac and show you the progress and how much time it needs.
- After a successful backup, test if you can restore a selected file to an isolated location.
These steps for configuring Time Machine are geared towards macOS Ventura and later. If your Mac is running macOS Monterey or earlier, take the steps in this guide: A Time Machine Guide to Back Up and Restore Your Mac. It also explains how to restore Mac from the Time Machine backup on an external hard drive in three different situations.
Share this guide to help others backup Mac to an external hard drive!
How to back up Mac to external hard drive via Finder?
If you only need to protect specific documents, photos, or project folders rather than your entire Mac, you can manually copy them to your external hard drive using Finder.
⚠️ Important Reminders:
Copy, don't move: Always keep the original files on your Mac until you have verified the backup copy. Deleting the originals immediately means you only have one copy of your data—which is not a backup.
No automatic updates: Manual copies are static snapshots. They will not track file changes, save past versions, or automatically update over time.
Incomplete coverage: This method only saves the files you manually select. It does not back up macOS settings, applications, or system data.
After the file is copied to the external drive, open it to verify access.
How to backup Mac with external hard drive by cloning Mac hard drive?
Instead of backing up the files, cloning the internal hard drive of your Mac may be a better choice if you want an exact copy of the Mac hard drive. This drive duplicate can be useful when you need to restore files, copy content on the internal hard drive to another disk, or keep your drive intact for data recovery.
I'll show you how to use the disk management tool iBoysoft DiskGeeker to make a bit-by-bit clone of your Mac hard drive. This software usually performs the backup faster than Time Machine.
Ensure your external hard drive has more capacity than your internal hard drive, or the destination partition has more capacity than the target partition. Besides, make sure its files are backed up because the cloning process will erase the destination external drive.
Here's how to clone a MacBook hard drive:
Step 1: Download and install iBoysoft DiskGeeker.
Step 2: Select your Mac hard drive and click Start next to Clone.
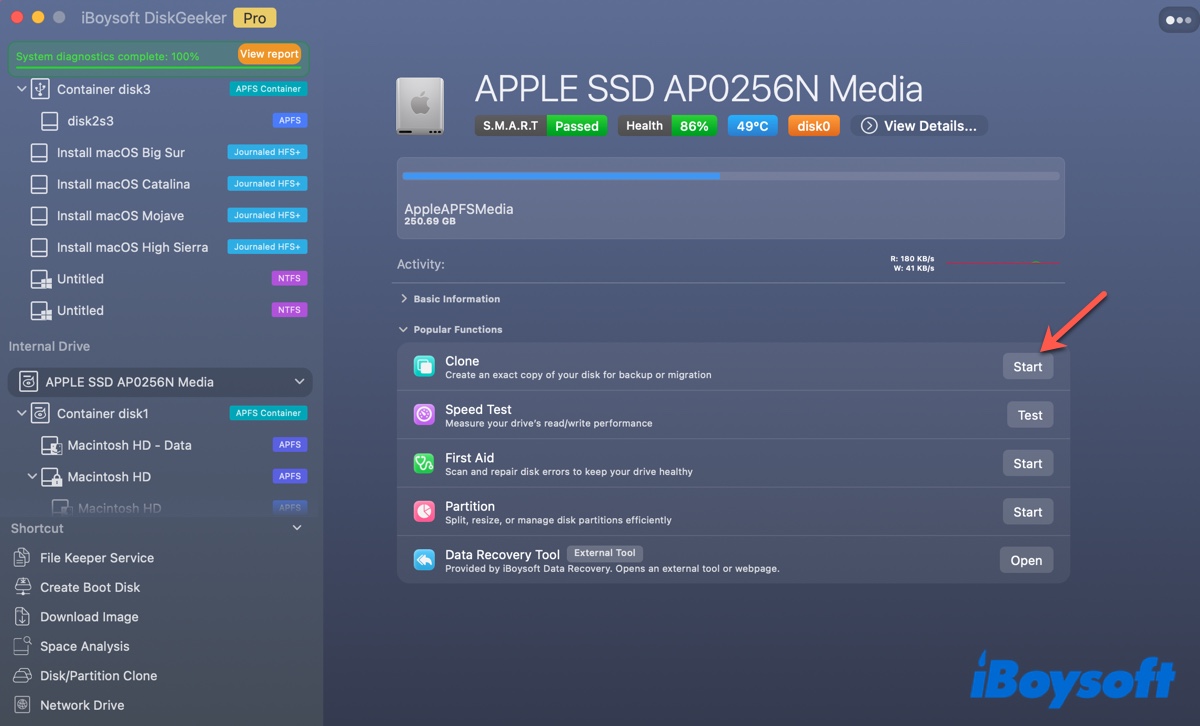
Step 3: Select the destination external drive and click "Start Cloning."
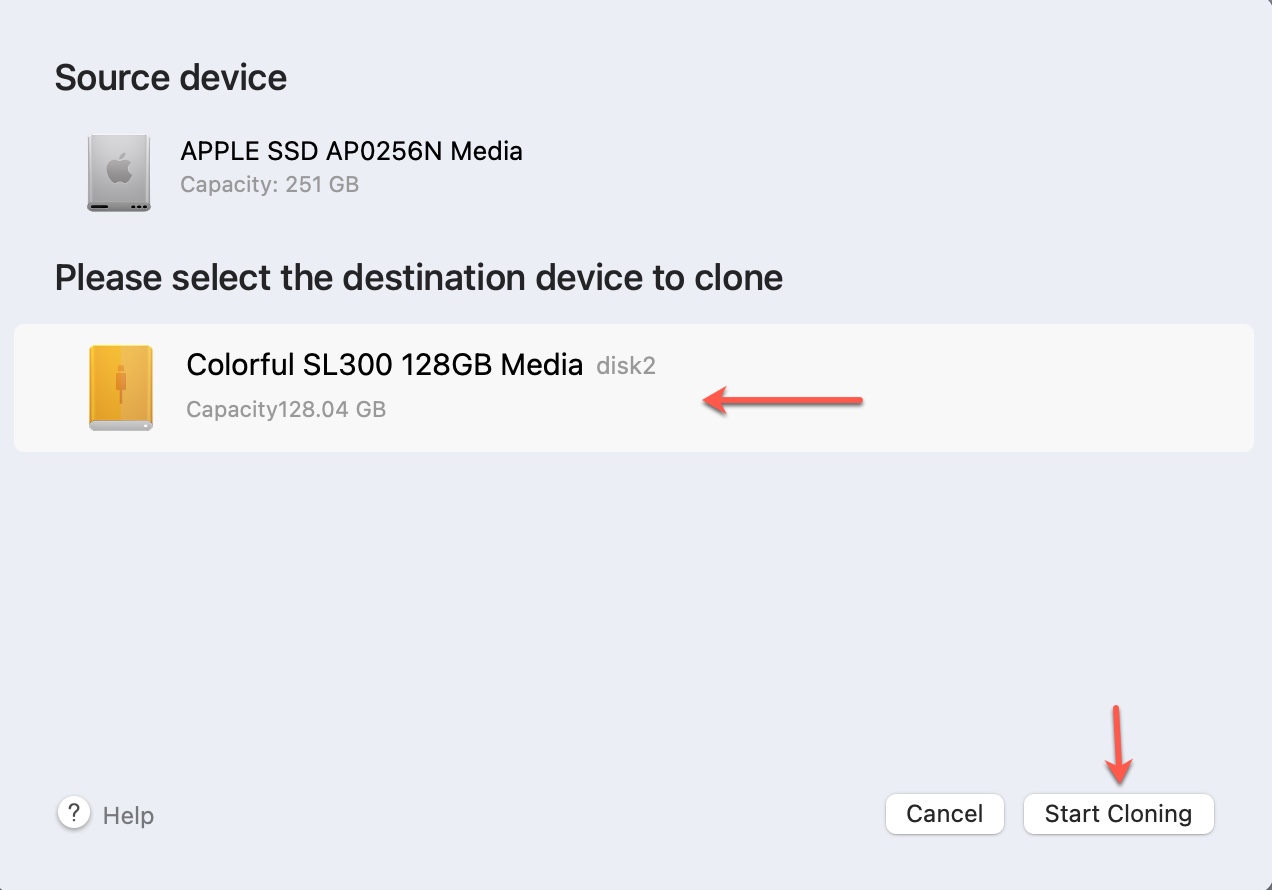
Step 4: Click OK when a message says, "Cloning the drive will overwrite data on the target disk."
After the clone is complete, check the files on the destination drive.
Help others learn how to duplicate hard drive on Mac to back it up to an external hard drive by sharing this guide!
How to back up Mac to external hard drive using Disk Utility?
If you want to back up some folders on your Mac to an external hard drive without erasing the drive, you can create a disk image using Disk Utility. This image can be compressed to reduce file size or encrypted to protect your privacy.
How to backup MacBook to external hard drive without erasing:
- Open Disk Utility.
- Select File > New Image > Image from Folder.
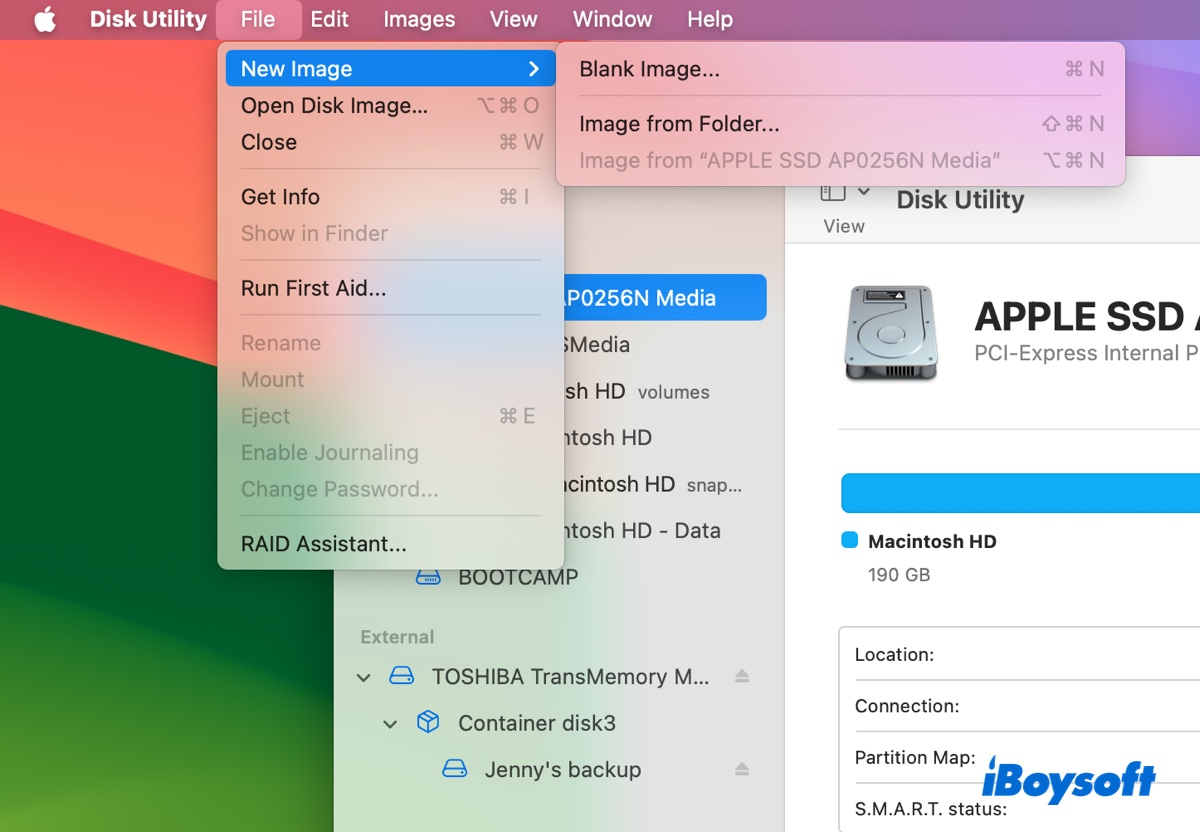
- Select the folder you want to back up and click Choose.
- Name the disk image and choose your external drive as the save location.
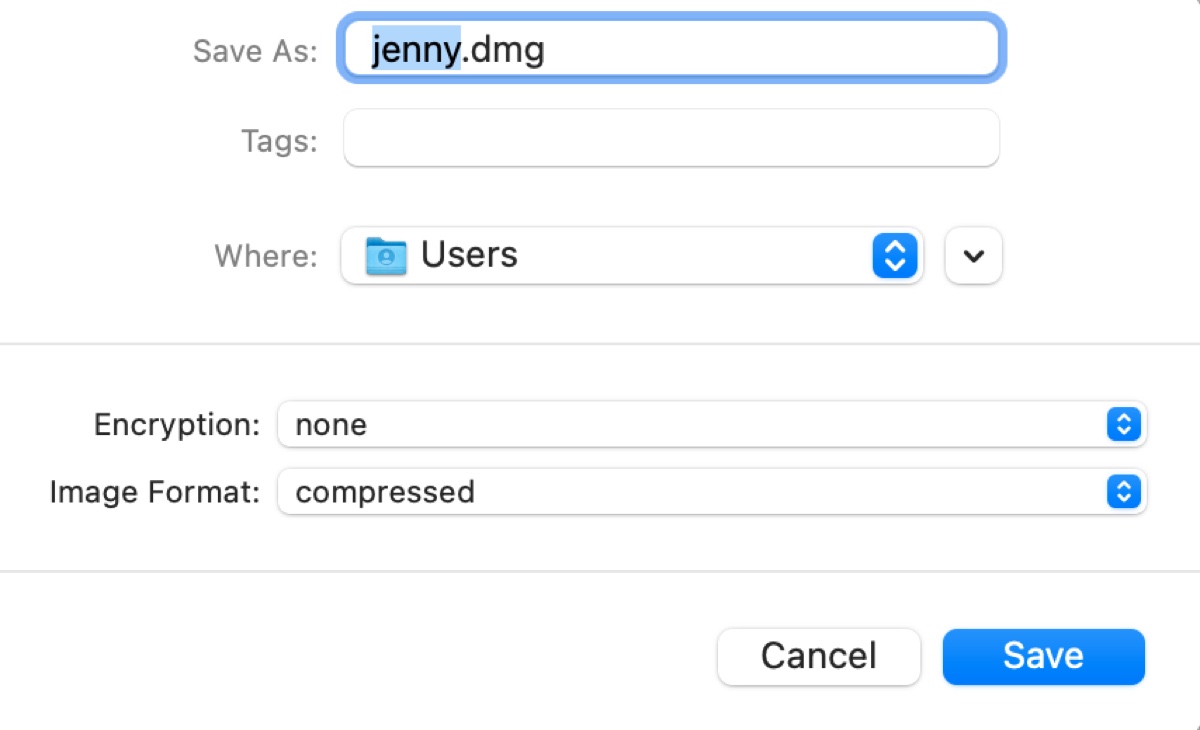
- Choose an encryption method and enter the password if you want.
- Decide the format for the disk image. Choose Compressed if you want to save space; choose Read Only if you need to view but not modify the backup; choose Read/Write if you need to modify the backup.
- Click Save.
- Mount the image to check the content.
These are the ways to backup Mac on external hard drive without Time Machine. Share this post if you find it useful!
Alternative: Back up Mac to iCloud
Alternatively, you can back up your Mac to a cloud-based service like iCloud. This has the benefit of syncing your files across different Apple devices that are logged in with the same Apple ID. But you'll also need to deal with the pain that deleting a file on your Mac will remove it from other devices as well.
Therefore, a cloud sync can't replace a full-system disk clone or a local external backup. It's only recommended for cross-device accessibility, seamless continuity, or local storage optimization.
By default, Apple offers 5 GB of iCloud storage for free, but you'll need to upgrade to back up the entire Mac. To back up your Mac with iCloud, take these steps:
- Go to System Settings/Preferences.
- Click your Apple ID and open iCloud.
- Sign in to your iCloud account if you haven't yet.
- Enable iCloud for your apps, such as Photos, Contacts, Calendars, Reminders, Notes, etc.
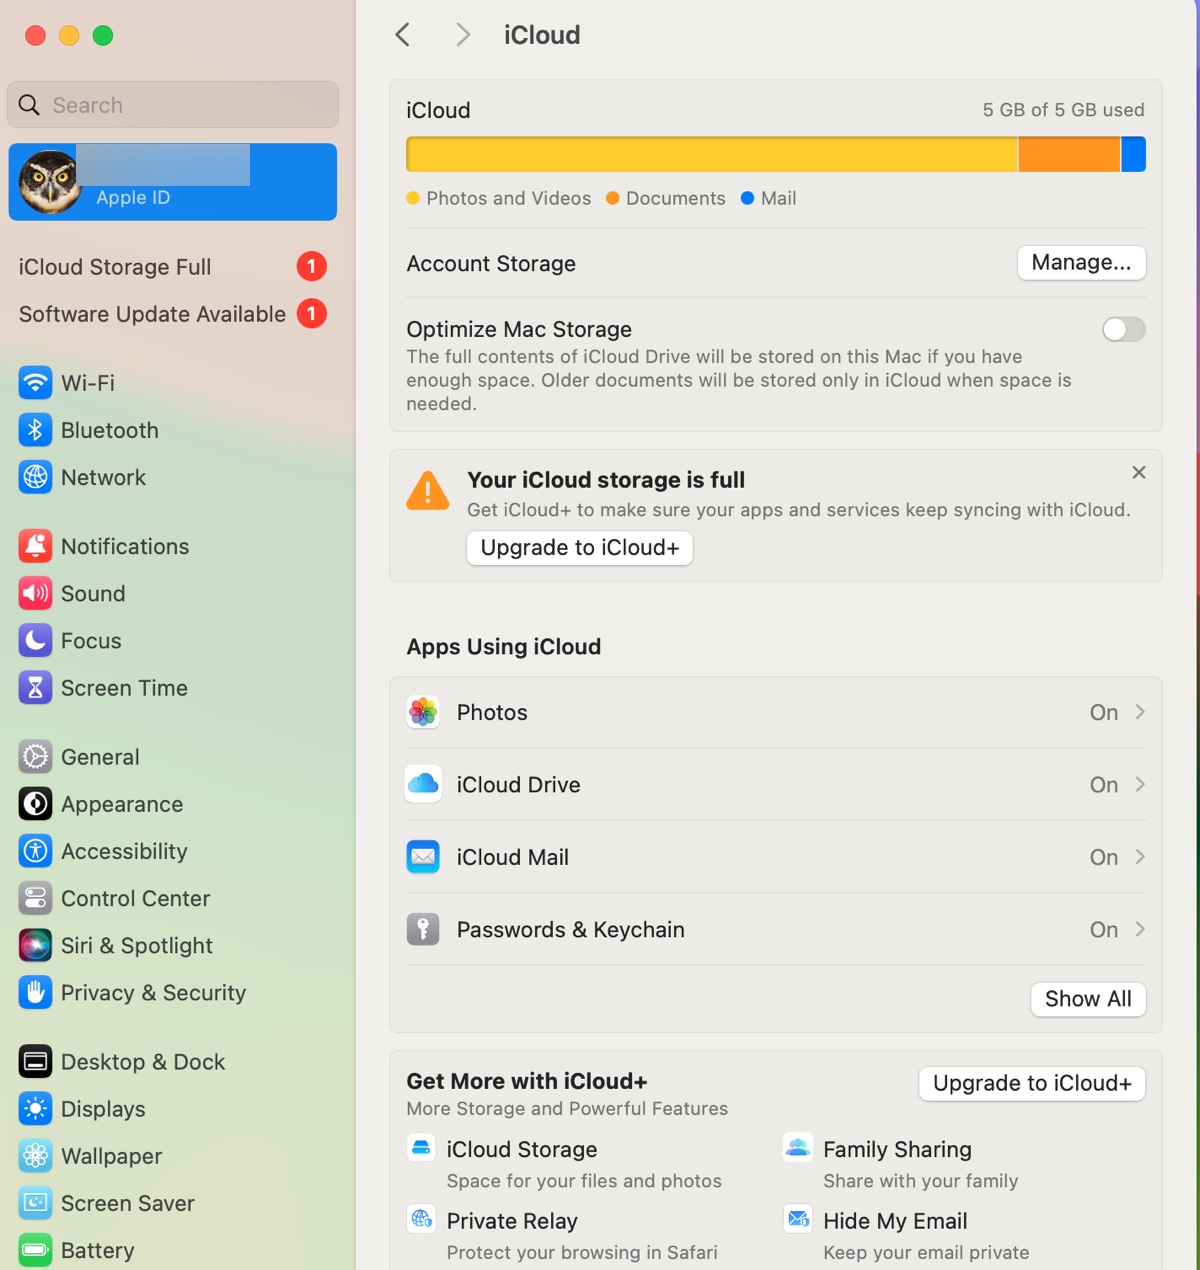
- Click "iCloud Drive" on macOS Ventura or later, or click the Options button next to "iCloud Drive" on macOS Monterey or earlier.
- Choose apps that can store documents and data in iCloud and turn on iCloud for Desktop & Documents Folders.
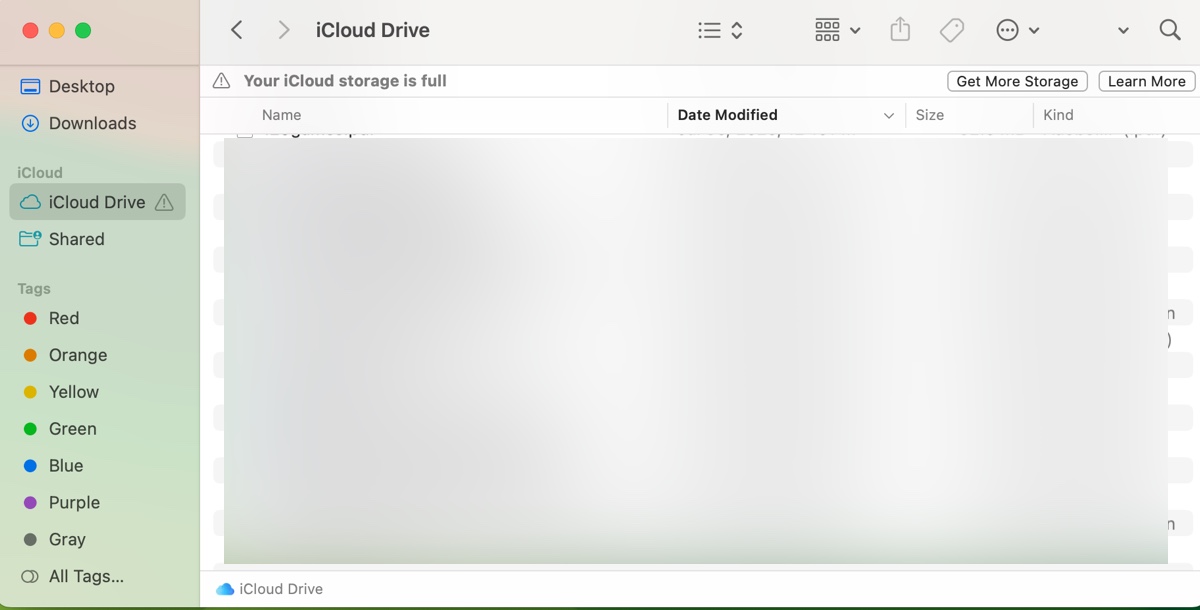
- To access iCloud, open Finder and click iCloud Drive from the left sidebar. You can also drag and drop files to this folder to save them to iCloud.
Share this post if you find it helpful!
Common backup issues on Mac
| Issue / State | What to check first | When to stop immediately | Next Step |
|---|---|---|---|
| Drive Not Showing Up | Open Disk Utility (Cmd + Space) and select View → Show All Devices to see if the hardware is detected. | Stop and unplug if the drive makes clicking/grinding noises or freezes Disk Utility. | External Drive Not Showing Up Guidance |
| Insufficient Storage | Compare your Mac's actual used storage (Apple Menu → System Settings → General → Storage) against the available free space on your external drive. Your external drive should ideally be at least 2x larger than the total data you want to back up. | Stop before manually deleting files inside .backupbundle folders (corrupts backups). | Delete Old Time Machine Backups or other unnecessary files |
| NTFS (Read-Only) | Right-click drive → Get Info → check Format. NTFS cannot be written to on Mac without third-party drivers. | Stop if the drive contains unbacked-up files—reformatting will erase all existing data. | Employ an NTFS for Mac driver or reformat the drive |
| Unexpected Disconnection | Check Notification Center for "Disk Not Ejected Properly" and inspect cable, hub, and port connections. | Stop using the drive if backups repeatedly freeze at the exact same percentage mark. | Try a different drive if changing hubs, ports or cables doesn't work |
FAQs
- QHow to backup MacBook to external hard drive without Time Machine?
-
A
Although Apple's Time Machine is the standard way to create a backup, it may sometimes fail or may not be the best way to back up your Mac. To backup your Mac to an external hard drive without Time Machine, copy the files to the external drive, create an image of the folder in Disk Utility, or make a clone of the internal drive.
- QCan I use one external hard drive for both Time Machine and general file storage?
-
A
Yes. You can partition your external drive into two separate volumes using Disk Utility. Then dedicate one volume to Time Machine and use the other for manual file storage (like movies, photos, or raw project files).
- QHow do I copy all data from my Mac to an external hard drive?
-
A
1. Use Time Machine as shown above. It saves all user data, applications, settings, and file structures automatically.
2. Clone your Mac to an external hard drive with iBoysoft DiskGeeker.
- QHow to set up an external hard drive as a backup on a Mac?
-
A
Plug in your external drive, open System Settings > General > Time Machine, click Add ( + ), select your drive, and click Set Up Disk. macOS will automatically format it to APFS if needed and start backing up.