Apple has released the new macOS -- macOS Sonoma for quite a while. However, some Mac users have complained online that there are no files or documents left on their computers after the new macOS is installed. Through further investigation, we found that this problem not only happened to macOS Sonoma updates but also to earlier macOS versions like macOS Ventura, macOS Monterey, macOS Big Sur, macOS Catalina, etc.
Facing the issue that Mac update deleted everything, you'd better try solutions to bring all your files and documents back for data loss is serve and immeasurable. Read on to learn how to recover lost files after a Mac update deleted everything.
| How to recover lost files after the macOS update | Steps |
| Check all files on Mac through Go To Folder | 1. Launch Finder and select Go for choosing Go To Folder. 2. Type in a file path/name/format to locate the file you want to access. |
| Utilize iBoysoft Data Recovery Software | 1. Download and install iBoysoft Data Recovery Software on your Mac. 3. Select the drive you lost files and begin the disk scanning process. 3. Check the scanned results to see if they are intact and well by clicking Preview. 4. Recover the desired files to your Mac by clicking Recover and save them well. |
| Recover lost files via the Time Machine backup | 1. Connect the Time Machine backup drive to your Mac (if you have one). 2. Launch Time machine on your computer. 3. Click the up and down arrow to locate the files you want to restore. 4. Click the Restore to recover the files straightforwardly. |
| Restore all fine with iCloud backup | 1. Go to iCloud.com in your Mac browser. 2. Log into iCloud with your Apple ID account and click Sign in. 3. Switch to the Settings tab and select the Advanced tab to click Restore Files. 5. Select the files you want and click Select All to restore them. |
| Log into another administrator account | 1. Click the Apple menu on your Mac and select Log Out. 2. Login with your previous administrator account to check if the files are still there. If they are, save them well. |
| Recover lost data from APFS Snapshot | 1. Restart your Mac and boot into macOS Recovery mode. 2. Select Restore From Time Machine Backup from the macOS Utilities and then tap Continue. 3. Select the disk that contains the snapshot (the startup disk) and click Continue. 4. Choose a local snapshot you want to restore and click Continue. 5. Click Continue if asked whether to restore from the selected snapshot or not. 6. The restoration process begins and wait it to end. |
| Ask a data recovery pro to restore your files | Contact the Apple support either by giving a call or sending an email. |
Will updating my Mac delete everything?
Some Mac users are curious about whether updating the Mac deletes everything, including the installed applications, associated files, caches, user settings, etc. To say it clearly, Mac will not delete everything when updating, no matter if it is a major update or a minor update.
macOS update means that your Mac welcomes some new features and bug fixes, but it has nothing to do with the personal files accumulated and stored on your computer.
If you find that your Mac is blank with nothing left but a new operating system and built-in apps coming with it, the contributing reasons may be the following:
- Unsuccessful or interrupted macOS installation
- Not enough space for the Mac to store missing files
- Irregular Mac operating system upgrade
- Untrusted macOS download from a shady or third-party website
- Simple data deletion of loss during the update process
- An internal hard drive format/erase before the macOS update
No matter what possible reason causes you to lose files, let's put the culprits aside for a moment, now we should focus on how to recover everything lost in the macOS update on your Mac.
If you think this article is informative, share it with more people on your social platform!
Mac Update Deleted Everything: How to Recover Lost Data?
This article will walk you through 7 comprehensive methods for recovering lost data after a Mac update deleted everything, and each one is elucidated with step-wise guidelines. You can get a quick overview here in advance:
- Check all folders on Mac through Go To Folder
- Utilize iBoysoft Data Recovery Software
- Recover lost files and documents via Time Machine backup
- Restore all files on your Mac with iCloud backup
- Log into a different administrator account to restore the missing files
- Recover lost data from APFS Snapshot
- Recover lost data by asking for a data recovery pro
Don't be freaked out the the listed solutions as they aren't as complex as you imagine, moreover, each solution is elaborated on in detail. Just continue reading to try one or more solutions for restoring all of your files and documents.
Solution 1: Check all files on Mac through Go To Folder
Sometimes, the scenario that all Mac desktop icons disappeared or desktop files disappeared on Macdisappear happens to you all of a sudden. At this time, it is preferable to check all files and folders before recovering data. The method of accessing the Go To Folder of Finder allows you to overview all files and folders on your computer with ease.
- Launch Finder by clicking it in the bottom menu bar.
- Select the Go menu and choose Go To Folder from the dropdown menu.
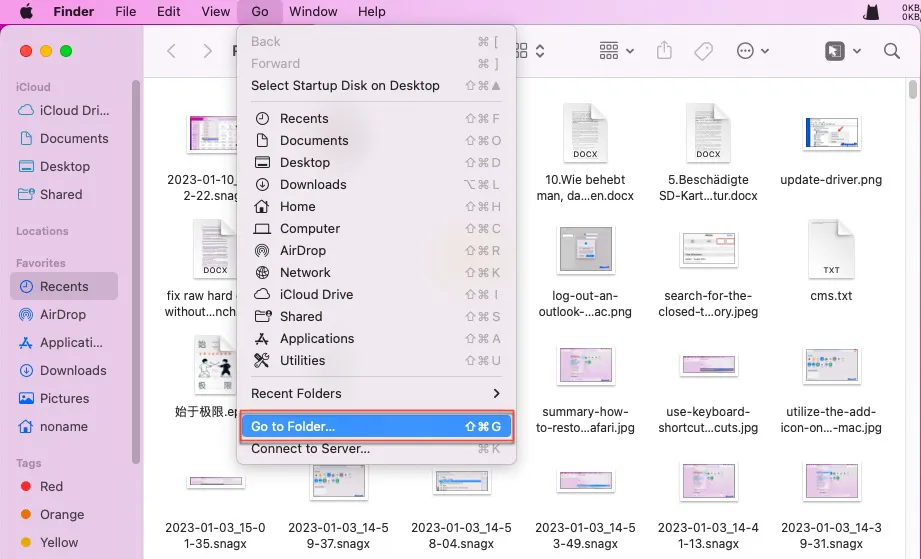
- Start typing the folder's pathname (for example, /Library/Fonts/ or ~/Pictures/) as best you can.
- Double-click the file or folder you want to open.
If you don't find the file that you want, you can take steps to recover data then.
Solution 2: Utilize iBoysoft Data Recovery Software
iBoysoft Data Recovery Software is highly recommended because it is the easiest and most effective way to recover deleted files and documents from your Mac. You can carry out the lost data recovery work within several steps.
iBoysoft Data Recovery Software is designed with outstanding disk scan and data recovery algorithms. It is to recover your files with a higher success rate. You can use it to recover disappearing, missing, deleted, or lost files from inaccessible, unreadable, formatted, corrupted, and almost failing hard drives.
Plus, the data recovery work should be performed as quickly as possible or the longer time it wastes, the lower the data recovery success rate is. Once you find there are no personal files/folders/apps/documents/settings left, hurry to utilize iBoysoft Data Recovery Software to start a thorough disk scanning!
Best Mac Deleted File Recovery Software - iBoysoft Data Recovery for Mac
- Recover deleted photos, documents, audio files, MST files, FLV files, emails, Sketch files, PPTs, etc.
- Recover deleted files from HDD, SSD, flash drives, SD cards, external hard drives, etc.
- Support APFS, HFS+, exFAT & FAT32 formatted drives.
- Intel-based Macs & Apple Silicon Macs are supported.
- macOS 13 -- macOS 10.11 are supported.
- Technical support is available by email
Read-only & risk-free
With an intuitive interface, you will never get confused about how to recover your files and documents with it:
- Free download and install iBoysoft Data Recovery Software to your Mac computer.
- Launch this software and then select the volume where you lost files.
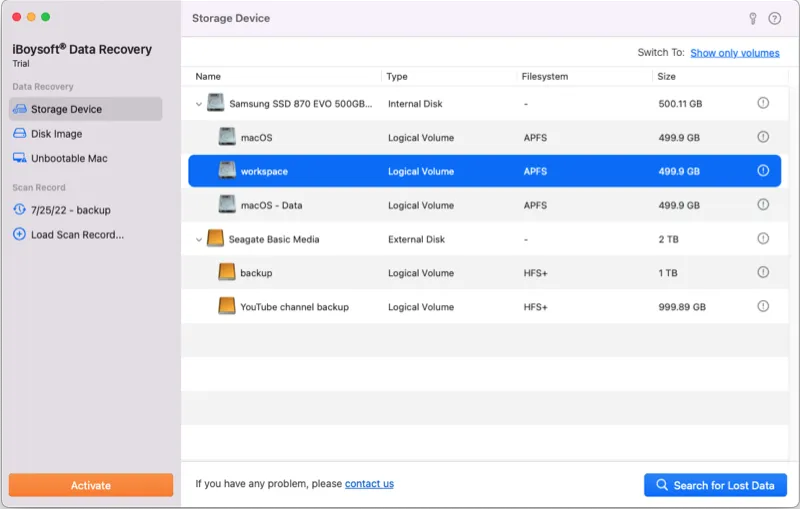
- Click Search for Lost Data on the lower right corner of the software to start the drive scanning process.
- When the scanning process ends, double-click the file or right-click it to select Preview and then check the mail file in advance.
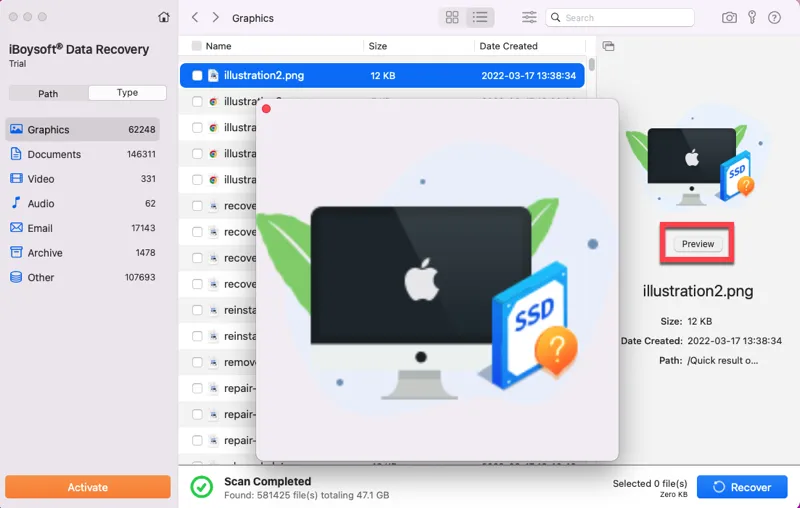
- After the check, choose the files you want to restore, then click Recover to bring them back. Please store the recovered files on another drive in case they get lost again.
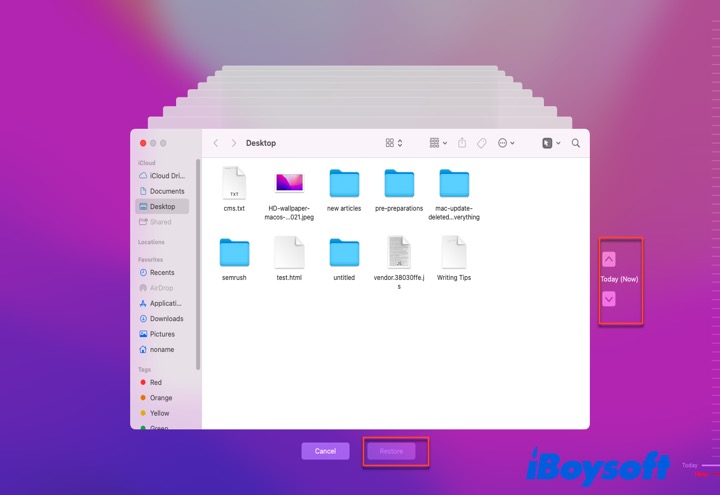
Solution 3: Recover lost files and documents via Time Machine backup
Time Machine always backs up every change you have made to your Mac if it has been enabled previously. When a Mac update deletes everything on your device, heading to recover missing pictures, documents, audio files, MST files, FLV files, emails, Sketch files, and PPTs from Time Machine is worth a shot.
- Launch Mac Time Machine through Spotlight Search shortcuts.
- A row of windows will appear on your desktop, just use the up and down arrow to scroll the timeline to browse the backups.
- When you find the files that you want, click Restore to send them to the original location.
If you have backed up all files and documents on your Mac with Time Machine to an external hard drive before the Mac update, you can also restore the data stored on it to your Mac.
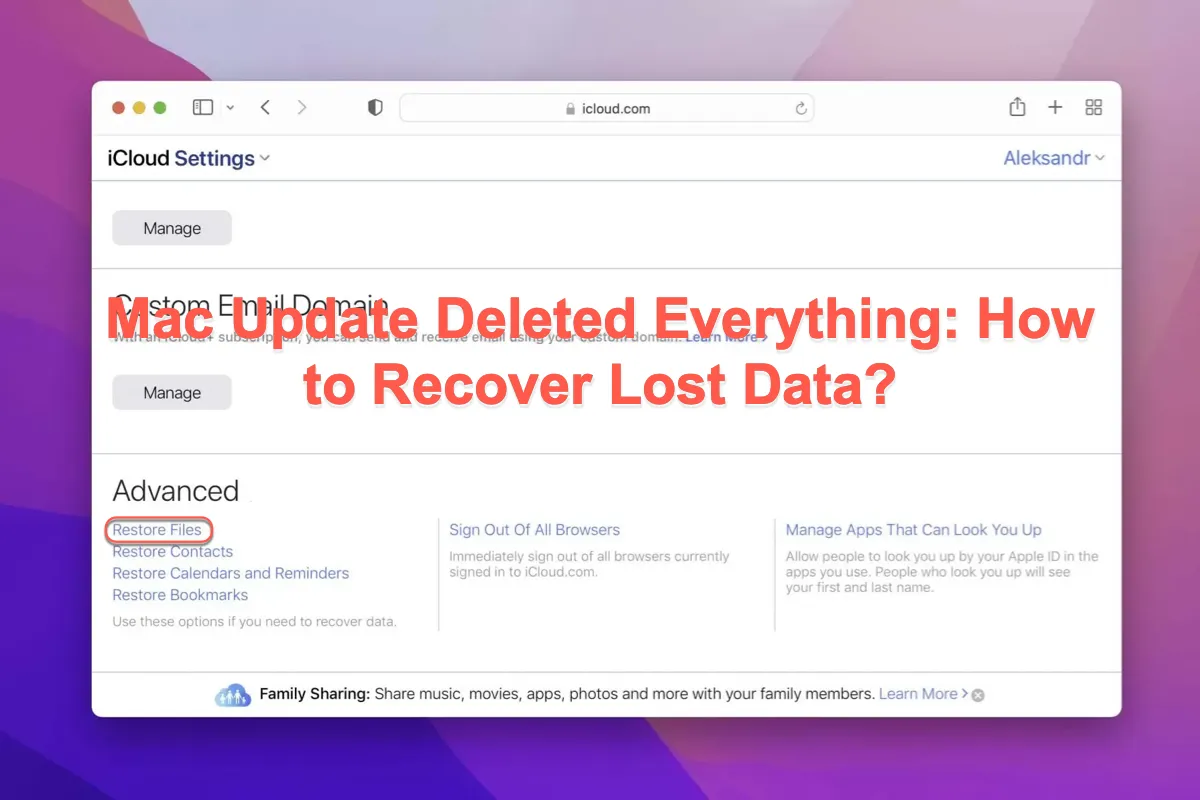
Solution 4: Restore all files on your Mac with iCloud backup
If you have a habit of backing files and documents to iCloud, then iCloud restoration is a viable method to save your deleted or missing files. For iCloud restoration work, a smooth network is the only thing you need. Launch macOS NetworkQuality to check the network situation first if you encounter any trouble during the recovery process.
- Go to iCloud.com in your Mac browser like Safari or Google Chrome.
- Log into iCloud with your Apple ID account and password and then click Sign in.
- Switch to the Settings tab and scroll down to the bottom of the home window.
- Locate the Advanced tab and click Restore Files. If you want to restore contacts, bookmarks, calendars, and reminders from iCloud, head to choose the responding options.
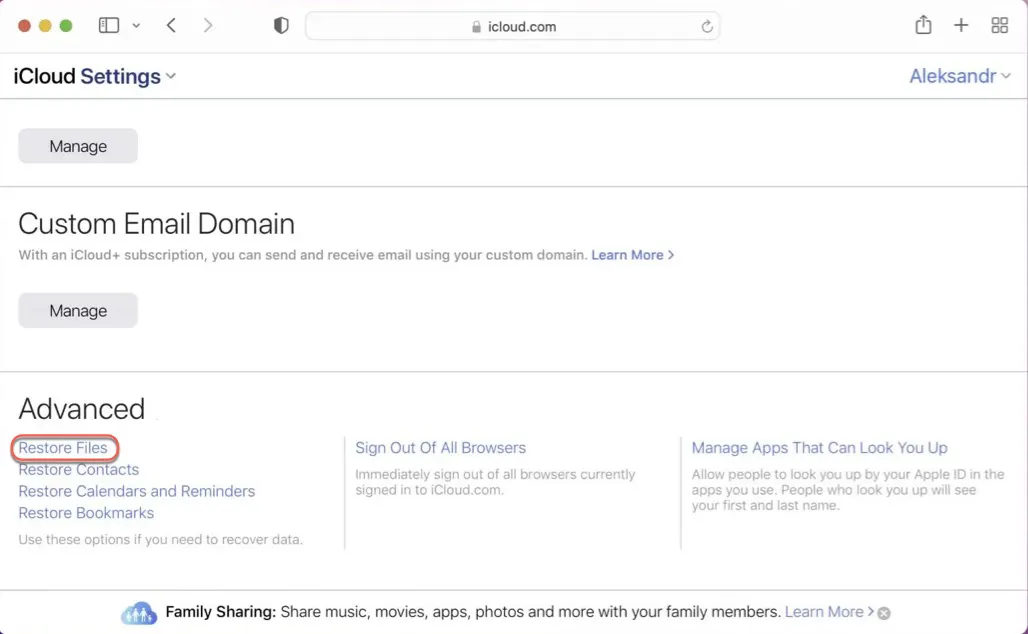
- Select the files you plan to restore or click Select All to restore all files and folders. Click Restore to begin the restoration work.
Solution 5: Restore the missing files by logging into another administrator account
Rare it is but it happens occasionally that a macOS update deletes your user account profile while keeping your home folder. And that's why your files are missing. In this case, all you need to do is add your old account profile back and log in again. Let me show you how to do so here:
- Click the Apple menu on your Mac and select Log Out ... from the dropdown menu.
- Login with your previous administrator account again to check if the files exist. Note that you should log in with all the accounts one by one.
If you are not permitted to log in with your old accounts, you can add them in Users & Groups first. Follow the steps below to add an old account:
- Click the Apple menu on your Mac desktop and select System Preferences/System Settings.
- Locate the User & Groups tab, and click on the padlock icon to make further changes.
- Click the + icon to add the old accounts that you used.
- Fulfill all the required messages in the new window to add the old accounts.
- Login to your old accounts to look for missing files and documents.
Solution 6: Recover lost data from APFS Snapshot
Snapshot is a built-in feature of APFS on Mac since macOS High Sierra. It can capture the state of the startup disk (APFS formatted) at a certain point and keep all the captured files on the drive. You can use the APFS snapshot to return your Mac to a certain state when the snapshot was taken.
Mac Recovery Mode is essential if you want to downgrade your Mac to a previous state to fix the issue that the Mac update deleted everything.
- Restart your Mac, and hold down the Command + R keys until you see the Apple logo appear.
- Select Restore From Time Machine Backup from the macOS Utilities and then tap Continue.
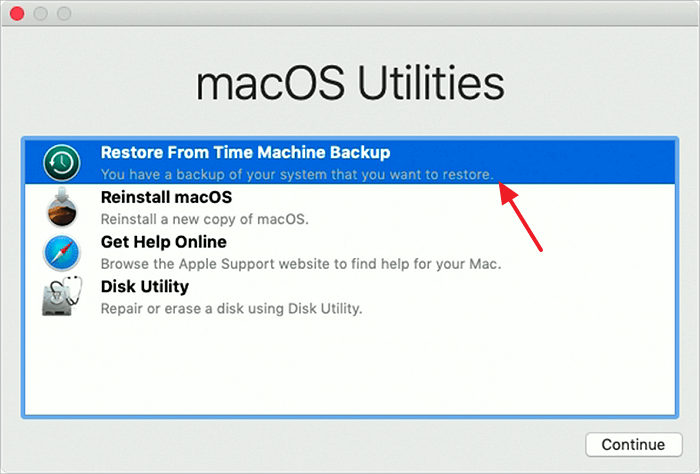
- Select the disk that contains the snapshot (the startup disk) and click Continue.

- Choose a local snapshot you want to restore and click Continue.
- Click Continue if asked whether to restore from the selected snapshot or not.
- Now, the restoration process begins. It will take some time; your Mac computer will restart automatically, and the files and documents will return.
If you find anything unpleasant about the macOS per se, you can also downgrade macOS Sonoma to Ventura or downgrade macOS Ventura to Monterey to fix it.
Solution 7: Ask a data recovery pro to restore your files
One last way you can count on is to contact Apple Support for professional fixes and advice. Anyway, this data loss happens due to unknown bugs instead of your misoperations. You can contact them in the form of online, give them a call, or send an email and wait for their replies.
Conclusion
A full backup of the data stored on your Mac is crucial before you update your Mac operating system to avoid any accidents during the process given that anxiety is useless when you encounter data loss.
This article offers you 7 comprehensive ways to recover deleted files and all you need to do is choose an appropriate method to begin the data recovery task. iBoysoft Data Recovery Software is recommended because it can restore most of the missing files without a hitch.
If you think this article is useful, plz share it with more people on your social platform!
FAQ about Mac update deleted everything
- QDoes updating Mac delete everything?
-
A
Mac will not delete everything when updating, whether it is a major or minor update. The macOS update means that your Mac welcomes new features and fixes some bugs, but it has nothing to do with the files stored on your computer. If you suffer from data loss during the update, it's the fault of an improper update. You can use iBoysoft Data Recovery Software to rescue your lost files and data.
- QIs iBoysoft Data Recovery Software safe to use?
-
A
Yes, iBoysoft Data Recovery Software is 100% safe to use. It is an Apple-trusted application and never steals your data. You can rest assured to use it!
- QWhy did my Mac update and delete everything?
-
A
This case happens due to various reasons, you can have a quick overview here: unsuccessful or interrupted macOS installation, not enough space for Mac to store missing files, irregular Mac operating system upgrade, untrusted macOS download from a shady or third-party website, and simple data deletion of loss during the update process.