Apple silicon Mac improves performance and efficiency, which brings a smoother and faster operating experience for users when compared with an Intel Mac.
But for some reason, you may want to reset a M1/M2/M3/M4 Mac:
- You simply want a fresh restart with the Mac.
- You are experiencing an unpleasant performance with the current version of macOS, like MacBook Pro screen flickering.
- You need to replace or exchange the Mac with Apple.
- You want to prepare Mac for sale or give it away.
- Your M1 Mac won't turn on.
Generally speaking, to factory reset a Mac contains two parts: erase all contents on the internal startup disk, and reinstall macOS on the Mac. However, the specific steps for erasing an Apple silicon Mac are different from those for an Intel-based Mac. And it also varies according to the state of your Mac, being bootable or bricked. Let's dive into the details of how to factory reset an Apple Silicon Mac.
Do you want to reset MacBook Air M1/M2/M3/M4 for the reasons above? Share it with your friends!
How to factory reset a bootable Apple Silicon Mac?
If you have installed the macOS Monterey and later macOS versions, you can easily reset MacBook Air M1/M2/M3/M4 with Erase Assistant to factory defaults, a new feature for 2018 and later Macs. For an earlier macOS, move to erase M1 Mac with Disk Utility.
But you need to keep in mind that backing up your data before resetting the Mac is important in case you want it back someday. If you want to quickly back up all your Mac files, you can pick up iBoysoft DiskGeeker for Mac to make a 1-to-1 copy of the Mac hard drive.
Free download and install iBoysoft DiskGeeker for Mac!
When resetting your Mac to factory settings, the system may ask for the admin password or Apple ID password. If you don't have the information, check out the solutions in this guide.
Factory Reset Mac running macOS Monterey and later
- 1. Clik Apple logo > System Preferences/System Settings.
- 2. Click System Preferences in the menu bar on macOS Monterey, or navigate to General > Transfer or Reset on macOS Ventura/Sonoma/Sequoia.
- 3. Choose Erase All Contents and Settings. (Getting "Erase assistant is not supported on this Mac"?)
- 4. Type your admin password and click OK and Continue.
- 5. You can back up Mac with Time Machine if asked.
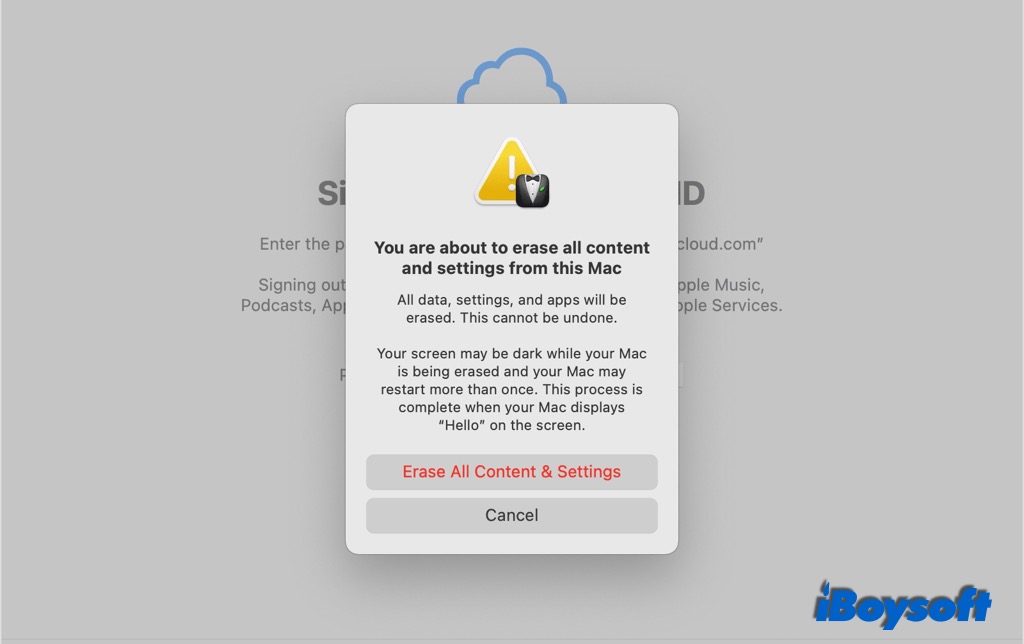
- 6. Read the warnings and select Erase All Content & Settings.
- 7. Select Wi-Fi to activate your Mac, then click Restart.
- 8. After restarting, follow the setup assistant to set up your Mac.
The new erase process in macOS Monterey handles everything to fully wipe your MacBook, it erases all settings, media, apps, and data for all accounts and volumes on the drive, including iCloud, Apple ID, Touch ID fingerprints, Bluetooth devices, Apple Wallet, etc., but it remains the currently installed operating system. This feature enables you to reset Mac without reinstalling macOS.
Factory Reset Mac running macOS Big Sur and earlier
- 1. Turn off FileVault on the MacBook Pro if you have enabled it.
- 2. Boot Mac in macOS Recovery Mode: restart your MacBook Pro and continue holding the power button until you see the Loading startup options appear on the screen. If you can't boot to the regular macOS recovery screen, use Fallback Recovery OS.
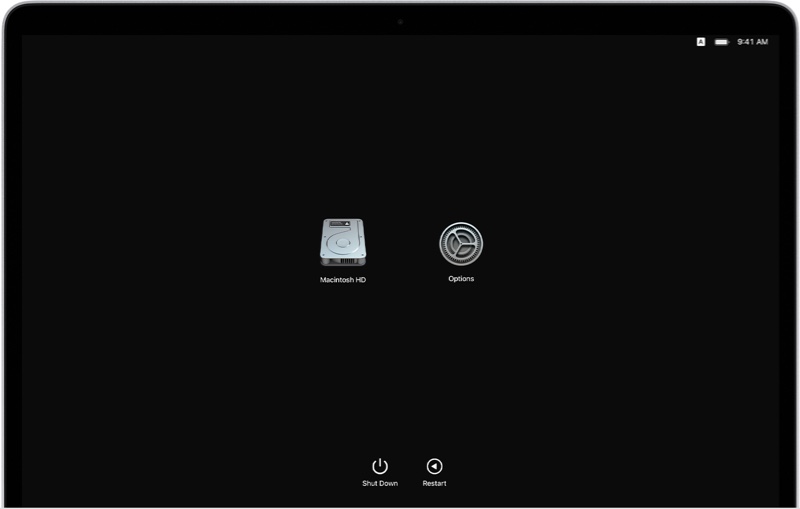
- 3. Select Options, and then click Continue.
- 4. If asked, select a user and enter the administrator password.
- 5. From the macOS Utilities screen, select Disk Utility and click Continue.
- 6. From the sidebar of Disk Utility, select and delete the volumes you added to the startup disk, Macintosh HD by default.
- 7. Select the Macintosh HD, then click Erase in the toolbar of Disk Utility.
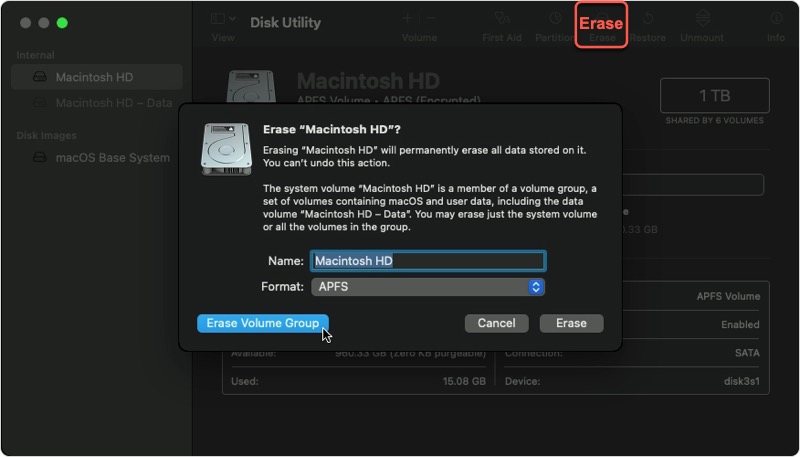
- 8. Specify a name and format (APFS for macOS 10.13 and later, Mac OS Extended for macOS 10.12 and earlier), then click Erase or Erase Volume Group if it appears.
- 9. After restarting, follow the introductions to choose a language and select a WiFi internet connection to activate the Mac.
- 10. After your MacBook Pro activates, click Exit to macOS Recovery Utilities.
Then you can proceed to install macOS using one of these methods and finish resetting Apple Silicon Mac:
- Use the Reinstall macOS utility in the macOS Utilities screen to reinstall the version of macOS you used before you erased the Mac.
- Use a macOS bootable installer if you have created one before erasing your Mac and boot Mac from USB.
- Use the terminal to reinstall macOS if you are a specialist knowing how to do it correctly.
Are these steps helpful? Share it right now!
How to factory reset a bricked Apple Silicon Mac?
Apple Configurator 2, a free macOS utility, is also a good solution to factory reset MacBook Pro M1/M2/M3/M4 when you want to troubleshoot problems like:
- The Mac becomes unresponsive due to a power failure during a macOS upgrade
- You can't start the Mac from the startup volume or the recovery macOS volume
To factory reset Apple silicon Macs, you'll need:
- The second healthy Mac with the latest Apple Configurator 2 installed.
- A USB-C to USB-C cable for newer Macs or a USB-A to USB-C cable for older ones, which supports power and data.
- Keep the internet connection of the second Mac and power source all the way.
If you have all the requirements ready for machine resetting, let's get into the steps:
- Connect the faulty Mac via the USB-C port with the second Mac using the cable you prepared.
- Launch Apple Configurator 2 on the second Mac.
- Boot your Mac into DFU Mode with these special key combinations, which show no screen activity from the problematic Mac.
For MacBook Air and MacBook Pro: Press and hold the power button, then simultaneously hold Control + Option + Shift for 10 seconds. And then keep holding the power button until a DFU icon appears in Apple Configurator 2 on the second Mac.
For Mac mini: Disconnect the Mac mini from power for 10 seconds, reconnect to power, and immediately hold the power key when you see the status indicator light become amber.
For iMac: Disconnect the iMac from power, plug the USB-C cable into the Thunderbolt port closest to the stand, reconnect to power, and immediately hold the power key for about 3 seconds.
Apple Configurator 2 allows you to both revive or restore an Apple Silicon Mac.
Revive Mac with Apple Configurator 2: It will update the firmware and recovery macOS to the latest version, which won't make any changes to the startup volume, the user's data volume, or any other volumes.
Restore Mac with Apple Configurator 2: This feature will restore the firmware, erase all data, and reinstall the latest version of macOS recovery and macOS on your internal hard drive.
So, depending on what depth you'd like to reset your M1/M2/M3/M4 Mac, either keep or erase the previous data, you can continue with different guides in Apple Configurator 2.
Note: If you lose power to either Mac during this process, you need to do the revive or restore operations once again.
To revive a bricked Apple Silicon Mac
- 4. In Apple Configurator 2 from the second Mac, select the M1 Mac that won't turn on after the macOS update failure.
- 5. Right-click on your Mac device and choose Advanced > Revive Device, then click Revive.

- 6. Wait for the process to complete.
- 7. The Apple logo will appear and disappear, and then your Mac will restart normally.
- 8. Make sure everything is working fine before quitting Apple Configurator 2 and unplugging cables.
To restore a bricked Apple Silicon Mac
- 4. In Apple Configurator 2 from the second Mac, select the first Mac computer.
- 5. Right-click on the Mac, choose Actions>Restore, and then click Restore.
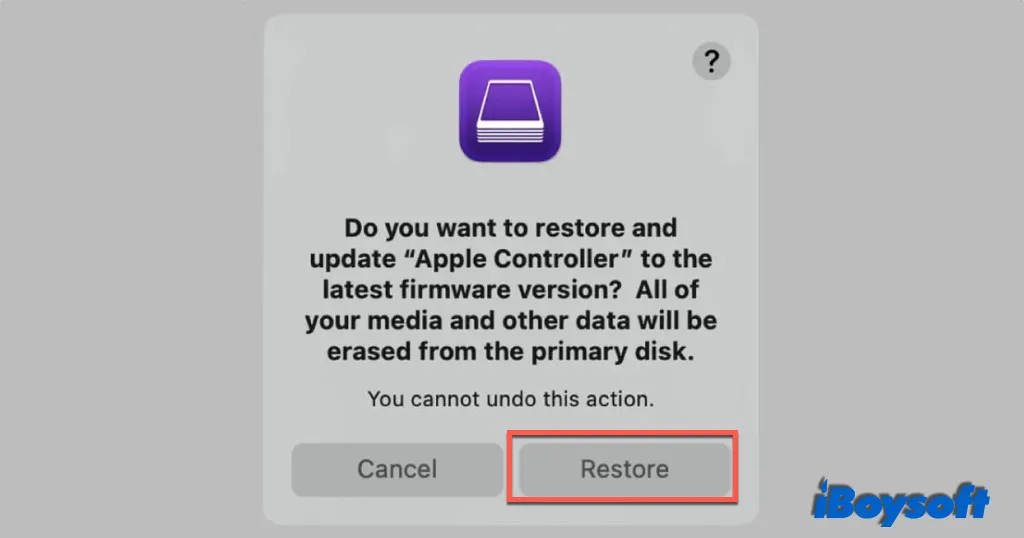
- 6. Wait for the process of factory resetting to complete on your faulty Mac.
- 7. The Apple icon will show and disappear, and then follow with an auto reboot.
It will take about 20-30 minutes to download macOS and install it on the Mac. When it finishes, you'll see the factory setup screen. And then you can quit Apple Configurator 2 and unplug any adapters and cables.
Problem solved? Share your happiness with others!
The Bottom Line
Factory resetting is the easiest way to start afresh on your Apple Silicon Mac. It helps when you can't start this Mac for startup disk corruption, firmware issues, or a failed macOS update. It's also the most efficient way to erase personal data before you decide to donate or exchange your Mac.