macOS 14(Sonoma) is the latest operating system developed by Apple Inc. and they published macOS Sonoma beta first on WWDC, on June 5, 2023. The official macOS Sonoma will be released later. This version promotes user experiences and also brings some new features.
They take significant changes in traditional apps as routine. For instance, users can take Safari's website as an app on their desktop, and the widgets put in the notification now can be placed on the desktop like iPhones and iPads. All of these attract them to install macOS Sonoma after they ask should I upgrade to macOS Sonoma.
It looks like a wonderful macOS version, and you must not wait to use it. Although you can only install macOS Sonoma beta on your Mac/MacBook, you can learn the methods to install macOS Sonoma (14) on your Mac/MacBook beforehand.
Much appreciate it if you would like to share this post on your social media.
Prepare for installation
Before you install macOS 14(Sonoma) on your Mac/MacBook, you need to check whether your Mac/MacBook is compatible with it. You can check with the following list:
- MacBook: 2017 or later
- MacBook Pro: 2017 or later
- MacBook Air: 2018 or later
- iMac: 2017 or later
- Mac Mini: 2018 or later
- Mac Pro: 2019 or later
- Mac Studio
- iMac Pro
After that, check whether your storage is enough for you to install it. At least 4GB or more RAM and 40GB or more storage space on your disk are needed. Before you update data to macOS Sonoma, don't forget to back up your Mac with Time Machine or other devices, in case the installation failed, you won't lose your important data.

This post tells you five ways to back up your Mac/MacBook, and the preparations before you back up are also included.
Three methods to install macOS Sonoma
After the preparation, now you can start to install macOS Sonoma. You should be very familiar with how to install macOS on your Mac/MacBook via System Settings. Here, we offer you some different ways to install macOS 14 but still include using System Settings.
Using System Settings
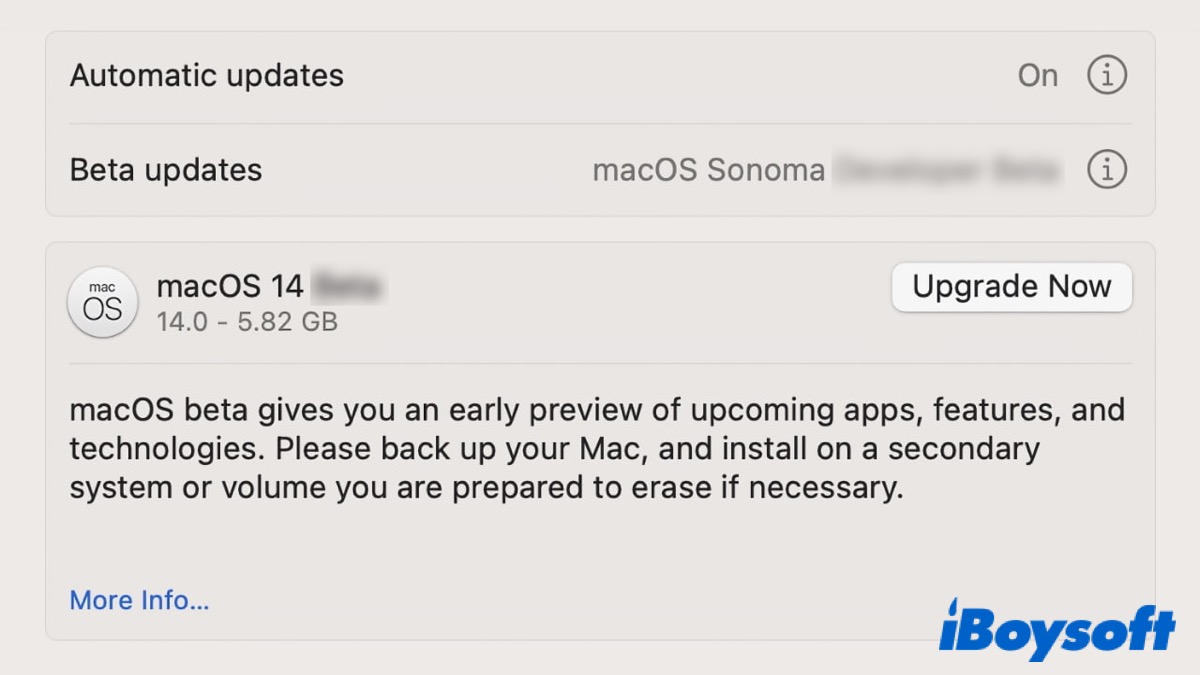
System Settings is the advanced version of System Preferences if you have updated to macOS Ventura, which is to give users more autonomy to modify the system settings and preferences on their Mac/MacBook. It's the easiest and quickest way for Mac users to install any version of macOS on their Mac/MacBook in System Settings. Here's how:
- Open System Settings in Dock.
- Turn to General > Software Update to check whether you can see macOS 14 in the right panel.
- Click Update Now.
Install in App Store
Instead of using System Settings, you can update to macOS 14 in App Store like installing an app on your Mac/MacBook.
- Open App Store in Dock.
- Type in macOS Sonoma in the search box in the top left corner.
- Click Get or View.
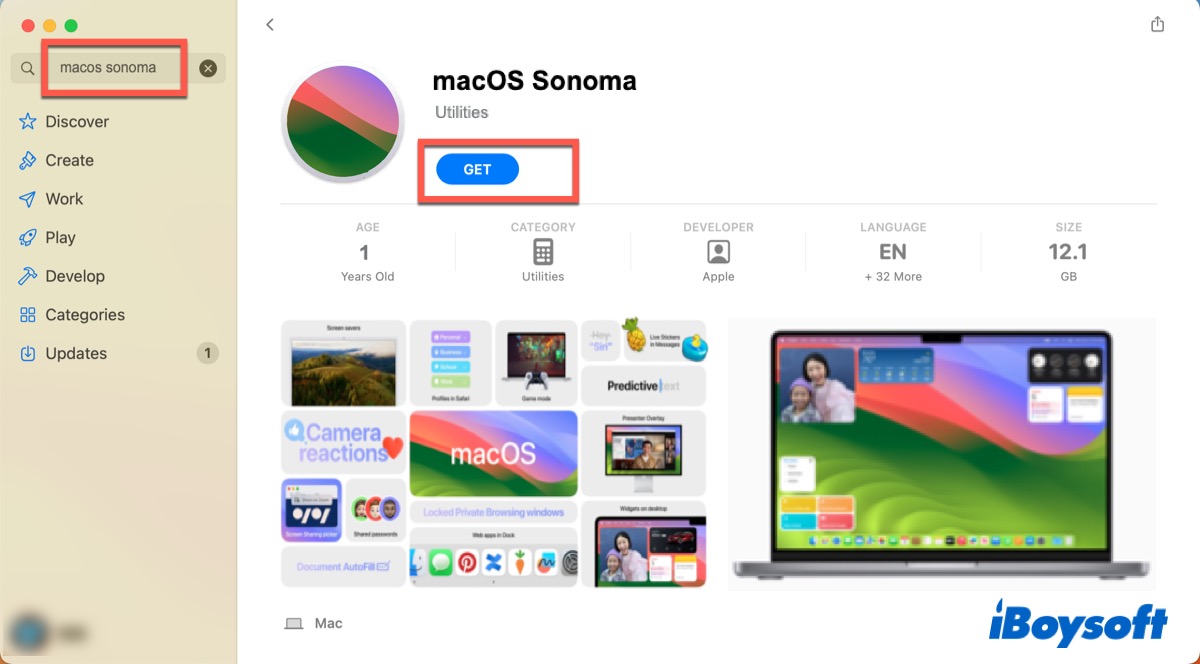
- Click Download to start the installation process.
After that, wait for the process to finish and you'll get the new version of macOS.
Clean install macOS Sonoma
You can use a macOS Sonoma bootable USB installer to take a clean installation of macOS Sonoma, which means it will remove the previous macOS while installing the new macOS. In this way, you need to format your USB, so make sure you have backed up your data before using it.
What's more, if you use the above two ways but failed to install macOS Sonoma, you can use the following steps to take a clean installation of it.
- Insert your USB drive into your Mac/MacBook.
- Format your USB with Mac OS Extended in Disk Utility.
- Launch Terminal and then type in the following command. Replace 'my volume' with the name of your volume.
sudo /Applications/Install\ macOS\ Sonoma.app/Contents/Resources/createinstallmedia --volume /Volumes/mycolume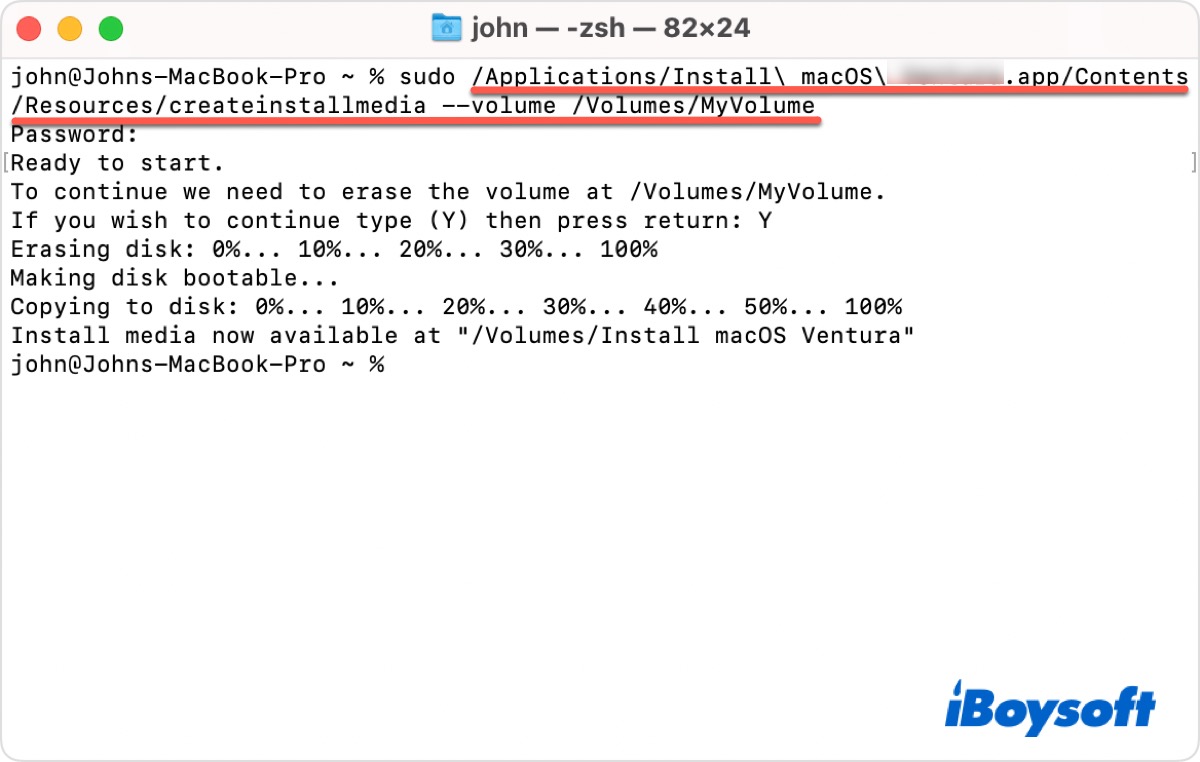
- Type in your admin password if it is required and then press Enter.
- Type in Y to confirm and then press Enter.
- Click OK when you see the prompt 'Terminal would like to access files on a removable volume.'
- Exit Terminal and then plug your USB to finish the process.
Up to now, a clean installation of macOS Sonoma has been downloaded to your Mac/MacBook.
If you have updated macOS Sonoma (14) successfully using the above methods, don't forget to share them with your friends who need them.
What to do if the macOS 14(Sonoma) update failed?
As we mentioned above, you may fail to update your Mac/MacBook to macOS 14 no matter which methods you use to install it. It's such a new version of macOS that it's inevitable to contain kinds of bugs. Here are some reasons that may cause you to fail to update to macOS Sonoma.
- Incompatible Mac/MacBook
- Lack of storage
- Corrupt installer
Before you take the below actions to fix this problem, check your disk storage and internet connection. Besides, make sure your startup disk is intact. If it is corrupted, you can try fixing it by running First Aid in Disk Utility.
Restart your Mac/MacBook
Restarting can solve most of the common problems on your computer. Following the below steps to restart your Mac/MacBook.
- Click on the Apple menu and choose restart in the drop-down list.
- Hold on to the Touch ID + Control keys and then select Restart in the pop-up window.
Reset NVRAM/PRAM
Now, modern Mac computers no longer use PRAM but use NVRAM instead. It is a small amount of memory in Mac, where the OS-related settings are stored to enable your computer to start up quickly and perform properly. Follow the below steps to reset NVRAM:
- Shut down your Mac/MacBook completely.
- Press the power button and simultaneously hold down the Option + Command + P + R keys for about 20 seconds.

- Release the key combination when you hear the second startup sound from your Mac.
If your Mac/MacBook is M1-based, you don't need to reset NVRAM manually as it will automatically reset it if necessary every time you boot your Mac/MacBook.
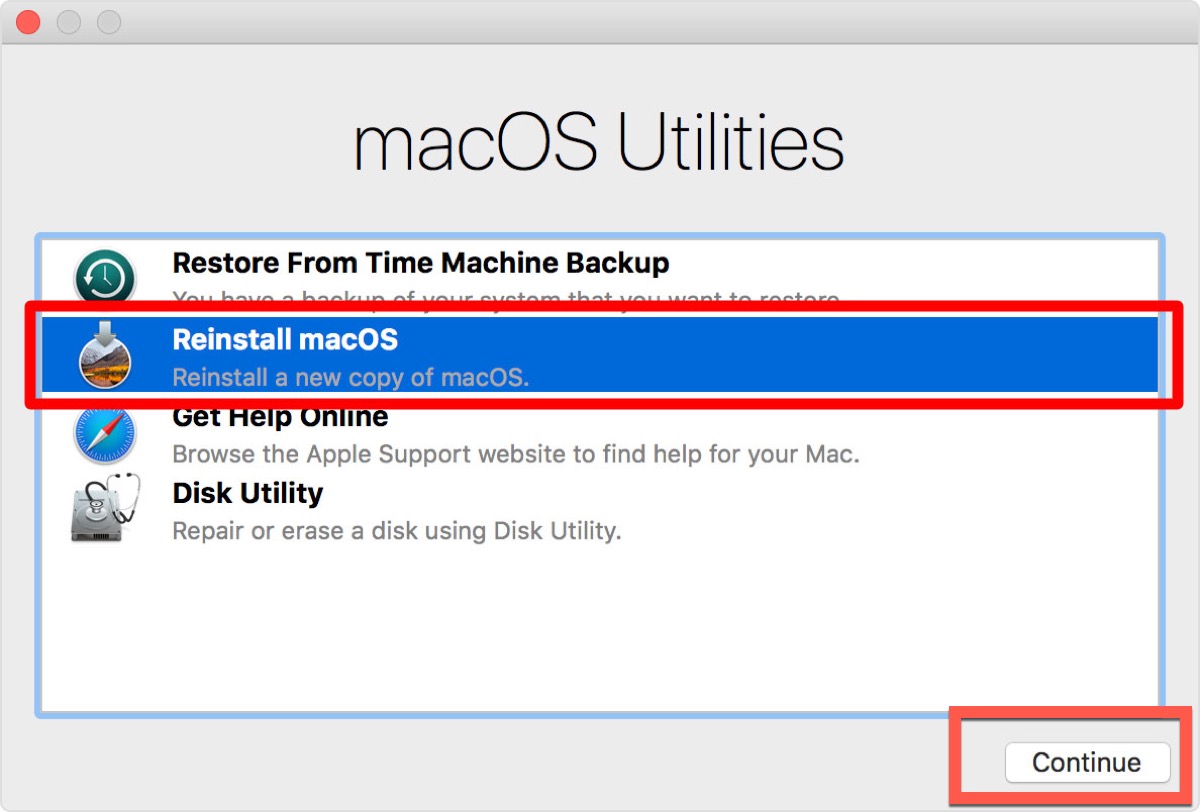
Reinstall macOS Sonoma in Recovery Mode
macOS Recovery is a special mode that can be loaded without starting up the operating system, helping you fix system-related issues on your Mac/MacBook. Try to reinstall macOS Sonoma in this mode to fix the issue.
- Shut down your Mac/MacBook completely.
- Press and hold the Touch ID (the power button) for a few seconds until you see "Loading startup options".
- Click Options next to the Mac's Macintosh HD disk and then click Continue.
- Enter your admin name and password if asked and you will arrive at the Recovery Mode screen.
- Click Reinstall macOS and then click Continue.
It will take a while and do not shut down your Mac/MacBook or make it sleep. After the installation is finished, your Mac/MacBook will restart automatically and ask you to create a new admin account.
Hope you have solved this issue successfully and don't forget to share this post.
Conclusion
Before you install any operating systems, back up your important data and make sure your Mac/MacBook has enough storage. This post offers three methods to install macOS Sonoma (14), including a clean installation of it. What's more, this post also gives three solutions to fix the failed installation of macOS Sonoma.
Relevant posts:
FAQ about how to update to macOS Sonoma
- QWhy can't i update my macOS?
-
A
Make sure that you have enough RAM and storage space to download the update. Make sure your startup disk is intact.
- QIs my Mac too old to update?
-
A
macOS Sonoma is supported by the 2017 or later version of MacBook or MacBook Pro, the 2018 or later version of MacBook Air, and the 2019 or later version of Mac Pro. You can check whether your Mac meets the requirements.
- QWhat is the latest macOS version?
-
A
macOS Sonoma Developer Beta, which was released on WWDC on June 5, 2023. The official macOS Sonoma will be released later.