macOS Sonoma was released to the general public on September 26, 2023, but, unfortunately, it's unavailable to most 2017 Mac models. If your Mac falls into the following categories, it's not officially supported by macOS Sonoma and you'll receive the error saying "macOS Sonoma is not compatible with this Mac" when trying to upgrade from the Mac App Store or Software Update.
- MacBook Pro: 2017 and earlier
- MacBook Air: 2017 and earlier
- Mac Mini: 2017 and earlier
- iMac: 2018 and earlier
- Mac Studio: 2021 and earlier
- Mac Pro: 2018 and earlier
However, being unable to upgrade through the usual means doesn't mean you can't install macOS on your unsupported Mac. This article will guide you through the process and install macOS Sonoma on your unsupported Mac with OpenCore Legacy Patcher:
Here is a quick summary of how to install Sonoma on unsupported Macs:
| Step 1: Download OpenCore Legacy Patcher | Open your browser to download OCLP on your Mac. |
| Step 2: Erase the USB drive | Launch Disk Utility to reformat your USB drive with Mac OS Extended (Journaled). |
| Step 3: Create the macOS Sonoma Installer with OCLP | Open OCLP to download macOS Sonoma on your unsupported Mac and create the bootable installer. |
| Step 4: Ensure your Mac has enough space | Use iBoysoft DiskGeeker to make more free space on your Mac. |
| Step 5: Boot from the macOS Sonoma bootable installer | Hold the Option key at startup to boot from the installer and install macOS Sonoma. |
| Step 6: Install OCLP on your internal hard drive | Follow the popup to install OCLP to your internal disk and restart from it. |
Should you install macOS Sonoma on an unsupported Mac?
If you're eager to explore specific features of macOS Sonoma or install the latest security updates to keep your Mac secure, you can install macOS Sonoma on your unsupported Mac. But bear in mind that it might slow down your Mac, cause overheating, or lead to boot issues and other possible problems.
That's why it's not recommended to install macOS Sonoma on your work Mac and it's highly recommended that you back up your Mac with Time Machine before proceeding with the installation. A backup can save you a lot of trouble when you encounter issues with macOS Sonoma and want to revert to the previous version without data loss.
Share this guide to help others decide if they want to install Sonoma on unsupported Macs.
How to install macOS Sonoma on unsupported Macs?
To install macOS 14 Sonoma on an unsupported Mac, you need to prepare a USB drive with at least 16GB of storage to create the bootable installer. If you have a 2010 or older Mac, you should also get a USB 2.0 hub or 2008 Apple keyboard and mouse to avoid keyboard compatibility issues within the installation.
After your Mac is backed up, follow the steps below to install Sonoma on your unsupported Mac. Note that the optional steps are necessary for preventing installation errors but are not compulsory.
Steps to install macOS Sonoma on unsupported MacBook Pro/Air/iMac/Mac mini/Mac Pro:
- Step 1: Download OpenCore Legacy Patcher
- Step 2: Erase the USB drive with Mac OS Extended (Journaled) (Optional)
- Step 3: Create the macOS Sonoma Installer with OCLP
- Step 4: Ensure your Mac has enough space for macOS Sonoma to run properly (Optional)
- Step 5: Boot from the macOS Sonoma bootable installer to install Sonoma
- Step 6: Install OCLP on your internal hard drive
Step 1: Download OpenCore Legacy Patcher
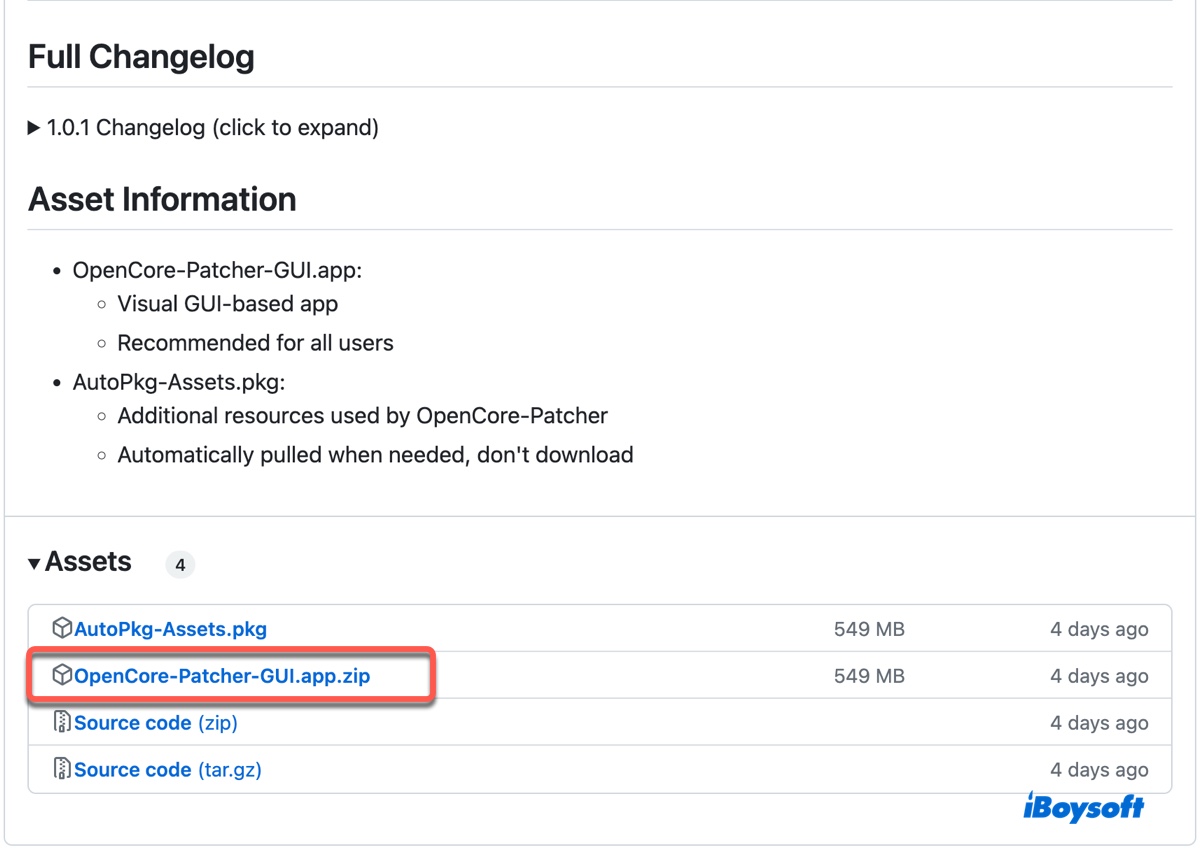
To install macOS Sonoma on an unsupported Mac, you need to download and install OpenCore Legacy Patcher (OCLP), which is a boot loader that's commonly used to facilitate the installation of newer macOS versions on unsupported Mac models. It has been updated to support macOS Sonoma. You can download the latest version and click OpenCore-Patcher-GUI.app.zip.
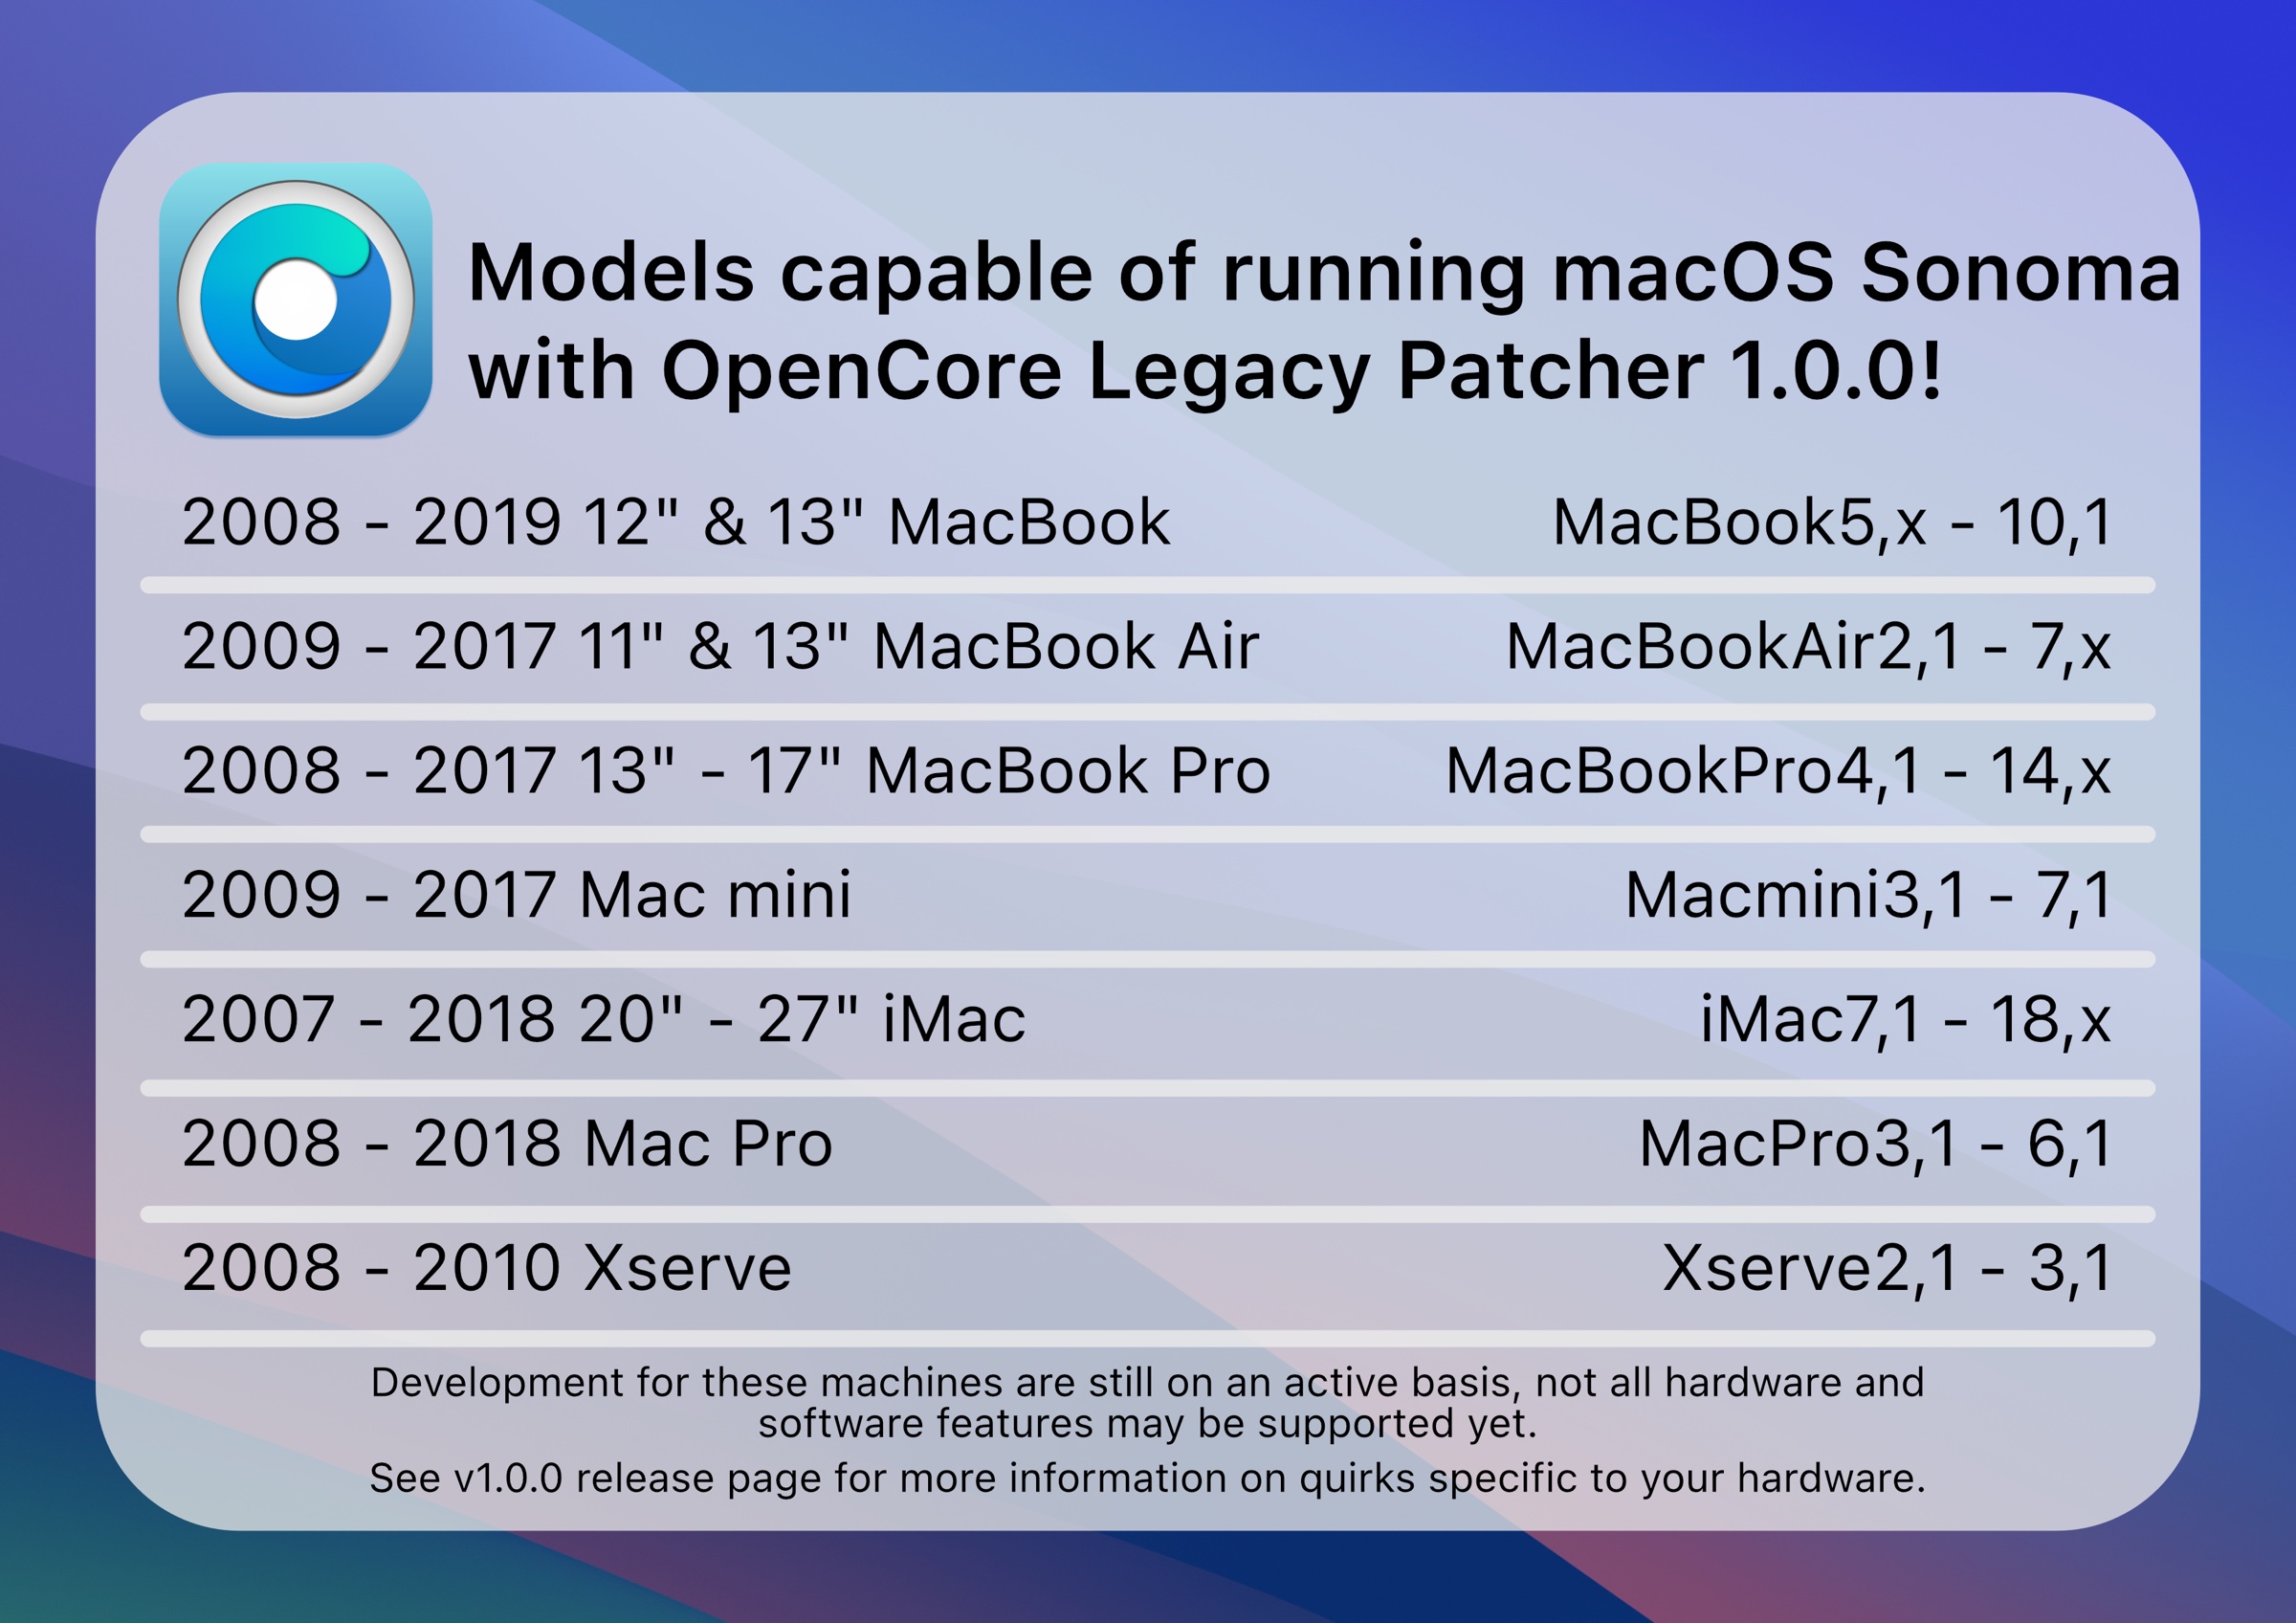
The current version (1.0.1) is available for installing macOS Sonoma on 83 unsupported Mac models.
Step 2: Erase the USB drive with Mac OS Extended (Journaled) (Optional)
The next step involves erasing your USB drive, which will remove all data on it. If it has important files, don't forget to back them up to another storage device. Preformatting your drive can help you avoid formatting problems when creating the bootable macOS Sonoma installer.
- Open Disk Utility from your Applications > Utilities folder.
- Click View > Show All Devices.
- Select the physical disk of your USB drive and click Erase.
- Name the USB drive.
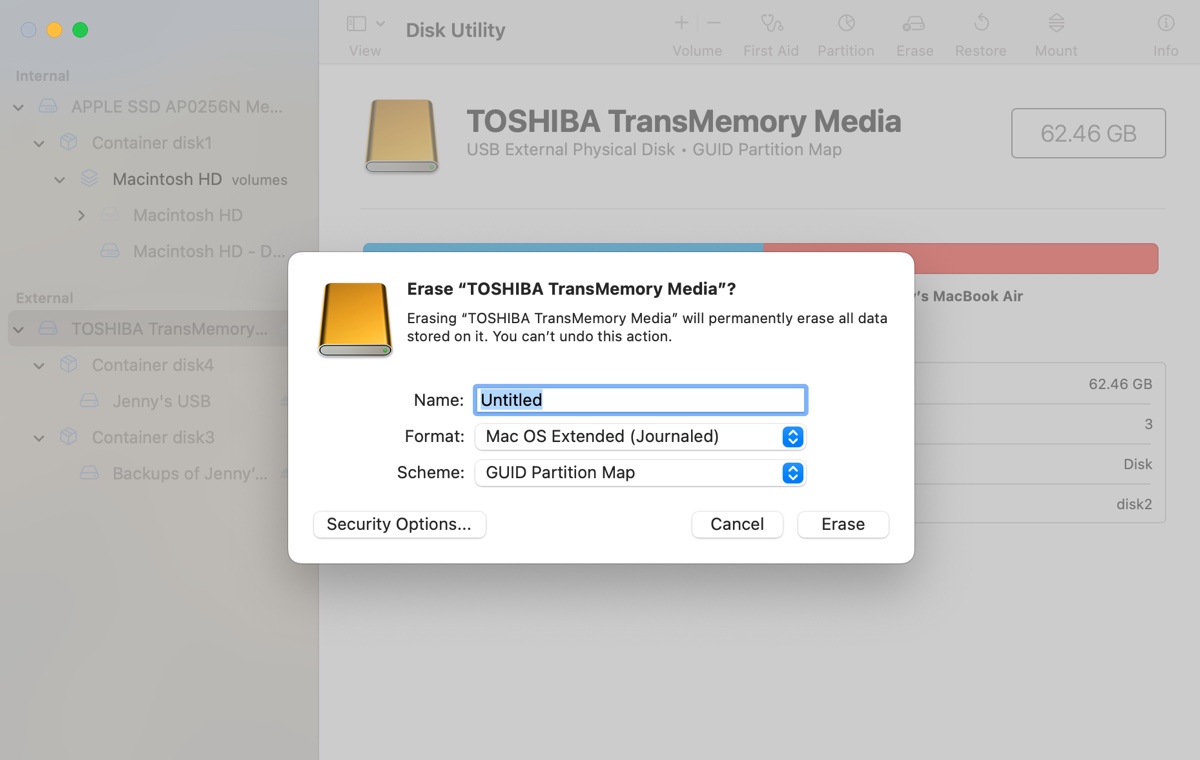
- Set the format to Mac OS Extended (Journaled).
- Set the scheme to GUID Partition Map.
- Click Erase again.
Step 3: Create the macOS Sonoma Installer with OCLP
Now that all the preparation is done, you can start to create the macOS Sonoma installer and install OCLP on it.
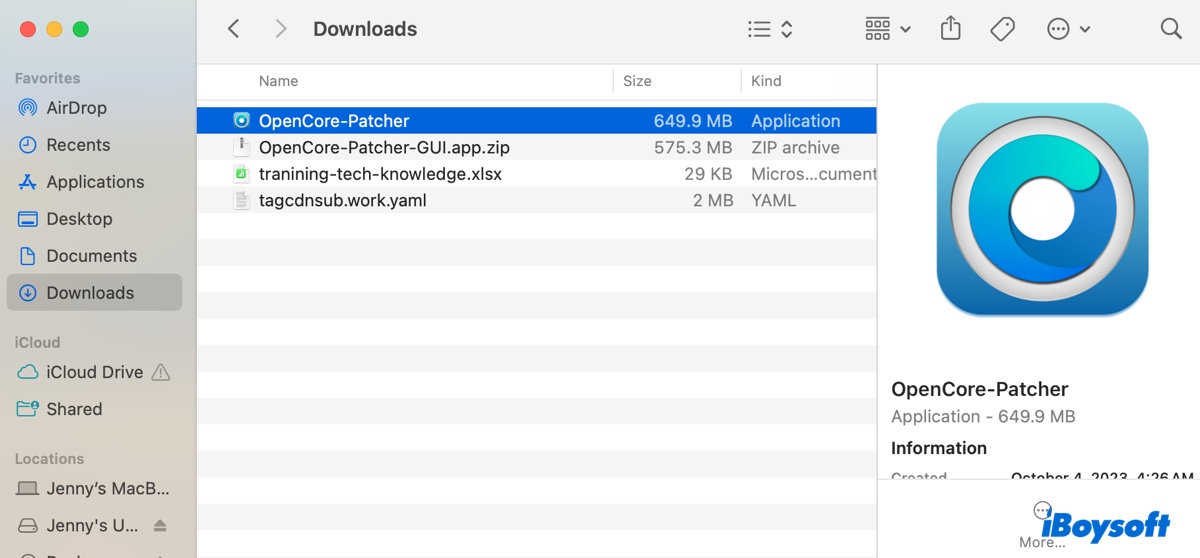
- Go to your Downloads folder or the designated directory where the downloaded OCLP is located.
- Double-click the zip file to decompress it.
- Launch OpenCore-Patcher.
- Click Open when a popup asks whether you want to open it.
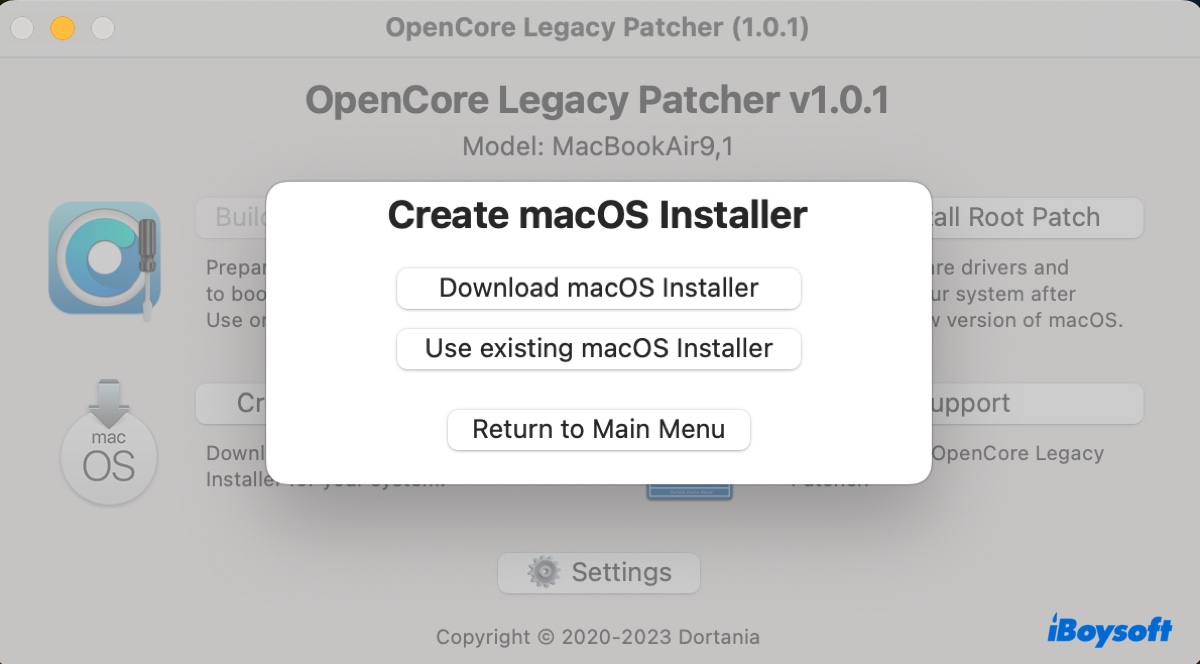
- Click Create macOS Installer > Download macOS installer to download macOS Sonoma on your unsupported Mac.
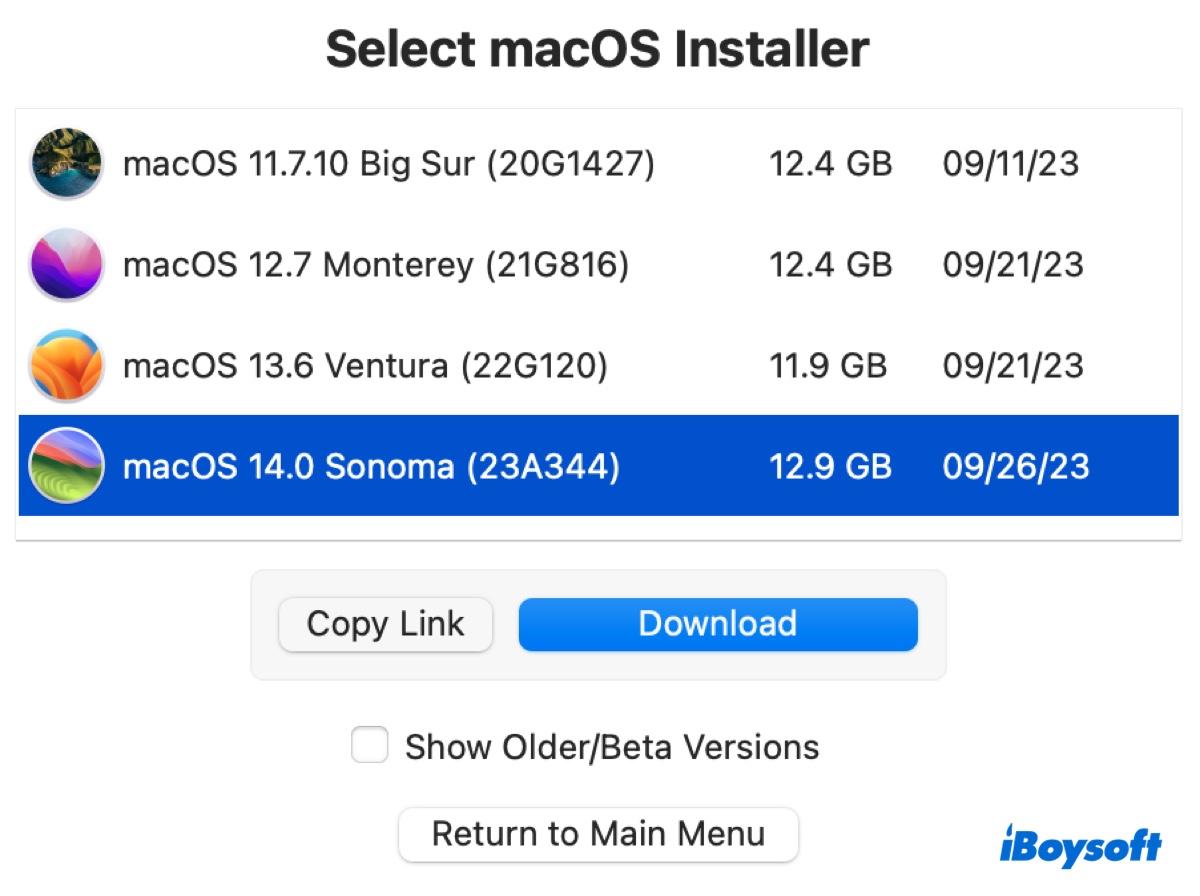
- In the available software list, select macOS 14.0 Sonoma and click the Download button.
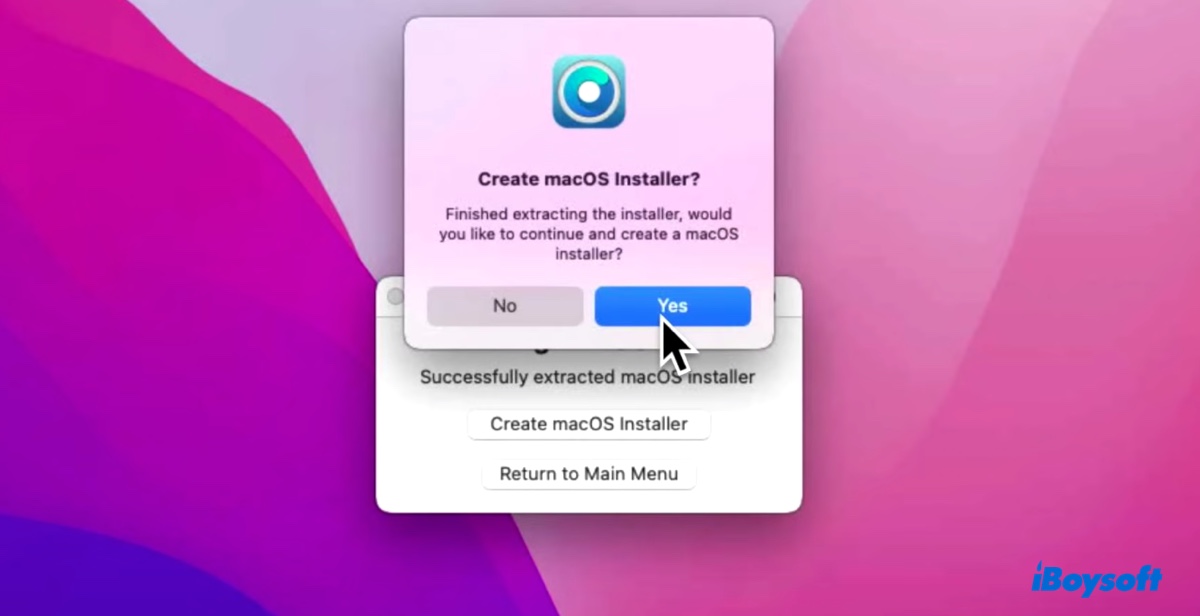
- After the download is complete, it will verify the macOS installer and require your admin password to extract the installer.
- Click Yes when the extraction is finished.
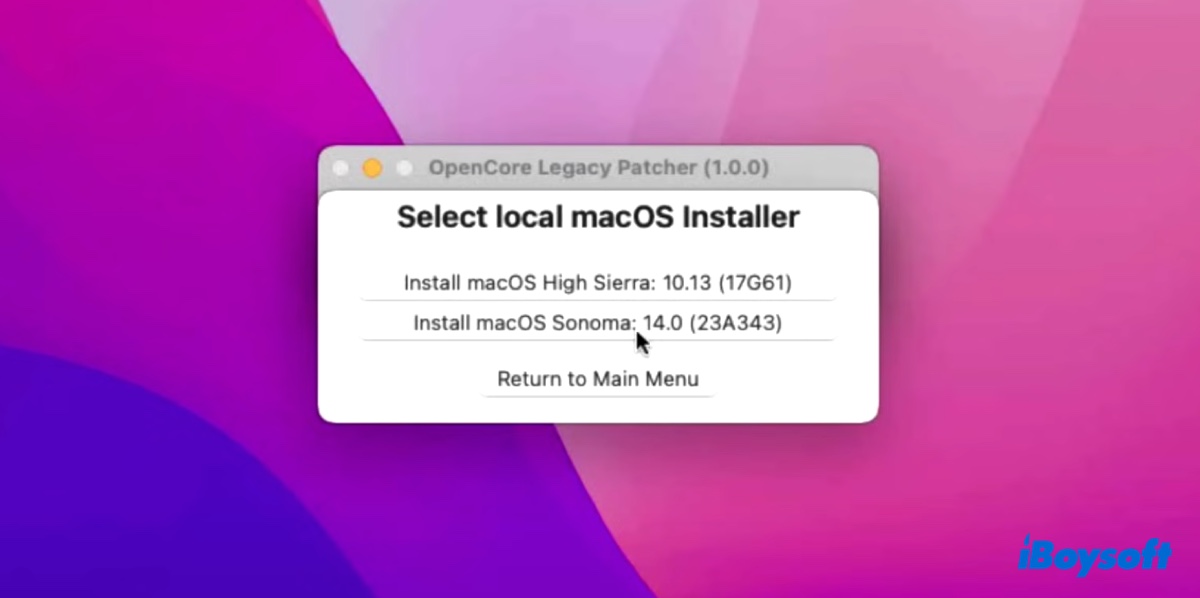
- Select the macOS Sonoma installer.
- Select your USB drive to erase it.
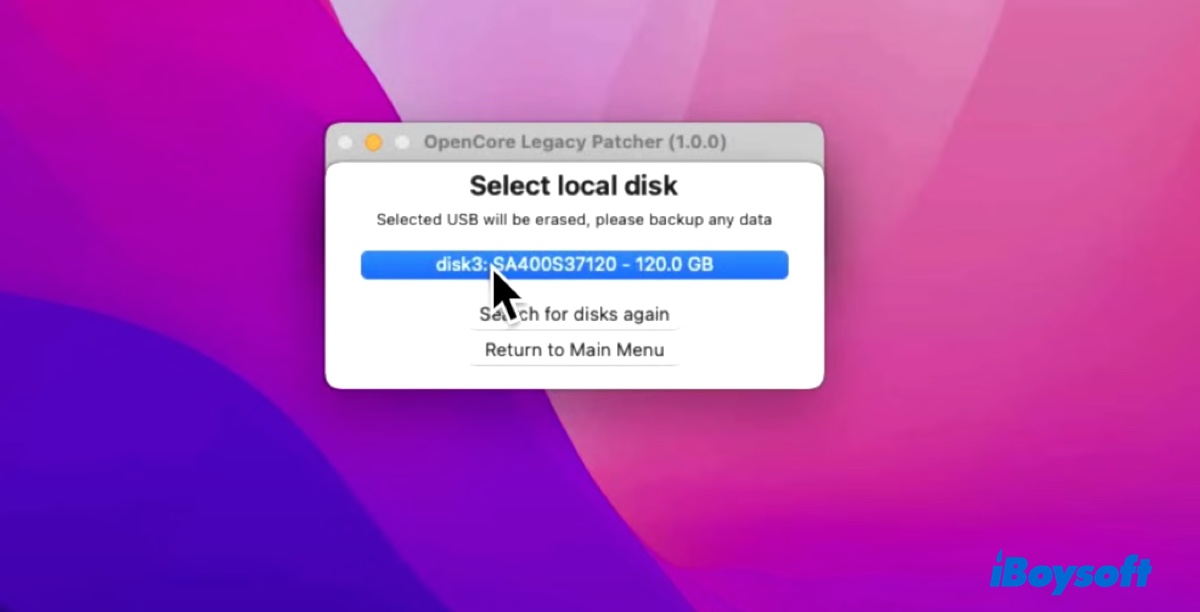
- Tap Yes to confirm you want to erase the USB drive.
- Enter your admin password when asked.
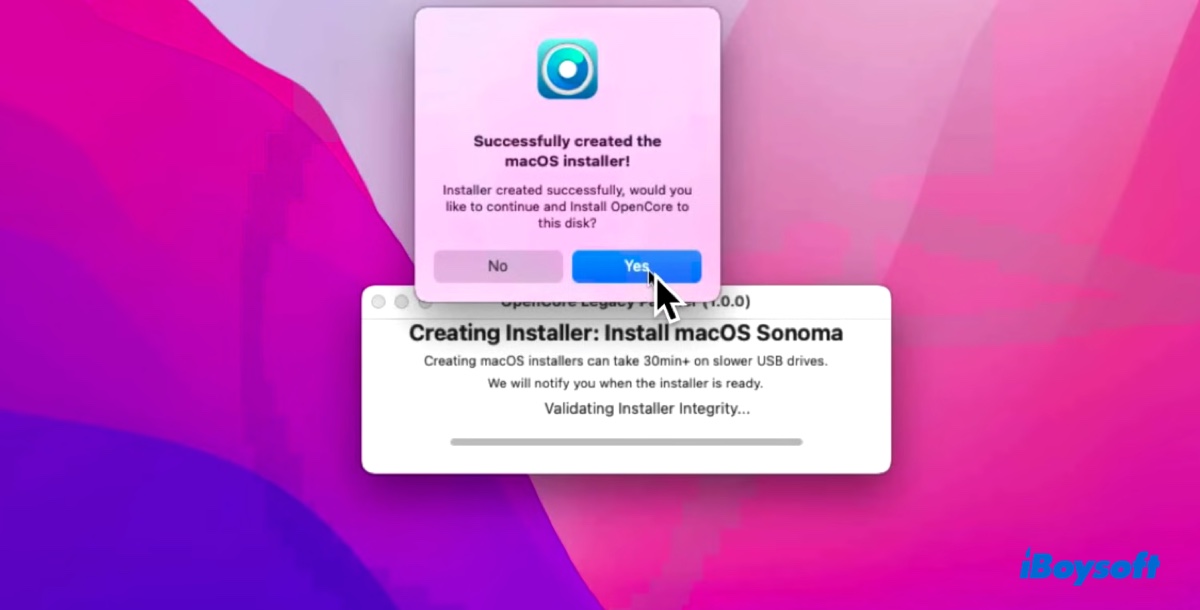
- Wait for the installer to be created.

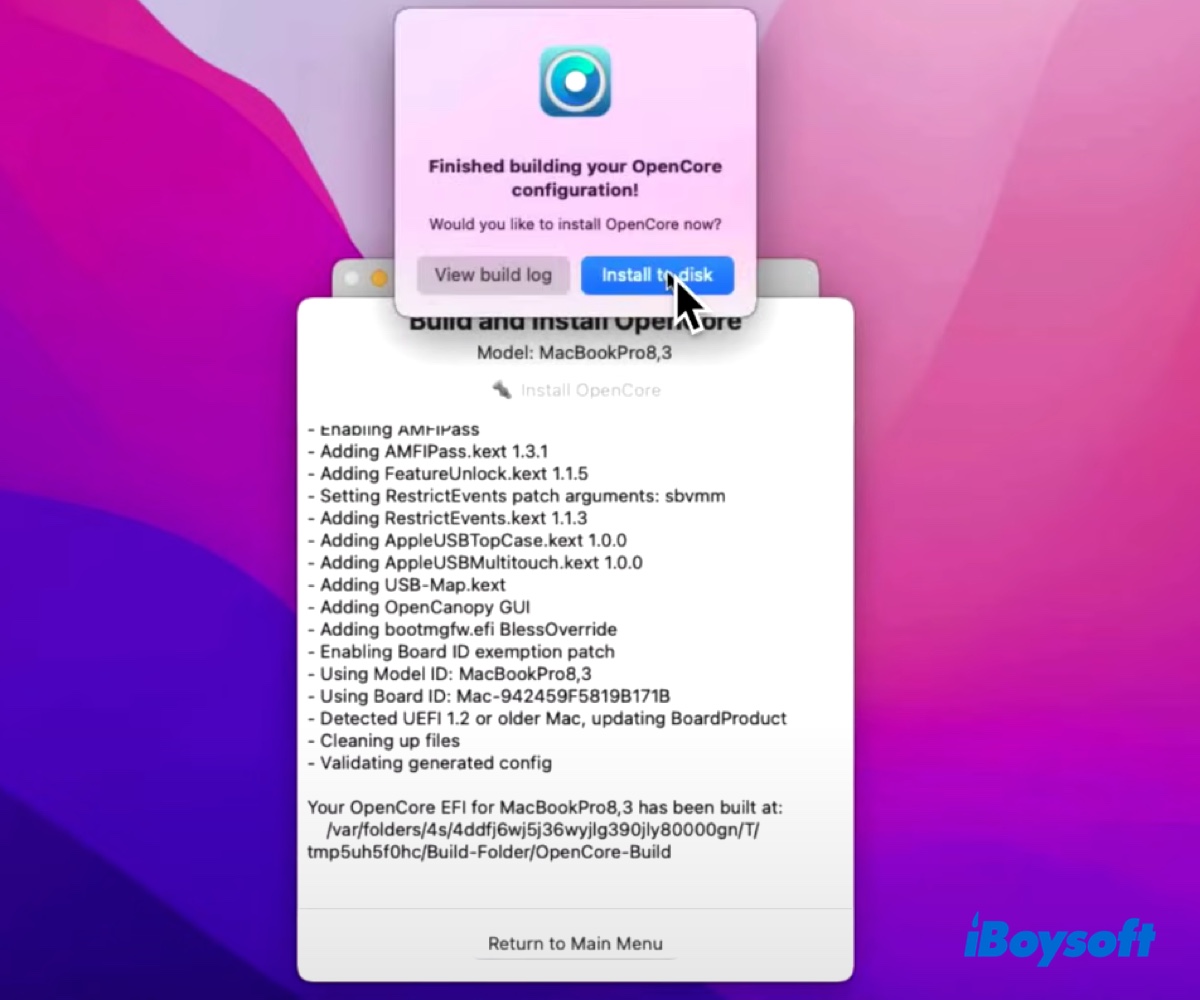
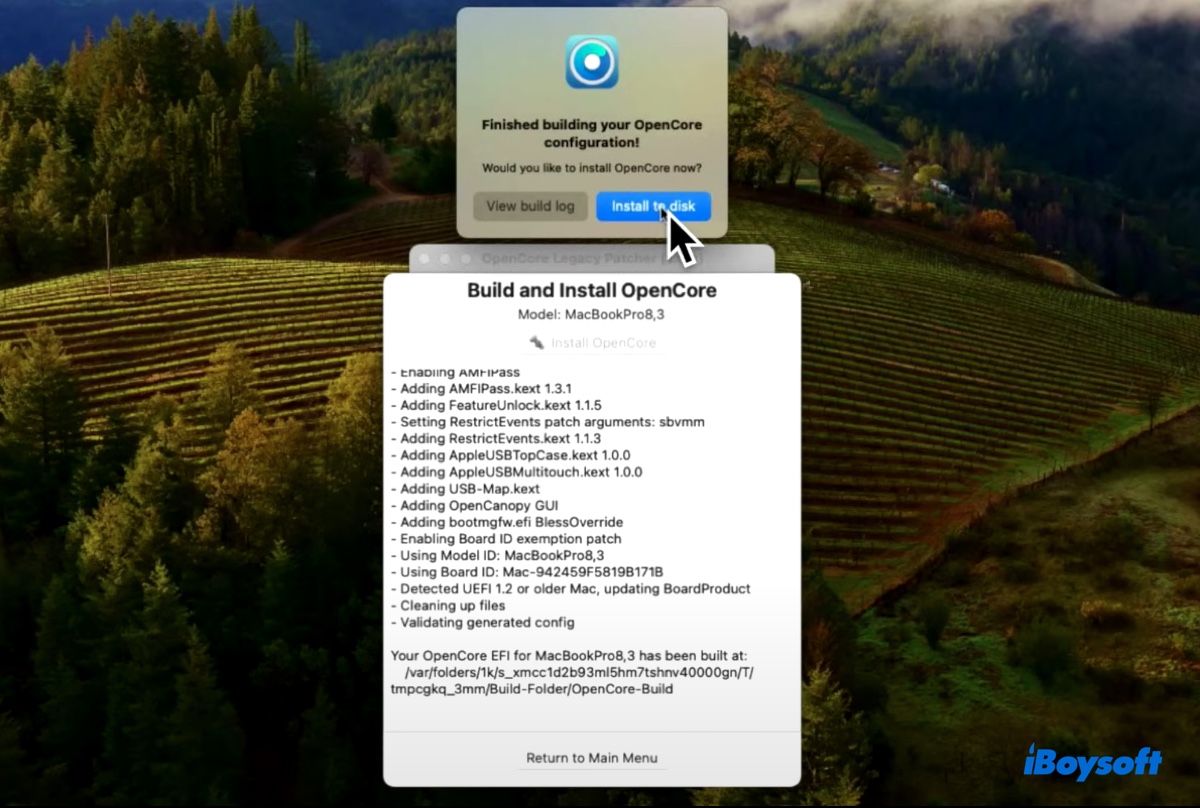
- Click Yes to install OpenCore to your USB disk.
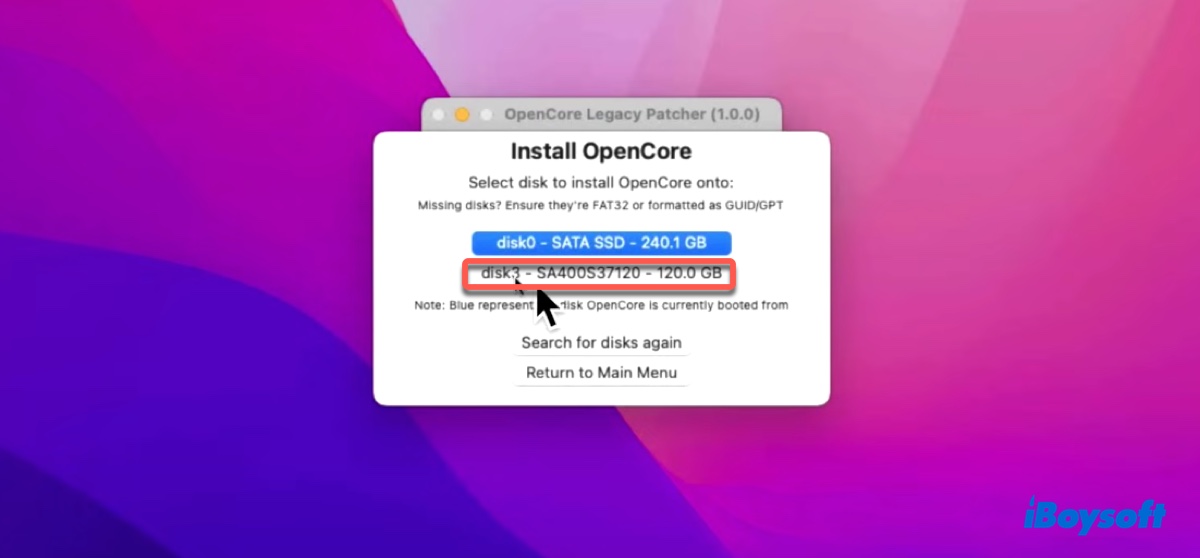
- Click "Install to disk."
- Select your USB drive. (Choose carefully as your internal drive is also listed here.)
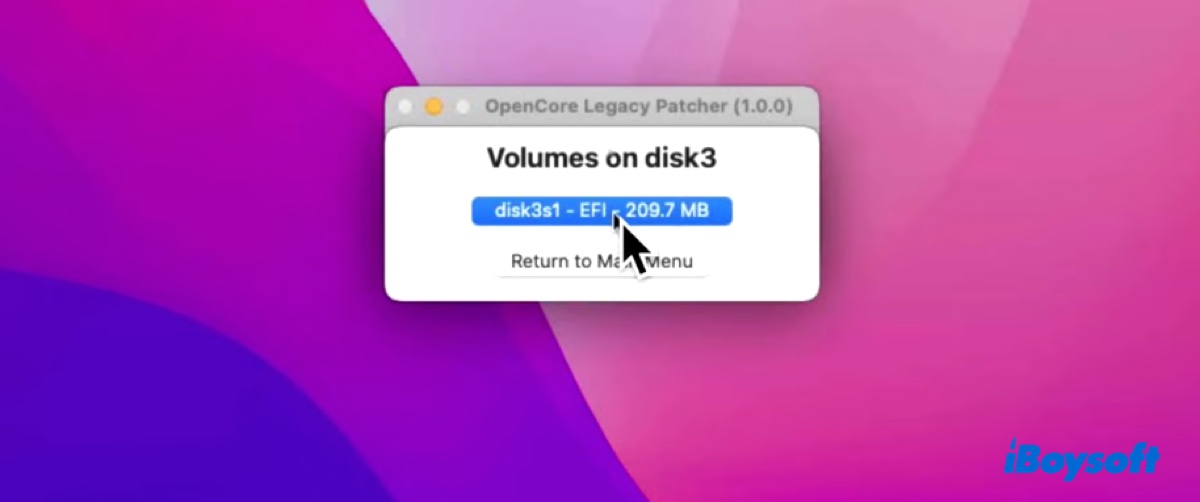
- Click the EFI partition.
- Type your admin password if required.
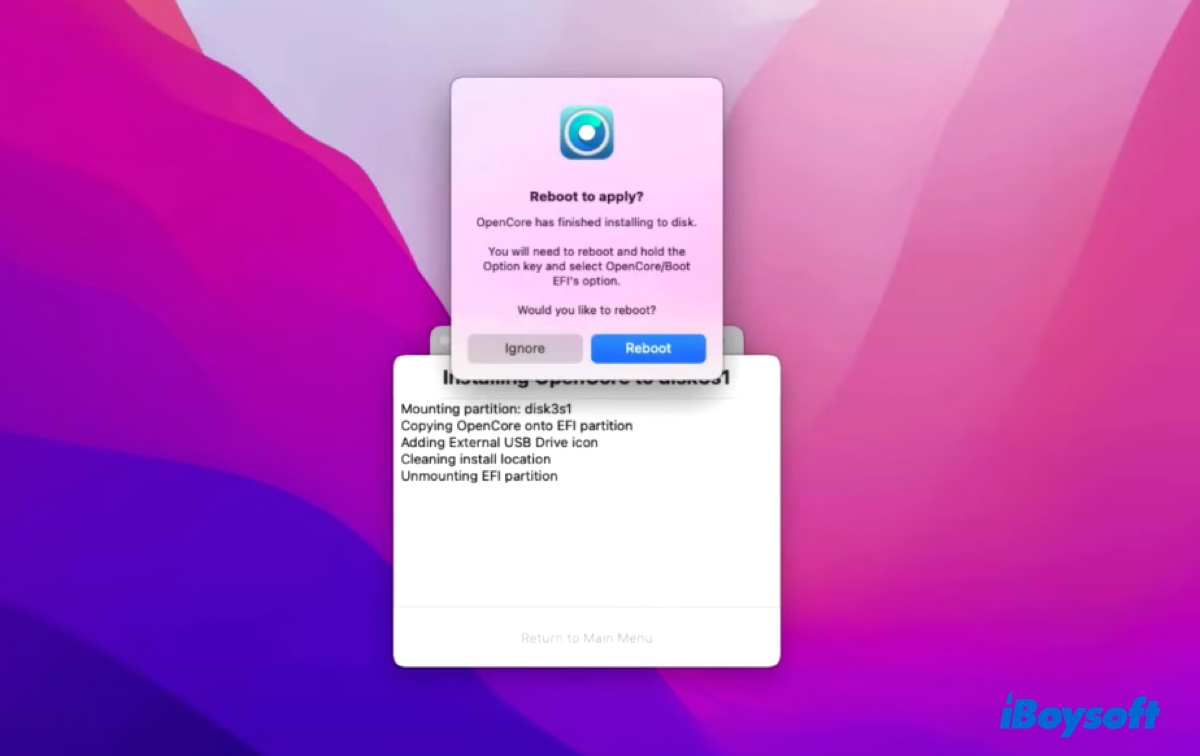
- Click Ignore when OpenCore is installed onto the disk.
Step 4: Ensure your Mac has enough space for macOS Sonoma to run properly (Optional)
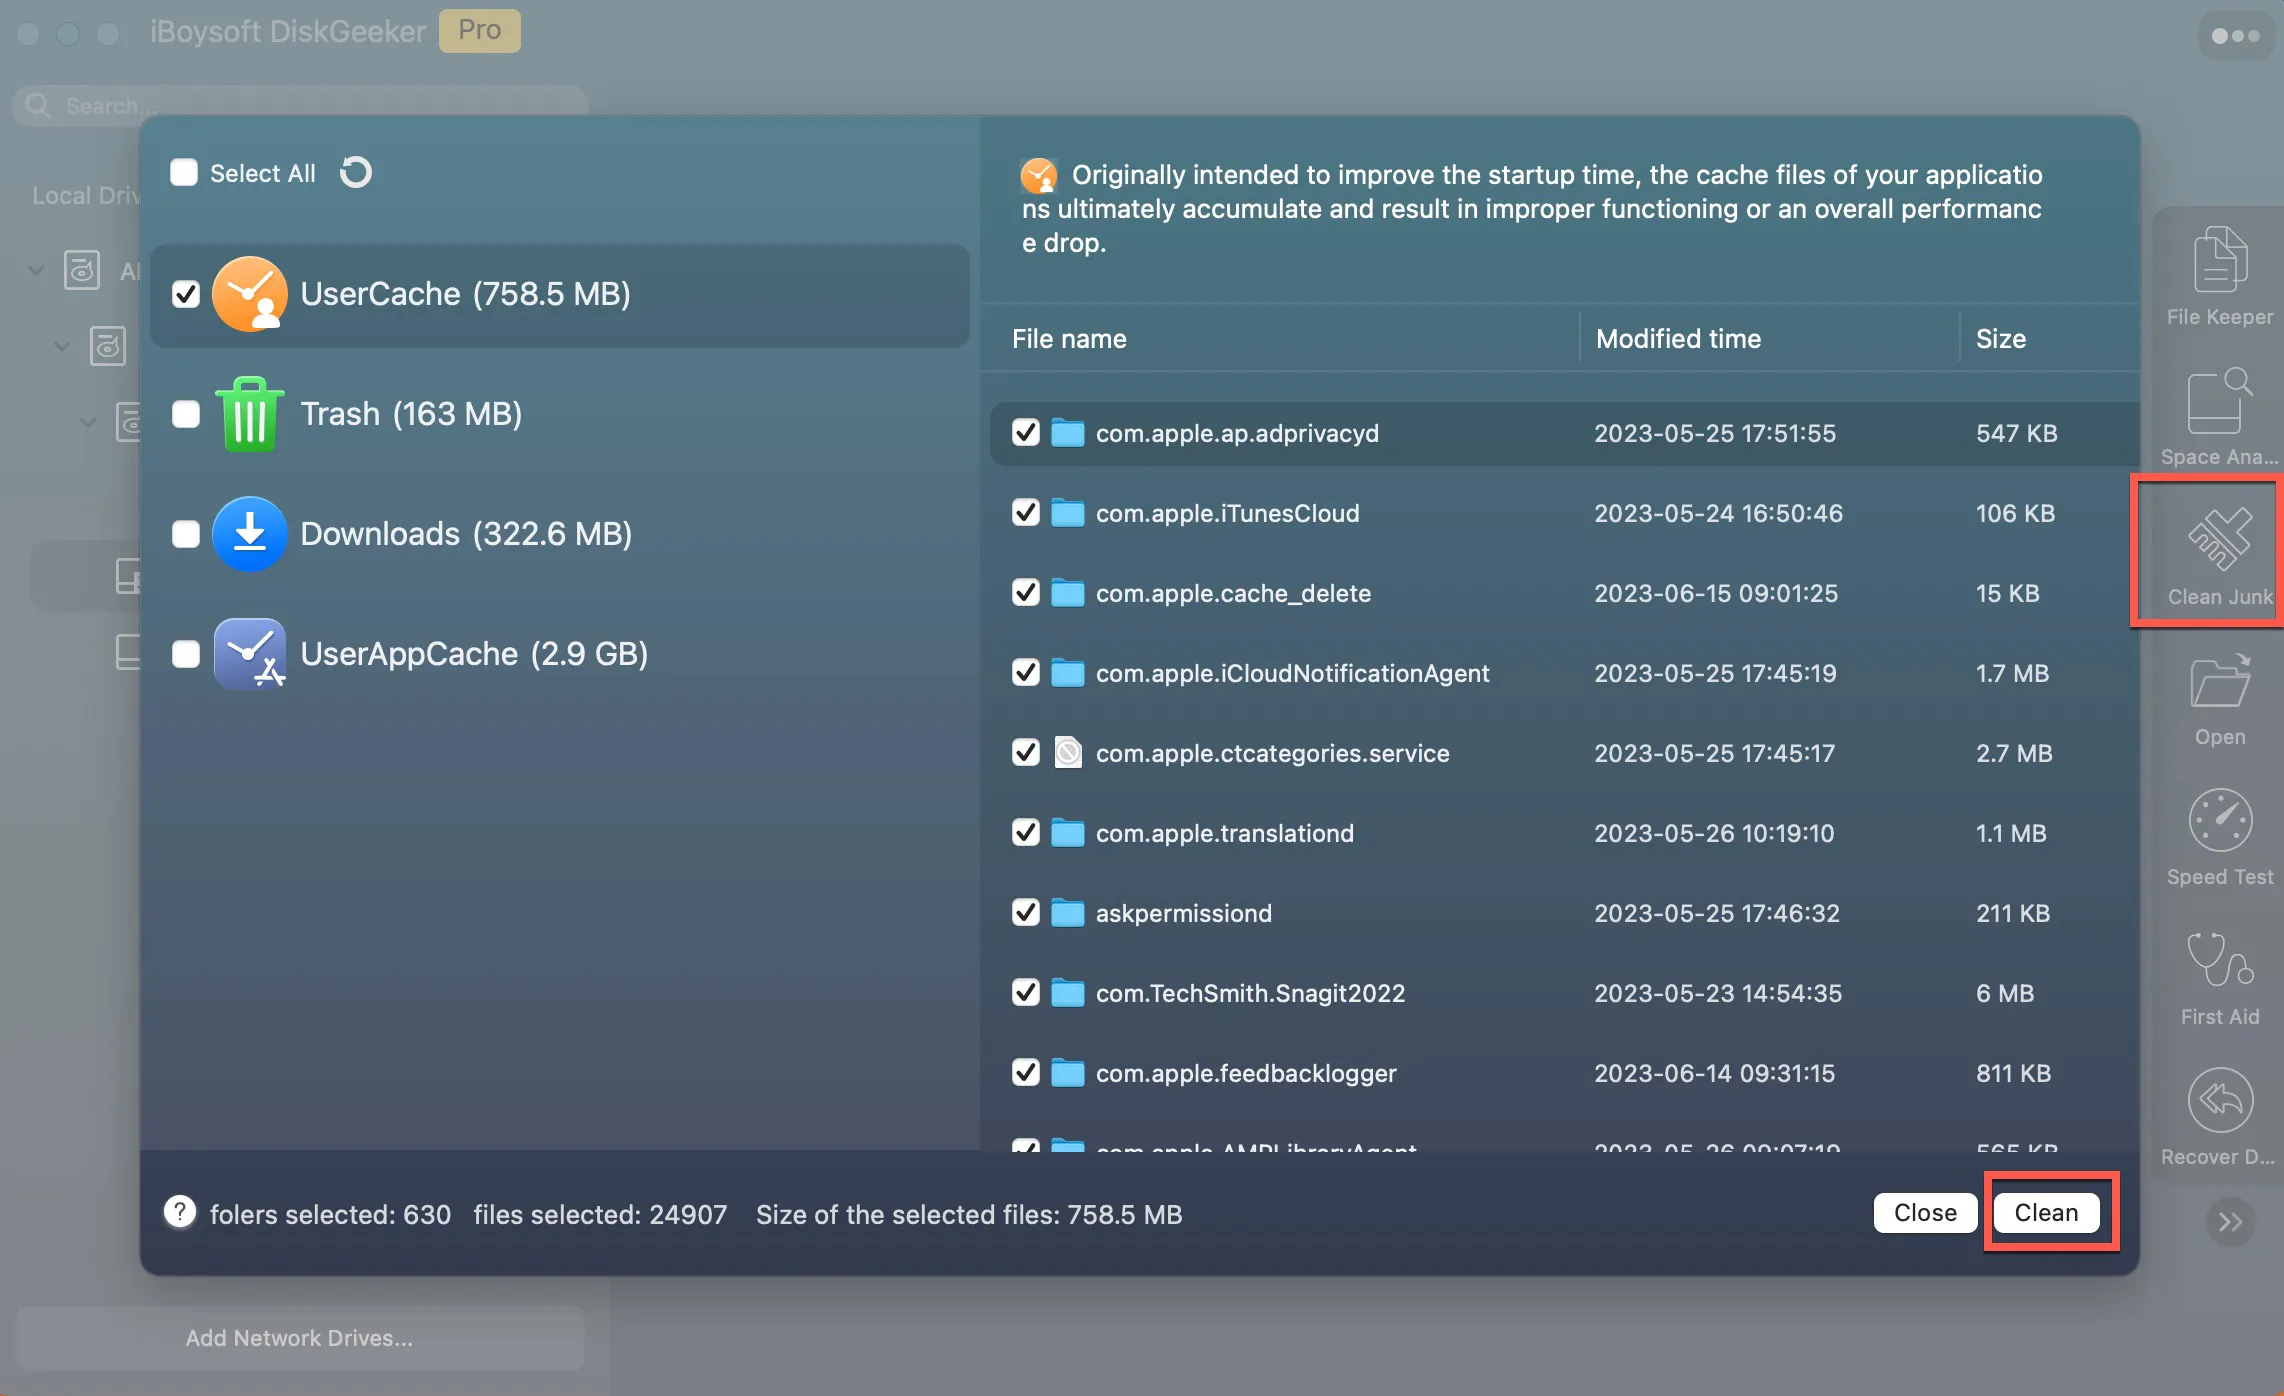
Before heading to the installation, it's necessary to ensure your Mac has at least 25GB of free space to run macOS Sonoma. If you haven't cleaned your Mac for a long time, it's advisable to use iBoysoft DiskGeeker to clear the unwanted files and junk files on your internal hard drive to reduce the likelihood of storage and performance issues.
The tool's "Space Analyze" feature can analyze your Mac's storage space and organize all files by size, allowing you to easily delete the large files you no longer need.
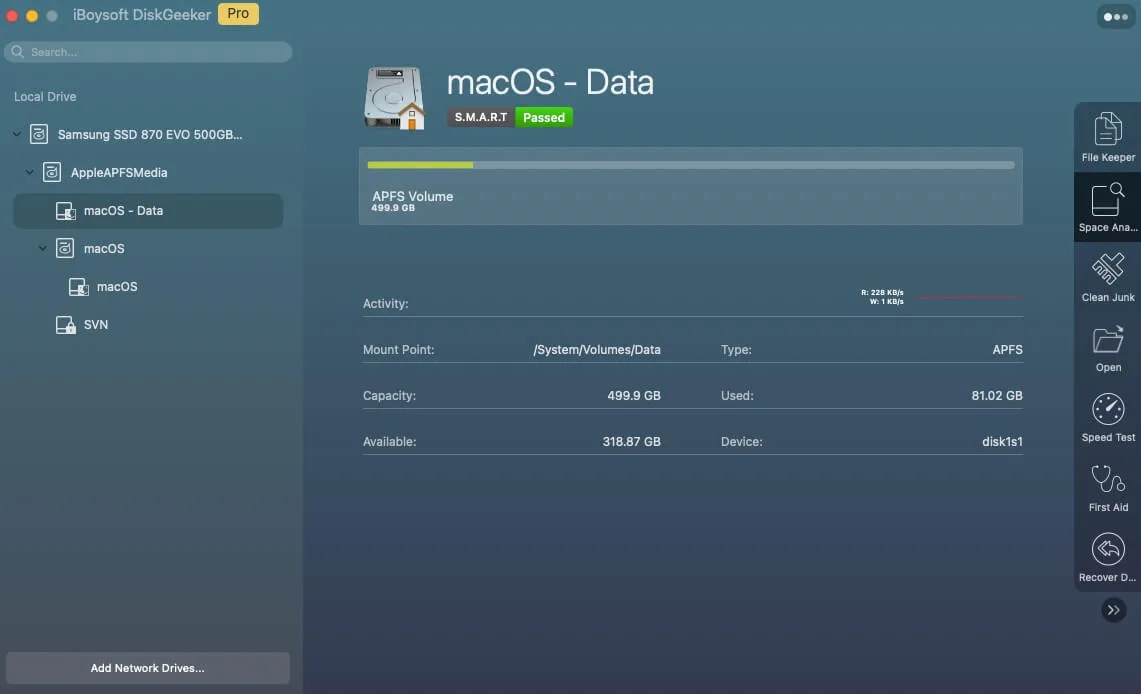
Its "Clean Junk" feature can help you efficiently remove all the log files, app & system caches, unemptied trash, and preferences files on your internal drive.
You can grab it for free from the button below!
Step 5: Boot from the macOS Sonoma bootable installer to install Sonoma
Now is the time to boot from the macOS Sonoma installer to complete the installation.
- Shut down your Mac.
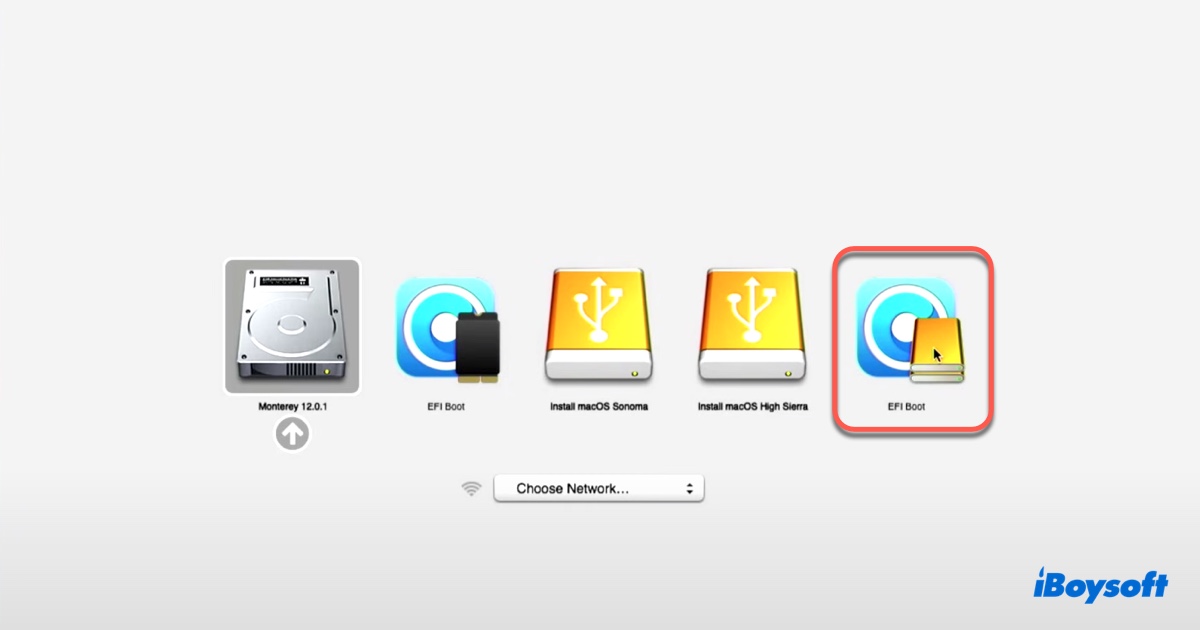
- Press the power button, then immediately press and hold the Option (Alt) key.
- Click "EFI Boot" with your USB drive icon and click the up arrow.
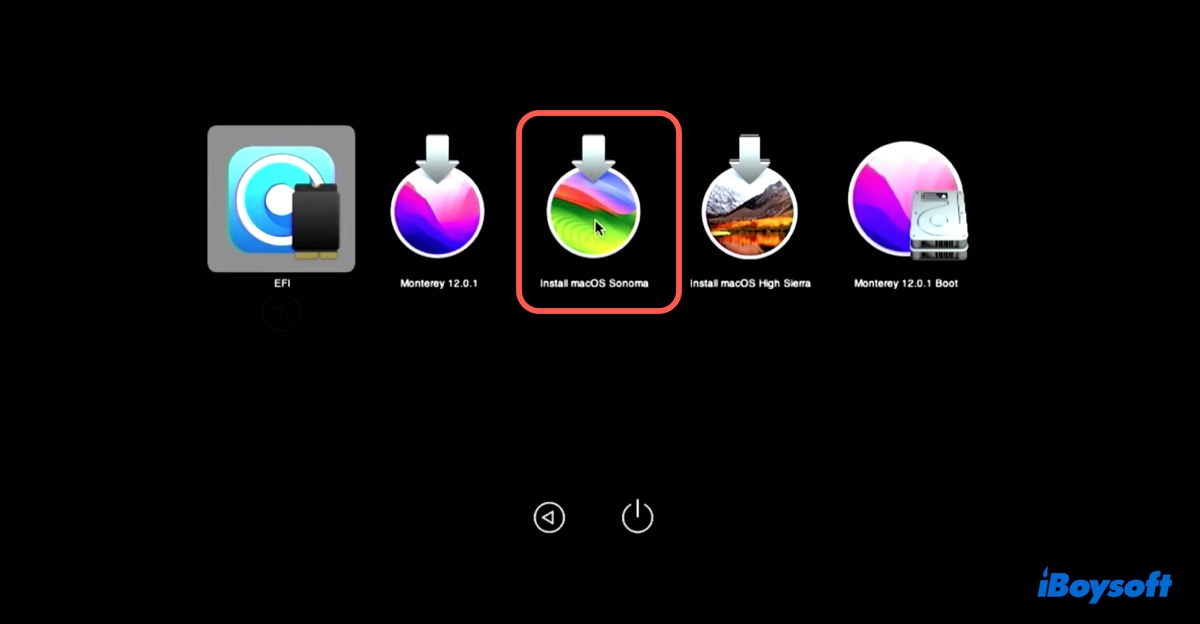
- Click "Install macOS Sonoma" and the up arrow.
- Select a language and click the right arrow.
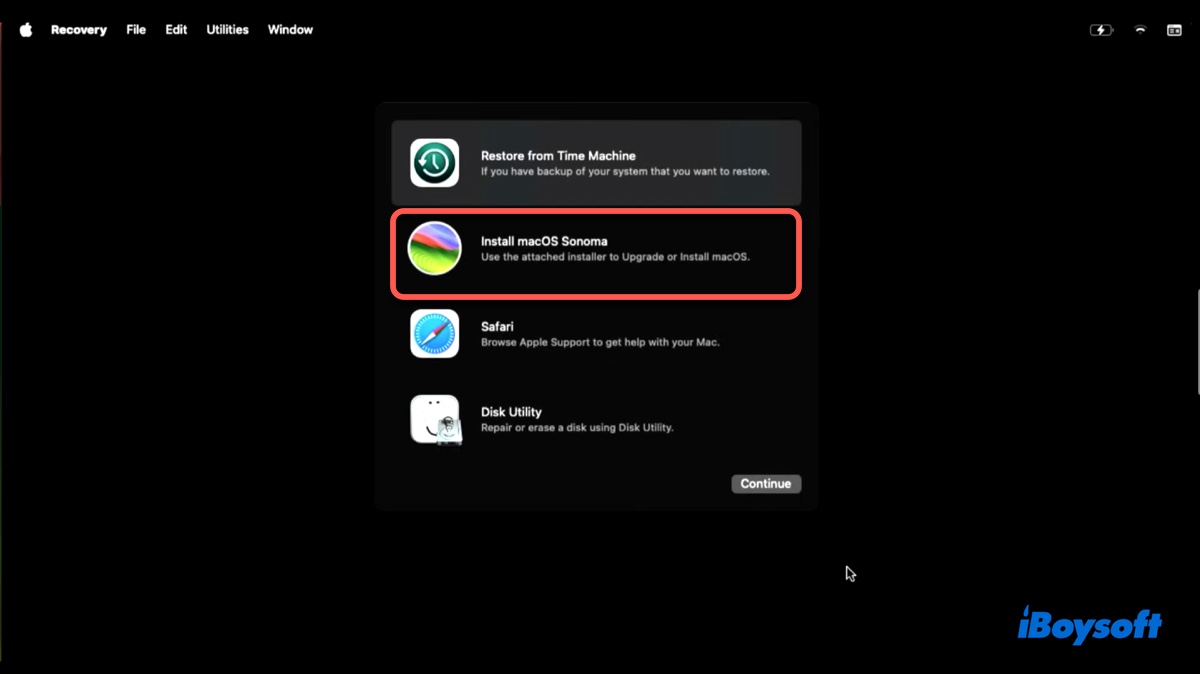
- Now, you should be in the macOS Recovery Mode.
- Erase your Mac if you prefer a clean installation. (not necessary; see the steps below to do it.)
- Click "Install macOS Sonoma" and follow the onscreen instructions to install macOS 14 Sonoma on your unsupported Mac.
✽If you want to erase your Mac and remove everything on your internal hard drive, take these steps before installing macOS Sonoma. (Take them too if the installation that was done without erasing your Mac fails.)
- Select Disk Utility > Continue.
- Click View > Show All Devices.
- Select the top-level physical disk of your internal hard drive and click Erase.
- Give it a name.
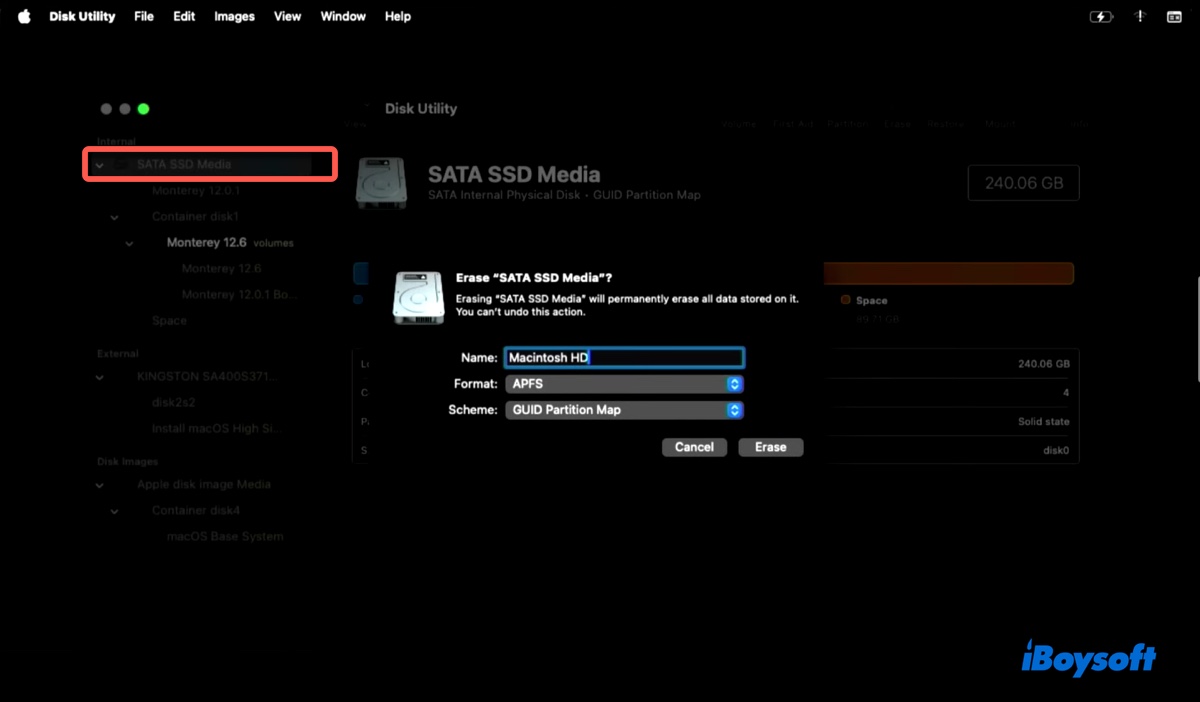
- Set APFS as the format.
- Set GUID Partition Map as the scheme.
- Click Erase.
- Exit Disk Utility.
- Click "Install macOS Sonoma" to install Sonoma.
Step 6: Install OCLP on your internal hard drive
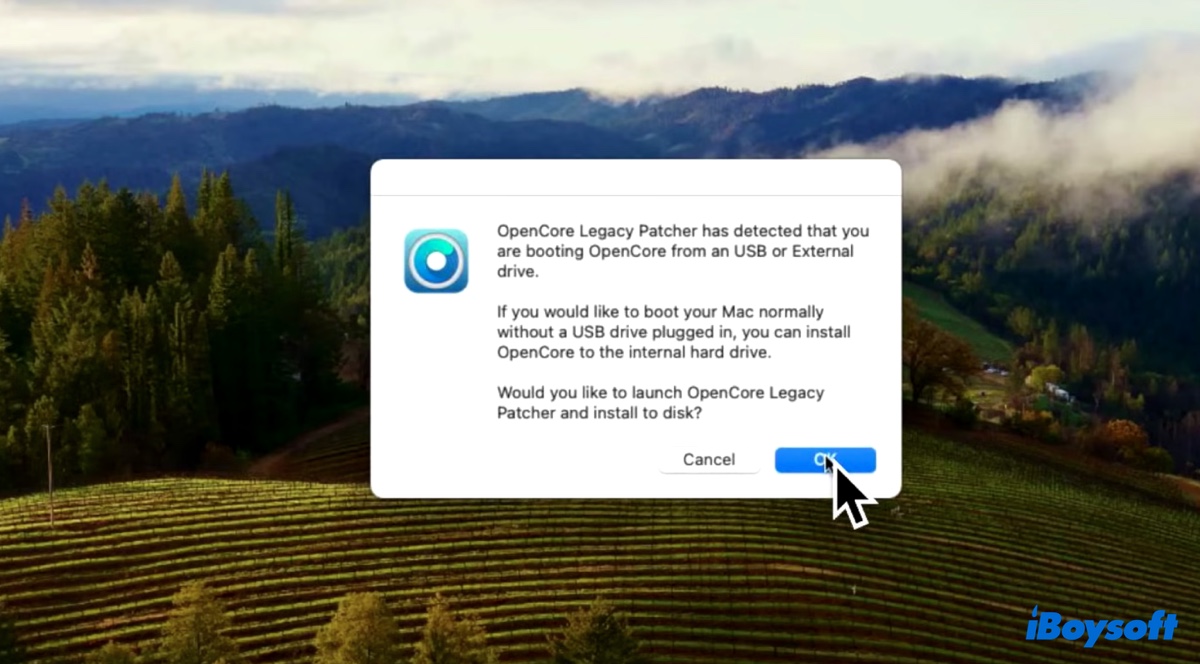
When macOS Sonoma is installed and reboots you to the desktop, a popup window will appear and ask if you want to install OpenCore on your internal hard drive. Proceed with the steps below:
- Click OK to proceed.
- Tap "Install to disk" and click your internal hard drive followed by its EFI partition.
- When the installation is done, a popup message will show up asking you to reboot your Mac with the Option key hold to start up from your internal hard drive.
- Safely eject your USB drive.
- Click the Reboot button on the popup message, then press and hold the Option key and click Restart.
- When the startup volumes are present, select the internal "EFI Boot" partition and click the up arrow.
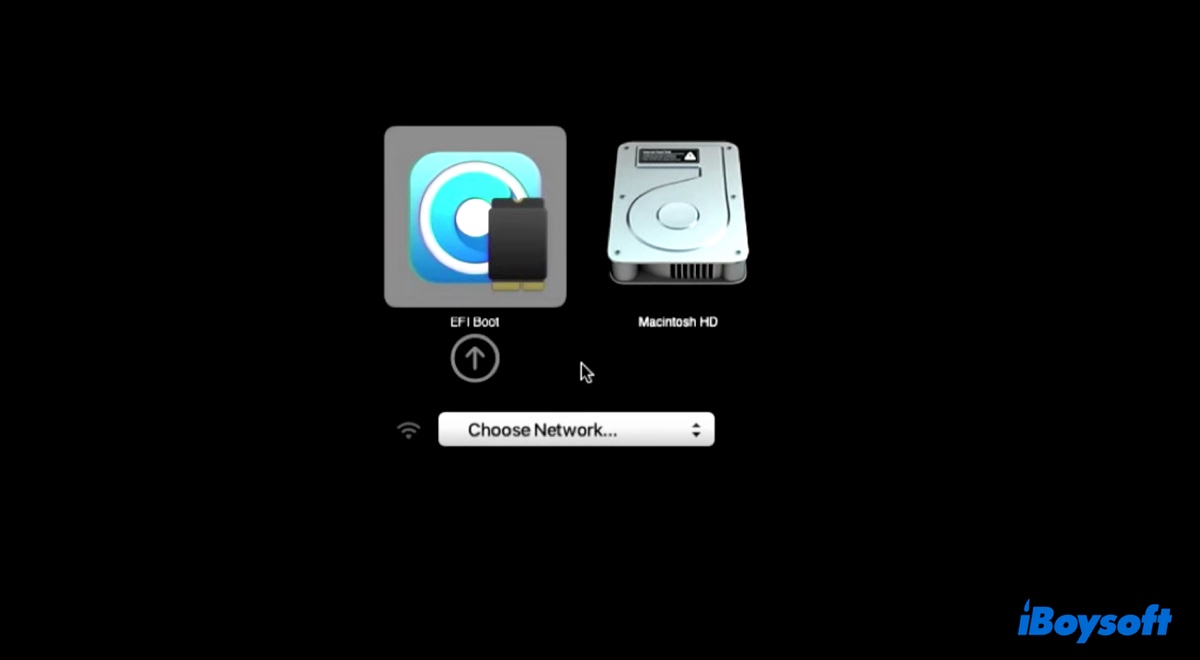
- Select Macintosh HD and click the up arrow.
- Enjoy macOS Sonoma.
Are these steps for installing Sonoma on unsupported Macs helpful? If they are, please share this guide.
FAQs about how to install Sonoma on unsupported Mac
- QHow do I install Sonoma on an old Mac?
-
A
To install Sonoma on an old Mac that's not compatible with it, you'll need OpenCore Legacy Patcher to patch your Mac. If macOS Sonoma supports your old Mac, you can upgrade to it from System Preferences/Settings > Software Update.
- QHow do I get Sonoma on an unsupported Mac?
-
A
You can get Sonoma on an unsupported Mac with OCLP by following the 6 steps provided in this guide.
- QHow to install macOS Sonoma on unsupported MacBook Pro?
-
A
Here are the steps to install macOS Sonoma on an unsupported MacBook Pro:
Step 1: Download OpenCore Legacy Patcher
Step 2: Erase the USB drive with Mac OS Extended (Journaled) (Optional)
Step 3: Create the macOS Sonoma Installer with OCLP
Step 4: Ensure your Mac has enough space for macOS Sonoma to run properly (Optional)
Step 5: Boot from the macOS Sonoma bootable installer to install Sonoma
Step 6: Install OCLP on your internal hard drive
- QCan my Mac upgrade to Sonoma?
-
A
Here are the Macs that can upgrade to Sonoma:
MacBook Pro: 2017 and earlier
MacBook Air: 2017 and earlier
Mac Mini: 2017 and earlier
iMac: 2018 and earlier
Mac Studio: 2021 and earlier
Mac Pro: 2018 and earlier
If your Mac isn't supported, consider using OCLP to install macOS Sonoma.