iBoysoft Data Recovery for Mac online help
Help Documents
- > iBoysoft Data Recovery for Mac Overview
- > Supported Operating Systems
- > Supported file systems
- > Supported storage devices
- > Allow Full Disk Access
- > Enable System Extensions
- > Activate iBoysoft Data Recovery for Mac
- > How to Recover Data From Mac's Internal Hard Drive
- > How to Recover Data From an External Disk on Mac
- > How to Recover Data From a Disk Image
- > How to Recover Data From an Unbootable Mac
- > Organize Found Files
- > Preview Found Files
- > Save and Load Scan Record
- > Preferences
- > Uninstall
- > FAQ
iBoysoft Data Recovery for Mac Overview
iBoysoft Data Recovery for Mac is a professional data recovery application that runs in macOS environment to help recover deleted Mac files or retrieve lost data from both Mac's startup disk or external storage devices attached to Mac.
Supported Operating Systems
macOS 15 Sequoia, macOS 14 Sonoma, macOS 13 Ventura, macOS 12 Monterey, macOS 11 Big Sur, macOS 10.15 Catalina, macOS 10.14 Mojave, macOS 10.13 High Sierra, macOS 10.12 Sierra and Mac OS X 10.11 El Capitan. If you need to recover data on an older version of macOS, contact [email protected].
Supported file systems
APFS, encrypted APFS, HFSX, HFS, HFS+, exFAT and FAT32.
Supported storage devices
Macintosh HD, external hard drive, USB flash drive, USB stick, flash drive, SD card, CF card, memory card, memory stick, micro card, digital camera & other disk-based storage devices. RAIDreconstruction is not supported by iBoysoft Data Recovery for Mac. Fusion drive recovery is under development.
How to allow Full Disk Access
Full Disk Access is a security feature starting in macOS 10.14 that protects user data on Mac's internal hard drive against unauthorized access from third-party programs. macOS will require the Full Disk Access to be enabled by the administrator when you install iBoysoft Data Recovery for Mac for the first time.
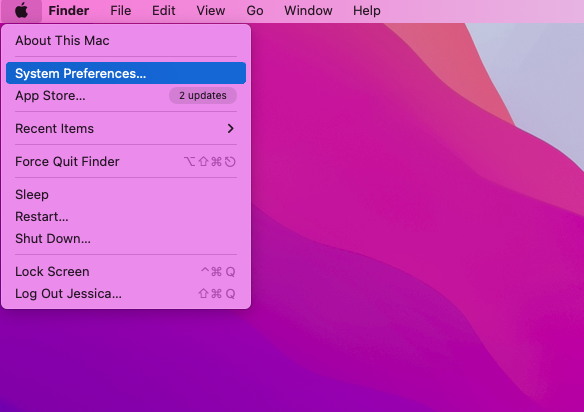
Step 1: Go to the Apple menu > "System Preferences" ("System Settings" on macOS Ventura).
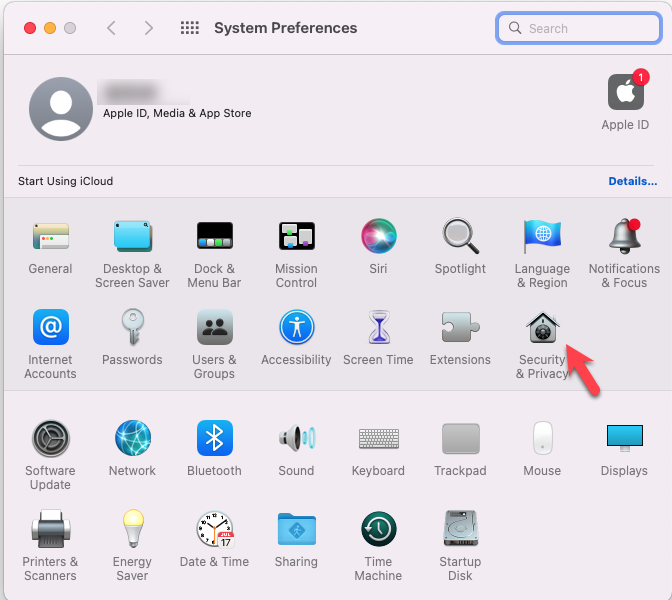
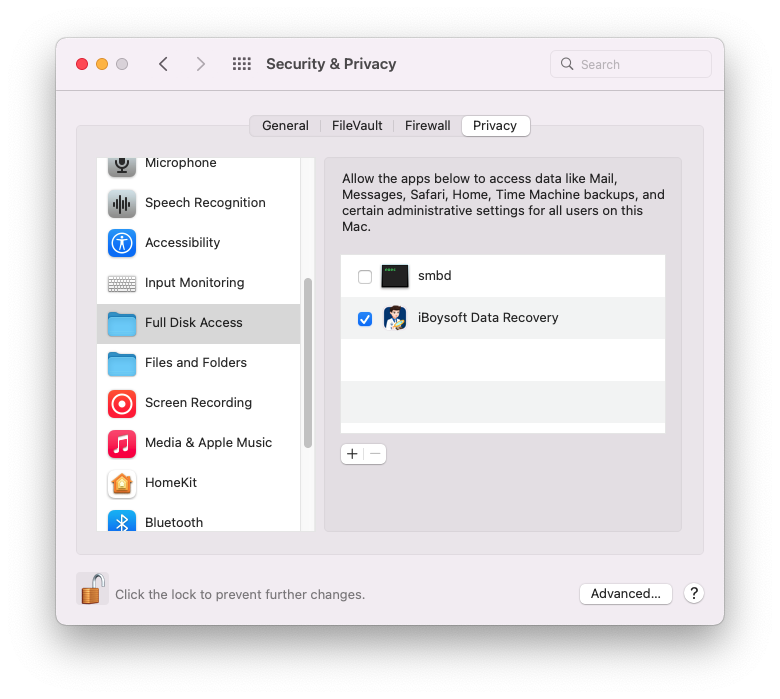
Step 2: Tap "Security & Privacy" and under the "Privacy" tab, select "Full Disk Access" from the left panel.
Step 3: Click on the lock icon to allow changes and enter your username and password.
Step 4: Click "+" and add iBoysoft Data Recovery to the list and close the window.
Step 5: Launch iBoysoft Data Recovery for Mac again.
How to Enable system extensions on Mac
System extensions are codes installed in macOS to extend the functionality of macOS. To protect the integrity of macOS, macOS 10.13 and later version require users to verify the developer of the system extension and manually allow the software installation for the first-time installation on your Mac.
Allow system extensions on an Intel Mac:
Step 1: Click the Apple menu > "System Preferences" ("System Settings" on macOS Ventura).
Step 2: Tap "Security & Privacy" and click the "General" tab. In macOS Ventura, just scroll down.
Step 3: Click the yellow lock and enter your admin account username and password to allow changes. In macOS Ventura, you will be asked to authorize after you click the "Allow" button.
Step 4: Click the "Allow" button next to "Chengdu Aibo Tech Co.,Ltd." which is the developer of iBoysoft Data Recovery for Mac.

Step 5: Restart your Mac to make the system extension take effect and finish installing the software.
Allow system extensions on an Apple silicon Mac:
If your Mac is shipped with Apple Silicon, enabling system extensions requires extra steps to reduce the security of secure boot in macOS Recovery Mode.
Follow the steps from this article:
Allow the System Extension of iBoysoft Data Recovery for Mac to Load on a Mac with Apple Silicon
How to activate iBoysoft Data Recovery for Mac
You can activate iBoysoft Data Recovery for Mac to Professional edition or Technician edition for unlimited data recovery either with internet connection or without internet connection.
Note: If you are running firewall or anti-virus programs on your computer, you may need to temporarily turn them off so as to complete the registration.
Activate iBoysoft Data Recovery for Mac if you have internet access:
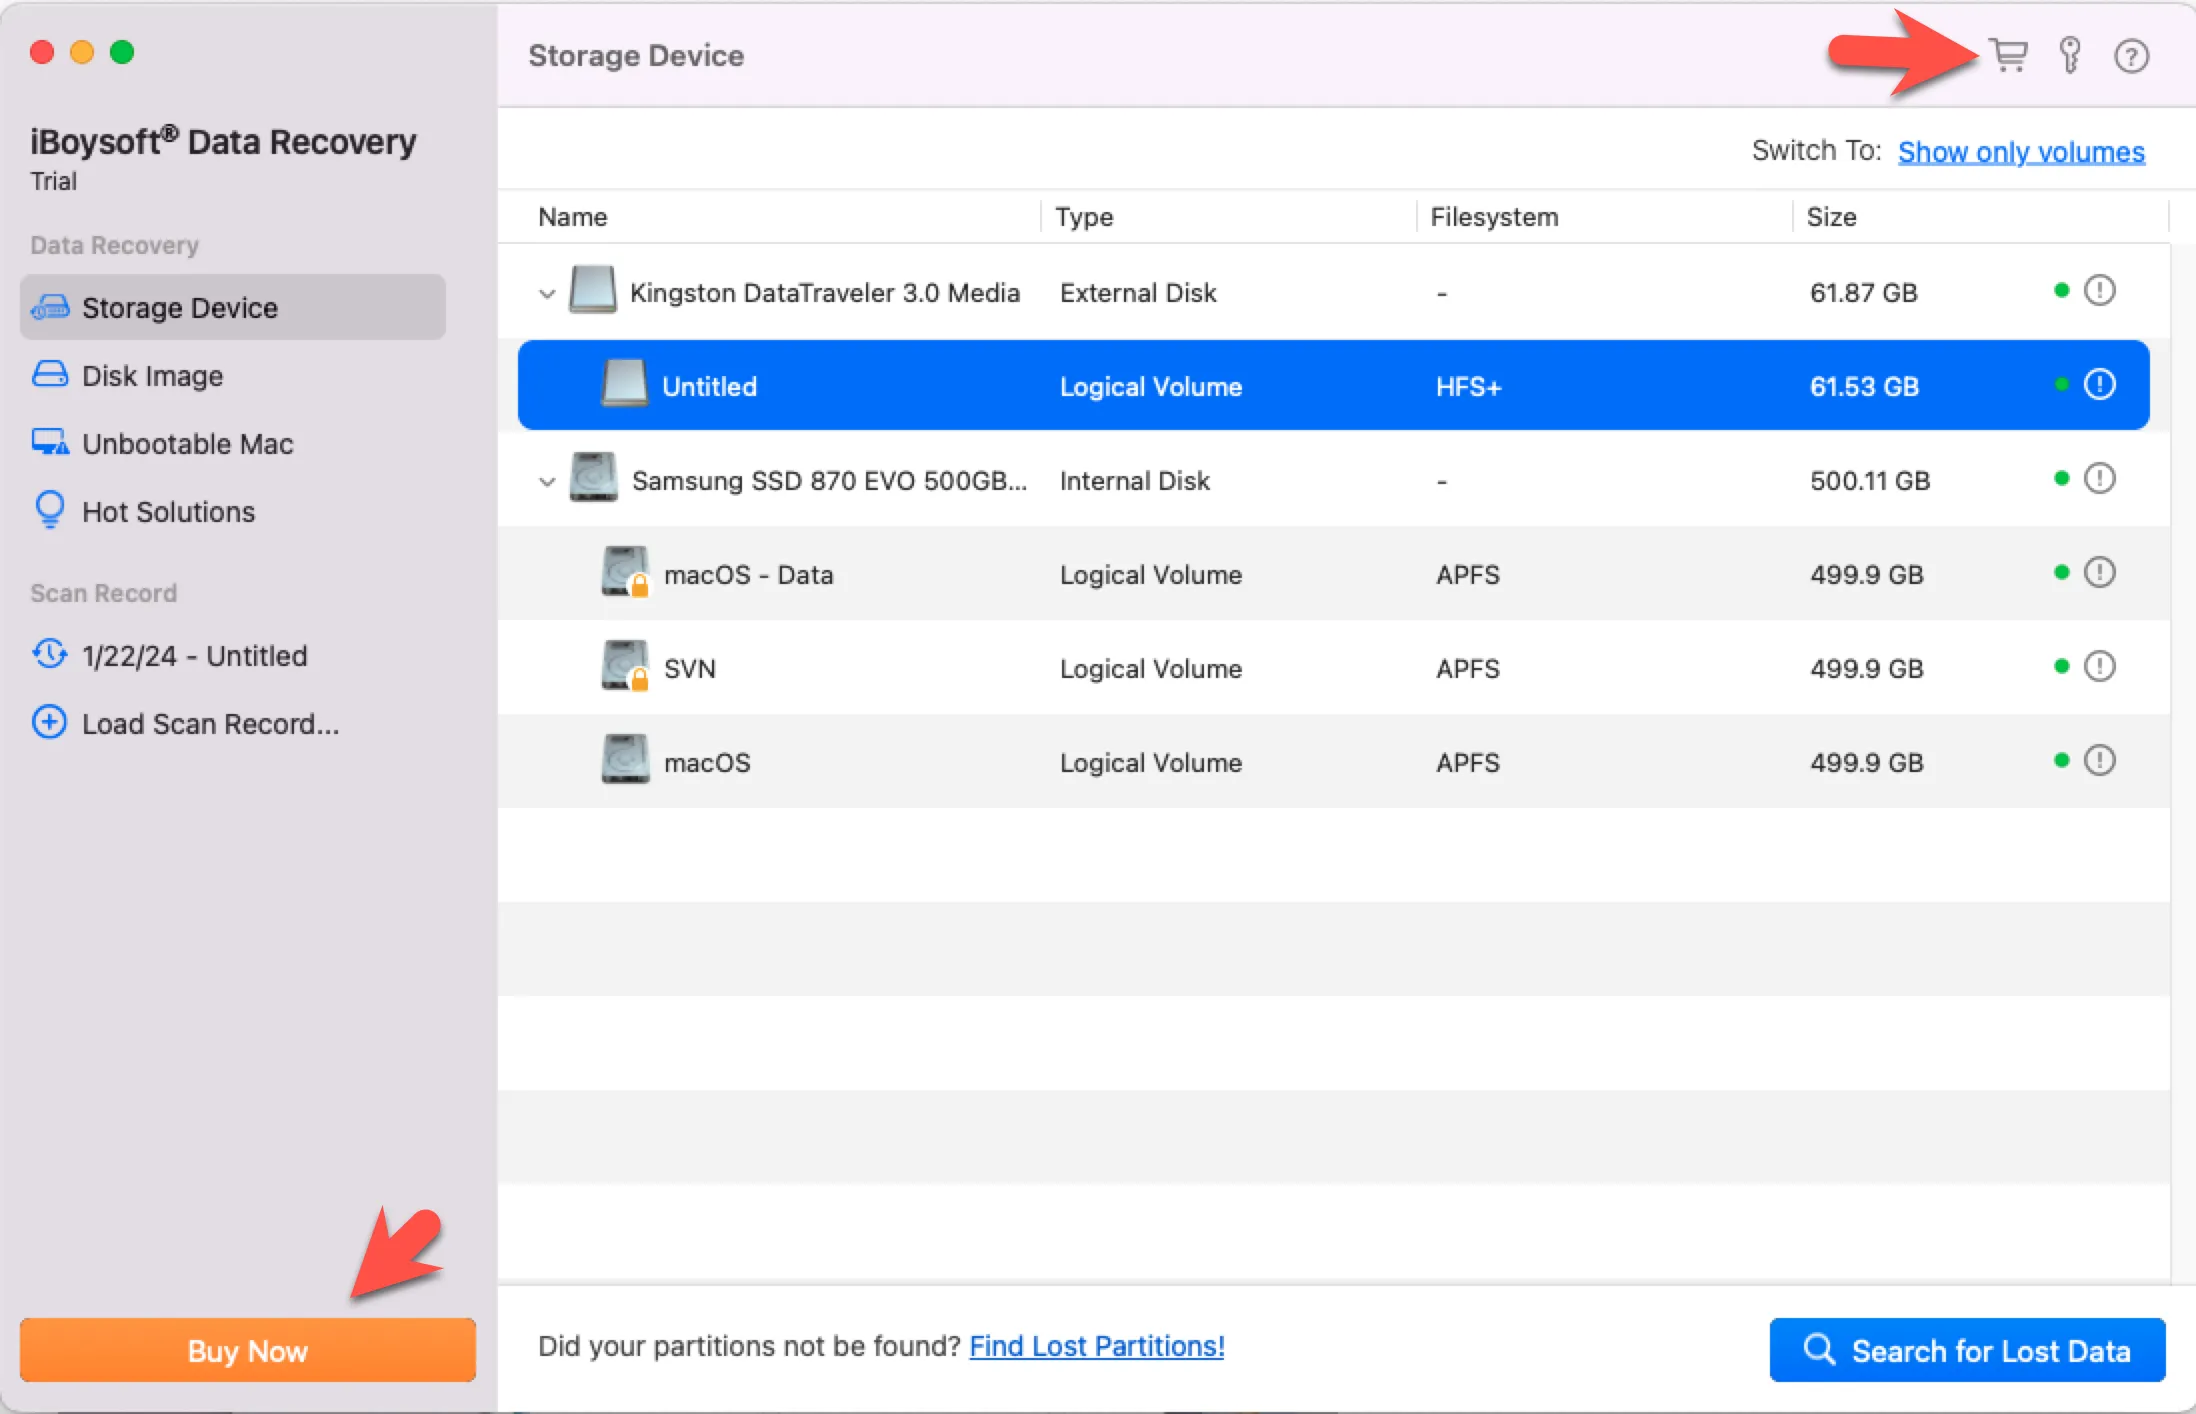
Step 1: Click the "Buy Now" button in Trial version. You can also click the key icon at the top corner to activate iBoysoft Data Recovery for Mac.
Step 2: Purchase a plan that fits you best and enter iBoysoft Data Recovery for Mac license key. You are recommended to copy and paste the license key from order confirmation email.
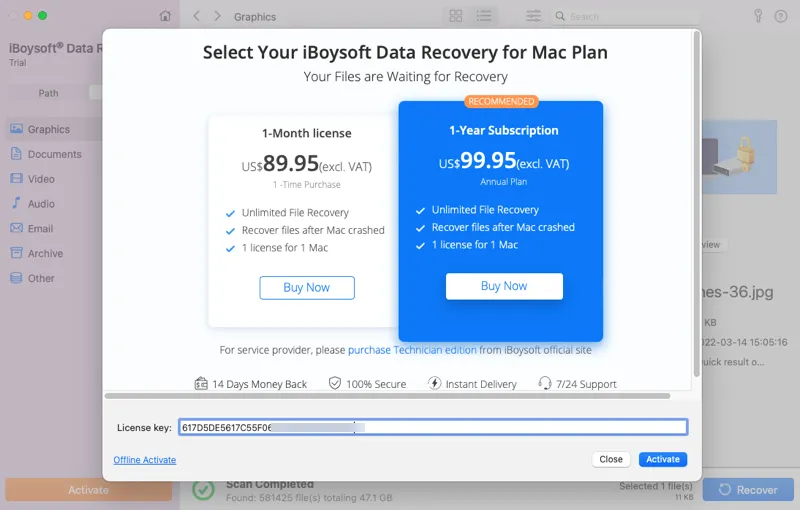
Step 3: Click the "Activate" or "Upgrade" button in the pop-up.
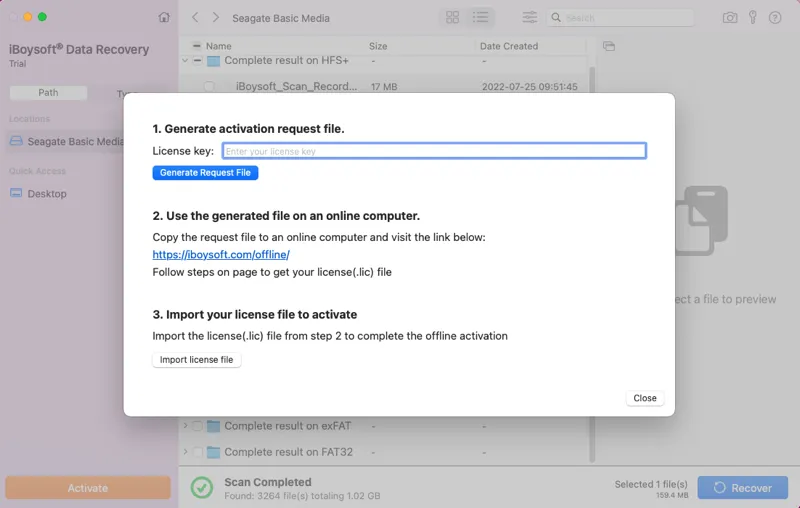
Activate iBoysoft Data Recovery for Mac if you don't have internet access:
If you can't access the Internet on your computer on which you need to perform data recovery, click iBoysoft Data Recovery on menu bar, select "Offline Activation" and then follow the wizard to complete the offline activation.
How to recover data from Mac's internal hard drive
Different Mac models use different recovery methods to maximize the success rate of data recovery. Before you use iBoysoft Data Recovery for Mac to scan your startup disk for deleted or lost data, verify the Mac model you have and which version of macOS is running, and then follow the steps below.
On a Mac with an only Intel processor, or with a T2 Security chip running macOS Big Sur or later, or with an Apple Silicon:
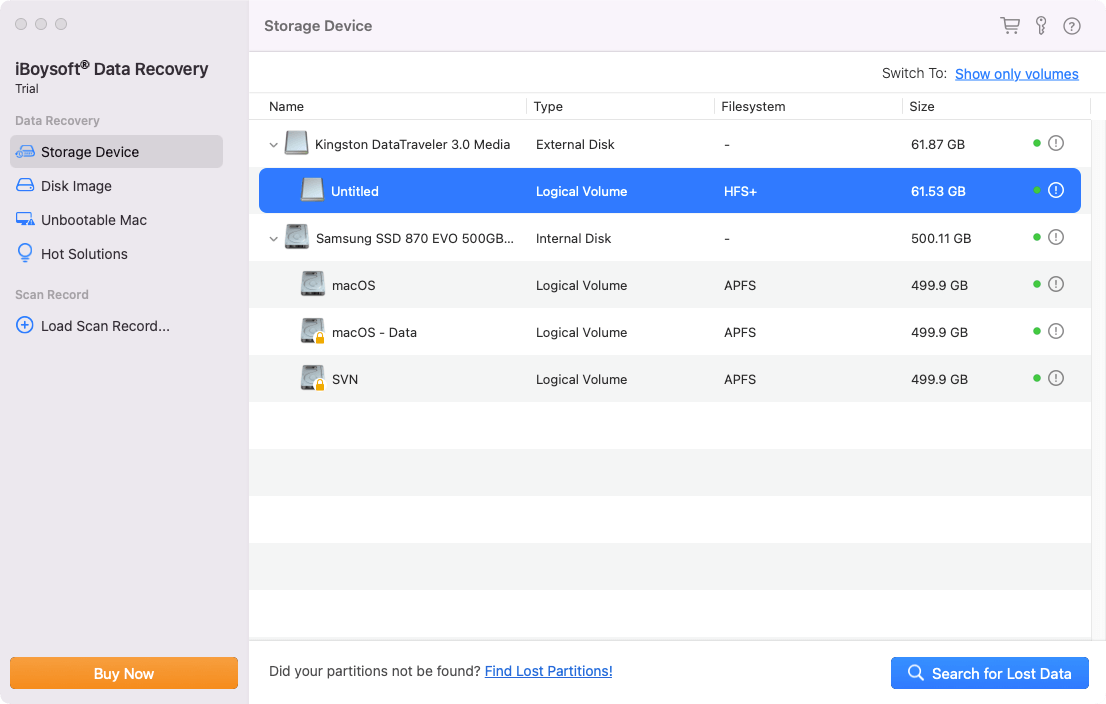
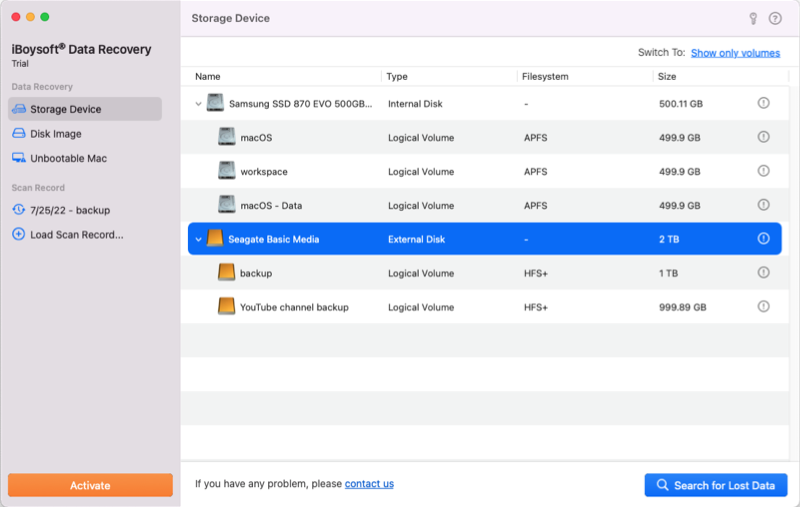
Step 1: Select "Storage Device" under "Data Recovery" in the left pane.
Step 2: Select an entire disk usually labled as Macintosh HD/Apple SSD or a volume and click "Search for Lost Data".
1. Click the "!" icon to know more details.
2. You can switch between "Show only volumes" or "Show only devices" to find the target device quickly.
3. If the partition you want to select is missing, select the whole disk and lost partitions will be found during the scan.
4. If the selected disk/partition is encrypted, you will be asked to enter the correct password to unlock it or skip.
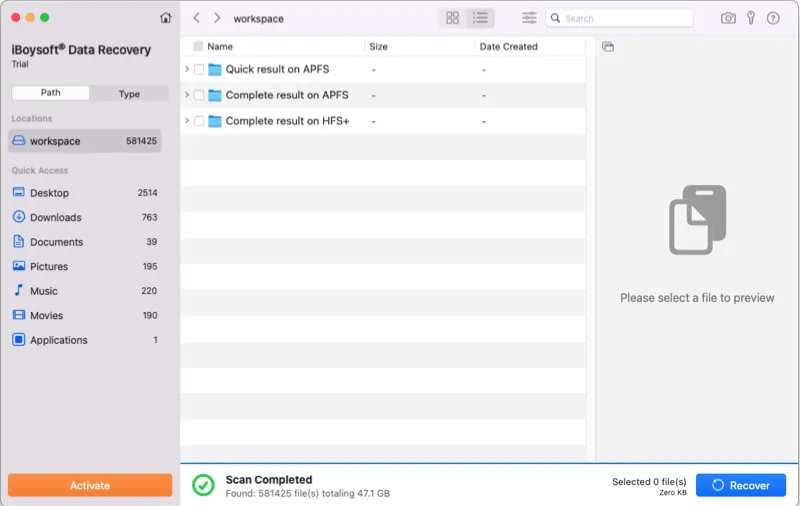
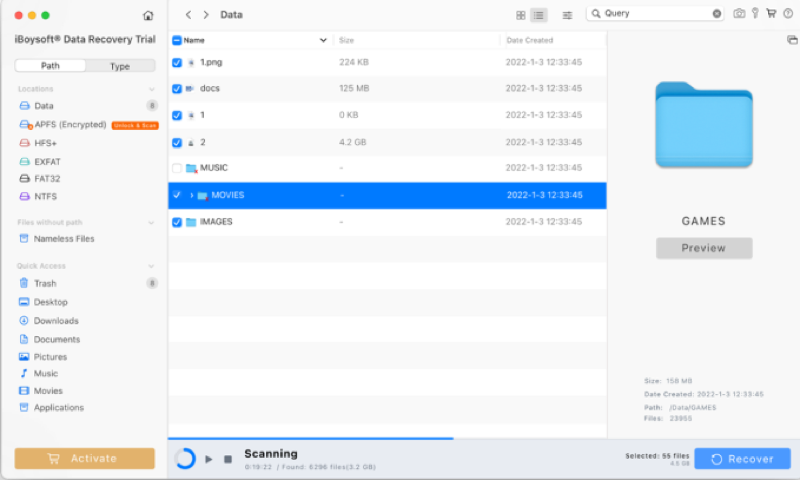
Step 3: Wait until the scan is complete.
You are allowed to check the "Quick result" to see if you can find wanted files or pause/stop the scan anytime.
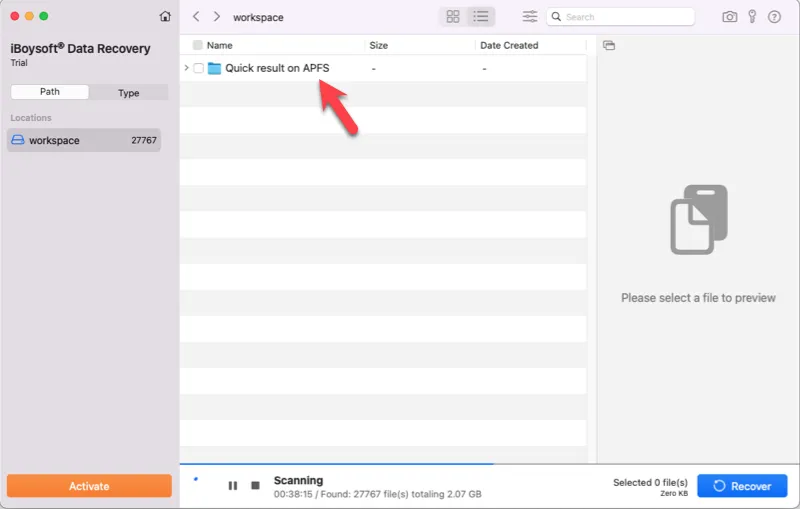
Note: Files will probably not be successfully recovered if you terminate the scan halfway and start recovery from the complete result. It is recommened to wait out the scan to finish.
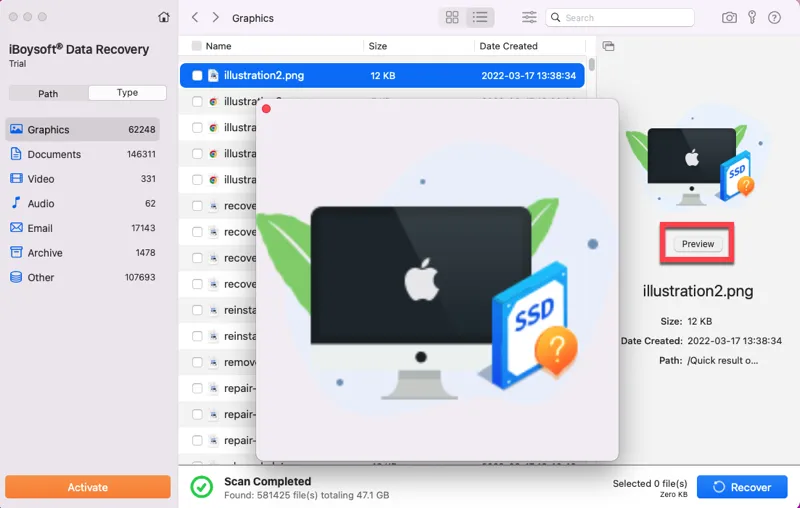
Step 4: Filter scan result and preview wanted files.
iBoysoft Data Recovery for Mac provides a wide variety of filters and organizers to help you find the files you want to recover quickly. Then you can click the "Preview" button to check the file.
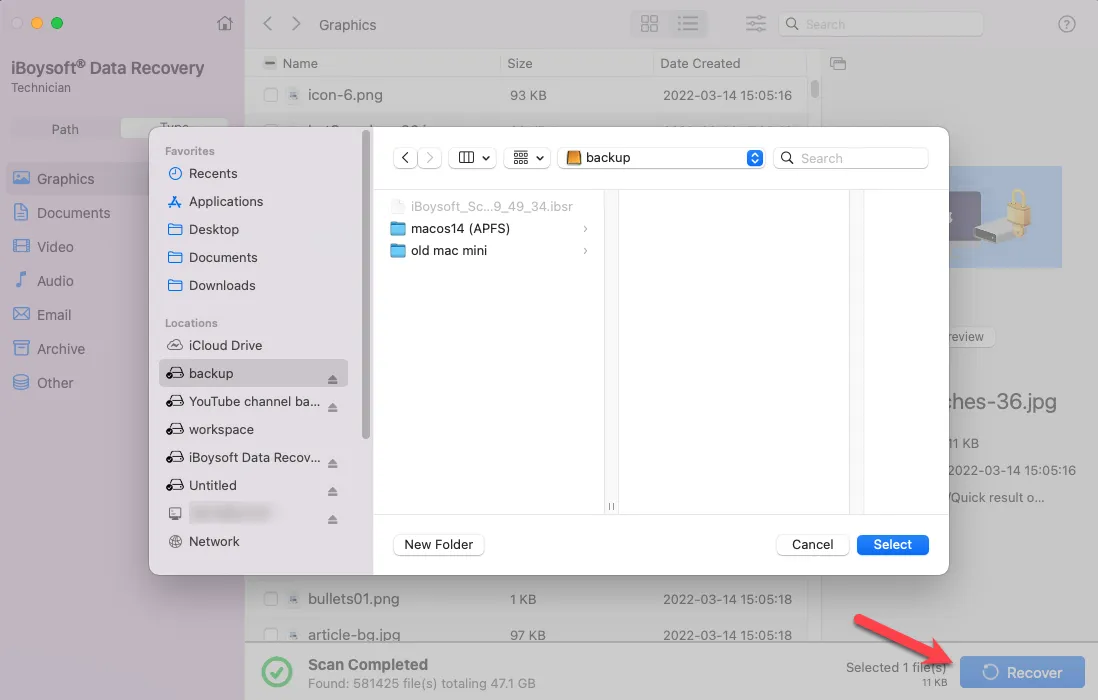
Step 5: Check the box in front of the files or folders you want to get back or use the space bar to select and click "Recover".
You will need an external disk with enough capacity to store recovered files because this data recovery software doesn't allow you store recovered files to the same startup drive to prevent data loss again.
Step 6: Click "OK" after the files are successfully recovered and the Finder app will open automatically for you to check recovered files.
Related articles:
Recover Deleted Files on Mac Before or After Trash Has Been Emptied
How to Recover Data From MacBook SSD
How to Recover Lost Data from an Apple Silicon M1 Mac
On a Mac with an additional T2 Security Chip running macOS 10.15 Catalina or before:After intensive tests, iBoysoft Data Recovery for Mac can find and recover most files from these Macs in macOS Recovery Mode. Please follow the detailed guide in these articles:
How to Run iBoysoft Data Recovery in macOS Recovery Mode
How to Recover Lost Data from T2-Secured MacBook Pro/Air
How to recover data from an external disk on Mac
Before you use iBoysoft Data Recovery for Mac to scan an external storage device, make sure your USB drive is attached to your Mac properly through a USB port, USB adapter, USB hub, or a USB dock and the memory card is connected through the built-in card slot, card adapter, or card reader. Open Disk Utility to find your device in the drive list.
Follow the steps below to recover data from an external drive:
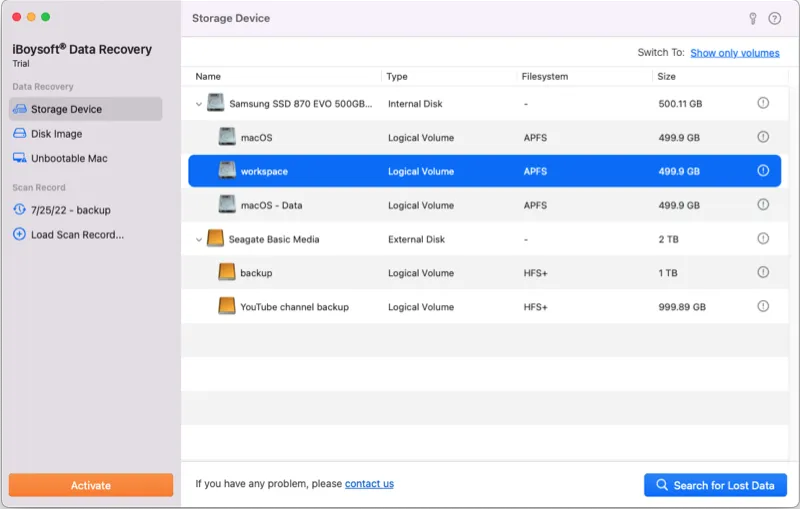
Step 1: Select "Storage Device" under "Data Recovery" in the left pane.
Step 2: Select the disk brand name or a volume and click "Search for Lost Data".
1. Click the "!" icon to know more details.
2. You can switch between "Show only volumes" or "Show only devices" to find the target device quickly.
3. If the partition you want to select is missing, select the whole disk and lost partitions will be found during the scan.
4. If the selected disk/partition is encrypted, you will be asked to enter the correct password to unlock it or skip.
Step 3: Wait until the scan is complete.
You are allowed to check the "Quick result" to see if you can find wanted files or pause/stop the scan anytime.
Note: Files will probably not be successfully recovered if you terminate the scan halfway and start recovery from the complete result. It is recommened to wait out the scan to finish.
Step 4: Filter scan result and preview wanted files.
iBoysoft Data Recovery for Mac provides a wide variety of filters and organizers to help you find the files you want to recover quickly. Then you can click the "Preview" button to check the file.
Step 5: Check the box in front of the files or folders you want to get back or use the space bar to select and click "Recover".
You will be asked to select a location which should not be the original location to store recovered files.
Step 6: Click "OK" after the files are successfully recovered and the Finder app will open automatically for you to check recovered files.
For more information, read the articles below:
How to Repair and Recover External Hard Drive on Mac
How to Repair and Recover USB Flash Drive on Mac
Recover Deleted or Lost Files from an SD Card on Mac
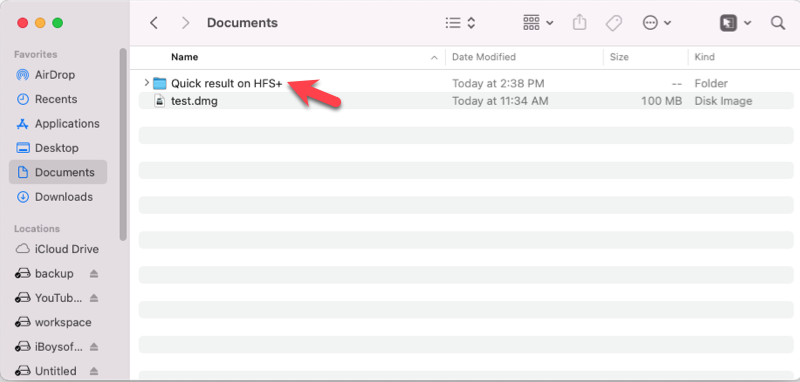
How to recover data from a disk image
A disk image is a compressed copy of the entire content of hard drive, solid-state drive, or other storage devices. A disk image file usually ends with one of the extensions including .iso, .cso, .img or .dmg. iBoysoft Data Recovery for Mac only supports DMG files.
If you want to recover deleted or lost data from a disk image file, follow the steps below:
Step 1: Select "Disk Image" under "Data Recovery" in the left pane.
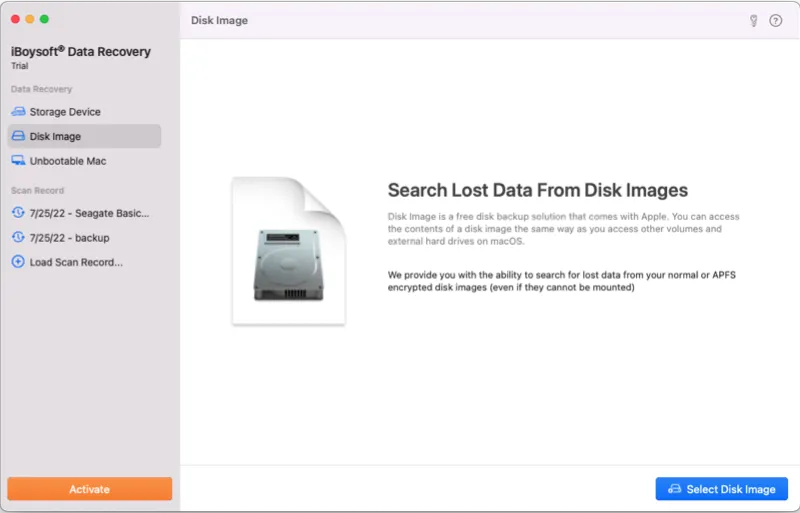
Step 2: Click the "Select Disk Image" button and select a disk image from Mac or an external disk with a DMG extension.
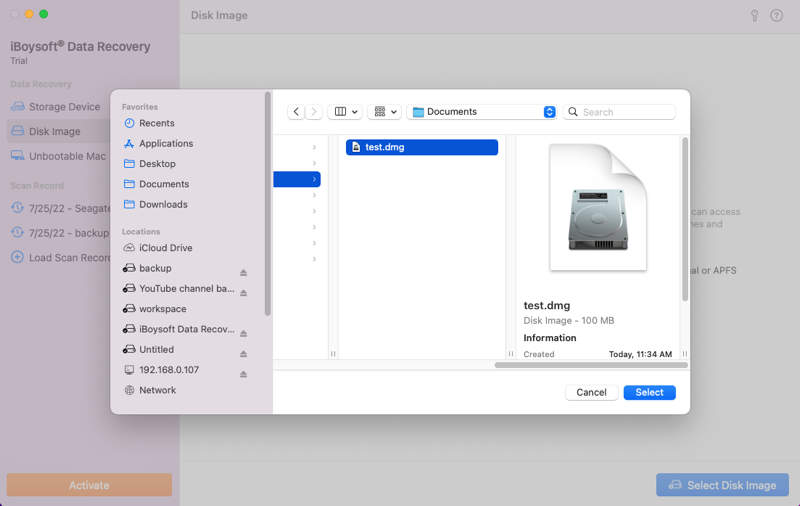
Step 3: Click the "Select" button to start scanning immediately.
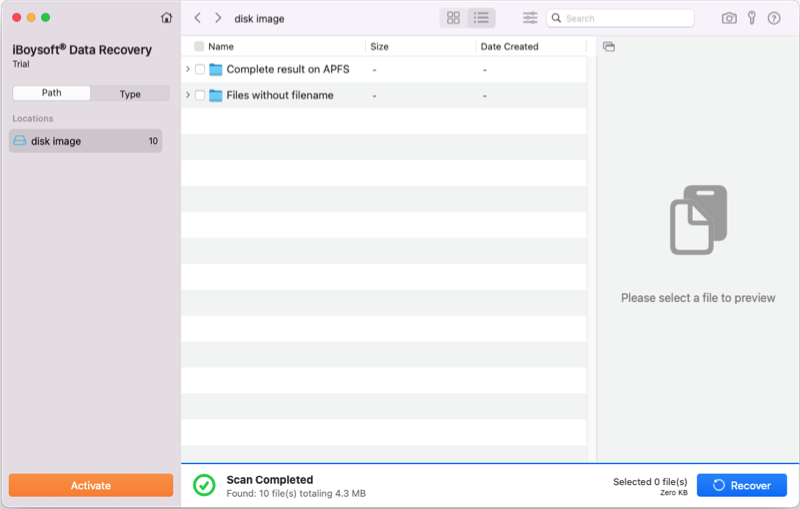
Step 4: Wait until the scan is complete.
You are allowed to check the Quick result to see if you can find wanted files or pause/stop the scan anytime.
Note: Files will probably not be successfully recovered if you terminate the scan halfway and start recovery from the complete result. It is recommened to wait out the scan to finish.
Step 5: Filter scan result and preview wanted files.
iBoysoft Data Recovery for Mac provides a wide variety of filters and organizers to help you find the files you want to recover quickly. Then you can click the "Preview" button to check the file.
Step 6: Check the box in front of the files or folders you want to get back or use the space bar to select and click "Recover".
You will be asked to select a location which should not be the original location to store recovered files.
Step 7: Click "OK" after the files are successfully recovered and the Finder app will open automatically for you to check recovered files.
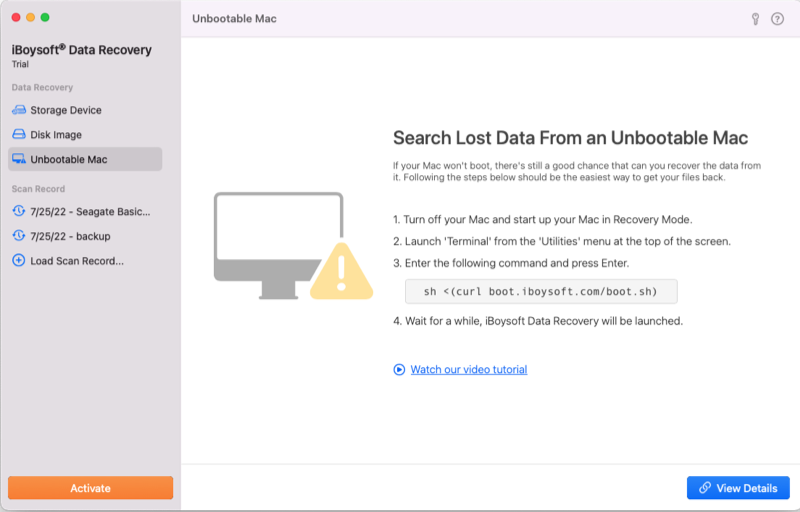
How to recover data from an unbootable Mac
When your Mac can't start up normally due to startup disk corruption or macOS bugs, iBoysoft Data Recovery for Mac can get files off your unbootable Mac. You can either launch iBoysoft Data Recovery for Mac through its server (recommended) or launch it through a bootable USB drive.
Find detailed instructions in these articles:
How to Run iBoysoft Data Recovery in macOS Recovery Mode
What To Do When My MacBook Won't Turn on or Boot up (Intel & M1)
Organize found files
To help you navigate through thousands of files, iBoysoft Data Recovery for Mac provides many file sorting and filtering features. You can use one or more options to find wanted files faster.
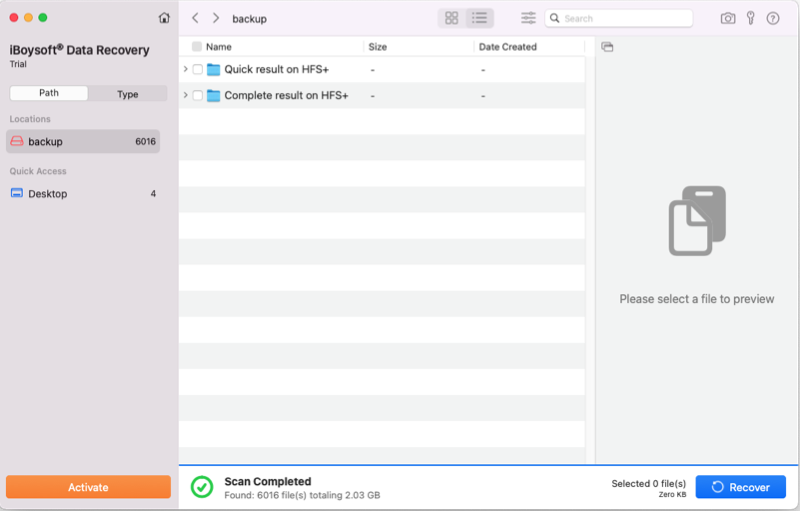
Path: Under Path tab, all found files are categorized into disk, partitions, and file systems (if the disk/partition contains multiple file systems). iBoysoft Data Recovery for Mac displays library folders including Desktop, Documents, Downloads, Pictures, Movies, Music, Applications, and Trash for quick access if it found files in these folders.
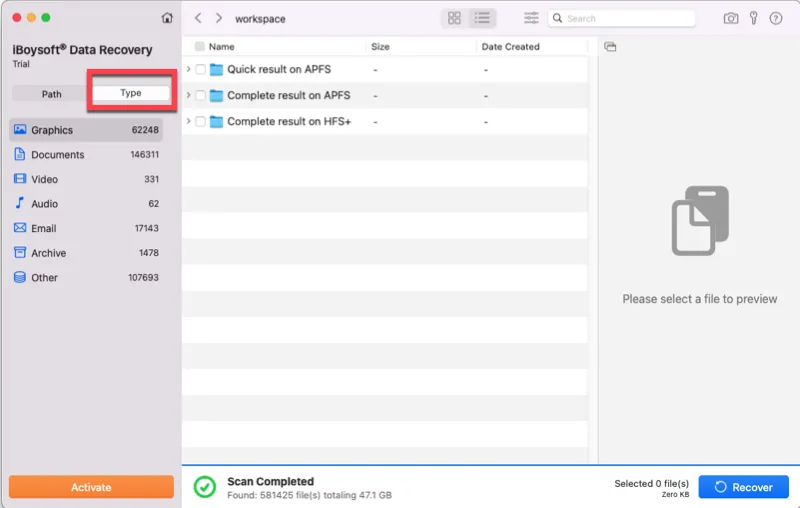
Type: Under Type tab, all found files are categorized into file format folders including Graphics, Documents, Video, Audio, Email, Archive, and Other.
As icons: iBoysoft Data Recovery for Mac allows users to display found files as icons to explicitly show file types and folders. You can sort the files by "Name", "Size", and "Date Created" in a descending or ascending order.
![]()
As list: iBoysoft Data Recovery for Mac by default displays found files as list and allows users to sort files by "Name", "File Type", and "Date Created". If you click the adjustment tool, you have more options to sort files including by "Type", "Show all files", and "Show only deleted files" (deleted files have a red cross mark).

Search: iBoysoft Data Recovery for Mac allows users to search for wanted files (not folders). You can enter the full or part of filename, folder name, or file type to navigate files faster.
Preview found files
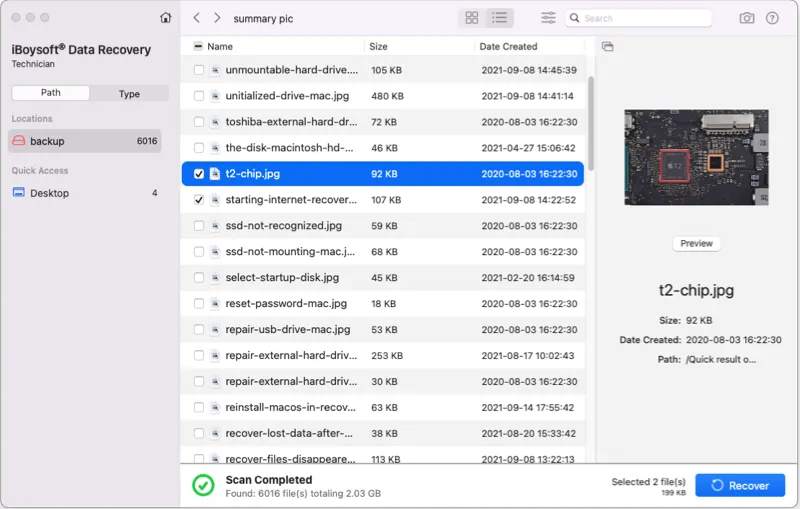
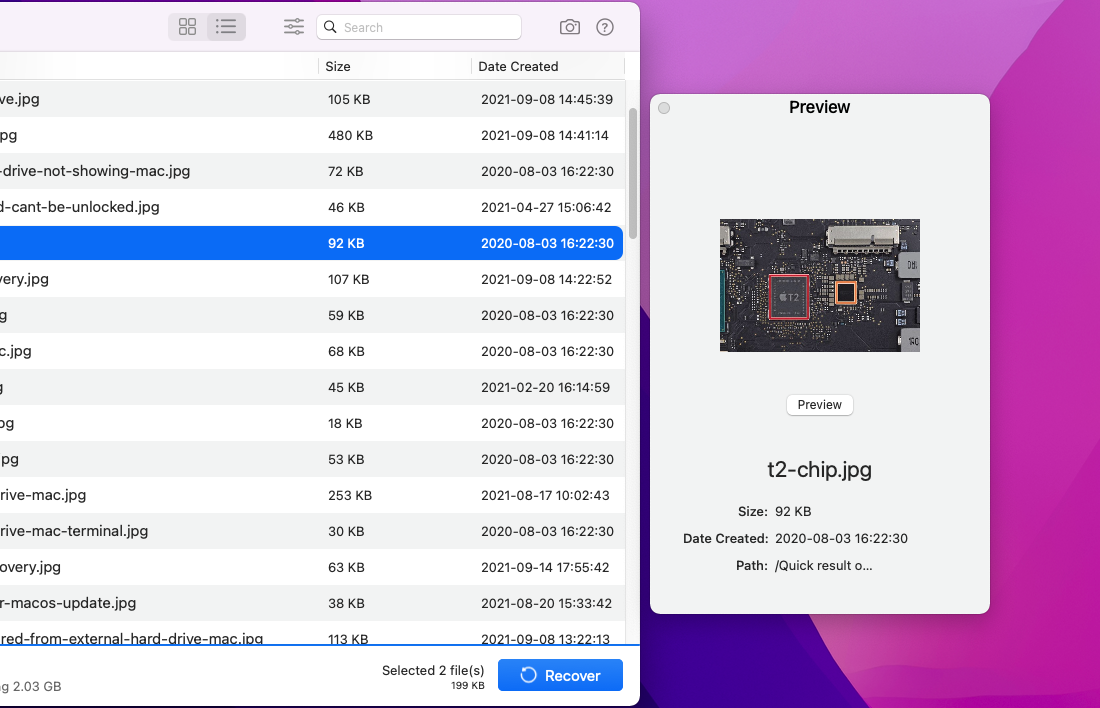
To find the wanted version from multiple files with the same names or check if the file is recoverable, iBoysoft Data Recovery for Mac allows users to preview the selected file before recovery.
Note: iBoysoft Data Recovery for Mac uses pre-installed software in macOS such as QuickTime Player and Preview app or installed third-party applications such as Microsoft Office and Photoshop to preview your files. If your file can't be previewed, either it is corrupted or there is no software on Mac to preview this type of file.
Step 1: Select a file you want to preview and a thumbnail will show up on the right.
Step 2: Click the "Preview" button below the thumbnail to preview the full file.
If you click the icon at the upper left corner of preview window, the preview window will be separated from the scan result.
Save and load scan record
You can save the scan record manually if you can't finish recovery this time and want to recover files from the same scan result next time. iBoysoft Data Recovery for Mac saves your scan record automatically after you stop scanning an external disk and return to the home window. The scan record from an internal disk or volume won't be saved automatically.
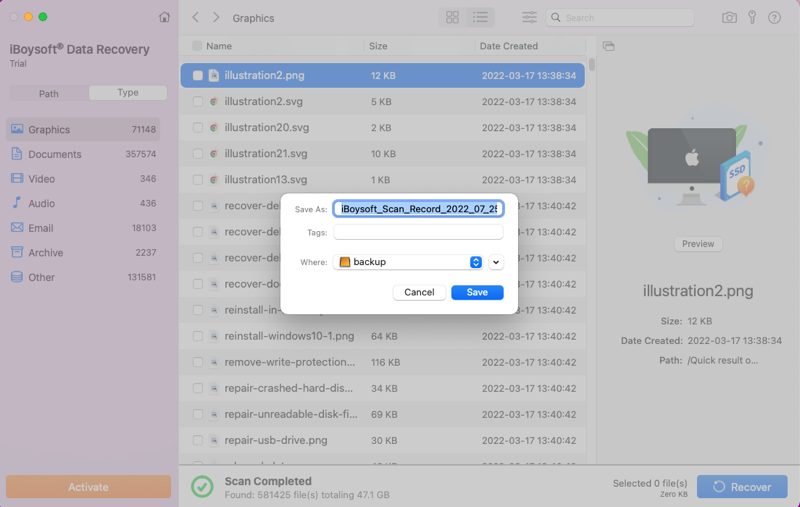
How to save a scan record:Step 1: In the scan result window, click the camera icon at the right upper corner.
![]()
Step 2: Select a location to save the scan record. A scan record looks like iBoysoft_Scan_Record_2022_07_22_14_45.ibsr.
Step 3: Click "Ok".
Note: Do not save the scan record to the same drive you scanned.
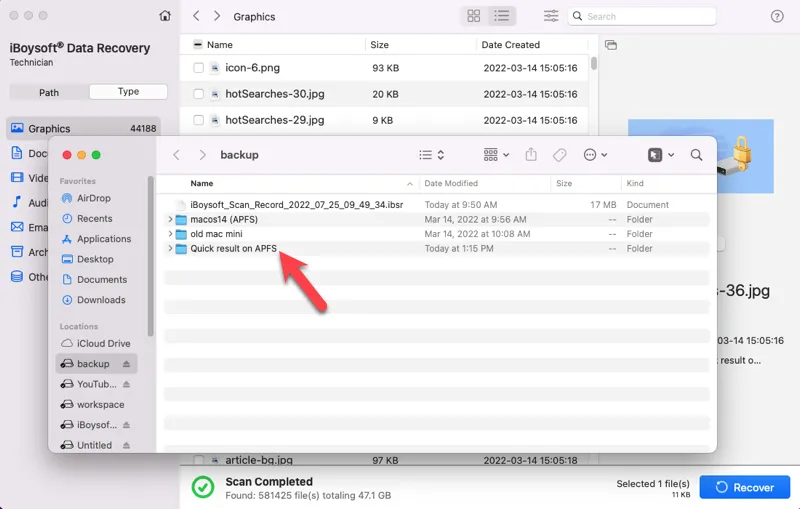
Step 1: Select a recent scan record by doing one of the following:
1. Select a record in the left pane in the home window.
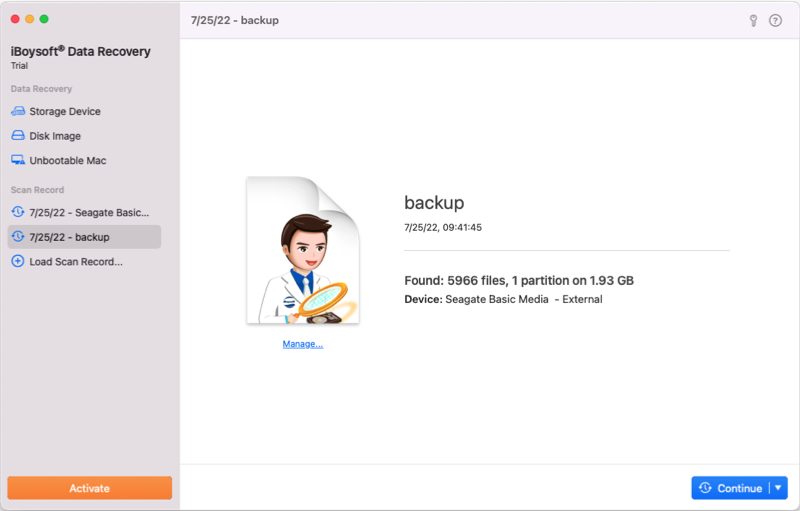
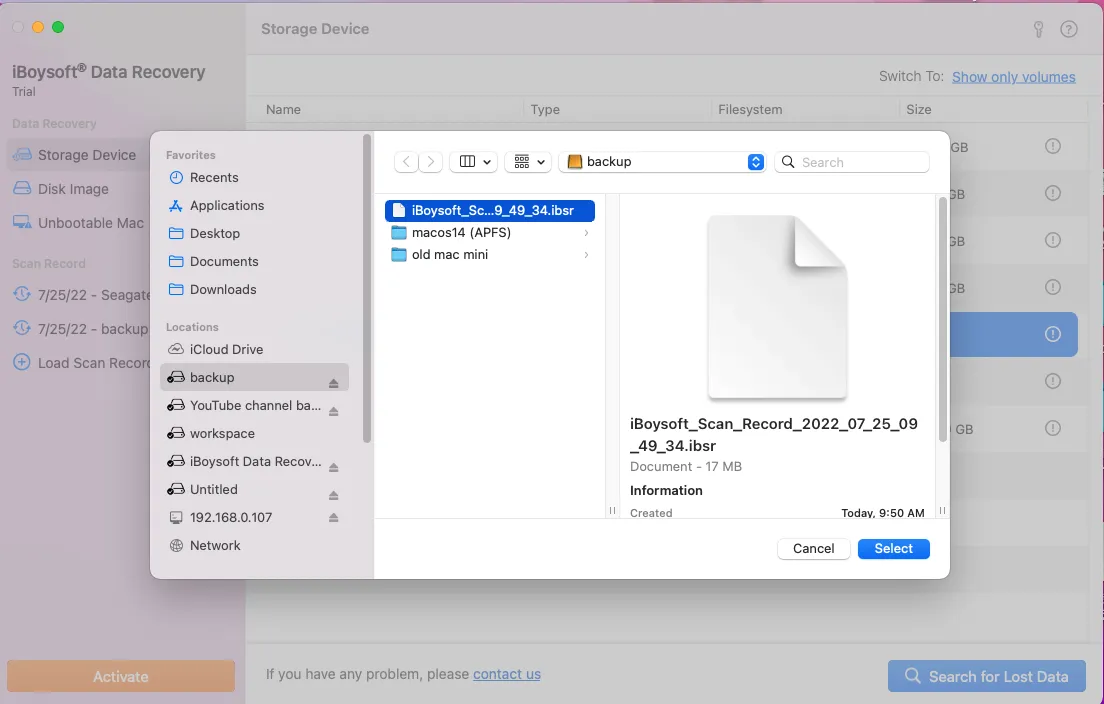
2. Attach the disk to the Mac if the scan record belongs to an external disk and click Load Scan Record to select a saved scan record with an IBSR extension.
Note: Click the "Manage" button, you can export the record to another location or delete it.
Step 2: Click "Continue". If you need to reselect a scan record, click the trangle button next to the Continue and tap "Reselect a source".
Step 3: Wait for a short while until the scan record is loaded.
Step 4: Select wanted files by ticking the checkbox or using the space bar and click "Recover".
Preferences
iBoysoft Data Recovery for Mac provides some general settings for users to scan data. By clicking "iBoysoft Data Recovery" at the menu bar next to the Apple logo and go to "Preferences", you will find the following settings.
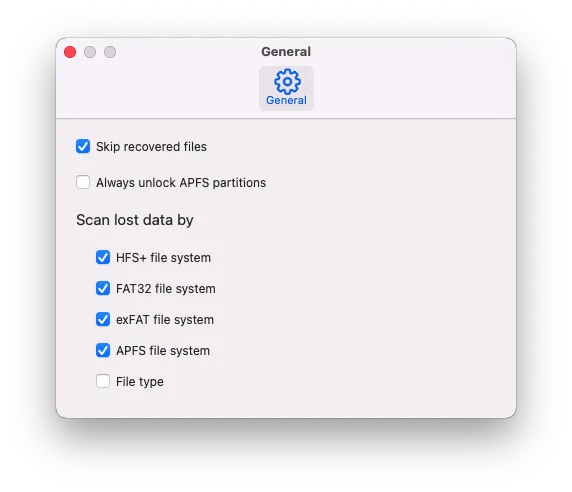
Skip recovered files: This option can skip recovered files to save time and avoid file duplicates after the process of data recovery is unexpectedly interrupted and you re-select files to recover.
Always unlock APFS partitions: This option allows you to enter a password on an encrypted partition that iBoysoft Data Recovery for Mac does not recognize. This is useful when your encrypted APFS partition is being decrypted but you need to recover data from the still-encrypted disk space.
Scan lost data by HFS+, FAT32, exFAT, APFS file system: These options allow Boysoft Data Recovery for Mac to scan only selected file systems. The less file systems you select, the faster the scan will be and the less files will be found.
Scan lost data by File type: This option allows iBoysoft Data Recovery for Mac to scan and recover RAW files.
Uninstall
Drag iBoysoft Data Recovery from Applications folder to trash.
FAQ
1. iBoysoft Data Recovery for Mac reported "Password is incorrect" when I tried to unlock a disk, what to do?
The reasons why you failed to unlock an encrypted disk or partition usually are: a) you entered the wrong password; b) you didn't use the same third-party software to encrypt and decrypt your hard drive; c) the intermediary key has been destroyed by disk reformatting/corruption/replacement. Find solutions in this post: Failed to Unlock an Encrypted Disk: Reasons and Fixes
2. iBoysoft Data Recovery for Mac reported "disk is offline" during scanning/recovery process, what to do?
An offline disk means your disk is currently disconnected with Mac computer because of an unstable hardware connection. You need to reconnect the disk to the Apple computer or replace any cable/port/hub that may cause the issue. Find the checklist in this post: The Drive is Offline: What Is It and How to Fix It
3. My hard drive is not showing up in iBoysoft Data Recovery for Mac, how can I recover data?
You can click "Show all devices" in the home window to see if your hard drive is listed. If not, try to connect your drive on another computer or open the Disk Utility app to see if it shows up. If you still can't find the hard drive, it is physically damaged and needs to be sent to a local service for data recovery. iBoysoft Data Recovery for Mac can't help recover data from a hard drive that can't be detected by Mac.