This post is focused on recovering data from a crashed or dead Mac.
Before you start data recovery from your Mac that won't turn on, make sure:
- You've connected an external hard drive with enough free space to the Mac for saving recoverable files.
- You haven't erased the internal drive or run any disk repair tools to fix your Mac, as these operations will reduce the success rate of data recovery.
Launch iBoysoft Data Recovery in macOS Recovery Mode (With Internet)
iBoysoft Data Recovery for Mac supports Intel Macs (including Apple T2 chip Macs) and Apple Silicon Macs (M5, M4, M3, M2, M1 chips).
The way to enter macOS Recovery mode varies by Mac model, so please follow the steps carefully.
Step 1: Boot your Mac into macOS Recovery Mode
For Intel-based Macs:
- Turn on your Mac and immediately press Command + Option + R.
For Intel Macs with the T2 security chip, press the Command + Option + Shift + R during the startup.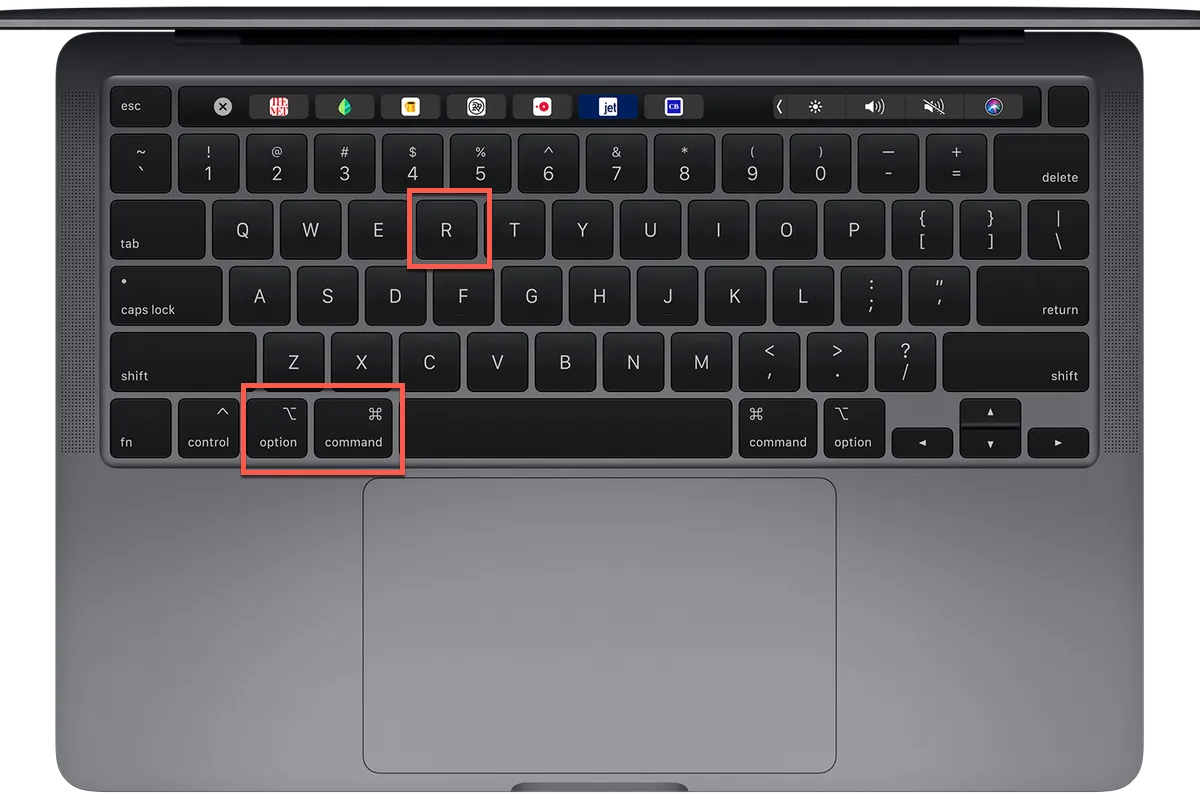
- Hold the keys until you see a spinning globe on your screen.
Your Mac is booting into Internet Recovery Mode rather than the local Recovery system.
Booting directly into Internet Recovery can help avoid extra troubleshooting if the local Recovery system is damaged or unavailable.
Tips: T2-secured Macs originally shipped with macOS High Sierra, Mojave, or Catalina, depending on the model and release year.
Based on testing, data recovery may work more reliably on macOS Mojave and Catalina than on newer versions like macOS Monterey, which include stricter security protections.
Therefore, when recovering data from a T2-secured Mac, it may help to start the Mac using the appropriate Recovery Mode key combination before running recovery software.
For Apple Silicon Macs:
- Press and hold the power button (Touch ID) until you see the loading startup options.
- Click Options > Continue to enter macOS Recovery Mode.

Step 2: Wait until the Mac enters Recovery Mode
Booting into Recovery Mode takes longer than a normal startup. Make sure your Mac is connected to power in case of any sudden shutdown.

Note: If your Mac can't even enter Recovery Mode, it indicates that your Mac may have hardware damage. No data recovery software can retrieve files from a Mac with physical damage. You should take your Mac to a local repair center or Apple store.
Step 3: Check your Internet connection
Running iBoysoft data recovery software in macOS Recovery Mode requires a network for fetching the software from its server. Thus, make sure your Wi-Fi or Ethernet connection is stable.
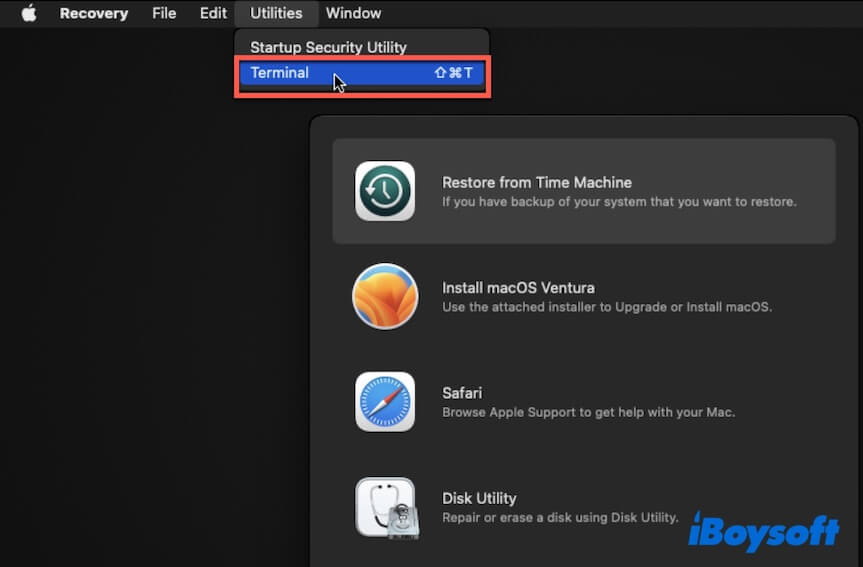
Step 4: Open Terminal from the Utilities drop-down menu
Go to the Apple menu at the top of your screen and click Utilities. Find Terminal and double-click it to open it.
Step 5: Run the following command to open iBoysoft Data Recovery for Mac
This command helps launch iBoysoft data recovery software remotely from the iBoysoft server rather than installing the software on your Mac.
sh <(curl http://boot.iboysoft.com/boot.sh)
If your Mac has a Fusion drive (iMac 2012, 2013, 2014, 2015, 2017, 2019, and Mac mini 2012, 2014), please run the following command to launch iBoysoft Data Recovery for Mac to recover data from a Fusion Drive.
sh <(curl http://boot.iboysoft.com/fdboot.sh)
- There is a space between sh and <. There is another space between curl and http.
- If you see a message "No such file or directory" after running the above command, it means you entered the wrong command. Please enter the correct one and try again.
- If you see a message "Could not resolve host: boot.iboysoft.com" after running the above command, it means your Mac has not connected to the Internet. Please check your Internet connection and try again.
- If the entered command is not found, please check if you entered the wrong command or your macOS is older than macOS 10.12 (The old macOS doesn't have the curl command).
Warning: Only copy this iBoysoft official command. Do not run similar Terminal commands copied from unknown third-party websites. They have security risks.
Step 6: Select your hard drive to scan for lost data
It takes a few minutes to launch the Mac data recovery software.
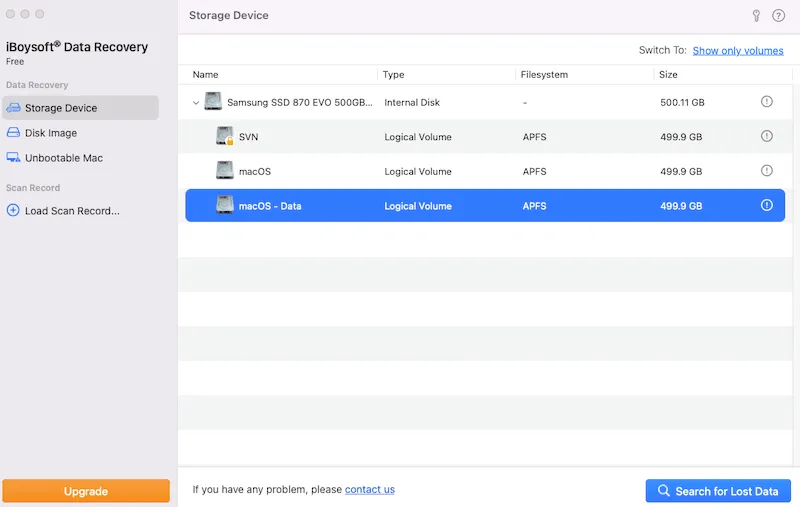
After the program successfully launches:
- Select the Macintosh HD - Data (or macOS - Data) volume.
- Click Search for Lost Data.
The scanning process will begin immediately.
Tips: On macOS Catalina and later, the startup disk is usually split into two volumes:
✅ Macintosh HD (or macOS): system volume
✅ Macintosh HD - Data (or macOS - Data): user data volume
In most cases, you should scan the Macintosh HD - Data volume first, because it stores your personal files, documents, photos, and user data. (Learn: Macintosh HD vs. Macintosh HD - Data)
If your Mac's internal hard drive is partitioned with several volumes with files stored, you should choose the entire internal disk.
If your Mac's internal drive is a Fusion drive that is split into SSD and HDD:
- Select "Fusion Drive" from the left side of iBoysoft Data Recovery.
- Ensure the SSD and HDD listed there are correct.
If not, click the Select SSD or Select HDD button to change to the correct one. - Click Search for Lost Data.
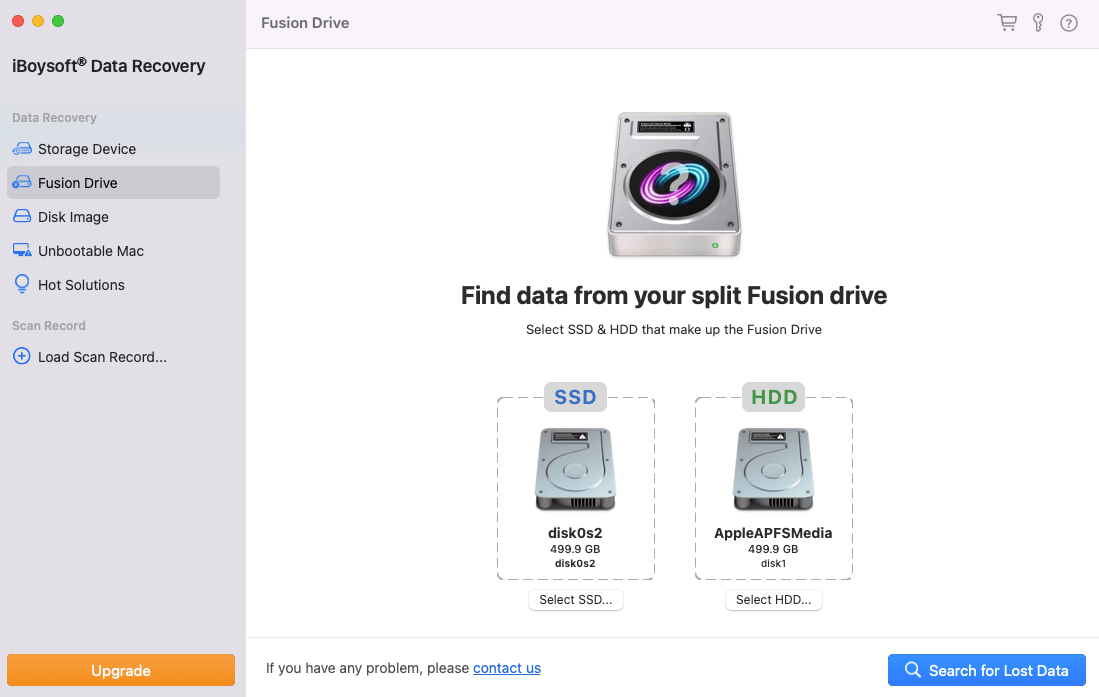
Explore more details on: Guide to Recover Data from Fusion Drive on Mac
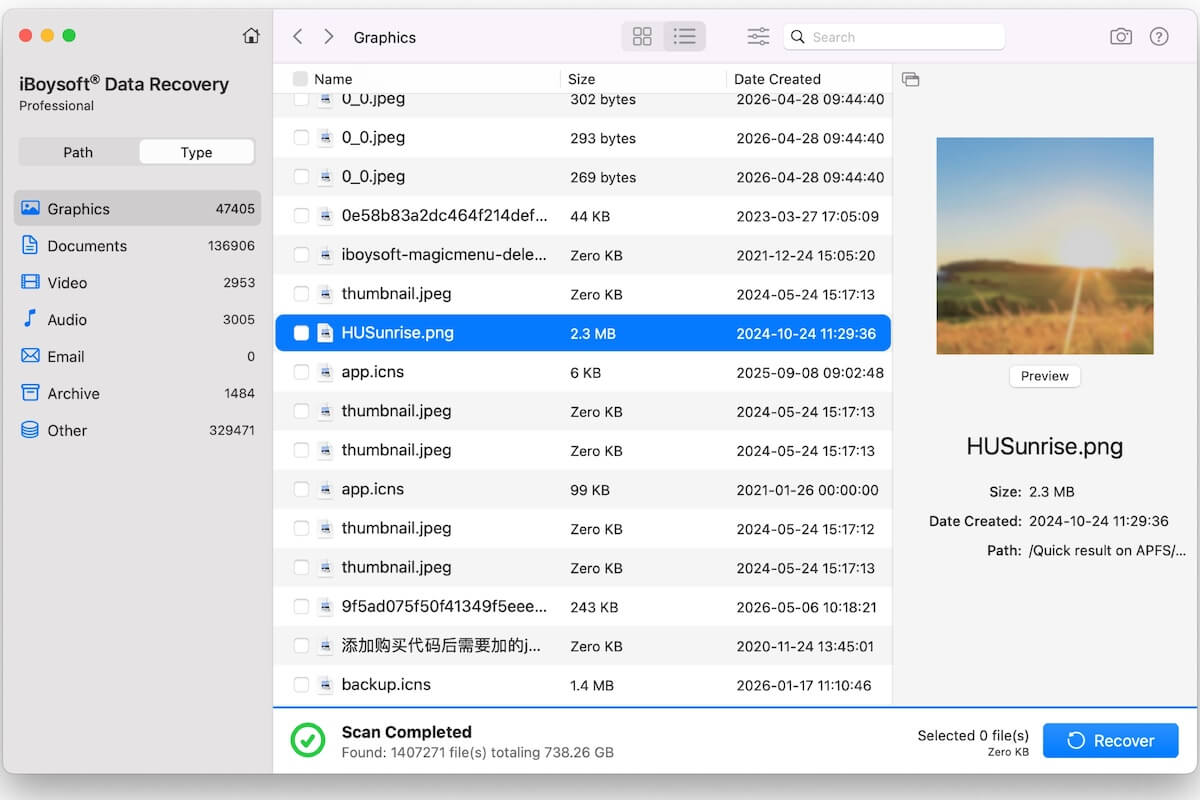
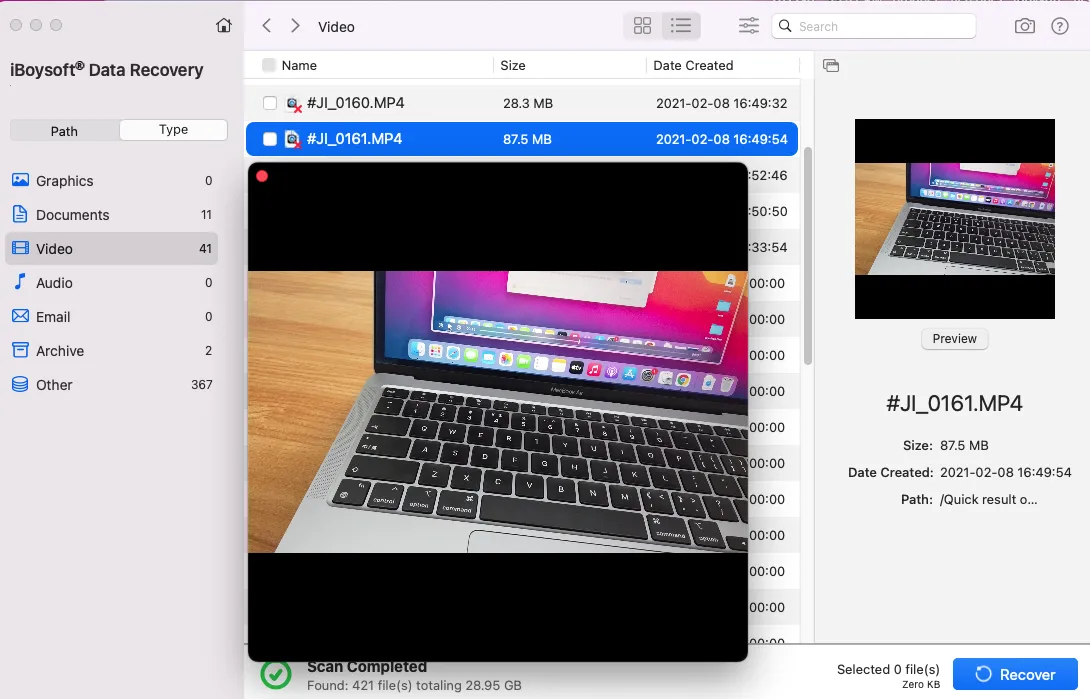
Step 7: Preview files for recovery
The total scanning time depends on how much data you have on your Mac's hard drive. Be patient and do not let your computer sleep or power off halfway.
After the scanning completes, you can filter the found files and preview them to find the ones you wish to recover.
Step 8: Select the files you want and click Recover
- Tick the checkbox of the wanted files and click the Recover button.
- Connect an external storage device to your Mac and select it as the destination for files.
If you have another computer, check the recovered files to make sure you have gotten back all your important data from that unbootable Mac. Then you can reinstall macOS on your malfunctioning Mac to make your Mac start up again.
Video guide
The video below demonstrates the detailed procedure for completing data recovery in Recovery Mode.
When this method will not work
This Recovery Mode method may not work if:
- The Mac cannot power on at all
- Your Mac cannot enter macOS Recovery
- The internal startup disk does not appear in Disk Utility
- The Mac has no Internet connection
- FileVault encryption cannot be unlocked
In these cases, professional hardware repair or data recovery services may be required.
Use iBoysoft Data Recovery in macOS Recovery Mode (Offline USB Method)
If your Mac cannot connect to the Internet in Recovery Mode, you can prepare the required files on another working Mac or PC and launch iBoysoft Data Recovery from a USB drive instead.
Before you proceed, prepare:
- A healthy PC or Mac that can connect to the Internet and has USB ports.
- An empty USB drive.
Step 1: Plug the USB drive into the healthy computer
Step 2: Download the files for the iBoysoft Data Recovery installation
Download the two files below and save them to the root directory of the USB drive. These two files are used to install iBoysoft Data Recovery on the drive.
- http://boot.iboysoft.com/boot.sh
- http://boot.iboysoft.com/iboysoftdatarecovery.dmg
Step 3: Connect the USB drive to the Mac that is not booting up
Step 4: Boot the Mac into Recovery Mode
Follow the steps mentioned above to enter macOS Recovery Mode. This time, use Command + Option + Shift + R keys on all Intel Macs to enter Internet Recovery.
Step 5: Open Terminal from the drop-down menu of Utilities at the Apple menu bar
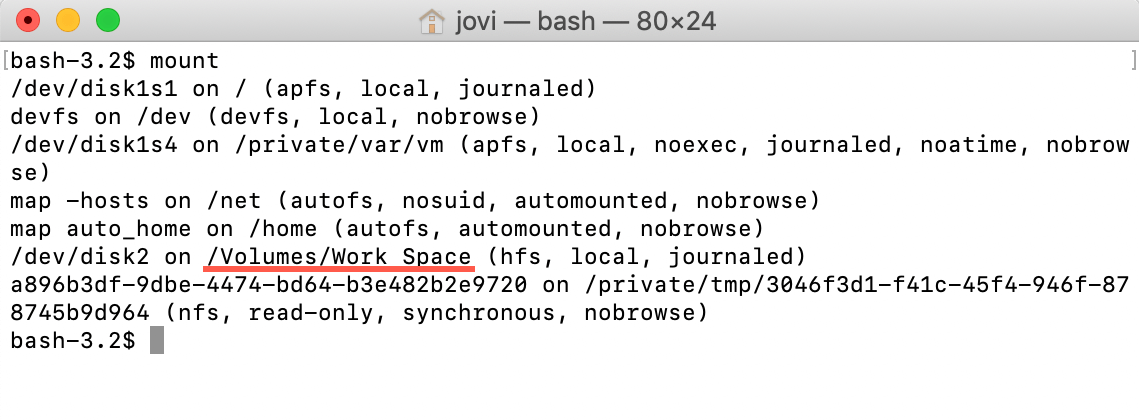
Step 6: Run the command below to list all mounted disks/partitions
mount
In the picture below, the volume in the USB drive which contains the downloaded files is named Work Space and its path is /Volumes/Work Space.
Step 7: Run this command to launch iBoysoft Data Recovery
First, run the command below to change the current working directory to the volume that contains the downloaded files mounted under /Volumes:
cd '/Volumes/Work Space'
Breaking it down:
- cd = change directory
- /Volumes/ = the location where macOS mounts external drives and volumes
- Work Space = the name of the USB drive or external disk
The single quotes ' ' are used because the drive name contains a space. Without quotes, Terminal would misinterpret the path.
Then, run the command to open iBoysoft Data Recovery for Mac:
chmod 777 ./boot.sh && ./boot.sh
Step 8: Recover lost data from the Mac that won't boot
After iBoysoft Data Recovery for Mac is launched:
- Select the Macintosh HD - Data volume (or named macOS - Data, it is the user data volume) or the entire internal disk of the unbootable Mac.

- Click Search for Lost Data, and follow the on-screen instructions to recover the files.
Also read:
FAQ
- QCan iBoysoft Data Recovery recover data from a Mac fail to enter Recovery Mode?
-
A
No. If a Mac can’t enter macOS Recovery Mode or fails to power on, it shows that the Mac has hardware damage. No data recovery software can rescue files from a broken Mac. In this case, a professional data recovery service is often the safest option.
- QHow long does iBoysoft Data Recovery take?
-
A
It depends on how many files are on your Mac. The more data on your Mac, the longer this tool will take to scan them; conversely, it takes a shorter time.