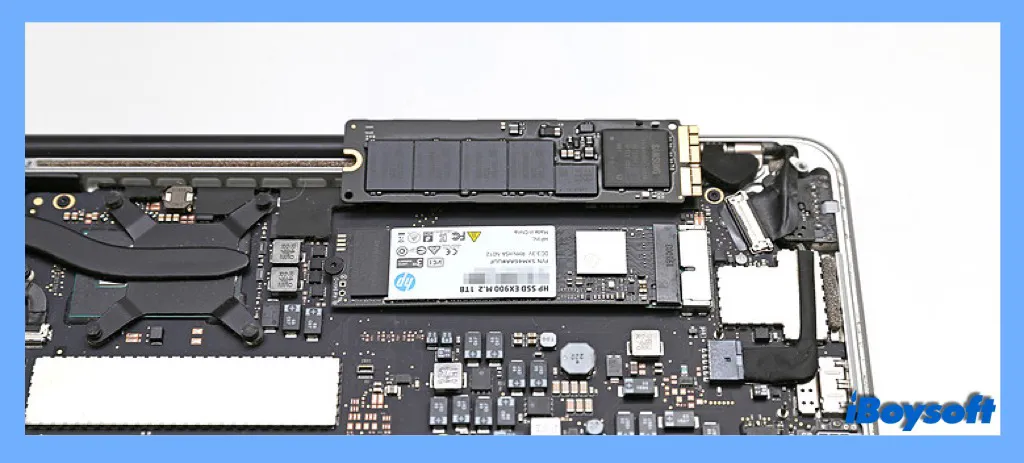
The Solid-State Drive, A.K.A. SSD, is a storage media widely used nowadays. It overwhelms traditional hard drives greatly in faster read and write speed, lower power consumption, longer lifespan, etc. And for years SSD has been applied to MacBook Air and MacBook Pro to improve performance. In the latest models, the SSD is even embedded in the Motherboard forming one single piece.
Despite that, the MacBook SSD may also fail you sometimes such as MacBook Pro SSD not mounted in Disk Utility, MacBook SSD excessively worn, etc. A faulty SSD poses a risk of data loss on your Mac. And the worse of it is, the data recovery of SSD is more difficult compared with that of HDD. More on that later.
When you realize that there are desktop files that disappeared on Mac, or if you delete files by mistake, you may wonder how to retrieve them back. Then this post is right for you, explaining whether you can get lost data back and how to make it.
Available ways to recover data from MacBook SSD:
| Options to recover data from MacBook SSD | Applicable scenarios | Difficulty level | Cost |
| Recover data from MacBook SSD with iBoysoft Data Recovery | No backups for MacBook SSD, data haven't been overwritten | Easy-Simply download and install iBoysoft Data Recovery for Mac, scan the MacBook SSD for lost data, then preview and save desired files to a different location. | Free Trial |
| Recover data from MacBook SSD via Time Machine backups | Have created backup for MacBook SSD before the deletion | Medium-Connect the Time Machine backup drive, enter Time Machine, find the target files or restore whole Mac to a previous date. | Free |
| Recover data from MacBook by sending to a local repair | No backups, physical or severe damage on the SSD | Hard-Technical expert use tools to disassemble the SSD and scan recoverable data on the sectors. | Expensive |
Solutions to recover data from MacBook SSD
At the moment you realize that you are missing some files, or by the time you accidentally delete important files on your MacBook SSD, you must stop any operation on the device to prevent the data from being overwritten, increasing the chance of complete data recovery. So proceed to recover your deleted videos on your Mac as soon as possible. Here are some of the most effective methods to apply.
Solution 1. iBoysoft Data Recovery for Mac(Easy and Secure)
Recovering data from an SSD is a procedure with such a great need, that's why there is some Mac data recovery software on the market. Among them, iBoysoft Data Recovery for Mac has shown reliability and competent performance.
This reliable and secure Mac data recovery program supports various kinds of data recovery, including APFS drive data recovery, formatted drive recovery, SD card recovery, corrupted external hard drive recovery, presenting a quick data recovery process, better recovery results, and a higher recovery rate.
Steps to recover lost or deleted files from MacBook SSD with iBoysoft Data Recovery:
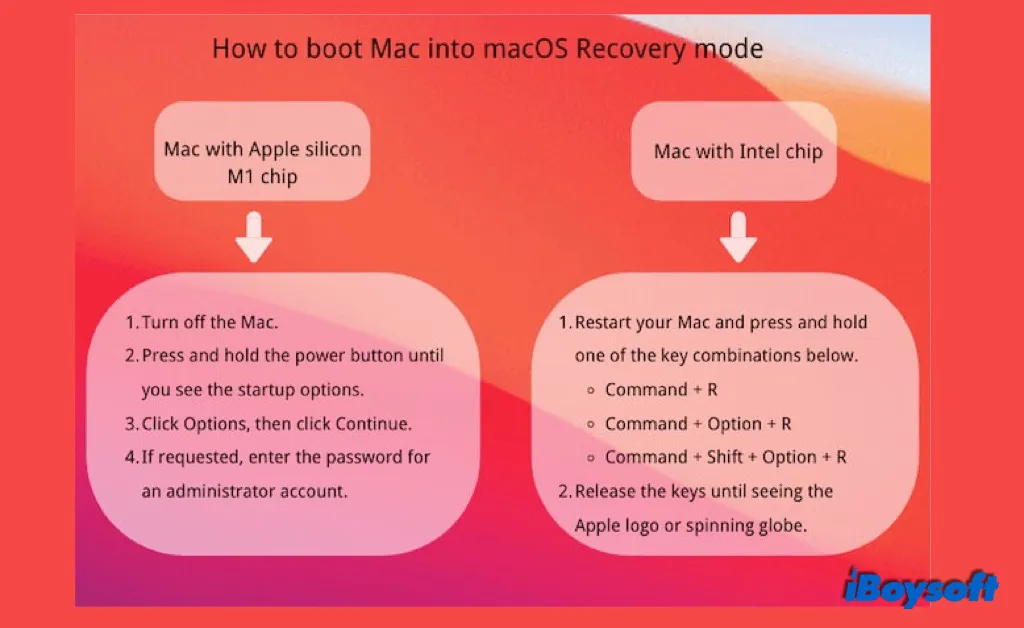
- 1. Reboot Mac into macOS Recovery mode to avoid overwriting the data on the MacBook SSD.
- 2. Choose a network for the Mac, and keep the Internet being connected all the time.
- 3. Open Terminal from Utilities drop-down menu.

- 4. Run the following command to launch iBoysoft Data Recovery for Mac in macOS Recovery mode.sh <(curl http://boot.iboysoft.com/boot.sh)
- 5. After the program is launched, you can start to rescue files.
- 6. In the main interface, you can select the MacBook SSD in the list.
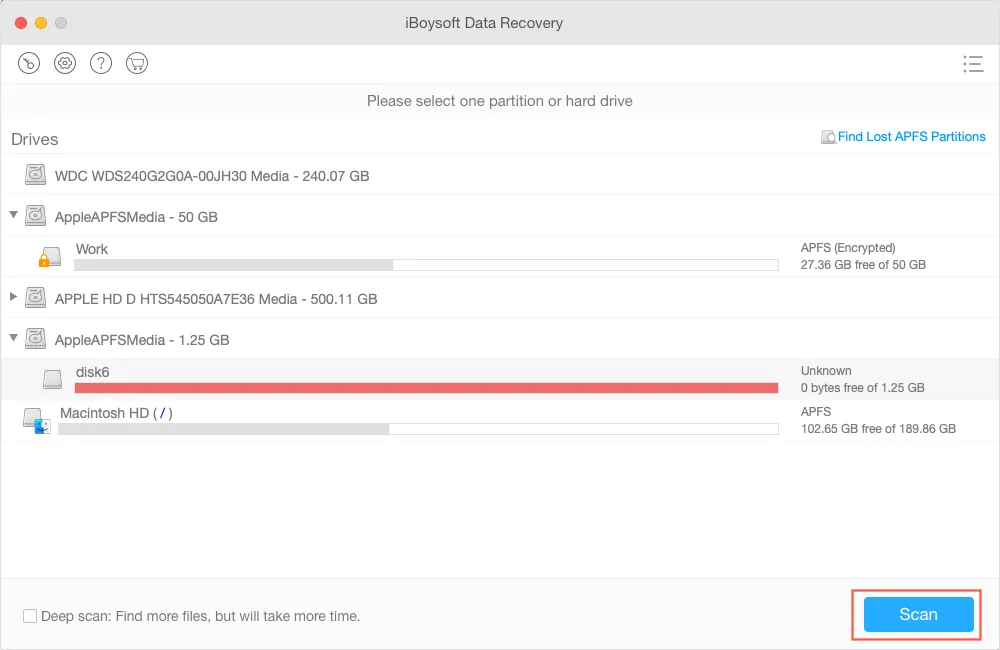
- 7. Click on the Scan button. This data recovery software will start scanning for lost files on the drive.
- 8. Preview the scanning results and choose the files you want to get back.
- 9. Click on the Recover button. Choose a different location to store the recovered files. The best way is to use an external device to save the recovered data.
iBoysoft Data Recovery for Mac is fully compatible with Mac OS X 10.11 and later version. And it works well on both Intel-based Macs and Apple Silicon Macs including M2, M1, M1 Pro, and M1 Max. What's more, it provides a free trial version of the software, so you can download it and have a try.
Solution 2. Backup and Restore with Time Machine
Time Machine solution will work for you just if it is up to date and has been enabled before your data loss happened. As it is Mac's own backup utility it will back up everything on your Mac by creating images or snapshots. With Time Machine turned on, you can restore a specific file or the whole system from it.
Check whether you have enabled Time Machine on your MacBook. Go ahead to Apple menu > System Preferences, then click Time Machine. If the box next to Back Up Automatically has been checked, you probably have backed up the files you want to retrieve with Time Machine. Then you can use Time Machine backup to find your lost and accidentally deleted files and restore them to your Mac.
Steps to restore data from MacBook SSD with Time Machine:
- Connect your Mac with the Time Machine backup drive. Enter password if asked.
- Open a window of the folder where your file was stored. (optional)
- Click the Time Machine icon at the menu bar > Enter Time Machine.
If you can't find the icon of Time Machine on the Menu Bar, you need to add it from System Preference. Click on the Apple icon > System Preference > Time Machine, then check the box next to Show Time Machine in menu bar on the bottom of the pane.
- Find the specific file from the timelines and backup files from the Time machine scrolling it or using the Up/Down arrows.
- Select the desired file and press Space Bar to preview it.
- Click Restore. You can check the file at its original location on the MacBook.
It is always necessary to back up your Mac, especially if you have important files stored on it. Thus you can avoid a potential disaster of data loss when the Mac is attacked by a virus, the Mac suffers physical damage, and so forth. If there is no backup, or the Time Machine drive is corrupted, move back to solution 1.
Solution 3. Send to local repair
Perhaps, the damage was physical or too severe on the MacBook SSD that corrupts your files or makes them disappear, be it the drive was overheated, has been dropped hard, is excessively worn out, etc. Your last resort maybe is to send it to a local repair store that provides data recovery service or a specialized data recovery company. It will be more costly, but a technician may help to get the files back.
Is it possible to recover data from MacBook SSD
You can recover deleted files on Mac with ease before you empty the Trash can. Once you have emptied the Trash folder or chosen to bypass the Trash and remove files from an SSD of Mac permanently, data recovery becomes intricate.
What happens when you delete files
There is a huge difference in how an SSD and an HHD (hard disk drive or mechanical drive) work when a file is deleted from them. In the case the deletion is on an HHD the sectors where the file once was stored will be marked as available. In fact, almost always, the deleted file will remain on the media until some new file takes the sectors that used to belong to the deleted file. This means that the previous data is overwritten. Such an interval makes it possible for data recovery.
Still, if the case is a permanent deletion of a file on the SSD and the SSD TRIM is enabled, then it will clear the data the next time computer reaches the idle state to make the sectors ready for use. TRIM is an Advanced Technology Attachment (ATA) command. If this feature is enabled, it'll be much more difficult to recover deleted files from an SSD of MacBook.
How to check if TRIM is enabled
In general, MacBooks have the SSD TRIM enabled by default. You can check this configuration easily by doing the following.
- Click on the Apple icon > About This Mac. Then click on System Report. Or press and hold down the Option key and then select System Information.
- On the left pane of the System Information window, under Hardware, Find NVM Express or SATA/SATA Express. It depends on what the interface of your Mac internal SSD is.
- On the right panel, scroll down until you find TRIM Support. If it appears Yes, then the TRIM command is running and vice versa.

Can I recover data from SSD even if TRIM is enabled
The scenario will be better if you find that the TRIM is disabled, although there is just a small probability for that to happen. In this way, your SSD will keep the deleted information on its sectors because it hasn't received the command from TRIM to clear those ones containing useless information. Thus, the drive will not erase the existing information until new information is written to the sector, as it happens on HDD. Then data recovery of SSD is highly possible.
Even if the TRIM is enabled on your MacBook, there is still a chance to recover data from the SSD. As has been said before, the TRIM command is to erase useless data when the computer is idle, not being used by any program. So, if the SSD has not yet been through TRIM, that is your chance to get those files back. Then you should quickly recover files from the SSD, the faster, the better.
When you need to recover data from MacBook SSD
The scenario varies for different MacBook users when there is a need to perform an SSD data recovery on MacBook Air/Pro. In certain cases, you can be aware of the risk of data loss on your MacBook SSD, but some are not. However, some signs still indicate a potential MacBook SSD failure, which may eventually lead to data loss.
With that being said, we will go through the most common scenarios and signs that your MacBook Air/Pro presents indicating when SSD data recovery is a must, and you should recover your files from the MacBook SSD as soon as possible if any of the following situations befall you.
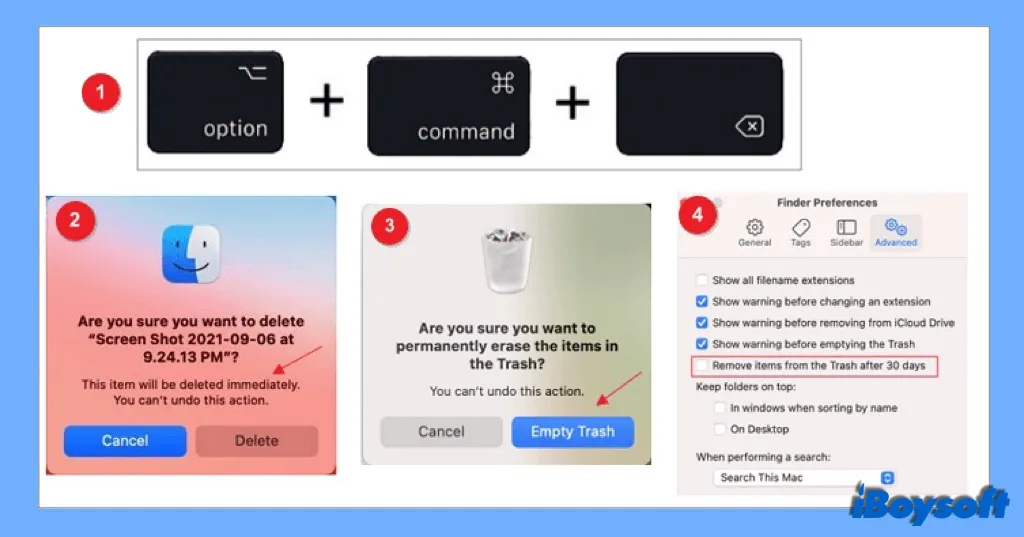
Permanently delete files from an SSD. This can happen by performing one of these 4 kinds of operations: Using the keyboards combination Option + Command + Delete; choosing to Delete Immediately in Finder; manually emptying the Mac Trash; and when the items that have been moved to the trash for more than 30 days are removed from it.
Misoperation on the SSD of MacBook. This is about an unintentional deletion of an APFS partition /container, a drive reformatting, a faulty partitioning volume, and any procedure that can corrupt the file system structure. All of these give rise to data loss on your hard drive, with all the data stored being erased.
Virus and malware attacks. Such a malicious computer program keeps you from functioning normally. Virus can cause great harm, by damaging Mac devices, stealing your data, deleting files, and so forth. Therefore, it is the most common case that you fail to open a file that is corrupted due to a virus or malware attack. Recover data quickly and remove viruses from Mac.
Physical damages on the MacBook SSD. If the MacBook suffers a heavy drop, overheat, and liquid immersion, some sectors or even the whole internal SSD may be damaged. A corrupted SSD will endanger the stored data on the drive.
Along with the above scenarios, it is also recommended to perform an SSD data recovery in the first place when confronted with MacBook Pro screen flickering, MacBook won't Turn on, MacBook is crashed/dead, MacBook black screen of death, Mac Stuck on Loading Screen, etc. to avoid a data loss.
To sum up
MacBook Air/Pro equipped with SSD indeed optimizes Mac's performance in reading and writing speed. But it also contributes to the difficulty in data recovery. Luckily, there are still methods to troubleshoot, using Mac data recovery software, restoring from Time Machine backup, or seeking help from a technician. Give it a shot when you need to recover files from MacBook SSD.
FAQs about recovering data from MacBook SSD
- QHow do I recover files from my MacBook SSD?
-
A
You are only a few steps away from recovering files from your MacBook SSD. You should download iBoysoft data recovery, launch the program and select the drive where your files were previously stored, then click the Scan button to find all your lost and deleted files, then preview the results and recover the desired files.
- QHow to disable SSD Trim on MacBook Air/Pro?
-
A
Before turning SSD TRIM on, make sure you're logged into your Mac with an account that has Administrator privileges. Then open Launchpad > Other, Run Terminal, type the following command in Terminal: sudo trimforce disable, then press Return. Type your password when asked and press Y when you see a notice to finalize the process.
- QDoes Apple offer data recovery?
-
A
No, Apple doesn't offer professional data recovery services. If you need to recover data from a MacBook, you should get in touch with a data recovery center. Using cutting-edge tools and techniques, data recovery professionals are able to reliably recover lost data from any MacBook.