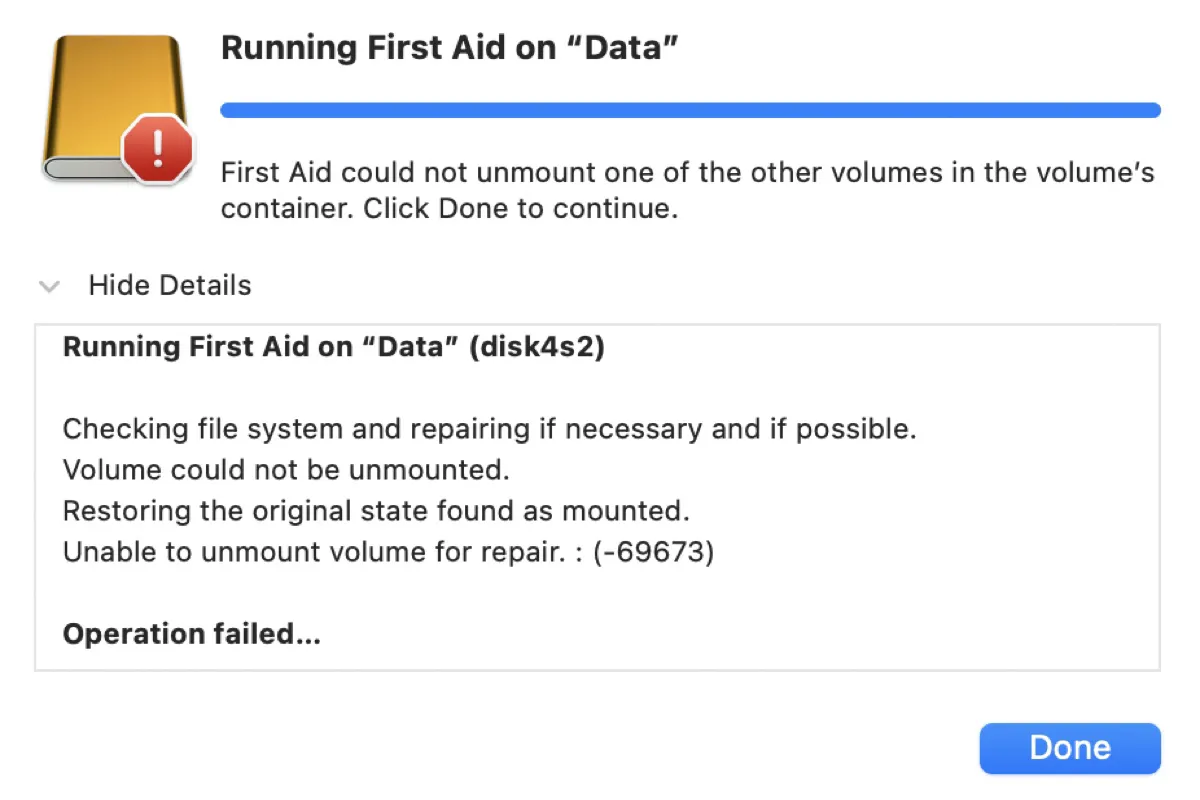
Disk Utility First Aid is the common go-to if you need to check and repair an internal or external drive on Mac. However, it sometimes fails its job and shows the error that reads "Unable to unmount volume for repair. : (-69673)." As the message implied, the error occurs due to a volume could not be unmounted.
Here, we will help you get your lost files back and fix the "Unable to unmount volume for repair. : (-69673)." for good.
Recover lost files when facing 'Unable to unmount volume for repair' on Mac
There are several reasons for "Unable to unmount volume for repair. : (-69673)." If your drive is in good condition, it likely is actively used by other programs or processes, which are preventing First Aid to unmount it. Nevertheless, if your drive is exhibiting behaviors, such as:
- Make a loud noise
- Show empty folders
- Have problems opening or copying files to/from your Mac
- Give errors like "The disk you inserted was not readable by this computer."
it may have corrupted files or even hardware problems. Regardless, you should back up or recover your data before proceeding to fix the drive.
To recover lost files from your Mac, you can use iBoysoft Data Recovery for Mac. It is one of the best data recovery software that can restore files from corrupted, unrecognized, or inaccessible storage devices, such as internal or external hard drives, USB flash drives, SD cards, etc.
It supports perfectly macOS 13 - Mac OS X 10.11 running on Intel and Apple Silicon Macs.
Here's how to recover your lost file from the drive that First Aid was unable to unmount for repair:
Step 1: Download and install iBoysoft Data Recovery for Mac.
Step 2: Select your disk and click "Search for Lost Data." 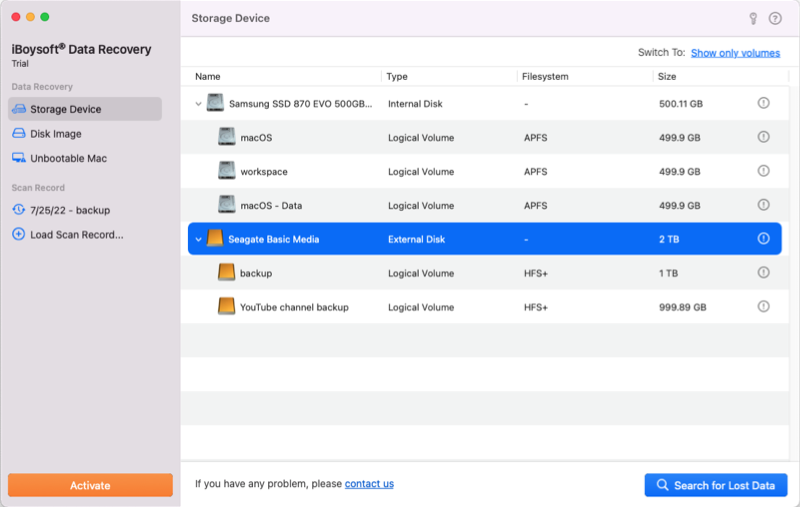
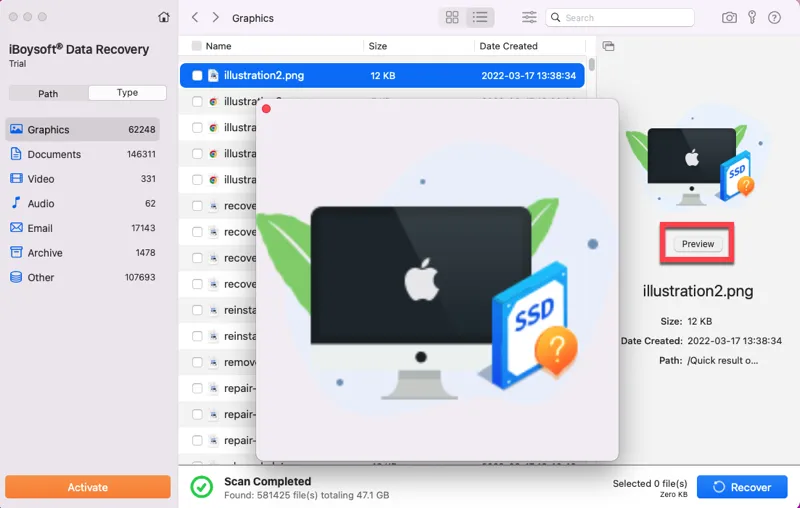
Step 3: Select a file and click the Preview button under the thumbnail to preview it.
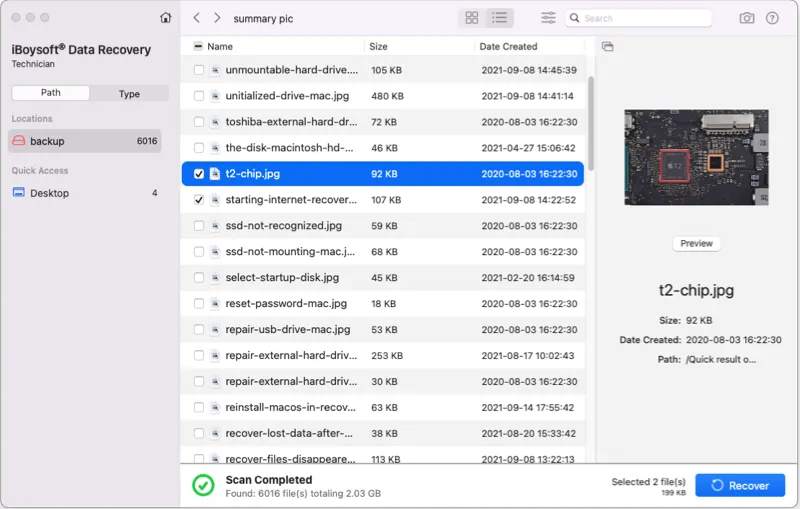
Step 4: Check the box next to the files you wish to recover and tap the Recover button.
Step 5: Select a different location than your infected drive to save the files.
You can click the button below to share these steps with more people.
How to fix 'Unable to unmount volume for repair 69673' on external drives?
Once your data is secured, you can work on fixing "Unable to unmount volume for repair. : (-69673)." on external drives like a Time Machine backup disk. Make sure you have closed all the programs running on your Mac, then go through the following solutions.
- Relaunch Finder
- Manually unmount the drive
- Unmount the drive with Terminal
- Force unmount the drive
- Uninstall the drive manufacturer's software
- Repair the drive in macOS Recovery
- Reformat the drive in Terminal
Note: It's worth mentioning that the order to repair the disk or its volumes may have an impact on the result First Aid presents. You can try repairing the disk first, then move on to the volumes. If First Aid reports no errors, the issue is most likely caused by a bug and you don't need to worry much about the drive.
Relaunch Finder
Disk Utility may fail to unmount your drive because it is currently in use by Finder. So, your first step to resolve the error "Unable to unmount volume for repair. : (-69673)." should be stopping Finder from accessing the drive.
- Hold down the Option key, then right-click the Finder icon at the Dock.
- Select Relaunch.

- Safely eject the drive and unplug it.
- Wait a few seconds, then replug it.
- Try First Aid again.
If the issue persists, keep reading the other solutions below.
Manually unmount the drive
Disk Utility can't perform checks and repairs on a live file system, so it always unmounts a disk before repairing it. When the process of unmounting goes astray, it will pop up "Unable to unmount volume for repair. : (-69673)."
Since Disk Utility can't unmount the drive on Mac automatically, you can assist it to do so, by manually unmounting the drive on Mac. Keep the external drive plugged in and follow the steps below:
- Go to Finder and open the Applications > Utilities folder.
- Launch Disk Utility.
- Select the volume of the disk and click Unmount at the top.
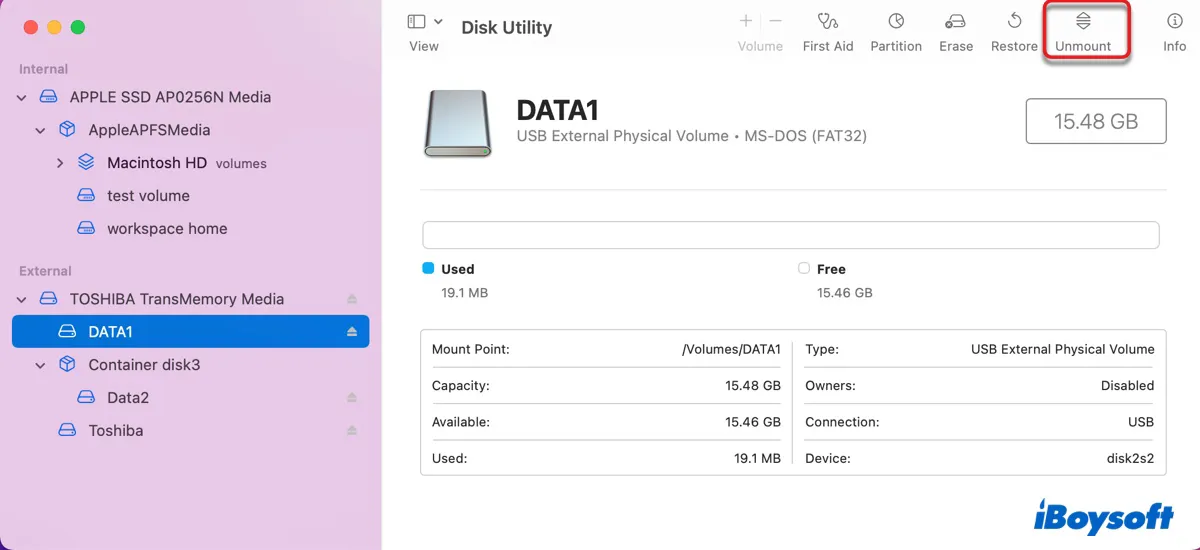
After the disk is unmounted, try repairing it with First Aid again. If First Aid still reports "Could not unmount the volume for repair," move on to the next fix.
Unmount the drive with Terminal
Alternatively, you can unmount a disk using the diskutil command in Mac's built-in utility Terminal, as guided below. It is also the solution to turn to if you tried the unmount command but fail with "Couldn't unmount disk. Resource busy." Bear in mind that you need to press the Enter key for each command to execute.
- Open Terminal from the Applications > Utilities folder.
- Run the command below to list all drives connected to your Mac.diskutil list
- Note down the disk identifier of the drive that First Aid can't unmount on Mac. (such as disk2)
- Execute the following command to unmount the drive in question.diskutil unmountDisk /dev/disk_identifierSuppose the identifier of the drive is disk2, then the command will be diskutil unmountDisk /dev/disk2.
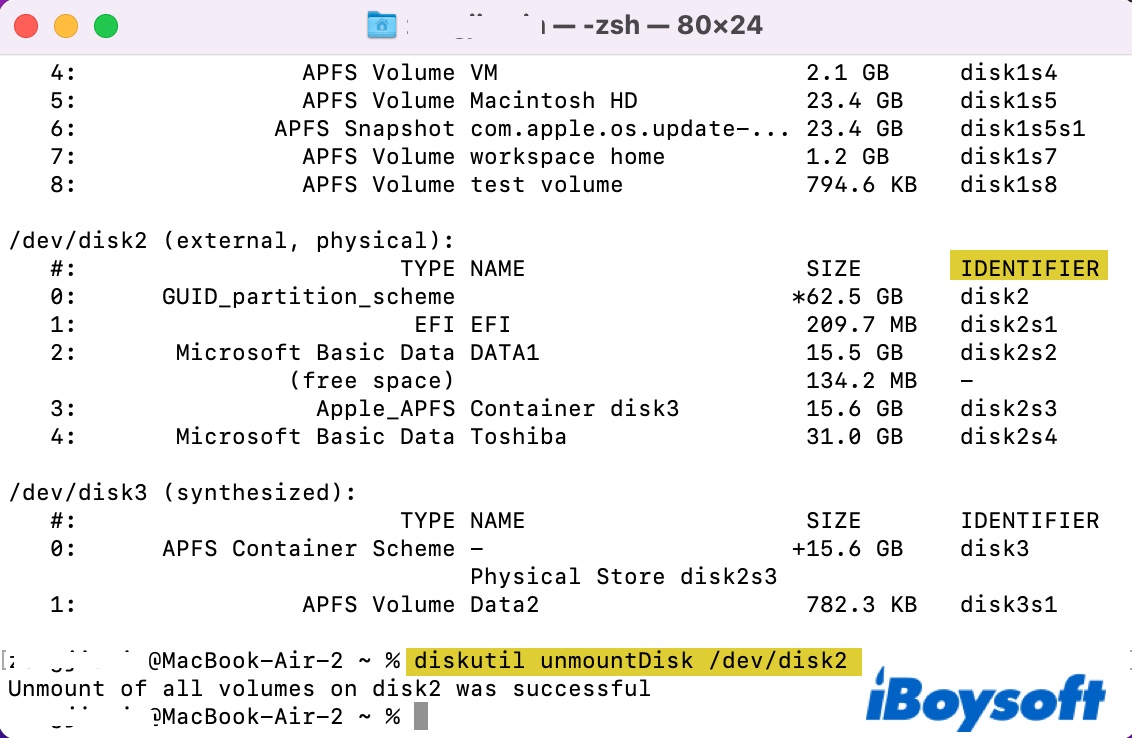
Once it's done, Terminal will report back that the targeted disk or volume is unmounted. Now, the drive will be grayed out in Disk Utility and you can re-run First Aid to check whether the issue is gone. If, instead, the command returns the error, "Error: -69673: unable to unmount volume for repair," you need to force unmount the disk.
Force unmount the drive
If you can't unmount the drive on Mac with the aforementioned methods, you should force unmount the drive in Terminal. This way, you can terminate any background processes that are secretly using the drive. To do it, execute the command below in Terminal. Don't forget to replace disk_identifier with yours.
diskutil unmountDisk force /dev/disk_identifier
Uninstall the drive manufacturer's software
Do you have any of the drive manufacturer's software installed on your Mac that allows you to unlock, maintain, or back up to or from the drive? When such software exists, there's often a related firmware on the drive. You may encounter "Unable to unmount volume for repair. : (-69673)." if either the software or the firmware isn't working properly, especially after a macOS update.
In this case, you need to check and install the available updates to the software on the manufacturer's official website. If it doesn't have an update yet, you should completely uninstall the software from your Mac.
Please note that simply dragging the software to Trash doesn't clear the installation files on your system fully. To get rid of the program, look for the uninstall feature in the preferences or check the website for a guide.
Repair the drive in macOS Recovery
Since OS X 10.7 Lion, every Mac has a recovery partition that users can turn to when they are having issues with the regular macOS. If First Aid keeps reporting "Unable to unmount volume for repair" when scanning your external drive, you can do it in macOS Recovery.
Here's how to repair an Intel-based drive in macOS Recovery:
- Safely eject your drive on your Mac, then unplug it.
- Shut down your Mac and wait a few seconds.
- Press the power button, then immediately press and hold the Command + R keys until the Apple logo shows up.
- Select Disk Utility and click Continue.
- Connect your external drive to your Mac.
- Choose your disk from the left side and click First Aid.
If running First Aid in Recovery Mode isn't helpful, continue with the next solution.
Reformat the drive in Terminal
The last resort to solve "Unable to unmount volume for repair. : (-69673)." on Mac is to reformat the drive. This way, you can fix all the disk errors regarding the file system. However, formatting the drive in Disk Utility will likely fail with the error "Couldn't unmount disk.: (-69888)."
Therefore, you should reformat the drive in the Terminal app with the steps below.
Warning: Reformatting a drive will erase all data on it. So, please ensure you have the essential data backed up or have recovered your data using iBoysoft Data Recovery as we mentioned in the beginning before erasing the drive.
- Open Terminal from the Applications > Utilities folder.
- Run the command below in Terminal to find the drive's identifier.diskutil list
- Reformat the drive with the following command.diskutil eraseDisk FILE_SYSTEM DISK_NAME /dev/DISK_IDENTIFIERFor instance, if you know the disk's identifier from step 2 is disk2 and plan to erase it to ExFAT and name it USB, the command will be: diskutil eraseDisk ExFAT USB /dev/disk2.
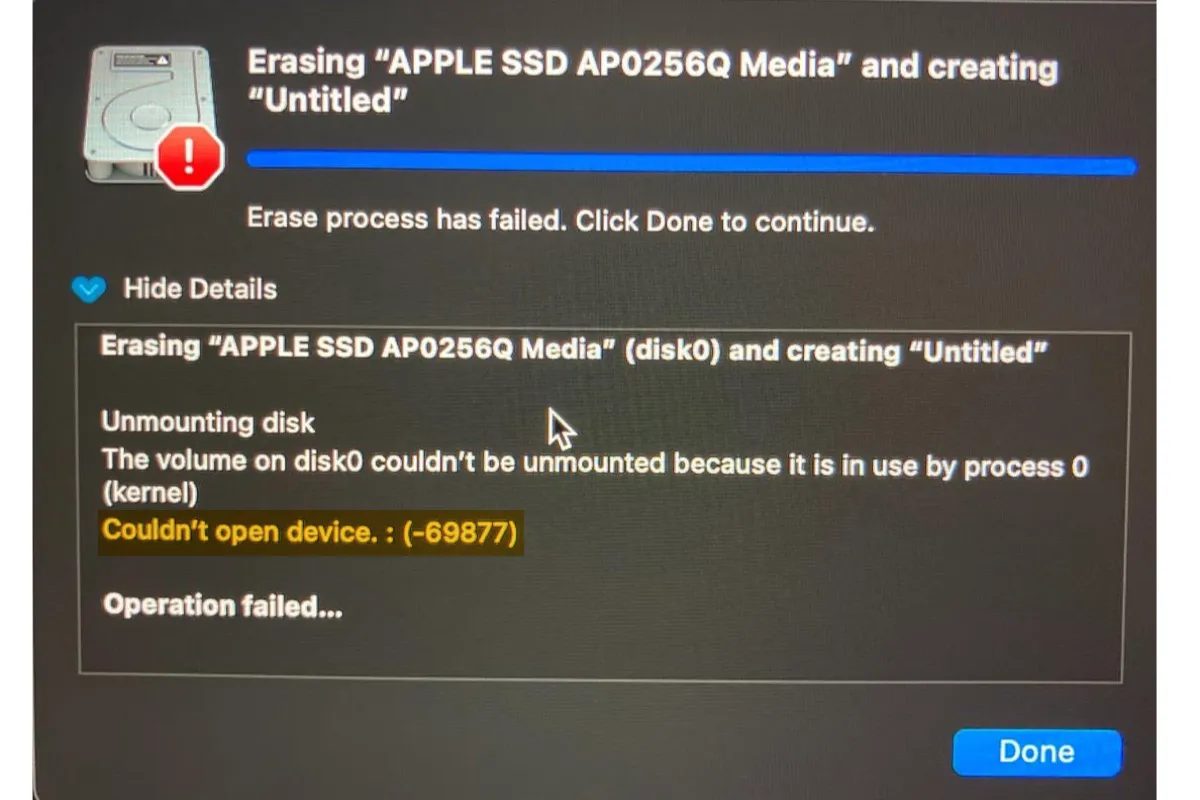
[Fixed] 'Couldn't Open Device 69877' on Mac When Erasing Mac/USB/SD Card
If you still can't erase the drive and Terminal returns the error reading, "Error: -69877: Couldn't open device," you can get it fixed with the solutions in this post. Read more >>
Hopefully, you have resolved the error with the solutions above. Don't forget to click the button below to share this post.
How to fix 'Unable to unmount volume for repair 69673' on internal drives?
There are several variations of the error "Unable to unmount volume for repair" that you may receive when dealing with your Mac's internal drive, such as:
- "Unable to unmount volume for repair." when failing to install or upgrade macOS.
- "First Aid could not unmount the volume for repair." when First Aid can't repair an internal volume running on an older macOS.
- "Unable to unmount volume for repair. : (-69673)." when First Aid fails to repair an internal volume running on a newer macOS.
To eliminate the error, you can follow these solutions.
- Run First Aid in Recovery Mode
- Remove and rename two files
- Repair the drive with fsck
- Clean reinstall macOS
Run First Aid in Recovery Mode
If you are trying to repair your startup disk (usually named Macintosh HD) in a normal boot, it won't work, as you are currently booted from it. One way around this is to start up in Recovery mode and run First Aid from there. Here's how to repair the startup disk on an Intel-based Mac.
- Shut down your Mac.
- Press the power button, then immediately press and hold Command + R.
- Release the keys when you see the Apple logo.
- Click Disk Utility > Continue.
- Click View > Show All Devices.
- Select the startup disk at the top and click First Aid.
If you still see "First Aid could not unmount the volume for repair," you can select the drive or each volume under the drive, click Unmount in Disk Utility, and then retry First Aid. Suppose manually unmounting the disk doesn't make any difference; then you should try repeating the process in Internet Recovery. If the repair succeeds, you can continue with what you planned to do with your Mac.
Remove and rename two files
Disk Quotas may be the one to blame if you are trying to update or install macOS but receive "Unable to unmount volume for repair." In this case, you need to rename and remove two files using Terminal commands in Recovery Mode.
- Restart your Mac in Recovery Mode.
- Open Utilities > Disk Utility.
- Copy and paste the command below and hit Enter.sudo mv /.quota.ops.user /.quota.ops.user.org
- Type in your password and hit Enter.
- Execute the following command.mv /.quota.user /.quota.user.orig
Once you have modified the files, you can run the installer again to see whether it works.
Repair the drive with fsck
Fsck is a command-line tool for checking and repairing file system errors on Mac. And there are several cases where it can repair a disk problem that Disk Utility was unable to. So, it's advisable to try repairing the drive with fsck, as we will describe next.
- Restart your Mac and hold down Command + S when your Mac starts up to boot into Single User Mode.
- Wait until the white texts stop scrolling.
- Type the following command after the hash sign (#) and press Enter./sbin/fsck -fy
- You can run the command several times until seeing a message stating "The volume appears to be OK."
- Then enter the following command and hit Enter to leave Single User Mode and reboot your Mac.reboot
Clean reinstall macOS
If "Unable to unmount volume for repair" keeps recurring despite all your effort to eliminate it, the last hope is to reinstall macOS after erasing the whole drive. You can first try reinstalling macOS in Internet Recovery.
- Boot into Internet Recovery by pressing and holding Option + Command + R at startup.
- Format your Mac's startup disk.
- Select Reinstall macOS.
Then do it with an external bootable installer if Internet Recovery doesn't work.
- Create a bootable installer with the macOS version you wish to install.
- Format your startup disk in Recovery Mode.
- Force unmount the startup disk in Terminal following the steps we mentioned in the upper half of this post.
- Boot from the USB.
- Select your startup disk as the destination to install the targeted macOS.
Also read: