Though it seems convenient to simply pull out a drive when you are done with it, the behavior may risk your data or even render the drive inaccessible on Mac. Therefore, it's essential to eject a disk from Mac properly.
Here, we will elaborate on the 8 ways to eject external devices on Mac and how to force eject on Mac with Terminal.
What does eject mean on Mac?
Eject unmounts a disk from Mac and virtually unplugs it from the system so you can physically remove it without data loss.
When you eject an external hard drive on Mac, you inform the operating system of the intention to unplug the drive. And this will cause it to finish any ongoing read or write operations regarding the disk, and then release the disk's file system and stop accessing it.
This way, you can avoid losing data or corrupting the drive, which would otherwise be the result if a transfer gets interrupted when the drive is yanked out without ejecting.
But can you just unplug an external hard drive without ejecting if the transfer is complete?
The answer is no because the seemingly complete transfer may still be running in the background due to write caching. When transferring data on Mac, macOS won't write data to the destination directly; instead, it first places it in the memory so that you can perform other tasks while waiting for the data to finish writing.
Once a drive is ejected, it will be powered down, and you will have to unplug and reattach it to use it again. But eject also means slightly different things depending on the type of devices you are dealing with.
- For removable hard drives and flash memory devices like USBs, HDDs, SSDs, etc., eject virtually removes them.
- For optical disc storage devices such as CD-ROM, DVD, and Blu-ray Disc, eject additionally physically ejects the media.
- For internal hard drives, eject means the same as unmount, as you can't unplug them anyway.
Eject vs. unmount: With Unmount, macOS stops using a disk's file system but still shows it in Finder and can access it at a lower level. The drive is still charging, and you can mount the drive without unplugging and reconnecting the drive. Similarly, eject also unmounts the drive, but it unplugs the drive logically from your Mac too.
If you find the information useful, please click the button below to share it with your friends.
How to eject external hard drive on Mac safely?
Once you have finished using an external peripheral on Mac, such as a USB flash drive, an SD card, or an external hard drive, you should safely eject it before pulling it out. Here are 8 ways to safely eject a disk from Mac.
[8 ways] How to eject hard drive from Mac:
- Way 1: Eject a device in Finder
- Way 2: Right-click to eject a disk
- Way 3: Drag a drive to Trash
- Way 4: Eject a disk via the File menu
- Way 5: Eject external hard drive on Mac using a keyboard shortcut
- Way 6: Eject external hard drive on Mac via the Eject button
- Way 7: Eject a disk in Disk Utility
- Way 8: Eject an NTFS drive on Mac using iBoysoft NTFS for Mac
I prefer ejecting an external hard drive on Mac with the keyboard shortcut; which one do you use most? You can share your thoughts with us.
Way 1: Eject a device in Finder
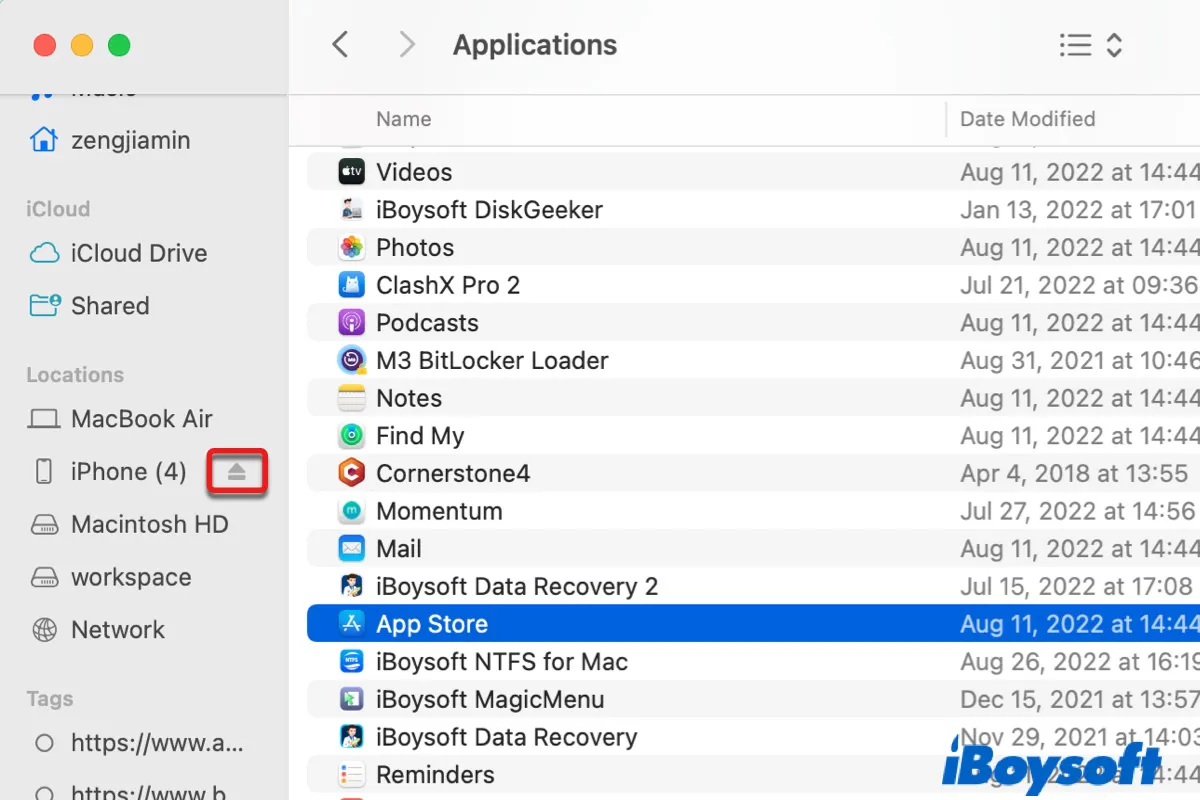
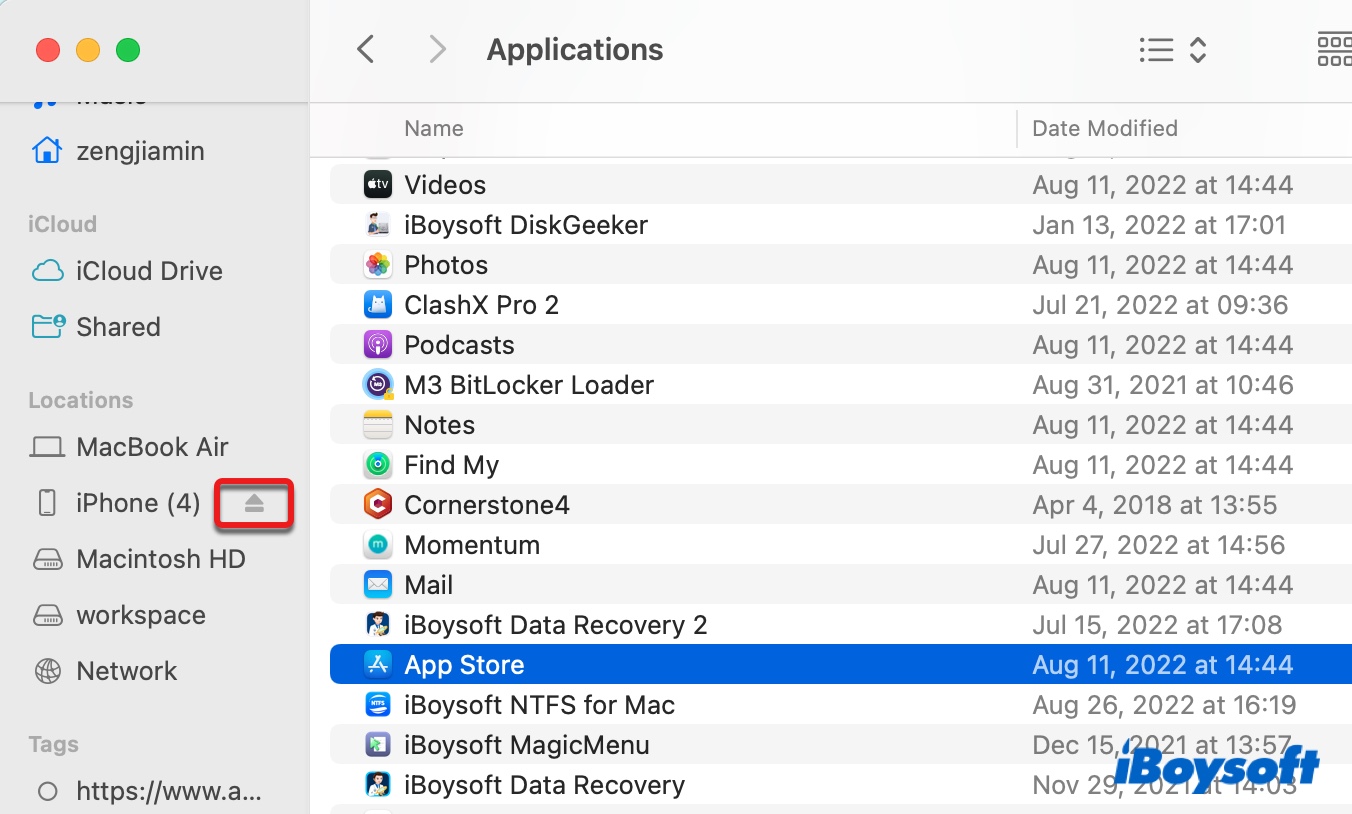
You can easily eject the external hard drive on Mac from Finder.
How to eject an external hard drive on Mac:
- Open Finder.
- Find your external storage device under "Locations."
- Click the eject button next to the drive.
If you prefer not to open Finder to eject a disk, here's how to eject USB from Mac without Finder.
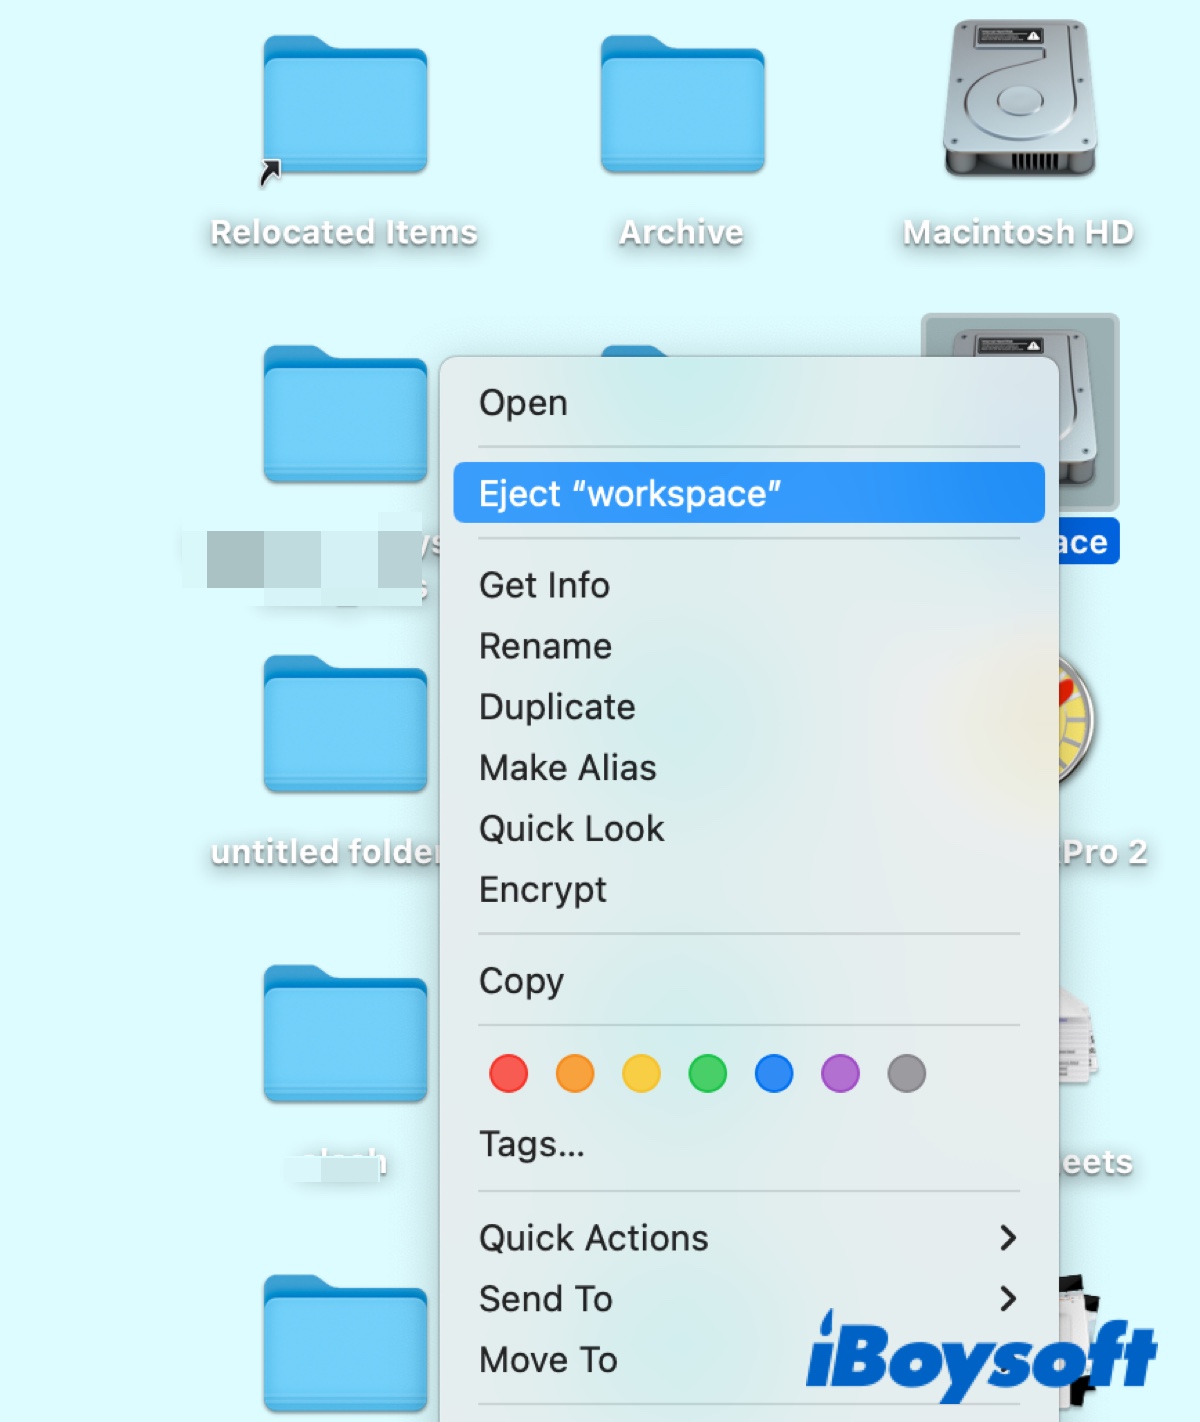
Way 2: Right-click to eject a disk
If you have set your Mac to display external disks on the desktop through Finder > Preferences, you can eject an external hard drive on Mac from there.
How to eject USB from Mac without Finder:
- Right-click the external drive's icon on the desktop.
- Select Eject "drive name" and wait until the icon disappears.
Way 3: Drag a drive to Trash
Dragging the USB or external hard drive to Trash is another simple way to eject a disk from Mac. The Trash icon at the rightmost of the Dock also serves as an eject button on Mac. When you click and drag your drive from the desktop towards it, the Trash icon will change its appearance.
Way 4: Eject a disk via the File menu
You can also eject a disk from Mac using Finder's File menu.
How to eject a USB from a Mac using the File menu:
- Select your drive icon on the desktop.
- Click File at the top-left menu bar.
- Select Eject.
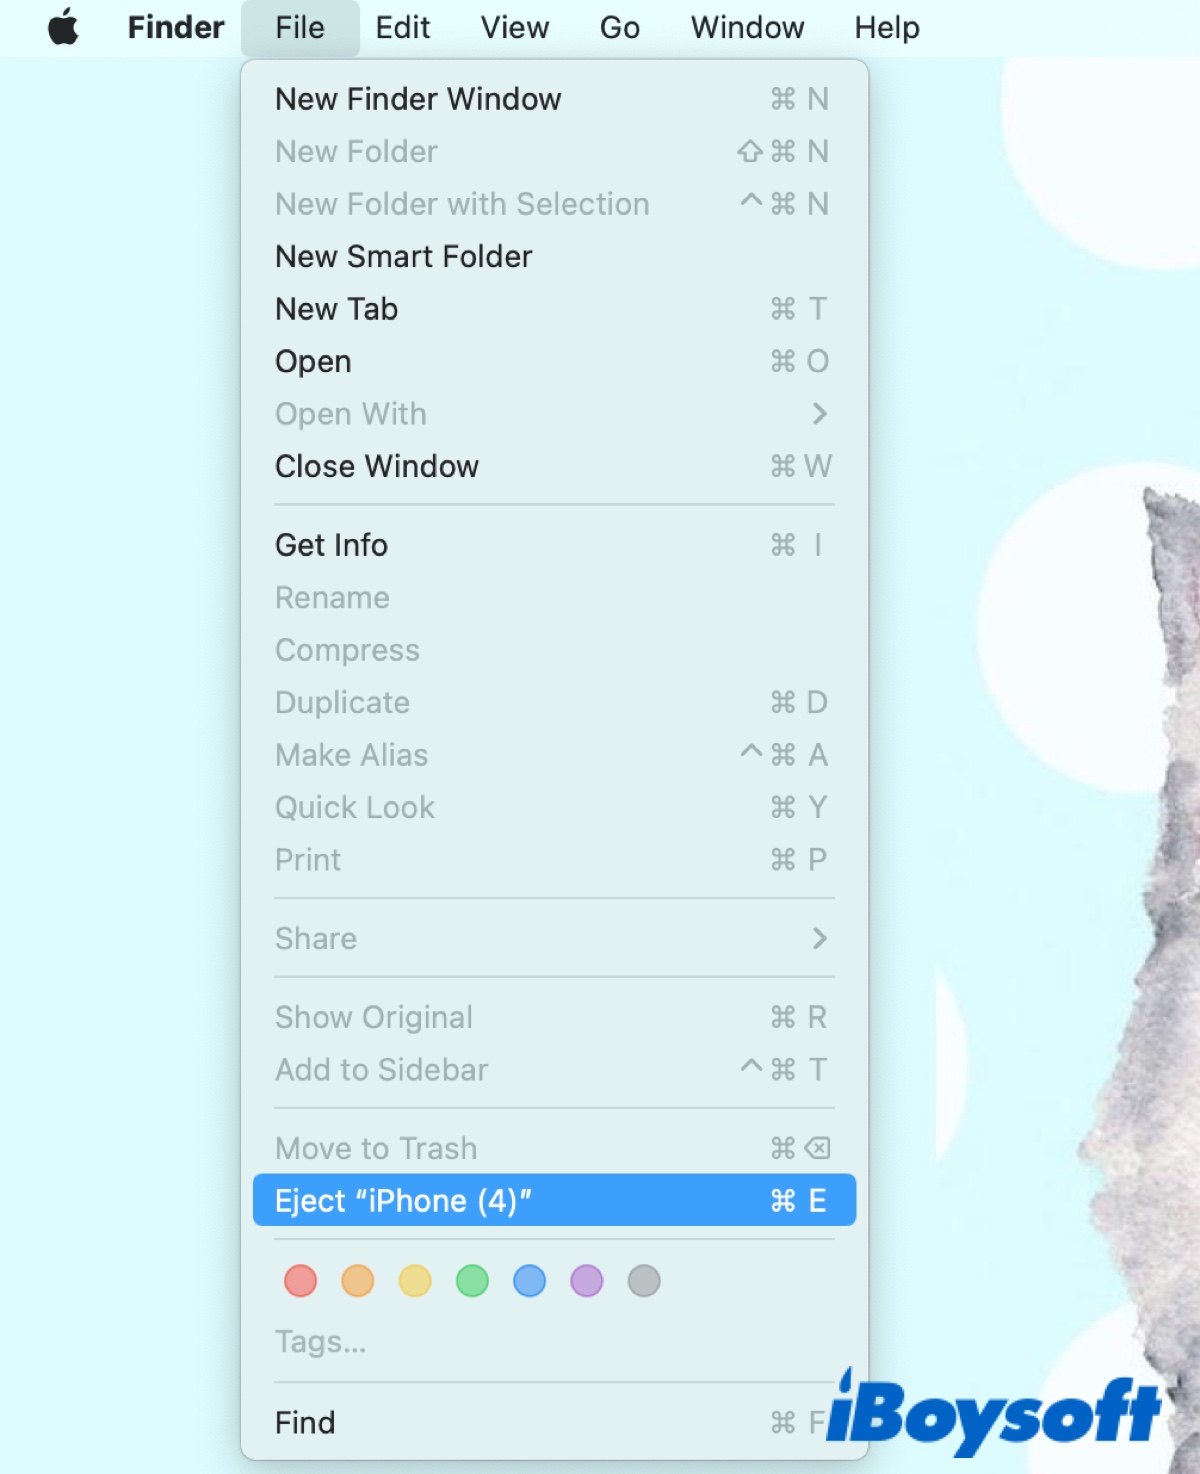
- Unplug the external drive after the USB icon disappears.
Way 5: Eject external hard drive on Mac using a keyboard shortcut
If you prefer to eject hard drive on Mac with a keyboard shortcut, you can press Command + E to achieve it. Then disconnect the drive after its icon vanishes from the desktop.
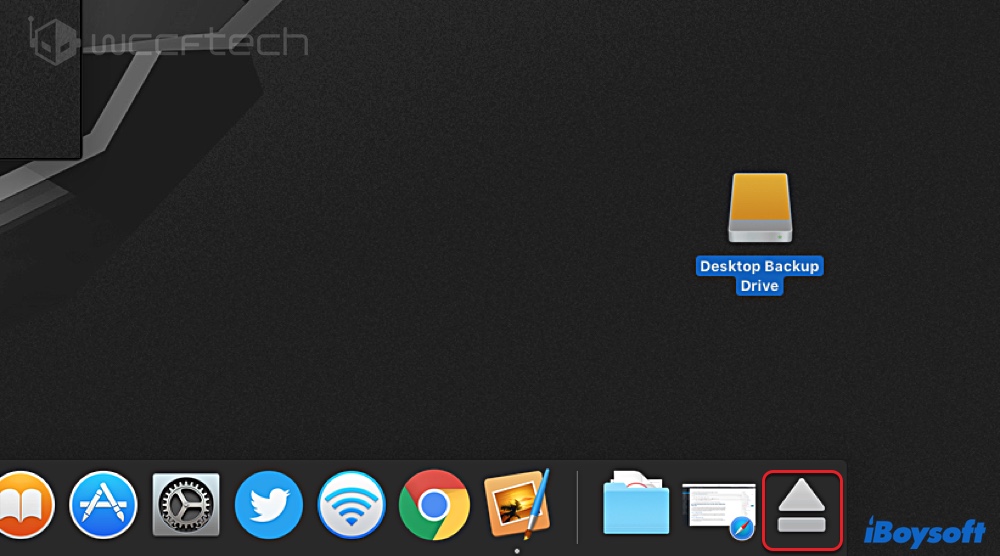
Way 6: Eject external hard drive on Mac via the Eject button
If you often need to eject several devices at a time, you can easily do so by adding an eject menu to the menu bar. The eject menu lists all the connected external disks so that you can choose which one to eject. It also comes in handy when the disc's ( such as CD or DVD) format is unrecognized on Mac.
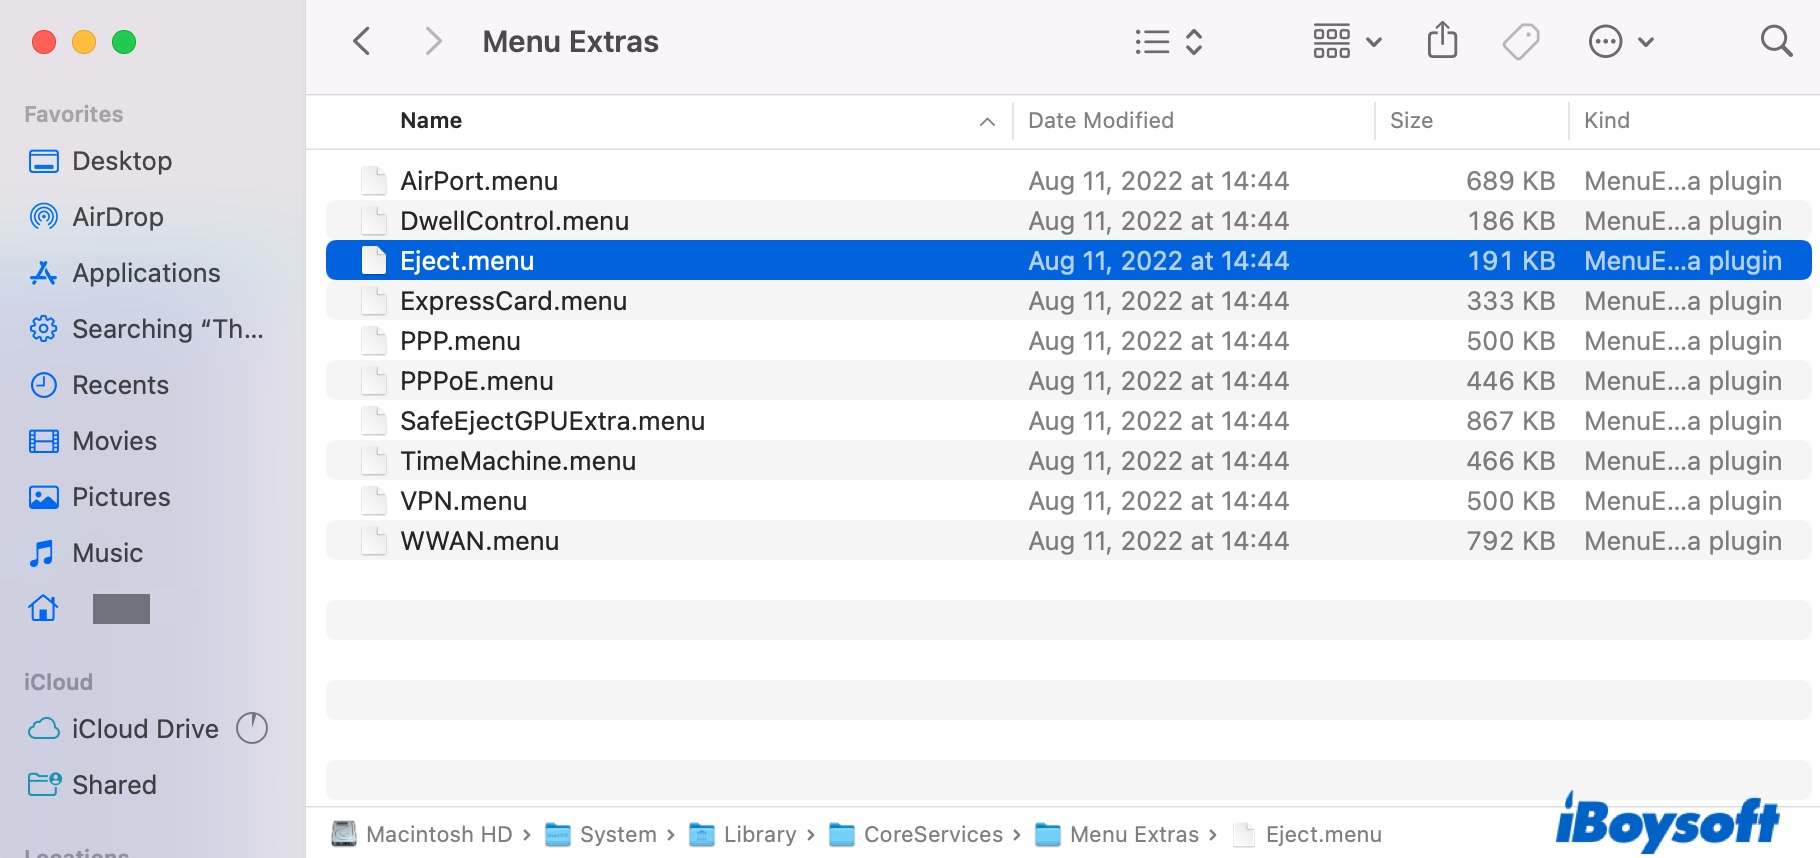
How to eject external hard drive from MacBook Air with the eject menu:
- Open Finder.
- Click Go > Go to Folder at the top.
- Copy and paste /System/Library/CoreServices/Menu Extras and hit Enter.
- Double-click Eject.menu.
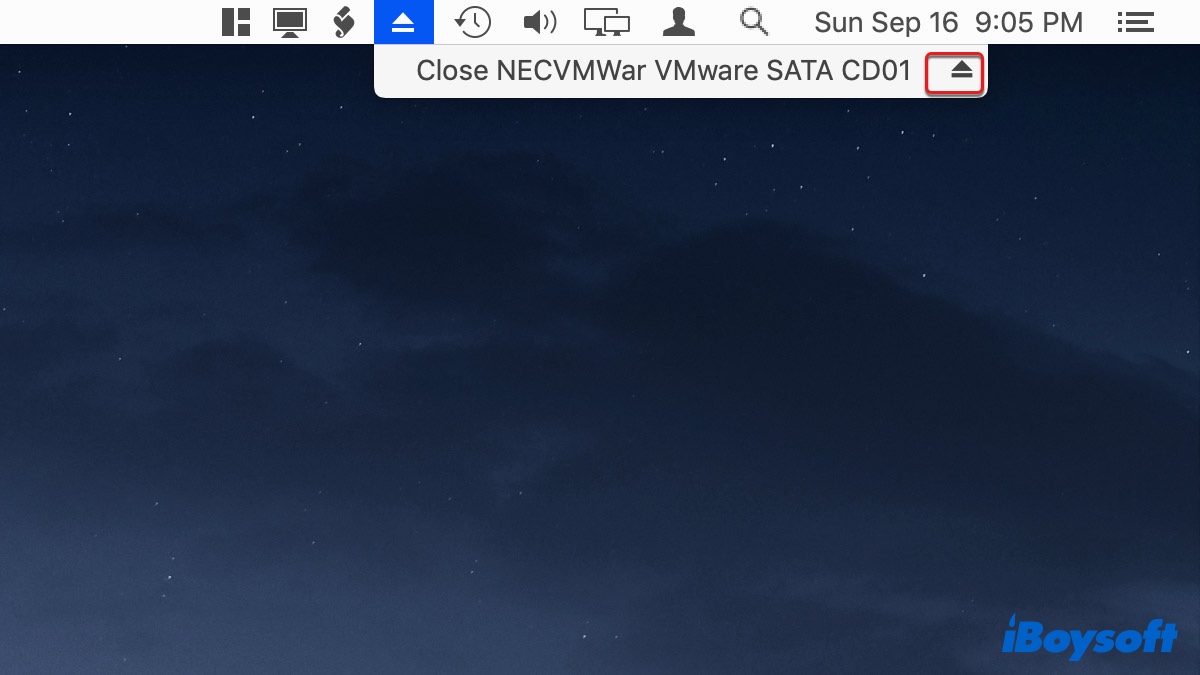
- Check the eject menu icon (a chevron with a line beneath it) at the top-right of your menu bar.
- Click the eject button to display all devices connected to your Mac.
- Tap the eject icon next to the drive to eject it.
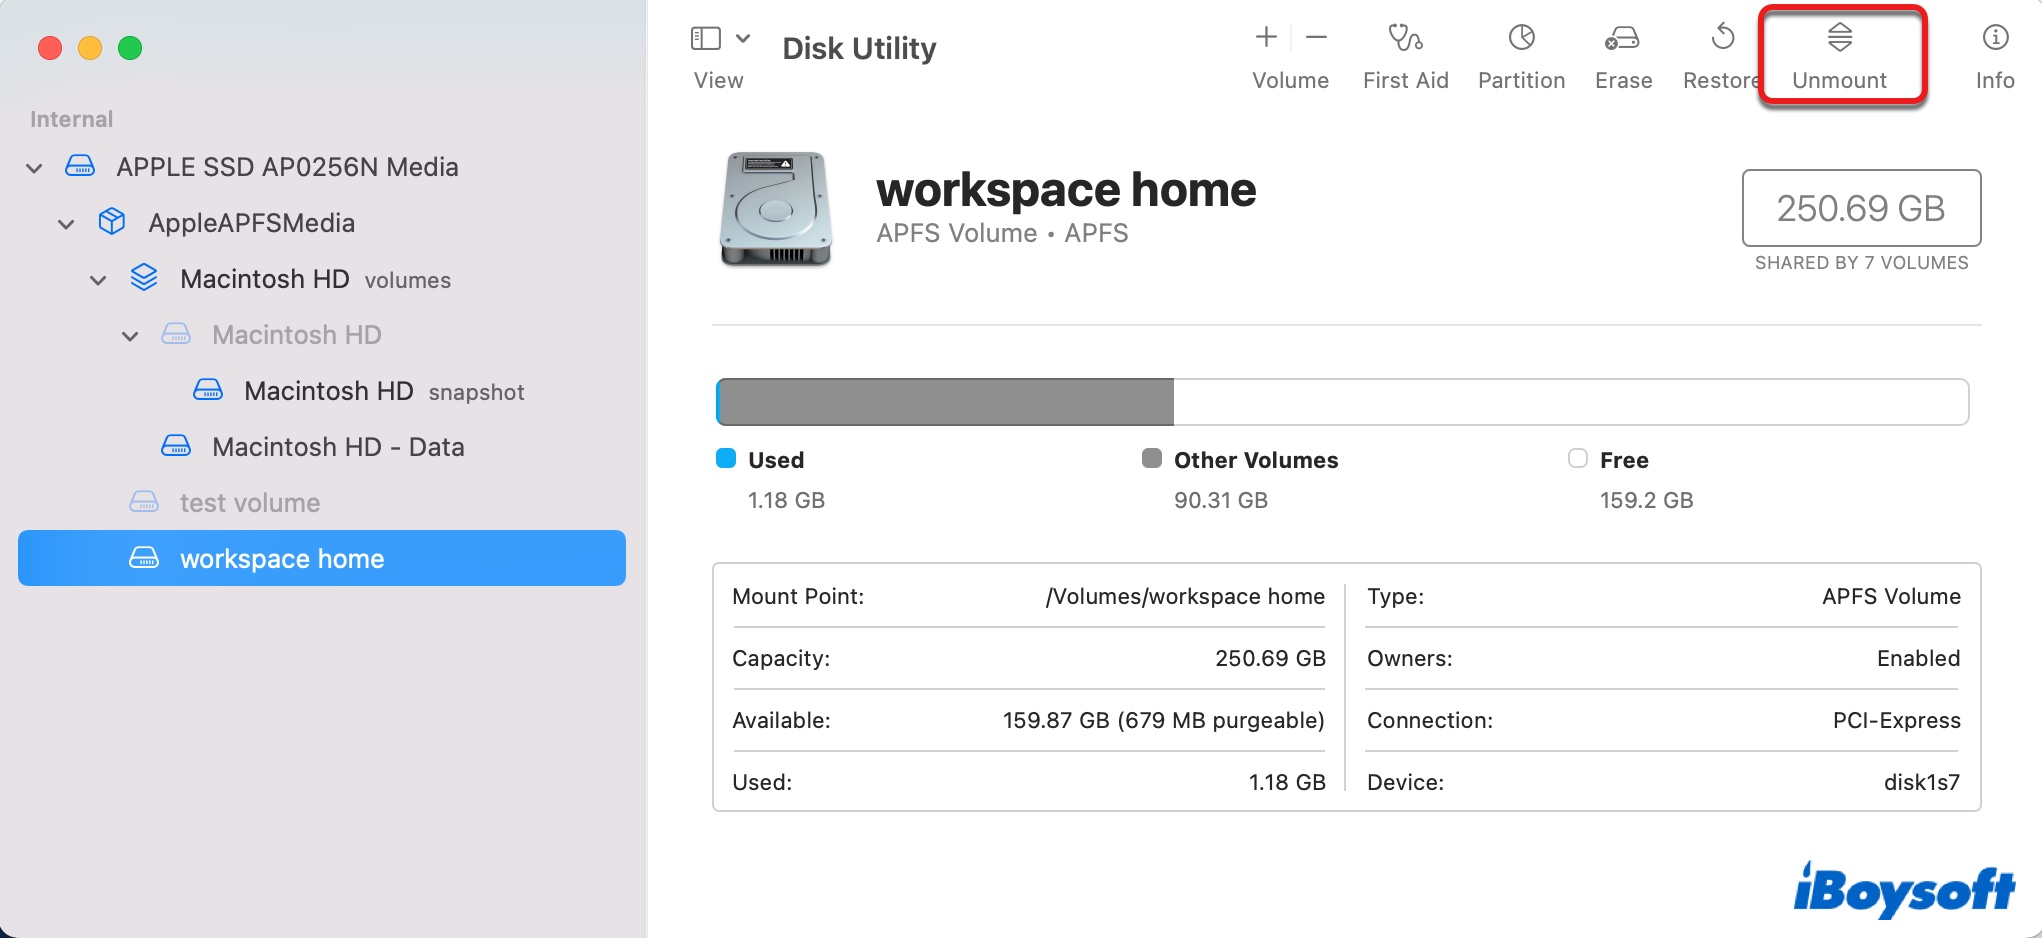
Way 7: Eject a disk in Disk Utility
Mac has a disk management tool called Disk Utility, allowing you to manage the internal and external hard drives connected to your Mac. With it, you can view the disk information and eject, unmount, erase, and partition a drive.
How to eject external hard drive from MacBook Air:
- Open Disk Utility from the Applications > Utilities folder.
- Locate your external drive from the left side.
- Click the eject button next to it.
Way 8: Eject an NTFS drive on Mac using iBoysoft NTFS for Mac
If the connected drive is formatted with NTFS, which is read-only on Mac, you can use iBoysoft NTFS for Mac to safely eject or unmount the NTFS drive. iBoysoft NTFS for Mac is the best NTFS reader for Mac that's compatible with macOS Sonoma 14 to macOS 10.13 running on Intel and Apple Silicon Macs.
It provides full read and write access to your NTFS drive, which makes it a great alternative if the NTFS-formatted external hard drive won't eject on Mac.
Here's how to eject an NTFS drive on Mac:
Step 1: Download and install iBoysoft NTFS for Mac.
Step 2: Click the icon of the NTFS reader at the top menu bar.
Step 3: Select your NTFS drive and click Eject.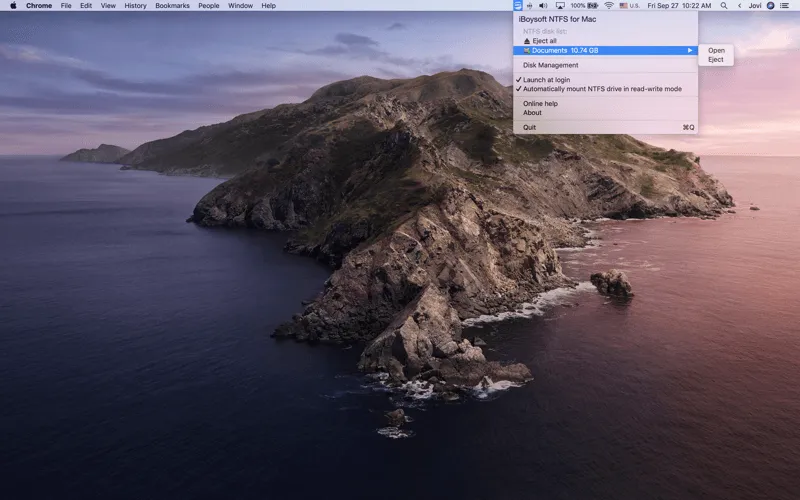
How to unmount an external hard drive on Mac?
If you want to temporarily disconnect the external hard drive to avoid it being accessed, you can unmount the drive and mount it again when ready to use it. Here are two ways to unmount an external hard drive on Mac.
Unmount a drive in Disk Utility
- Launch Disk Utility from the Applications > Utilities folder.
- Click Unmount at the top toolbar.
Unmount an NTFS drive on Mac with iBoysoft NTFS for Mac
If you are unable to unmount an NTFS drive in Disk Utility, you should definitely try iBoysoft NTFS for Mac. Apart from allowing you to unmount your NTFS-formatted drive on Mac with a simple click, it also lets you eject the drive safely, read and write to the drive natively, repair the drive, and format other non-NTFS drives into NTFS.
Here's how to unmount an NTFS drive on Mac:
Step 1: Download and install iBoysoft NTFS for Mac.
Step 2: Open the NTFS reader from your Applications folder.
Step 3: Select your NTFS drive from the left side and click Unmount.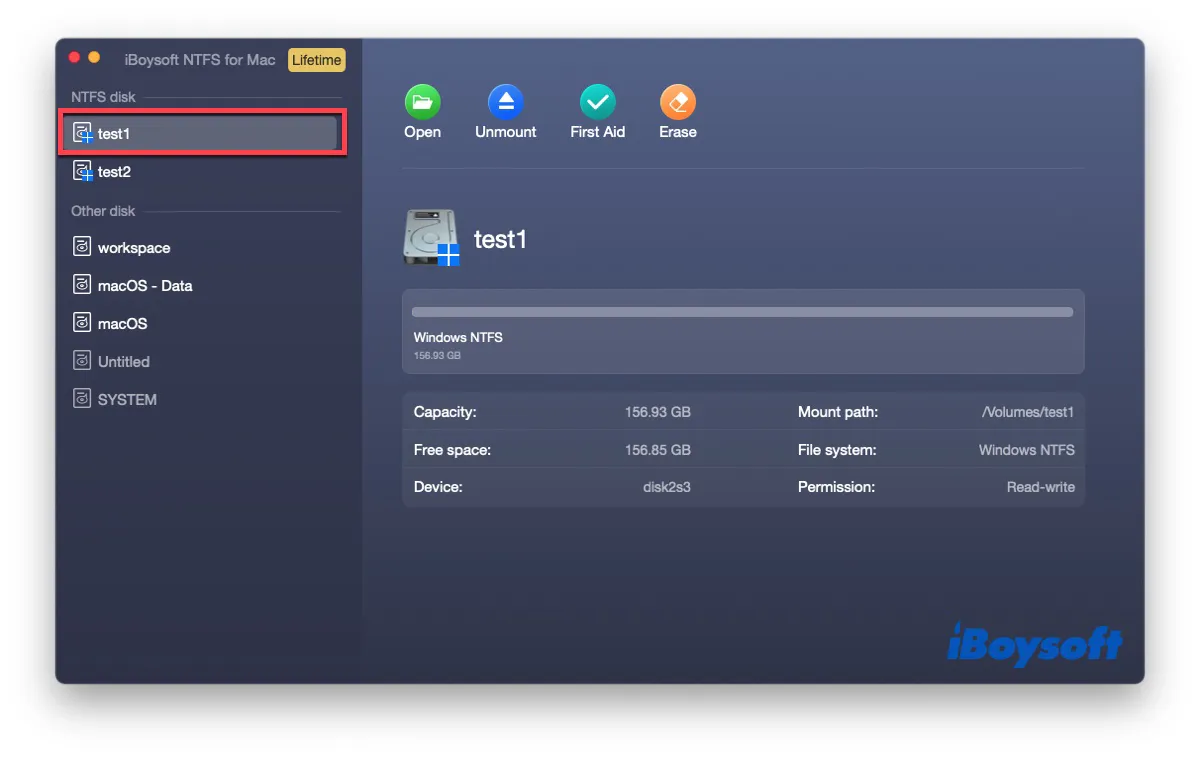
[4 Methods] How to Remove SD Card from MacBook Safely
This article provides a detailed guide on how to remove an SD card from MacBook safely, and helps you prevent your SD card from file corruption. Read more >>
Why can't I eject my external hard drive on Mac?
Suppose you can't eject the external hard drive on Mac but receives error messages such as "The disk wasn't ejected because one or more programs may be using it.", "The volume can't be ejected because it's currently in use.", or "The disk couldn't be ejected because the Finder is using it. Stop the Finder action and then try to eject the disk again." In this case, it may result from one of the following issues:
- The external drive or certain files on the drive are currently in use.
- Some processes or programs are using the drive in the background.
- The external drive is under Spotlight indexing.
- The drive is malware or virus infected.
What to do if you can't eject drive because Finder is using it?
If your external hard drive won't eject, don't physically remove it until you have tried and failed with all the solutions below. Also, if you just transferred some big files to the drive, wait longer because the process is likely still running in the background. Suppose you have given the drive enough time to finish a transfer, then carry on with the following fixes.
Solutions to try if you can't eject drive because Finder is using it:
- Quit all running applications
- Force quit Finder
- Find and quit processes that are using the drive
- Exclude the drive from Spotlight Indexing
- Locate the processes that are using the drive
- Log out and log back into your Mac
- Repair the external drive with Disk Utility First Aid
- Restart or shut down your Mac
- Tips: Directly connect the external drive to your Mac
Quit all running applications
When your external drive was failed to eject because it is currently in use, the first thing you should do is close all running applications to stop the drive from being used by them. Then retry ejecting the disk. Besides, it also helps if you disable programs like antivirus, drive monitors, malware detectors, etc.
Force Quit Finder
If you receive "The disk couldn't be ejected because the Finder is using it. Stop the Finder action and then try to eject the disk again." when ejecting a disk, you can follow the advice to stop Finder from using your disk.
How to stop Finder from using a disk:
- Press Option + Command + Escape simultaneously.
- Select Finder and click Relaunch.
- Click Relaunch again in the pop-up window.

After relaunching Finder, you can open Finder again to eject the disk.
Exclude the drive from Spotlight Indexing
If your flash drive won't eject on Mac, it likely is under Spotlight indexing. To prevent Spotlight from indexing folders on the drive, follow these steps:
- Go to System Preferences > Spotlight.
- Select the Privacy pane.
- Click the ( + ) button to select folders on the drive that you want to exclude from Spotlight indexing.
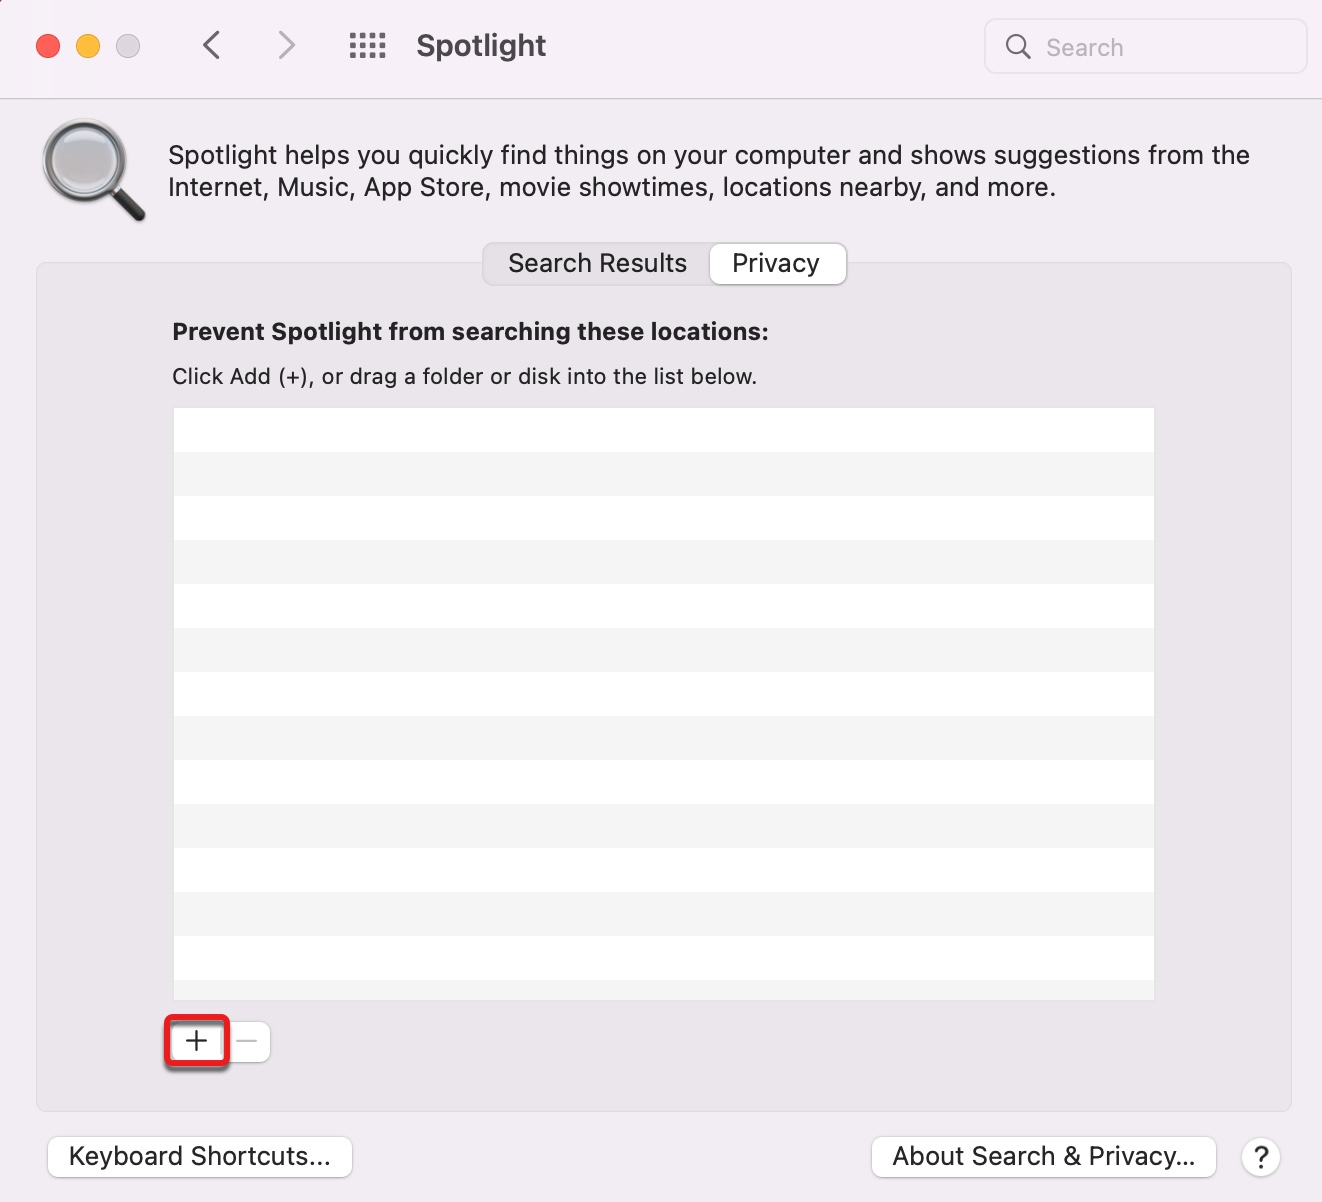
- Click Choose.
- Restart your Mac for the change to take effect.
- Eject the drive again.
Note that the downside of disabling Spotlight indexing is that you can't search files on the excluded folder. If you want to re-enable the indexing, go through steps 1 and 2, then select the folder and click the ( - ) button.
Locate the processes that are using the drive
If you still can't eject external hard drive on Mac, try figuring out what processes are using what files of the drive in Terminal and kill these processes as needed.
- Launch Terminal from the Applications > Utilities folder.
- Input the command below and hit Enter.sudo lsof | grep /Volumes/yourdiskname Change yourdiskname with your disk name and separate the words with \ if there are more than one.
- Enter your administrator password.
- Note down the running processes.
If you notice the mds process is open and holding files on your external drive, you can execute the command below to terminate it.sudo killall mds
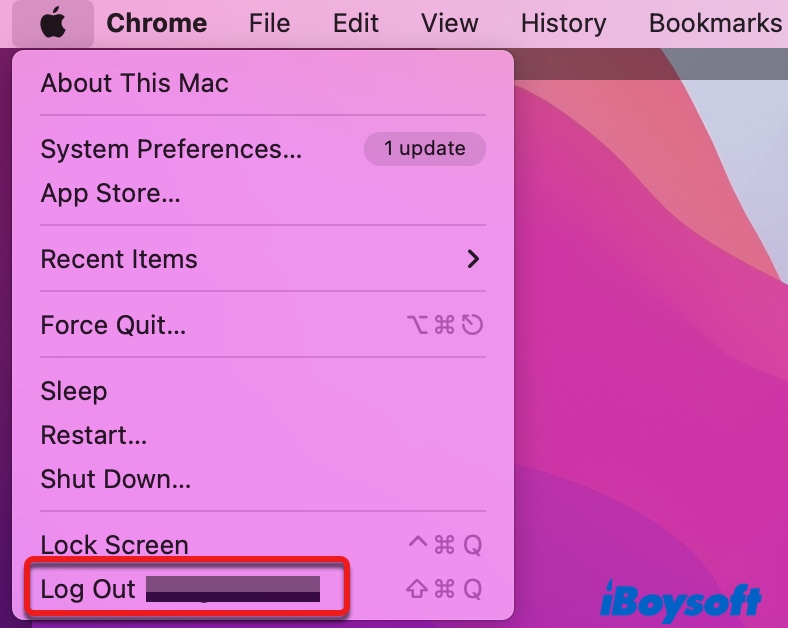
Log out and log back into your Mac
As introduced in Apple's guide, you can log out and log back into your account if your flash drive won't eject on Mac. If you haven't tried it, choose the Apple menu > Log Out, then follow the onscreen instructions to log in again.
Repair the external drive with Disk Utility First Aid
It's possible that the external hard drive won't eject because the drive is having issues. To verify it, you can make use of the "First Aid" feature in Disk Utility. It can check the drive for disk errors and repair them if possible. Here are the steps to repair a drive with First Aid on Mac:
- Open Disk Utility from the Applications > Utilities folder.
- Select your external disk from the left side.
- Click "First Aid" at the top.
- Click "Run."
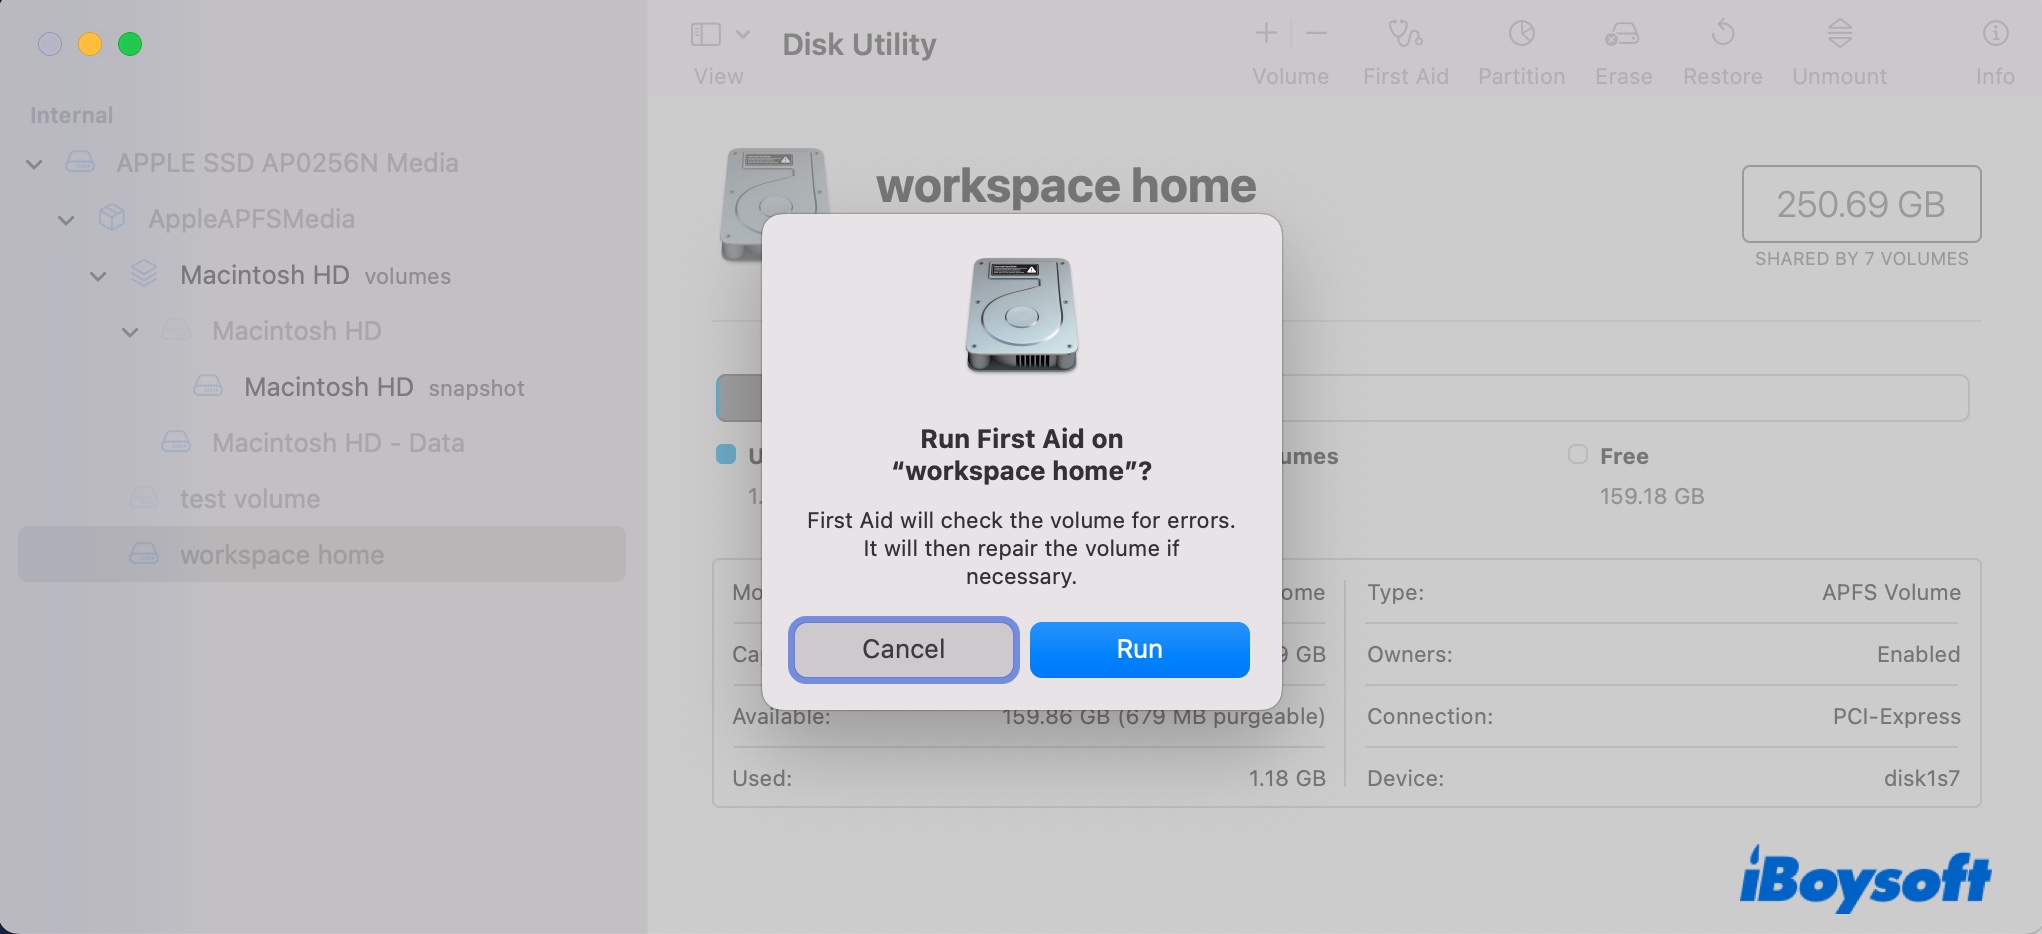
- Wait for the scan to complete.
When the drive is reported OK, eject the drive in Disk Utility.
Restart or Shut down your Mac
If none of the above solutions work, you can restart your Mac with the drive connected. Then try ejecting the disk from Mac. Apart from that, shutting down your Mac and then unplugging the drive has also worked for many users without causing corruption.
Tips: Directly connect the external drive to your Mac
Many users whose drive failed to eject because it is currently in use soon figured out that it's the USB connecter on the hub they used not allowing the drive to eject. If that also happens to you, consider using a different connector or directly connecting the drive to your Mac.
Have you resolved the "external hard drive won't eject" issue on Mac? If so, which solution worked for you? Share it with your favorite platform.
How to force eject on Mac?
In most cases, you should've ejected the drive safely with the abovementioned solutions. If not, you can force eject the external hard drive on Mac, as discussed next. Before getting started, let's talk about whether it's safe to force eject external hard drive on Mac.
If the error you received is "The disk wasn't ejected because one or more programs may be using it.", you are also given the option to force eject the drive, which will likely warn you of the potential risk once you click on it. So, yes, force-ejecting a drive isn't completely safe as it may interrupt important data transfer in the background.
On the other hand, it's not a bad idea to force eject on Mac as it may be your last resort, and you likely have waited enough time for a transfer to complete. To prevent losing important files, it's advisable to back up the essential files before proceeding to force eject a drive on Mac.
Besides clicking the "Force Eject" button showing with the error, you can also eject an external hard drive on Mac with Terminal. Here's how to safely force eject external hard drive on Mac.
Note: As a reminder, you should first attempt to safely eject the external drive on Mac with the solutions in the last section before moving on to force eject external hard drive on Mac with Terminal.
How to eject USB from Mac Terminal:
- Copy and paste essential files to another storage device on Mac.
- Wait a while after the message shows the transfer progress at 100%.
- Open Terminal from the Applications > Utilities folder.
- Enter the following command and hit Enter to list external drives connected to your Mac.diskutil list external
- Note down your drive's disk identifier, such as disk2.
- Type in the following command and hit Enter to force unmount the disk.diskutil unmountDisk force /dev/disk_identifier(Don't forget to replace disk_identifier with yours.)
- Run the command below to eject the drive.diskutil eject /dev/disk_identifier
If you encountered the error reading, "Volume timed out while waiting to eject," Read this guide to eliminate it: How to Fix 'Volume timed out while waiting to eject' on Mac?
FAQ about how to eject external hard drive on Mac?
- QDo I need to eject external hard drive on Mac?
-
A
Yes, you need to eject external hard drive on Mac first if you want to pull it out. Otherwise, you may risk the data security and even experience drive corruption if a data transfer is interrupted.
- QWhat is the eject button on Mac?
-
A
There are several ways to eject a disk from Mac, so as the location of the eject button. You can see the eject button next to the drive name in Finder, Disk Utility. Apart from that, the Trash icon will change to an eject button when you drag a drive towards it.
- QWhat happens if you remove USB without ejecting?
-
A
If you remove USB without ejecting when the files are completely transfered, it won't cause any damage. However, if the USB was removed without ejecting when a transfer is working in the background, you will likely lose data or end up with a corrupted drive.
- QHow do you add an eject button on a Mac?
-
A
Here's how to add an eject button on Mac:
1. Open Finder.
2. Click Go > Go to Folder at the top.
3. Copy and paste /System/Library/CoreServices/Menu Extras and hit Enter.
4. Double-click Eject.menu.