Sometimes, you fail to reinstall macOS or want a clean reinstallation, then you will need to format the startup disk. This post explains how to format the Mac startup disk with step-by-step guides.
How to format the Mac startup disk?
Erasing the Mac startup disk will cause all data stored on it permanently wiped out. Make sure you have a backup to crucial files.
The position of buttons and background color may slightly differ in different operating systems, but the overall process remains the same.
Steps to format the Mac startup disk:
- Step 1: Boot your Mac into macOS Recovery mode
- Step 2: Open Disk Utility
- Step 3: Select the startup disk in Disk Utility
- Step 4: Name and Format
- Step 5: Quit Disk Utility
Step 1: Boot your Mac into macOS Recovery mode
To format the startup disk, you have to boot your Mac into Mac Recovery mode first because you can't format the drive when it's in use. Note that the way to boot into macOS Recovery mode on M1 Macs differs from Intel-based Macs.
When the Utilities window pops up, the startup is then finished. You'll be asked to select a user you know the password for, choose the one you know and enter your password.
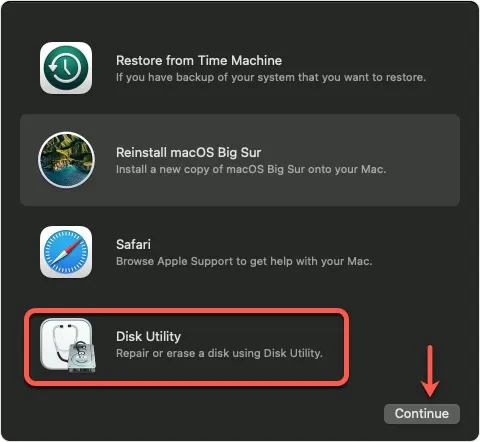
Step 2: Open Disk Utility
Select Disk Utility from the macOS Utility window and click Continue.
Step 3: Select the startup disk in Disk Utility
Click View > See All Devices. All the mounted drives are listed in the left sidebar.
The startup drive is usually named Macintosh HD or Home HD, or a custom name. On macOS Catalina and later, the Mac hard drive has two volumes, sometimes under an APFS container, which are the startup disk - Macintosh HD where the operating system resides, and Macintosh HD - Data where the user data is stored.
In that case, you need to delete Macintosh HD - Data first by clicking the delete volume button (-). If there are other internal volumes, delete them too. If you don't delete Macintosh HD - Data, the reinstallation will create another volume named Macintosh HD - Data - Data and you will encounter errors or notifications like "Enter a password to unlock the disk ”Macintosh HD - Data."
Then select the startup drive - Macintosh HD, click Erase at the top-right menu bar.
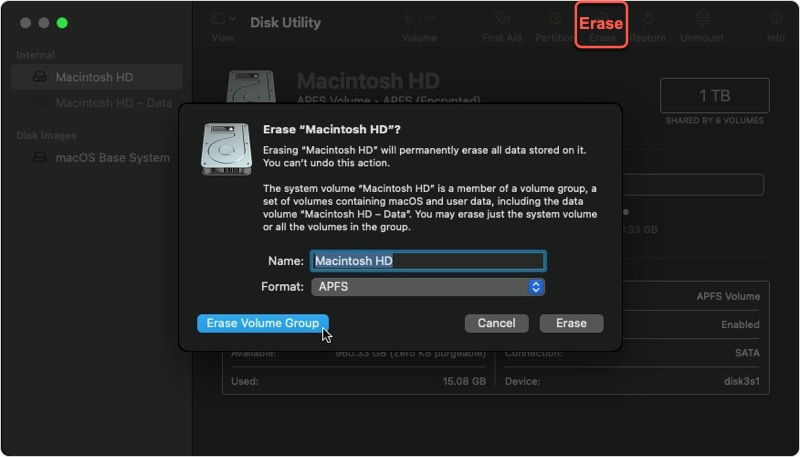
Note: Do not delete or erase the disk image called macOS Base System that contains essential information for your Mac to run smoothly.
Step 4: Name and Format
When the dialog box pops up, you can enter a name for the startup drive or keep the default name: Macintosh HD. Click the pop-up menu next to Format to select a file system.
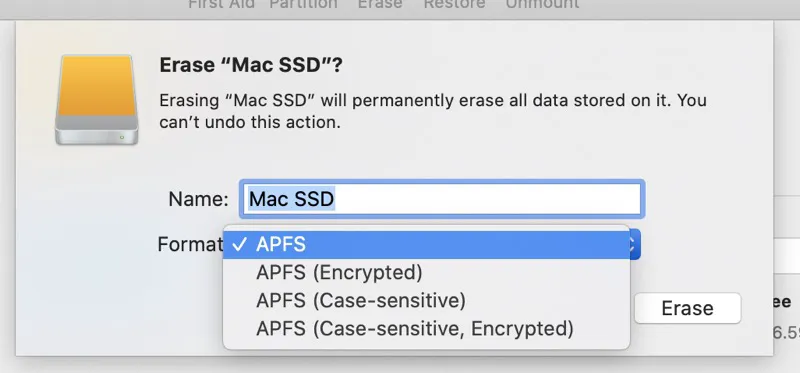
The file system options vary in different operating systems. Check the following list to see file system options.
For Mac computers using macOS 10.13 or later:
APFS: This is the default file system. Keep it ticked if you don't need an encrypted or case-sensitive format.
APFS (Encrypted): For extra security, you can choose this option.
APFS (Case-sensitive): Select this one if you are used to case-sensitive file systems. For this option, “VIDEO” and “video” are two different folders.
APFS (Case-sensitive, Encrypted): Use this option for higher security and case-sensitive files and folders.
For Mac computers using macOS 10.12 or earlier:
Mac OS Extended (Journaled): Choose this option if you don't need an encrypted or case-sensitive format.
Mac OS Extended (Journaled, Encrypted): Use this one for better security.
Mac OS Extended (Case-sensitive, Journaled): Select this option if you prefer case-sensitive files and folders.
Mac OS Extended (Case-sensitive, Journaled, Encrypted): Choose this option for a case-sensitive system and more security.
You can select the file system based on your needs or keep the default file system unchanged. Read APFS vs. Mac OS Extended.
Once you have finished the name and format, click Erase to erase the startup disk. Enter your Apple ID if asked.
Step 5: Quit Disk Utility
Tape on Disk Utility on the top-left menu bar and click Quit Disk Utility to go back to the Utilities window. You can also click the red cross to close Disk Utility. Press Command + Q to leave Recovery mode or select Reinstall macOS and click Continue to start up again with the formatted startup disk.
Why won't my Mac let me erase the hard drive?
The startup drive can only be formatted in macOS Recovery mode. Otherwise, it's grayed out in Disk Utility.
If you boot into macOS Recovery mode but can't see the startup disk, click Apple menu > Shut down, unplug all devices connected to your Mac and start again.
If it still doesn't work, you may need to contact Apple support for help.
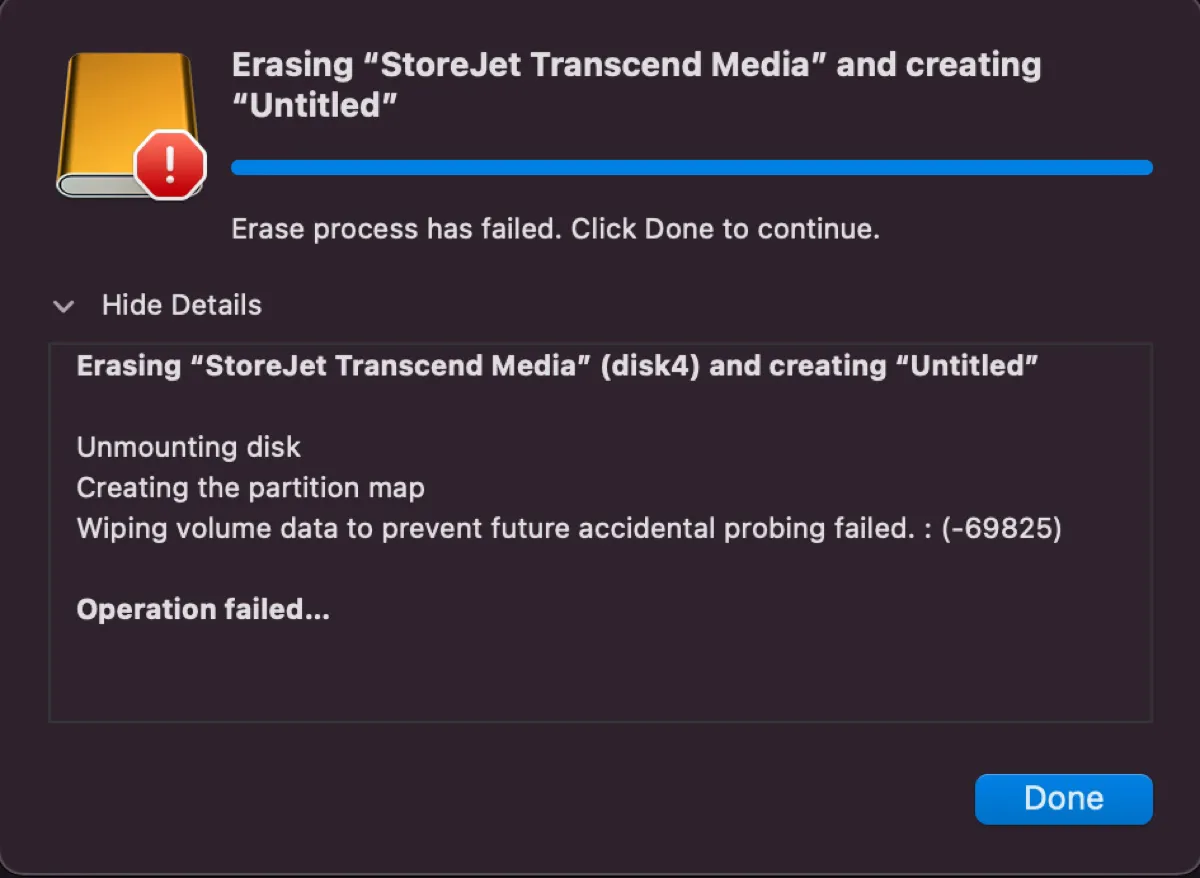
If you receive the error "Wiping volume data to prevent future accidental probing failed" when formatting your startup disk, check out this guide for the solutions.
Also read: Will Formatting My Mac Make It Faster? Here Comes Answer
FAQ about how to format startup disk on Mac
- Q1. How do I wipe my Mac and reinstall?
-
A
To erase all the data on your Mac and reinstall macOS, you need to boot into Mac recovery mode, erase the Mac hard disk, then select Reinstall macOS and follow the on-screen instruction to get the job done.
- Q2. Do I need to erase Macintosh HD - Data?
-
A
If you simply want to reinstall macOS, it's not necessary to erase Macintosh HD or Macintosh HD - Data.
However, if you fail to reinstall macOS or that you want to resale your Mac, you need to delete Macintosh HD - Data or other internal volumes and then format Macintosh HD.
Please be reminded that if you don't delete Macintosh HD - Data, when you reinstall or downgrade macOS, another volume possibly named Macintosh HD - Data - Data will be created.
- Q3. What format should Mac boot drive be?
-
A
APFS for macOS High Sierra and later; Mac OS Extended (Journaled) for macOS Sierra and earlier.