NTFS (stands for NT File System) is the default file system for Windows, while macOS can only read it. Writing to NTFS drives on a Mac is often unavoidable for cross-platform users, such as sharing files between Windows and macOS.
Given the read-only limitations of NTFS on Mac, we've tested and outlined three reliable ways to enable NTFS write support on macOS. Each of them has pros and cons. You can choose the best option for your case to enable NTFS write on Mac with ease.
Overview of the 3 ways to read-write NTFS on Mac
| Options | Reliability | Compatibility | Difficulty Level | Best for |
| 1. Use professional NTFS for Mac - iBoysoft NTFS for Mac | Reliable It is Apple-authenticated | Support macOS Tahoe 26 - macOS High Sierra 10.13 Support Apple Silicon M1, M2, M3, M4, M5 chip | Easy - Get full read and write access to NTFS drives on Mac after simple clicks. | Tech-newbie. Users who want a reliable and safe way to use NTFS drives on Mac. |
| 2. Use free NTFS for Mac - Mounty for NTFS | Relatively reliable It is an open-source | Support macOS Tahoe 26 - macOS Catalina 10.15 Support Apple Silicon M1, M2, M3 chip | Hard - Requires advanced knowledge of the command line. Need to install MacFUSE and NTFS-3G first. | Tech-savvy persons, computer experts. Users who prefer zero cost. |
| 3. Enable NTFS write on Mac via Terminal | Unreliable Not officially supported by Apple Not recommend | Support macOS Catalina and earlier Note: very unstable on macOS Big Sur and Monterey; almost unusable on macOS Ventura and later | Hard - Need to run commands in Terminal. | Tech-savvy persons and computer experts. Users who look for free ways. |
Tips: Formatting NTFS drives to a macOS-compatible file system is also a way to make the drive writable. However, this way is for those whose NTFS drives are empty or have not much data to back up before erasing.
Option 1. Use an easy-to-use and professional NTFS for Mac
Considering the NTFS for Mac tech evolution, using a commercial third-party app is the easiest and fastest way to enable NTFS write support on Mac.
Although it costs a little, it offers:
- High reliability
- Fast write speeds
- High compatibility
- Free technical support
These benefits you probably won't get from open-source tools.
iBoysoft NTFS for Mac is one of the remarkable and incomparable utilities. It features in:
- Super-fast macOS NTFS write and file transferring speed
- Automatically mount NTFS drives in read-write mode
- Let you change exFAT to NTFS
- Allowing you to copy, edit, and delete files on NTFS drives directly in Finder without erasing the disk
- Support NTFS on Mac with Apple silicon, including M1, M2, M3, M4, and M5 chips, and is compatible with macOS Tahoe - macOS High Sierra.
With it, you won't feel any difference in using a Microsoft NTFS drive and a macOS-compatible drive on a Mac, like copying files from a Mac to NTFS drives. It provides your Toshiba NTFS drive read-write access on Mac or any other brand.
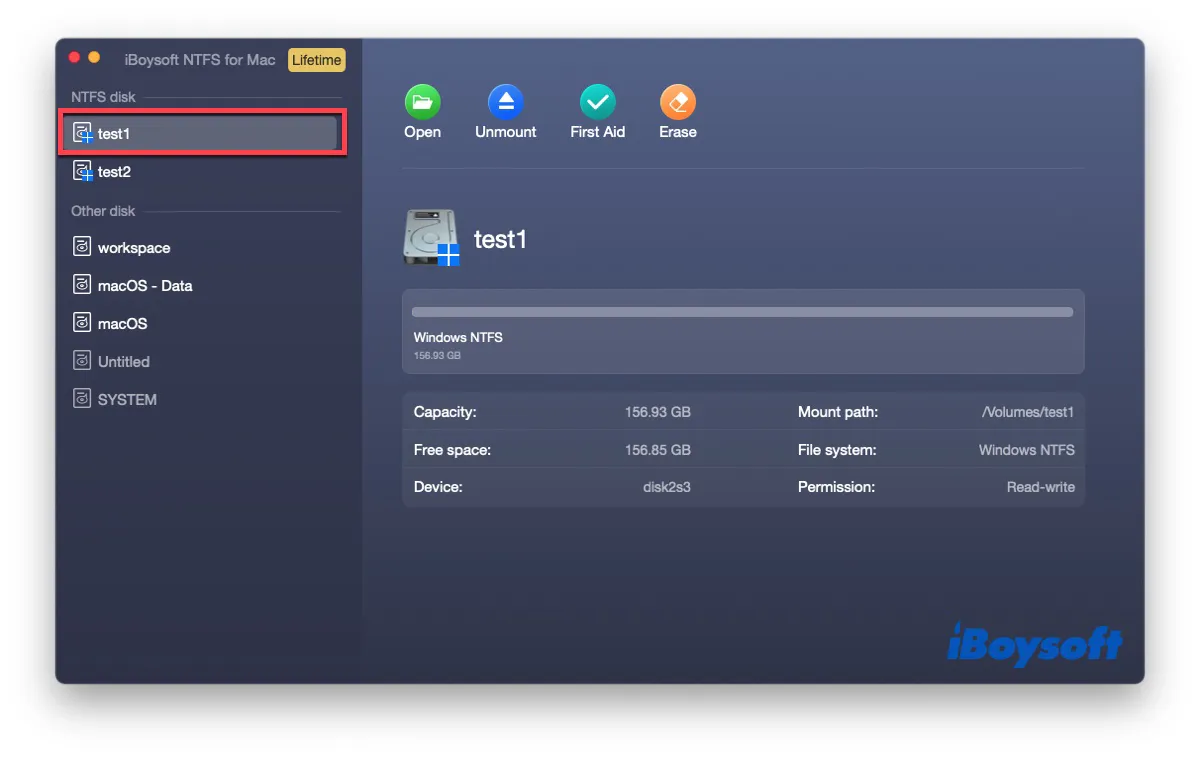
Steps to write to NTFS on Mac:
1. Free download and install iBoysoft NTFS for Mac on Mac.
2. Connect your NTFS drive to your Mac computer.
3. After your drive is mounted successfully, you can access the NTFS disk on Mac and read/write NTFS files. If necessary, you'll be asked to install an NTFS driver and enable System Extensions to gain full disk access.
This wonderful software is available for any brand of NTFS hard drives, for example, the WD My Passport NTFS drive, as long as you install the WD NTFS driver for Mac on your device.
There is a tutorial video about how to read NTFS on Mac and fix an NTFS external hard drive read-only on Mac issue with NTFS for Mac software by iBoysoft.
To read/write to an NTFS drive on macOS Tahoe, read: How to Read & Write NTFS Drive on macOS Tahoe 26?
Option 2. Use a free NTFS for Mac tool
Update: Apple changed the NTFS mount architecture in macOS Ventura, moving away from the previous kernel-based approach that older NTFS remount methods relied on.
As a result, Apple's hidden NTFS write support — previously accessible through tools like Mounty, /etc/fstab, and terminal remount commands — no longer works on macOS 13 Ventura.
However, third-party NTFS solutions based on NTFS-3G and macFUSE can still provide NTFS write access on macOS Ventura and later versions.
If you don't want to use a commercial NTFS driver for Mac or format NTFS, there are some free NTFS for Mac you can choose from. For example, you can use an open-source project called FUSE for macOS (or macFUSE).
Although they are free to use, the process is very complicated and technical, involving many command lines and repetitive Mac reboots. If you want to try such a free program, please follow the guide very carefully, or you may put your machine and data at risk!
Step 1. Download and install macFUSE.
Keep the options default when installing it.
Step 2. Install NTFS-3G.
Go to the Terminal window and run the following command to install Homebrew first: /bin/bash -c "$(curl -fsSL https://raw.githubusercontent.com/Homebrew/install/HEAD/install.sh)"
Then, run this command to let Homebrew install NTFS-3G:
brew tap gromgit/fuse
brew install ntfs-3g-mac
Step 3. Install Mounty for NTFS.
Step 4. Write to NTFS on Mac.
Other than Mounty for Mac, SYSGeeker NTFS for Mac, and SL-NTFS are other free NTFS for Mac. They are free, but all of them require a complex workflow to install and use.
Option 3. Run commands in Terminal
#Experimental method, not recommended for low stability and security
macOS includes experimental NTFS write support, but Apple disables it by default. You can run some command lines in Terminal to enable macOS NTFS write support. Since Apple hasn't officially supported this way, it has proven to be unstable and risky.
Notably, this hidden experimental NTFS write support works relatively reliably on macOS Catalina and earlier. From macOS Big Sur, it becomes very unstable. And then it is forbidden on macOS Ventura and later versions.
I tried this way on my MacBook Air (macOS Sonoma 14.5). It failed to mount my NTFS USB flash drive (256 GB) in read-write mode, and during the process, my Mac got stuck on a spinning ball, and I had to restart my Mac.
This high-risk solution is not recommended, but if you are curious about it, browse the steps below for understanding only, rather than following:
1. Go to the Applications > Utilities > Terminal to launch the Terminal program.
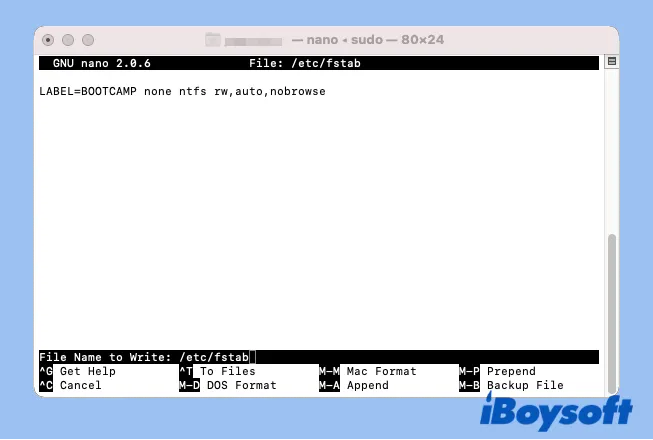
2. Input the following command to edit the fstab file (provide your password when prompted). No letters will show up when you type in a password.
sudo nano /etc/fstab

3. Type the command below in the editor window for the fstab file and press "Control + O" to write. (Be sure to change the word DISKNAME to the name of your NTFS drive)
Tips: If you have multiple NTFS drives you want to write to, write different lines for each NTFS drive.
LABEL=DISKNAME none ntfs rw,auto,nobrowse
4. Hit Enter and press "Control + C" and then "Control + X" to exit.
5. Re-connect the NTFS drive to the Mac.
6. Click "Go" at the top left menu bar and choose "Go to Folder".
7. Type in this file path and hit Enter.
/Volumes
8. Find the NTFS volume or drive and drag it to the sidebar for easy access.
Tips: If you want to undo the change, follow steps 1 and 2, then delete the command line. Save your change and exit.
A lot of users reported that the set of commands above didn't work on macOS Monterey. Please another another set of commands below. They are more complicated.
1. Open Terminal and input the command below, and hit the Return key to unmount your disk. Replace the DISKNAME with the name of your device.
sudo umount Volumes/DISKNAME
2. Run the command to create a mount point for your NTFS volume.
sudo mkdir /Volumes/1
3. Run the command to mount the NTFS on a Mac computer in read and write mode. The "disk2s2" is the Device info of the NTFS drive in Disk Utility. Yours might be different.
sudo mount -t ntfs -o rw, auto, nobrowse /dev/disk2s2 /Volumes/1

4. Quit the Terminal and open the NTFS volume on Mac for use.
Conclusion
Letting Mac write to NTFS files is possible. In addition to changing the file system by formatting, which erases all the contents, you have several options to choose from - free NTFS drivers, open-source NTFS drivers, and Apple's native NTFS support.
Open-source NTFS drivers and Terminal can let you write to NTFS on a Mac for free, but using them wastes a great deal of time and energy. Moreover, they are risky and very unstable.
In comparison, paid NTFS for Mac software saves you a lot of time and effort with its excellent reliability and ease of use.
How to Format an External Hard Drive for Mac and PC?
This article tells you how to format an external hard drive for Mac and Windows and erase any other external hard drives with the best format. Read more >>
FAQS about writing to NTFS on Mac
- QHow to read and write to NTFS drives on a Mac without software?
-
A
Reformatting the NTFS drive to a supported file system like exFAT (both macOS and Windows compatible) is the safest and most reliable way.
Since Mac supports reading NTFS drives, you can copy files from the NTFS drive to your Mac for backup. Then reformat it.
However, Mac can't write to NTFS by default, so you can't edit, rename, paste, delete, create, or move files to the NTFS drive on a Mac. Of course, you can directly format the NTFS drive for Mac. It will erase data. Besides, there are some workarounds to read and write NTFS on a Mac without reformatting.
- QHow to read and write to NTFS drives on Mac for free?
-
A
There are several free ways to read and write to NTFS drives on a Mac.
Use freeware Mounty for NTFS. To use it, you should install macFUSE and NTFS-3G first. And this way is not reliable, especially when transferring large files between Mac and NTFS drives.
Reformat the drive to a macOS-compatible file system. You need to back up data on the drive first, as reformatting a drive will erase data on it.
Run commands in Terminal. This way is unstable and not recommended. It is not officially supported by Apple. If you insist on trying it, ensure your Mac runs macOS Catalina or earlier.
- QWhat is the best NTFS tool for Mac?
-
A
iBoysoft NTFS for Mac is the best NTFS for Mac tool. It has two modes - Simple Mode and Advanced Mode.
Simple Mode enables you to write to NTFS drives without enabling system extensions.
Advanced Mode requires you to enable system extensions to install iBoysoft’s self-designed NTFS driver. This is to help NTFS drives be auto-mounted every time they are connected to your Mac.