
External storage devices like external hard drives, USB flash drives, or SD cards are often pre-formatted with a file system, such as exFAT, FAT32, or NTFS. While exFAT and FAT32 are compatible with both the Windows operating system and macOS, the NTFS format only has full read-and-write support on Windows.
Sometimes, you may need to format a drive to NTFS file system or format an NTFS drive to another file system on Mac. Here, we'll walk you through all the possible methods to format drive to NTFS on Mac and format NTFS drive on Mac.
Before you format the drive
Formatting to NTFS will erase the selected disk or partition. Back up important files first. If you only need to copy, edit, or delete files on an existing NTFS drive from Mac, you do not need to format the drive. Use an NTFS driver to enable read-write access instead.
Why Disk Utility does not show NTFS on Mac?
Many users notice that NTFS is missing from Disk Utility. This is expected because macOS can read NTFS by default but does not natively provide full NTFS write or formatting support. Disk Utility primarily supports APFS, Mac OS Extended, MS-DOS (FAT), and exFAT for standard formatting workflows.
The following Reddit thread is an example. Some users suggest formatting to NTFS on a Windows PC. Others recommend third-party NTFS formatters, such as iBoysoft NTFS for Mac.
Hi everyone! I want to format my external HDD in NTFS format but I don’t see the option in the disk utility ? I really need to get this done. Help me out please. I am on macOS Monterey 12.0.1
by u/SynergyRamoz in mac
Which method should you use?
If you want to format a USB or an external hard drive to NTFS on Mac, four methods are available.
| Options to format to NTFS on Mac | Effectiveness | Difficulty Level |
| iBoysoft NTFS for Mac | High - Effectively format drives to NTFS on Mac (Golden Gate ~ High Sierra) | Easy - Just need a few clicks |
| Format on a Windows PC | High - When you have a Windows PC | Medium - Know how to format on a PC |
| Terminal | Low if you are unfamiliar with command lines. None if you need to write to the NTFS drive on Mac or if your Mac is running macOS Ventura or later. | Hard - Need to carefully follow the commands; may receive the "formatting is not supported by ntfs" error |
| Format to exFAT | High - If you plan to use the drive on both Windows and macOS | Easy - Format in Disk Utility |
Method 1: Format a drive to NTFS on Mac with iBoysoft NTFS for Mac
The most recommended way to format to NTFS on Mac is with an NTFS formatter for Mac. iBoysoft NTFS for Mac is widely considered the top choice.
This excellent tool can format your drive to NTFS on Mac without the annoying error, "Formatting is not supported by: NTFS ntfs windows NT file system (NTFS)," which you may otherwise experience in Terminal. Besides, it grants you full read-and-write access to the NTFS drive on Mac, allowing you to copy, move, delete, modify, and save files to the NTFS drive freely.
Such an NTFS for Mac driver is essential for using your NTFS drive on Mac. Without it, you can't even copy files to the drive, let alone work with it on macOS.
The software not only formats your drive as NTFS on Mac but also enables you to repair, open, unmount, and mount NTFS-formatted external hard drives, SSDs, HDDs, USB flash drives, or SD cards read/write in macOS.
Format drive as NTFS on Mac with the best NTFS for Mac
- Format external hard drive to NTFS on Mac
- Format USB to NTFS on Mac
- Format SD card to NTFS on Mac
- Format exFAT to NTFS on Mac, as well as APFS, HFS+ (Mac OS Extended Journaled), HFS, exFAT, FAT32, FAT16, or NTFS itself
- Support macOS Tahoe/Sequoia/Sonoma/Ventura/Monterey/Big Sur/Catalina/Mojave/High Sierra
- Add the "Windows NTFS" option to Disk Utility, allowing you to format any drive as NTFS within Disk Utility
- Compatible with Intel-based and T2 Macs
- Grant write access to NTFS on Apple Silicon M1/M2/M3 Mac
- Enable full read-write support to NTFS drives on Mac
- Auto-mount NTFS drives in read-write mode without relaunching
- Open, eject, mount, unmount, and repair NTFS drives on Mac
- Fix the error reading "Formatting is not supported by: NTFS ntfs windows NT file system (NTFS)"
Warning: Formatting is destructive and will erase the selected drive. Make sure you have selected the correct disk and backed up important files.
How to format to NTFS on Mac without the error "Formatting is not supported by: NTFS ntfs windows NT file system (NTFS):"
Step 1. Download and install iBoysoft NTFS for Mac. This software is fully compatible with macOS 10.13 High Sierra and later versions, including the latest macOS 26 Tahoe.
Step 2. Plug in the drive that needs to get NTFS format on Mac. Wait for it to mount.
Step 3. Launch iBoysoft NTFS for Mac. On the left side of the main interface, you'll find the connected drive listed either under "NTFS disk" or "Other disk", depending on its current file system.
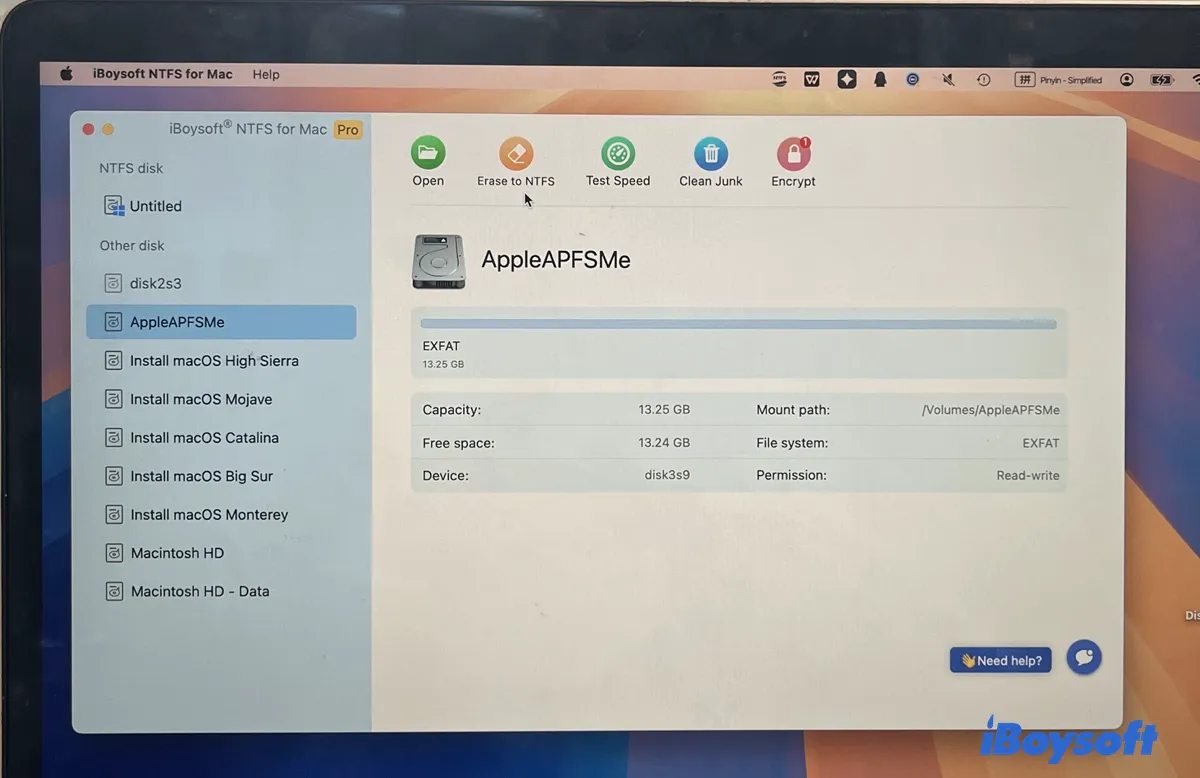
Step 4. Select your drive and click on the Erase to NTFS button to format your drive to NTFS with just one click.
Note: If you want to format an APFS drive to NTFS on Mac, choose the APFS container name instead of the APFS volume.

More impressively, with iBoysoft NTFS for Mac, you can now format the drive to NTFS directly in Disk Utility.

You should have successfully formatted the drive to NTFS on Mac. Help us spread the word by sharing this post!
Method 2: Use Terminal on legacy macOS only
If your Mac is running macOS Monterey or earlier, the system app Terminal can format a drive to NTFS on Mac.
Be reminded that this only formats the drive with NTFS but doesn't grant it read & write access on a Mac. After the format, your drive will be read-only, preventing you from copying, moving, or deleting files on it. If you plan to use the NTFS drive on a Mac for file saving, we suggest you switch to iBoysoft NTFS for Mac formatter instead.
Besides, this won't work on macOS Ventura and later releases.
Please read the following instructions carefully before taking action.
How to format a drive to NTFS by running Terminal commands:
Step 1. Navigate to Finder > Applications > Utilities > and find Terminal. You can also find Terminal by clicking Launchpad > Others. Moreover, you can press the Command and Space keys together to bring out Spotlight search and type in Terminal.
Step 2. After entering the Terminal panel, type in the following command and hit the Enter button.
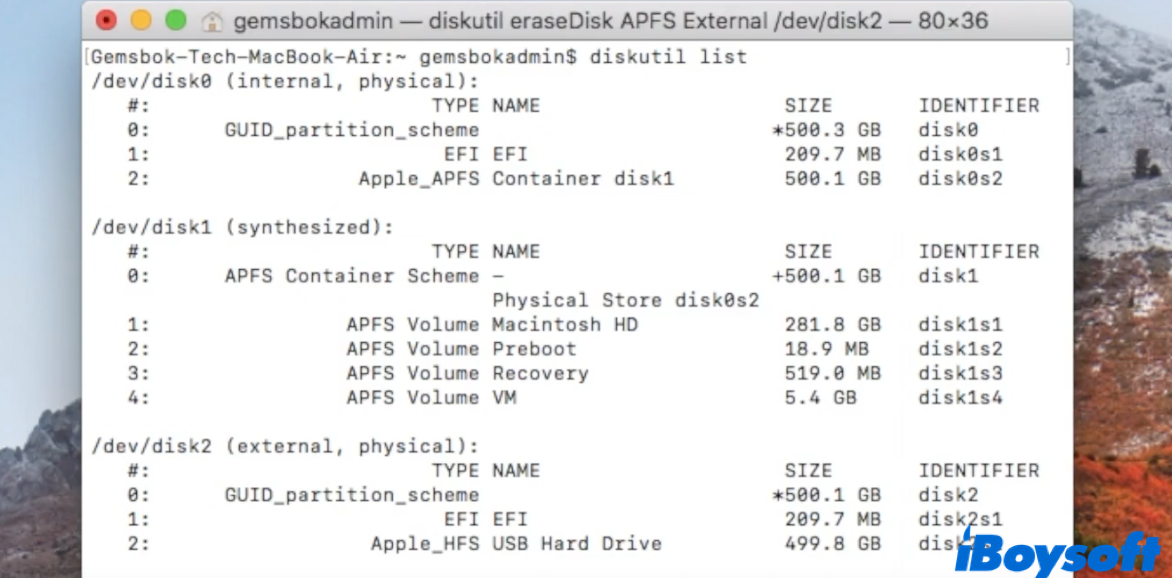
diskutil list
Terminal will return information about drives connected to your Mac. Note down the disk identifier of the drive you want to format to NTFS on Mac, such as disk2.
Step 3. Type in the command below to format the drive to NTFS on Mac.
diskutil eraseDisk NTFS LABEL /dev/diskx
Note: You should replace Label with the new name you want to assign to the formatted hard drive. Meanwhile, you should replace disk x with the right disk identifier of the drive you want to format.
For instance, if you want to format disk2 to NTFS, you should type in: diskutil eraseDisk NTFS External /dev/disk2 and hit enter. Your Mac will automatically start to erase, unmount, create a new partition map, and format the drive with a new file format. Wait for the procedure to be done.

While Terminal is a good way to get NTFS format for Mac, it may sometimes give you the error, "Formatting is not supported by: NTFS ntfs windows NT file system (NTFS)." To fix it, you need a more capable NTFS formatter for Mac - iBoysoft NTFS for Mac.
Now that you know how to format a drive with NTFS format on Mac, don't forget to share it with more people!
Method 3: Format the drive to NTFS on a Windows PC
If you have a Windows PC, you can format the drive to NTFS using Windows' built-in Disk Management utility. Here are the steps:
- Right-click the Start Button and select Disk Management.
- Scroll down to find your external drive (it may display as Healthy (Primary Partition) with no drive letter, or labeled as an unknown partition).
- Right-click on each existing partition on that drive and select Delete Volume until the entire disk shows as a black bar labeled Unallocated.
- Right-click the Unallocated space, choose New Simple Volume, click Next, and select NTFS as the file system in the format wizard.
Method 4: Use exFAT instead if you only need Mac and Windows compatibility
If there's no specific reason to choose NTFS, exFAT may be a better fit. It has full native read and write support across macOS, Windows, Linux, Android, and modern gaming consoles. It can also handle massive individual files and partitions, making it ideal for large disk backups, 4K video footage, and virtual machine images.
If you already have an NTFS drive, should you format it?
If you're using an NTFS-formatted drive on Mac, you likely have found that you can't write any data to it and are only able to read its files. In this case, you can't transfer files from your Mac to the NTFS external drive, delete files you no longer need, or modify file content.
You may be advised to reformat the NTFS drive on Mac with another file system that has read-and-write support in macOS. If so, you're in the right place, as we'll elaborate on how to format NTFS on Mac for free.
We'll also discuss an alternative way to work with your NTFS drive on Mac freely without formatting or losing data. This may be a better choice if you want to use this drive on Windows as well.
| Ways to reformat NTFS for Mac | Effectiveness | Difficulty Level |
| Disk Utility | High - Erase all data on the drive and give it a new format | Low - Format your NTFS drive to APFS, HFS+, exFAT, or FAT32 |
| Terminal | Low - May encounter errors if not using the correct command | High - requires command line knowledge |
| iBoysoft NTFS for Mac | High if you want to read & write to the NTFS drive on Mac without formatting or losing data | Low - Once it's installed, it automatically mounts your NTFS drive on Mac in read-write mode. |
How to format NTFS drive on Mac via Disk Utility?
The easiest way to format NTFS on Mac for free is to use Disk Utility. It's a system app that allows you to format drives to Mac-compatible formats, such as APFS, HFS+, exFAT, or FAT32.
Warning: Reformatting NTFS for Mac will remove all data on the drive. Please make sure the important data is backed up before proceeding.
How to format NTFS drive to APFS
With Disk Utility, the built-in disk manager on Mac, you can easily manage both internal hard drives and connected external hard drives. It enables you to run First Aid to repair disks, add or delete an APFS volume, erase or format a volume, mount or unmount a drive, etc.
You should know that formatting the NTFS drive will erase all the data stored on it. If the drive is in use and you have kept some important files on it, you should create a backup of the drive using a Windows PC. Then you can proceed to format NTFS to APFS with the following steps:
- Open Disk Utility by heading to Finder > Applications > Utilities.
- Click the View button and choose Show All Devices.
- Select the NTFS drive you attempt to format on the left.
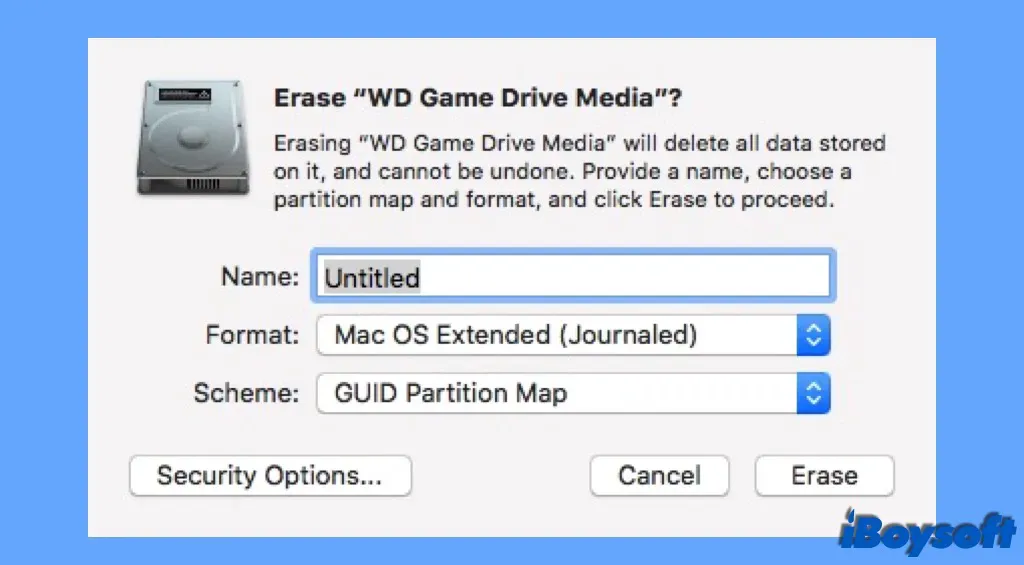
- Tap on the Erase button on the top of the Disk Utility window.
- Name the drive as you prefer and choose an APFS file system.
- Click Erase again to start the formatting process.
How to format NTFS drive to HFS+
If your Mac is running macOS 10.12 or earlier, you can format NTFS drive to HFS+ file system instead of APFS for compatibility. Or, you need the previous Mac OS Extended file system to use some applications that are only compatible with HFS+, etc. Whatever the reason, you can format the NTFS drive to HFS+ file system on Mac.
- Launch Disk Utility by using the Spotlight Search.
- Tap View on the upper left corner and choose Show All Devices.
- Locate and choose the NTFS drive from all devices listed on the left.
- Choose Erase on the top of the Disk Utility window.
- Assign a name to the drive and choose the format as Mac OS Extended(Journaled).
- Choose Erase to format NTFS drive to HFS+ file system.
How to format NTFS drive to FAT32/exFAT
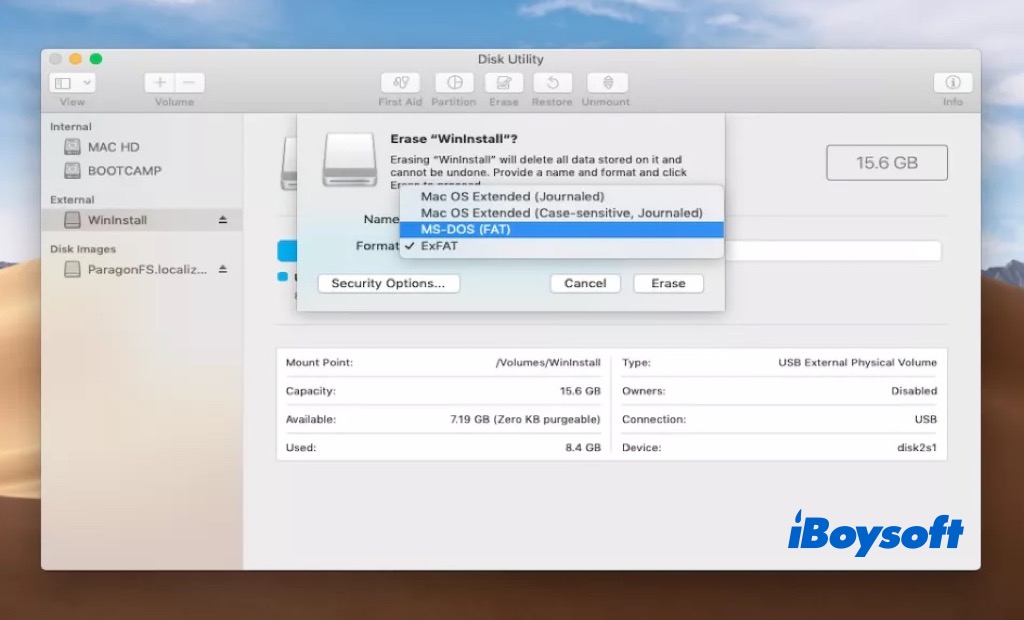
Both APFS and HFS+ file systems are exclusive to macOS. That is to say, once you format the NTFS drive to APFS or HFS+ file system, you can not read and write the drive on a Windows PC. If you want to share files between Mac and Windows PC using the same drive, you can format NTFS drive to FAT32 or exFAT file system to make it compatible with both macOS and Windows.
Similarly, you can directly format NTFS drive to FAT32 or exFAT file system in Disk Utility, just choose the file system as FAT32 or exFAT on the pop-up window. Once the process completes, you can use the FAT32/exFAT-formatted drive on both Mac and Windows PC.
Can't format NTFS-formatted USB to FAT32/exFAT file system on Mac? You can try to use the Terminal command to convert NTFS drive to FAT32 file system on Mac.
- Connect the NTFS USB drive to your Mac.
- Open and run Terminal from Finder > Applications > Utilities.
- Enter command diskutil to locate the USB drive.
- Run the command diskutil eraseDisk FAT32 MBR Format /dev/disk2. (Replace disk2 with the correct disk name and identifier).
How to format NTFS drive on Mac using Terminal?
Alternatively, you can format NTFS on Mac using Terminal. It's the command-line interface of your Mac operating system, which allows you to perform various tasks, including formatting an NTFS drive to other formats. Follow the steps below:
- Launch Terminal from the Applications/Utilities folder.
- Type the following command and hit Enter.diskutil list
- Note down the disk identifier of your NTFS drive, such as disk2.
- Input the following command and press Enter to reformat NTFS for Mac.diskutil eraseDisk file_system drive_name disk_identifierYou need to replace file_system with the one you want to format the drive with, disk_name with the name you want the formatted drive to have and the disk_identifier with the one you acquired in step 3. An example will be: diskutil eraseDisk APFS USB disk2
How to read-write to NTFS drives on Mac without formatting or losing data?
Instead of formatting your NTFS drive on Mac, which will erase all data on it, you can enable the read & write access to it without formatting. Here are three ways to achieve this:
Option 1. Read-write to NTFS drives on Mac with a reliable NTFS driver
The easiest and most effective way to enable NTFS write support on Mac is to use a reliable third-party NTFS driver. iBoysoft NTFS for Mac is highly recommended, as it's one of the best NTFS drivers for Mac. It's the ultimate solution to use your NTFS drives on Mac without formatting.
It's easy to use, safe to install, and offers full compatibility to Intel-based, T2, M1, M2, M3, and M4 Macs running macOS 26 Tahoe ~ macOS 10.13 High Sierra, including macOS Ventura.
Once this excellent NTFS driver for Mac is installed, it will automatically mount your NTFS drives on Mac in read-write mode without requiring you to relaunch the software. It offers fast file transfer speed and options to format, repair, mount, and unmount NTFS drives on Mac.
Click the button below to download it for free!
It allows you to copy and move files to NTFS drives on Mac, as well as delete, modify, and save content in the NTFS drive.
Option 2. Enable NTFS write support with a free NTFS driver
There are some free NTFS drivers to choose from, including FUSE for macOS, Mounty for Mac, and NTFS-3G. Although free NTFS for Mac software costs you no money, it requires a lot of work to make things happen. The process to enable NTFS writing is often technical and complicated, involving running command prompts and rebooting your Mac. Not an easy task for both veterans and newbies.
Option 3. Use command lines in Terminal to enable NTFS writing
As a matter of fact, macOS does come with experimental writing support for NTFS drives, though it's disabled by default. Users can enable it by running command lines in the Terminal. However, this is the least recommended method to gain write support for NTFS on Mac since it's proven to be risky and unstable. It's possible to cause permanent data loss and damage to your hard drives.
Update: Sadly, Apple has changed the entire mount process on Ventura and later releases. It removed the previous kernel-based architecture - /System/Library/Extensions/ntfs.kext.
Is this post useful? Spread the info to help others learn how to reformat NTFS drive on Mac!
Can I format a drive to NTFS on Mac?
Since NTFS is a proprietary file system owned by Windows, macOS can't natively format your flash drive, USB stick, external hard drive, or SD card to NTFS file system. Drive formatting is usually performed by Mac's built-in disk management tool, Disk Utility, but it doesn't have the file system option for NTFS.
Fortunately, it's possible to format a drive to NTFS file system on Mac with Terminal, which is the default gateway to all command lines on your Mac. Unlike the graphical interface of Disk Utility, it requires you to enter the correct commands to accomplish tasks like formatting a drive.
If you find Terminal a bit challenging, you can use an NTFS formatter for Mac instead. It allows you to format a drive to NTFS easily and gives you full read-write support for NTFS drives on Mac.
What is NTFS file system?
NTFS (NT file system), also called the New Technology File System, is a proprietary file system introduced by Microsoft with the release of Windows NT 3.1. It's used by Windows to organize, store, manage, and find files on internal and external drives. Unfortunately, it doesn't have write support on Mac.
As the default file system of the Windows OS, the NTFS file system enjoys a bunch of benefits compared to other formats.
- File compression: NTFS allows you to compress files and enjoy larger storage capacity on your flash drives.
- Access permission: Users can set permissions on certain files and folders to enhance data security.
- Journaling: By using the MFT log, users can easily keep and audit the log of the files on the drives.
Although NTFS is a Windows file system, you can still reformat a drive to NTFS on Mac with the proper means.
Final Words
In this post, we introduced two ways to format drives to NTFS on Mac. By the end of the reading, you should know how to format (micro) SD card to NTFS on Mac, how to format USB to NTFS on Mac, or how to format SSD to NTFS on Mac. Besides, we offered details to format NTFS drives on Mac to NTFS or other formats.
FAQs about how to format drive to NTFS on Mac
- QDoes NTFS format work on Mac?
-
A
macOS only offers read support to NTFS drives on Mac. You can view and copy the files within the drive but find it unable to write the drive. If you need to make any change to the drive, using a third-party NTFS for Mac tool such as iBoysoft NTFS for Mac is the best option.
- QHow do I format a drive to NTFS file system?
-
A
On a Windows computer, go to My Computer and right-click the drive you want to format. Select Format and choose NTFS as the file system to your hard drive.
- QIs exFAT or NTFS better for Mac?
-
A
Thanks to its high compatibility with both Windows and Mac devices, most flash drives prefer exFAT as the file system. Also, exFAT has no requirements for partition size limits and complicated file attribution systems as NTFS does.
- QHow do I change my Mac USB to NTFS?
-
A
To change your USB to NTFS on Mac, you can either run some Terminal commands or use a NTFS formatter for Mac like iBoysoft NTFS for Mac.
- QCan Disk Utility format a drive to NTFS on Mac?
-
A
Not by default, but a reliable NTFS for Mac tool can add the NTFS format to Disk Utility.
- QDoes formatting to NTFS erase data?
-
A
Yes, formatting to NTFS or any format will erase data on the selected drive or partition.
- QShould I use NTFS or exFAT for Mac and Windows?
-
A
You should use exFAT for Macs and Windows PCs because it has read and write support on both platforms.
- QCan Terminal format NTFS on macOS Tahoe/Sequoia/Sonoma/Ventura?
-
A
No, Terminal can't format to NTFS on macOS Ventura and later versions.
- QWhat if my NTFS drive already has files?
-
A
If your NTFS drive already has files, consider writing to it with an NTFS for Mac driver instead of formatting it. If you have decided to reformat it, back up the important files first.
- QWhat if the drive is BitLocker-encrypted?
-
A
If you need data on the BitLocker drive, you must first unlock it to access its data, then perform the reformat.