You want to convert your exFAT external drive to NTFS if you want to use it with certain devices, apps, or features. For example, Dropbox only supports backing up NTFS-formatted external drives on Windows. BitLocker encryption is exclusive to NTFS-formatted drives. Xbox games can only be stored on drives formatted with NTFS.
The biggest concern about converting exFAT to NTFS is data security. If you're also wondering whether you can convert exFAT to NTFS without losing data and how to do it on a Windows PC or Mac, this article gives you the answer.
| Platforms | When to keep exFAT vs. switch to NTFS | How to convert exFAT to NTFS |
| macOS | • Keep exFAT if: You frequently share the drive between Mac and Windows and want native, out-of-the-box write access on both. • Switch to NTFS if: You need advanced Windows file features or better data reliability, and you don't mind installing a third-party NTFS driver to bridge the Mac compatibility gap. | Convert exFAT to NTFS with NTFS for Mac driver (check the free NTFS for Mac collection) and grant read/write access to NTFS on Mac |
| Windows | • Keep exFAT if: The drive is a removable USB/SD card used across different operating systems or media devices (smart TVs, consoles). • Switch to NTFS if: The drive is an internal or dedicated external PC storage unit requiring large file transfers, built-in encryption, file permissions, or compression. | 1. Format exFAT to NTFS with File Explorer 2. Change exFAT to NTFS using Disk Management 3. Convert exFAT to NTFS via CMD |
Before you convert
Before you convert the drive, running through a strict data safety checklist is a non-negotiable first step to prevent permanent file loss.
1️⃣ Back up your exFAT drive
Unfortunately, there's currently no exFAT-to-NTFS converter that lets you convert exFAT to NTFS without losing data. If you want to convert an external hard drive or flash drive from exFAT to NTFS, you have to format it. This removes all data on the drive and creates the new NTFS file system.
Therefore, your absolute priority is to create a complete backup of all existing files to an external storage device or cloud solution. This may take some time depending on the amount of data stored on your exFAT drive.
You can simply drag and drop your files to another storage device, like an external hard drive or your Mac if it has enough free space. If you don't have a spare external storage device big enough to hold all the data on the drive, consider the following:
- Back up only those essential to you.
- Split the data and save it to different storage devices. For instance, you can save half on your computer and the other half on an external drive.
- Borrow a drive from a friend or family.
- Purchase a new drive (HDD is cheaper) or a cloud backup service.
2️⃣ Verify drive letter in Disk Utility
Once your data is safe, double-check and verify the exact drive letter or disk identifier within Disk Utility to ensure you don't accidentally wipe the wrong storage device.
3️⃣ Check the target file system
Finally, take a moment to double-check that your settings are explicitly set to the NTFS file system before hitting the final button, ensuring your drive is formatted correctly for its new Windows-centric role.
How to convert exFAT to NTFS safely on Mac?
After data on your exFAT drive is secured, you can use the following steps to quickly convert exFAT to NTFS on Mac.
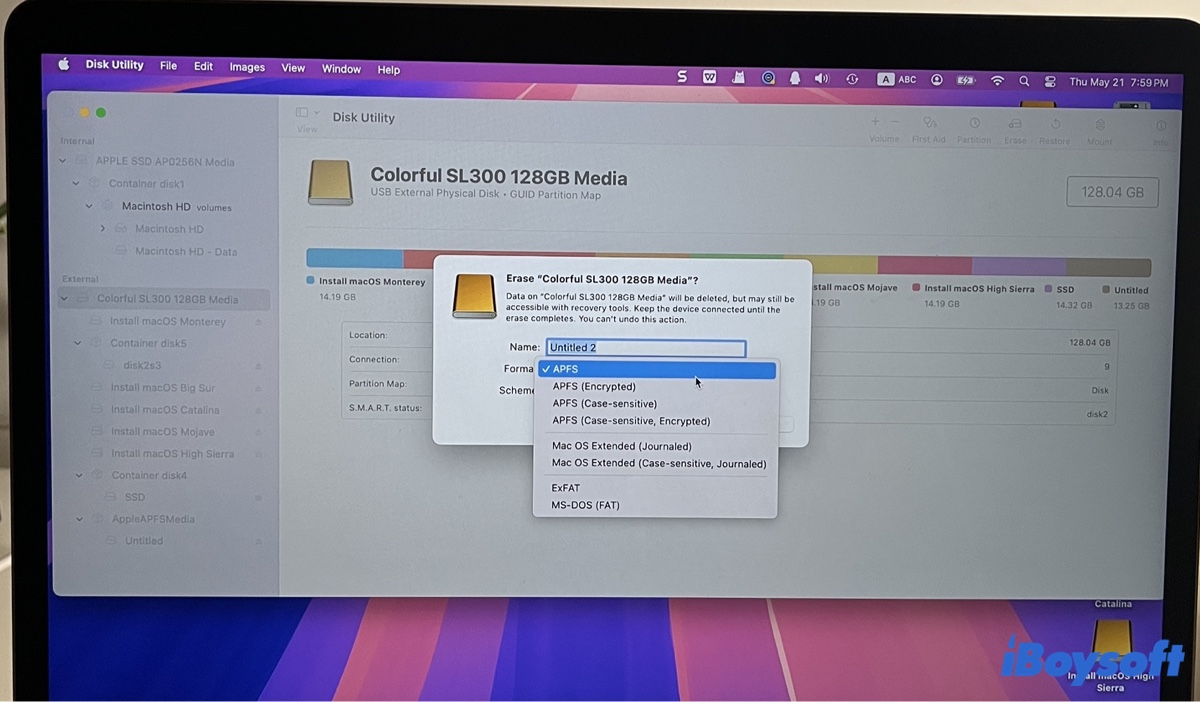
If you have used Disk Utility before, you probably know that it's the tool for converting file systems on Mac. But that's not the case for NTFS. Since it's a proprietary file system owned by Windows, it isn't available in Disk Utility.
Instead, you need a third-party exFAT to NTFS converter to perform the task. Here, we'll use iBoysoft NTFS for Mac as an example. It's an efficient NTFS driver that allows you to convert non-NTFS file systems to NTFS on Mac.
Apart from that, it also grants you read and write access to the NTFS drive on Mac, enabling you to edit, save, transfer, or delete files on the NTFS drive. This feature is essential if you plan to use the NTFS drive on your Mac because macOS cannot write to NTFS drives by default. In other words, if you connect an NTFS drive to Mac without installing a reliable NTFS driver, you can't modify the drive.
Another thing many users love about this exFAT to NTFS converter software is that it automatically mounts their NTFS drives without the need to relaunch the app. Once the drive is connected, they can access its files as if it's formatted with a native macOS file system.
Take the following steps to convert exFAT to NTFS on Mac:
Step 1: Again, ensure data on your exFAT drive is backed up to another storage device.
Step 2: Free download the exFAT to NTFS converter on your Mac.
Step 3: Launch the app, select your exFAT drive from the left side, and click "Erase to NTFS."
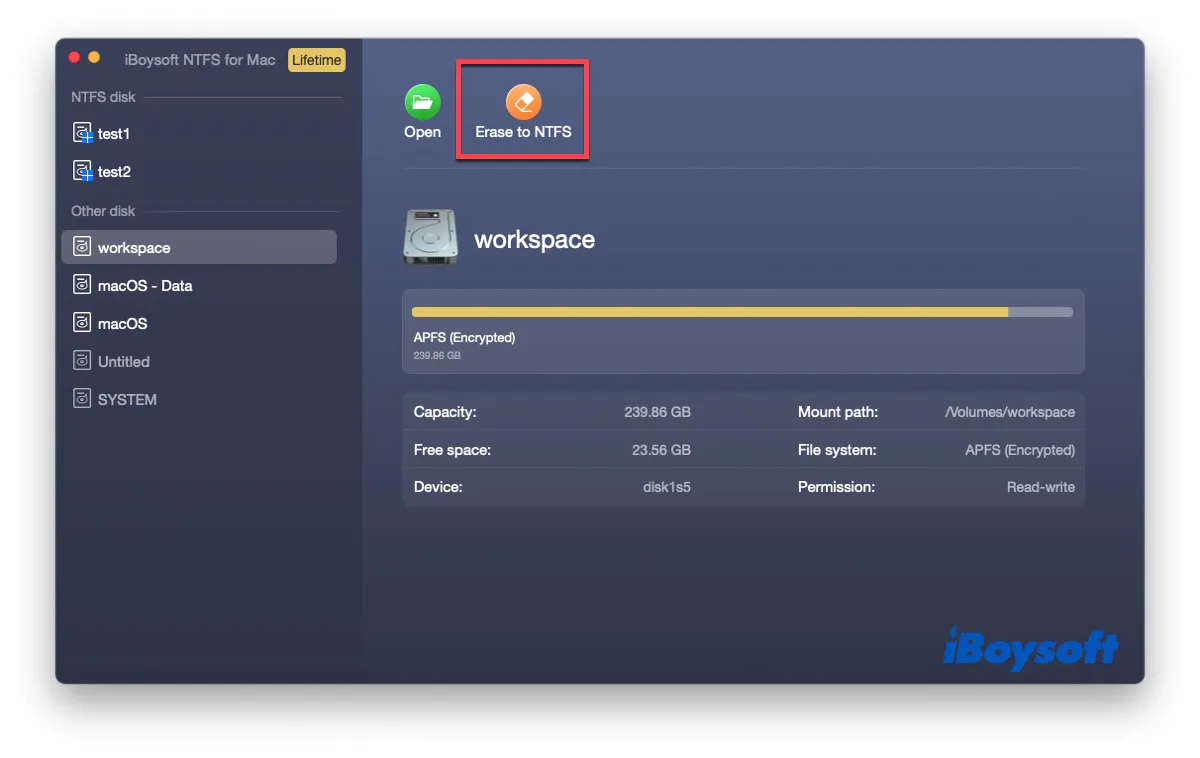
Step 4: Click OK to format the destination drive to NTFS from exFAT.
Step 5: Afterward, you can move files from the backup to your NTFS drive and seamlessly work with your Windows PC and Mac computer.
Now that you know how to change a flash drive from exFAT to NTFS, share the steps with your friends!
How to convert exFAT to NTFS safely on Windows 11/10/8/7?
Once your data is safe, you can convert exFAT to NTFS using CMD, Disk Management or File Explorer.
Way 1: Convert exFAT to NTFS using File Explorer
The easiest way to convert exFAT to NTFS on Windows is by using File Explorer. It's a file management tool that allows you to view and manage files and folders on your Windows PC, network locations, and external storage devices. Follow the steps below to convert exFAT to NTFS on Windows 11/10/8/7:
- Ensure your data is backed up.
- Open File Explorer. (Press the Windows logo key + E or double-click its icon on the taskbar or Start menu.
- Locate the exFAT drive you want to convert.
- Right-click on it and select "Format..." from the context menu.
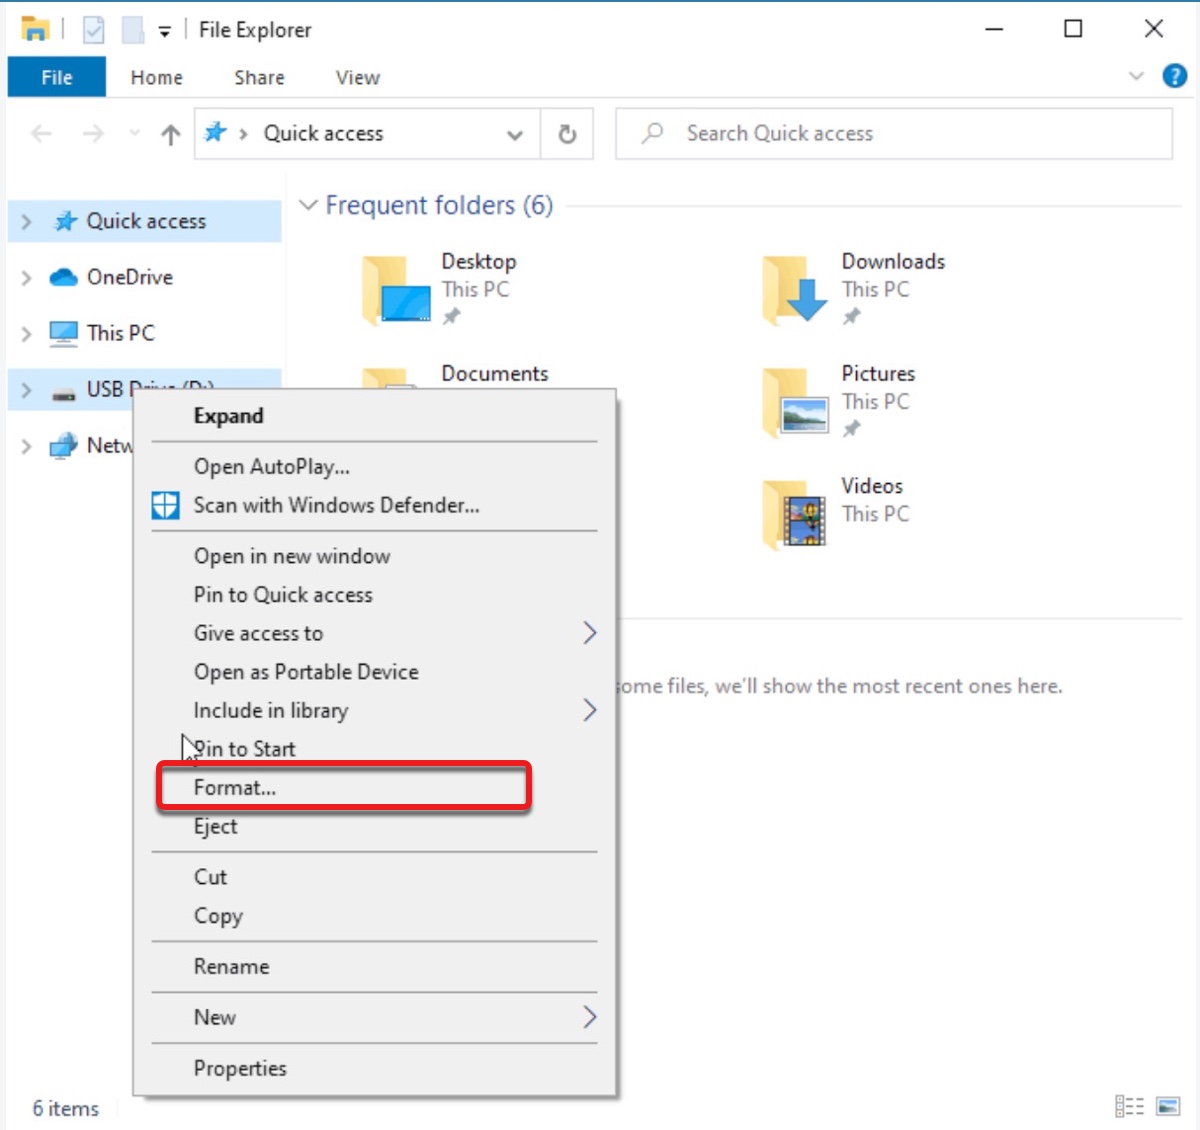
- In the Format dialog box, select "NTFS" from the "File system" drop-down menu.
- Leave the "Quick Format" option checked.
- Click the "Start" button to begin the conversion process.
- Click "OK" to confirm that you want to proceed with the action.
- Wait for the conversion process to complete.
- Once the conversion is complete, you can close the Format dialog box and begin restoring the needed files to the NTFS drive.
Way 2: Convert exFAT to NTFS using Disk Management
If you are unable to convert exFAT to NTFS via File Explorer, you can do it in Disk Management. It's a built-in utility that empowers you to manage disk partitions and volumes on your computer's internal and external drives. You can use it to change the file system of a drive or partition, such as converting from exFAT to NTFS.
Here's how to convert from exFAT to NTFS with Disk Management:
- Right-click the Start button and select Disk Management from the context menu.
- Locate the drive that you want to convert from exFAT to NTFS.
- Right-click it and select "Format..." from the context menu.
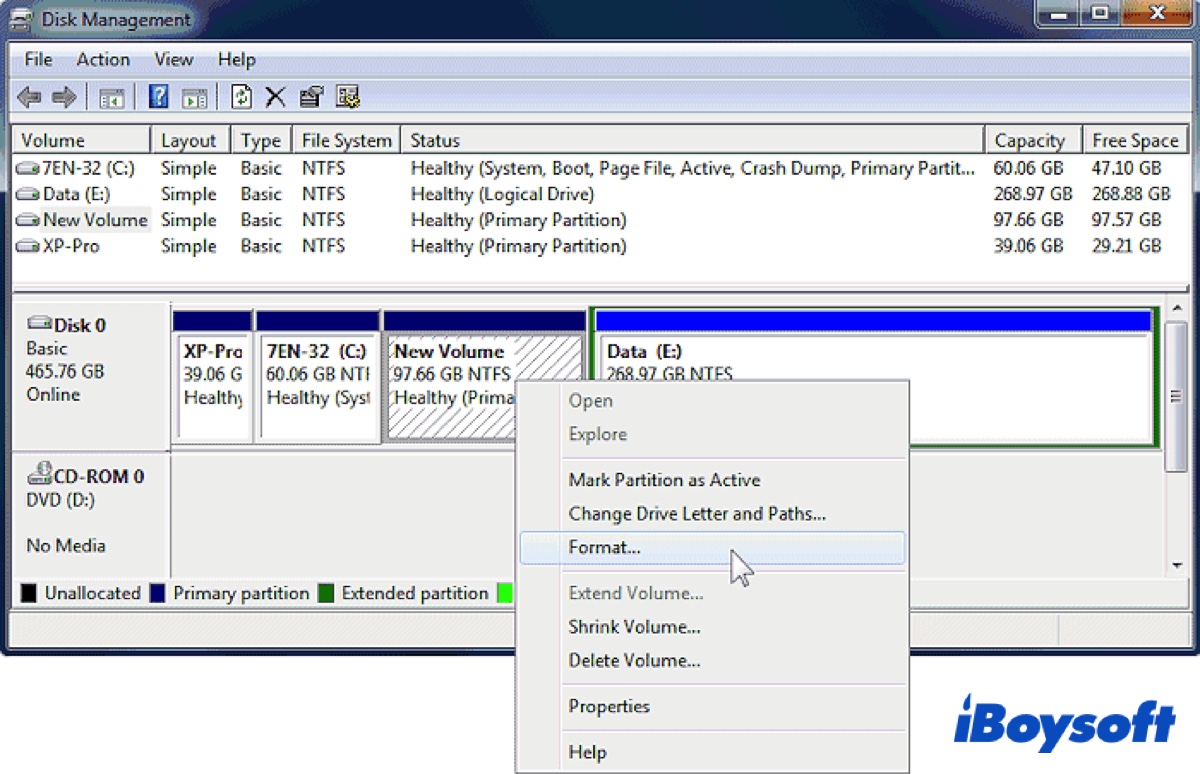
- Select NTFS as the file system.
- Leave the "Quick Format" option checked.
- Click OK to begin the conversion.
- Tap OK again.
- Wait for the conversion to finish.
- Move files from your backup to the NTFS drive.
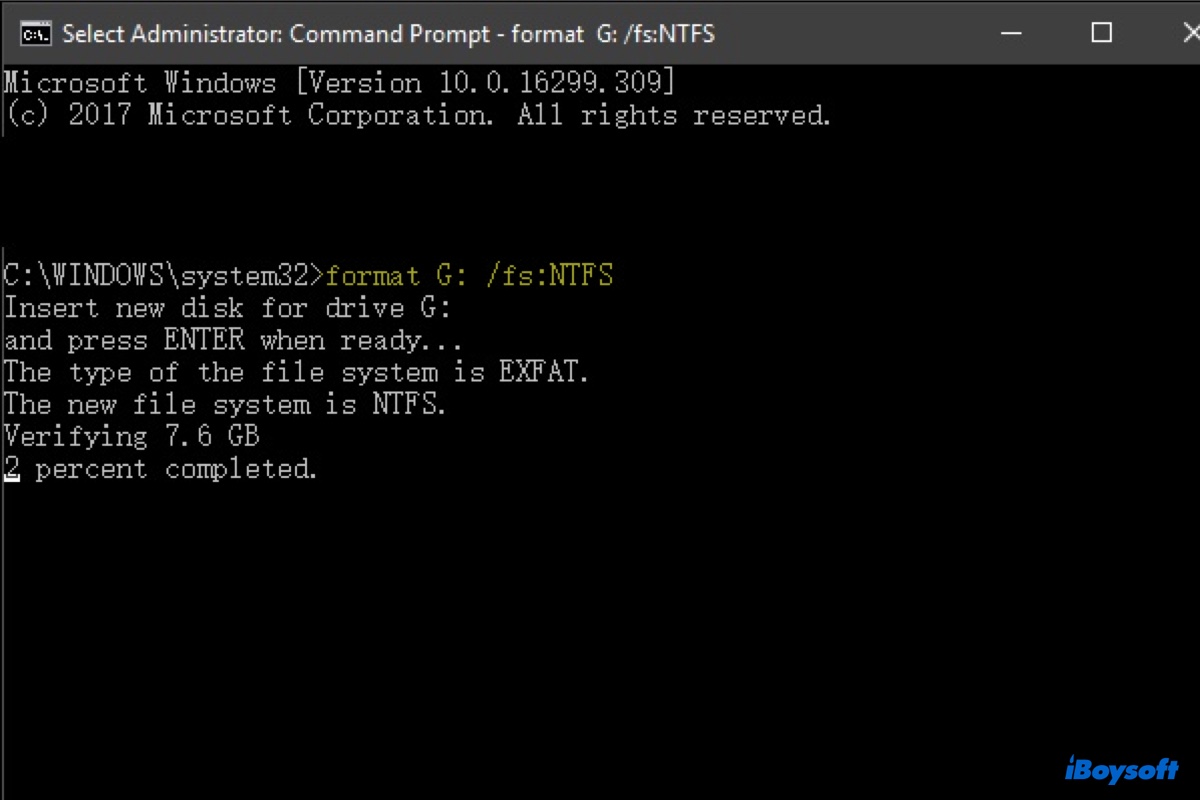
Way 3: Convert exFAT to NTFS using CMD
Suppose you have tried the above methods but are still unable to convert exFAT to NTFS, then you should try the command-line interface, Command Prompt. It allows you to run commands and perform various tasks, including converting exFAT to NTFS. It may seem a bit intimidating if you're not familiar with command lines. But don't worry, we've laid out the details below.
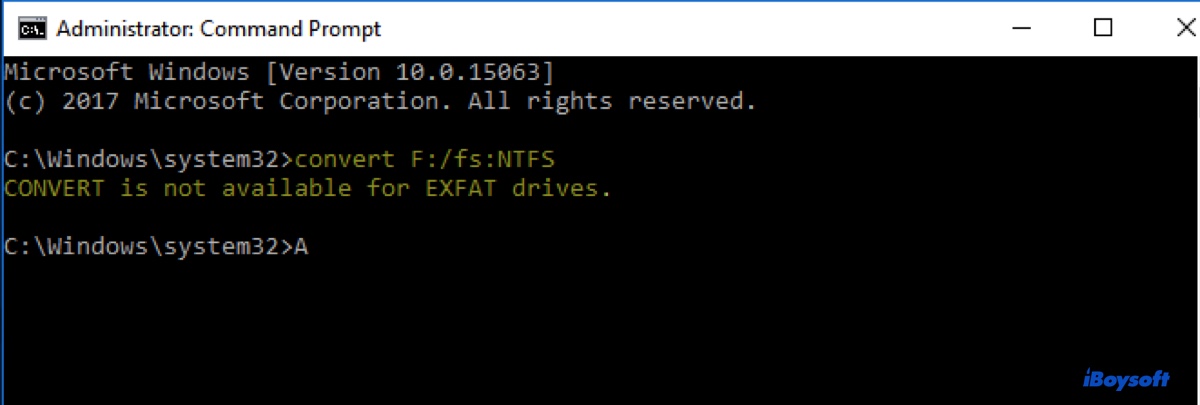
CONVERT is not available for EXFAT drives?
It's worth mentioning that if you use the convert command to convert exFAT to NTFS, such as convert E: /FS: NTFS, you'll receive the error, "CONVERT is not available for EXFAT drives." That's because the convert command only works with FAT32-formatted drives or partitions.
To fix "CONVERT is not available for EXFAT drives" in Command Prompt, use the format command instead. Unlike the convert command, format will clear all files on the drive.
How to convert exFAT to NTFS using CMD on Windows 11/10/8/7:
- Press the Windows logo key + R simultaneously to open the Run dialogue.
- Type in cmd and press the Enter key.
- Right-click on Command Prompt and select "Run as administrator."
- Input the following command and hit Enter.format drive_letter: /fs: NTFS Replace drive_letter with the drive letter of your exFAT drive. You can find the drive letter in Disk Management.
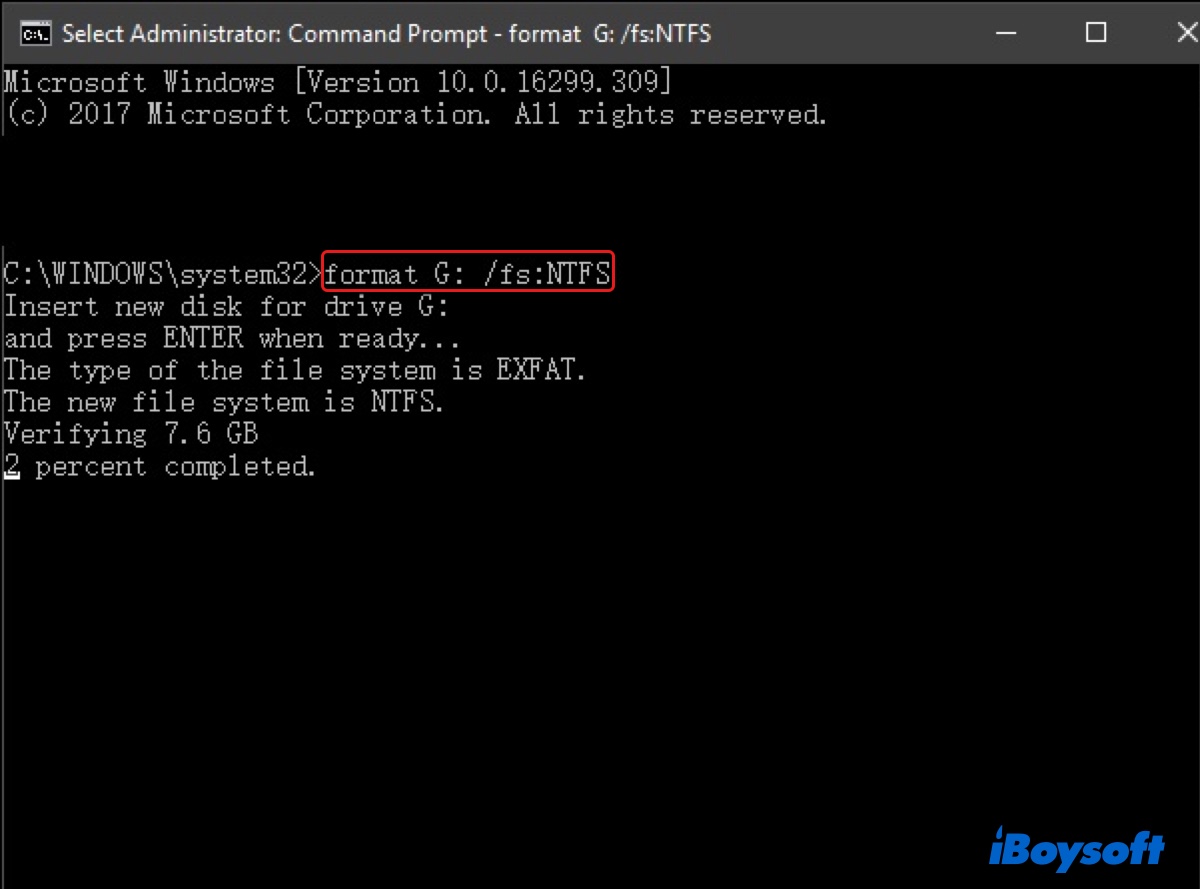
- Wait for the process to complete.
- Restore files to your NTFS drive from your backup.
Hopefully, you're now clear about how to convert your external hard drive or flash drive from exFAT to the NTFS file system. If you find the steps helpful, please share them to help others format exFAT to NTFS without losing data.
exFAT vs. NTFS: Differences between exFAT and NTFS
You're probably wondering about which one is better, NTFS or exFAT. Let's understand the differences between them to make an informed decision.
NTFS: NTFS, also called New Technology File System, is a Windows file system developed by Microsoft for Windows operating systems. It's read-only on Mac but you can enable write access to NTFS on Mac with a NTFS for Mac driver.
exFAT: exFAT, or Extended File Allocation Table, is also a file system developed by Microsoft for flash drives and external storage devices. It has read/write access on both macOS and Windows.
Here's a table concluding the differences between exFAT and NTFS:
| Features | NTFS | exFAT |
| Compatibility | Mostly with Windows; macOS (read-only), Linux (with additional software) | Widely supported across modern operating systems (Windows, macOS, Linux) |
| File Size Limit | 16 EB (exabyte) | 128 PB |
| Max Volume Size | 16EB | 128 PB (practical limit) |
| Journaling | Yes (enhances reliability by keeping a log of changes) | No |
| File Permissions | Supports file permissions and encryption | Does not support file permissions |
| Encryption | Supports Encrypting File System (EFS) | No built-in encryption |
| Use Case | Best for internal and external drives requiring security features and large file support | Best for external drives, flash drives, and cross-platform use |
FAQs about converting exFAT to NTFS
- QCan I convert exFAT to NTFS without formatting?
-
A
No, you cannot convert an exFAT file system to NTFS without formatting the drive. Converting from exFAT to NTFS requires reformatting the drive, which means you will lose all the data stored on the drive. It is important to back up your data before proceeding with the conversion process.
- QHow do I change my Mac from exFAT to NTFS?
-
A
If you want to change an external drive from exFAT to NTFS on a Mac, you need to download a trustworthy NTFS for Mac driver, such as iBoysoft NTFS for Mac.
- QIs exFAT better than NTFS for hard drive?
-
A
Not really. One thing that exFAT excels in NTFS is its compatibility with both Windows and macOS operating systems. Other than that, NTFS is a better choice, as it supports larger file sizes and partition sizes, offers more advanced security features and file permissions, and provides better performance,
- QIs NTFS better than exFAT for SSD performance?
-
A
The performance difference of file systems on an SSD is often minimal and may not be noticeable in typical daily usage. Overall speaking, NTFS offers some advantages on Windows operating system and the handing of large files. If you prioritize cross-platform compatibility, exFAT may be a suitable choice.
- QDoes Mac read exFAT or NTFS?
-
A
Yes, macOS can read exFAT and NTFS. However, it can't write to NTFS, which means that you can view a file in an NTFS drive on Mac but can't change its content, delete, or copy new files to it.
- QCan I convert exFAT to NTFS?
-
A
Yes, you can convert exFAT to NTFS. Read the methods in this article for more details.
- QWill formatting erase my files?
-
A
Yes, formatting will completely erase all files on the drive. It wipes the storage clean and resets the file system, so you must back up your data before proceeding.
- QShould I use exFAT or NTFS for Mac and Windows?
-
A
Use exFAT if you need seamless, out-of-the-box read and write access on both Mac and Windows without installing extra software.
Choose NTFS only if the drive is primarily for Windows, as macOS can only read NTFS drives by default and requires third-party drivers to write to them.