Many external storage devices, such as external hard drives, SD cards, USB flash drives, etc., come pre-formatted with the NTFS file system. While they work perfectly on a Windows PC, you will find yourself unable to rename, modify, delete, copy, or save files to the NTFS drives on an Apple Silicon Mac.
Here, we'll explain why NTFS doesn't work on your Apple Silicon Mac and how to use NTFS drive on Mac M1/M2/M3/M4 effectively.
Tips: To read and write to NTFS on macOS Tahoe, get NTFS for macOS Tahoe!
If you need a free software, don't miss: Free NTFS for Mac Tools
How to read & write to NTFS drive on Mac M1/M2/M3/M4 (Quick Summary):
There are three ways to read and write to an NTFS-formatted external drive on M1/M2/M3/M4 Mac.
You can install a reliable third-party NTFS driver, which is highly recommended and applicable to reading and writing NTFS on Mac; enable Apple's experimental NTFS-write support with command lines; or completely erase your NTFS drives with another file system.
Among them, the best solution for NTFS on an M1/M2/M3/M4 MacBook or desktop Mac is iBoysoft NTFS for Mac.
Click the button below to get the NTFS for Mac M1/M2/M3/M4 free download.
Share the best way to use NTFS drives on Apple Silicon M1/M2/M3/M4 Macs with read-and-write access!
Does NTFS drive work on Mac M1/M2/M3/M4?
The short answer is that NTFS only partially works on Mac M1/M2/M3/M4.
By default, macOS can only read NTFS-formatted drives but not write to them. That's because NTFS is a proprietary file system owned by Microsoft, and Apple hasn't licensed the technology to allow write support in macOS.
In other words, you can open and read files from an NTFS-formatted drive on your Mac, regardless of whether it has the Intel chip or Apple Silicon (M1, M2, M3, M4) chip. However, you can't change the drive's content due to the lack of write access.
Share the information to benefit other NTFS drive users.
How to use NTFS drive on Mac M1/M2/M3/M4?
Take one of the following solutions to use an NTFS drive on M1/M2/M3/M4 Mac with read and write access.
Method 1: Read/Write to NTFS drive on Mac M1/M2/M3/M4 via iBoysoft NTFS for Mac
If the NTFS drive isn't working on your Apple Silicon Mac, the best solution is to use iBoysoft NTFS for Mac.
It's one of the best NTFS drivers for Apple Silicon Macs that grants you full read/write access to NTFS drives on Macs with the M series chips, including M1, M1 Max, M1 Pro, M1 Ultra, M2, M2 Max, M2 Pro, M2 Ultra, M3, M3 Max, M3 Pro, M4, M4 Pro, and M4 Max.
It's easy to use, safe to install, and offers performance close to the drives formatted with native macOS file systems. With it, you can easily read from or write to NTFS drives or Boot Camp partitions on M1/M2/M3/M4 MacBooks, Mac minis, iMacs, and Mac Studios.
This NTFS for Mac M1/M2/M3/M4 tool can also mount & repair your unmountable NTFS drives and format other drives to NTFS. It supports operating systems ranging from macOS 26 Tahoe, macOS 15 Sequoia, macOS 14 Sonoma, macOS 13 Ventura, and macOS 12 Monterey to macOS 10.13 High Sierra.
What highlights this NTFS driver for Apple Silicon M1/M2/M3/M4 Mac is its auto-mount ability, which automatically mounts your NTFS-formatted drives in read-write mode once they're connected. It's highly efficient, as you don't need to relaunch it after a reboot or reconnecting the NTFS drive.
Follow the steps below to enable read-write support for NTFS drive on Apple silicon M1/M2/M3/M4 Mac:
Note: If you're looking for solutions when an installed NTFS for Mac doesn't work on your M1, M2, M3, or M4 Mac, remember to uninstall it.
Step 1: Download iBoysoft NTFS for Mac for free.
#NTFS for Mac M4 #NTFS for Mac M3 #NTFS for Mac M1 #NTFS for Mac M2 #best NTFS for Mac M1 Pro #macOS Tahoe #macOS Sequoia #macOS Sonoma #macOS Ventura #mount NTFS on Mac M3
Step 2: After it's installed, you can use your NTFS drive freely.
If your NTFS drive isn't mounting or showing up on the desktop or in Finder, take the following steps:
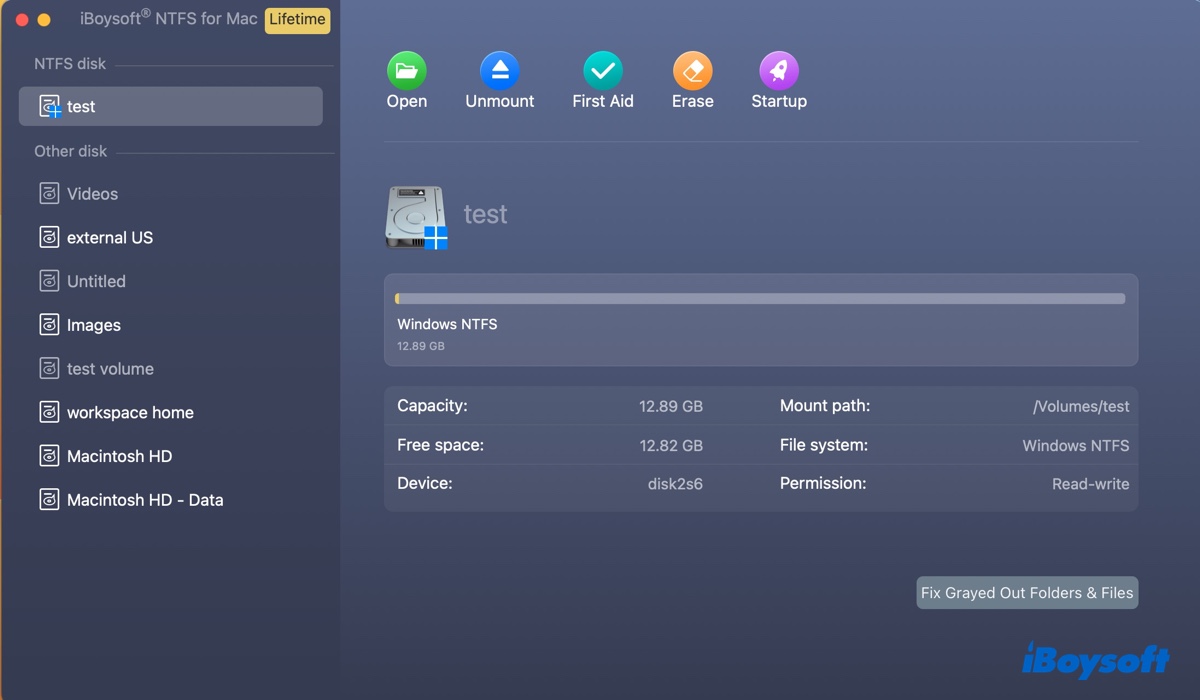
- Open the NTFS driver.
- Select your NTFS drive and click Open.
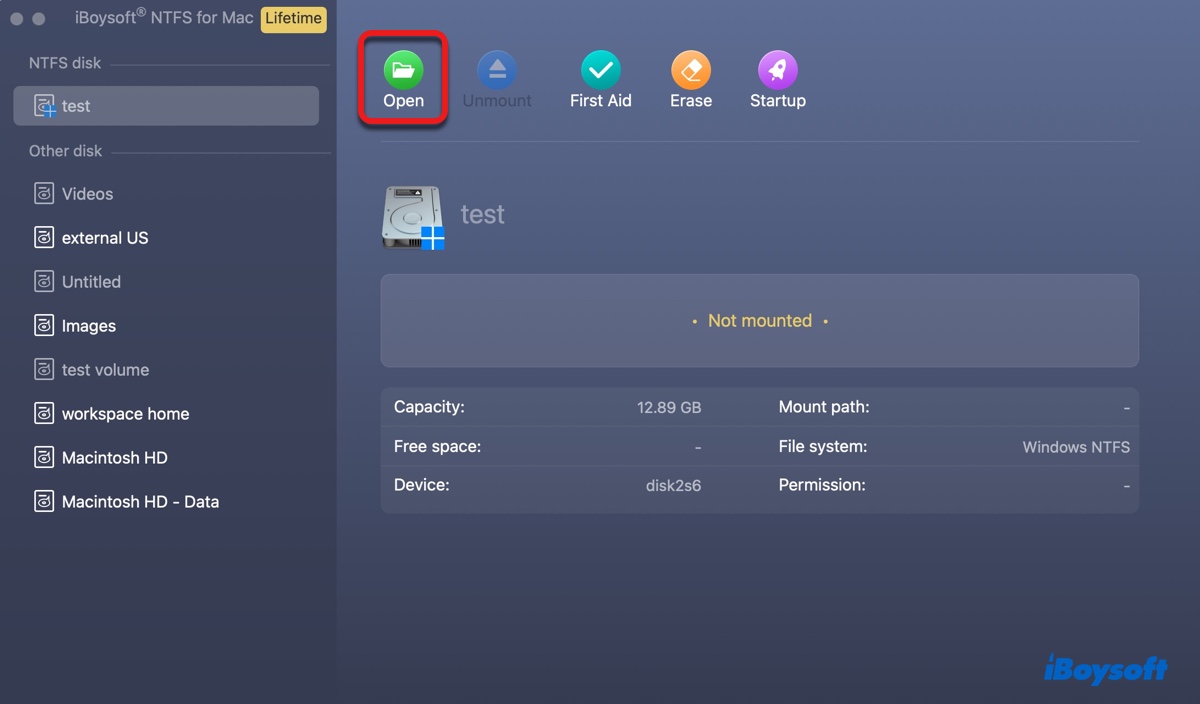
- If the NTFS drive still doesn't work, click "First Aid" > "Check disk" to repair it.

You should now be able to read and write to NTFS on M1/M2/M3/M4 MacBook Pro, MacBook Air, or desktop Mac. Share this NTFS driver for Apple Silicon M1/M2/M3/M4 Mac with others.
Method 2: Enable Write access to NTFS drive on Mac M1/M2/M3/M4 via Terminal
There's experimental support for writing to NTFS drives on Mac running macOS Monterey and earlier (macOS Ventura has removed it.) It's disabled by default and requires executing commands in Terminal to be enabled.
It offers the possibility of enabling write support for the NTFS drive on Mac; however, it's not guaranteed to work and may potentially damage your system and corrupt the data.
Even if it does work, it only enables write support for the specific session. The next time you want to write to an NTFS drive on your M1/M2/M3/M4 Mac, you will need to run the commands again.
So, it's generally not recommended to do it that way. But if you want to try it out, take your own risk and follow the steps below:
- Launch Terminal from the Applications/Utilities folder.
- Type the following command and hit the Enter key.sudo nano /etc/fstab
- Input your admin password and press Enter. (The password won't echo to the screen.)
- This will open the /etc/fstab file in the nano text editor and allow you to make changes.
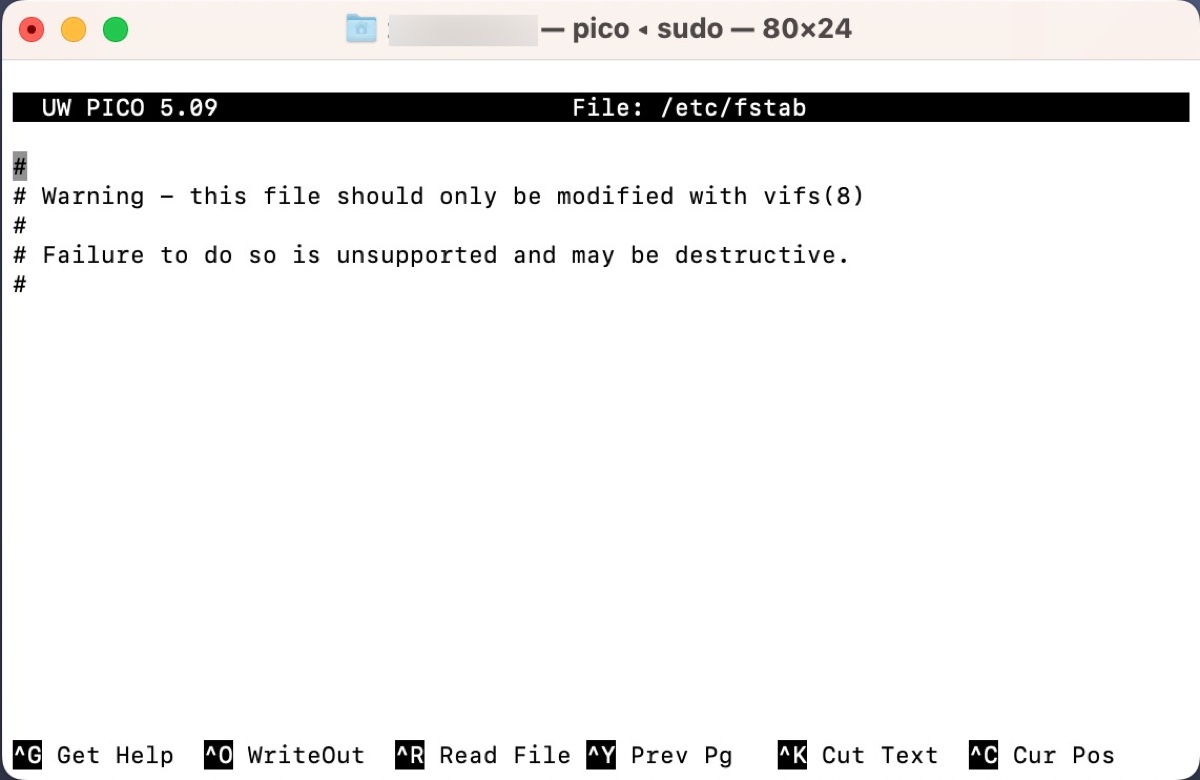
- Use the arrow key to move the cursor to a new line at the bottom of the file.
- Type the following command into the new line, replacing "NAME" with the name of your drive:LABEL=NAME none ntfs rw,auto,nobrowse
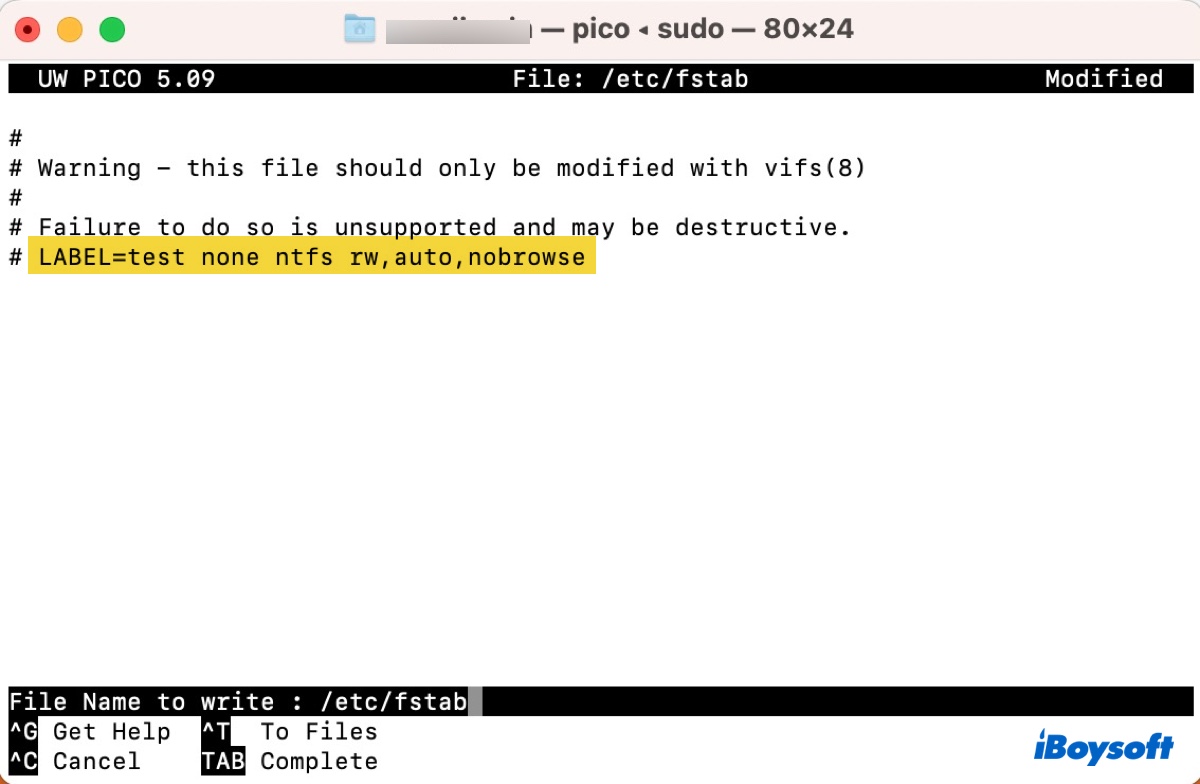
- Press Ctrl + O to write the changes to your NTFS drive.
- Press the Enter key and then Ctrl + X to exit nano.
After that, try if you can read and write to NTFS-formatted drives on your M1/M2/M3/M4 Mac.
Method 3: Erase NTFS drive to another file system
Another way to bypass NTFS issues on an M1/M2/M3/M4 Mac is to completely avoid the format by erasing your NTFS drives with another file system that macOS has both read and write support, such as APFS, HFS+, exFAT, or FAT32. Note that this will remove all data on your drive, so make sure the important data is backed up before proceeding.
- Open Disk Utility from the Applications/Utilities folder.
- Click View > Show All Devices to reveal the physical disk.
- Select your NTFS drive, the top-level one, usually labeled with the manufacturer's name.
- Click Erase.
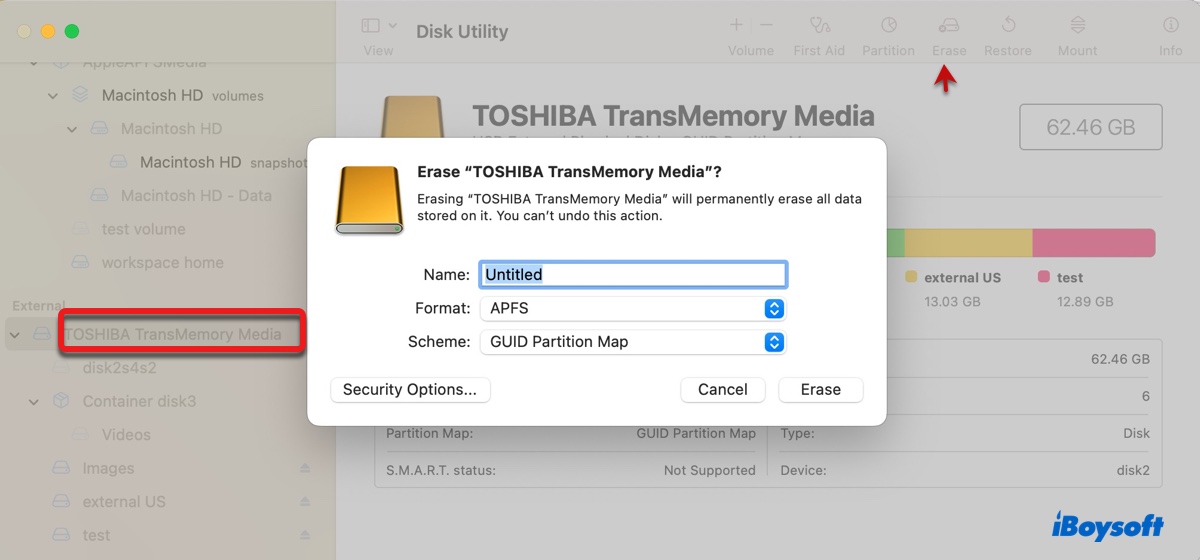
- Enter a name for the drive.
- Choose a proper file system. (Select APFS or HFS+ when working with Mac only; choose exFAT or FAT32 when working with both Windows and macOS.)
- Select GUID Partition Map as the scheme.
- Click Erase again.
Which solution did you take? Share this article to help others use NTFS on a MacBook Pro/Air with the M1, M2, M3, or M4 chip.
FAQs about how to read/write to NTFS drive on Mac M1/M2/M3/M4
- QHow do I open NTFS drive on an M1/M2/M3 Mac?
-
A
To open NTFS drive on an M1/M2/M3 Mac, just double-click its drive icon on the desktop or select the drive in Finder's "Locations" sidebar.
- QCan Apple Mac read NTFS drive?
-
A
Yes, Apple's Mac computers can read NTFS drive. However, they can't write to it.
- QWhat is the best solution for NTFS on Mac M1/M2/M3?
-
A
The best NTFS for Mac (M3, M2 & M1) is iBoysoft NTFS for Mac. It's a professional NTFS driver that can enable read and write support to NTFS drive on Mac M1, M2, M3, and Intel-based Macs.
- QWhat is NTFS file system for Mac?
-
A
NTFS is a file system that macOS can only read but not write to. To gain write access to an NTFS drive on Mac, you need to employ a third-party NTFS for Mac driver.
- QIs exFAT or NTFS better for Mac?
-
A
If you need to use a drive on both Windows and macOS, exFAT may be a better choice, as it's compatible with both operating systems. However, exFAT drives may have mounting issues on Mac. Besides, NTFS is generally faster than exFAT in reading and writing to a drive on Windows. So, if you value read and write speeds on Windows, NTFS is probably a better choice.
- QWhat drive file system is fastest for Mac?
-
A
If you plan to use a drive on Mac only, APFS is probably the best choice as it's the most advanced file system on Mac and is optimized for SSD.