When you drag and drop files to the NTFS drive, a forbidden symbol appears, or the files return to their original location. You can't copy files from your Mac to the connected NTFS SSD, HDD, or USB flash drive.
The truth is that NTFS is a file system developed by Microsoft, and macOS only has read-only support for it by default. You should:
- Use an NTFS for Mac tool to enable you to read and write to NTFS drives on a Mac.
- If you've already used one, the NTFS for Mac utility may not be working. (Try using the latest NTFS for Mac Tahoe-compatible tool.)
This definite tutorial will help you identify the issue and show you how to copy files to an NTFS hard drive on a Mac. Then, you can use NTFS external hard drives to transfer files between Windows and macOS seamlessly.
Note: If your drive is not formatted with NTFS but a macOS-compatible one, follow this guide: Can't Copy Files to External Hard Drives on a Mac.
Quick overview and comparison of the ways
| Ways to copy files to NTFS drives on Mac | When should you use it | Whether reliable |
| Use iBoysoft NTFS for Mac | 1. Want to copy files from Mac to NTFS external hard drive without formatting 2. Need to use NTFS drives on both Mac and Windows PC | Yes, safe and sustainable |
| Format the NTFS drive to exFAT or FAT32 | 1. Don't want an NTFS for Mac solution 2. The drive is empty or easy to back up (doesn't store too much data) | Yes, need to back up data first |
| Utilize Terminal | 1. Don't want an NTFS for Mac tool 2. Accept the risk (instability or data corruption) it brings 3. Your Mac runs macOS Catalina or earlier (relatively workable) | No, it's just an experimental way. |
Tips: In comparison, using iBoysoft NTFS for Mac is the safest, quickest, and easiest way to copy files from a Mac to an NTFS external drive.
This tool can automatically mount the NTFS drives on your Mac in full read-write mode. With it, you can transfer files between a Mac and a Windows PC without limitations.
Why can you read NTFS drives but cannot move files to them on a Mac?
NTFS is the default file system for Windows, while macOS can only read it. Moving or copying files to NTFS drives on a Mac is the action of writing to them. Thus, it is forbidden.
If you've already used an NTFS for Mac tool to grant the NTFS drive read-write access on your Mac, the causes may be:
- The NTFS for Mac utility may be outdated or broken.
- Bugs in the system or NTFS for Mac, or errors in the disk's file system, make the drive read-only.
How to copy files to NTFS hard drives on a Mac without formatting?
By default, you can't change permissions on the external drives on a Mac if they are NTFS formatted.
To read and copy to your NTFS drive on a Mac, follow the efficient methods we summarized:
Way 1. Use NTFS for Mac (Safest way)
| ⌛ Time Cost: Within a minute Tool: iBoysoft NTFS for Mac Highlights: Copy files from Mac to NTFS external hard drive without formatting; simple, instant Overall Score: |
If your NTFS drive contains important data and you do not want to reformat it, the most practical solution is to use an NTFS for Mac instead of erasing or converting the drive.
(Learn the evolution of this tool for a wiser decision: NTFS Driver Tech Evolution)
Which NTFS for Mac tool should you choose?
There are several NTFS for Mac solutions on the market, but their reliability and system compatibility vary significantly across different macOS versions, including macOS Ventura and newer Apple Silicon systems.
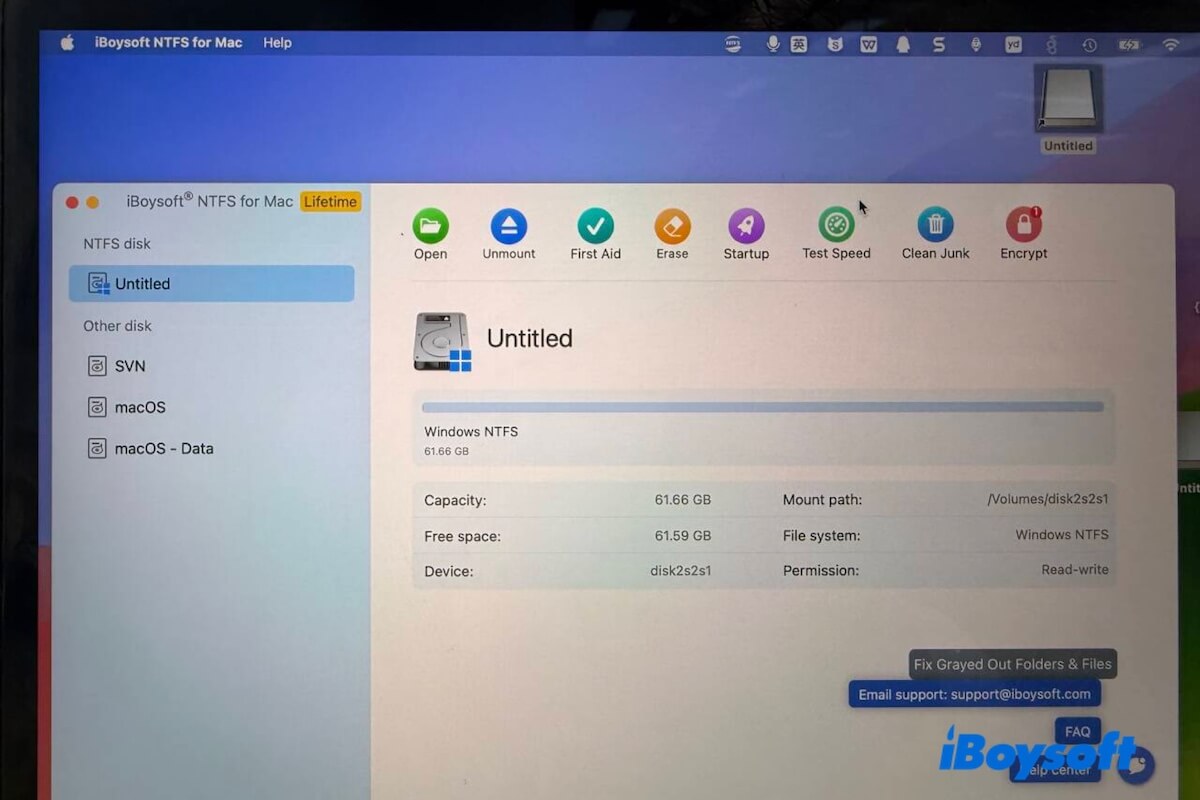
Among them, iBoysoft NTFS for Mac is widely used due to its stability and ease of operation. It supports:
- Automatic mounting of NTFS drives when connected
- Full read and write access in Finder
- Compatibility with both Intel-based Macs and Apple Silicon Macs
- Fast and stable NTFS read-write speed
What can you do with iBoysoft NTFS for Mac?
Once you install iBoysoft NTFS for Mac, your NTFS drive behaves almost like a native macOS drive. You can:
- Copy files from your Mac to the NTFS drive quickly and easily, just as if operating on a Windows computer.
- Edit, delete, and rename the files stored on the NTFS drive in Finder.
How to run iBoysoft NTFS for Mac to help copy files from Mac to the NTFS drive?
- Download and install iBoysoft NTFS for Mac.
- Connect your NTFS external hard drive to your Mac and open this application.
- Click Enable Writable on the app's main interface and select a mode - Simple Mode and Advanced Mode.
I suggest you select Advanced Mode, as it enables the NTFS drive to be auto-mounted in full read-write mode on your Mac every time it is connected.
Now, you can transfer the target files from your Mac to the NTFS drive safely, stably, and fast.
Note: There are indeed many other NTFS drivers like Paragon NTFS for Mac and free NTFS-3G. However, after tests, I found Paragon NTFS for Mac doesn't perform as fast a read-write speed as iBoysoft NTFS for Mac does.
Besides, NTFS-3G is a free NTFS for Mac utility, and it has to rely on extra apps (Homebrew and macFUSE), making it hard and unstable to use for tech newbies.
Way 2. Utilize Terminal (Unreliable and with limitations)
| ⌛ Time Cost: Depends on your degree of familiarity with command lines Tool: Built-in Terminal Highlights: Completely free Overall Score: (Not recommended, take it as the last choice) |
Is using Terminal commands to enable NTFS write on Mac safe?
Using Terminal commands to make an NTFS drive writable on a Mac is generally not considered a safe or reliable method.
This approach depends on Apple's hidden and undocumented experimental NTFS write support in macOS, which is not officially supported by Apple and may behave inconsistently across system updates.
In addition, this workaround generally only works reliably on macOS Catalina and earlier versions. But it becomes very unstable on macOS Big Sur and Monterey, and almost invalid on macOS Ventura and later, as Apple changed the NTFS mounting architecture.
Why is this method risky?
Because it relies on experimental system behavior, using Terminal-based NTFS write access can lead to:
- NTFS file system corruption
- Unexpected data loss during write operations
- Unstable mounting behavior after system updates
- Inconsistent performance across different Mac models
In short, it is a system-level workaround rather than a supported feature, which makes it unsuitable for important or production data.
So, you are supposed to use the safe and stable way - run iBoysoft NTFS for Mac on your Mac model to enable you to add files from Mac to NTFS.
How to run Terminal to enable NTFS read-write access on a Mac?
If you ignore the security risk and unstable performance, you can try this method with these steps:
- Connect your NTFS drive to your Mac.
- Back up data on the NTFS drive and your Mac to avoid accidental data loss.
- Go to the Launchpad on the Dock > Other > Terminal. Or, you can open Terminal in Finder.
- Enter the command below into the Terminal window. This opens all the drives recognized by your Mac. sudo nano /etc/fstab
- Press the arrow keys on the keyboard to scroll to the end of the list and then type the following command. You need to replace NAME with the name of your NTFS drive. LABEL=NAME none ntfs rw, auto, nobrowse
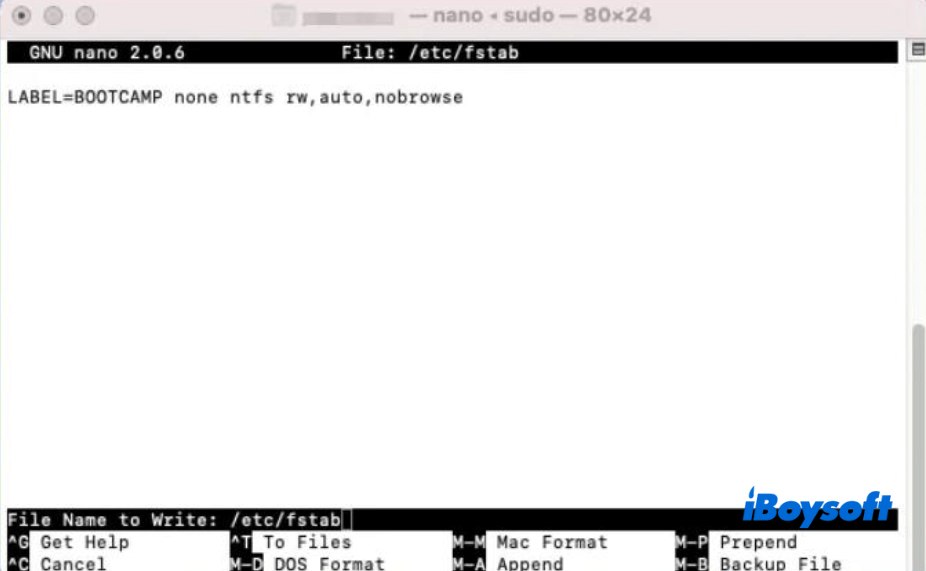
- Press the Control + O keys. Then, press the Control + X keys.
- Open Finder and navigate to the top Finder menu bar, then choose Go > Go to Folder.
- Enter /Volumes/NAME into the Go to Folder box. Here, replace NAME with the name of your NTFS drive.
- Select Go to open your NTFS device.
Now, you can copy files to your NTFS drive on your Mac.
Update: Sadly, Apple has changed the entire mount process on macOS Tahoe, Sequoia, Sonoma, and Ventura. It removed the previous kernel-based architecture - /System/Library/Extensions/ntfs.kext. It means all free NTFS for Mac drivers, including Mounty for NTFS and others, and terminal commands will no longer function on macOS 13 Ventura and later.
Format the NTFS drive to copy files to it on a Mac (When & how)
| ⌛ Time Cost: Depends on the number of your files on the NTFS drive Tool: Built-in Disk Utility Highlights: Copy to NTFS from Mac for free Overall Score: |
To move or transfer files from your Mac to the read-only NTFS drive, you can also reassign a macOS-compatible file system to it. As we all know, macOS supports:
- FAT32
- exFAT
- APFS
- Mac OS Extended (Journaled)
Among them, FAT32 and exFAT are compatible with macOS and Windows.
So, if you meet these situations, it is suitable to format your NTFS drive to exFAT or FAT32:
- Your NTFS drive is empty or doesn't store large amounts of files. Or else, you'll spend a lot of time backing them up, because formatting a drive will erase all data on it.
- You don't want an NTFS for Mac tool, but want to use the drive cross-platform for free.
Before reformatting the drive, move files from your NTFS drive to the Mac and then back after erasure completes.
How to format the NTFS drive on Mac:
- Connect your NTFS drive to your Mac.
- Open Disk Utility (open Finder > Applications > Utilities).
- Select the NTFS disk from the left sidebar and then click the top Erase button.
- Enter a name for the drive, select MS-DOS (FAT) or exFAT (FAT vs. exFAT) as the format, and choose GUID Partition Map as the scheme.
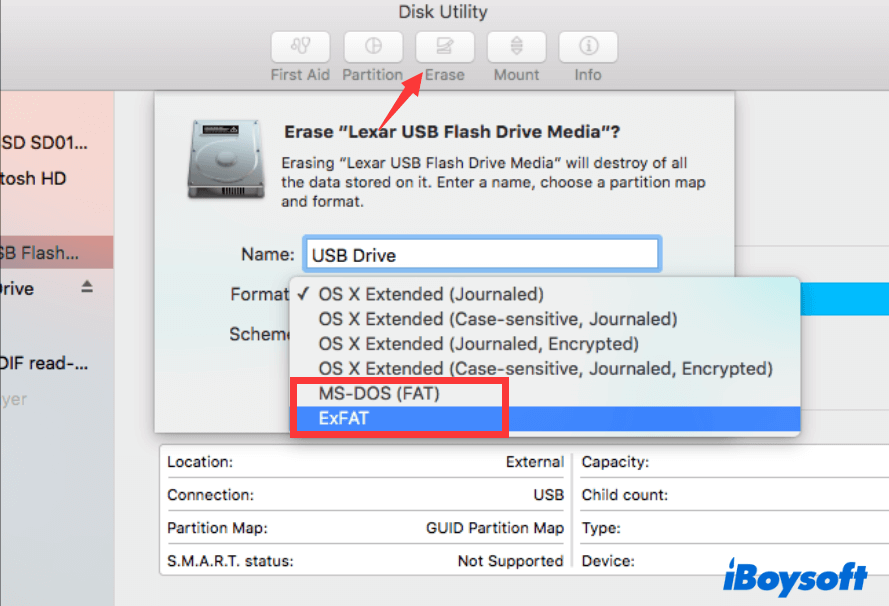
- Click Erase.
- Wait until the erasure process is done. During the process, don't do any operations on your Mac.
Final thoughts
NTFS is the file system that is not compatible with macOS. To copy files to an NTFS drive on a Mac, you need an NTFS for Mac solution or reformat it.
I do not recommend using Terminal to make the NTFS writable on a Mac, as it is an unstable and unverified experimental way after our tests.
From experience, I have found that if a drive can't be written to, you should check the file system limits first.
FAQ
- QWhat is the best way to move files between Mac and NTFS drives?
-
A
The best way is to use an NTFS for Mac tool like iBoysoft NTFS for Mac. This utility can mount NTFS drives in full read-write mode. Then, you can edit files on the NTFS drive and copy files from your Mac to it.
- QHow can I read and write to an NTFS drive on a Mac?
-
A
You can follow these ways:
1. Use NTFS for Mac - The most reliable and easiest way.
2. Reformat the NTFS drive to macOS-compatible APFS, Mac OS Extended (Journaled), exFAT, or FAT32.