Can't write to NTFS drives on macOS Tahoe 26? If so, you may fall into one of the two situations. You either don't have an NTFS for Mac tool, or the NTFS for Mac driver is not working on macOS Tahoe. The latter is common after updating macOS. If you start to have issues reading or writing to NTFS after installing macOS Tahoe, it's usually due to incompatible NTFS for Mac software.
Whichever it is, you can enable macOS Tahoe NTFS write support with iBoysoft NTFS for Mac. It's a reliable NTFS writer for both Intel and Apple Silicon Macs, supporting macOS High Sierra - macOS Tahoe.
Note: Follow the steps below to read/write NTFS drives on macOS 26 Tahoe:
(If your Mac has an NTFS for Mac tool, like Paragon NTFS for Mac, uninstall it first to avoid conflicts.)
Step 1: Free download iBoysoft NTFS for Mac Tahoe.
Step 2: Launch it, then select your NTFS-formatted drive from the left, and click Open.

Step 3: After that, macOS Tahoe will automatically mount your NTFS drive in read/write mode. This process also applies to macOS Ventura if you want to enable NTFS write access on macOS Ventura.
Additionally, you can explore other solutions. Here's a table comparing the potential methods:
| How to read and write NTFS on macOS Tahoe | Applies to | Recommendations | Best for | Data Risk | Apple Silicon | Intel | Difficulty |
| Use iBoysoft NTFS for Mac Tahoe | All Mac models (Intel, M1, M2, M3, M4, M5) | Seamless read/write without data loss | None | Supported | Supported | Easy | |
| Reformat NTFS drives on Mac | All Macs but delete all data | Permanent Mac use or cross-platform (exFAT) | High (Erases drive) | Supported | Supported | Easy | |
| Create a Boot Camp Windows partition | Intel-based Macs only | Running native Windows apps and gaming | Medium (Requires partitioning) | Not Supported | Supported | Hard |
Tips: NTFS is a Windows file system that's read-only on macOS. Normally, you can view files on the NTFS drive on a Mac, but you can't modify them.
Generally speaking, there are four ways to enable write support to NTFS on Mac, including using an NTFS for Mac tool, creating a Boot Camp partition, using Terminal, and reformatting the disk.
However, the Terminal route is no longer available because Apple has removed the kext file on which it relies since macOS 13 Ventura.
Way 1: Use iBoysoft NTFS for Mac Tahoe (No formatting required)
As we mentioned before, the best way to read and write to NTFS on macOS Tahoe is to use iBoysoft NTFS for Mac. This tool is Tahoe-compatible, allowing you to read-write NTFS in Finder without formatting. Besides, it lets you manage NTFS drives on Mac more efficiently. Here are a few features of it:
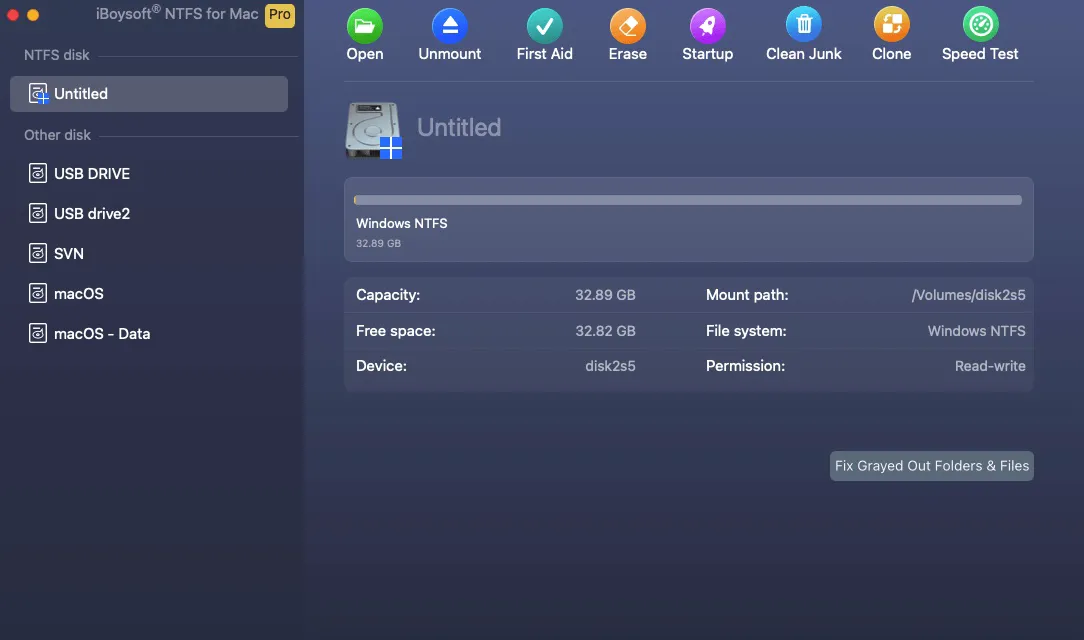
- Support macOS 26 Tahoe ~ macOS 10.13 High Sierra
- Grant read/write access to all NTFS drives once installed
- Format drives to NTFS on Mac
- Check and repair NTFS drives on Mac
- Support copying files from Mac to NTFS drives
- Read/write to Boot Camp partitions
- Open, mount, and unmount NTFS disks on Mac
- Start up from the Boot Camp partition
NTFS for Mac Tahoe download 👇
Share this tool to help others use NTFS on macOS Tahoe!
Way 2: Reformat NTFS drives on Mac (For empty or backed-up drives)
If you are starting fresh, reformatting the NTFS drive is a highly effective workaround. To be clear, this doesn't magically teach macOS Tahoe how to write to an NTFS drive; instead, it changes the drive's file system to one that Mac natively understands.
Because reformatting completely wipes the drive, ensuring a solid backup on a Windows PC beforehand is non-negotiable. For an empty or newly backed-up drive, wiping it to a Mac-friendly format is a permanent, hassle-free solution.
Here are the formats with read & write access on macOS Tahoe:
- APFS (for Macs running macOS High Sierra or later).
- Mac OS Extended (Journaled) (for Macs running macOS Sierra or earlier).
- exFAT (for sharing between Mac and Windows)
Warning: Be reminded that reformatting a drive will erase all data on it!
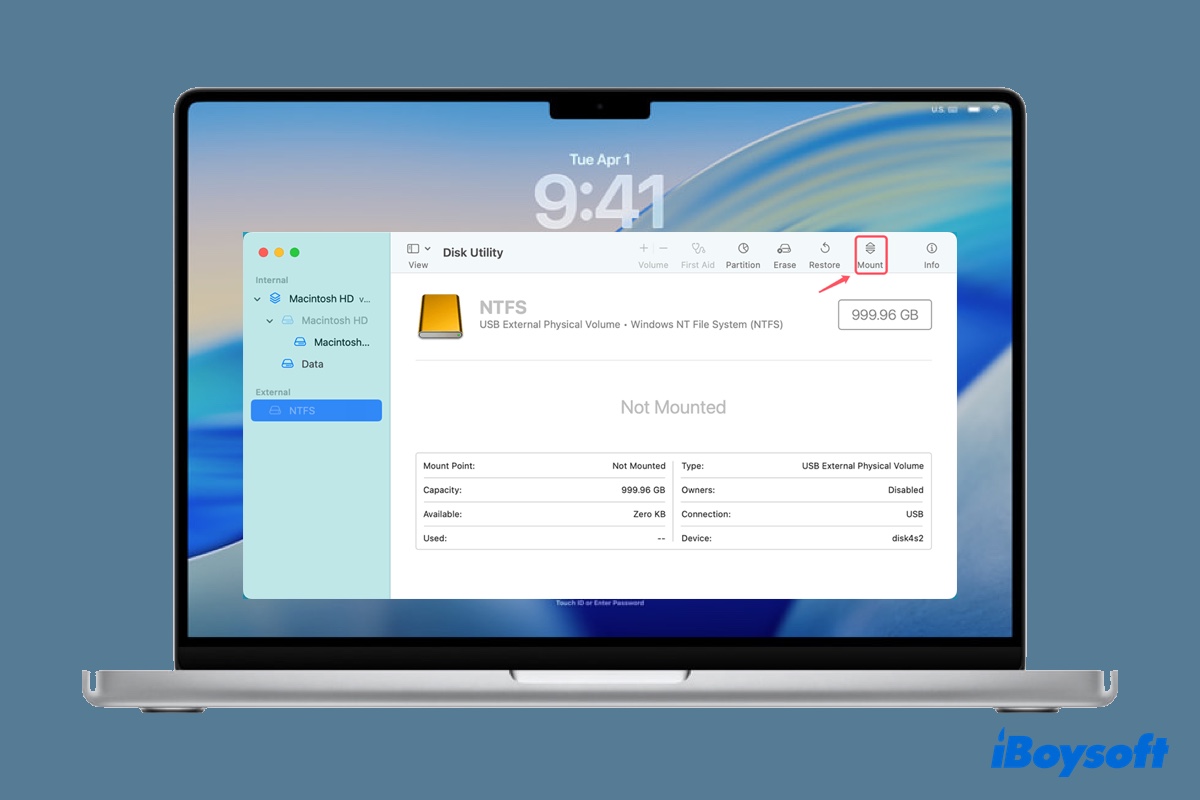
Here's how to reformat the NTFS external hard drive on macOS Tahoe:
- Open Disk Utility.
- Select your external drive and click Erase.

- Name it.
- Choose a proper file system as the format. (Get more details here: How to Reformat External Hard Drives on Mac)
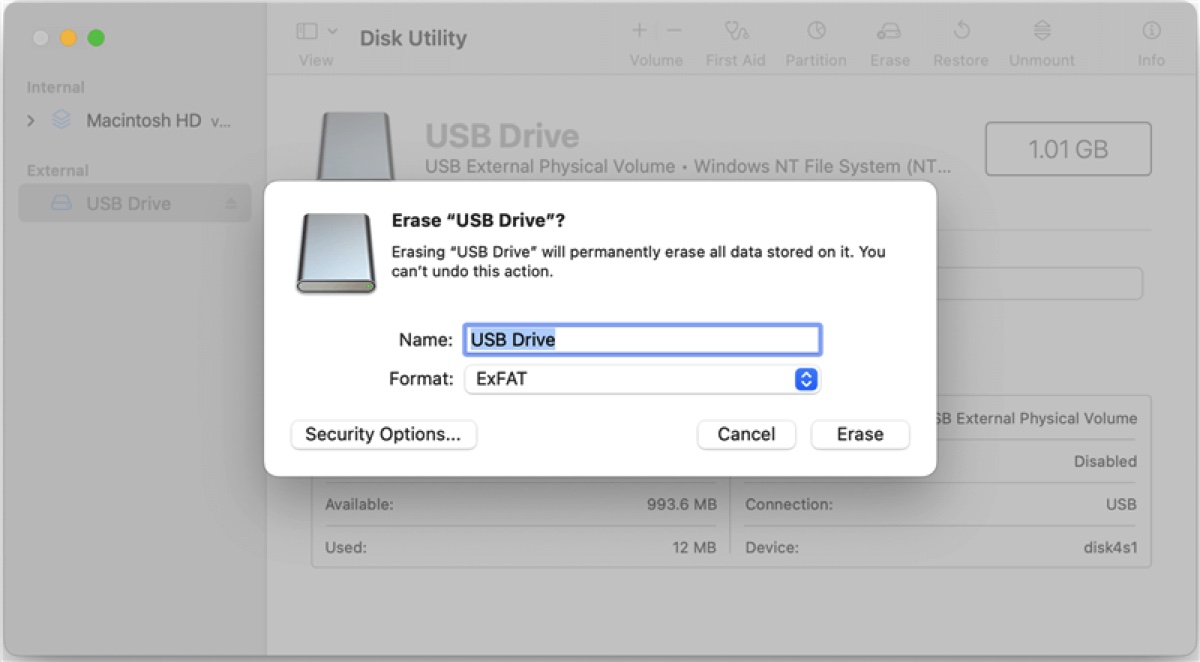
- Keep the scheme GUID Partition Map. (This item only appears when you erase the physical disk.)
- Click Erase.
Way 3: Create a Boot Camp Windows partition (For Intel Macs)
If your Mac is Intel-based, you can also create a Windows Boot Camp partition to access the NTFS drive on macOS Tahoe. This is only recommended if you need to use Windows on your Mac. It's overkill to set aside a large chunk of your Mac's storage for occasionally writing to the NTFS drive.
Another disadvantage of this method is that you must boot into the Windows partition every time you need to write to an NTFS drive, and while in Windows mode, you can't access data on the macOS partition.
Refer to this article for more details on creating a Boot Camp partition on Mac: How to Install Windows on Mac?
Free NTFS for Mac Tahoe options
Free NTFS drivers aren't recommended for average users managing important data drives on macOS Tahoe. These solutions usually rely heavily on a complex combination of open-source tools like macFUSE NTFS, NTFS-3G, Mounty for NTFS, and fuse-t. Because the installation process is complicated and long-term maintenance is often uncertain, there is no guarantee of stability when handling your critical files.
Paragon NTFS for Mac not working on macOS Tahoe
Upgrading to macOS Tahoe frequently breaks existing NTFS setups. If your external drive is suddenly locked in read-only mode or failing to mount entirely, it is almost certainly due to one of four major causes: an outdated NTFS driver, system extension blockages, denied Full Disk Access permissions, or conflicts with legacy software scripts.
A prime example of this environment-shift is Paragon NTFS for Mac not working immediately after the Tahoe update.
Because Apple has tightened its security architecture in Tahoe, running an outdated driver version means the software is fundamentally incompatible with the new codebase.
Furthermore, macOS Tahoe aggressively blocks legacy system extensions and requires users to manually grant Full Disk Access permissions in System Settings for the utility to function. Finally, driver conflicts frequently spike post-upgrade, as leftover scripts from older or competing NTFS utilities clash with the new operating system, requiring a clean reinstall and manual permission approval to fix.
Here's how to troubleshoot the issue:
- Update your current NTFS driver to a Tahoe-certified build
- Ensure the system extension for your NTFS driver is approved under Privacy & Security
- Ensure the driver has full disk access
- Uninstall the incomptaible NTFS driver and switch to an alternative like iBoysoft NTFS for Mac.
Also read:
FAQs
- QCan macOS Tahoe write to NTFS by default?
-
A
No, macOS Tahoe can't write to NTFS by default. NTFS is a proprietary Windows file system owned by Microsoft, and Apple has kept it strictly read-only on the Mac ecosystem for decades.
- QWhy did my NTFS driver stop working after Tahoe?
-
A
If your NTFS driver stops working after the Tahoe upgrade, it's likely incompatible with macOS Tahoe. Check the tool's wesite for an upgraded version that supports macOS Tahoe.