Most of the time, you can use a USB flash drive with your Mac computer without any problem. But sometimes, you may encounter errors, and the most common one is the USB drive read-only on Mac. Except for USB drives, external hard drives being read-only on a Mac happens frequently as well.
When a drive uses a macOS read-only file system (Microsoft NTFS), naturally, you can't write to it on a Mac. For example, you are unable to edit, rename, or delete the files on the hard drive, or copy files from your Mac to it. Besides, if the disk is set to write-protected, you can only read or view the data on it as well.
Fortunately, it's quite easy to fix this problem. Read this article and you'll know how to change a USB drive from read-only permission to read-write on Mac.
| Ways | Applicable Situations |
| Reconnect the USB drive to your Mac | The USB drive uses a macOS-supported file system, such as FAT32, exFAT, APFS, or Mac OS Extended, but is read-only. |
| Check and change the USB drive permission | Your privilege to the USB drive is write-protected. |
| Use iBoysoft NTFS for Mac to mount the USB in full read-write mode | The USB flash drive is NTFS formatted. |
| Run First Aid check the USB or if necessary format it | The USB drive has minor software errors or is corrupted. |
Right-click the external drive and choose Get Info to view the file format of the USB. If it shows NTFS, use iBoysoft NTFS for Mac to automatically mount the USB drive in full read-write mode. Then, you can write to it seamlessly.
USB flash drive read-only on a Mac, what to do?
Here, we list the 4 most common situations you may encounter with the USB flash drive read-only on Mac issue, along with their solutions.
If you don't know what happened but just can't write to your USB drive on the Mac, that's fine. You can follow this guide, and try the solutions below one by one.
Case 1: The USB drive isn't properly recognized by your Mac
Perhaps, you haven't connected the USB drive to your Mac correctly, inserted it into the port too quickly, or used this drive on a Windows PC, making macOS fail to recognize and mount it correctly. Or, the culprit is the temporary bugs in the system.
So, you can eject your APFS, Mac OS Extended, exFAT, or FAT32 USB drive, restart your Mac, and then insert it into the USB port tightly and slowly.
Case 2: USB drive permission is read-only
If you locked or set permission limits to your USB drive before, and for whatever reason, you forgot about it, the FAT32 USB drive becomes read-only on your Mac.
In this case, you only need to change the permission settings to remove write protection from the USB. Then, your flash drive will become writable again.
How to change permissions on the USB drive on your Mac:
- Connect the read-only USB drive to your Mac.
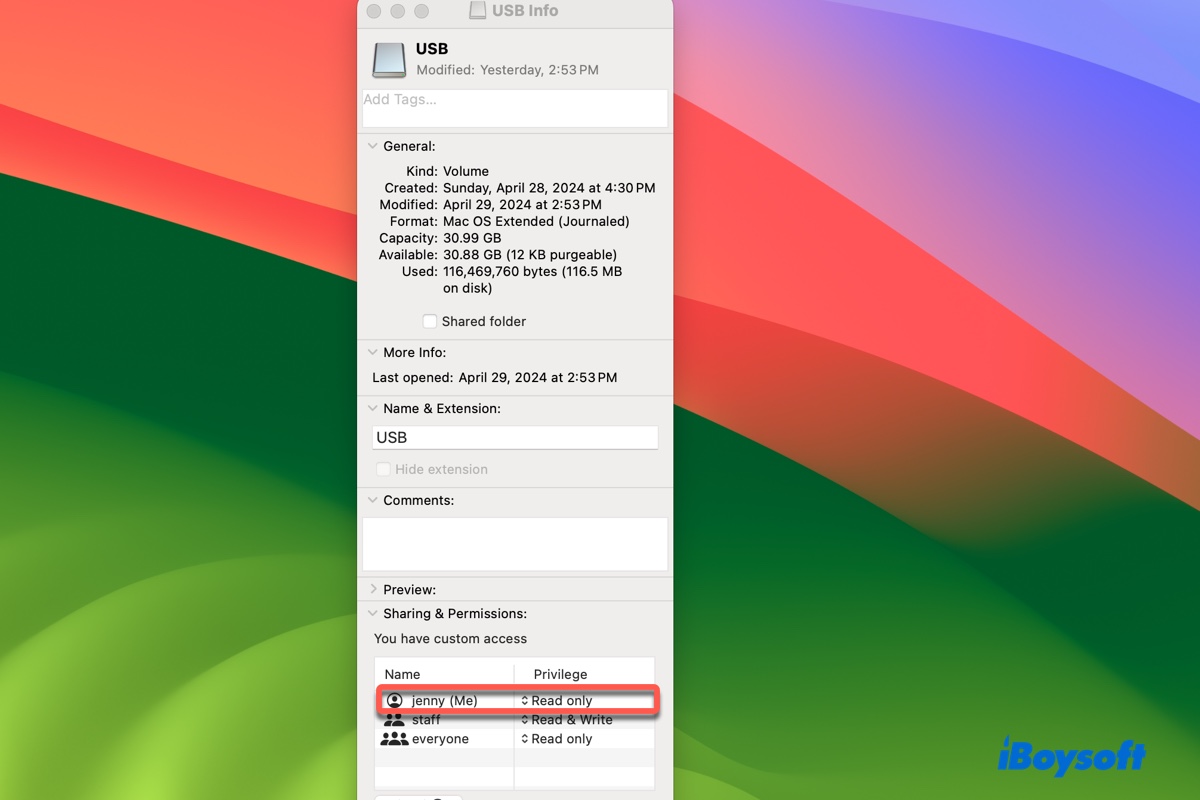
- Find the USB drive icon on your Mac desktop, right-click on it, then select Get info. Or, you can simply select the drive icon, and then press Command + I, it works the same.
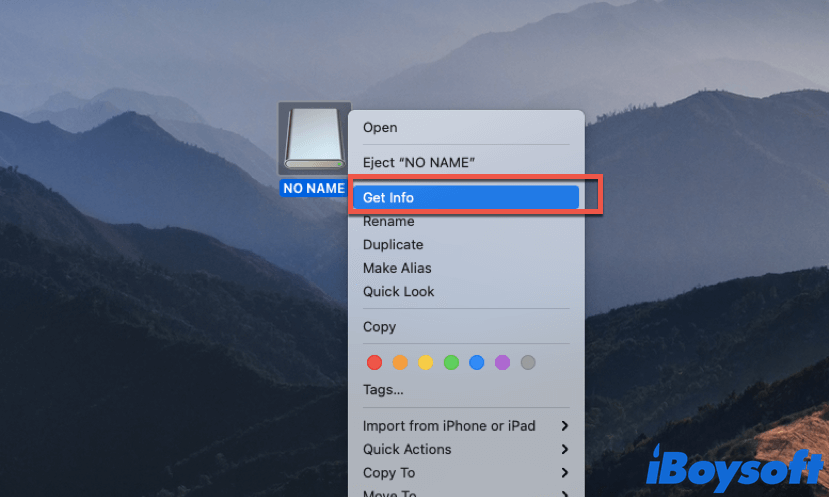
- In the Get Info window, click the arrow next to Sharing & Permissions. (Seeing the message "You can only read" on your external hard drive on Mac?)
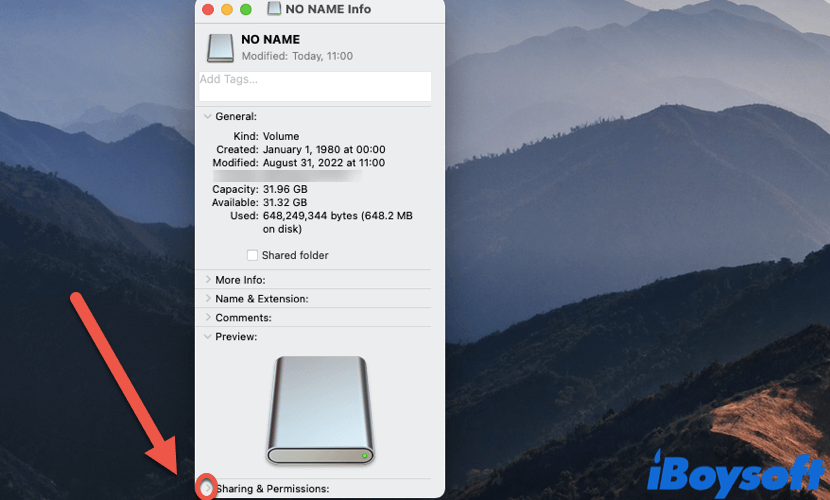
- Click the Lock icon, and enter your admin password to unlock for changes.
- Tick the checkbox next to "Ignore ownership on this volume." Or, change your privilege to "Read & Write."
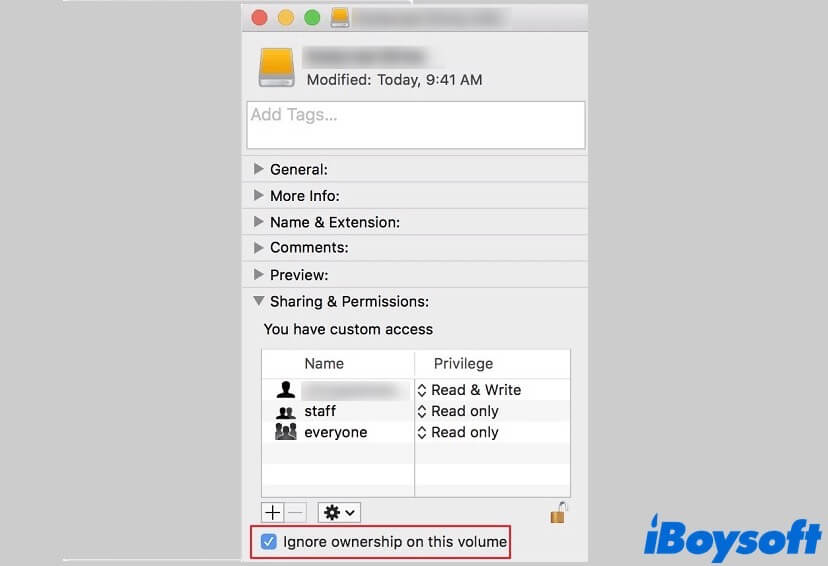
After that, you can see if you can access and edit files on your USB flash drive. If not, safely eject the drive, restart the Mac, connect the USB drive to your Mac, and check again.
If you like this post, share it on social media now!
Case 3: The USB drive is an NTFS file system formatted
Some USB sticks are formatted as Microsoft NTFS file systems by default for Windows use, or you've manually formatted the flash drive to NTFS. NTFS is not a macOS-compatible file system, it is only read-allowed on a Mac.
So, if your USB drive is formatted with NTFS, you will encounter the USB drive read-only issue on Mac.
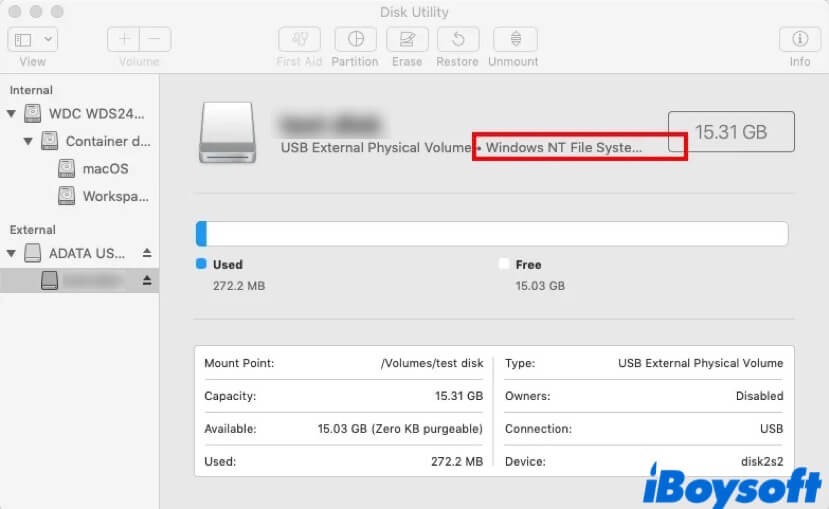
Step 1: Check if your USB drive is formatted with an NTFS format
- Navigate to Launchpad > Others, then click on Disk Utility.
- Select the USB drive you can only read from the left sidebar.
- If your drive is formatted as an NTFS file system, you will see "Windows NT File System" in the right column.
Step 2: Use NTFS driver to make you write to an NTFS USB on a Mac
If it is formatted with NTFS, how to write to an NTFS USB drive on a Mac? To solve this issue, the most effective way is to use iBoysoft NTFS for Mac software.
iBoysoft NTFS for Mac is the best NTFS drive manager for Mac in the market. It works as a Mac NTFS mounter to mount your Windows NTFS USB drive on your Mac device in full read-write mode. With it, you will have full read and write control over your NTFS-formatted drive in a macOS environment without formatting the disk with a Mac-compatible file system.
You can check this video guide to learn how to read and write NTFS drives on Mac using iBoysoft NTFS for Mac.
If you are not a video enthusiast, check the text version below:
- Free download and install iBoysoft NTFS for Mac on your computer.

- Connect the read-only USB stick to your Mac, then launch iBoysoft NTFS for Mac.
- Your USB drive will be mounted in read-write mode automatically, and you can write, modify, transfer, and delete files on that drive now. If necessary, you'll be asked to install an NTFS driver by iBoysoft and enable System Extensions to gain full disk access, just follow the onscreen instructions and finish the installation.
What if my read-only USB drive is blank and there are no files on it?
If your NTFS formatted USB drive is totally blank, you can directly format it with a Mac-compatible file system to fix the Mac USB drive read-only issue, thus gaining full read and write permission to that drive.
Note that formatting a disk will erase all data stored on it, so be careful! Here's how:
- Connect the read-only drive to your Mac computer.
- Open Disk Utility, then select the malfunctioning drive in the left sidebar.
- Click the Erase button at the top, set the format of the USB drive as APFS, MS-DOS (FAT), Mac OS Extended (Journaled), or ExFAT, and click Erase.
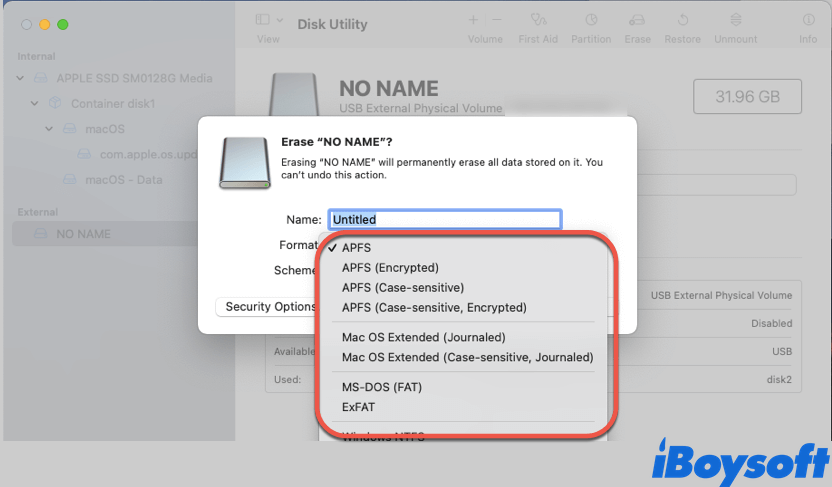
- When the formatting process is completed, disconnect the drive and restart your Mac, then reconnect your USB drive. The drive is writable on Mac now.
Complete guide to solving WD My Passport read-only problem on Mac, to change permissions on WD My Passport from write-protected, to unlock read-only WD My Passport on macOS.
Case 4: The USB drive contains unknown errors or is corrupted
When a USB contains some unknown internal errors, it may display as read-only on Mac, and prevents you from editing, transferring, deleting, or modifying files stored on it. In this case, to get rid of the Mac OS USB read-only issue caused by internal errors, you can run Disk Utility First Aid, and see if the problem still exists.
First Aid will help you repair some minor existing errors on the read-only drive. Here's how to fix the USB drive is read-only on Mac using Disk Utility:
- Make sure the read-only USB is connected to your Mac.
- Navigate to Mac Launchpad > Others, and double-click on Disk Utility to open it.
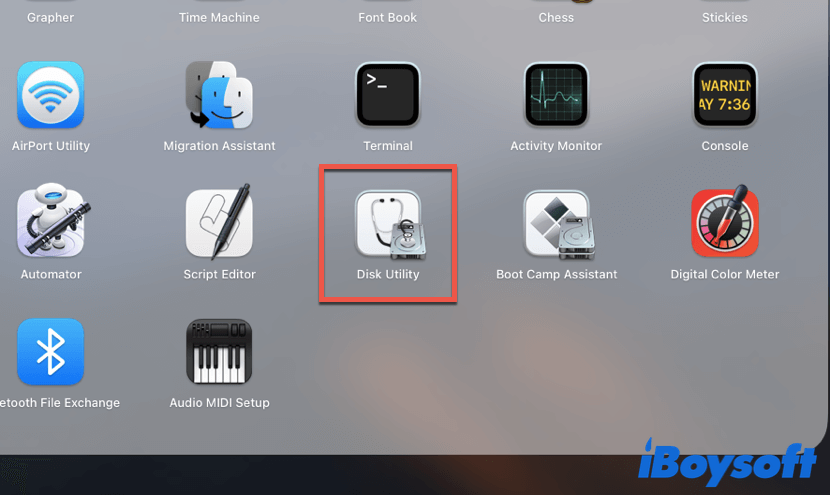
- In the Disk Utility window, select your malfunctioning USB drive in the left column.
- Click on the First Aid tab at the top pane, a dialogue box appears, then click Run.
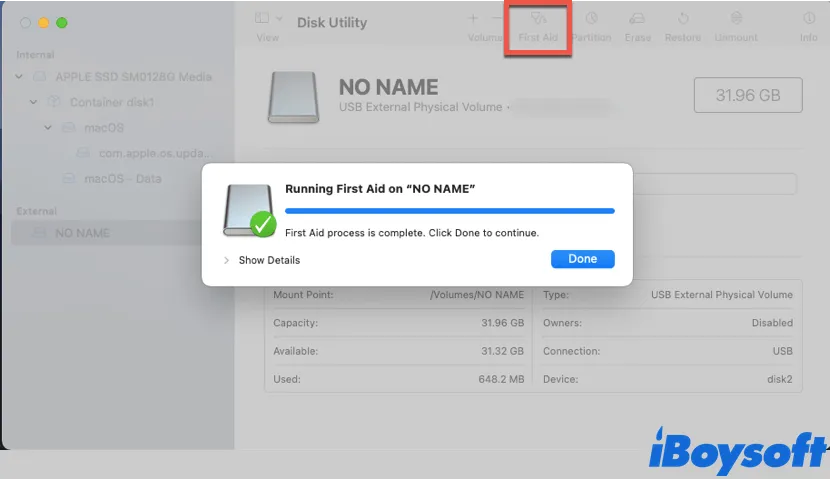
- Until the First Aid process is completed, then safely eject and reconnect the drive to Mac.
- Check if you can write to your USB pen drive now.
If fortunately, you can write to your read-only drive after First Aid, congratulations. But if not, don't worry, back up your files on the flash drive and then format it in Disk Utility.
Problem solved? Share this tutorial with more people who encounter the same issue!
Why is your USB drive read-only on a Mac?
It is necessary to know why your USB thumb drive becomes read-only on your Mac. Generally speaking, this problem can be caused by the following reasons:
- USB drive permission is changed to read-only.
- The USB flash drive is formatted as an NTFS file system.
- The USB thumb drive is corrupted, or it contains unknown errors.
- Wrong device connection.
- Viruses or malware.
Do note that the reasons behind the Mac USB drive read-only issue vary in different situations, we've just listed some of them. But whatever your case is, the ways in this post can help you out.
If your USB drive is from Toshiba, read this article to learn the 5 best ways to resolve the "Toshiba external hard drive read-only" issue on Mac.
If you think that this content is helpful, share it with more people!
Conclusion
In this article, we help you fix the USB drive read-only on Mac issue with 4 methods. By following the methods above one by one, you can get rid of the issue, and write to your read-only USB flash drive successfully. Again, if your USB drive is NTFS-formatted, don't hesitate to use iBoysoft NTFS for Mac to easily gain full read-write control over it!
