The NTFS is the most widely used Microsoft file system in the world. Due to its copyrights, however, it offers no full write access for Mac users, making them fail to write to the NTFS-formatted WD My Passport hard drive on Mac devices.
On top of that, frequent formatting is not advisable because it always causes data loss and disk damage, making your WD My Passport hard drive unreadable or inaccessible.
In such a case, you'd better install an NTFS driver to write to the WD NTFS hard drive on a Mac. This article teaches you how to download the WD My Passport NTFS driver for Mac for free in detail.
👉 If you want to learn how an NTFS driver is developed and its evolution, here it is: NTFS Driver Tech Evolution.
What happens when you run an NTFS-formatted WD drive on a Mac?
Let's see what will happen if you insist on running an NTFS-formatted WD hard drive on a Mac first:
- You can't rename and write to the WD drive because it's not writable on your Mac
- You are unable to copy or transfer files to the WD hard drive on your Mac
- You can't edit, delete, or create files on the WD hard drive on your Mac
- You can't see any files and folders when you open your WD hard drives on Apple Silicon Macs
This WD My Passport read-only on Mac problem is common. You're really restricted when you want to make any further changes to your NTFS drive on a Mac. Trapped in this trouble, you may want to format the hard drive to NTFS directly. However, this way is less recommended for two reasons:
Firstly, since you need to use it on both macOS and Windows, repeatedly formatting it to one file system for temporary usage takes time and effort, let alone having to back up the drive before the formatting to avoid its files being erased.
Secondly, too often disk formatting shortens its life span and causes data loss.
Therefore, downloading a WD NTFS driver for Mac is the simplest and most secure way to gain full read/write access to the WD external hard drive on a Mac.
iBoysoft NTFS for Mac - Best WD NTFS driver for Mac
iBoysoft NTFS for Mac is a professional and handy Mac tool, which enables you to read and write to a WD NTFS drive as a local APFS drive on macOS 26/15/14/13/12/11/10.15/10.14/10.13 versions.
Meanwhile, this wonderful software is compatible with Intel-based and Apple Silicon Macs. Significantly, iBoysoft NTFS for Mac is the first WD NTFS driver for Mac that is fully compatible with Apple Silicon Mac.
It also keeps fast read-write speed for NTFS disks on macOS (check the real test results).
Note: Want a free NTFS for Mac tool? Follow: Free NTFS for Mac
What does iBoysoft NTFS for Mac allow you to do on your device?
As an NTFS for Mac toolset, iBoysoft allows you to use the NTFS drive as the APFS drive on your Mac nicely. You can read more to know what exactly you can operate on your NTFS drive on Mac with it.
Read and Write to WD NTFS Drives on Mac
iBoysoft WD NTFS driver for Mac supports you in reading and writing kinds of Western Digital NTFS portable external hard drives on macOS, including WD Elements, My Passport Ultra, Easystore, My Book, My Passport Slim, My Passport Essential SE, and Game Drive.
Specifically, with iBoysoft NTFS for Mac, users can write to, edit, delete, copy, paste, create, and view files stored on the NTFS drives on Mac seamlessly and natively.
How to use iBoysoft NTFS for Mac to read/write to WD drives on Mac:
Step 1: Download and install iBoysoft NTFS for Mac on your MacBook Pro, MacBook Air, etc.
Step 2: Launch iBoysoft NTFS for Mac and insert the WD NTFS drive into the Mac.
Step 3: Write to the NTFS drive after the NTFS drive has been mounted successfully.
Note: If the NTFS disk still can't be read and written to, a pop-up will require you to install an NTFS driver by iBoysoft and enable System Extensions. Then, you can edit files on the NTFS drive freely.
Auto Mount Western Digital NTFS External HDD/ SSD
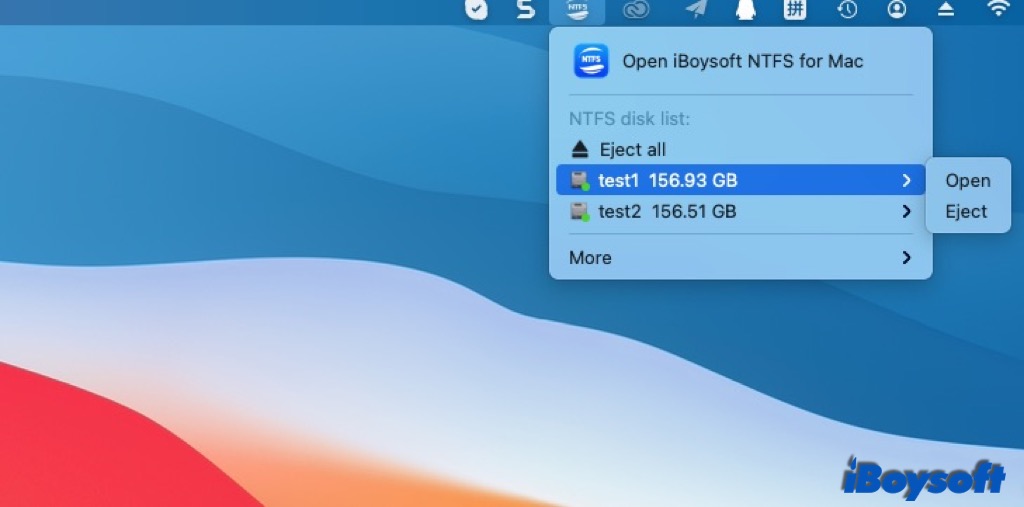
In addition to writing to the NTFS drive, iBoysoft NTFS for Mac can also mount, unmount, and eject all WD external hard drives and SSD with a single click. It's a menu bar utility that automatically mounts NTFS drives after you allow it.
Erase WD drives to the NTFS file system on Mac
Also, this utility bridges the gap of erasing disk to the NTFS file system on Mac.
As we all know, Disk Utility on Mac doesn't allow users to erase the disk to the NTFS file system when choosing the disk format, and it definitely brings lots of inconveniences to Mac users and fans.
Now, we can erase an NTFS disk on Mac easily with the assistance of iBoysoft NTFS for Mac software.
Conclusion
You're not allowed to write to the WD drive with the NTFS file system on macOS. To fix a read-only WD hard drive on Mac, you have to format this drive to a Mac-compatible file system first.
Or, you can install an iBoysoft NTFS for Mac application to write to the WD NTFS hard drive on Mac, which is more recommended for data safety and disk performance.
Also read:
Share to let more people know about this wonderful article!
FAQ about WD NTFS driver for Mac
- QWhat is WD NTFS driver for Mac?
-
A
WD NTFS driver for Mac is the software that allows you to write, edit, and make any modification to your NTFS hard drive on your Mac. iBoysoft NTFS for Mac is the best NTFS driver which enables you to write and edit your NTFS-formatted WD My Passport drive on Mac seamlessly.
- QHow do I get my WD NTFS hard drive to work on my Mac?
-
A
You can download iBoysoft NTFS for Mac software on your Mac, launch iBoysoft NTFS for Mac and insert your WD NTFS drive into Mac, and then you can get your WD NTFS hard drive to work on your Mac, just like the APFS hard drive does.