macOS updates always bring new features and patches to known bugs, according to users' expectations. However, it also triggers new issues as these features and enhancements may conflict with the already existing hardware and system settings.
Anything can be regarded as the second priority while the slow performance brought by the OS is urgent to deal with, it impacts user experience awfully, anyhow. This post is gonna explore the macOS Ventura slow issue and provide relevant approaches to boost Mac's performance. Let's get started to fix the Mac Ventura slow issue:
macOS Ventura slow collections
Tons of Mac users have run into different Mac OS Ventura slow issues, and each one is frustrating especially when you're hurrying for some significant missions on the Mac workstations. Here we collect the common ones and analyze the possible reasons for you to reference.
- macOS Ventura slowly opens file windows and opens applications: Insufficient space
- macOS Ventura loads games sluggishly: Insufficient space or overloaded CPU
- macOS Ventura install packages freeze: The install package is defective or broken
- macOS Ventura Internet browser laggingly: Poor internet connection
- macOS Ventura Spotlight Search loads files, folders, and applications slowly: False Spotlight Index
- macOS Ventura detects, recognizes, and mounts external drives slowly: File system incompatibility
- macOS Ventura boots slowly from the startup: Insufficient space or too many login items launching from the startup
- macOS Ventura Safari is laggy: Less available space, poor internet connection, or Safari being problematic
Now that we have concluded the universal slow performance troubles and the possible factors on macOS Ventura, it's time to dive right into the pin-point solutions. If the trouble you meet is not listed here, you can leave your trouble and discuss it with us for a solution!
Approach 1: Free up hard drive space on the Mac
Taking the Mac as a workstation, it's inevitable to create files and data on its drive. If not being cleared frequently, loads of files including caches, cookies, user preferences, system logs, junk, etc. accumulate on the device, leaving no space for it to run normally.
Hence, you face the issues of the app loading slowly, the file window opening sluggishly, and the downloads stopping in the middle. To make the Mac work properly, you can always check the hard drive space and clean junk from it regularly.
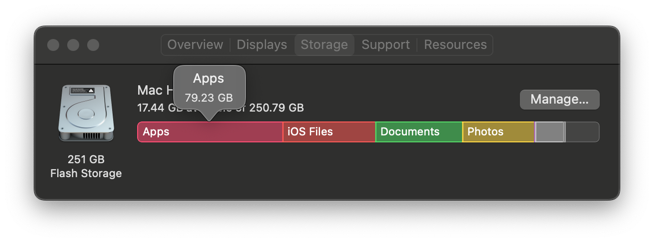
Go to Apple Menu > About This Mac > Storage, and you can view how much free space is left on your Mac. If the drive shows up with a long red mark implying that the available space is less, go to clean junk on your Mac directly.
Cleaning mussy files or folders in different file directories is extremely time-wasting, you can run a professional Mac junk cleaner – iBoysoft DiskGeeker, if you're not averse. It helps a lot in resolving macOS Ventura's slow issue, especially when you find there is no hard drive space left.
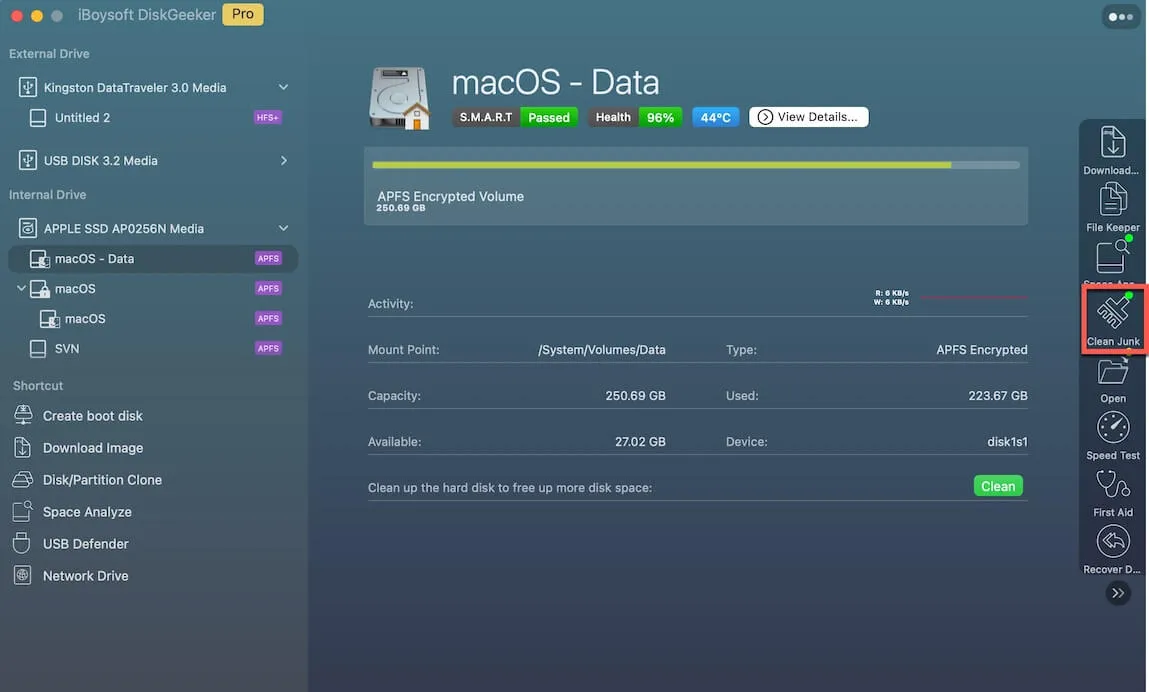
The Clean Junk feature of iBoysoft DiskGeeker is designed to scan the system drive usually labeled as Macintosh HD, Macintosh HD - Data, macOS, or macOS - Data for redundant data. It can find information and files no longer needed in the system cache, user logs, application cache, downloads, install packages, launch helpers, support files, etc.
Step 1: Download iBoysoft DiskGeeker and select a volume from the startup disk usually labeled as macOS - Data, macOS, Macintosh HD, or Macintosh HD - Data.
Step 2: Click "Clean Junk" from the toolbar.
Files and folders will be listed with file names, modified dates, and sizes for users to select which files should be cleaned to free up the space of the system drive, improve Mac performance, and reduce the system crash risk.
Step 3: Select a folder from the left panel and select the files/folders you want to delete.
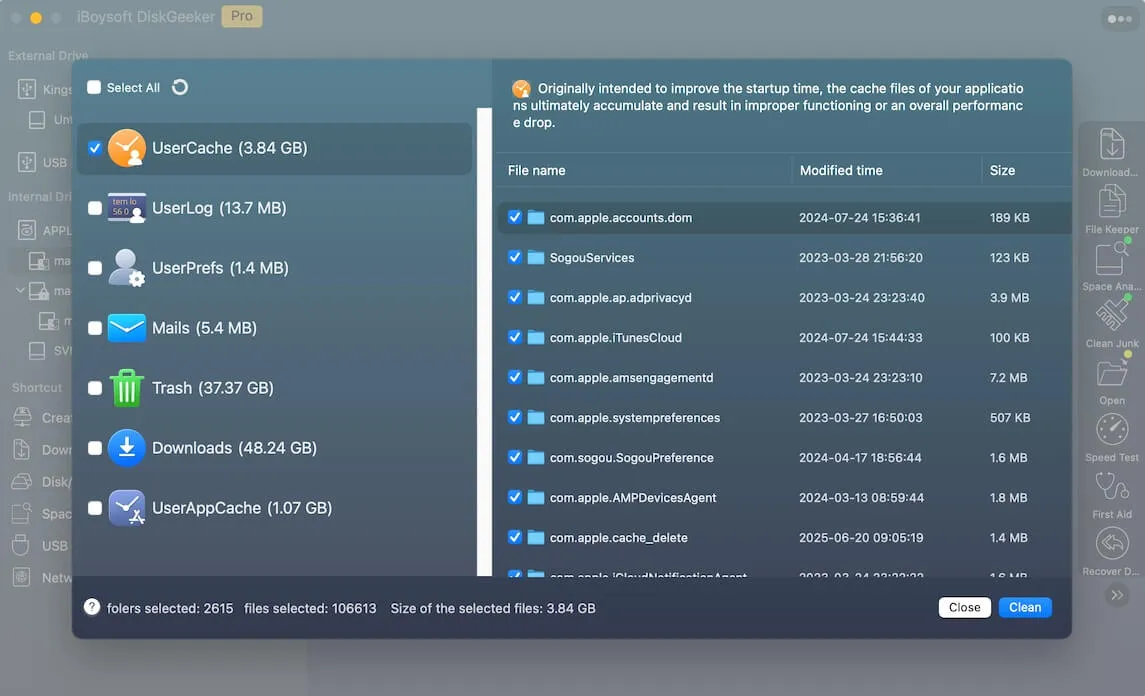
Step 4: Click "Clean" and then click "Ok". You will fail to clean certain files if you don't have permission to do so.

Once iBoysoft DiskGeeker successfully removes all useless files from your Mac, you can check if it performs as same as before the update.
Approach 2: Quit unnecessary processes or apps from running
When Mac overloads too many processes and applications, it definitely gets lagging and sluggish. For the sake of Mac health and to restore super fast performance, it's recommended to quit the processes and apps from a Mac background.
This way is quite easy as long as you know how to use Activity Monitor on your Mac:
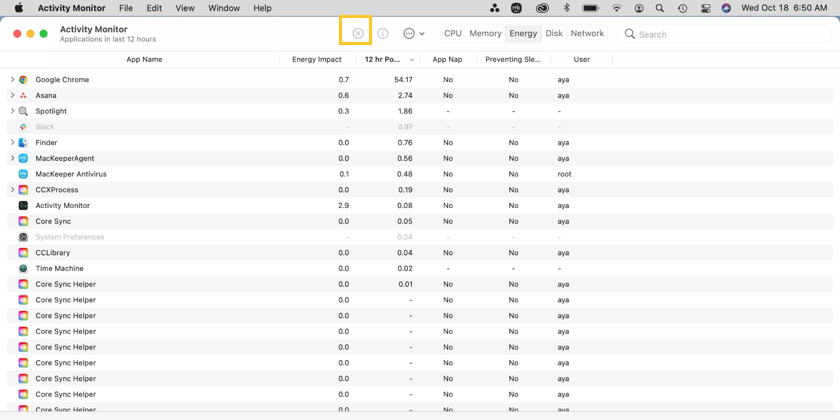
- Go to Finder > Go > Applications > Utilities and launch Activity Monitor.
- Go to the CPU column or RAM column to check the most intensive apps or programs.
- Select the items that burn more than before and click the X button on the top bar to kill it.
Or, you can swipe up the trackpad with three or four fingers to minimize all apps and windows, then directly close the ones you're not using by zooming in on the desired app/window > and clicking the red X button on the targeted window.
Approach 3: Reformat the hard drive with an incompatible file system
Some users mentioned that Mac detects, recognizes, mounts, and reads the external SSD extremely slowly after updating to macOS Ventura. Well, this is because the best file system with macOS Ventura is APFS. If you formatted the external hard drive to the earlier file system, like HFS or HFS+, macOS Ventura lags in reading it.
Therefore, you can reformat the external hard drive to APFS on Mac to boost the reading and writing speed. Here are how to do it:
- Open Finder, then launch Disk Utility from the Applications > the Utilities folder.
- Click View > Show All Devices.
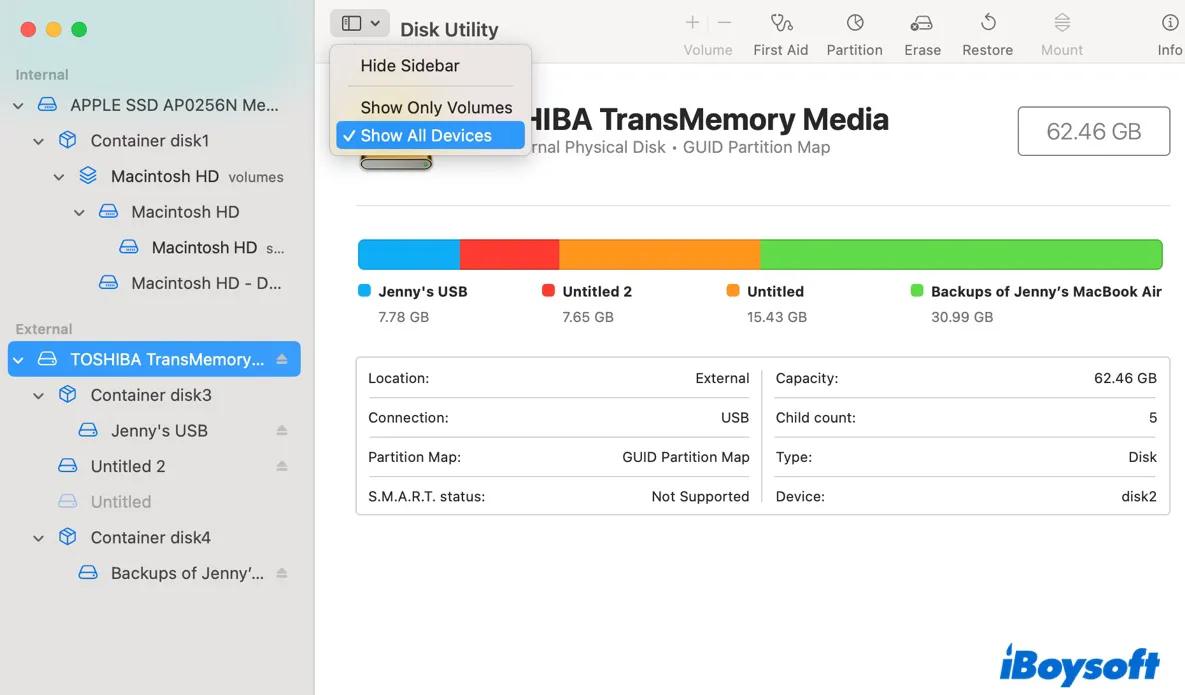
- Select the physical disk of your external hard drive. (Usually named with the manufacturer's name)
Click Erase. - Give the disk a name and choose APFS as the drive's file system.
- Set the scheme to GUID Partition Map.
- Click Erase.
With a fitting file system configured with the hard drive, Mac can read and write it at normal fast speed.
Approach 4: Remove programs from Login Items
Setting frequently-used applications to log in along with the Mac restart saves time and effort, but it increases the burden of the Mac to load. To lessen Mac's boot time, you can remove programs from Login Items with the following steps:
- Click on the Apple menu in the upper left corner of your Mac and choose System Settings from the dropdown menu.
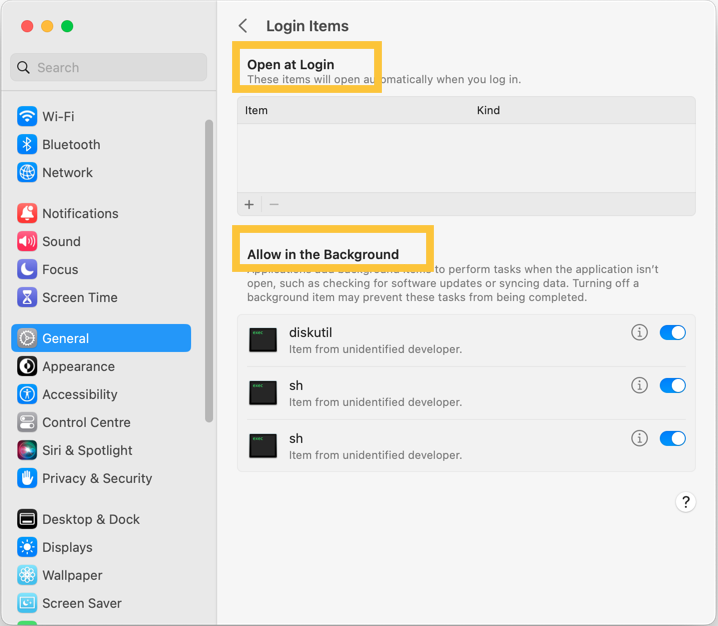
- Select General, then go to Login Items.
- In the first group – Login Items, select any you want to remove and click '-' to confirm your actions.
- In the second group that shows up "Allow in the Background", go to toggle the switch to off next to those you want to disable.
Approach 5: Rebuild Spotlight Index
Spotlight Search displays relevant items you desire slowly when its index database goes wrong, and this can be common as it keeps standby as your device is on. You can rebuild its index to terminate the Spotlight Search lagging issue:
- Choose Apple menu > System Settings.
- Open Spotlight settings.
- Drag the disk or folder that you want to index again to the list of locations that Spotlight is prevented from searching. Or click the add button (+) and select the disk or folder to add.
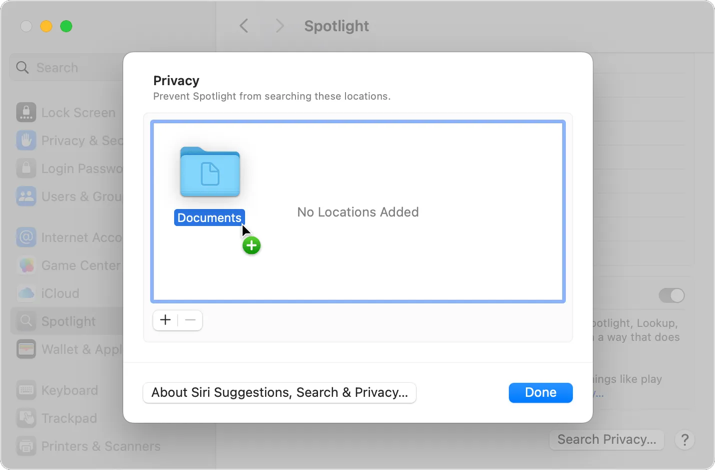
- From the same list of locations, select the disk or folder that you just added. Then click the remove button (–) to remove it from the list so that it can be reindexed.
- Click Done, then quit System Settings.
Spotlight will reindex the contents of the destinated disk or folder, which takes some time, depending on the amount of information being indexed.
Approach 6: Downgrade macOS Ventura to earlier macOS versions
You have to accept the truth that you cannot enjoy every essence of Ventura if you install macOS Ventura on unsupported Macs, and macOS Ventura running slowly might be one of the troubles brought by the disruptive install.
If you want to back to the smooth and seamless performance, go to downgrade macOS Ventura to macOS Monterey or earlier macOS versions:
- Connect your Time Machine drive carrying the easier macOS and user data to your Mac.
- Restart your Mac.
- For Apple Silicon Mac: press and hold the Power button until you see the startup screen. Then, choose Options > Continue.
For Intel-based Mac: press and hold Command + R until you see the Apple logo. - Choose Restore from Time Machine Backup, and then tap the Continue button.
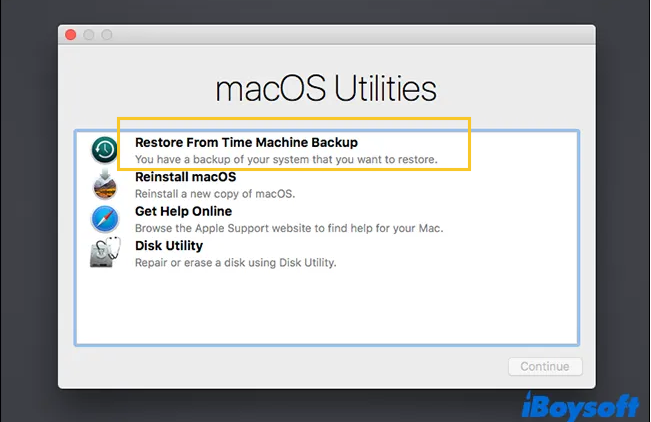
- Select your Restore Source, and then click Continue.
- Select the backup you want to restore from.
- Follow the prompts to complete the reinstallation, then restore your files from your backup drive.
It's suggested to run macOS Ventura on a supported Mac, which not only allows you to experience every sharp feature of it but also avoids being attacked by a security hole.
Approach 7: Upgrade Mac CPU and other hardware
As for the game lags on macOS Ventura with a relatively small CPU, the most effective solution is to upgrade the CPU by purchasing a machine with a more advanced chip and configuration. The higher the configuration the device carries, the smoother and more seamless the machine operates.
If this way is not your type, scroll up to try the solutions we mentioned before!
Conclusions
The macOS Ventura slowing down Mac issues show up in different forms in various scenarios, but the culprits resulting in these issues are common in the final.
When you discover your machine works improperly after the macOS Ventura update, give the approaches explored in this post a try!