The inability to unmount a disk on Mac can cause various errors. "Couldn't unmount disk 69888" is one of them, in addition to "Unable to unmount volume for repair.: (-69673).
The error occurs when you fail to erase, partition, or delete an internal or external disk or volume on Mac, including an external hard drive (SSD or HDD), USB flash drive, Time Machine backup disk, an internal fusion drive, etc.
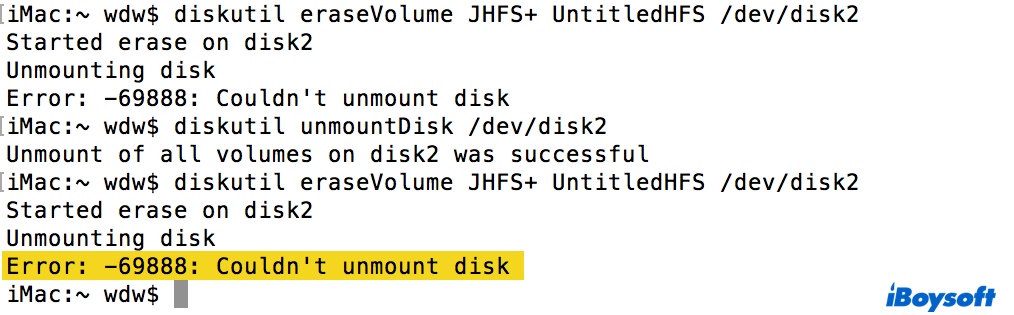
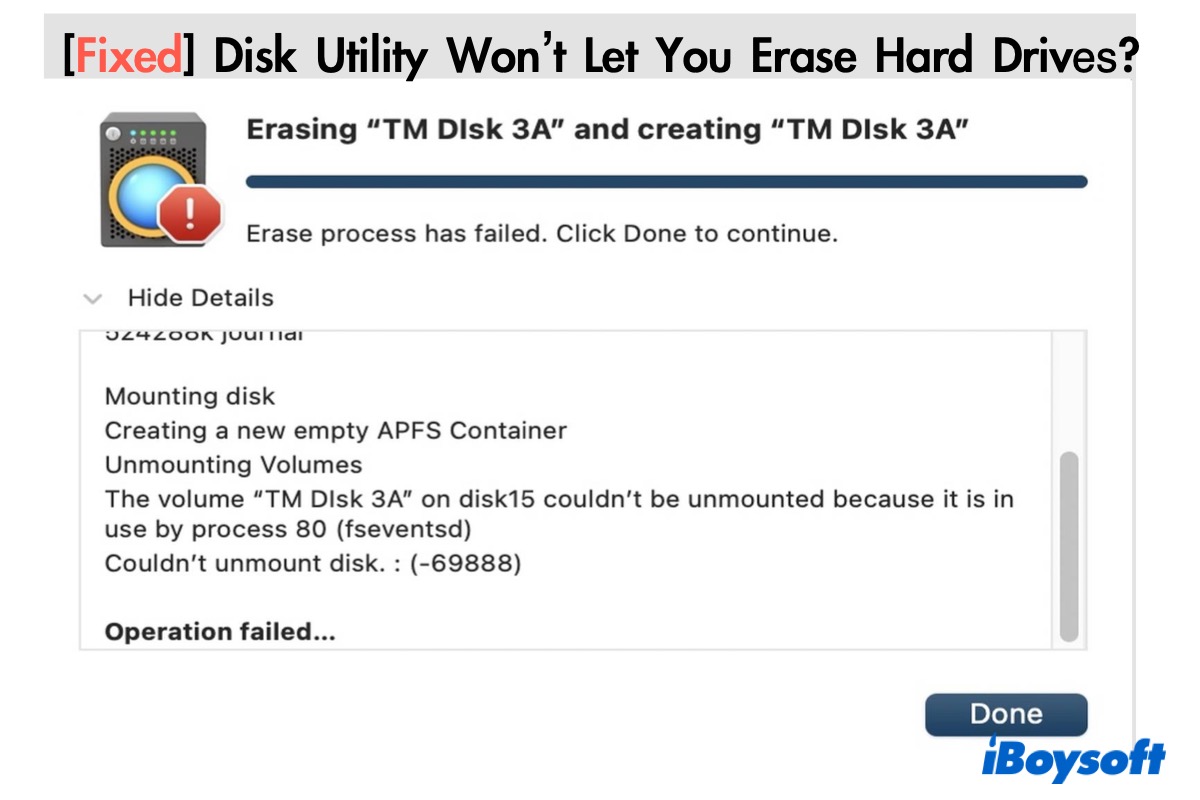
The "couldn't unmount disk" error usually comes in two forms: it reads "Couldn't unmount disk.: (-69888)" in Disk Utility and "Error: -69888: Couldn't unmount disk" in Terminal.
Here, we will analyze the error and help you resolve "couldn't unmount disk" on Mac with practical solutions.
What does 'couldn't unmount disk' mean?
If you see the error "Couldn't unmount disk.: (-69888)" or "Error: -69888: Couldn't unmount disk" on Mac, it usually means that you are trying to reformat, partition, or delete a volume or disk but can't because the operating system won't allow it due to the volume/disk currently being used by other applications or processes, or hardware failure.
Fix 'couldn't unmount disk 69888' on Mac when erasing or partitioning an external disk
If your iMac, MacBook Air, or MacBook Pro couldn't unmount disk, it more likely results from the drive being occupied by other running processes rather than a hardware failure. But if your drive opens to empty folders or files, gets frozen on Mac, or reacts incorrectly in other ways, it may have hardware problems.
To test whether your external hard disk is failing, you can plug it into your Mac and check its S.M.A.R.T status in Disk Utility with the steps below:
- Open Disk Utility from the Applications > Utilities folder.
- Select your external disk from the left.
- Click the Info button in the toolbar.
If you see a message reading the disk has a fatal hardware error, you should replace the drive with a new one.
If you don't see any message showing the disk has a hardware error, you can repair it with First Aid, then try the solutions below.
- Relaunch Finder
- Check and Quit processes that are using the drive
- Ensure two partitions are using the same file system before merging
- Format the drive on Windows
- Exclude the drive from Spotlight indexing
- Check if you are in the same directory as the external drive
- Remove the disk from Time Machine
- Force unmount disk on Mac with Terminal
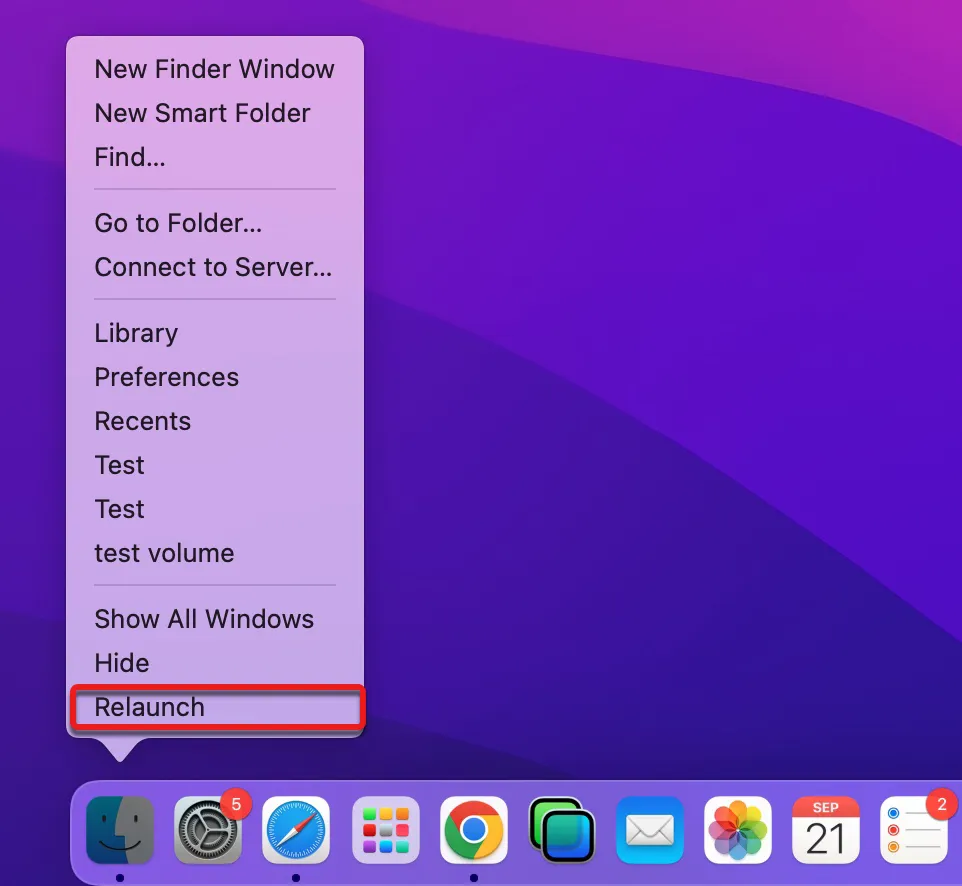
Relaunch Finder
Often time, the process that's using your disk and causing "Erase Process has failed. Couldn't unmount disk.: (-69888)" or "Disk erase failed. Couldn't unmount disk." is Finder. To stop Finder from accessing the drive, you need to relaunch it with the steps below.
- Right-click the Finder icon at the leftmost of the Dock while holding the Option key.
- Select Relaunch to restart Finder.
- Safely eject the external drive on Mac.
- Replug the drive into your Mac.
- Retry erasing or partitioning the disk.
Check and Quit processes that are using the drive
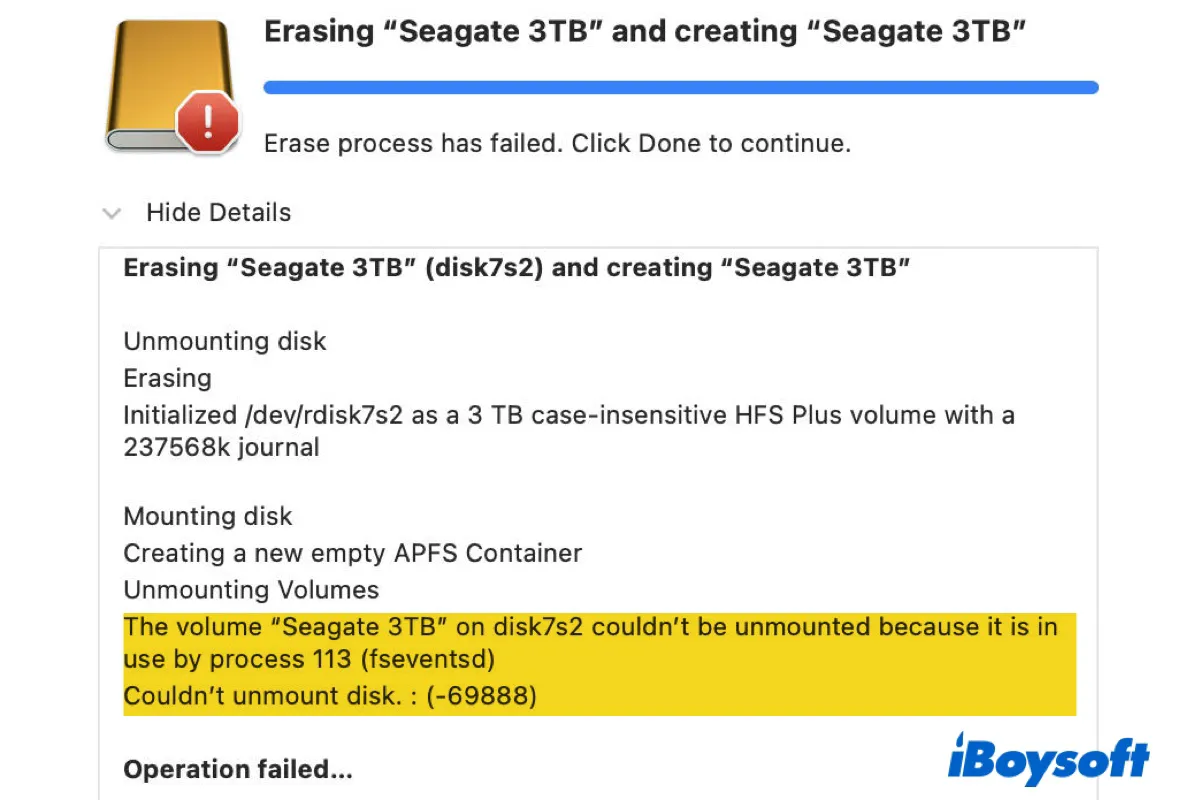
If restarting Finder doesn't help, you can check the PID number of the processes currently using the disk or its volume and quit them. The first place to look is the error message.
If "Couldn't unmount disk 69888" is generated by Disk Utility, it likely also tells you the process that's using it, such as:
- couldn't be unmounted because it is in use by process fseventsd.
- couldn't be unmounted because it is in use by process kextcache.
- couldn't be unmounted because it is in use by process 1 (launchd).
- the volume on disk0 couldn't be unmounted because it is in use by process 0.
- couldn't be unmounted because it is in use by process 958 (Finder).
Similarly, if you receive "couldn't unmount disk 69888" in Terminal, it may give you details about the error too, such as:
- volume failed to unmount dissented by pid=0 (kernel).
- failed to unmount: dissented by PID=230 (/usr/libexec/ApplicationFirewall/socketfilterfw)
- failed to unmount: dissented by PID 326 (/System/Library/Frameworks/CoreServices.framework/Versions/A/Frameworks/
Metadata.framework/Versions/A/Support/mds_stores) - failed to unmount: dissented by PID=199 (/usr/libexec/ApplicationFirewall/socketfilterfw)
If the error shows that an application is using your drive, such as Firewall, you should close it and retry modifying the disk.
Suppose the message doesn't give much about the process; you can follow these steps to locate it in Terminal.
- Launch Terminal from the Applications > Utilities folder.
- Input the following command and hit Enter.diskutil list
- Note down the identifier of your disk or volume. (e.g., disk2s1)
- Type in the command below and hit Enter. (Replace identifier with the one you wrote down.)sudo fuser -c /dev/identifier
- Enter your password and press Enter.
- The command will return some PID numbers of the active processes.
Tips: Another command for identifying the process at fault is sudo lsof | grep diskn. Note that you need to replace diskn with the number of the offending disk. If it returns a process labeled fsck_hfs, you can run sudo killall fsck_hfs to terminate it.
Once you find the troublesome process's PID number, go through the steps below to terminate it:
- Launch Terminal from the Applications > Utilities folder.
- Type in the following command and hit Enter. (Replace PID with your PID number.)sudo kill PID
- Input your password and hit Enter.
- You can also force kill the process by executing the following command.sudo kill -9 PID
To learn more about the process, you can open Activity Monitor and sort the PID number to find them.
Suppose the "MacBook Pro couldn't unmount disk" issue persists; proceed with other solutions below.
Ensure two partitions are using the same file system before merging
If you receive "Error: -69888: Couldn't unmount disk" when attempting to merge two diversely-formatted partitions, you need to decide on the preferred file system and reformat the different partition with it before merging them.
For instance, if one is formatted as APFS and the other Mac OS Extended, you can first format the Mac OS Extended partition to APFS, then merge the two partitions.
Format the drive on Windows
If you happen to have a Windows computer available, you can format the external hard drive, USB, or Time Machine backup disk that's experiencing "couldn't unmount disk 69888" on it, then initialize the drive on Mac with the desired file system.
Here's how to erase the Mac-compatible drive on Windows:
- Connect the Mac drive to the Windows computer.
- Press Command + R, type diskmgmt.msc into the box and hit Enter.
- Note down the number of your external disk, such as disk 1.
- Open Start, search for Command Prompt, then select "Run as administrator."
- Type in the following command and hit Enter to launch DiskPart.diskpart
- Type in the following command and press Enter to list all active drives. (Double-check your external drive's disk number.)list disk
- Type in the following command and hit Enter to select your external drive to clean. (Replace disknumber with your external drive's number.)select disk disknumber
- Type in the following command and hit Enter to wipe out the drive.clean
- Close the Command Prompt window when you see "DiskPart succeeded in cleaning the disk."
- Plug the empty and uninitialised disk into Mac.
- If a pop-up asks you to initialize the disk, click Initialize to format it in Disk Utility. Otherwise, open Disk Utility to erase it.
If you're not confident with the command lines, you can use a tool like TransMac to format the drive with APFS/HFS+/HFS on Windows directly.
Since TransMac allows you to run its full features without charge for 15 days, you can basically use it for free. It's worth mentioning that you need to open TransMac in Administrator mode to format your drive.
If you are able to fix "couldn't unmount disk" on your MacBook Pro with the solutions above, share this post to help others in the same boat.
Exclude the drive from Spotlight indexing
Spotlight helps you quickly find things on your Mac and its connected devices by indexing files constantly. However, you may encounter "Disk erase failed. Couldn't unmount disk." if you are trying to format a drive Spotlight is indexing.
To unmount the drive, you can temporarily stop Spotlight from indexing it with these steps:
- Go to the Apple menu > System Preferences > Spotlight.
- Select the Privacy tab.
- Click the ( + ) button to select the external drive's folder.

- Click Choose.
Now you can try erasing or partitioning the disk again. If you want to add the drive back for Spotlight indexing so you can search files easily on Mac, you can repeat steps 1 and 2, then select the folder and click the ( - ) button.
Check if you are in the same directory as the external drive
You'll inevitably face "couldn't unmount disk" when erasing a Time Machine backup disk in Terminal if you are in the same directory as the drive. If that's also your case, you can use the cd command to change to another directory, such as the home directory (cd ~).
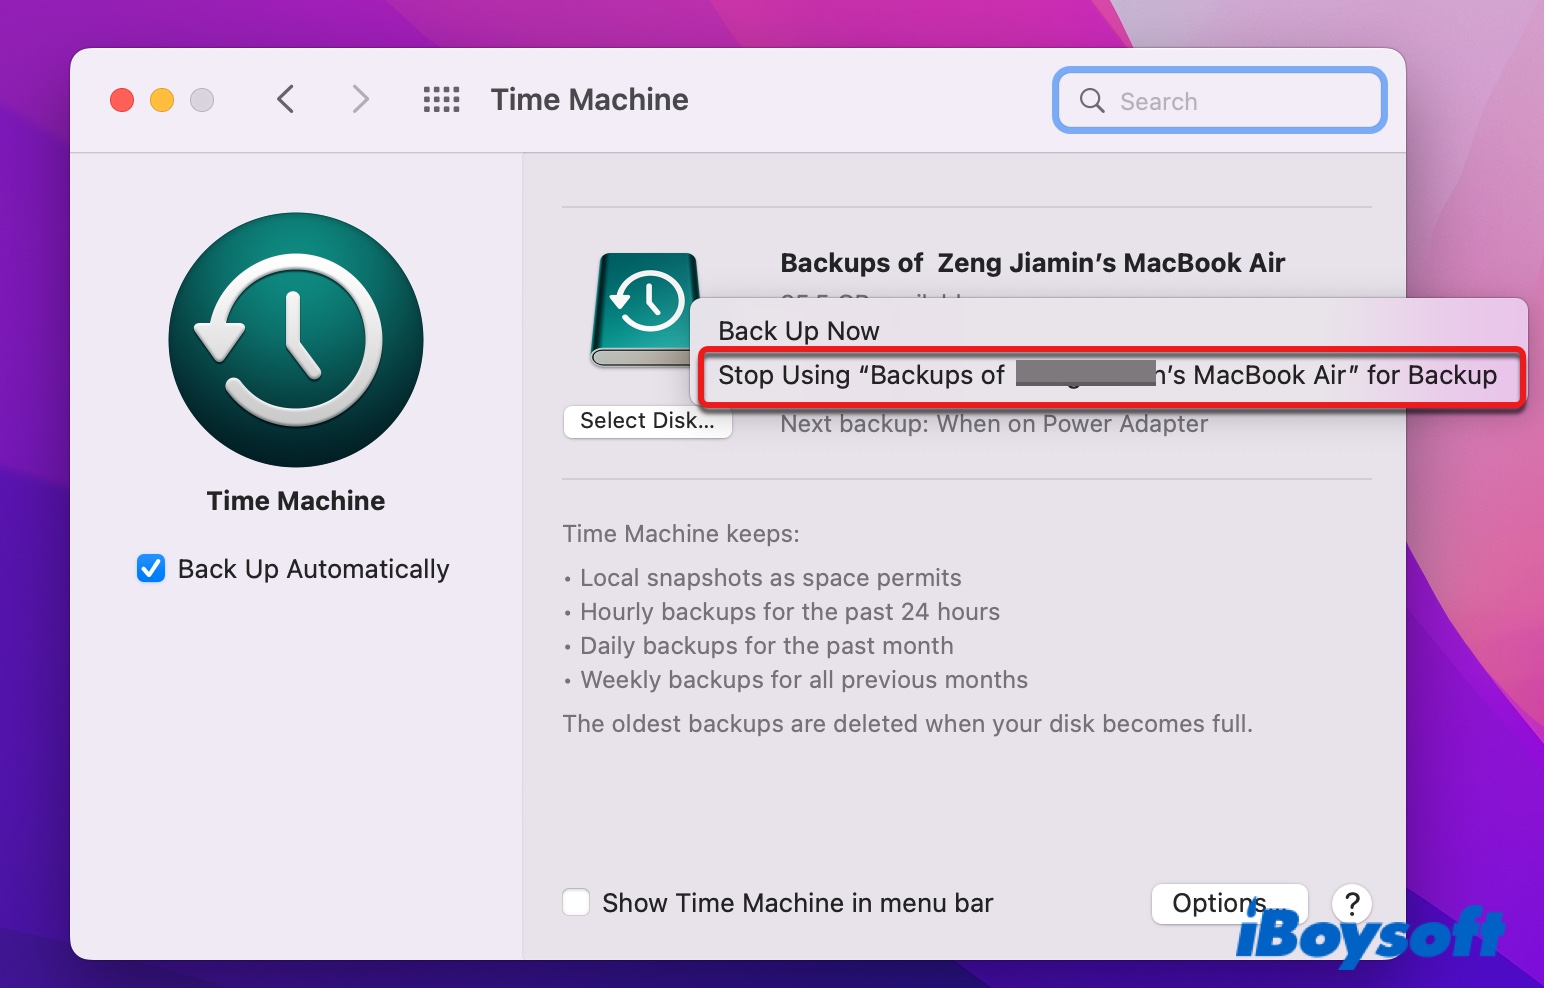
Remove the disk from Time Machine
Suppose the disk was used as a Time Machine backup on your Mac; it's best to stop Time Machine from backing up to the drive.
To remove the drive from Time Machine on macOS Monterey, open System Preferences > Time Machine, then right-clicking the Time Machine disk that provokes "couldn't unmount disk" and select "stop using (drive name) for Backup."
Force unmount disk on Mac with Terminal
If you still can't unmount the disk on Mac, you can force unmount the drive in Terminal. Then attempt to erase or partition the external disk again.
- Open Terminal from the Applications > Utilities folder.
- Enter the command below to acquire the identifier of your disk. (e.g., disk2)diskutil list
- Type in the following command and hit Enter to force unmount the drive. (Replace diskN with your disk identifier.)diskutil unmountDisk force /dev/diskN
Have you resolved the "couldn't unmount disk" error? If so, please share these solutions to help more people.
Fix 'couldn't unmount disk 69888' on Mac when erasing or partitioning an internal disk

Here are the solutions to try if "couldn't unmount disk 69888" pops up when modifying volumes on the internal hard drive on Mac:
Boot into macOS Recovery
In some cases, "Disk erase failed. Couldn't unmount disk." appears when attempting to modify the boot disk, which you can't because it's where your operating system boots from. The solution is to boot from a different volume from the one you intend to format.
On newer Macs with the recovery partition, you can enter macOS Recovery, then select "Disk Utility" to format the boot disk.
If you fail to erase the startup disk in Recovery Mode, try erasing the whole disk after clicking View > Show All Devices instead of deleting the data volume and then erasing the Macintosh HD volume or restarting in Internet Recovery.
However, if the error occurs after erasing the whole disk, try erasing the Macintosh HD volume and choose Erase Volume Groups instead.
Boot from an external bootable installer
If the issue still exists or you are using an old Mac that doesn't have the recovery partition, you can create a bootable installer, then boot from it to erase the startup disk.
Restart your Mac
Sometimes, a simple reboot is all you need to solve the problem. According to users who encountered "couldn't unmount disk 69888" with the drive being used by kextcache, they eventually managed to erase the startup disk with the following sequence:
- Delete the Macintosh - HD volume in Recovery Mode.
- Restart Mac into the Recovery mode.
- Erase the Macintosh - HD volume.
By the way, the kextcache process seems to have different PID numbers, as shown below:
- "couldn't be unmounted because it is in use by process 689 (kextcache) Couldn't unmount disk. :(-69888)"
- "The volume Macintosh HD on disk2S5 couldn't be unmounted because it is in use by process 673 kextcache. Couldn't unmount disk (-69888)."
- "The volume Macintosh HD on disk2s5 couldn't be unmounted because it is in use by process 677 (kextcache). Couldn't unmount disk. : (-69888)."
- "The volume Macintosh HD on disk2S5 couldn't be unmounted because it is in use by process 664 kextcache. Couldn't unmount disk (-69888)."
- The volume "Macintosh HD" on disk2s5 couldn't be unmounted because it is in use by process 655 (kextcache) Couldn't unmount disk (-69888)."
Delete an internal volume in Safe Mode
Except for the internal disk and the Macintosh HD & Macintosh HD - Data volume groups, you should be able to erase or delete other internal volumes in a regular boot. If Disk Utility displays the "couldn't unmount disk" error, you can shut down your Mac and restart into Safe Mode to retry the operation.
Fix the split Fusion Drive in Terminal
If "error: -69888: couldn't unmount disk" shows up on iMac or Mac mini computers when setting up Fusion drive, you likely have a split Fusion Drive that appears as two drives instead of one in Finder. This is common after replacing either the drive of your Fusion Drive or using software to split them.
To resolve the issue, you need to reset the split Fusion Drive as guided in this Apple Document, then install macOS on the SSD and use the HDD for extra storage. If the Fusion Drive suddenly becomes split, you may want to fix a split Fusion Drive without losing data, this guide helps.
Suppose Disk Utility reports "Couldn't open device.; (-69877)" when erasing your Mac with a fusion drive, try to force unmount the startup disk as we mentioned for the external disk above.
Create a non-APFS partition before erasing the disk
If you have tried to force unmount the startup disk in Recovery mode, but it failed with a message similar to "Forced unmount of disk0 failed: at least one volume couldn't be unmounted. Unmount was dissented by PID 0 ( kernel_task). Try adding another non-APFS partition, then erase the startup disk in Disk Utility.
- Boot your Mac in macOS Recovery.
- Click Disk Utility.
- Select the container of your startup disk.
- Click Partition and then the ( + ) button.
- Choose any file system (e.g., exFAT) but not APFS.
- Choose any size.
- Click Apply.
- Format the drive again.
Unmount each volume first, and then the disk
Another trick that has helped users who receive "Forced unmount of disk0 failed: at least one volume couldn't be unmounted." is to unmount each volume or disk if you have a fusion drive before mounting the startup disk in Terminal.
- Restart your Mac in Internet Recovery.
- Click Utilities > Terminal.
- Execute the command below to list all mounted disks and volumes.diskutil list
- Note down the disk or vlome identifier, such as disk1.
- Run the command below to force unmount a disk if you have several or a volume under the same disk. (Replace disk_identifier with the disk number like disk1 or the volume number like disk0s2.)diskutil unmountDisk force /dev/disk_identifier
- Try to force unmount the target disk (it's often disk0.) after unmounting one or two other disks or volumes. If it fails, keep trying until the startup disk is unmounted.
- Once the startup disk is unmounted, you can erase the drive in Terminal with this command.diskutil eraseDisk file_system disk_name /dev/disk_identifierFor example, if you know the disk identifier is disk0 and want to format the drive with APFS and name it Storage, the command should be diskutil eraseDisk APFS Storage /dev/disk0.
[Complete Guide] Disk Utility Won't Let You Erase Hard Drives
This post tells you how to deal with errors that stop Disk Utility from erasing an external drive or the internal Macintosh HD. You can read this post to find more solutions if Disk Utility still won't let you erase the drive. Read more >>
Hopefully, you no longer face "error: -69888: couldn't unmount disk" on Mac. Click the button below to share this post.
What to do if you can't unmount an NTFS drive on Mac?
Sometimes, you can't unmount NTFS drives on Mac after a macOS update because they are instantly remounted again. When that happens or the NTFS drive fails to be unmounted due to other reasons, you can always count on iBoysoft NTFS for Mac.
It's one of the best NTFS readers for Mac that gives your NTFS-formatted drives full read and write support and allows you to unmount, eject, format, and repair them on Mac. iBoysoft NTFS for Mac is compatible with NTFS drives from various brands such as Toshiba, WD, Seagate, etc running on macOS 10.13 - macOS 13 beta, regardless of Intel or M1 Macs.
You can test it for free as it offers a free trial. Here's how to unmount NTFS drives on Mac:
Step 1: Download and install iBoysoft NTFS for Mac.
Step 2: Connect the NTFS drive to your Mac.
Step 3: Launch the NTFS reader from the Applications folder.
Step 4: Select your drive from the left and click Unmount. 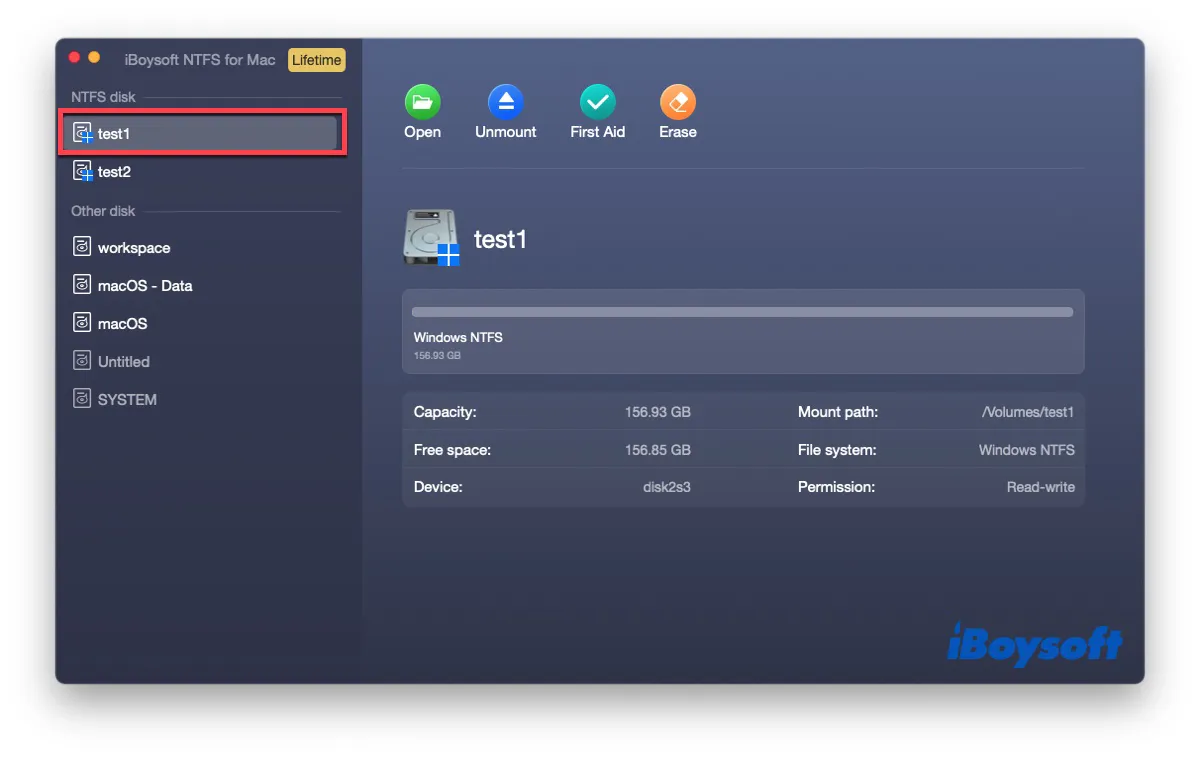
Also read:
Fix 'Couldn't modify partition map' on Mac (69874 & 69803)
Fix 'Unable to write to the last block of the device' 69760
Fix 'Couldn't open disk 69879' When Erase Process Has Failed
Please share this post if you find it useful.
FAQ about 'couldn't unmount disk 69888'
- QCan I unmount my hard drive?
-
A
Yes, you can unmount your hard drive. Here's how to do it on Mac and Windows:
On Mac: Open Disk Utility, select the drive, then click Unmount at the top.
On Windows: Open Disk Management, right-click the drive, choose Change Drive Letter and Paths > Remove > Yes.
- QWhat is unmount disc?
-
A
If you unmount a disk, you tell the operating system to stop accessing its file system but still keep it in Finder so you can easily mount it again for full access.