What to do when Disk Utility won't let you erase SD cards, USB drives, and other hard drives on Mac?
You may fail to erase APFS volume on your Mac hard drive or an external hard drive when the erase button is grayed out on Mac Disk Utility or when you receive the "Erase process has failed" or "A writable disk is required. : (-69772)" error message. Here, we will discuss solutions to solve these Disk Utility erase errors so you can format the disk.
How to fix the Erase button grayed out in Mac Disk Utility?
When you try to format the Mac hard drive or its volumes - Macintosh HD and Macintosh HD - Data, you inevitably see the Erase button grayed out in Disk Utility or find that it takes so long to format an external drive. That's because you can't erase the drive you are currently running from, and you need to boot into Mac Recovery mode to format the Mac startup disk.

How to erase Mac hard drive?
- Boot into Mac Recovery Mode.
On an Intel-based Mac: Restart your Mac, then hold the Command + R keys until the Apple logo shows up.
On an M1 Mac: Turn off your Mac, and press the power button until you see the Options Menu. Then Click Option > Continue. - Select a language, then your account, and enter the password for it.
- On the Utilities window, select Disk Utility.
- Select Macintosh HD - Data, click the (-) sign, then tap on Delete to confirm the deletion.
Ignore this step if your Mac is running macOS Mojave or earlier. - Select Macintosh HD, then click the Erase button.
- Name the hard drive (like Macintosh HD), choose APFS for macOS 10.13 or later; Mac OS Extended for macOS 10.12 or earlier. Then keep the Scheme as GUID Partition Map.
- Click Erase.
We recommend you erase the volume but not the entire disk to avoid the "Secure Disk Erase Failed - Couldn't Unmount Disk" error. But, if you did choose the volume and still failed, you can click View > Show All Devices to display all the drives, then erase the drive itself to see if it succeeds.
Nevertheless, If Disk Utility still can't erase the Mac hard drive, please repair it with First Aid.
Problem solved? Share your joy with others.
What to do when Disk Utility can't erase Macintosh HD?
It's rare to see Disk Utility can't erase Macintosh HD in Recovery Mode. But if that's your case, here are the solutions you can try.
- 1. Repair the startup disk with Disk Utility First Aid
- 2. Format the drive in Internet Recovery Mode
Solution 1: Repair the startup disk with Disk Utility First Aid
First Aid is often used to scan the whole disk for errors relevant to the directory structure and formatting, then repairs it automatically. Running First Aid to repair Mac hard drive could potentially fix errors that stop Disk Utility from erasing it.
- Launch Disk Utility and select your Mac hard drive from the left sidebar.
- Click First Aid at the top, then hit Run.
Depending on your drive size, amount of data on it, the potential number of errors, the time First Aid takes for a diagnosis varies. Once First Aid completes, try to format the drive again. If you can't erase Macintosh HD, follow solution 2 to format it in Internet Recovery Mode.
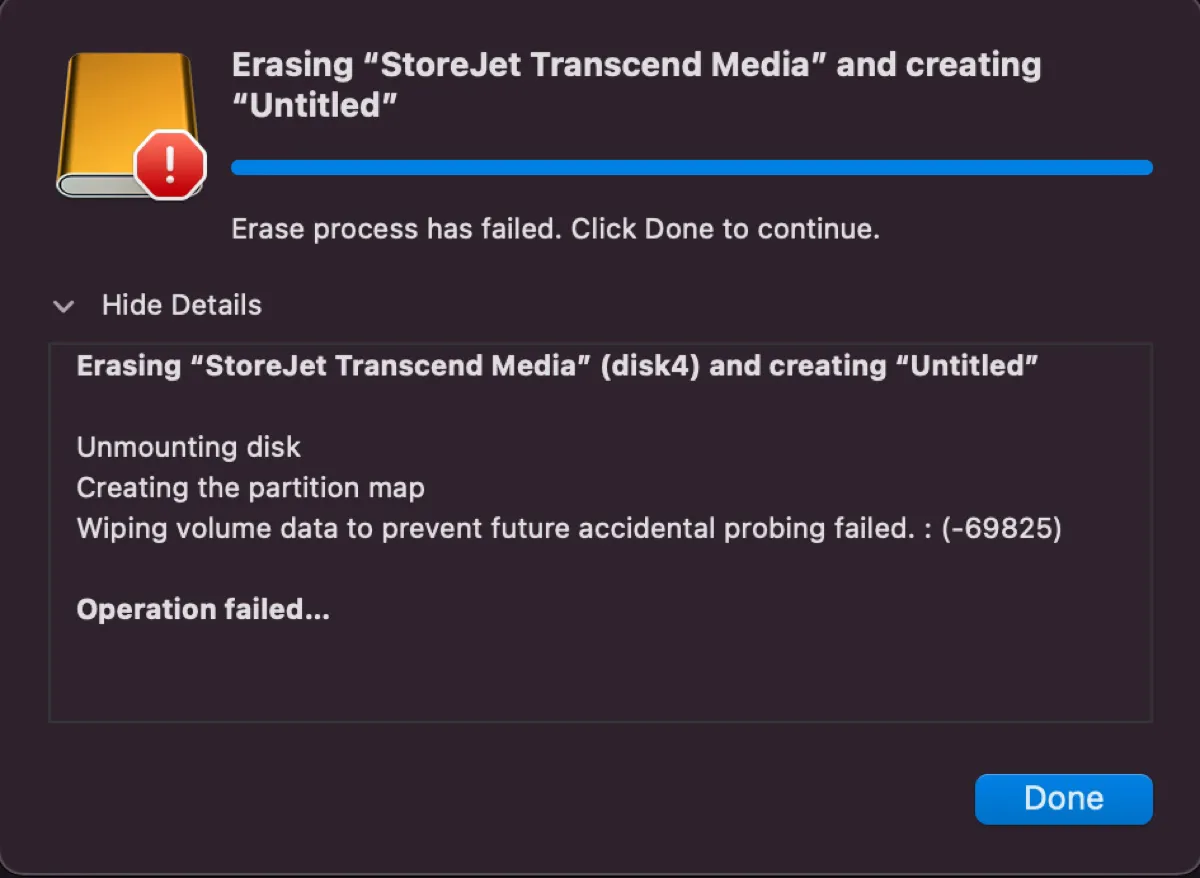
If you get the error "Wiping volume data to prevent future accidental probing failed," continue reading this guide for the solutions.
Solution 2: Format the drive in Internet Recovery Mode
Internet Recovery Mode is similar to the standard Recovery mode, only that it doesn't rely on the recovery partition to access Disk Utility. It allows your Mac to contact Apple's Internet Recovery server for the disk image to boot your Mac into recovery mode.
Although the extra process for downloading the disk image (the latest macOS compatible with your Mac) takes time, many users managed to erase the Mac hard drive when it failed in Recovery Mode. Once you boot into Internet Recovery, follow the same procedure to erase the Mac hard drive as in Recovery mode.
Suppose formatting in Internet Recovery Mode is not helpful. Try to boot from a USB installer to format your drive or forcibly erase the Mac hard drive in Terminal using the steps detailed in the next section.
If you are experiencing the "erase process has failed on Mac" error while formatting external hard drives on MacBooks, MacBook Pros, and MacBook Airs, read on to get it resolved.
Do steps really work? Share it on your social platforms!
How to fix the 'Erase process has failed' error on Mac?
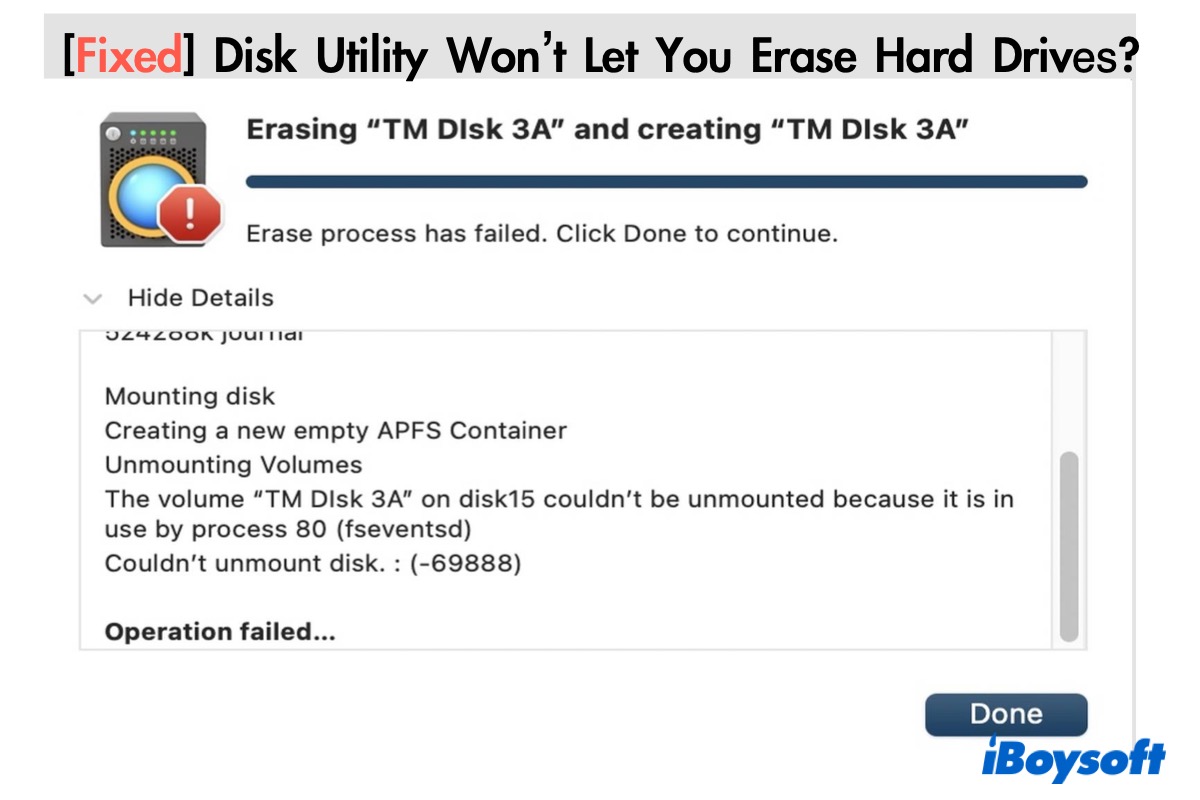
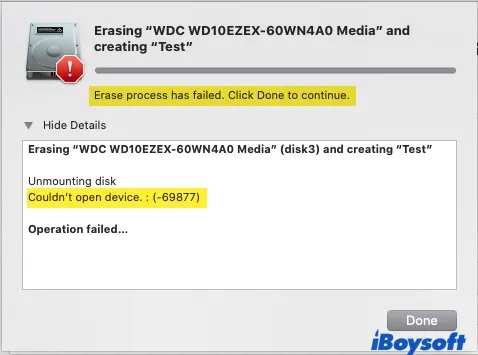
You will often receive the message "Erase process has failed. Click Done to continue." when Disk Utility fails to erase a drive. There may be more details about the error, such as "couldn't open device (-69877)," "couldn't open disk: (69879)" and "couldn't unmount disk: (-69888)."
Fixes to solve the "Erase process has failed" error on Mac:
- 1. Reboot your Mac and run Disk Utility First Aid
- 2. Erase the Volume
- 3. Force unmount the drive with Terminal
- 4. Force erase disk on Mac with Terminal
- 5. Update the macOS
- 6. Move down the Security level
- 7. Delete partitions
- 8. Format the drive in Safe Mode
Before getting to the solutions, let's figure out the causes of these errors first.
Why does it say "Erase process has failed" on Mac?
It's hard to decide the real reason resulting in the "Erase process has failed" error, but there are some of the common ones that you may feel fit to your case:
- The disk is removed or disconnected while formatting.
- Some files fail to mount due to sudden power failure or outage.
- There is software or virus on the drive stopping it from being erased.
- Some essential files are accidentally deleted.
- The hard disk is corrupted or damaged.
Although you may face various errors, such as couldn't open the device (-69877), couldn't unmount disk: (-69888), couldn't modify partition map because file system verification failed, or others. There are some common solutions to try when you can't erase or partition a disk on Mac.
You may notice that already but we still want to remind you that formatting a drive will erase all data on it, so make sure you have a backup of the important data. Then we will start with a simple check to make sure your drive is at least not corrupted.
Solution 1: Reboot your Mac and run Disk Utility First Aid
- On the left sidebar of Disk Utility, click the Eject icon next to your SD card or hard drives to safely eject the disk.
- Click the Apple logo > Restart to reboot your Mac to reset the system processes that may have been disrupted while using it.
- Now plug in your hard drive and launch Disk Utility.
- Then select the drive and click First Aid at the top menu bar to check and repair errors related to the directory structure or formatting of the drive.
If Mac won't format the external hard drive as before, try solution 2.
Solution 2: Erase the Volume
When you erase a disk, you are handing with all volumes it contains. If one of the volumes is posing problems, you won't be able to erase the disk. Therefore, if you can't erase the whole disk, try to erase volumes under it. If you succeed at erasing the volumes, test the disk again. Similarly, you can erase the entire disk when the erase process has failed on the volumes.
If that's of no avail, try to force-unmount the disk in Terminal first, then erase it.
Solution 3: Force unmount the drive with Terminal
Formatting the drive after forcibly unmounting it is a potential fix for both error 69877 (couldn't open the device) and error 69888 (couldn't unmount disk). It's worth noting that forcibly unmounting a disk may cause data loss, so ensure that you are unmounting the correct drive by following the instruction below carefully.
- Open Terminal by clicking Launchpad > Other folder > Terminal.
- Enter this command to list all drives connected with your Mac and press Enter.diskutil list
- Note down your Device Node for the next step.
- Type in the following command to unmount your disk and press Enter:sudo diskutil unmountDisk force device node
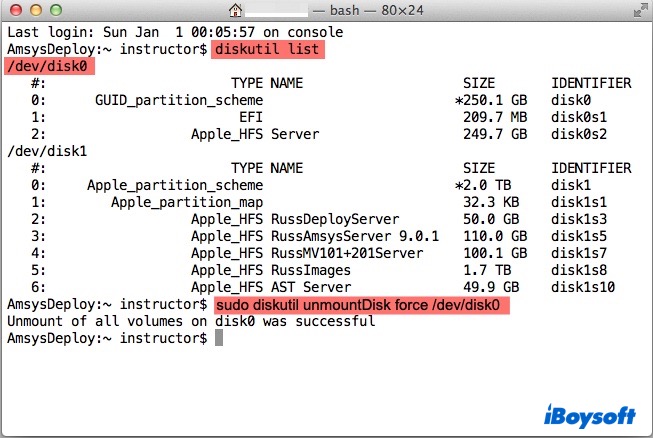
E.g. My disk node is /dev/disk0, so my command line becomes: sudo diskutil unmountDisk force /dev/disk0 - Enter your account password if needed.
- Exit Terminal after it reports success.
- Open Disk Utility, select your drive, and click Erase again to format it.
This time your external hard drive should be successfully erased. If the erase process in Disk Utility is still not working, try to force erase the disk.
Solution 4: Force erase disk on Mac with Terminal
Terminal is a regular go-to for erasing hard drives when Disk Utility is not working. The command lines may be intimidating, but it's firmly practical if you act as instructed.
How to force your Mac to erase a hard drive:
- Open Terminal by clicking Launchpad > Other folder > Terminal.
- Input the command to display information regarding disks on your Mac. Then press Enter.diskutil list
- Save the disk identifier for the next step.
- Enter the command for formatting a drive and press Enter.diskutil eraseDisk format desired name disk identifier

E.g., My disk identifier is disk2, and I want to format it into Mac OS Extended (Journaled) with the name BackupMaster, then I will type in: diskutil eraseDisk JHFS+ BackupMaster disk2
If it's a volume you are trying to erase, use this command instead: diskutil eraseVolume format Disk Name disk identifier. - Enter your password if required.
- After Terminal finishes, check if the drive is erased in Disk Utility.
If you are unlucky with Terminal and haven't updated the macOS for some time, move on to solution 5.
Solution 5: Update the macOS
An outdated Mac operating system is more prone to Mac errors, which is probably why Disk Utility won't let you erase the hard drive. Luckily, updating the macOS can update firmware on your Mac and fix the "erase process has failed" error.
- Click the Apple logo, then select System Preferences > Software Update.
- If any macOS update is available, click Update to update the macOS.
If Disk Utility still can't format your external hard drive on Mac, try to reduce the difficulty of erasing drives by adjusting the security level.
Solution 6: Move down the Security level
You may have clicked Security Option to adjust the safety to the Most secure while formatting. This is safer than the default, but it will take more time and sometimes cause the "erase process has failed" error.
- Open Disk Utility, select your SD card or hard drive, then click Erase.
- From the pop-up window, click Security Options. Keep the security level on the Fastest side to avoid errors.

This step might not be helpful if you didn't change the Security level initially. If so, go for solution 6.
Solution 7: Delete partitions
If you want to erase all content on the drive, deleting its subordinate partitions has a similar effect. Repartitioning a hard drive will delete all data on it, allow you to choose a format, and merge several partitions.
- Launch Disk Utility, select your hard drive, and click Partition at the top.
- Click the entitled partition, then click the (-) sign to delete that partition.
- Rename your drive, choose a format, then click Apply > Partition.
Repartitioning should be able to erase your drive. If Disk Utility fails to partition your drive, the final solution we can try is to format the drive in Safe Mode.
Solution 8: Format the drive in Safe Mode
Safe Mode is commonly used to troubleshoot Mac errors. If software or malware prevents Disk utility from formatting your hard drive, Safe Mode can bypass this problem by only loading essential kernel extensions.
- Shut down your Mac, then immediately press and hold the Shift key until you see the login screen.
- Log into your account.
- You may be required to log in again. Once you are in Safe Mode, you will see the words Safe Mode at the top-right corner.
Hopefully, we covered the right solution for your case, and you are now free of the "Disk Utility won't let me erase hard drives" dilemma.
Also read:
Fix Disk Utility Stuck on Waiting for Partitions to Activate
Share this tutorial to help more people who are trapped in the same question!