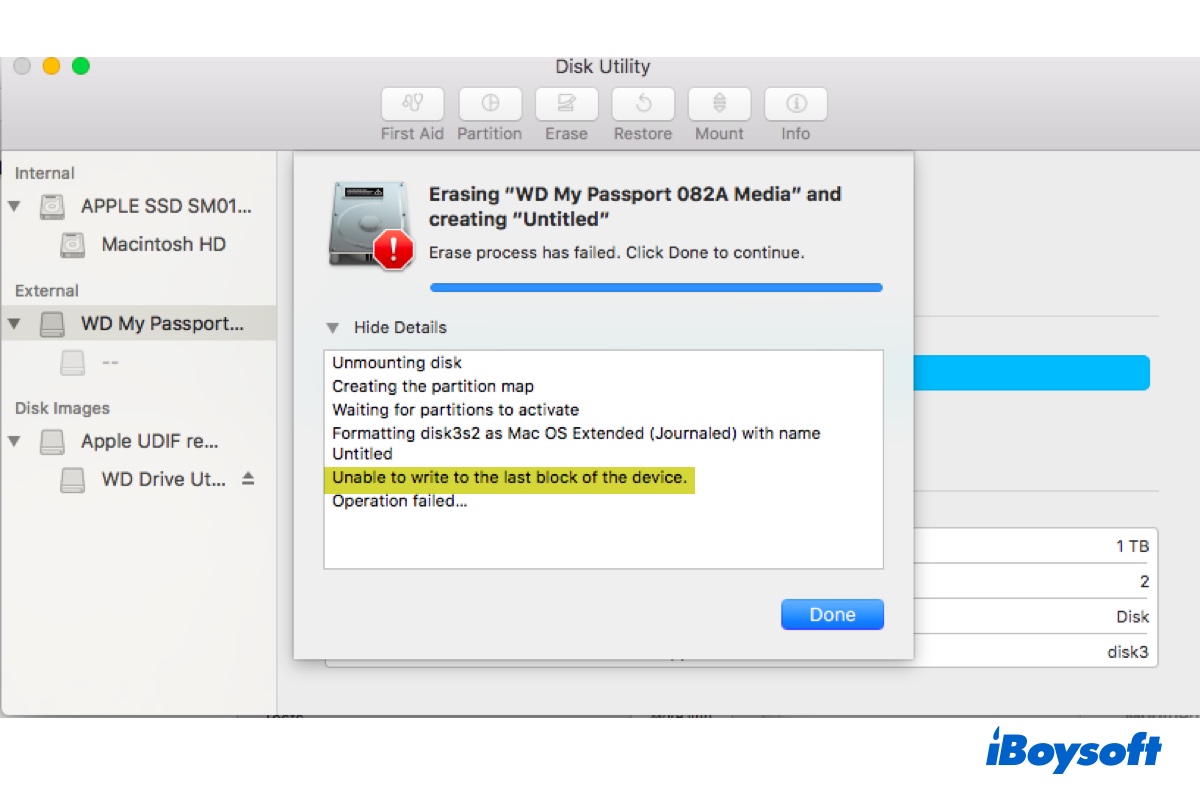
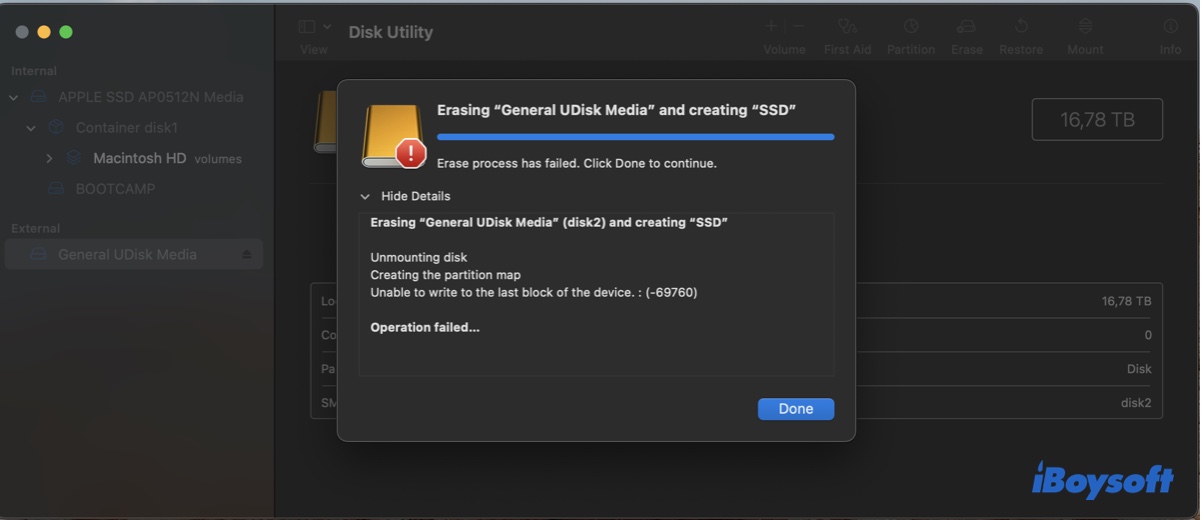
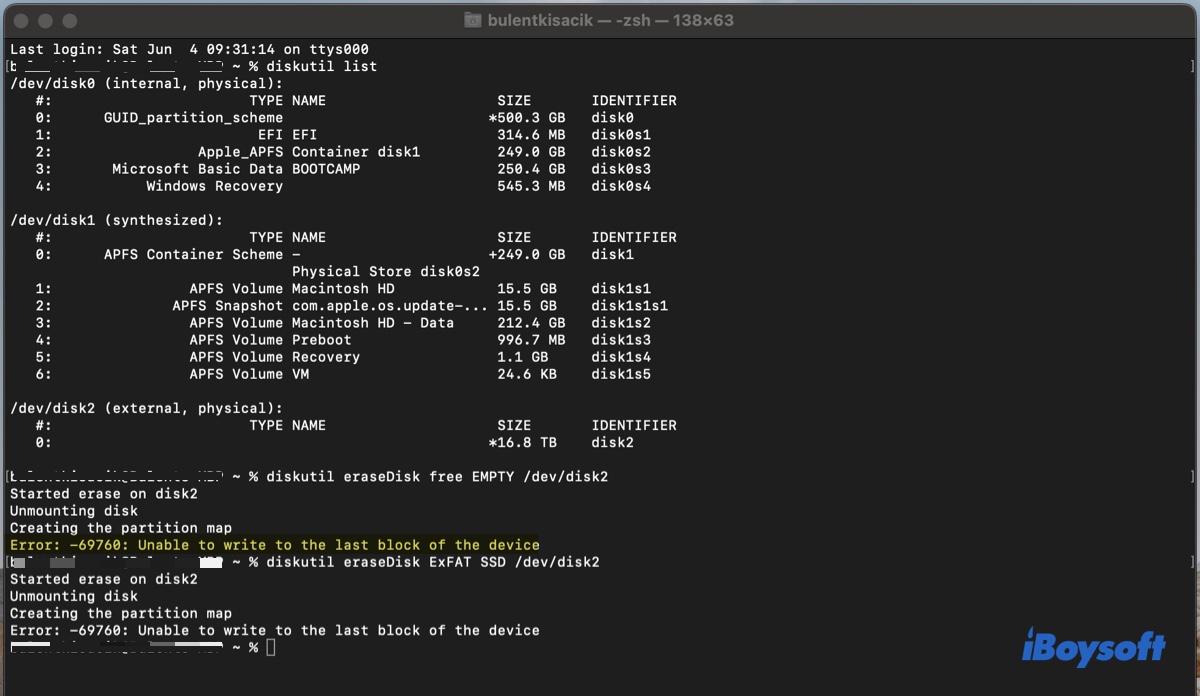
You may receive the error "Unable to write to the last block of the device." on Mac when failing to erase or partition an internal or external hard drive. It sometimes came with the error code 69760. Here are some examples of the error shown in Disk Utility or Terminal.
① The erase process has failed in Disk Utility with "Unable to write to the last block of the device."

② The erase process has failed in Disk Utility with "Unable to write to the last block of the device.: (-69760)."
③ The erase process has failed in Terminal with "Error: -69760: Unable to write to the last block of the device."
The error could be caused by different issues and we'll address it with proven solutions to help you erase or partition your drive.
Recover data from the drive that receives 'Unable to write to the last block of the device'
Many users are forced to format their drive as it doesn't work as expected. If that's also your case, you might want to get the essential data off the offending drive before formatting it. Erasing a drive will delete all data on it and you may not be able to recover them afterward.
Depending on whether your Mac can boot up, you can take different approaches to recover the inaccessible data.
If your Mac can't start up, you need to run Mac data recovery software in Recovery Mode.
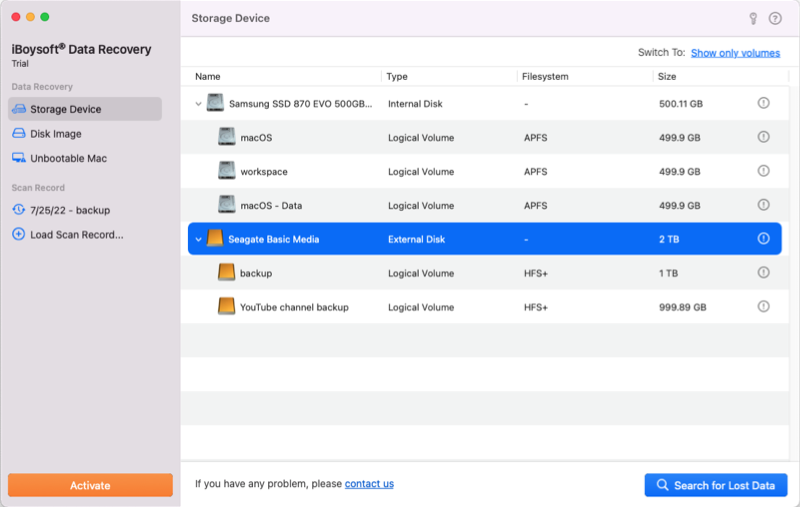
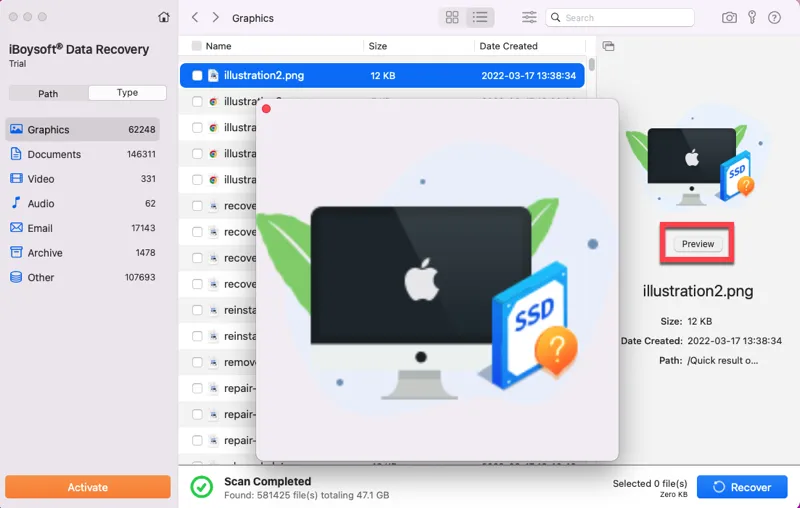
If your Mac can start up, you can use iBoysoft Data Recovery for Mac to retrieve your data.
It's a safe and well-known data recovery tool that's able to restore lost data from inaccessible, unmountable, unreadable, and corrupted internal hard drives and external storage devices, including external HDDs, SSDs, USB sticks, SD cards, etc.
You can use it to scan your drive and preview the found files for free. Here's how to recover your data from the drive that's experiencing "Unable to write to the last block of the device."
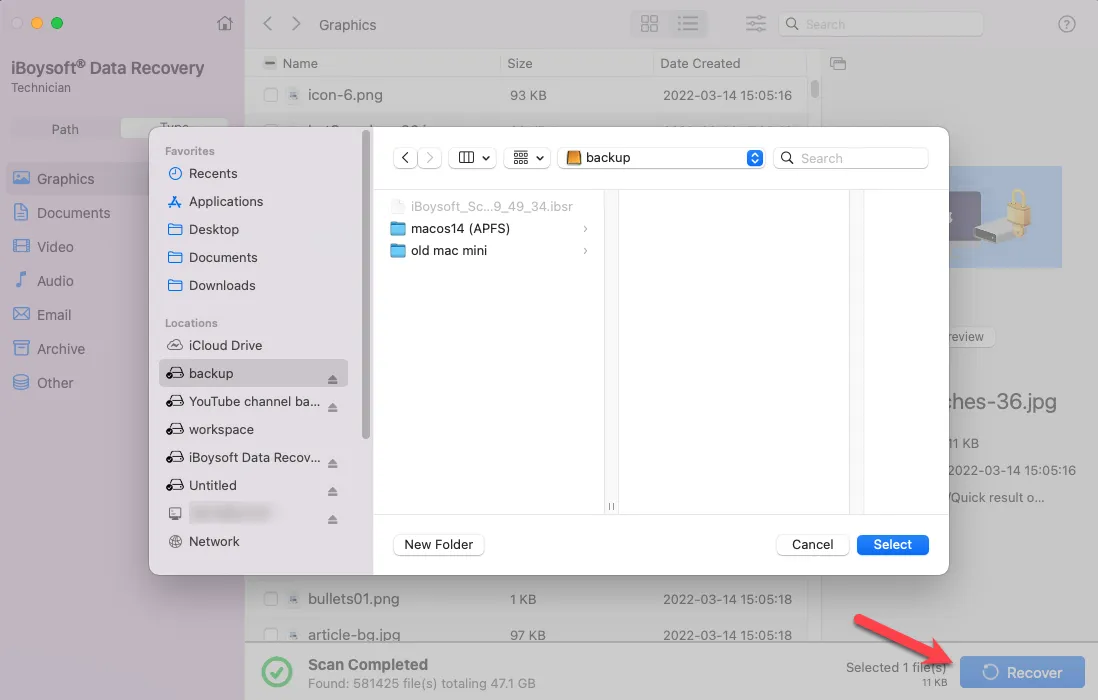
Step 1: Free download and install iBoysoft Data Recovery for Mac.
Step 2: Ensure the dive is connected to your Mac if it's a removable disk.
Step 3: Launch the software, select your disk and click "Search for Lost Data."
Step 4: Preview files gathered from your drive.
Step 5: Tick the boxes next to the files you want to recover, then click Recover and save them to a storage place that's not the disk you're recovering data from.
Is your data secured? Share the steps to help more people.
Fix 'Unable to write to the last block of the device' on internal hard drive
If the error "Unable to write to the last block of the device." pops up when erasing your startup disk or internal SSD, try the solutions below to resolve it.
Fix "Unable to write to the last block of the device." on Mac when erasing the internal hard drive:
- 1. Retry erasing your drive multiple times
- 2. Erase the drive in Internet Recovery Mode
- 3. Erase the drive from an external bootable installer
- 4. Replace the hard drive SATA cable or controller
- 5. Switch to a new SSD
Retry erasing your drive multiple times
Make sure to erase your internal drive multiple times after you receive the error. It's not uncommon to see Disk Utility fails to erase a drive the first time but succeed on the second or third attempt made afterward.
Erase the drive in Internet Recovery Mode
If you can't erase the startup disk in Local Recovery Mode (Command + R), try Internet Recovery. It loads recovery tools from the Apple server and allows you to reinstall the latest macOS compatible with your Mac. Note that this mode is exclusive to Intel-based Macs, so it won't work on M1 & M2 Macs.
Now, take the steps below to erase your internal hard drive in Internet Recovery:
- Shut down your Mac.
- Hit the power button, then immediately press and hold the Option + Command + R keys.
- Release the keys when the spinning globe shows up.
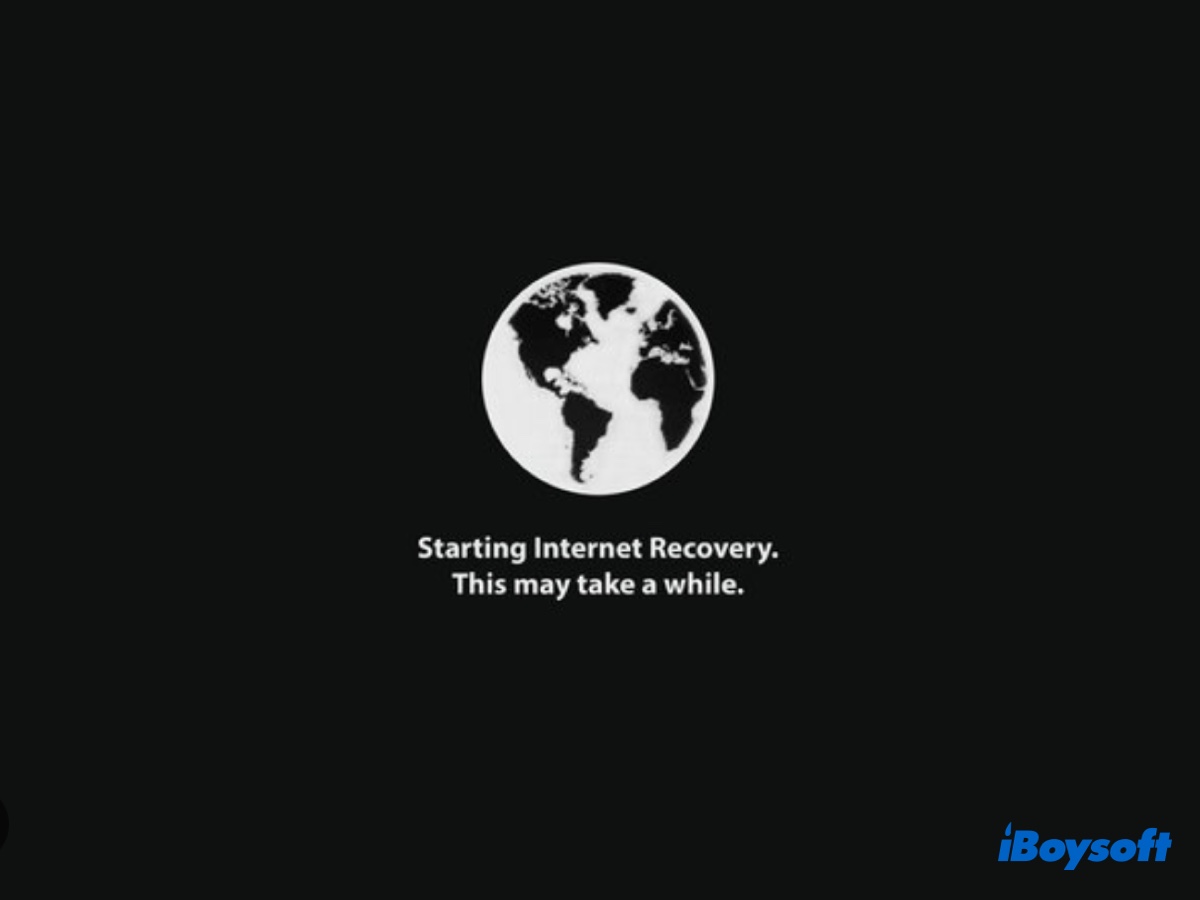
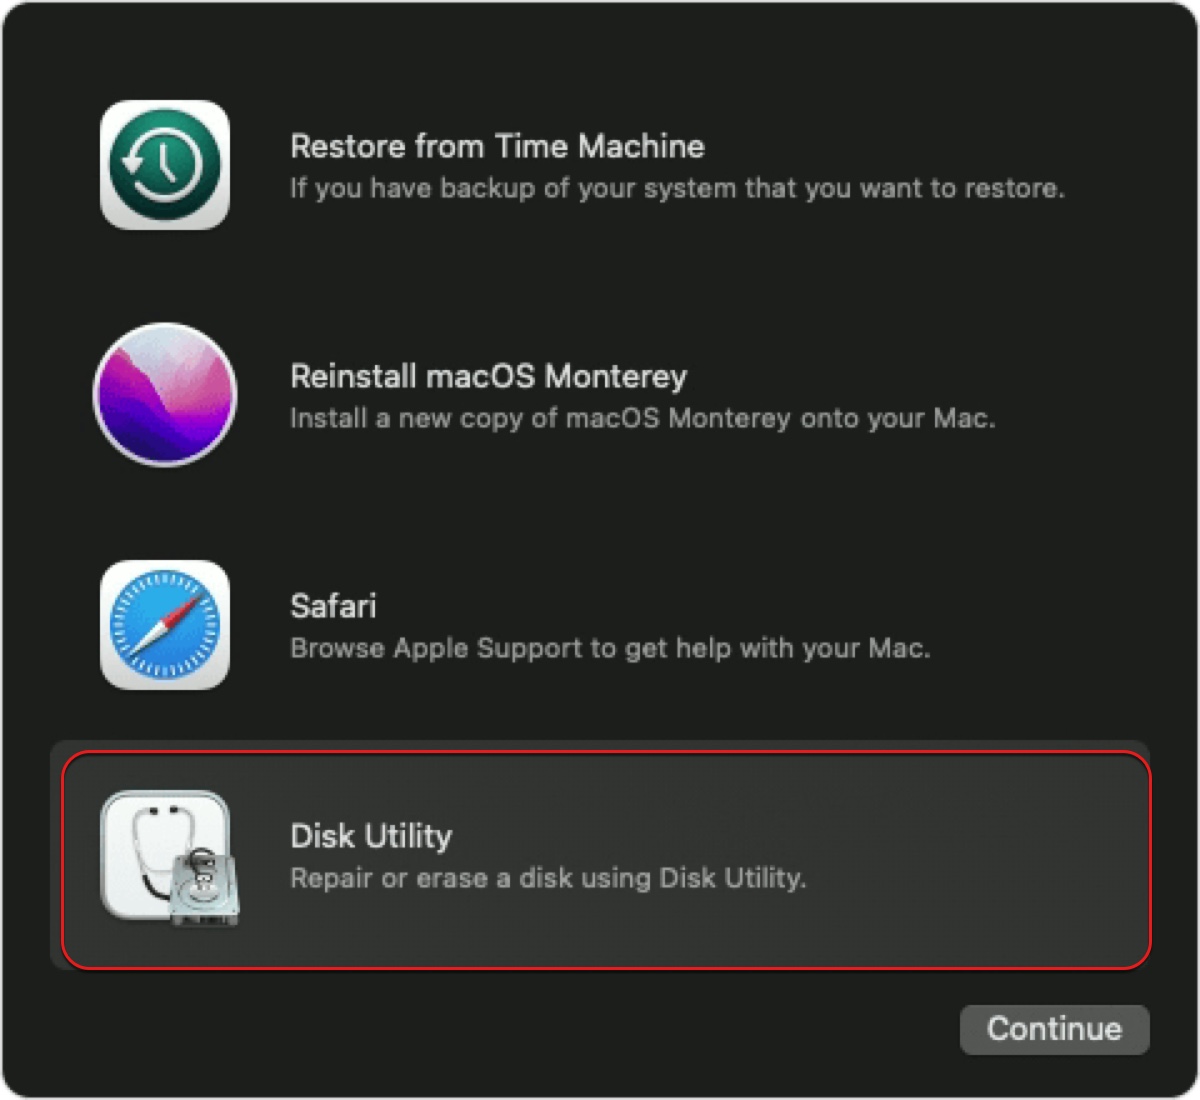
- In the "macOS Utilities" window, select Disk Utility and click Continue.
- Click View > Show All Devices.
- Select your startup disk (usually the upper-most one under the "Internal" section) and click Erase.
- Name the startup disk.
- Set the format to APFS if you're running macOS 10.13 or later.
- Set the scheme to GUID Partition Map.
- Tap Erase.
If you still experience "Unable to write to the last block of the device." on Mac, move on to the next fix.
Erase the drive from an external bootable installer
Alternatively, you can erase the internal hard drive in Disk Utility after booting from a bootable installer. This may achieve what the Recovery Mode didn't. To create the bootable installer, you'll need a USB flash drive or another external storage device with at least 14GB of available space.
- Create a bootable macOS USB installer.
- Connect the bootable installer with your Mac.
- Ensure your Mac is connected to the internet.
- Shut down your Mac and disconnect all external peripherals except for the power cable and the newly created installer.
- Boot from the installer.
On an Intel Mac: Turn on your Mac and immediately press and hold the Option key. Release the key after seeing the bootable volumes. Then select the installer and click the up arrow.
On an Apple Silicon Mac: Press and hold the power button until seeing the bootable volumes. Then select the installer and click Continue. - Choose Disk Utility > Continue.
- Erase the startup disk following the steps in the last solution.
Replace the hard drive SATA cable or controller
Seeing "Unable to write to the last block of the device." when erasing an SSD may indicate that the data cable has failed or the SATA controller not loading correctly. Replacing the SATA hard drive cable or controller with a working one will do the trick.
To test whether it's the issue, you can remove the SSD from your Mac and test it with an external enclosure. If it can be properly erased externally, it's likely that the hard drive cable or controller is causing issues.
Switch to a new SSD
If you're having trouble booting your Mac (e.g, your Mac starts to a folder with a question mark.) and have failed to erase your SSD or HDD with the error, "Unable to write to the last block of the device," your hard drive is probably defective and needs to be replaced. Especially if it can't be properly recognized by your Mac.
In this case, you need to change the damaged hard drive to a new one. This is easier to do if your internal hard drive isn't soldered to the motherboard. Suppose your hard drive can't be replaced, consider installing macOS on an external SSD and boot your Mac from it.
If the error is resolved, please share this post to benefit more Mac users.
Fix 'Unable to write to the last block of the device' on the external hard drive
When your external drive isn't functioning properly, reformatting it is usually the apparent and most effective fix. However, sometimes the erase process will fail with the error reading "Unable to write to the last block of the device.: (-69760)." When that happens, you can fix it with the following solutions.
Fix "Unable to write to the last block of the device (-69760)." on Mac when erasing an external hard drive:
- 1. Try a different cable or port
- 2. Securely erase the external drive
- 3. Format the drive on a different computer
- 4. Erase the drive in Terminal
- 5. Format the drive in Recovery Mode
- 6. Restore from a disk image
Try a different cable or port
The error could be caused by a communication error in the connection. Therefore, it's a good idea to repeat the task after changing to a different cable or port. It's also recommended to try a different enclosure if you're using one. Besides, try connecting to your Mac with or without an adapter.
Securely erase the external drive
If you're trying to erase an external hard disk drive, USB flash drive, SD card, etc but the operation failed with the error, it's advisable to run Disk Utility to securely erase it again. This can give the drive a clean scrub and wipe any troublesome blocks.
However, it will also render the data on the drive irrecoverable. So, you should ensure the essential data is backed up before taking the action.
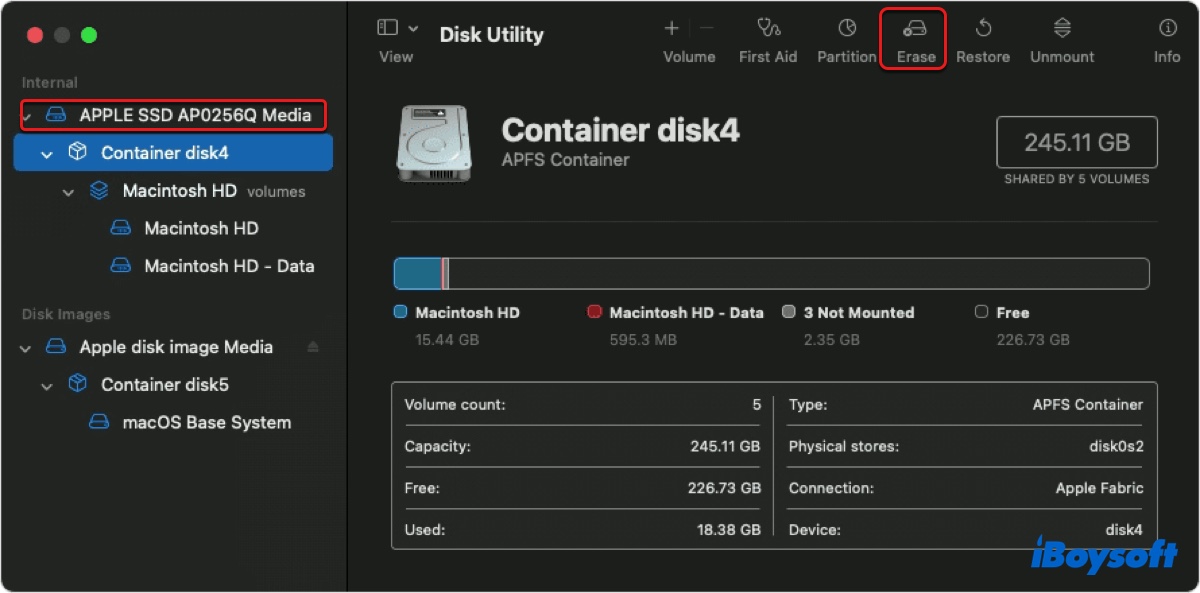
To securely erase the external drive, you can choose Security Option 2. According to Apple, it "writes a pass of random data, and then a single pass of zeros over the entire disk and erases the information used to access your files and writes over the data 2 times." Here's how to securely erase your drive:
- Plug the external disk into your Mac.
- Launch Disk Utility.
- Tap View > Show All Devices.
- Select the physical disk (the upper drive by the manufacturer's name) and click Erase.
- Click Security Options at the bottom-left of the dialog.
- Move the slider to the second option.
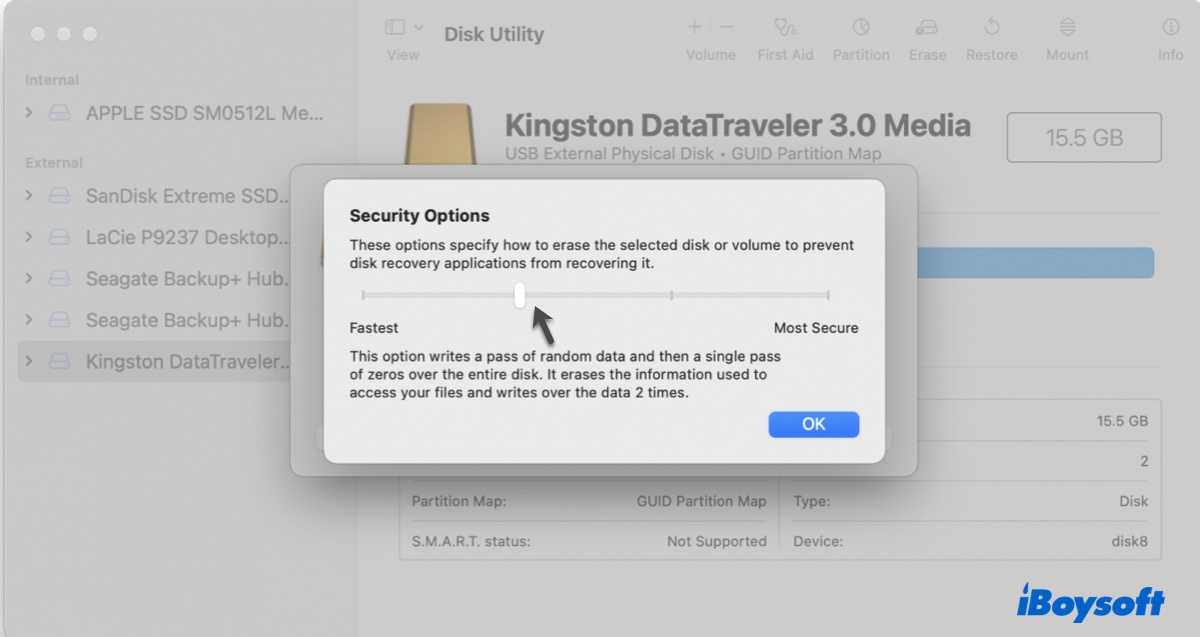
- Click OK.
- Name your drive.
- Choose a proper file system.
- Set the scheme to GUID Partition Map.
- Click Erase.
Note: The "Secure Options" button isn't available on SSDs. The standard erase has already made data recovery difficult for SSDs, so there's no need to securely erase them.
Format the drive on a different computer
Some users have found that they were able to format the external drive that triggers "Unable to write to the last block of the device (-69760)." on Mac after it's been formatted in a Linux or Windows computer. You can also give it a try if you haven't already.
It's worth mentioning that you will be asked to initiate the drive if you have formatted it on a Linux computer. That's because macOS doesn't support Linux file systems. Just follow the instruction to initiate or reformat it.
Erase the drive in Terminal
When Disk Utility failed to erase a drive, you can turn to the Terminal app. Keep the external drive connected to your Mac and carefully follow the steps below to format your drive.
- Open Terminal.
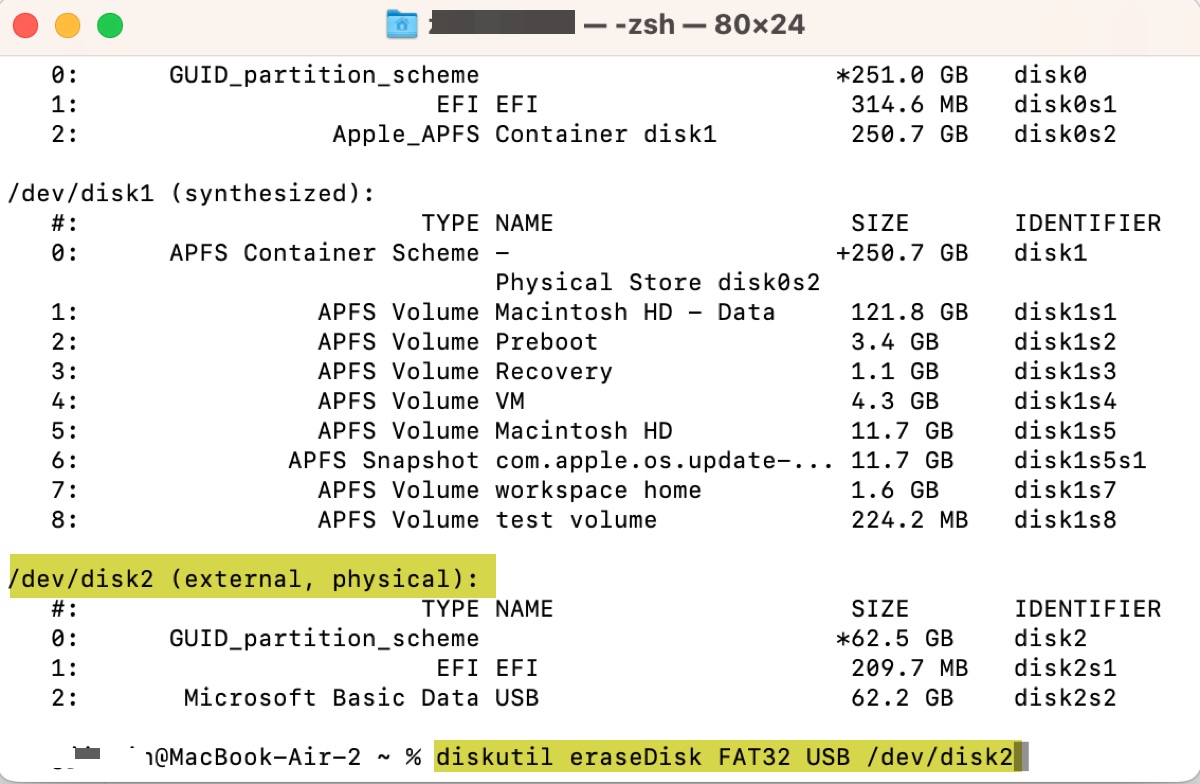
- Type the following command and hit Enter.diskutil list
- Note down the disk number of your external drive, such as disk2.
- Input the following command and hit Enter. (Substitute the variables with your drive info.)diskutil eraseDisk file_system disk_name /dev/disk_number
- Exit Terminal.
If Terminal returns the same error saying, "Error: -69760: Unable to write to the last block of the device," continue with the other solutions below.
Format the drive in Recovery Mode
You can also try to format your external drive in macOS Recovery. It's a built-in recovery system on your Mac that's also equipped with tools to reformat drives. You can immediately spot Disk Utility after booting into Recovery Mode and Terminal is hidden in the Utilities menu at the top.
Repeat the erase process in both Disk Utility and Terminal to see if it works.
Restore from a disk image
A forum user has found a unique solution to eliminate the error, "Unable to write to the last block of the device (-69760)." on an external drive. He was able to erase the problematic drive normally after restoring it from a blank image. Here's the detailed process:
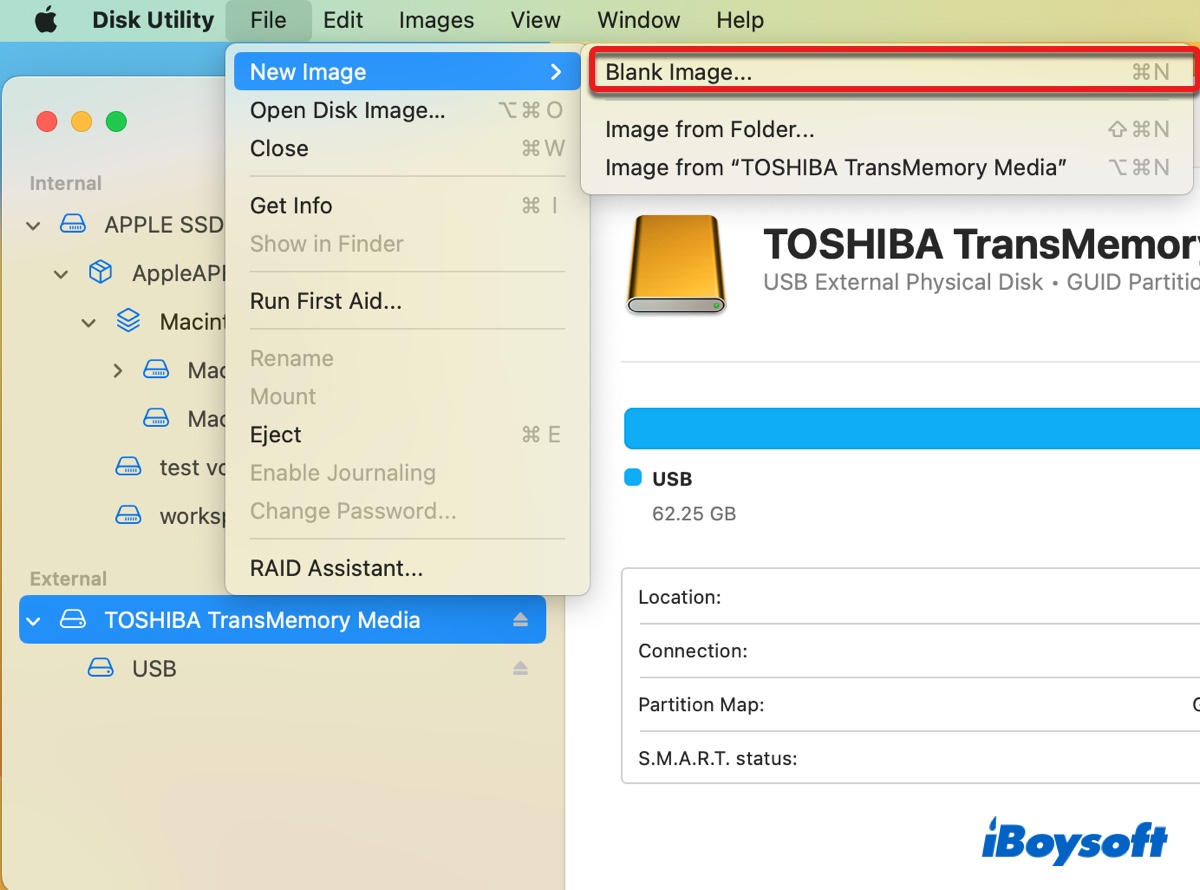
- Open Disk Utility.
- Click File > New Image > Blank Image from the top-left menu bar.
- Enter a filename for the disk image and choose a location on your Mac to save it.
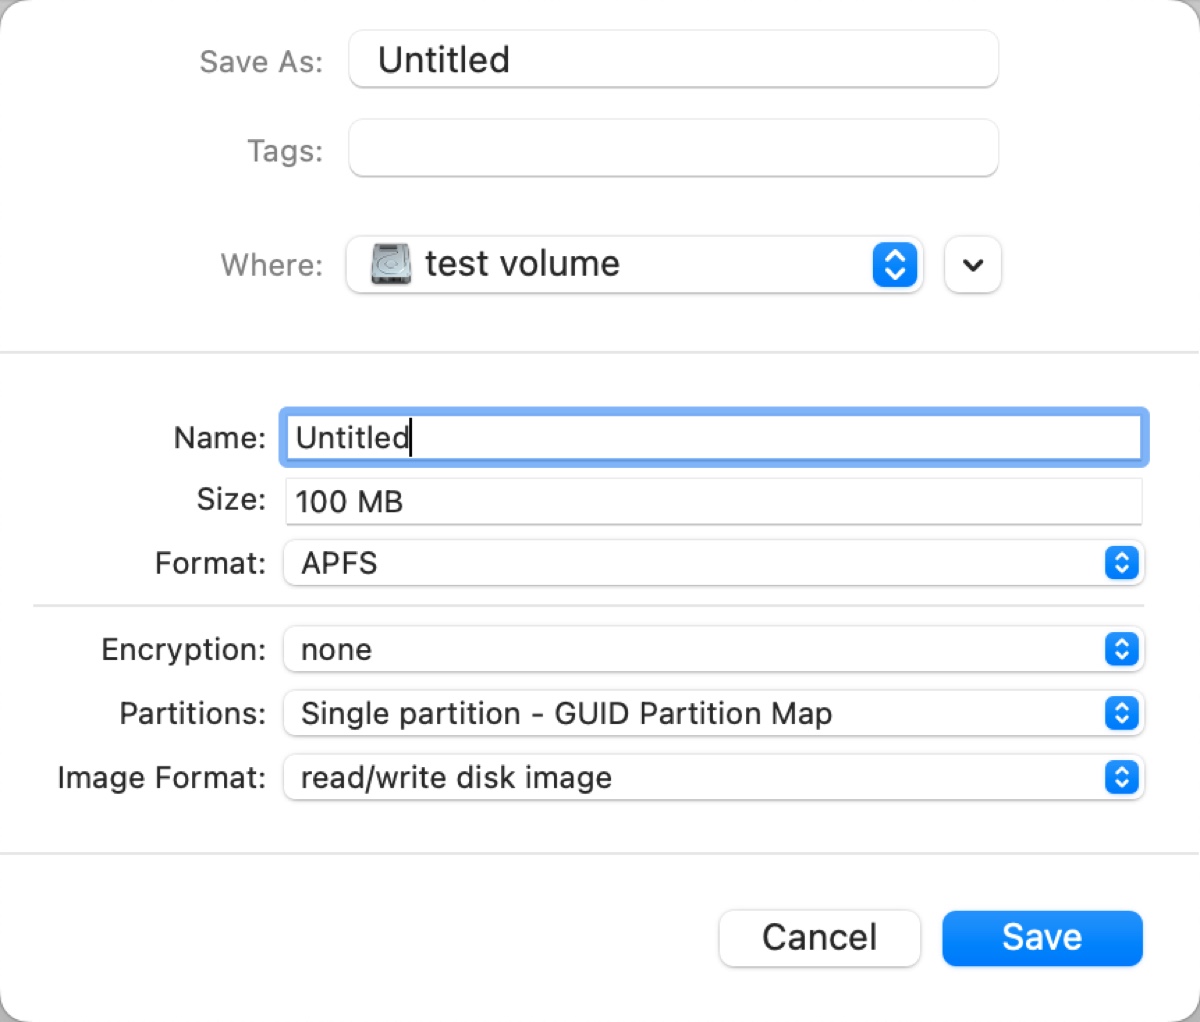
- Input a name for the disk image.
- Choose the format you want to use on your external drive.
- Keep other information to the default.
- Click Save > Done.
- Select the external drive that can't be erased and click Restore.
- Choose to restore from the created blank image and click Restore.
Hopefully, you have fixed the error on your internal and external drives with the solutions in this post. If so, you can click the button below to share it with more people.