Combined with an SSD and an HDD, the Fusion Drive delivers high performance and large capacity. It is available on part of Mac Mini and iMac and should display as one drive on your Mac's desktop, Finder, and Disk Utility.
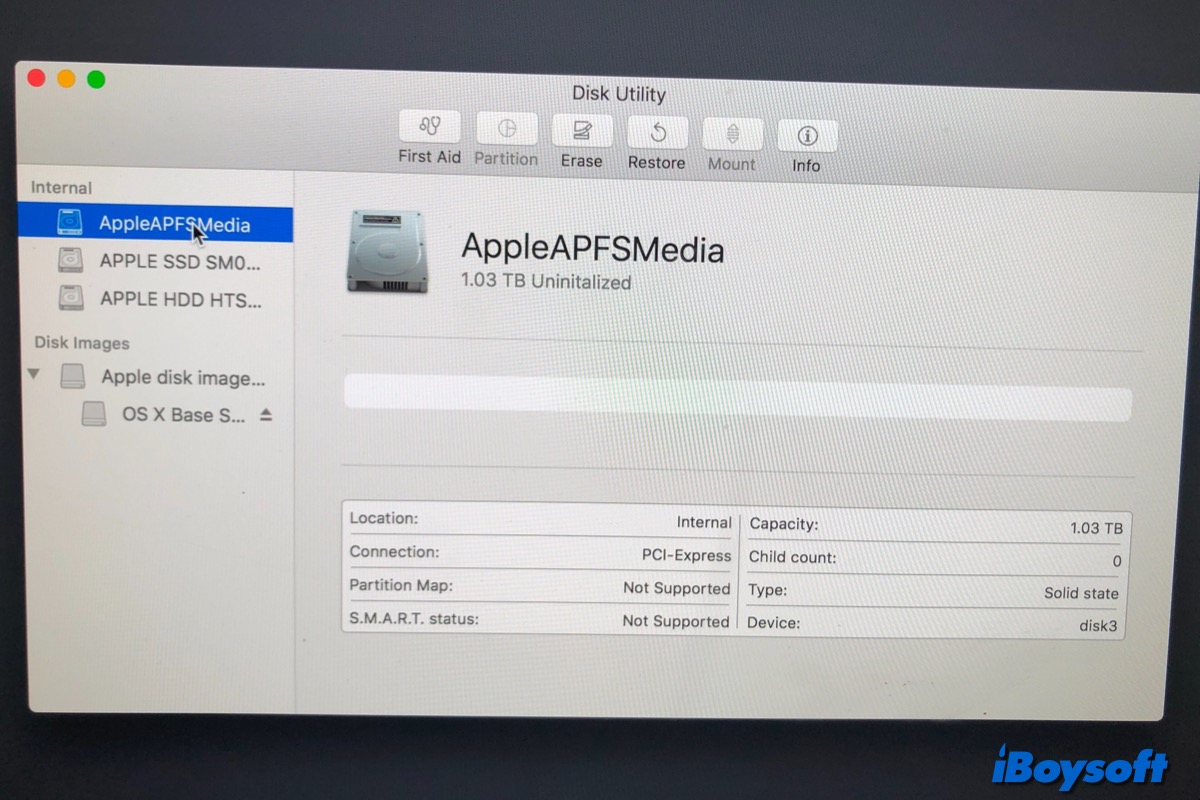
However, some Mac users found that even though they haven't replaced either drive of the Fusion Drive or split them purposefully into different volumes using software, the Fusion Drive still appears as two drives on iMac/Mac Mini. In the Storage overview, there are now two drives instead of the single Fusion drive. One is labeled as Flash Storage and has a 24GB capacity, while the other one has a 1TB capacity.
Your Fusion Drive is no longer functioning as a Fusion Drive if it shows up in the Finder as two drives rather than just one. In addition to manually replacing and splitting, incompatible file systems and drive errors could cause a split Fusion Drive. Keep reading to know the fixes.
How to recover data from a split Fusion Drive
Are the separate drives of the Fusion Drive accessible on your Mac? When the Fusin Drive suddenly becomes split, the two drives may not work normally which could cause data loss on the Fusion Drive. Moreover, the steps to re-creating the Fusion Drive on iMac and Mac Mini could also erase the data. Therefore, you'd better recover data from the split iMac Fusion Drive before fixing it.
What you can rely on is professional third-party data recovery software for iMac Fusion Drive if there is no backup available. iBoysoft Data Recovery for Mac is a good choice for you. It supports recovering data from Fusion Drive, unbootable iMac, Disk Image, corrupted external drives, etc.
Here's how to recover data from split Fusion Drive with iBoysoft Data Recovery for Mac:
- Shut down the Mac, then restart it and simultaneously press Command + Option + R.
- Release the keys until a spinning globe appears on your screen.
- Ensure a good internet connection on your iMac/Mac Mini to download iBoysoft Data Recovery and run it from its server.
- Open Utilities > Terminal in macOS Recovery Mode.
- Copy and paste the following command into the Terminal window and press Return. sh <(curl http://boot.iboysoft.com/fdboot.sh)
- As the iMac Fusion Drive is split into HDD and SSD in Finder/Disk Utility, on the iBoysoft Data Recovery main interface, select Fusion Drive on the left sidebar and select the SSD/HDD automatically listed here, then click Search for Lost Data.
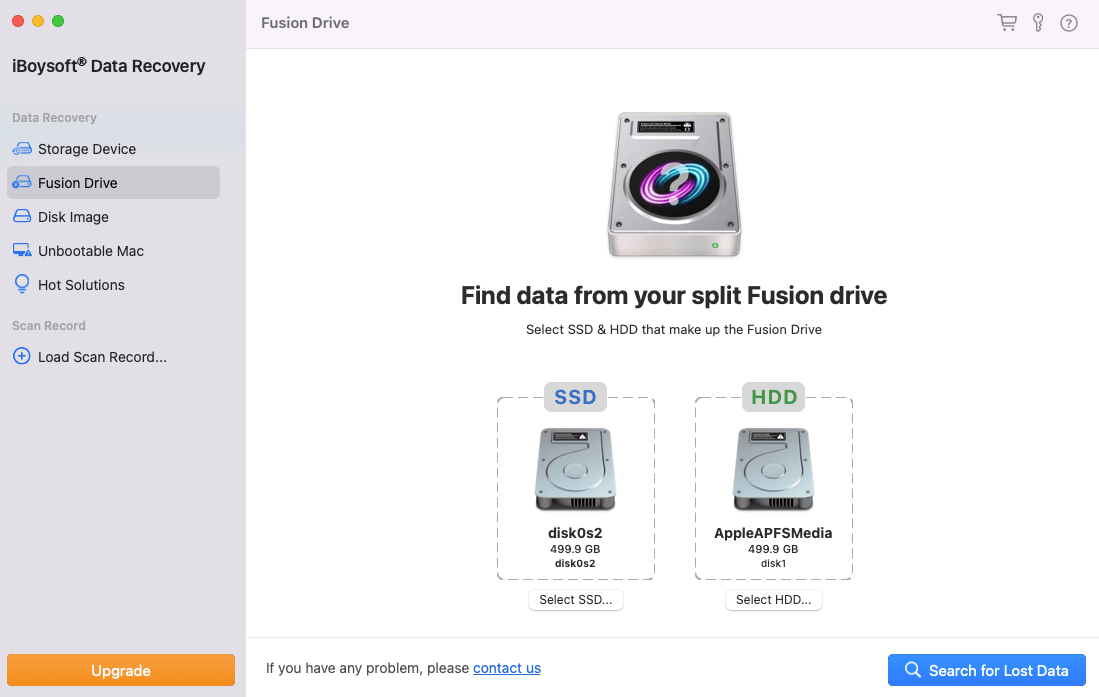
To recover data from a Fusion Drive that is not split into SSD and HDD, directly select the entire Fusion Drive from the Storage Device and click Search for Lost Data.
- Wait for the scanning process to finish and browse the results.
- Connect an external hard drive to your Mac to keep recovered data later.
- Filter and preview the scanned results, then select the desired files and click Recover to save them to the external drive.
If you have successfully recovered data from the split Fusion Drive, share this tool with more people!
How to fix a split Fusion Drive on iMac/Mac Mini
If you still want the HDD and SSD drive to function as a Fusion Drive, you can proceed to fix it after you have already recovered data from it. To reclaim the advantages of owning a Fusion Drive's single logical volume, follow these steps.
Note: Make sure you have already recovered data from the Fusion Drive, or created a backup with Time Machine or other methods, given that by following these steps, all data on the drives that make up your Fusion Drive will be permanently deleted.
Re-fuse the split fusion drive on macOS Mojave or later:
- Turn on your Mac, then immediately press and hold Command-R to boot into macOS Recovery Mode.
- Release the keys until you see the Apple logo or spinning globe.
- On the macOS Utilities window, choose Utilities > Terminal from the menu bar.
- Type the following command in the Terminal window, then press Return. diskutil resetFusion
- Type Y to confirm when prompted, then press Return.
- When the operation finishes, quit Terminal to back to the macOS Utilities window.
- Choose Reinstall macOS, then follow the onscreen instructions.
- Wait for the Mac to restart from the Fusion Drive when done.
Create the Fusion Drive again on macOS High Sierra or earlier:
- Restart your Mac and simultaneously press and hold Command-R until you see the Apple logo or spinning globe.
- Choose Utilities > Terminal from the menu bar on the macOS Utilities window.
- Type the command below in the Terminal window, then press Return. diskutil list
- In the IDENTIFIER column, find the identifier for each of the two internal, physical drives that make up your Fusion Drive.
- Type the following command, replace identifier1 and identifier2 with the identifiers of the two drives. Then press Return. diskutil cs create Macintosh\ HD identifier1 identifier2
- If you get a disk unmounting error, type this command to unmount the two drives, you need to run it twice and respectively replace the identifier with that of the SSD and the HDD.diskutil unmountDisk identifier
- Retry the command in step 5.
- Type the command below, then press Return. diskutil cs list
- Find the string of numbers that appears after "Logical Volume Group" for the volume named Macintosh HD. It's a number like 8354AFC3-BF97-4589-A407-25453FD2815A.
- Type the following command, replacing logicalvolumegroup with the number you wrote down. Then press Return. diskutil cs createVolume logicalvolumegroup jhfs+ Macintosh\ HD 100%
- When the operation finishes, quit Terminal to return to the macOS Utilities window.
- Select Reinstall macOS and follow the onscreen instructions.
- Mac will automatically restart from your Fusion Drive.
Now, you can see the Fusion drive appears as one drive in Finder and Disk Utility.
Share this post to help others fix a split Fusion Drive!