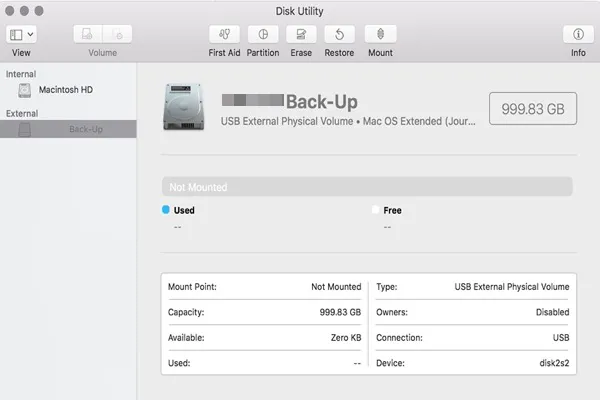
You plug an external hard drive into your Mac like you normally do, but this time it doesn't appear in Finder or on the desktop. When you open Disk Utility to check, you notice the external drive is grayed out.
In most cases, this means macOS has detected the drive's volume or partition but hasn't mounted it yet. Because of that, the drive won't appear in Finder, and its files can't be accessed.
The good news is that this doesn't necessarily mean your data is lost. If the drive still appears in Disk Utility and shows a normal capacity, there's a good chance you can mount it and regain access without losing your files.
Below, we'll walk through how to diagnose a grayed-out external drive and the steps you can take to mount it again.
Diagnose the grayed-out drive first
Inside Disk Utility, right-click on the grayed-out drive and choose Get Info.
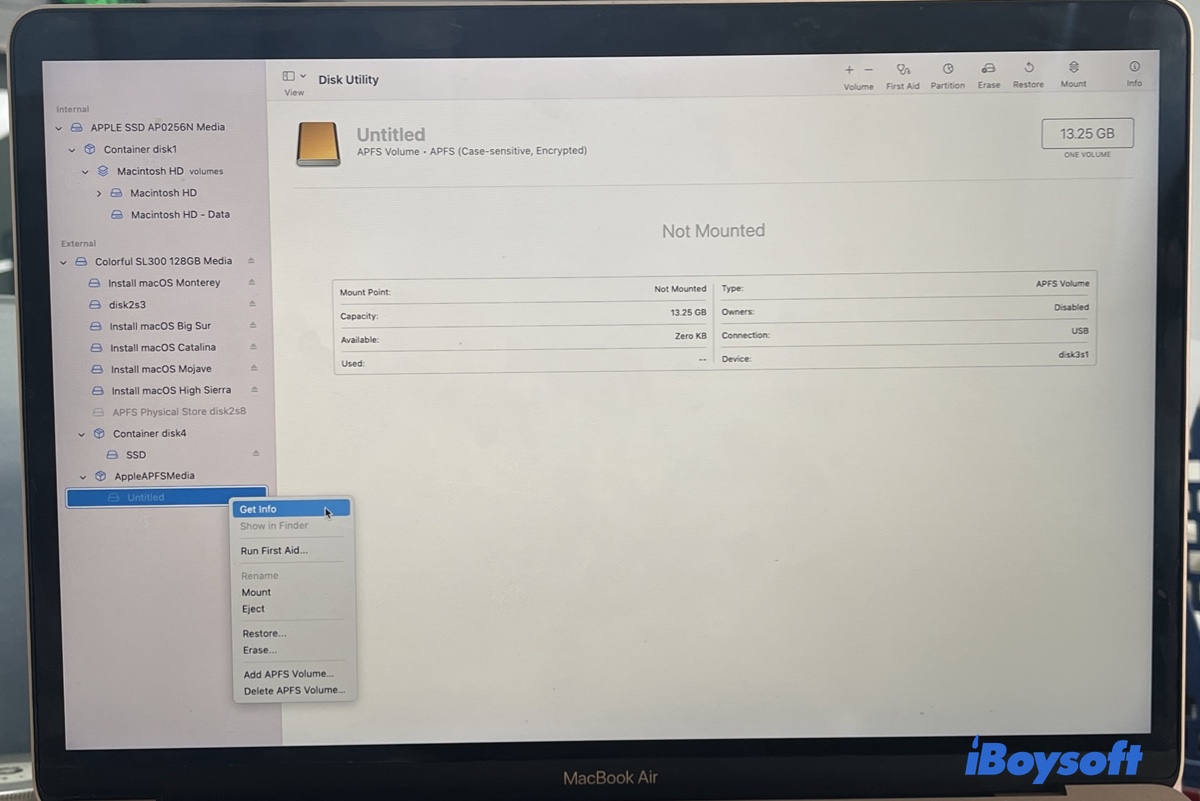
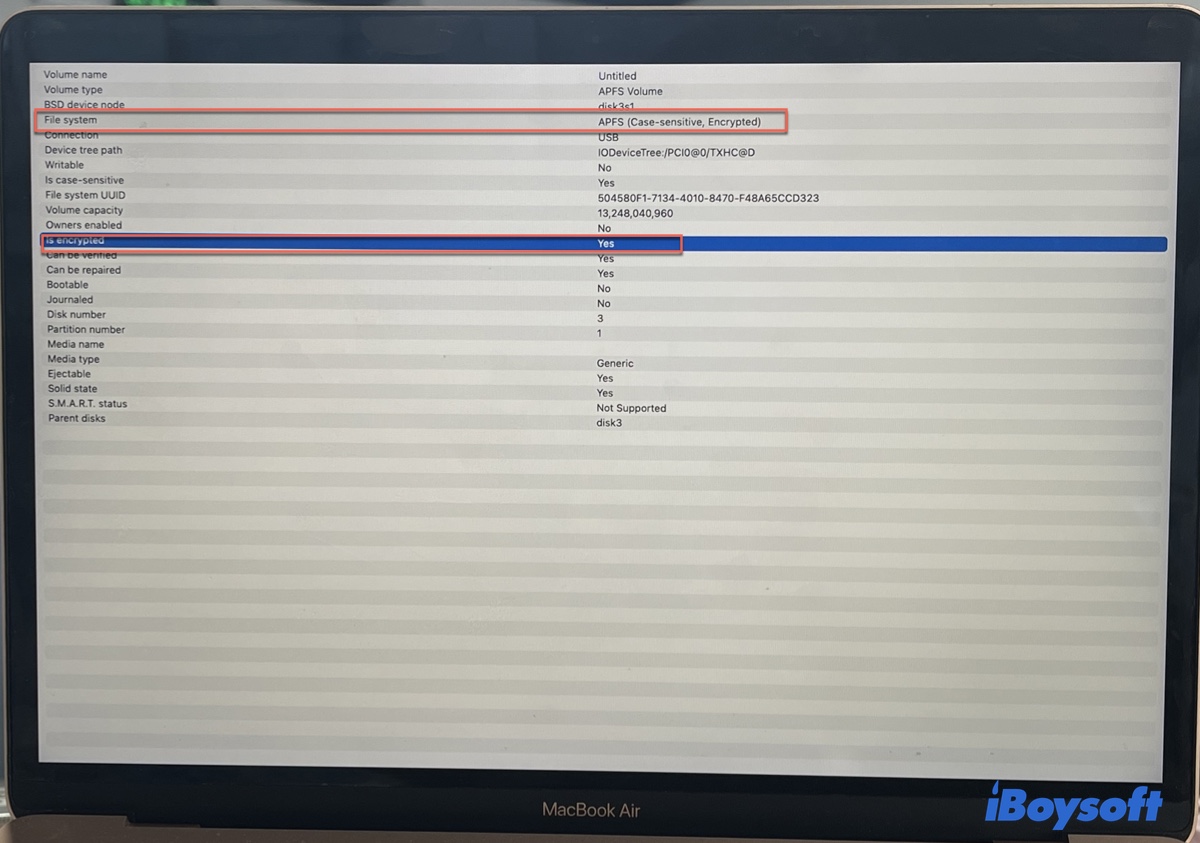
Then, check the information for File System and Is encrypted.
| Situations | Causes | Recommended Fix |
|---|---|---|
| The grayed-out drive is formatted in APFS, Mac OS Extended, FAT32, exFAT | file system corruption | Click Mount. If it fails, run First Aid. If still fails, recover data and reformat (APFS/exFAT) |
| The grayed-out drive is NTFS-formatted | unsupported NTFS driver | Use a compatible NTFS driver |
| The drive is encrypted | drive encryption | Click Mount in Disk Utility and enter the password. If unlock fails, reformat. |
After checking the drive's file system and encryption status, you can head straight to the corresponding section.
- If your drive is not formatted as NTFS, go to Case A.
- If your drive is formatted as NTFS, skip to Case B.
- If your drive is encrypted, head to Case C.
Case A: Non-NTFS external drive grayed out in Disk Utility
In most cases, the grayed-out external hard drive has a file system that's compatible with macOS, such as APFS, Mac OS Extended (Journaled), FAT32, or exFAT.
This can happen for several reasons.
- Improper ejection: The drive may have been improperly ejected or disconnected, leaving the file system in an unclean state, so macOS refuses to mount it automatically.
- File system errors: Errors (for example, in APFS, HFS+, or exFAT) can also prevent the volume from mounting.
- Temporary system issues: In some cases, macOS may simply fail to mount it due to a temporary system glitch.
- Hardware issues: Less commonly, the issue may be caused by partition structure problems or hardware issues, such as a faulty cable, enclosure, or failing disk.
Follow the solutions below to fix the issue of the external drive being grayed out in Disk Utility on Mac:
Solution 1: Mount the external hard drive manually
Sometimes, your USB drive may appear greyed out in Disk Utility because it was not mounted. Thus, you can try to mount this external hard drive in Disk Utility manually. To do this, select your external drive and click on the "Mount" button in the upper menu bar. If it doesn't work, reboot your Mac and try again.
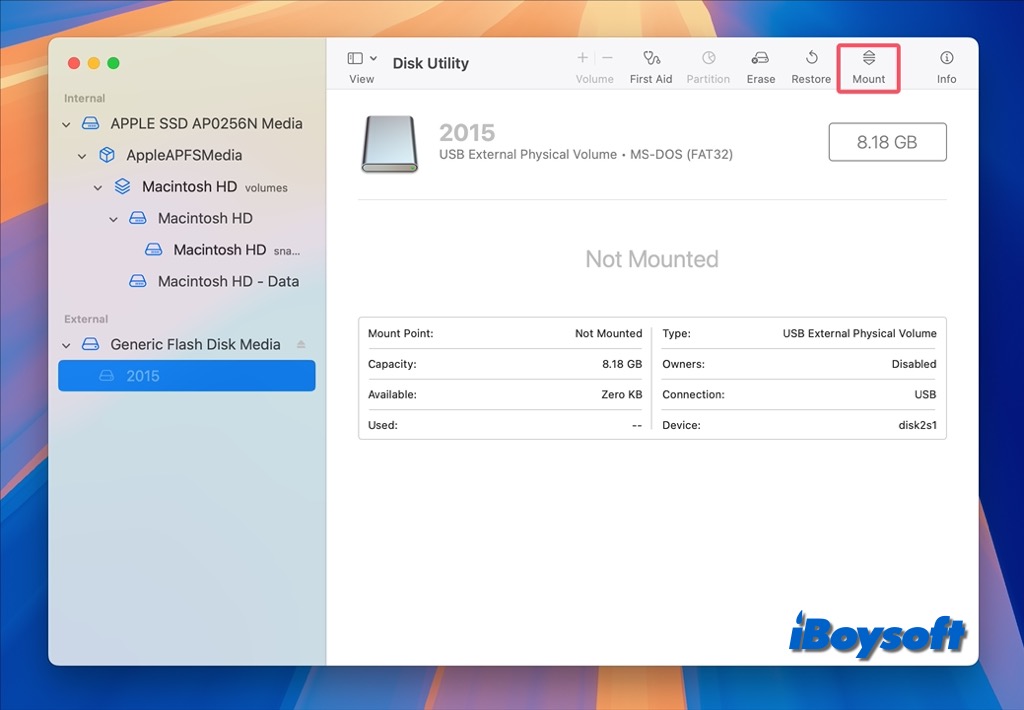
If the external drive is mounted successfully, the issue was a temporary mount failure.
If you see an error like "com.apple.DiskManagement.disenter error 49153," the file system is likely corrupted and requires repair.
Solution 2: Update the disk driver
Another practical solution to this issue is to update the necessary drivers. To update an outdated disk driver, you can simply open the Apple Menu > System Settings >General > Software Updates. This will automatically check for updates. If any macOS updates are available, follow the onscreen guide to update the Mac.
After updating the disk driver, reboot your Mac, reconnect the external drive, and check whether the drive is mounted now.
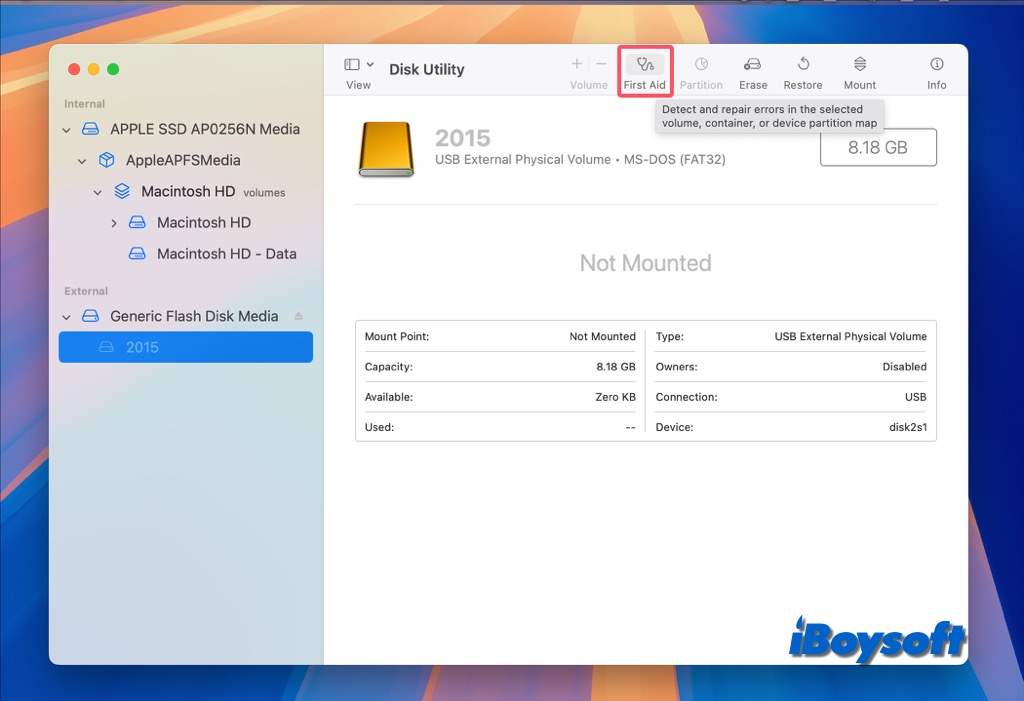
Solution 3: Repair this external hard drive with First Aid
In some cases, a disk is unmountable and greyed out in Disk Utility because minor disk errors are preventing your Mac from reading the drive. Fortunately, your Mac includes a built-in utility called First Aid that can check and repair such minor file system errors.
- Go to Utilities, find Disk Utility, and run this program.
- Click Show All Devices > View option and select this external hard drive in the left sidebar.
- Click First Aid in the top menu of Disk Utility.
- Click Run to check and repair errors in this drive.
If the First Aid repair succeeds, you can right-click on the partition and tap "Show in Finder" to access your data.

However, if First Aid failed to repair your drive, it will return the message "First Aid process has failed. If possible, back up the data on this volume. Click Done to continue." In this case, reformat the drive.
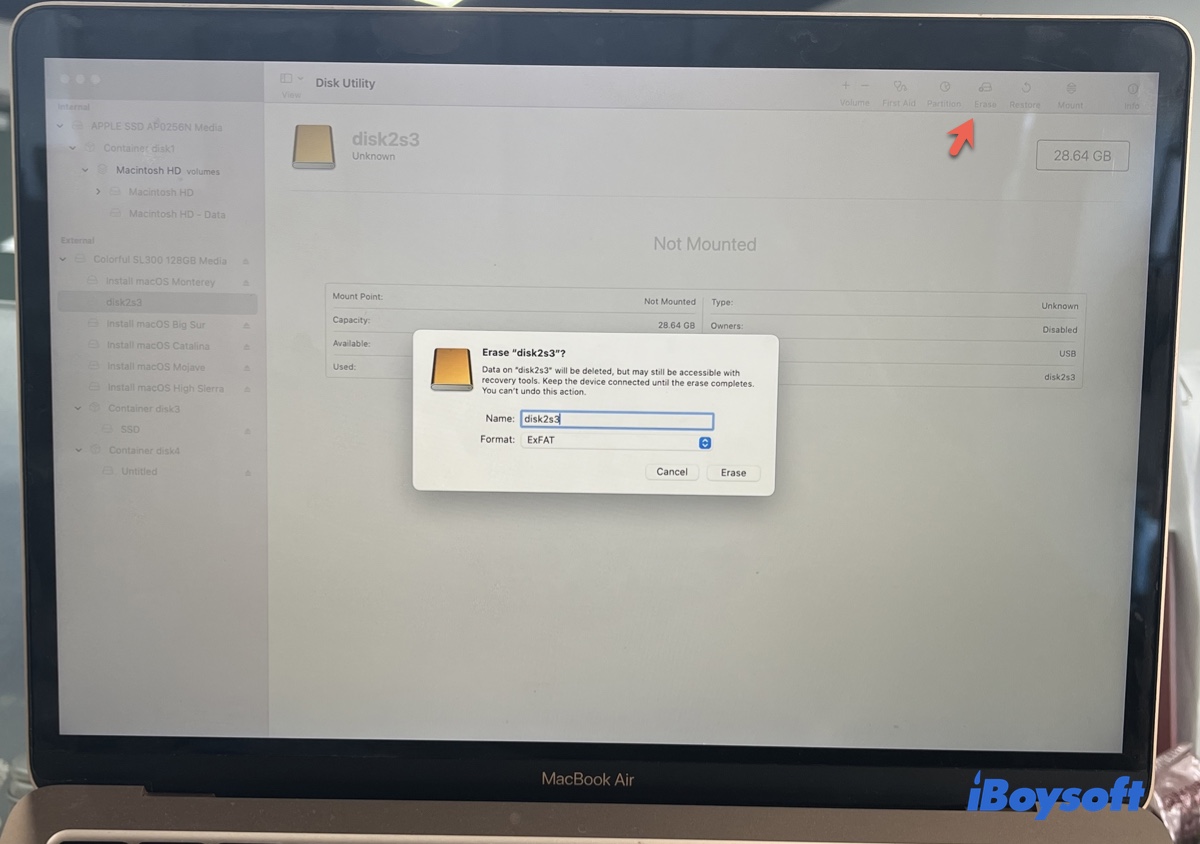
Solution 4: Reformat the external hard drive
Reformatting the drive can fix some file system errors, like the hard drive being greyed out in Disk Utility. Just be aware that reformatting will erase all data on the drive, so make sure to recover any important files beforehand.
• How to format external hard drives on Mac?
If your external drive can't be mounted or reformatted, it likely has hardware issues.
Recover data from the greyed-out external hard drive
If First Aid failed on the external hard drive, you're likely facing a seriously corrupted file system issue. Before reformatting the drive, you must ensure you have a copy of the important files on the drive.
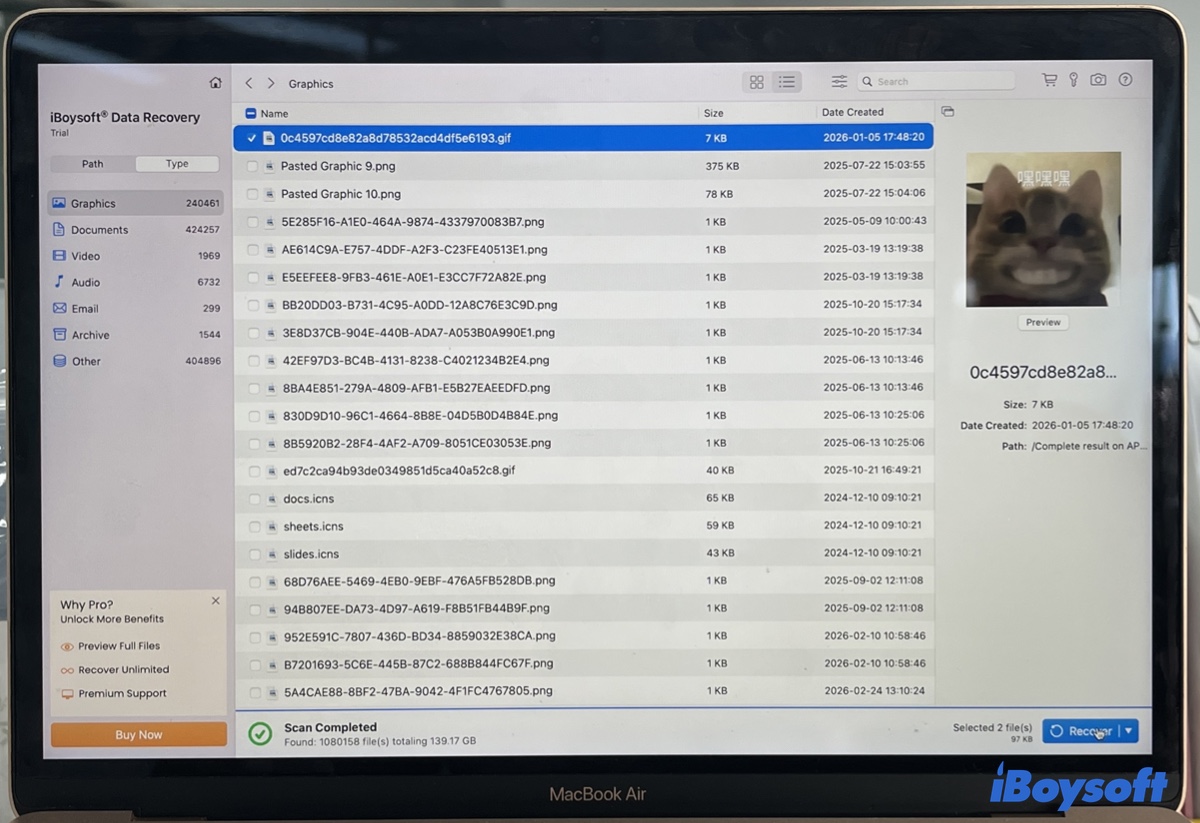
If you didn't back up the drive, the safe choice is to recover the lost data with reliable data recovery software, like iBoysoft Data Recovery for Mac. If data loss is not a hassle, you can skip to reformatting.
iBoysoft Data Recovery for Mac can recover lost data from unmounted, grayed-out external hard drives, whether they're APFS, HFS+, HFS, FAT32, or exFAT formatted USB drives, flash drives, SD cards, CF cards, or memory cards.
It supports Mac OS X 10.11 and later versions and works fine on M1/M2/M3/M4 and Intel-based Macs.
- Free download, install, and launch iBoysoft Data Recovery for Mac.
- Select the external hard drive that is greyed out and click "Search for Lost Data" to scan for data stored on this drive.
- Once the scanning is done, you can preview and click the wanted files, then click "Recover" at the bottom.
Case B: NTFS external hard drive grayed out in Disk Utility
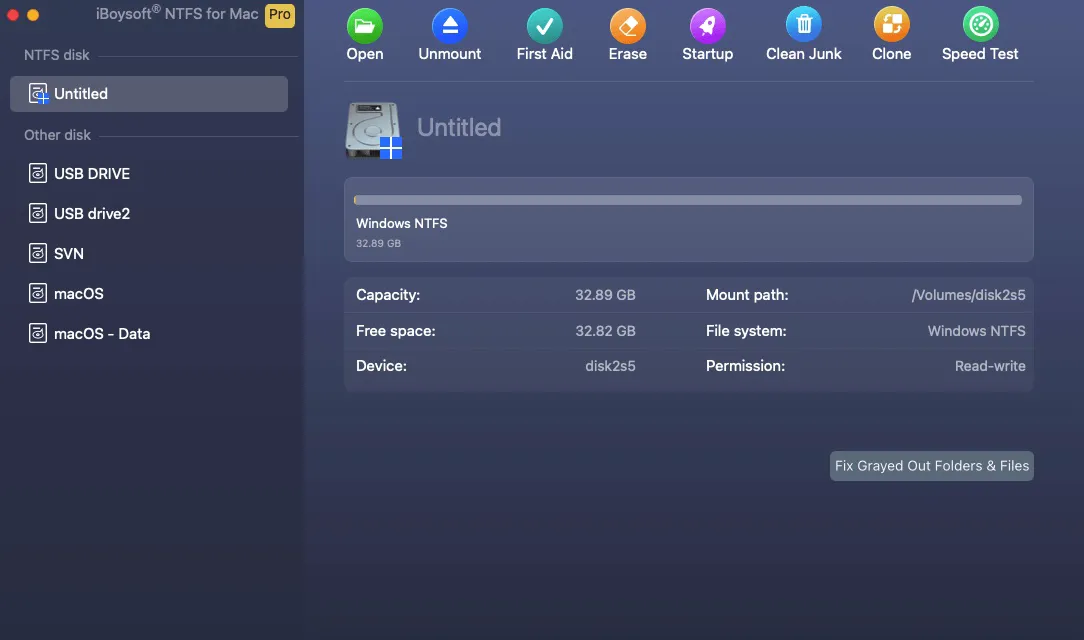
As you probably know, most external drives are pre-formatted with the Windows NTFS file system by the manufacturer because Windows is the dominant OS. Since NTFS is read-only on Macs, an NTFS driver is needed to write to the drive.
If an NTFS external hard drive is grayed out in Disk Utility, it usually suggests two things: 1) there's an incompatible NTFS driver, and 2) the drive is corrupted.
To fix the grayed-out NTFS drive on Mac, use a compatible NTFS driver for Mac. iBoysoft NTFS for Mac can automatically mount any NTFS drives in read/write mode and help you erase drives to NTFS on a Mac.
I recommend you uninstall existing NTFS drivers completely first to avoid conflicts, then download and install iBoysoft NTFS for Mac to mount the drive on Mac.
If the NTFS drive still won't mount, select the NTFS drive from the left and click Erase to reformat it. (Remember to recover important data on the drive before erasing it.) Suppose you don't want to continuously use NTFS; use Disk Utility to erase it with other formats.
Share this article if it's helpful!
Case C: Encrypted external hard drive grayed out on Mac
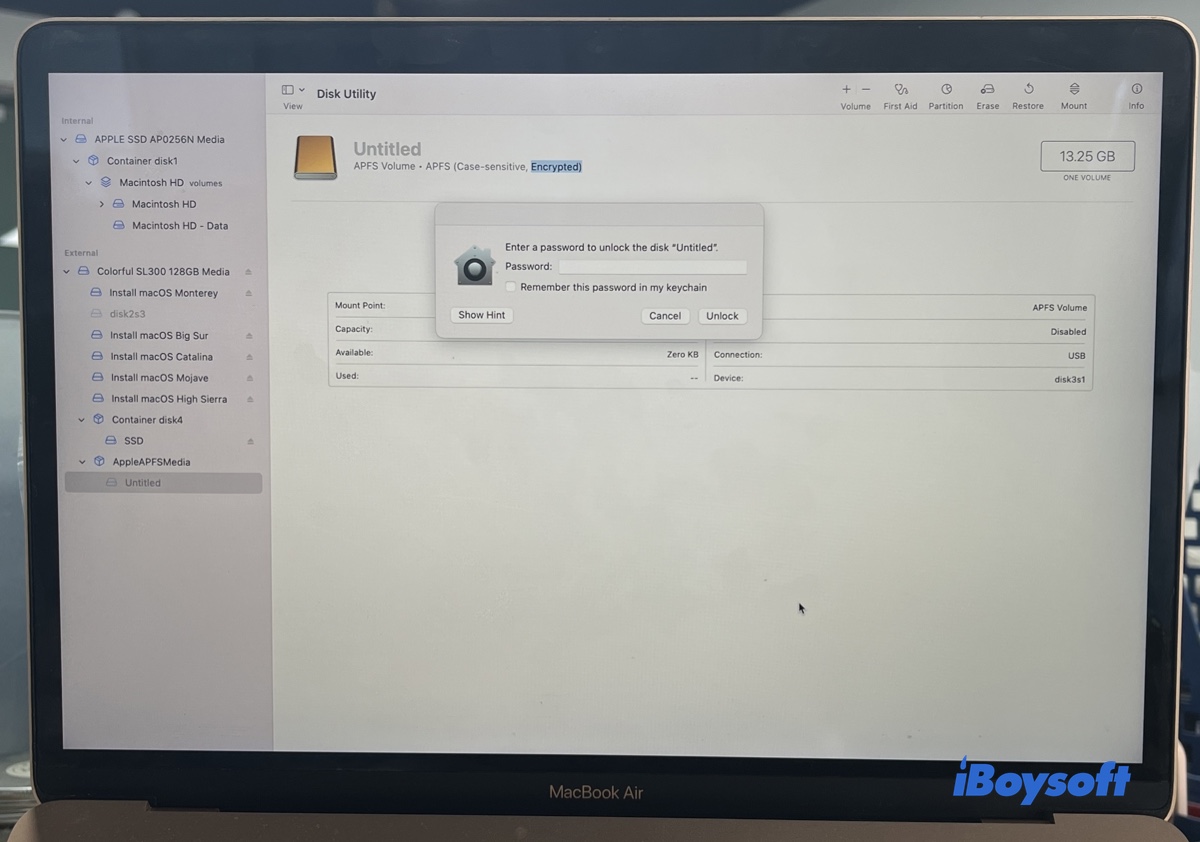
In some cases, the drive may be encrypted and needs to be unlocked first. When a drive is encrypted, its contents are secured and can only be accessed with the correct password or encryption key. Before it's unlocked or decrypted, it will appear grayed out in Disk Utility.
Depending on the encryption method, you can unlock the drive in one of the following ways:
- If the drive is encrypted with FileVault, either with an encrypted file system or by being encrypted in Finder, you'll be prompted to enter the password when the drive is connected. If the prompt doesn't show up, select the drive and click Mount in Disk Utility to trigger it.
- If the drive is encrypted with a utility that comes with the drive, such as WD Security, open it to unlock the drive.
- If the drive is encrypted with BitLocker, unlock it with a BitLocker To Go for Mac utility.
Why is the external hard drive greyed out in Disk Utility?
Seeing an external hard drive greyed out in Disk Utility is one of the most frustrating things that can happen to a Mac user - especially if the drive holds all your important files. Many of us will eventually come up against this issue but some users remain clueless as to what may be causing it.
One user on the MacRumors forums described the situation in a way that many of us can relate to:
"I've been scouring the internet for solutions for SEVEN hours. I was just about to back up my data when - to my horror - my external hard drive in Disk Utility shows up as greyed out. My whole life is stored on that thing - I'm talking vital documents, precious memories, the works. And to make matters worse the computer seems to know it's there, because it shows up in Disk Utility - but I still can't get to it."
So, why does this happen in the first place?
More often than not, the problem has something to do with disk corruption or a dodgy connection. Things like a sudden power failure, yanking your drive out of the computer without warning, a system crash, or even a sneaky malware attack can all cause problems with the drive's file system or partition map.
When your Mac can see the disk but can't quite make sense of its inner workings, you've got a greyed-out external hard drive on your hands, failing to mount and refusing to be accessed in Disk Utility. Don't even get me started on popular drives like WD My Passport - even they can fall victim to this problem if the file system gets sufficiently trashed.
If your drive is showing as greyed out in Disk Utility and you don't have a backup, your first priority should be to try to recover your data before attempting any repairs. This safety net will help prevent you from losing your precious files for good while you try to get Disk Utility to behave.
However, things get a bit more complicated if your greyed-out drive also shows up with a dodgy capacity reading or no disk information at all. In this case, it's possible that the drive itself has suffered physical damage. If that's the case, then a software fix might not be enough to get it going again, and you might be looking at sending it off to a pro for some serious data recovery or repair work.
If you've managed to fix a greyed-out external hard drive, then consider sharing your solution - there are probably plenty of others out there who are desperate to hear about your experience.
Also read:
External hard drive not showing up on Mac
External hard drive not showing up on Mac after force ejection
NTFS External Hard Drives Not Mounting/Working on Mac (Sonoma/Ventura)
FAQs
- QWhy can’t I click First Aid?
-
A
First Aid is disabled if macOS can’t read the volume (corrupted, unknown filesystem, or NTFS). Use diskutil info diskXsY to check. Unlock or install a driver if needed.
- QWhy is the drive's capacity 0B?
-
A
0 B usually means the filesystem is unreadable or damaged. Check with diskutil info diskXsY. If First Aid fails, backup data and reformat.
- QWhy doesn’t Finder show the drive?
-
A
Finder only shows mounted volumes. If the volume is gray/unmounted in Disk Utility, it won’t appear in Finder. Click Mount to make it visible.
- QWhy is the Partition button gray?
-
A
It’s gray if the disk has no valid partition table or the file system doesn't allow partitioning on a Mac.