When your Mac's hard drive is running out of space, you may not be able to save large files to it, update to the latest macOS, run programs smoothly, or even start up your Mac.
Upon which, the first thing that pops up in your head is to find large files on Mac that you no longer need and delete them quickly, likely from your Desktop, the Downloads folder, or the Applications folder.
These are indeed good efforts, but there is more you can do to reclaim disk space, such as deleting purgeable space, removing system logs, deleting duplicate files, clearing browser caches, etc.
No time should be wasted; follow this comprehensive guide on how to free up space on Macintosh HD to stop unneeded files from eating up your Mac.
Tips: If your Mac is running out of space, slowing down, or freezing frequently, I highly recommend a thorough disk cleaning with iBoysoft Cleaner.
This can give you an overview of your Mac's storage usage and help you quickly spot large files, clean system junk, fully uninstall apps, and clean duplicate files & photos, ensuring your Mac is decluttered and optimized.
To free up disk space on Mac:
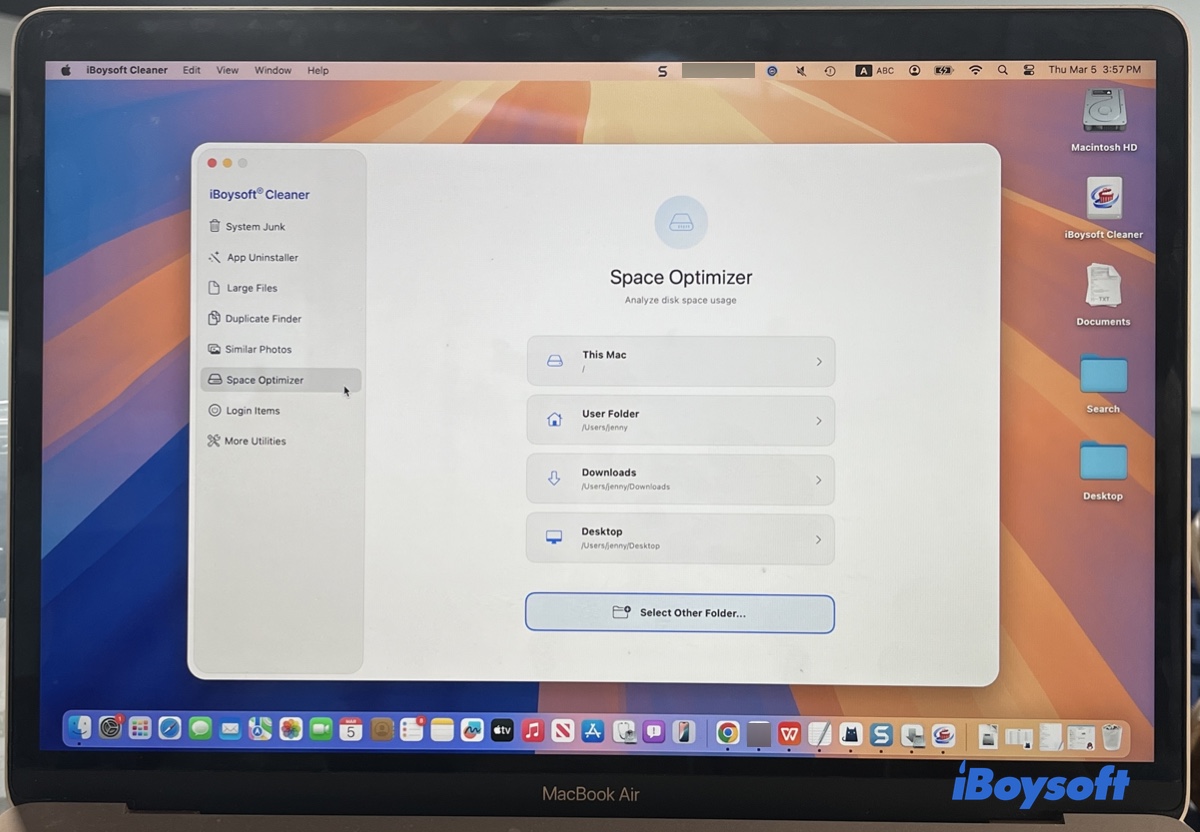
Step 1: Free download, install, and open iBoysoft Cleaner.
Step 2: Tap Space Optimizer from the left panel and choose This Mac to view your hard disk space usage.
Or:
- If you want to clean large files first, choose Large Files.
- If you want to fully uninstall apps without leaving leftovers on your Mac, choose App Uninstaller.
- If you want to clear system junk immediately, choose System Junk.
- If you need to clean duplicate files or photos, choose Duplicate Finder or Similar Photos.
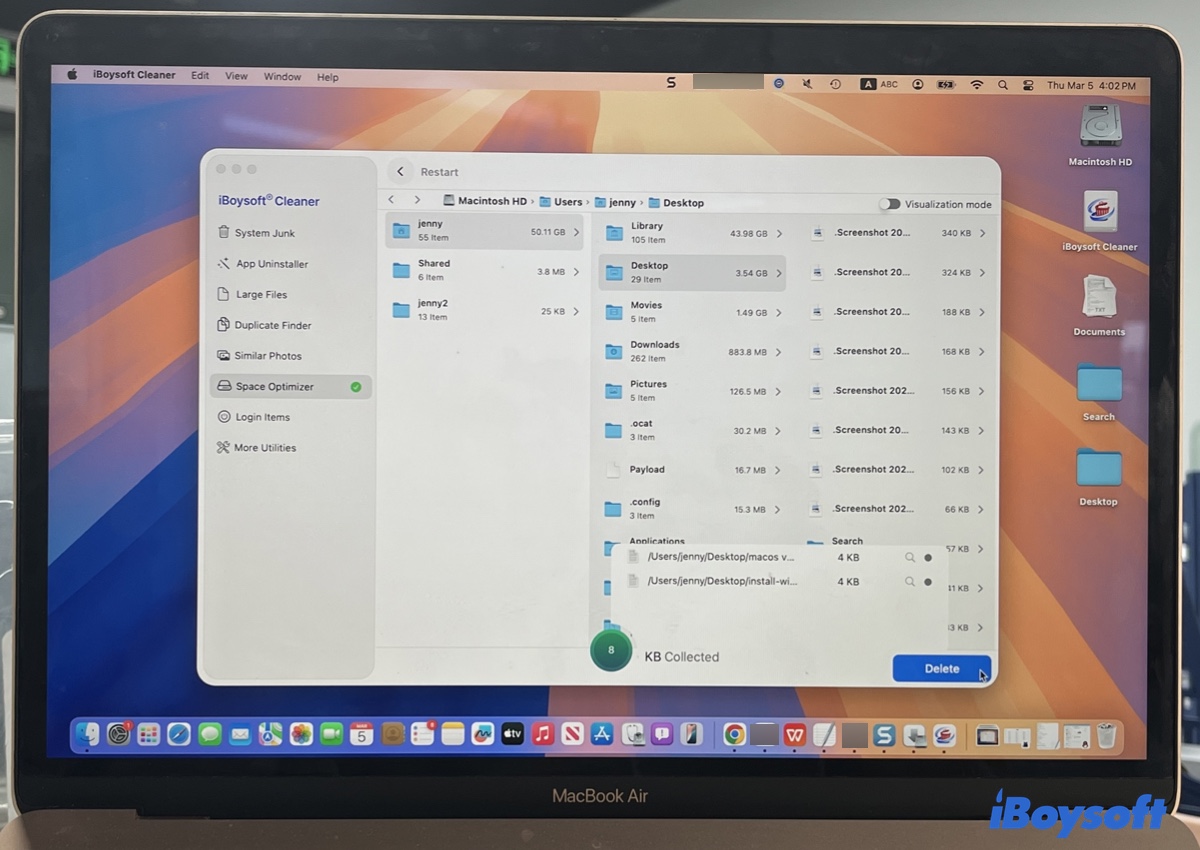
Step 3: Wait for the scan to complete, then view the files in each folder in a descending order by size.
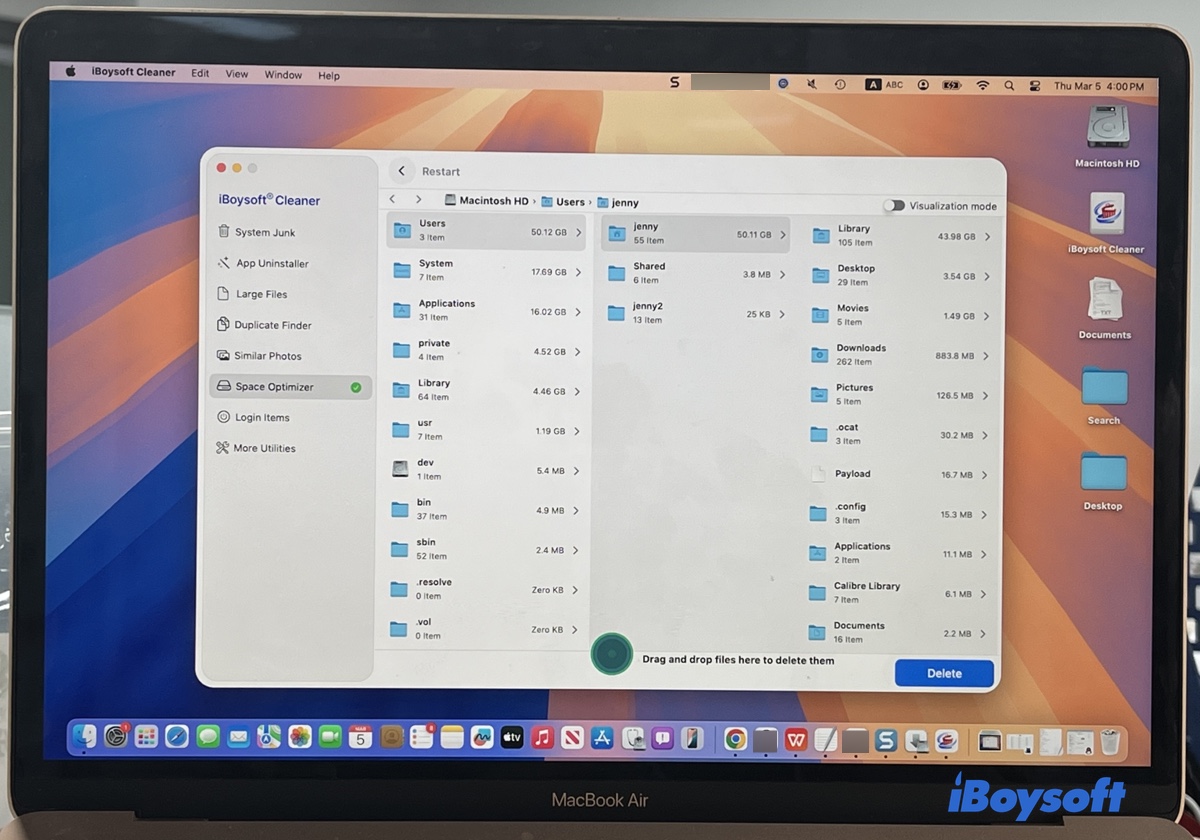
Step 4: Collect unnecessary files and click Delete to remove them.
How to check storage for MacBook Pro, MacBook Air, and other Mac Models?
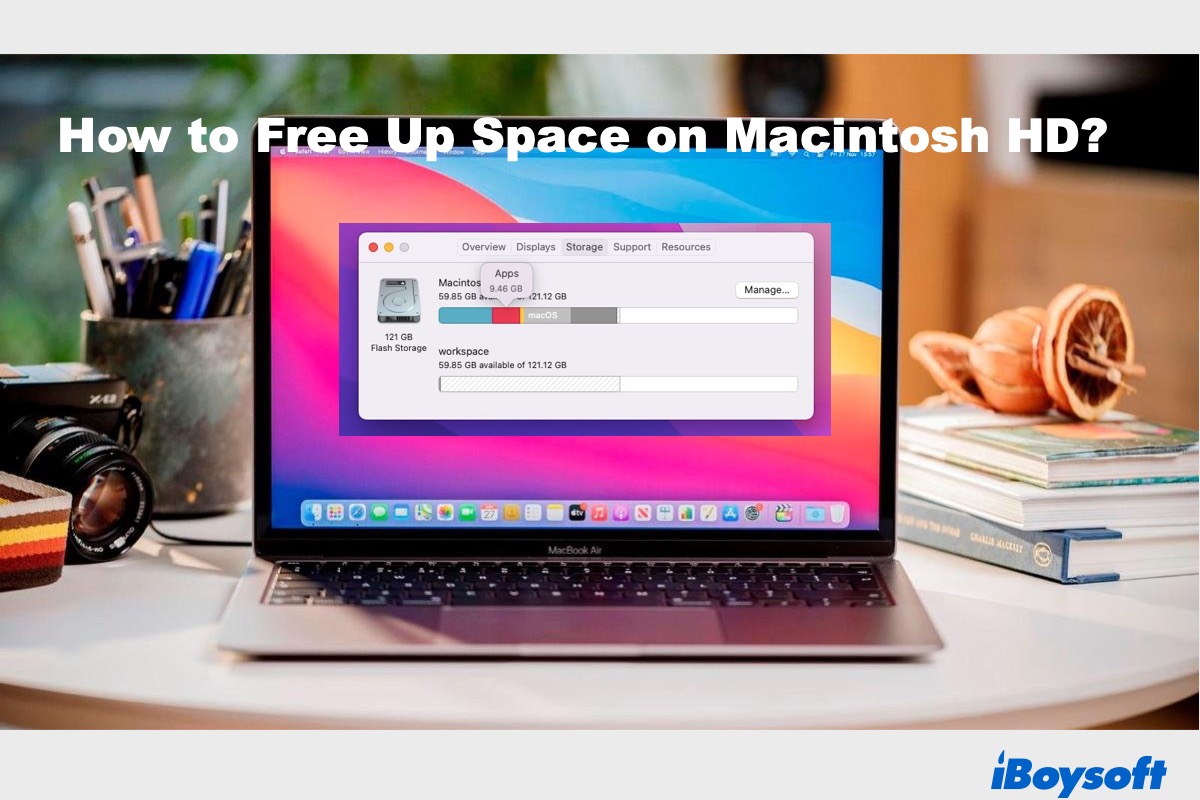
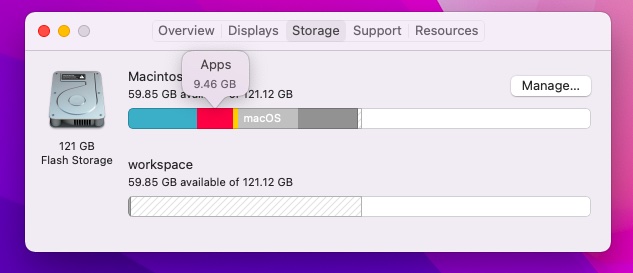
To get a clear picture of how your Mac storage is used and how much is still available, you need to click the Apple menu at the top-left corner, then click About This Mac > Storage. Here you can see a bar segmented in different colors.
To know how much space is allocated to what category, hover the cursor over a segment. In the example below, the internal hard drive stores six types of data - Music, Apps, Photos, macOS, System data, and Other storage.
Files that don't easily fall into a clear category are classified as Other, such as installer packages, cache files, browser extensions, temporary files, and so on. If you find the Other category a big consumer of storage, you can clean up the Other storage to optimize Mac space.
By the way, you may find the purgeable storage there. It is usually the culprit why your Mac says not enough space but there is.
How to free up space on Macintosh HD?
Now that you have a rough idea of what fills up your Mac hard drive, it's time for a thorough disk cleaning. To make sure you delete all the possible unwanted files scattered around your Mac, we will elaborate on the top 12 tips on how to free up space on Mac.
How to free up space on Mac?
- Free up space with Mac's built-in storage management feature
- Clear storage used by Virtual Machine
- Delete duplicate files
- Clear browser data
- Remove application & system logs
- Clean up iTunes backups for your iPhone and iPad
- Delete large attachments in Mail
- Remove unnecessary language files
- Clean your desktop
- Uninstall unwanted apps
- Move files to an external storage device
- Empty the Trash
Note: We suggest you back up your Mac with Time Machine before removing anything to avoid potential data loss or operating system corruption caused by maloperation.
Free up space with Mac's built-in storage management feature
Continuing from where you saw the storage overview (in case you missed that, click Apple logo > About This Mac > Storage), click Manage to see the recommended ways to optimize storage. Once you are there, you will see four sections as stated below:
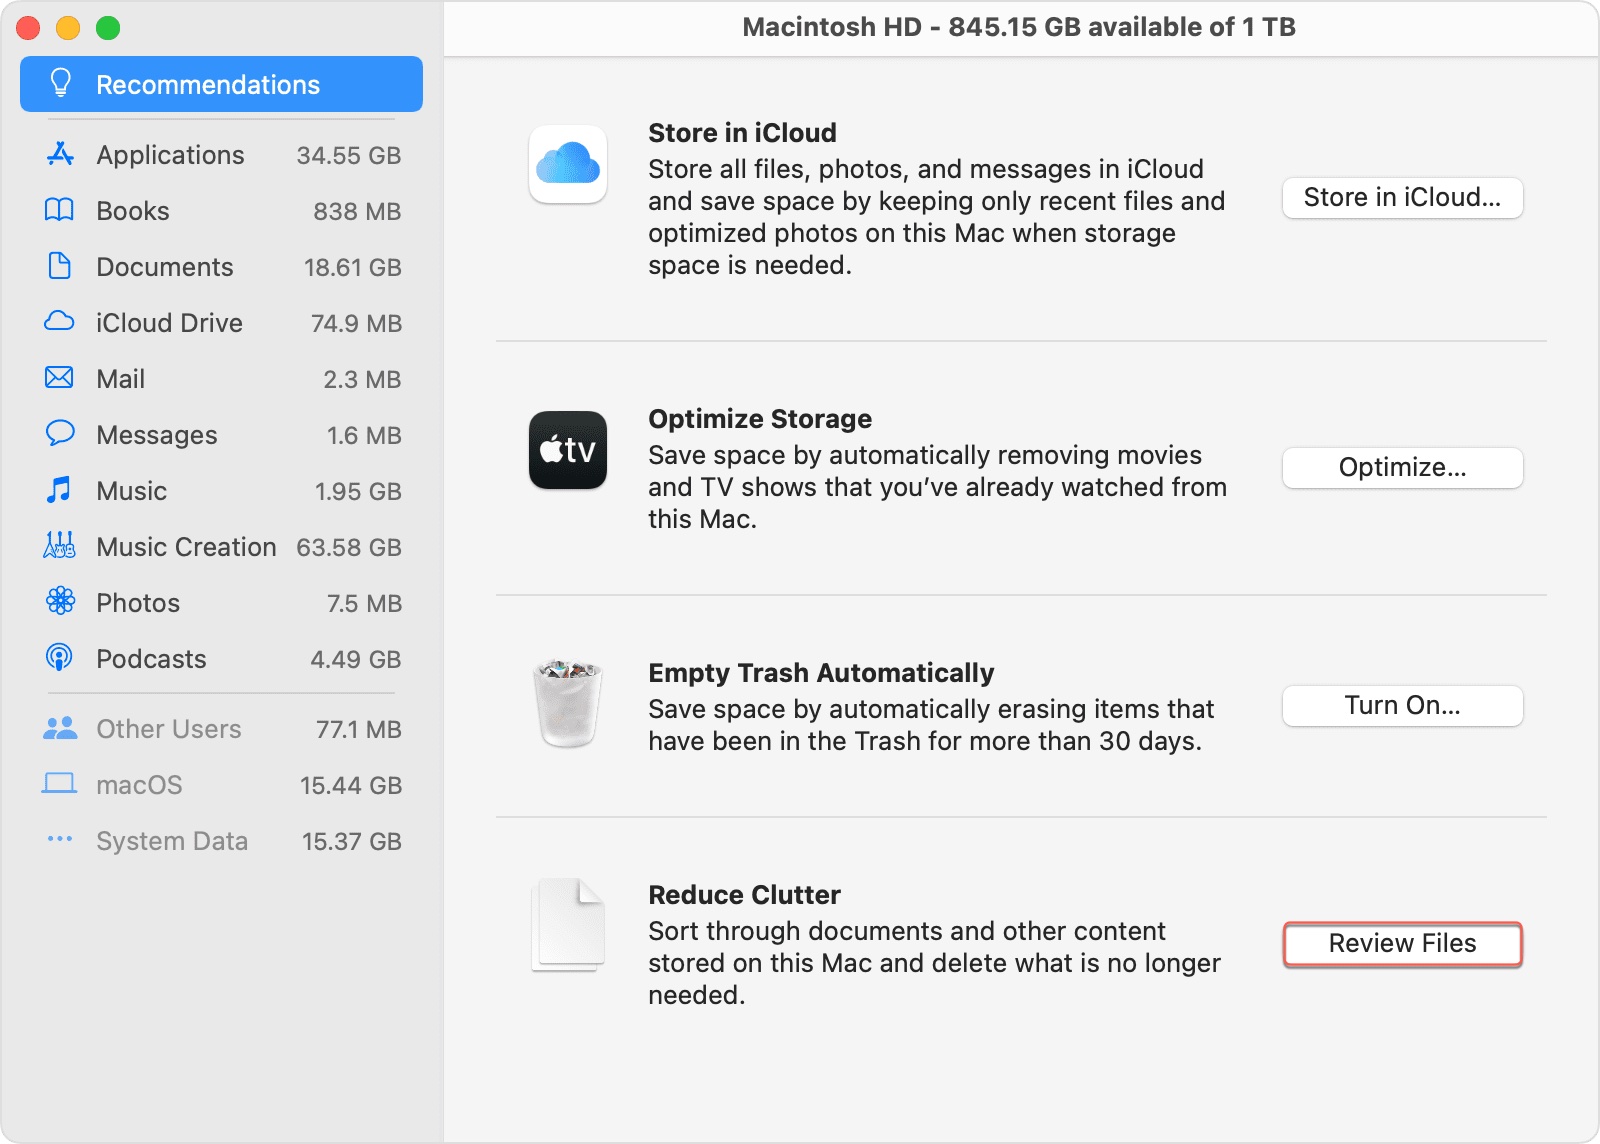
Section 1: Store in iCloud
This feature allows you to store files in the Desktop and Documents folders, photos, and messages to iCloud to save space. But Apple only provides 5GB of free iCloud storage, so you have to pay if you need more or you will receive the notification saying that "iCloud storage is full". To store files in iCloud, click Store in iCloud, then check the boxes alongside the files you want to keep in iCloud.

Once this feature is turned on, it will automatically free up local space when your Mac is low on storage. You can also expect:
Desktop and Documents: Except for the recently opened files, the rest are stored in iCloud, downloadable by double-clicking the download icon - a cloud with an arrow pointing down.
Photos: Photos stored on Mac are optimized to save space. The original ones are kept in iCloud.
Messages: Only recently opened messages and attachments are saved on your Mac.
Section 2: Optimize Storage
You can turn on Optimize Storage to automatically delete TV shows and movies you purchased from iTunes after you have watched them.
Section 3: Empty Trash Automatically
Usually, people right-click on the Trash icon to empty the Trash, but you can automatize the process by enabling Empty Trash Automatically. This feature will automatically remove items moved to the Trash longer than 30 days.
To set up the automatic deletion of Trash, click the Empty Trash Automatically option and confirm the action by tapping on Turn on.
Section 4: Reduce Clutter
Click on Review Files, and you can see tabs for Large Files, the Downloads folder, a list of Unsupported Apps, Containers, and a File Browser that gives you quick access to the folders for Pictures, Music, Downloads, Movies, Documents, etc. You can go through these tabs one by one and press the Space bar to preview a selected item.
Once you decide what to delete, choose the file, then click the Delete button to dump it permanently. This may take some time as you thinking over files you want to delete, but it's worth the effect.
The next step is to view each category listed on the left and remove the unwanted files. You will also notice two groups of data greyed out in the list naming System/Other or macOS/System data. They are made inaccessible to prevent users from removing the files inside, causing data corruption or unexpected behaviours.
Clear storage used by Virtual Machine
If you run Windows on Mac with a virtual machine, the biggest culprit to storage shortage may be the undeleted files accumulated through each operating system update or other files and programs stored on its partition. To avoid unimportant data cluttering up your Mac, you can configure Windows to automatically free up disk space, then manually run a cleanup.
- Go to Settings > System > Storage, and enable Storage Sense.

- Click Free up space now.
- Wait for the scan to complete.
- Review files that are taking plenty of disk space.
- Select files you want to remove, then click Remove files.
Delete duplicate files
Over time, your Mac will inevitably accumulate a large amount of duplicate files generated when you replicate documents or repeatedly download certain files such as app installers, online images, email attachments, and the like. Deleting these duplicates makes a great move to recycle wasted space for better intention.
To manually search for duplicate files:
- Open Finder.
- On the top menu bar, navigate to File > New Smart Folder.
- Click the + button at the top-right corner to bring up filters.
- When boxes pop up, choose Kind for the first box, then Document (or other data categories) for the box next to it.
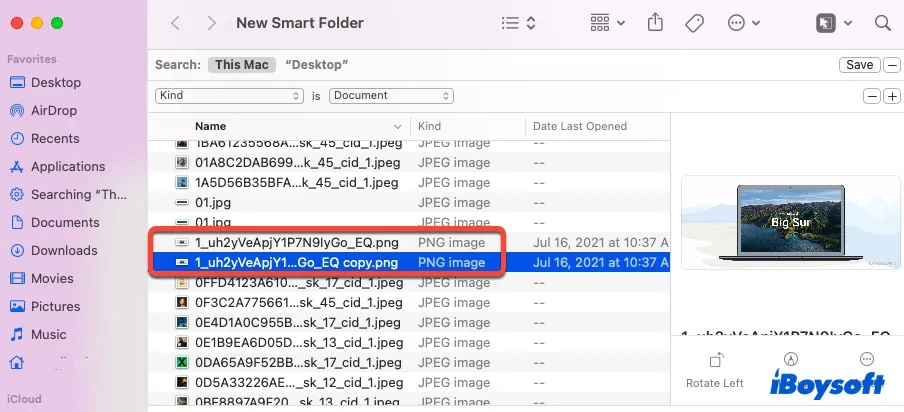
- Click on the Name column to sort the results.
- Find duplicate files you want to delete, right-click on them and choose Move to Trash.
If you use the Music app on Mac frequently, it has an easier way to find duplicate songs.
To find duplicate music files on Mac:
- Open Music.
- Navigate to File > Library > Show Duplicate Items from the top menu bar.
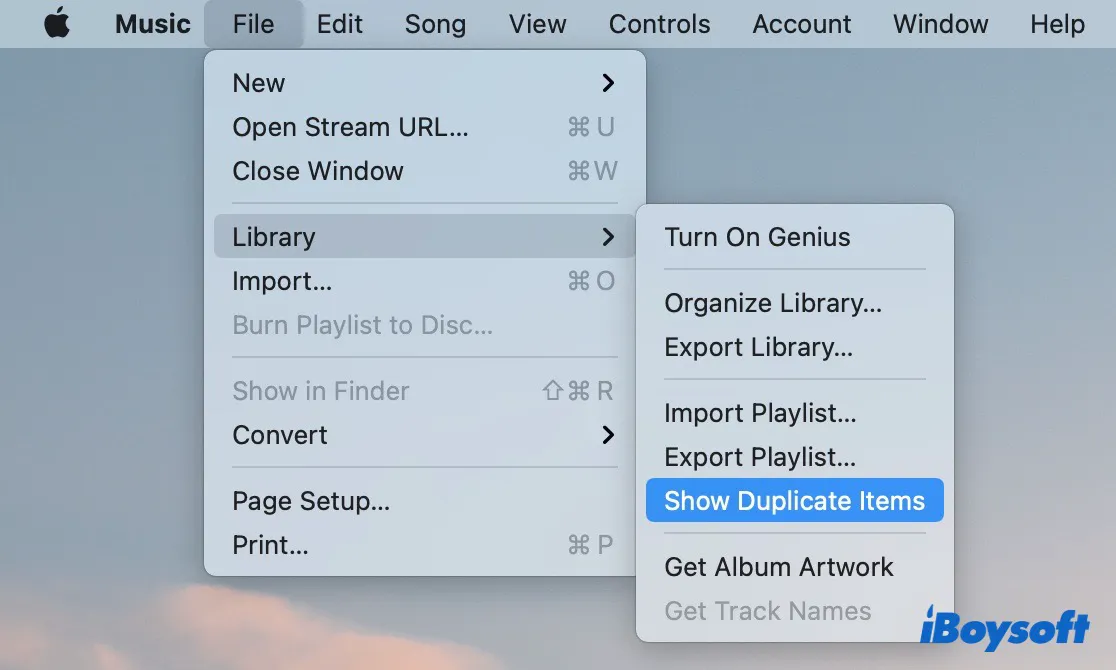
- Check the list of duplicate music files and delete those you don't need.
It takes time to search for duplicates manually. If you edit pictures or do tasks that produce duplicate files a lot, you can consider getting a free tool like MacClean or investing in paid software to do the job for you.
Clear browser data
When you use a web browser like Google, Safari, or Firefox, it saves information from the websites you visited in its cache and cookies. Your activities and preferences on a site are stored in Cookies to improve user experience. Although cookies expire automatically, it may pose a privacy issue since third parties can use them to track your browser history.
Unlike Cookies, Cache stores website contents such as images, documents for faster future retrieval. It takes up larger storage space and must be manually cleared. It's recommended to delete cookies on Mac every few weeks to free up some space and keep the browser running smoothly.
Note: Clearing cookies may reduce tracking and log you out of the websites.
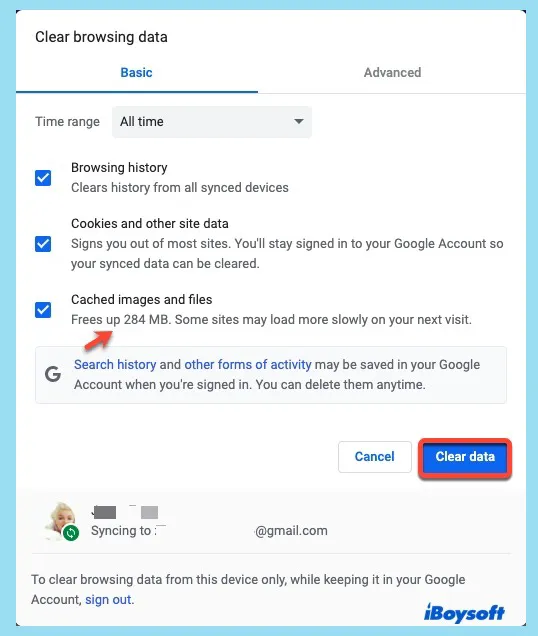
To clear Chrome's browser data:
- Launch Chrome, then click the three vertical dots at the top-right corner.
- Click More Tools, then select Clear browsing data.
- Select a time range, tick all options, and click Clear data.
If you want to stop third-party websites from tracking your activity or configure Google to remove cookies upon closing the browser window, follow these steps:
- Check the circle before Block third-party cookies on the "Cookies and other site data" pages.
- Then enable the "Clear cookies and site data when you close all windows" option.
- If you have some frequently visited websites that you trust and want them to use cookies to offer better recommendations, scroll down to the Customized behaviors tab.
- Click the Add button near the "Sites that can always use cookies" option.
- Enter the site URL and click Add.
To clear Safari's browser data:
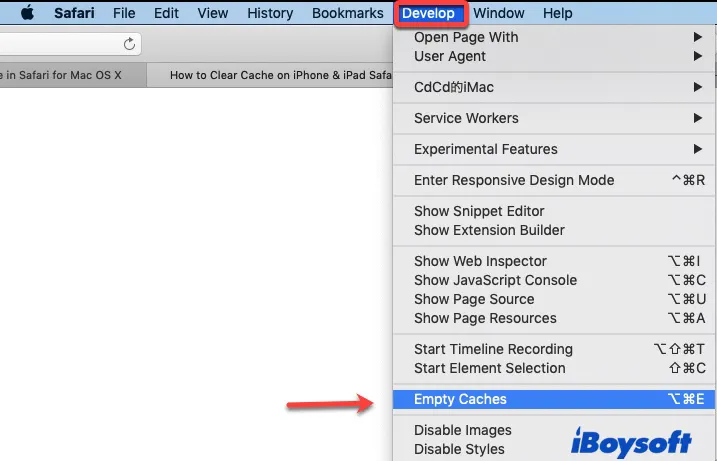
- Open Safari, and click Develop at the top menu bar. If you don't see it, follow step 2. Otherwise, move on to step 3.
- Click Safari > Preferences > Advanced on the top menu bar, then mark the box next to Show Develop menu in menu bar.
- Click Empty caches.
- Click Safari > Preferences > Privacy, then select Manage Website Data.
- Choose a website and click Remove to stop it from saving your information.
To clear Firefox's browser data:
- Open Firefox.
- Click the button with three horizontal lines at the top-right corner.
- Tap on Library > Clear Recent History.
- Choose a time range, then mark the checkbox next to Cache and Cookies.
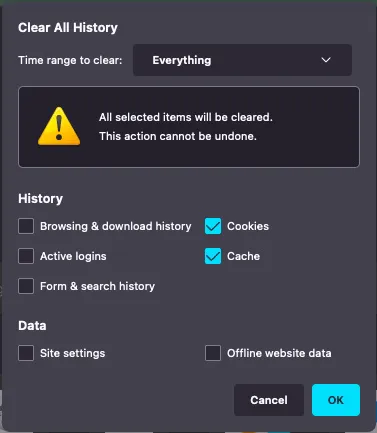
- Click OK.
Another way to locate caches is to open Finder, click the Go tab on the top, then select Go to Folder. Type in ~/Library/Caches and hit Enter to see all cache folders.
Remove application & system logs
Your Mac saves details about errors, crashes, and other issues that occurred in logs to help experts troubleshoot problems. However, these log files are not user-friendly and are almost useless to average users.
As time goes on, the log files will pile up and occupy the valuable space on your system drive. Given that deleting log files won't cause any damage to your Mac, it's advisable to clear them for more space.
To clear application and system logs on Mac:
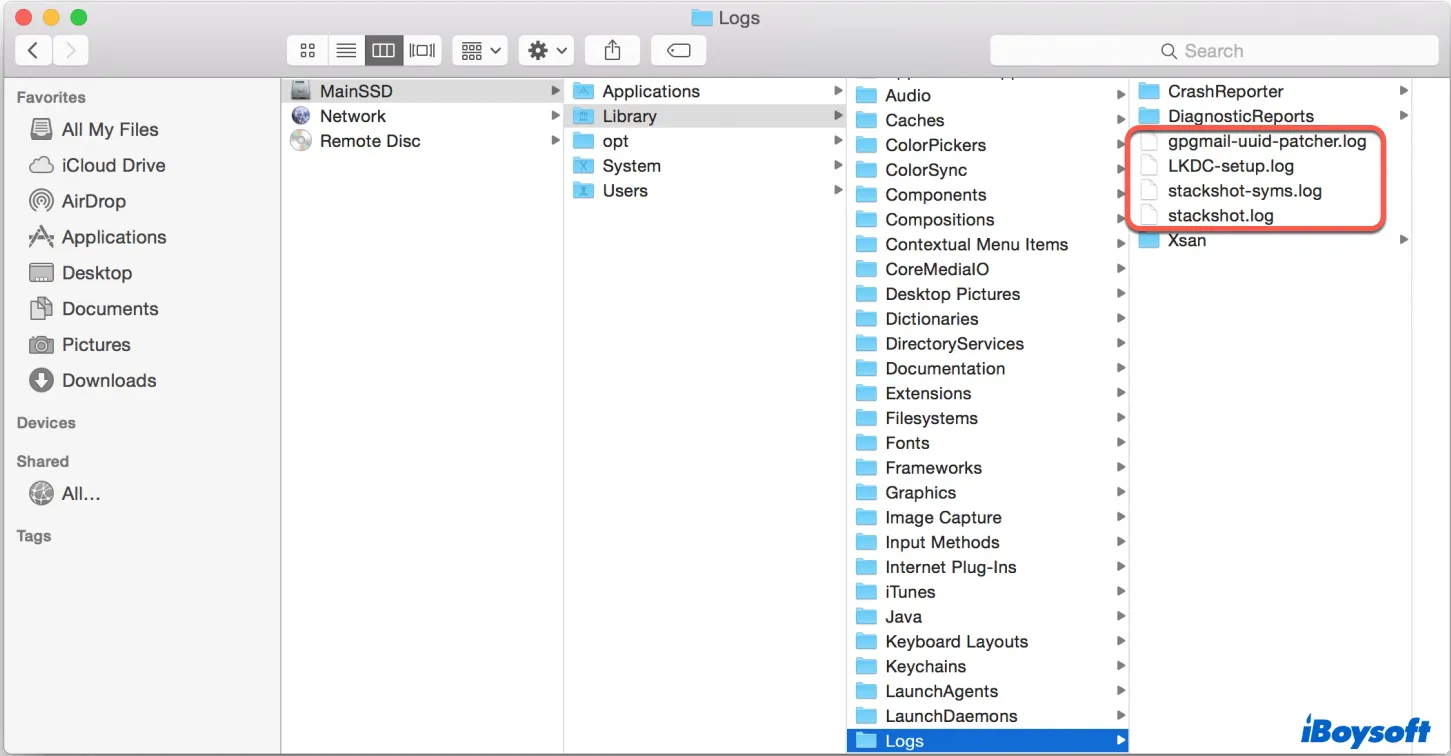
- Open Finder.
- Click the Go menu from the top, then select Go to Folder.
- Enter ~/Library/Logs to view application logs or /var/log to see system logs, then press Enter.
- Select files end with the .log extension, right-click on them, then choose Move to Trash.
Clean up iTunes backups for your iPhone and iPad
If you have backed up your iPad and iPhone with iTunes, there's likely a massive amount of backup files eating up your storage space. In this case, you need to close iTunes and go to the backup folders through this path: ~/Library/Application Support/MobileSync/Backup. The folders inside are randomly named, so you should review the contents before starting deletion.
Alternatively, you can delete the backups by opening iTunes and going to iTunes > Preferences > Devices. Here you will see a list of backups; select those you don't need and click Delete Backup. In addition, you can choose back up iPhone to external hard drive the next time to not strain the Mac disk space.
Delete large attachments in Mail
As an important ingredient of daily life, emails don't take up much space but may carry many attachments, such as pictures, documents, etc. When you delete emails, these attachments stay on your Mac, taking a piece of your storage space.
Therefore, you can set up your Email app to delete the attachment once the email is gone. Also, the junk mail you receive now and then won't go away unless you delete it or configure the app to do so.
How to set up the Mail app to remove attachments and delete junk mails:
- Launch the Mail app, click Mail in the top menu bar.
- Go to Preferences > General.
- In the box next to the "Remove unedited downloads" option, choose After Message is Deleted.
- Click the Accounts tab > Mailbox Behaviors.
- Beneath the "Erase junk messages" option, select After one month.
Learn more about deleting mail storage on Mac.
Remove unnecessary language files
Every application on your Mac comes with pre-loaded language files for many countries. But in reality, you only use one or two of them. That left the rest of the unused language files on your hard drive for no good reason. Since removing them doesn't impact your Mac, you can get rid of them to regain a few hundred megabytes or gigabytes of storage space.
To remove unused language files manually:
- Go to Finder > Applications.
- Right-click on an app and choose Show Package Contents.
- Navigate to Contents > Resources.
- Delete any subfolders with .lproj except for those you need.

Some of the language and code names used on Mac:
- English: en.lproj
- Spanish: es.lproj
- French: fr.lproj
- Chinese: zh.lproj
- German: de.lproj
- Japanese: ja.lproj
You need to repeat this process for all apps on your Mac, which may take a while. Luckily, there's a freeware called Monolingual that can automate and speed up the process for you.
To remove extra language files with free third-party app:
- Download Monolingual.
- Open Monolingual, uncheck languages you want to keep, then click Remove.
- Wait for it to be done.
Clean your desktop
Organizing your Mac desktop not only makes it better to look at, but also frees up space. Take a look at your Desktop and move anything you don't need to the Trash.
- Open Finder and choose Desktop.
- Click the View button and select as List.
- Sort the items by size and delete any unwanted files.
There's a simple trick for users running macOS Mojave or later to organize stuff on their Mac. Click on the blank space of your Desktop, select Use Stacks, and then you will see your files neatly stacked in categories.
Uninstall unwanted apps
You can uninstall apps you haven't used for some time or no longer need in storage management. Or directly from Finder.
To delete unneeded apps on Mac:
- Go to Finder > Applications.
- View the items as a list, then click the Size heading to sort the applications.
- Select an app you want to get rid of, right-click on it, and choose to Move to Trash or drag and drop the app's icon to the Trash can on the right side of your dock.
Move files to an external storage device
When it comes to freeing up space on Mac, deleting files is the obvious choice. But that's a different story if you have large files like photos that you don't want to get rid of. In that case, besides storing them in the cloud, you can move them to a USB flash drive or a hard disk drive. Here is an example of moving Photos Library to an external hard drive:
- Quit Photos.
- Insert your external storage device into the Mac.
- Press Command while dragging and dropping photos to the drive so that the original files are automatically deleted and save you time to delete them again.
- Once all photos are removed, hold the Option key while launching Photos.
- Navigate to Photos > Preferences > General, then choose Use as System Photo Library.
Empty the Trash
When you delete a file on a Mac, it often goes to the Trash, which means these files are still on your Mac until you empty the Trash. So the last resort for freeing up disk space on a Mac is to empty your Trash.
You can permanently delete files on a Mac by right-clicking on the Trash icon on your dock and choosing Empty Trash. You should make sure those files are unwanted because you can hardly recover permanently deleted files on a Mac. For apps like Photos, iMovie, and Mail that have their own trash cans, you need to open the app and erase the deleted files individually.
To permanently delete photos on Mac:
- Launch Photos.
- Click Recently Deleted in the left pane.
- Make sure you want these photos gone forever, then click Delete All.

How to Add More Storage on Mac [4 Ways Included]
If you encounter a storage shortage when using your MacBook, this post offers four ways to help you add more storage on Mac. Read more >>
Conclusion:
After the cleansing process is done, your Mac will regain precious space and reward you with improved performance. You can now reboot your Mac to start fresh and enjoy your lightweight Mac. To see how much space is available now, visit the Storage tab in About This Mac.
This post guides you to upgrade the HDD or SSD on your MacBook Air/Pro/iMac without losing data, you can clone the Mac drive to the new drive with iBoysoft DiskGeeker. Even if it is a Mac with an irreplaceable drive, you can upgrade it by booting the Mac from an external SSD.
FAQ about how to free up space on Macintosh HD
- QWhy is my Macintosh HD full?
-
A
If you store too many files without making an effort to clear space on Mac, your Macintosh HD will gradually fill up. When the available space is dangerously low, Mac will alert you with a pop-up saying that your startup disk is full. To find the culprit causing your Macintosh HD full, check the storage overview in Apple logo > About This Mac > Storage.
- QHow to manage storage on Mac?
-
A
Since macOS Sierra, Apple has added a storage management feature to help users quickly free up disk space on Mac. Besides utilizing this tool, you can follow the steps in this guide to delete duplicate files, unused language files, application logs, browser data, large attachments in emails, etc.