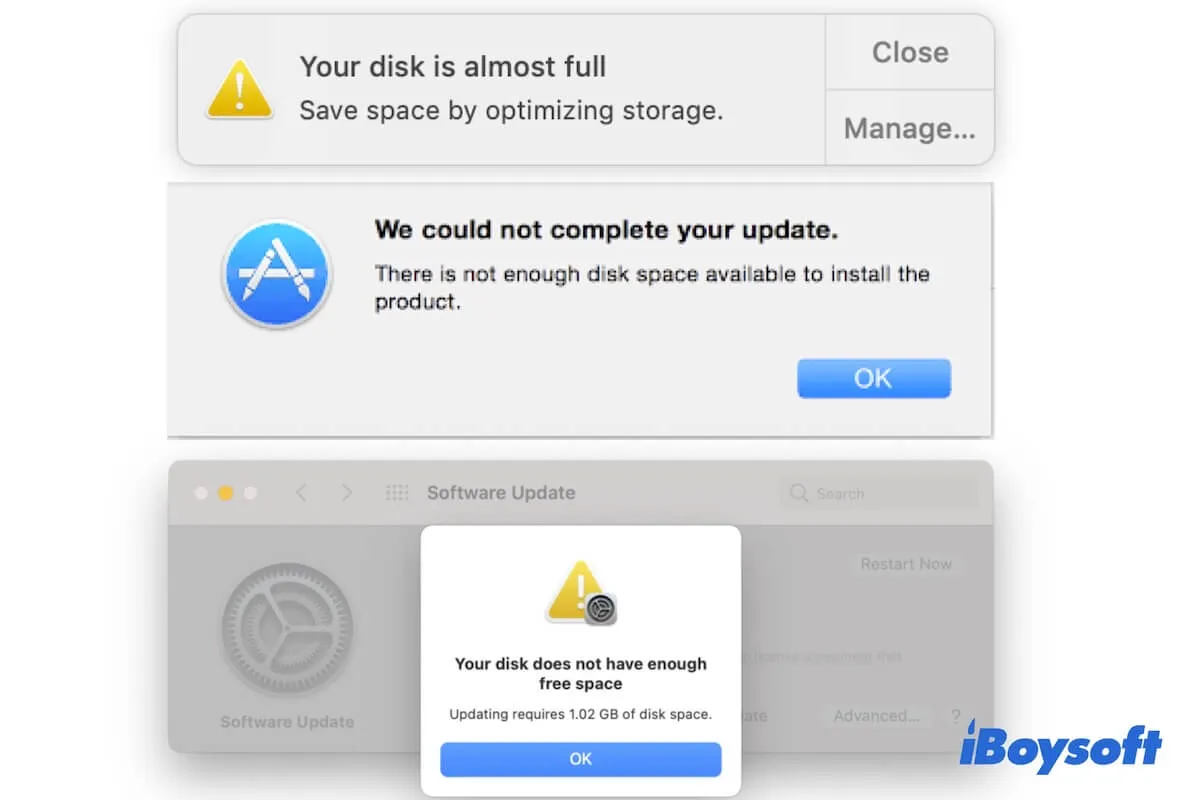
You attempt to update your Mac but it says the disk space is not enough, like the error "Not enough disk space for software update macOS Big Sur. Or you get the "The disk is almost full" or "Not enough disk space to copy" warning and can't save things to your Mac hard drive. However, when you check the Mac disk space in Storage Management or Disk Utility, you find that there is still plenty of available storage space.
It is so inexplicable that your Mac says "Disk Full" but it isn't! Don't worry. You can follow this post to learn why your Mac says not enough disk space but there is and get the solutions to eliminate the issue.
What to do if Mac says not enough disk space but there is:
| Ways | Specific steps | Effectiveness |
| Let Spotlight re-index all content on the Mac | 1. Click the Apple menu > System Preferences > Spotlight > Privacy. 2. Click + to add all partitions on your Mac disk and then remove them from the list. | High if it is caused by Spotlight indexing errors. |
| Use iBoysoft DiskGeeker to clean purgeable space | 1. Free download, install, and open iBoysoft DiskGeeker. 2. Select the startup disk and click Clean Junk. 3. Select the useless files and click Clean. | High as iBoysoft DiskGeeker can help you quickly clear up a lot of unwanted and useless files from your Mac. |
| Disable "Optimize Mac Storage" in iCloud | 1. Open System Preferences > Apple ID. 2. Select iCloud and uncheck "Optimize Mac Storage". | High as most of you are enabled "Optimize Mac Storage" when turning on iCloud. |
| Empty Trash | Open Trash and click Empty in the upper right corner. | Medium as some of you have the habit of emptying the Trash after deleting files. |
| Remove caches | 1. Open Finder > Go > Go to Folder. 2. Search ~/Library/Caches. 3. Move app caches to Trash. | Low as clearing app caches is a temporary way as app caches can be re-generated when apps are running. |
| Turn off the Time Machine automatic backup | 1. Open System Preferences > Time Machine. 2. Uncheck "Back Up Automatically". | High as turn off Time Machine automatic backup will stop hourly, weekly, and monthly local snapshots. |
| Remove purgeable storage using Terminal | 1. Open Terminal. 2. Enter for d in $(tmutil listlocalsnapshotdates | grep "-"); do sudo tmutil deletelocalsnapshots $d; done to delete all local backup snapshots. | Low as running command lines is not simple and may produce some derivative problems. |
Note: Purgeable space is the most possible reason that makes your Mac say not enough disk space but there is. To fix the issue and avoid the purgeable space from forming repeatedly, use iBoysoft DiskGeeker to help you clean up the useless files on your Mac to keep your Mac always having enough free space and running fast.
Share the ways to help others fix "Mac says the disk is full but it isn't".
What does it mean when the disk is full on Mac?
If your Mac alerts you that the startup disk is full, it means that there's not enough storage space to maintain your normal work on the Mac. Some of your operations on the Mac will be limited and your Mac may run slower and slower or crash. Or the startup disk full error may your Mac won't start in the end. You need to free up more space in a hurry.
Why does it say the disk is full when you have enough space?
It is worth mentioning that you may have ignored the "purgeable" space on Mac.
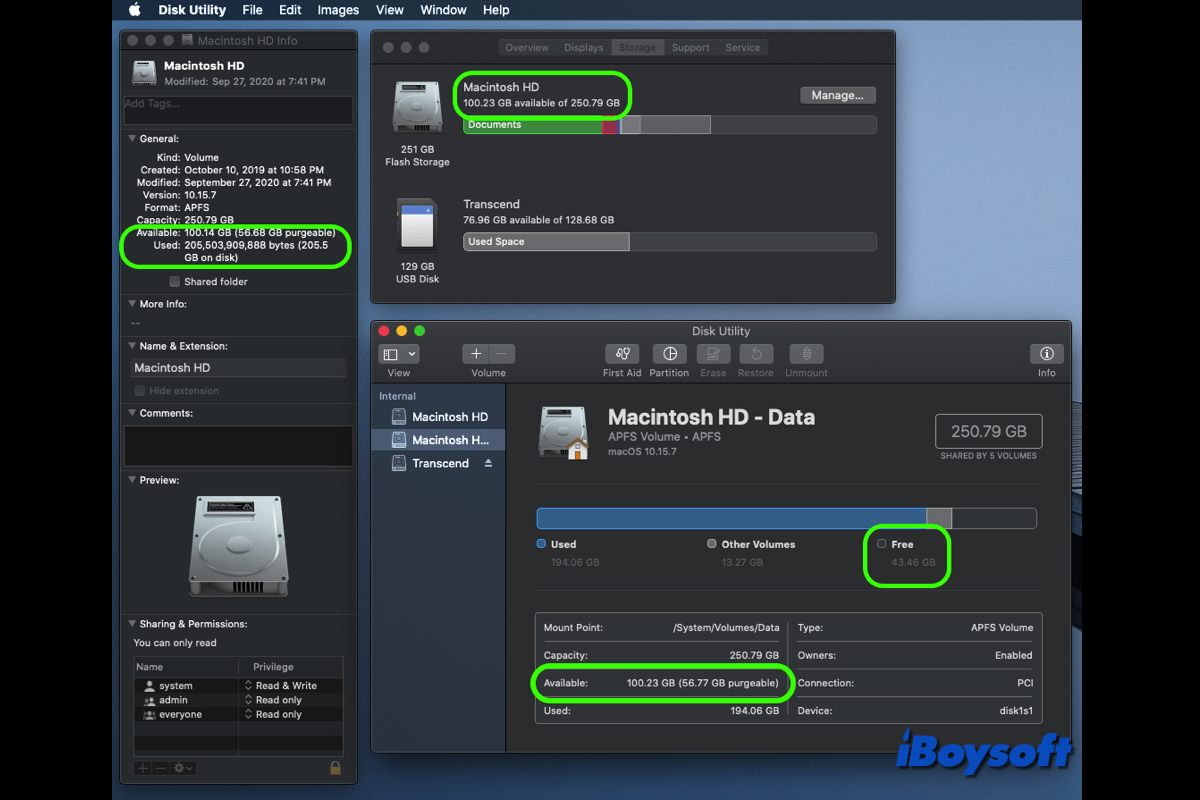
The labeled "Available" space for the hard drive in Mac Storage Management, Disk Utility, or Get Info is not absolute free space. Apple's definition of "Available" space in macOS contains the storage that "could become" free (so-called purgeable storage) when you really needed it. But, of course, whether or not you need it is Apple's decision. So, your actual free space should exclude the purgeable storage.
That's why your Mac says not enough disk space but you regard that there is.
And some users also report that after removing GBs of files from Mac, still no increase in the available storage space. This may be caused by Spotlight indexing or system errors.
Share to help others learn about the causes of this problem.
How to free up disk space on Mac/MacBook Air?
You may want to free up more space on your Macintosh HD to fix the startup disk full error. To clear system storage on your Mac, you need to remove the accumulated junk files on your Mac.
Here's how to free up space on your Mac hard drive with simple tricks:
- Use iBoysoft DiskGeeker to clean junk files on your Mac.
- Delete duplicate files.
- Clean browser history, cookies, and caches.
- Delete app logs and caches.
- Uninstall useless apps.
- Empty Trash in routine.
- Run Optimize Storage function in Storage Management.
Among the above methods, using iBoysoft DiskGeeker is the quickest and simplest way to clear system storage on your Mac. You can free download this Mac optimizer to help you analyze disk space and quickly remove useless files from your Mac!
Mac says not enough disk space but there is, try these ways to fix
If your Mac says not enough disk space but there is, try restarting your Mac first to get rid of the temporary system errors that may cause this problem. If it changes nothing, try the workarounds in this part.
By the way, a Mac should remain at least 15% free of its disk space to allow the OS and apps to run properly. Or else, a warning "Your disk is almost full" may appear and you may face issues like failure to update macOS or even boot up your Mac.
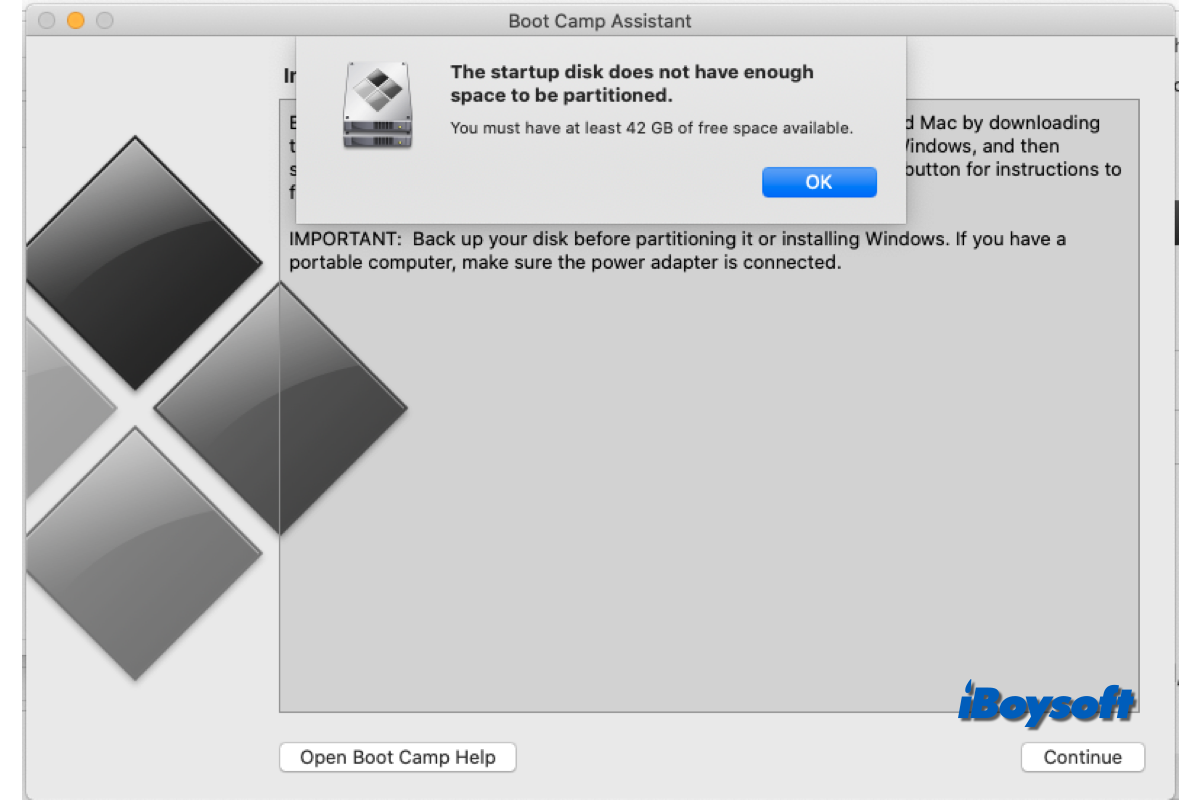
Receive the warning that the startup disk does not have enough space to be partitioned when using Boot Camp Assistant, but there is plenty of space on the Mac startup disk, read this post to learn the possible causes and effective fixes. Purgeable space is the most probable reason, clean them via iBoysoft DiskGeeker to fix the issue quickly.
Here's what you can do if your Mac says not enough disk space but there is plenty:
- Force Spotlight to re-index your Mac hard drive
- Use iBoysoft DiskGeeker to clean purgeable space
- Disable "Optimize Mac Storage" in iCloud
- Empty Trash
- Delete cache files
- Turn off Time Machine local snapshots
- Remove purgeable storage using Terminal
Force Spotlight to re-index your Mac hard drive
Spotlight indexes all content on your Mac for your quick access. But if errors arise in Spotlight indexing, it may mean that the Mac disk is full and won't let you save files onto your Mac.
To get you out of the "Mac says disk full but isn't" trouble, you can force Spotlight to re-index your Mac.
Here's how:
- Go to the Apple menu > System Preferences > Spotlight.
- Click on the Privacy tab.
- Click the add button (+) at the bottom to add the Mac startup disk to the list.
- Select them and click the remove button (-) to remove them from the list.
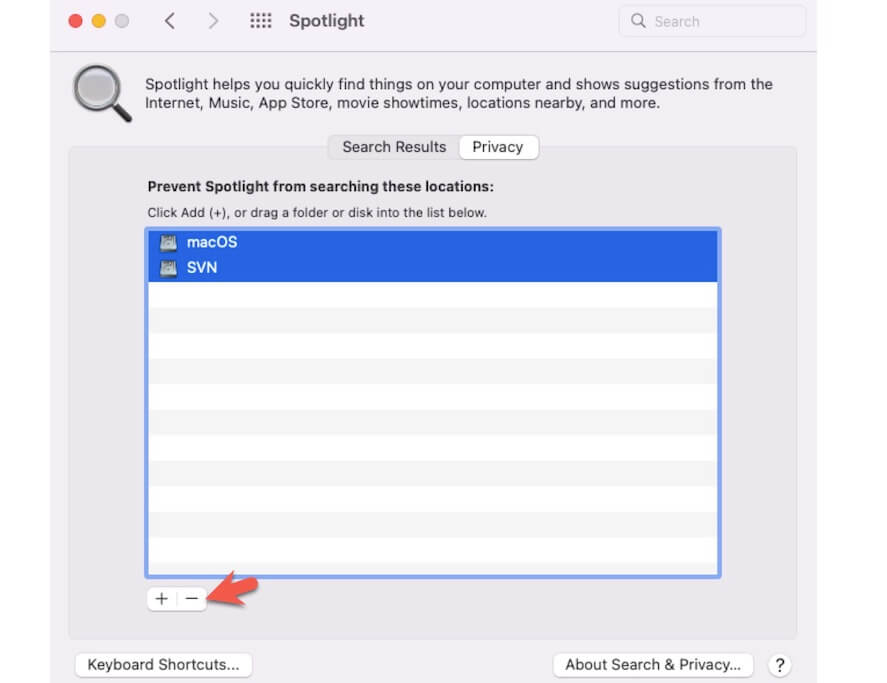
- Close System Preferences.
Then, Spotlight will reindex all content of the Mac hard drive. After that, go to the Apple menu > About This Mac > Storage to check the available storage and see if the disk is almost full hint shows up again or not.
Use iBoysoft DiskGeeker to clean purgeable space
As a lot of files on your Mac are maintained in purgeable space, the following ways can only remove some but not all of them from your Mac. And converting the purgeable space to real available space is just a temporary solution to release space on your Mac.
If you want to better manage the storage on your Mac and block the "The disk is almost full" warning from appearing again, you'd better use a professional Mac cleaner or disk storage management tool to help you.
iBoysoft DiskGeeker is an all-in-one disk management assistant that supports analyzing disk space and cleaning junk files on the Mac hard drive with simple clicks. With it, you won't need to waste a lot of time searching for temporary and unnecessary files scattered on your Mac.
Here's what iBoysoft DiskGeeker can bring you:
- Clean the purgeable space with a few clicks.
- Remove unwanted and useless files from your Mac quickly.
- Better maintain disk space and increase space utilization.
- Optimize Mac performance.
You can free download iBoysoft DiskGeeker to clear the purgeable space on your Mac now!
How to clean the purgeable space on your Mac using iBoysoft DiskGeeker:
- Free download, install, and open iBoysoft DiskGeeker on your Mac.
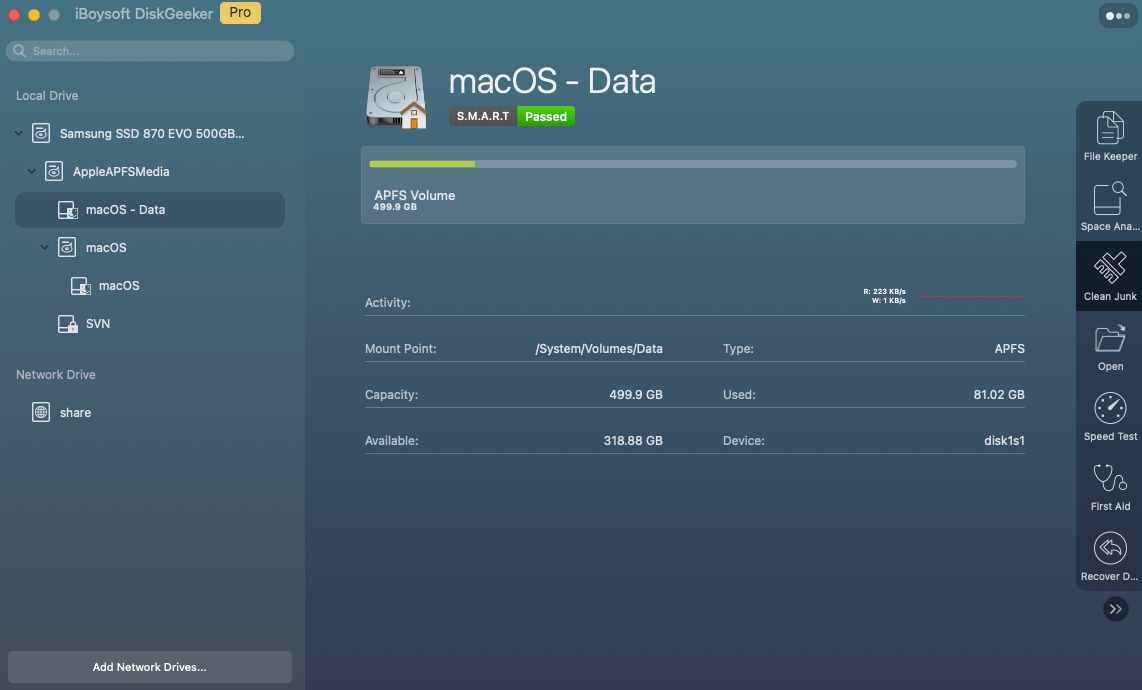
- Choose the Macintosh - Data (or macOS - Data) volume that stores your user data.
- Click "Clean Junk" from the right-side toolbar.
- Wait for the scanning process to complete.
- Click on the categories on the left sidebar to browse content.
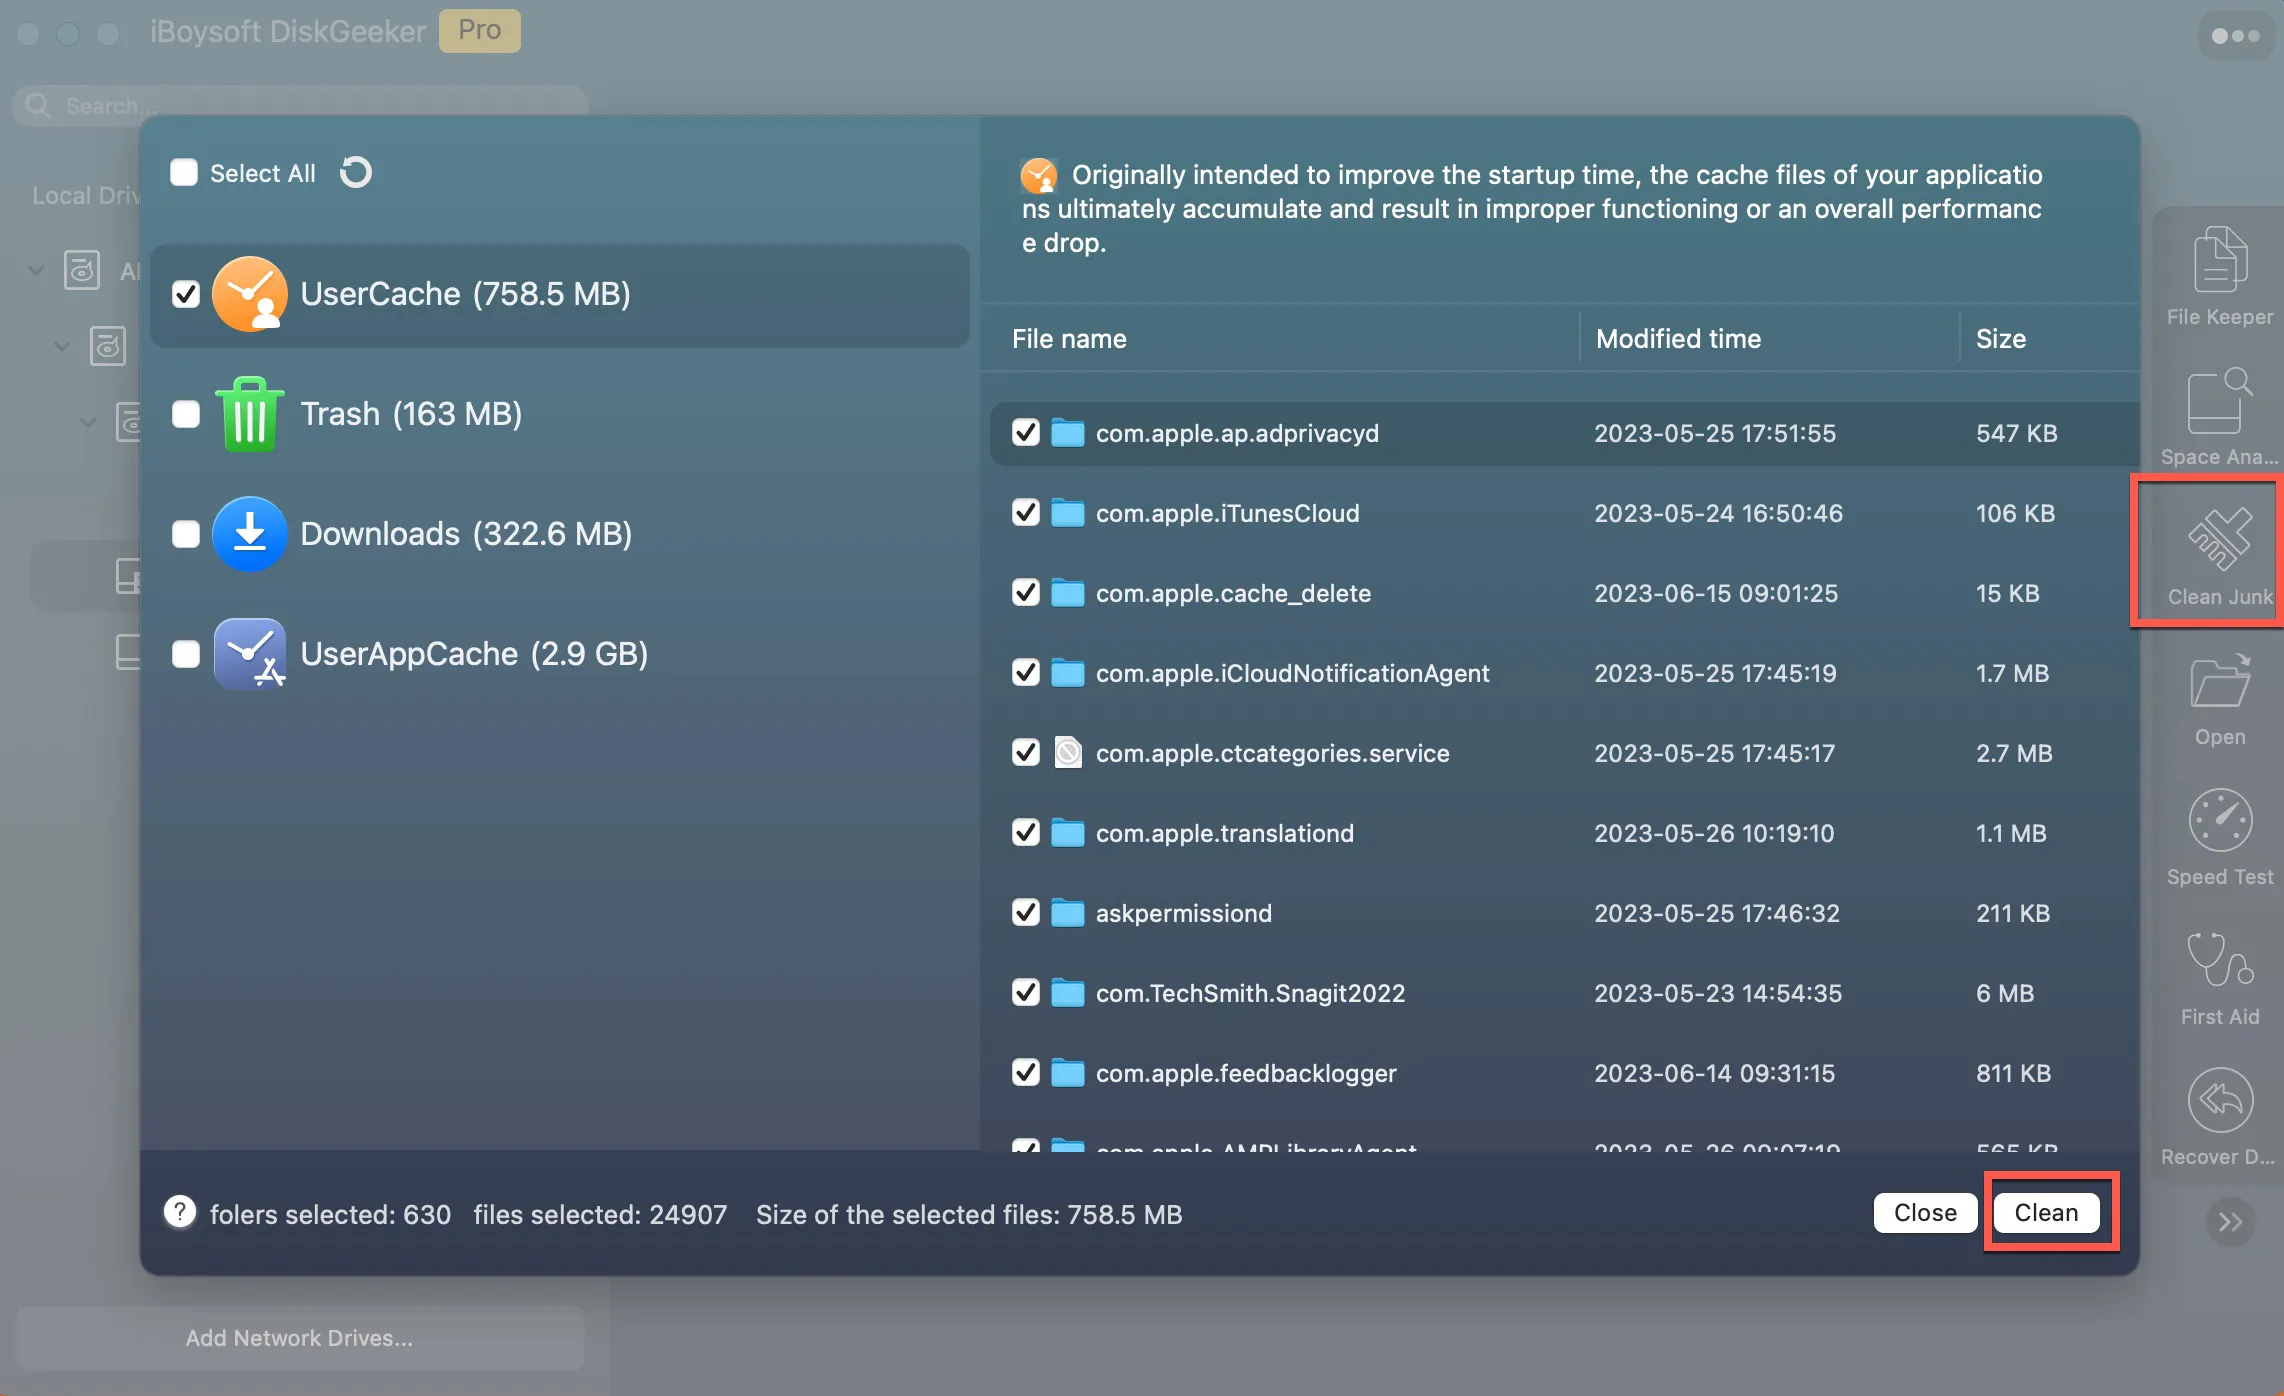
- Choose the purgeable files (the temporary files like app cache, files in Trash, and more.) and click Clean > OK.
Disable "Optimize Mac Storage" in iCloud
Perhaps, you've enabled iCloud to sync your Mac and checked the Optimize Mac Storage option. The Optimize Mac Storage function allows the full contents of iCloud Drive to be stored in the "invisible" space (if available) on your Mac. And the "invisible" space they occupy is the purgeable storage.
So, you can disable Optimize Mac Storage in iCloud on your Mac:
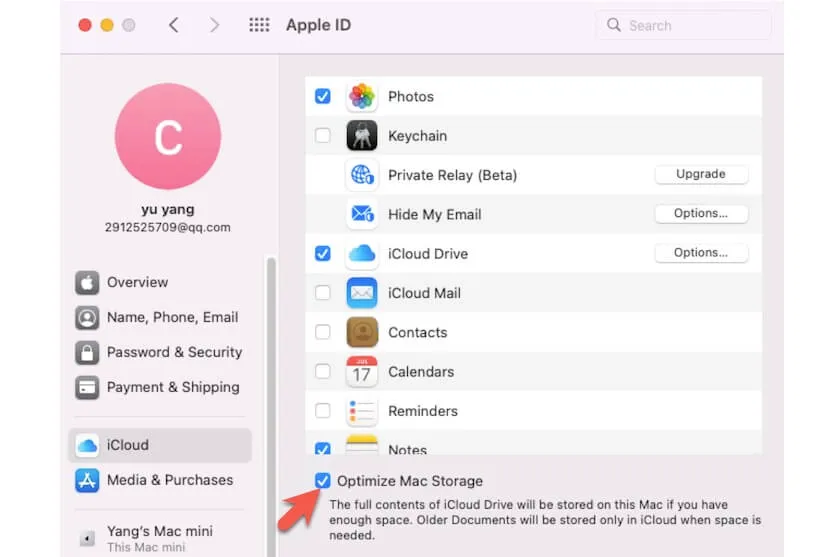
- Open the Apple menu > System Preferences.
- Click on the Apple ID.
- Select iCloud.
- Uncheck the "Optimize Mac Storage" option.
You should know that on macOS Sonoma, the iCloud Drive Remove Download option missing to remove downloaded files when the Optimize Mac Storage is turned off. Therefore, you can turn it on after you fix the issue.
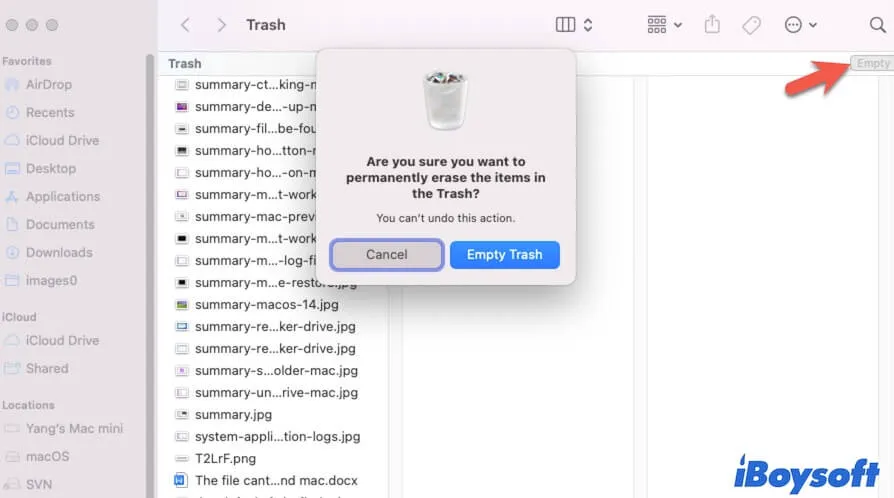
Empty Trash
The files that you delete by right-clicking and choosing Move to Trash or directly dragging and dropping to Trash are still on your Mac and take up your space.
You can empty your Trash to release the space that the deleted data occupies to increase the real available storage of your Mac disk. Then, you won't think that the Mac says not enough disk space but there is.
Delete cache files
Cache files are usually produced by the apps on your Mac. They are temporary and purgeable files that are used to help the apps run smoother and quicker. If you often run multiple apps on your Mac, especially streaming apps like image processing software and video watching and editing software, a lot of cache files will be produced and eat your disk space.
So, go to delete the app caches on your Mac to let you won't regard that there's plenty of space when the Mac says not enough.
- Open Finder and click "Go" on the top menu bar.
- Select Go to Folder on the Go dropdown menu.
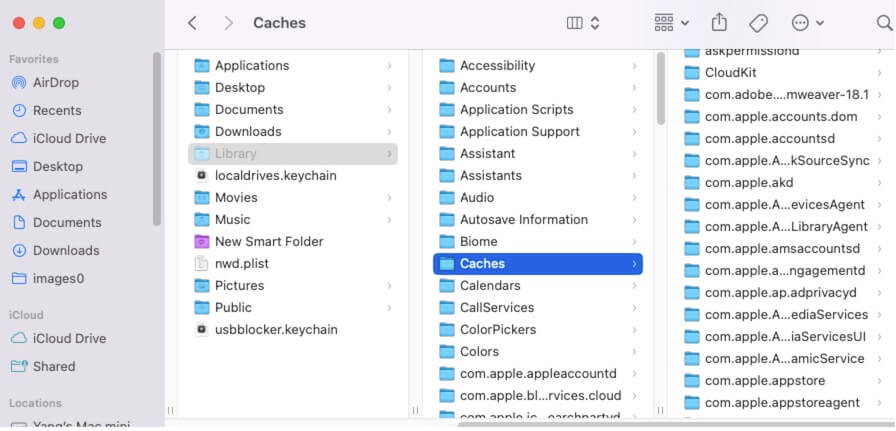
- Enter ~/Library/Caches and press Return.
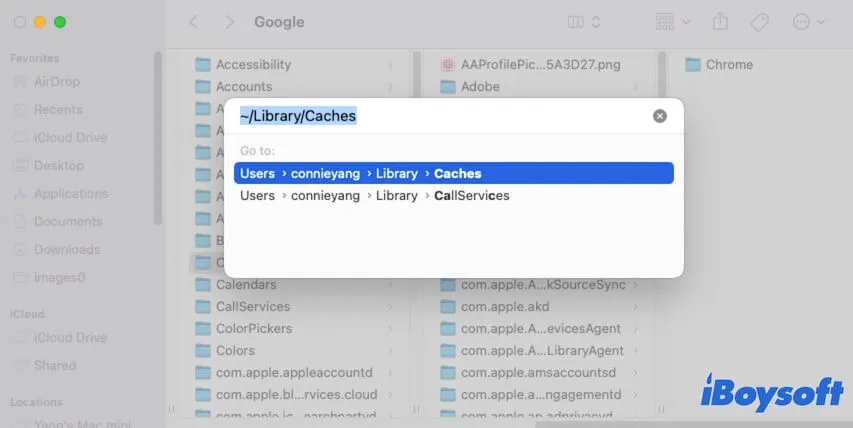
- Browse and move the caches to Trash and empty your Trash.
Turn off Time Machine automatic backup
If you've enabled the "Back Up Automatically" option in Time Machine preferences, Time Machine will automatically create local snapshots hourly, daily, and weekly and keep them on your Mac. Since the local snapshots can be auto-deleted when your Mac hard drive is full, they are managed in purgeable space.
So, to reduce the purgeable space that causes the "Mac says not enough disk space but there is" confusion, simply disable Time Machine automatic backup.
Here's how:
- Open Finder > System Preferences > Time Machine.
- Uncheck the box beside "Back Up Automatically" on the Time Machine preferences window.
Remove purgeable storage using Terminal
If the purgeable storage still occupies much space on your Mac hard drive, you can use Terminal to remove the backup snapshots to reduce storage usage. But running command lines in Terminal is a complicated job as every incorrect step may result in your Mac's abnormal performance, like crashing or not booting up. So, take care of every step below:
- Open Terminal.
- Copy and paste the command below into the Terminal window and press Return. This is to show up all local snapshots created by Time Machine on your Mac. (If no local snapshots, exit Terminal.) tmutil listlocalsnapshots /
- Enter the following command to delete the local snapshot you want. Here, you need to replace 2023-06-26-123742 with the generated date of the target local snapshot. Then, press Return. sudo tmutil deletelocalsnapshots 2023-06-26-123742
- If you want to delete all local snapshots at a time, put this command line into Terminal: for d in $(tmutil listlocalsnapshotdates | grep "-"); do sudo tmutil deletelocalsnapshots $d; done
If this post helps you resolve the issue, tell your followers.
There are multiple ways to check the free disk space on your Mac, however, you may find problems that macOS Disk Utility shows wrong free space, macOS reports different free space in Finder, Disk Utility, Storage, etc. Read this post for proven solutions.
FAQs about Mac says not enough disk space but there is
- QHow to check disk space on Mac?
-
A
Click the Apple menu > About This Mac > Storage. Then, you can see the disk storage usage on your Mac. Alternatively, you can open Launchpad > Other > Disk Utility or right-click the disk from the Finder sidebar and choose Get Info to check the disk space.
- QHow to clear system storage on Mac?
-
A
You can clear the system user data storage space on your Mac in these ways:
1. Use iBoysoft DiskGeeker to scan and delete unnecessary files with a few clicks, including user cache files, user logs, Trash, app cache, etc.
2. Manually delete Time Machine local snapshots.
3. Manually empty Trash.
4. Uninstall useless apps.