You receive the error "Your startup disk is almost full" and prepare to free up more space on your Mac. However, after you've removed some documents, applications, or other types of files from your Mac, you find that the Mac storage space in Finder or Disk Utility is not changed at all.
It is so ridiculous that deleting files doesn't free up space on Mac. But don't worry, you can read this post carefully to learn about the reasons and also acquire the ways to fix the deleting files but Mac free space not changing issue.
Why does your Mac not have free space after deleting files?
Deleting files but not freeing up space mainly occurs on macOS Monterey, Big Sur, and Catalina. But different users are in different situations. So, there are a variety of reasons why your Mac doesn't update the free storage space after deleting files and macOS reports the wrong free disk space. If you delete the files by simply moving them to Trash, these files are not cleared up and still stay on your Mac hard drive.
Usually, most users who report the Mac free space do not change after deleting, they have already emptied Trash. In this case, the main cause of this problem may be related to macOS errors, your use of Time Machine, and the number of files you've deleted.
Share the reasons why deleting files but not freeing space on Mac Big Sur with others.
Deleting files doesn't free up space on Mac, try these solutions
If you are also one of those who are troubled by Mac free space not changing after deleting files, you can wait for a moment to check if the available space is updated. If not, follow the workarounds below to get out of the dilemma.
Here are all the possible methods to fix 'deleting files but not freeing space on Mac':
- Close the document or other files before deleting
- Ensure you've emptied the files from Trash
- Restart Mac
- Disable Time Machine and disconnect your backup disk
- Deleting files in Safe Mode
- Fix the startup disk errors in macOS Recovery Mode
1. Close the document or other files before deleting
If you are editing a document and meanwhile delete it, a new document will be generated when you finish editing. So, before permanently cleaning up the files from your Mac, stop using them and close them. Or else, you'll find that deleting files doesn't free up space on your Mac.
2. Ensure you've emptied the files from Trash
Maybe, you forgot to empty the files that you've put into Trash. So these files are still on your Mac startup disk. You can open the Trash bin and check if your deleted documents, installers, or other files are there. If they are, select them and then right-click to choose Delete Immediately. Or you can click the Empty button in the Trash folder to permanently remove all the files in Trash.
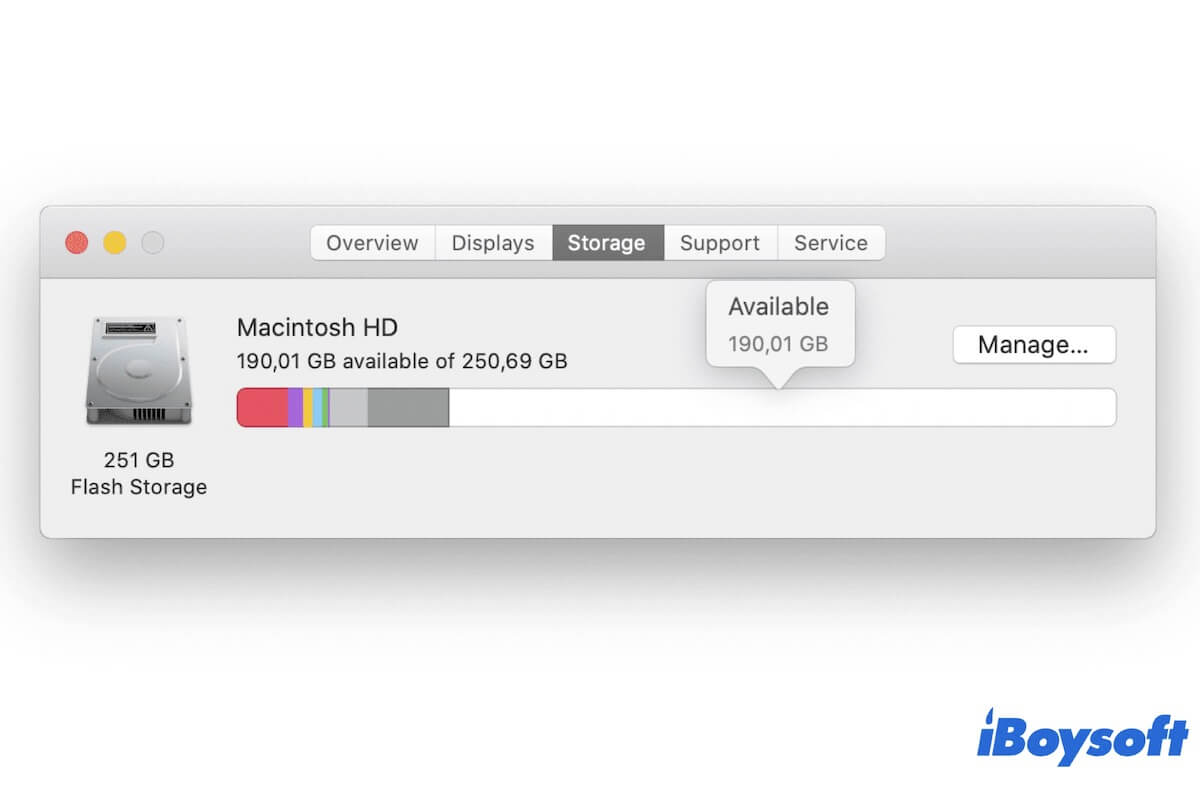
Now, you can open Disk Utility in Launchpad or click the Apple menu > About This Mac > Storage to check if the available space is increased or not.
3. Restart Mac
Commonly, the capacity of free space will be updated immediately after the time you delete files from your Mac. But sometimes, the system occurs temporary errors, leading to the task of updating free space lagging or getting stuck. And a Mac restart can fix these errors and refresh the macOS. Thus, you can reboot your Mac to see if the usable disk space is increased.
4. Disable Time Machine and disconnect your backup disk
Some users illustrate that the Time Machine may be the troublemaker that results in deleting files but not freeing space on Mac. Once you enable Time Machine, it saves local snapshots on your Mac about every hour and keeps them for 24 hours. And your Mac calculates the space occupied by snapshots as available storage (the purgeable space).
Perhaps, the time when you remove files from your Mac, Time Machine also creates the local snapshot with a similar capacity. Hence, you still can't store other files on the limited storage on your Mac. That is why you regard that deleting files doesn't make the space increase. And if you back up your Mac to an external hard drive at the same time, Time Machine will also save an additional snapshot once the backup finishes.
So, you can temporarily disable Time Machine in System Preferences and disconnect the Time Machine backup disk until you free up a large amount of available disk space. And turn off Time Machine will also enable Mac to delete the no longer required local snapshots.
- Open Apple menu > Time Machine. Or click the Time Machine icon at the top Apple menu bar and then select Open Time Machine Preferences.
- Uncheck Back Up Automatically.
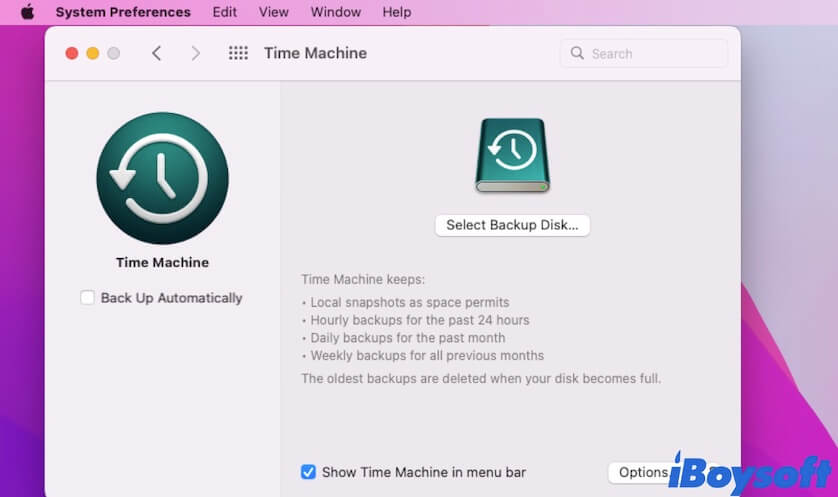
- Eject your Time Machine backup disk.
5. Deleting files in Safe Mode
Some third-party apps may be with designed with scripts that prevent you from completely deleting them or even interfere removing other unwanted files on Mac.
To verify if it is true, you can boot your Mac into Safe Mode and then delete some useless documents, DMG files, downloads, or others. If the free storage space grows, it means that these third-party apps lead to deleting files but do not free up space on your Mac.
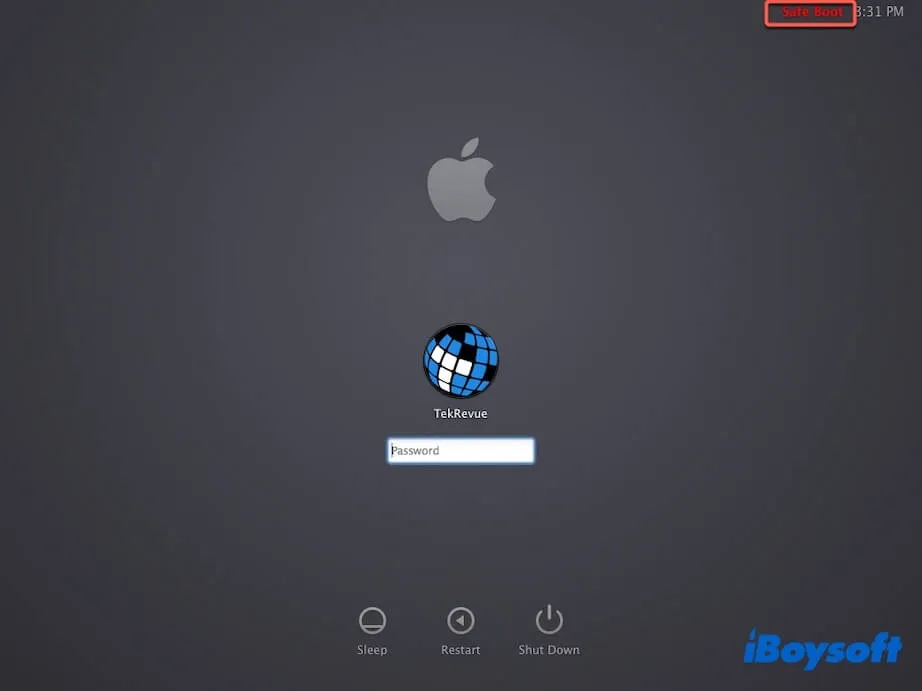
To boot your Intel-based Mac in Safe Mode:
- Turn off your Mac.
- Restart your Mac and hold down the Shift key at the same time.
- Release the Shift key when the login screen appears.
To boot an M1 Mac in Safe Mode:
- Shut down your Mac.
- Press the power button until the startup options show on the screen.
- Select the startup disk and press down the Shift key.
- Click Continue to Safe Mode and release the Shift key.
Then, you can check if there's a built-in uninstall button on the third-party software or use Terminal to completely remove it from your Mac.
6. Fix the startup disk errors in macOS Recovery Mode
If the above ways can't fix the issue of 'deleting files but not freeing space' on your Mac, you should think about whether there are errors on the startup disk causing it. You can verify and fix the minor errors on the Mac startup disk in macOS Recovery Mode.
- Boot your Mac in macOS Recovery Mode.
- Select Disk Utility to open it.
- Select your Mac startup disk (macOS or Macintosh - HD) at the left sidebar in Disk Utility.
- Click First Aid at the top of the pane > Run.
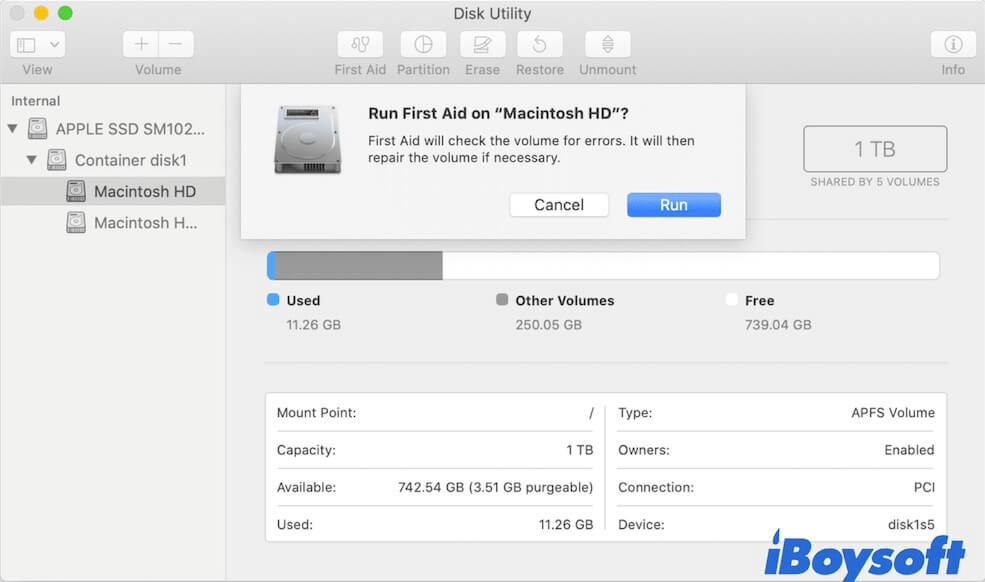
- Wait for the First Aid checking process done.
Restart your Mac and check if the storage space in Disk Utility or in the Apple menu > About This Mac > Storage is increased.
How to greatly increase free space on your Mac
Perhaps, you just delete a few documents or an application from your Mac. So the increase in available space is not very significant. If you want to increase free storage space on your Mac to a large extent, you need to organize files on your Mac in routine, such as cleaning up a large number of unnecessary files, especially those large ones.
Delete useless downloads, large files, and apps with the built-in tool
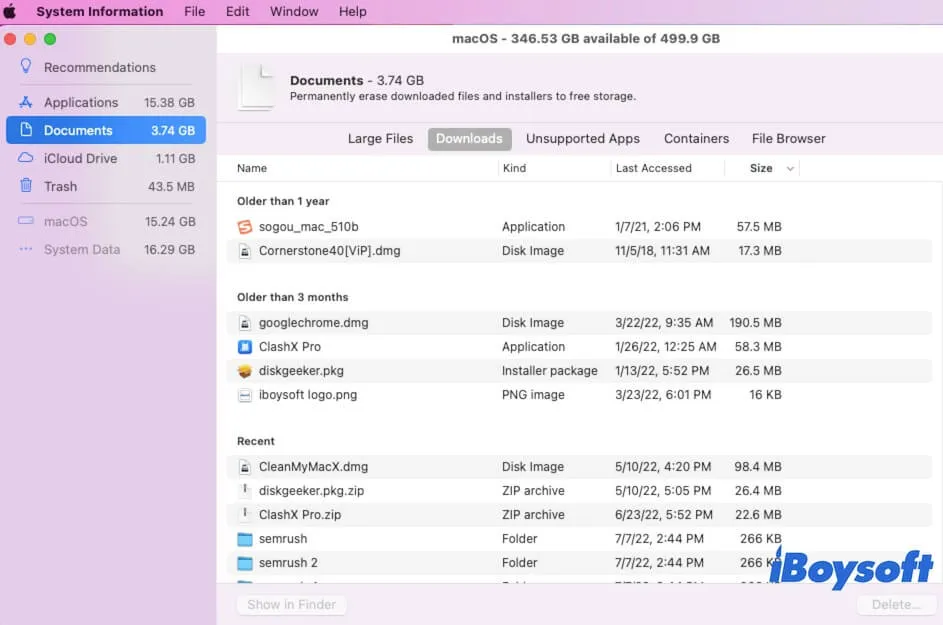
macOS is designed with a storage management utility, which can be used to free up space on Macintosh HD.
To open this tool, go to the Apple icon > About This Mac > Storage and then click the Manage button at the upper right corner of the window. Then, you can then see some of the files displayed by category, including applications, documents, Trash, etc.
You can select the unwanted apps, large files, downloads, and other files in batch from the list and then click the Delete button to clean them up.
Clear browser cache files
Also, the accumulated cache files and browsing history occupy part of your disk storage space. You need to clear the cache on your Mac in routine.
Here take Safari as an example. You also need to clean up cache files on other browsers, like Chrome and Firefox.
- Open Safari on your Mac.
- Click the Safari option at the top Safari menu bar and select Preferences.
- Select Privacy and click the Manage Website Data button. Then, click Remove All to remove the saved website data.
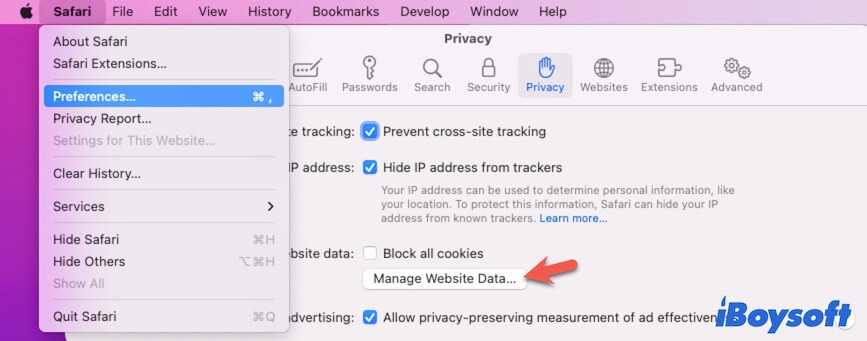
- Go back to the top Safari menu bar and click History > Clear History. You can clear all history or only the history at a certain period of time.
Remove junk files with a professional Mac cleaning tool
In fact, there are various files that take up your space, making your Mac run slower and slower. To optimize your Mac, it is necessary to use a Mac cleaner to clean up junk files on your Mac.
Commonly, a professional Mac cleaning tool can not only help you remove the cache files, useless documents, and unwanted apps but also can delete other useless files that are hard to find, such as system logs, user logs, and app leftovers.
Here, iBoysoft DiskGeeker is your best choice. This advanced Mac cleaner software can help you permanently clean up the useless files on your startup disk within a few clicks, freeing up a large amount of space in a short time.
How to use iBoysoft DiskGeeker to clean up your Mac and free up disk space:
- Free download and install iBoysoft DiskGeeker on your Mac.
- Open the app and select your startup disk.
- Click the Clean Junk button on the right-side toolbar.
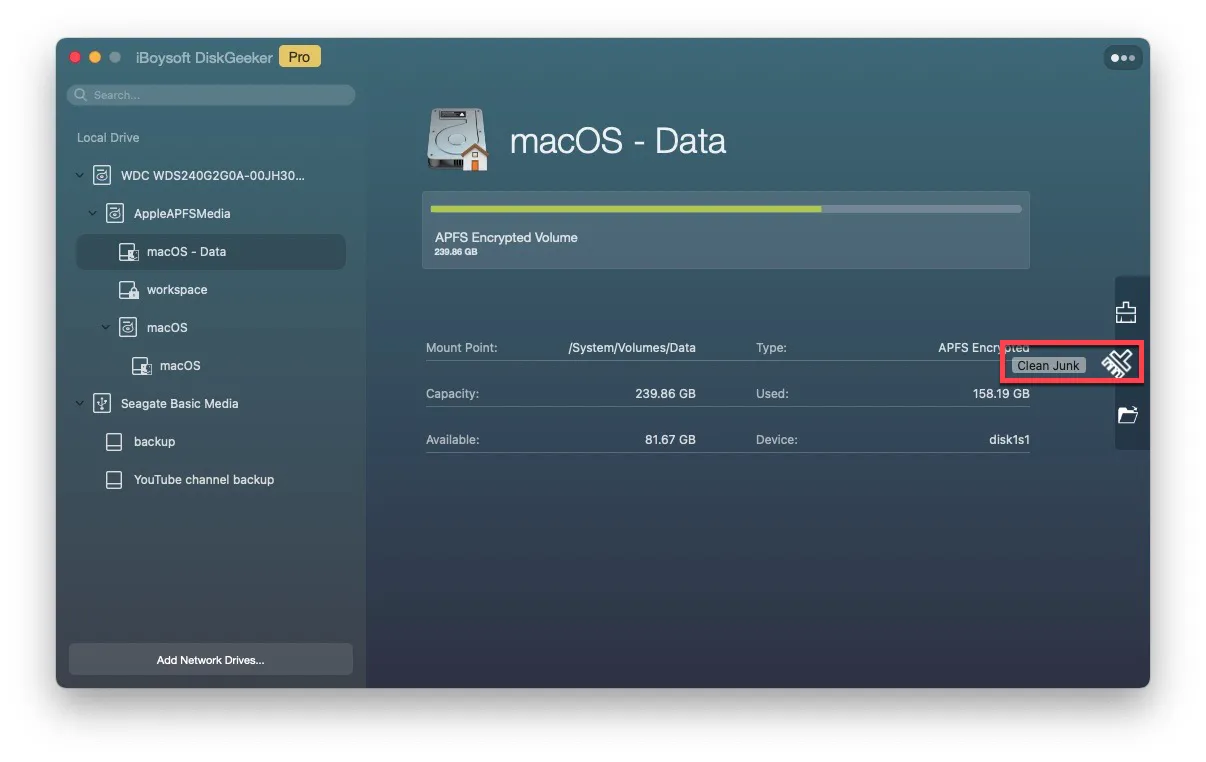
- Open the folder and select the files you want to delete.
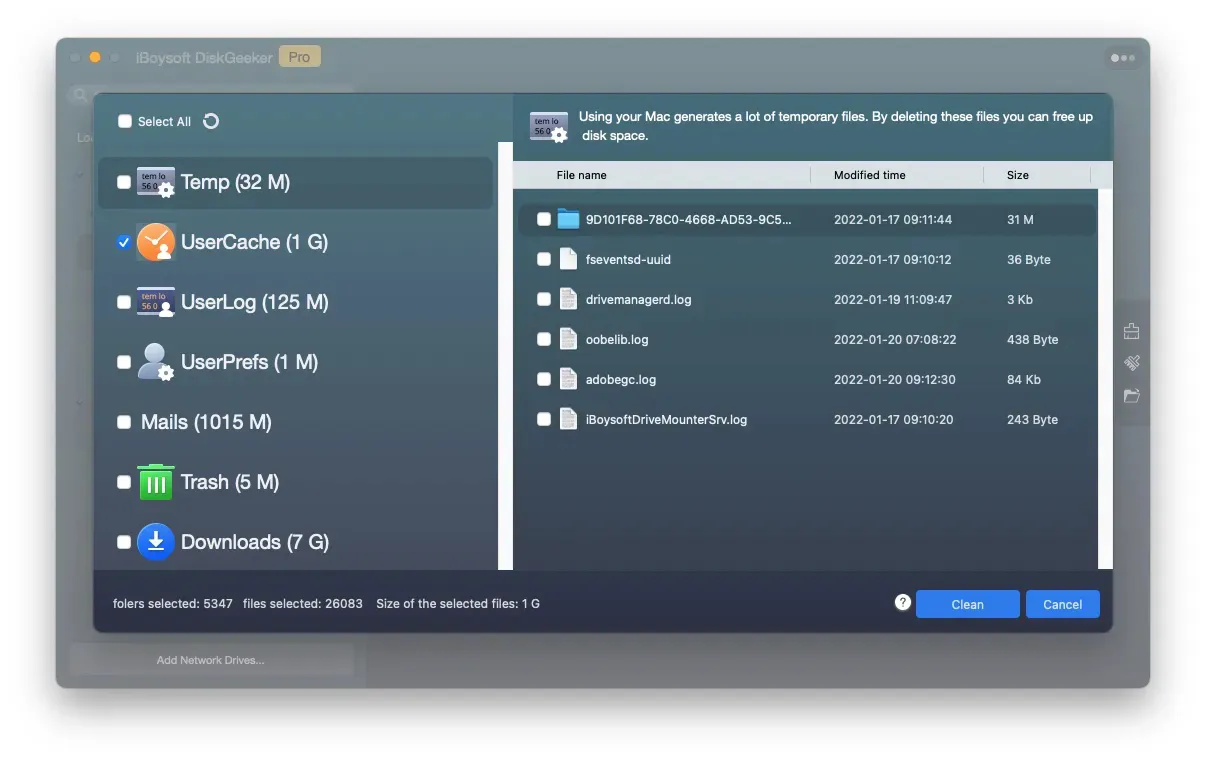
- Click Clean > OK.
With the assistance of iBoysoft DiskGeeker, you can find that the free space on your Mac is greatly increased.
If these ways help you out with the Mac free space not updating error, share with more people who are in the same plight.
FAQ about deleting files doesn't free up space mac
- Q1. Why is my hard drive still full after deleting files?
-
A
Sometimes, the system is stuck on updating the available space. You can wait for a moment. And by theory, after you delete files from your Mac, the storage space on the startup disk that is used to save the deleted files is not reclaimed immediately until the new files occupy the space.
- Q2. Why can I not free up space on my Mac?
-
A
To free up space on your Mac, you not only need to move the files to Trash but also need to empty Trash to completely remove them from your Mac. And if you want to free up a large amount of space on Mac, you need to delete the large files in batches, such as useless apps, documents, downloads, media, movies, audio, etc.