This post will answer all your questions about NTFS for macOS Sequoia 15, including whether macOS Sequoia supports NTFS and how to write to NTFS on macOS 15.
Tips: The successor of macOS Sequoia has been announced. If you're interested, try NTFS for macOS Tahoe.
Can macOS Sequoia write NTFS by default?
NTFS is a type of file system developed by Microsoft and is mainly used in Windows to store, organize, and retrieve data on storage devices, such as HDDs, SSDs, and USB drives.
As a competitor of Microsoft, Apple still doesn't have the privilege to write to NTFS-formatted disks.
macOS Sequoia, like the previous macOS versions, still only supports reading NTFS.
Use a professional NTFS for Mac Sequoia
#Best no-formatting method #Safest method to write to NTFS on Sequoia
NTFS for Mac usually refers to a third-party NTFS driver that is designed to grant you read-write access to NTFS drives on Mac.
There are diverse Microsoft NTFS for Mac tools, and each one claims to be professional, but is quite different in performance, read-write speed, operation, security, price, and more in reality. You can check the NTFS for Mac tech evolution and get a deep learning of the technology that popular NTFS for Mac utilities take.
Among them, iBoysoft NTFS for Mac is distinctive. This Apple-trusted NTFS mounter is easy to use. Once you install it on your Mac, it can automatically mount the connected NTFS external drives in full read-write mode.
What differs iBoysoft NTFS for Mac from others is its dual-mode: Simple Mode and Advanced Mode.
- Simple Mode: Allow users to directly write to NTFS drives without enabling kernel extensions and installing the NTFS driver.
- Advanced Mode: Let users install its self-designed NTFS driver and also enable system extensions. This enables the NTFS drives to be automatically mounted in read-write mode every time they are connected to the Mac and also has more stable performance.
With this software, you can:
- Edit, delete, and add files on the NTFS drive in Finder seamlessly
- Move and copy files from Mac to NTFS drives
- Erase external drives to NTFS on a Mac
Most importantly, it not only supports macOS Sequoia 15 but also its successor, macOS Tahoe 26.
How to use:
- Free download and install iBoysoft NTFS for Mac on your Mac.
- Connect the NTFS drive to your Mac.
- Click Enable Writable and choose a mode - Simple or Advanced.
This tool will immediately and automatically mount the NTFS drive with full read-write access.
Note: For your initial installation of iBoysoft NTFS for Mac, it will prompt you to install an NTFS driver, enable System Extensions in System Settings, and allow the program to access the Desktop folder in order to grant full disk access to the app and ensure it is workable on your Mac.
If the NTFS driver stopped working after the Sequoia update, follow: NTFS for Mac Not Working on macOS Sequoia.
Try free NTFS for Mac for macOS Sequoia
#Command-oriented way, hard to operate#Open-source apps bring unstable performance
There are free NTFS for Mac programs that support macOS Sequoia:
- NTFS-3G
- macFUSE
- Mounty for NTFS
They are not standalone software; rather, they need to work together.
macFUSE acts as a bridge or runtime environment on macOS. It does not provide NTFS write support itself; instead, it allows third-party filesystem drivers to run on macOS.
NTFS-3G is the actual NTFS read/write driver. However, on macOS, NTFS-3G depends on macFUSE. Without macFUSE, NTFS-3G usually cannot work properly.
Mounty for NTFS is not an NTFS driver by itself. It is more like an auto-mounting and graphical helper tool that uses either macOS's built-in NTFS support or NTFS-3G.
Dependency requirements vary by version:
- Mounty 1.x versions (such as 1.13, 1.14, 1.15, and 1.16) mainly relied on macOS's experimental NTFS write support.
- Mounty 2.0 version (released in March 2023) often requires:
macFUSE
NTFS-3G
As a result, on macOS Sequoia, Mounty is often not fully standalone. In many cases, users still need:
macFUSE + NTFS-3G + Mounty
In this setup:
- NTFS-3G acts as the actual NTFS read/write driver
- macFUSE acts as the runtime environment
- Mounty acts as the auto-mounting/UI tool
Reformat the NTFS drive to a macOS-compatible file system
#Suitable for empty NTFS drives#Suitable for NTFS drives with a few files (or else, backup will take much time)
Since NTFS is not writable on macOS Sequoia, you can reformat it to a macOS-compatible file system, including:
- APFS
- Mac OS Extended (Journaled)
- exFAT
- FAT32
For cross-platform use, exFAT is the best choice.
Reformatting the NTFS hard drive is to erase all content on it and reassign a file system. Thus, you need to back up your files in advance to avoid data loss. However, if your NTFS drive contains a huge amount of files:
- Both the file backup and disk erasure processes will take a long time.
- You may face NTFS drive erasure failure, as disk erasure is a complicated process.
If you insist on reformatting to make the NTFS drive writable on macOS Ventura or Sequoia, follow these steps:
- Connect your NTFS drive to your Mac.
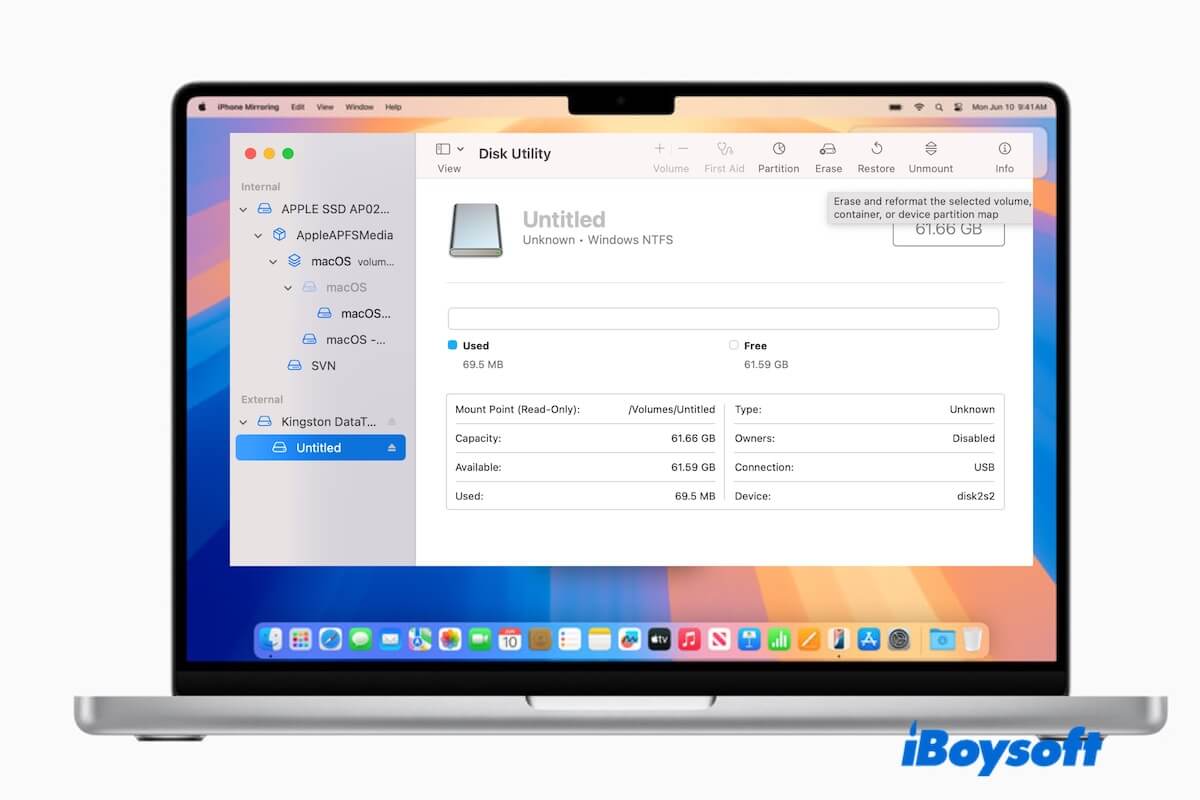
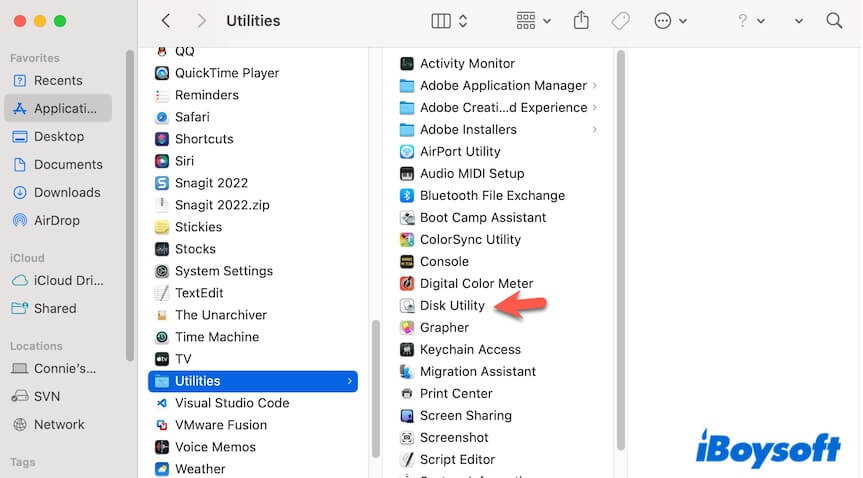
- Open Finder, click the Applications folder on the sidebar > the Utilities folder > Disk Utility.
- Select the NTFS drive from the sidebar.
- Click Erase on the toolbar.
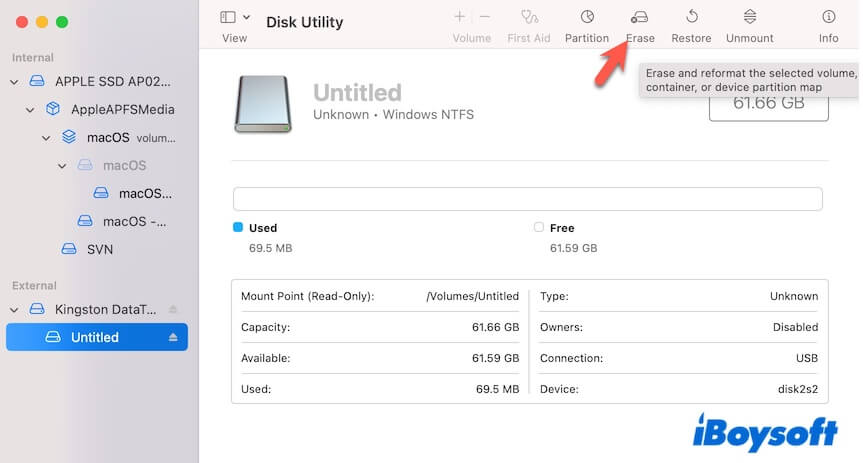
- Rename the NTFS drive, choose a macOS-compatible file format for it, and click Erase.
If you only need to use this drive on your Mac in the future, you can format it to APFS or Mac OS Extended. If you prepare to use the drive cross-platform, you need to format it to exFAT or FAT32.
Also read:
FAQ about NTFS for macOS Sequoia
- QIs free NTFS for Mac safe on Sequoia?
-
A
Free NTFS for Mac tools are generally less reliable and potentially riskier than commercial NTFS drivers on macOS Sequoia.
Since Apple keeps tightening system security and changing filesystem behavior from macOS Ventura, older free NTFS tools may:
Fail to mount drives properly
Cause random disconnects
Have slower write speeds
Increase the risk of file corruption during large transfers
- QShould I format NTFS to exFAT?
-
A
It depends on the situation.
If your NTFS drive is empty, just reformat it to exFAT.
If your NTFS drive stores a large number of files, you'd better not format it. Because reformatting will erase data on the drive, you need to back up first. Backing up large amounts of data will take a long time.