
I finished downloading macOS Ventura just fine. But when I agreed to the terms, it gave me an error saying, "macOS Ventura cannot be installed on Macintosh HD." Why is macOS Ventura not installing? Any suggestion on how to fix it?
Updating or upgrading to a new macOS version always has the potential to go wrong, and macOS Ventura is no exception. Like what's said in the above quote, a lot of Mac users have encountered the error reading, "macOS Ventura cannot be installed on Macintosh HD," or "macOS Ventura cannot be installed on this computer," when trying to install macOS Ventura.
Fortunately, there are quite some solutions you can try to eliminate the error, and we will explain the practical ones in detail. Before trying any of the methods, let's start by understanding why macOS Ventura cannot be installed on Macintosh HD.
Note: A quick fix is to download the full installer of the macOS version and then install it. If you can't install macOS Ventura, choose another method:
How to Download & Install macOS
How to Install macOS on Unsupported Macs
Why can't macOS Ventura be installed on Macintosh HD?
There could be numerous causes for the appearance of "macOS Ventura cannot be installed on Macintosh HD" or "macOS Ventura cannot be installed on this computer." Some of the common ones include:
- Ventura bugs
- Lack of storage space on Macintosh HD
- Corrupted macOS installer file
- Startup disk issues
- Unstable or poor internet connection
- Incompatible hardware
- Missing or damaged installer path
Now that you know the possible reasons why macOS Ventura failed to install on your Mac, follow the tips below to sort out the issue.
How to Fix 'macOS Ventura Cannot Be Installed on Macintosh HD'?
Though most of the solutions we'll discuss soon won't cause data loss, it's still recommended to back up your Mac with Time Machine before troubleshooting the macOS installation error. Once you've made sure your data is safe, you can try out the methods below in the order they are shown to fix macOS Ventura not installing on your Mac.
Note: If you encountered the error when installing macOS Ventura on an unsupported Mac, ensure that you use the latest version of OpenCore Legacy Patcher.
How to fix "macOS Ventura cannot be installed on Macintosh HD or this computer":
- Fix 1. Check the internet connection
- Fix 2. Reboot your Mac and retry the installation
- Fix 3. Ensure Macintosh HD is APFS-formatted
- Fix 4. Set your Mac to the correct date and time
- Fix 5. Delete the installer and redownload it
- Fix 6. Install macOS Ventura from Software Update
- Fix 7. Update to the latest version of your current macOS first
- Fix 8. Install macOS Ventura in Safe Mode
- Fix 9. Install macOS Ventura from App Store
- Fix 10. Install macOS Ventura from Internet Recovery
- Fix 11. Install macOS Ventura with a bootable USB drive
- Fix 12. Install macOS Ventura on the original SSD
- Fix 13. Repair your startup disk
- Fix 14. Free up space on Macintosh HD
- Fix 15. Clean install macOS Ventura
Share this list of solutions to help more Mac users who can't install macOS Ventura.
Check internet connection
Even if you're installing macOS Ventura from a downloaded installer, the internet is still needed for the installer to get firmware and other information specific to your Mac. So, you should make sure that your Mac has a working and stable internet connection. Consider using an ethernet cable if your WiFi is slow.
Or, you can directly download macOS 13 from the macOS Ventura download database.
Reboot your Mac and retry the installation
Sometimes, a reboot is all you need to get past the installation error, as it can fix all sorts of minor glitches, clear the memory and give your Mac a fresh start. You can click the Apple menu and choose Restart to reboot your Mac. After it starts up, retry installing macOS Ventura. You might need to try several times for the installer to work correctly.
If you still can't install macOS Ventura after several attempts to rerun the installer, move on to the next fix.
Ensure Macintosh HD is APFS-formatted
If you are upgrading from an old version of macOS, your Mac may still be formatted with Mac OS Extended (Journaled), also known as HFS+, rather than the required APFS for macOS Ventura. Incompatibility could also lead to SDErrorDomain error 104 and you may not install to this volume missing firmware partition. To verify what file system your Mac has, open Disk Utility, select Macintosh HD, and you can find the info on the pop-up window.
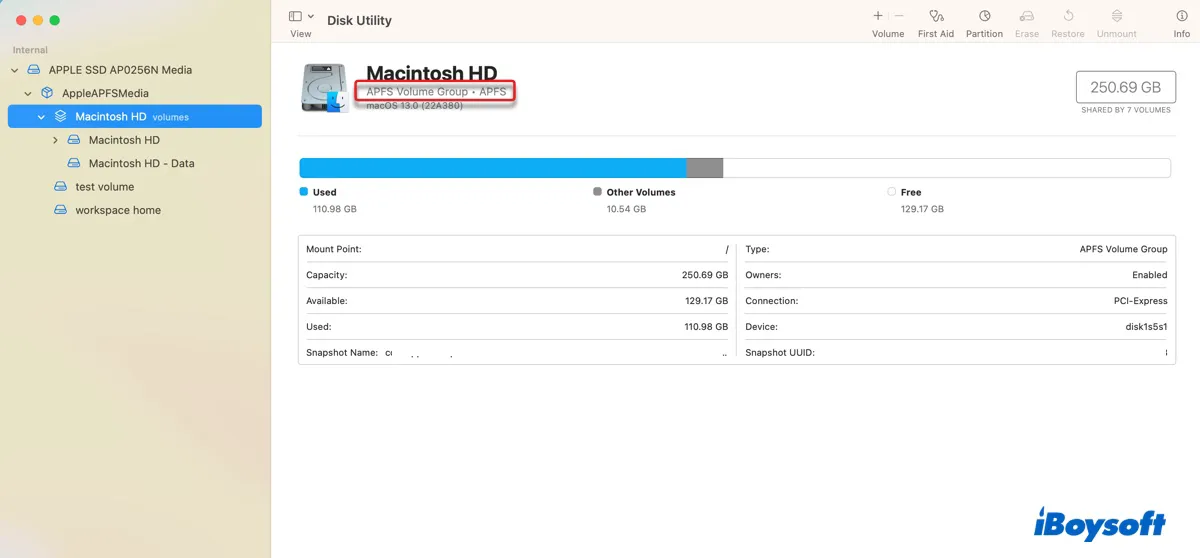
If Macintosh HD is indeed formatted with Mac OS Extended (Journaled), you need to reformat your startup disk into APFS following the last method in this post.
If your Mac is already with APFS, keep reading other solutions below.
Set your Mac to the correct date and time
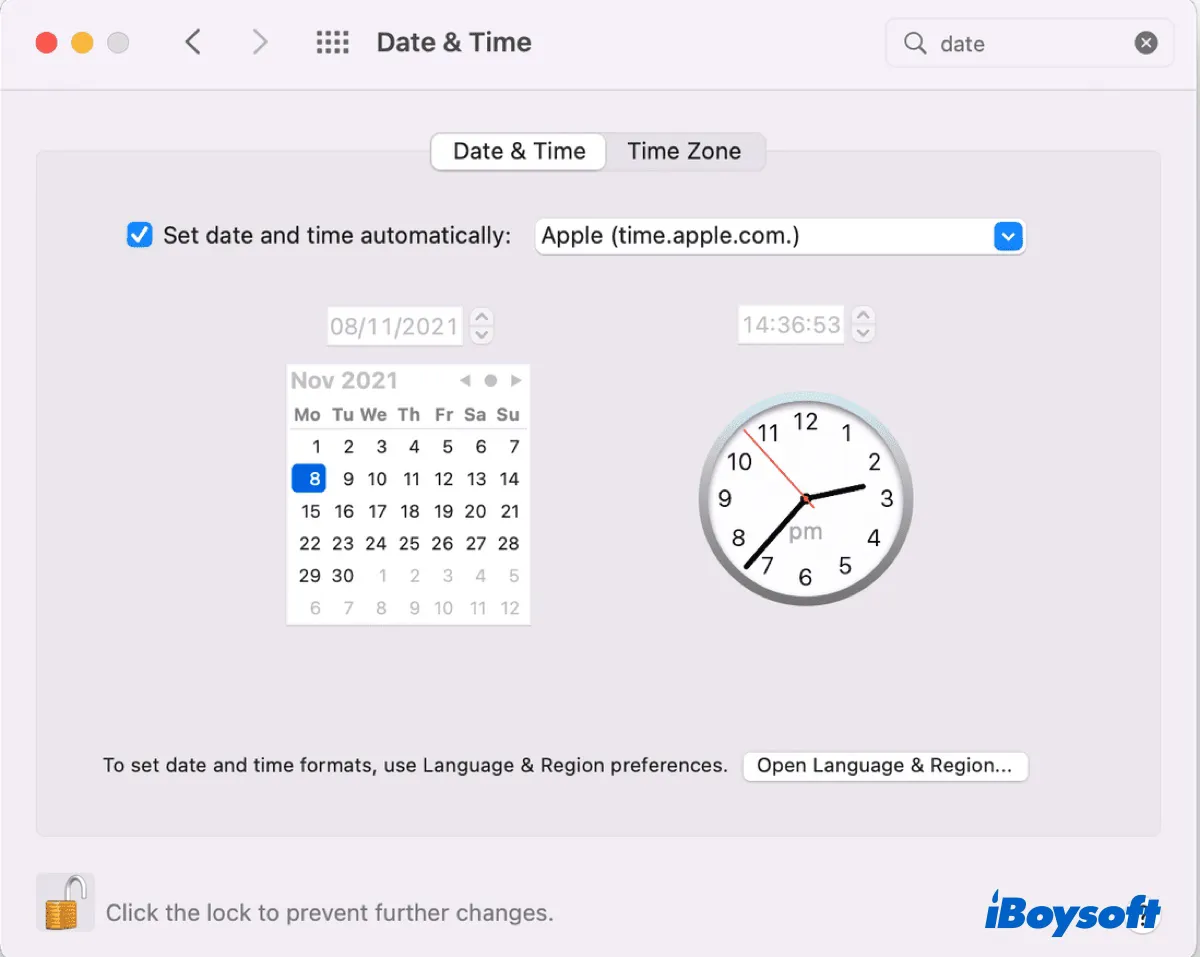
It's possible that your Mac has incorrect Date & Time settings. When that happens, it may result in issues connecting to the Apple Server, which could be the reason why the installation failed with "macOS Ventura cannot be installed on Macintosh HD."
Follow these steps to make sure your Mac has the correct date and time:
- Open System Preferences > Date & Time.
- Click the padlock and enter your administrator password.
- Check the box before "Set date and time automatically."
If the "macOS Ventura not installing" issue persists, continue with the next solution.
Delete the installer and redownload it
Chances are that the macOS Ventura installer may have become corrupted somehow. Since you can't upgrade to Ventura if its installer file is corrupt, it's a good idea to delete the installer from your Applications folder, empty Trash, and download a new one from the App Store.
After the new installer is ready, install macOS Ventura again to see if makes any difference.
Install macOS Ventura from Software Update
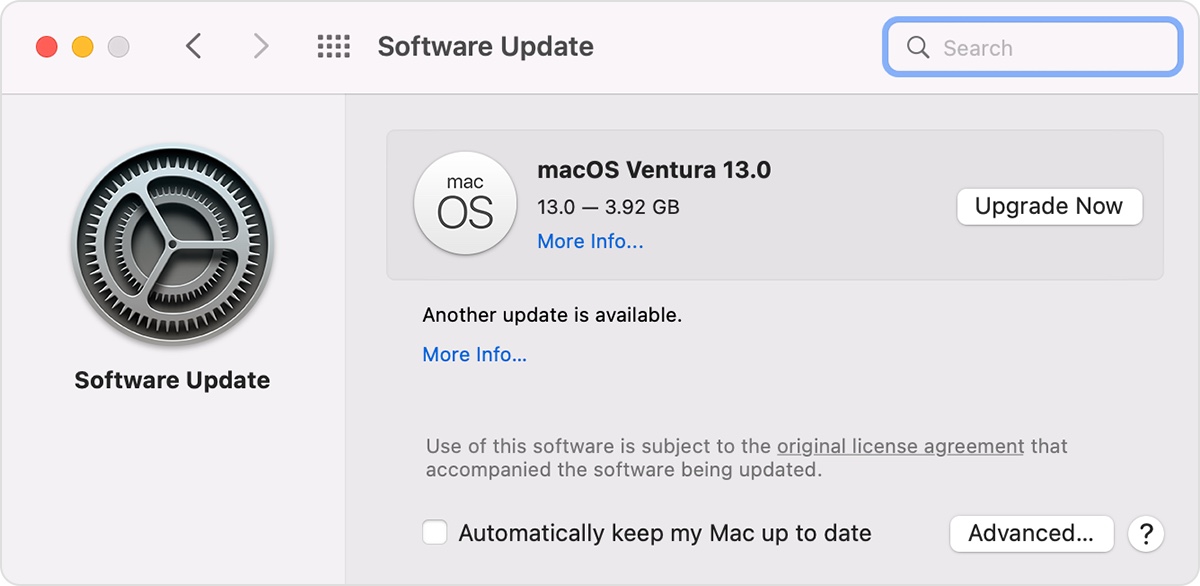
If "macOS Ventura cannot be installed on Macintosh HD" pops up, you likely have tried to install macOS Ventura from the full installer downloaded from App Store or a bootable USB drive. Either way, you should try upgrading to Ventura via the Software Update pane.
Different from previous major updates, upgrading to macOS Ventura from the Software Update pane will install macOS Ventura to your Mac automatically without asking you to select the startup disk or save an installer to the Applications folder.
To upgrade from macOS Monterey or earlier to macOS Ventura, open System preferences > Software Update, and click "Upgrade Now."
Update to the latest version of your current macOS first
Suppose your Mac won't update to Ventura directly. You can try updating your current macOS release to the latest version first. Besides releasing a major macOS update annually, Apple also keeps the major update maintained with security patches in small point releases.
You're recommended to install these minor releases before upgrading to macOS Ventura, as it can often fix different problems on your current macOS and increase the possibility of a successful upgrade. Here's how to do it:
- Open System Preferences > Software Update.
- Click "More info" if any.
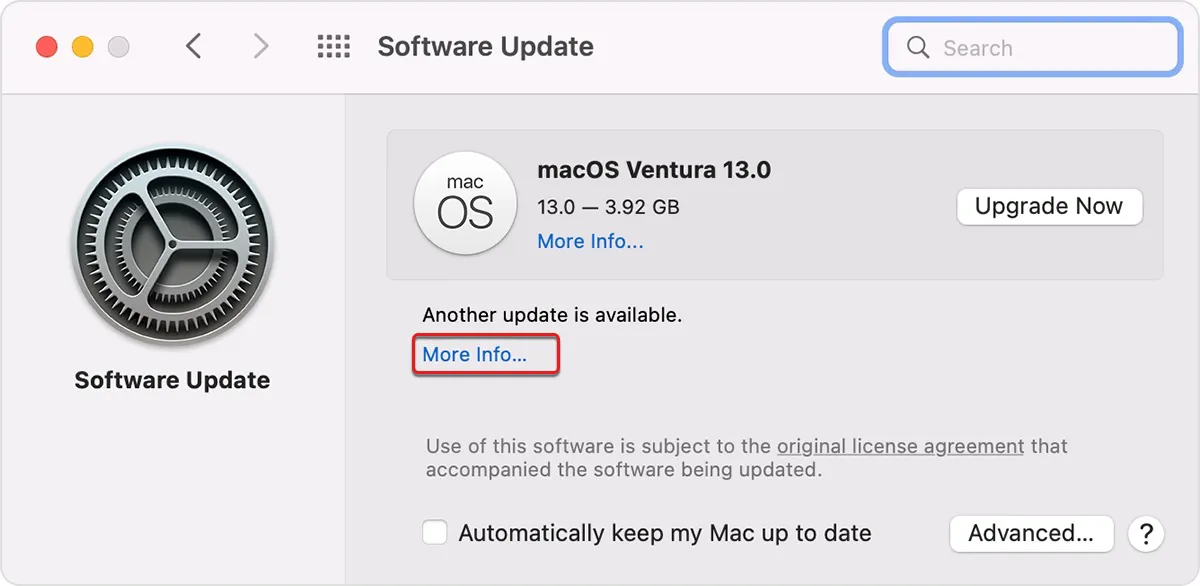
- Select the available update and click "Install Now."
After the installation is complete, you can install macOS Ventura again.
Install macOS Ventura in Safe Mode
Alternatively, you can upgrade to macOS Ventura in Safe Mode. Booting into Safe Mode only allows the essential components to be loaded and can thus prevent third-party programs from interfering with the installation. Note that the processes of restarting in Safe Mode on Apple Silicon (M1 & M1) Macs differ from Intel-based Macs.
On Intel-based Macs:
- Turn off your Mac.
- Press the power button, then immediately press and hold the Shift key.
- Release the key when you see the login screen.
- Log into your account.
On Apple Silicon Macs:
- Shut down your Mac.
- Press and hold the power button until seeing "loading startup options."
- Select your startup volume.
- Hold the Shift key and click "Continue in Safe Mode."
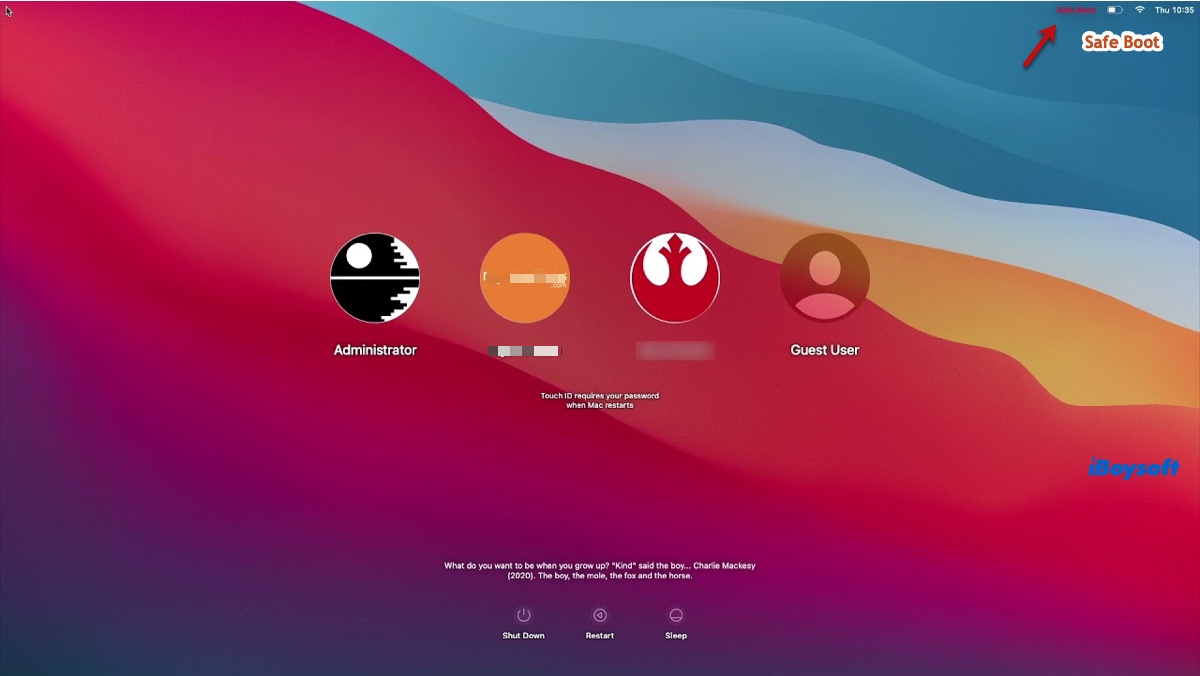
Once you're in Safe Mode, you should see the words "Safe Boot" in the top-right of the menu bar. Perform the installation again to see whether you can upgrade to Ventura.
Install macOS Ventura from App Store
If you weren't running the Vetnura installer downloaded from App Store, you should definitely try it out. Simply open App Store and search for macOS Ventura, then follow the on-screen instructions to install it.
Install macOS Ventura from Internet Recovery
When you reinstall macOS from Local Recovery Mode, you usually get the current version of the most recently installed macOS. However, if your Mac is Intel-based, you can reinstall the latest macOS that's compatible with your Mac via Internet Recovery.
With that said, you can upgrade to macOS Ventura by reinstalling macOS. This replaces your current macOS version but keeps all the data on your Mac intact. Follow the steps below:
- Shut down your Mac.
- Press the power button, then immediately press and hold the Option + Command + R keys.
- Release the keys when you see the spinning globe.
- Select a WiFi network if you're using one.
- When the macOS Utilities window pops up, select "Reinstall macOS Ventura" and click Continue.
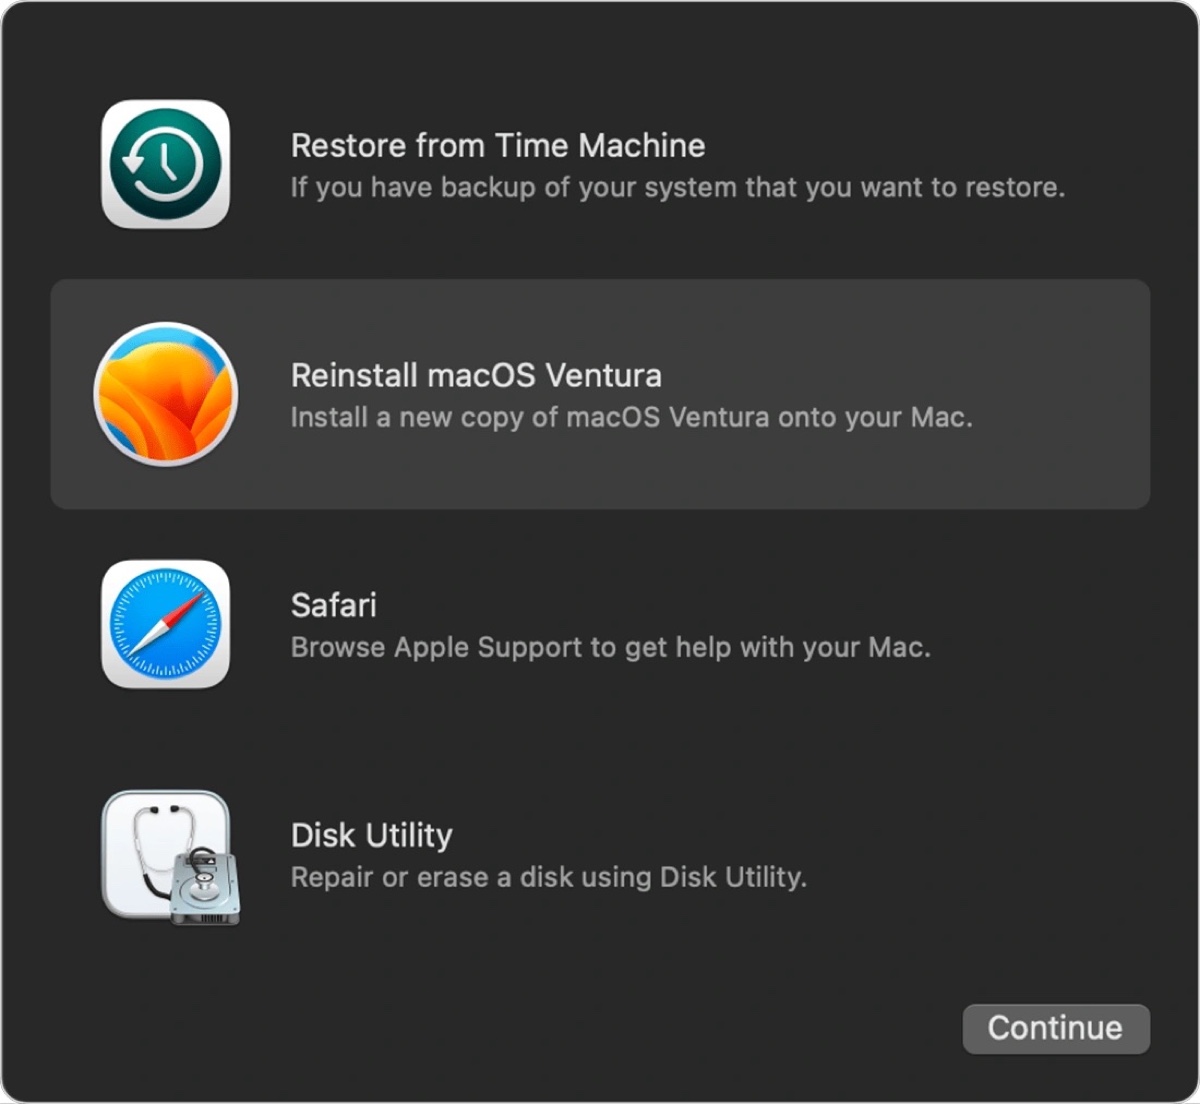
- Follow the onscreen instructions to reinstall macOS and upgrade to the latest macOS Vetnura.
Install macOS Ventura with a bootable USB drive
Another popular way to install macOS Ventura is by booting from a USB drive. If you haven't tried it already, you can create a bootable USB installer, boot from it, and point the installer to Macintosh HD. To prevent the installation from getting the error reading "macOS Ventura cannot be installed on Macintosh HD," you need to ensure the followings are checked:
- The macOS Ventura USB installer needs to be formatted with Mac OS Extended (Journaled).
- Ensure your Firewall settings allow all incoming connections. (Open System Preferences > Security & Privacy > Firewall, tap the padlock and enter your administrator password, uncheck "Block all incoming connections" and check "Automatically allow built-in software to receive incoming connections."
- Open Startup Security Utility to allow booting from external or removable media if it's a T2 Mac.
Install macOS Ventura on the original SSD
If the error reading "macOS Ventura cannot be installed on Macintosh HD" appears when upgrading macOS on a new internal hard drive, you need to switch back to the original SSD. That's because the EFI Boot ROM included in Ventura needs to verify for the original SSD. If it's not found, macOS Ventura won't install on your Macintosh HD.
Therefore, you need to put the original hard drive back into your Mac and install macOS Ventura on it. After that, replace it with the new drive and rerun the installation.
Repair your startup disk
macOS Ventura won't install on Mac if your startup disk has disk errors. It's advisable to check and repair your Mac with Disk Utility First Aid and then attempt the installation of macOS Venture one more time to see if it works. Here's how to repair your startup disk on Mac:
- Shut down your Mac.
- Boot into Mac Recovery Mode.
On an Intel-based Mac: Hit the power button, then immediately press and hold the Command + R keys until you see the Apple logo.
On an M1 & M2 Mac: Press and hold the power button until "Loading startup options" appears. Then click Options > Continue. - If you're asked to select a user you know the password for, select one, click Next, then enter the administrator password.
- Select Disk Utility > Continue.
- Click View > Show All Devices.
- Select the last volume list under your internal storage, click "First Aid," then tap the Run button.
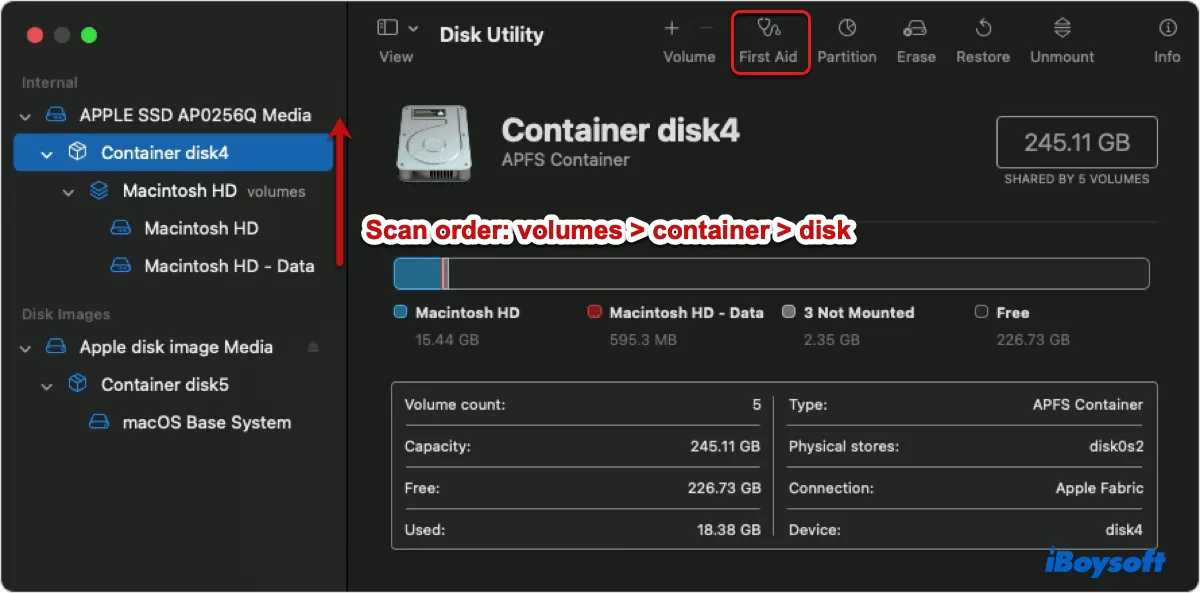
- After repairing the last volume, continue checking the volume above it until the disk (usually labeled similarly to Apple SSD) has gone through the repair process.
- Click on the Apple menu and select Restart to reboot your Mac.
- Try again to install macOS Ventura.
Free up space on Macintosh HD
Your Mac won't update to Ventura if it lacks the storage space to accommodate the installation. Though the full Ventura installer is about 12 GB, you'll need extra space to run it. If you're upgrading from macOS Sierra or later, prepare at least 35GB of free space for macOS Ventura. But if you're upgrading from an earlier version, macOS Ventura requires up to 44GB of free space.
You can open the Apple menu > About This Mac > Storage to view the available space on your Mac. If it doesn't have enough storage for Ventura, you can free up space on Macintosh HD by deleting unwanted files and emptying the Trash.
If you prefer an easier way to clean the junk files on your Mac, you can free download iBoysoft DiskGeeker.
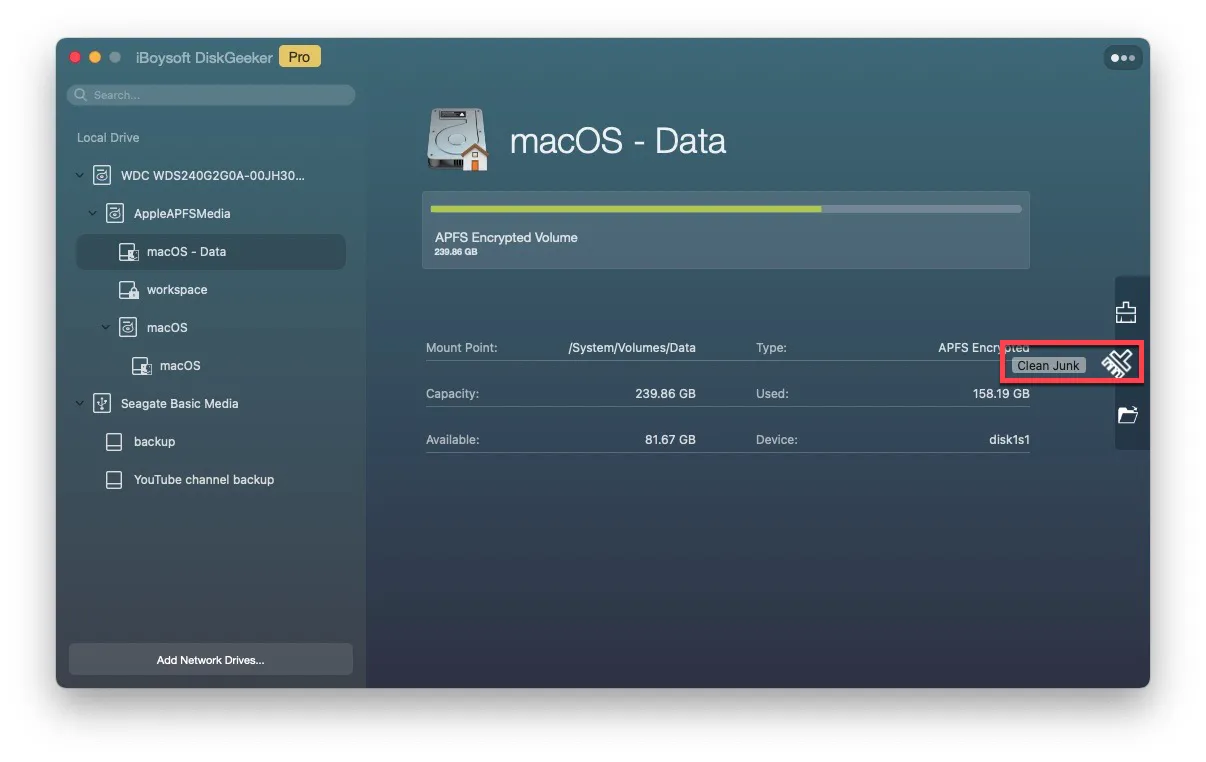
It features "Clean Junk" and "Clean Drive" to help you get rid of unwanted files easily. With "Clean Junk," you can find and delete unnecessary temporary files, user caches, log files, etc. And "Clean Drive" allows you to browse all files on your Mac and sort them by size so that you can quickly locate and trash the files that are taking up space on Macintosh HD.
Clean install macOS Ventura
If macOS Ventura won't install despite you've tried all the above solutions, the last resort is to erase your Mac before retrying installing macOS Ventura. This will remove all data on your hard drive, so back up your Mac before attempting the steps below.
- Turn off your Mac.
- Boot into macOS Recovery Mode.
On an Intel-based Mac: Hit the power button, then immediately press and hold the Command + R keys until you see the Apple logo.
On an M1 & M2 Mac: Press and hold the power button until "Loading startup options" appears. Then click Options > Continue. - Select Disk Utility > Continue.
- Click View > Show All Devices. (Jump to step 7 if your startup disk isn't APFS-formatted.)
- Select Macintosh HD - Data and click the ( - ) button to delete it.
- Continue deleting other internal volumes except for Macintosh HD.
- Select the top-level disk (e.g. Apple SSD) and click Erase.
- Name your startup disk Macintosh HD.
- Set the Format to APFS.
- Set the Scheme to GUID Partition Map.
- Click Erase again.
Once your Mac is erased, you can choose one of the following ways to install macOS Ventura:
- Exit Disk Utility, tap "Reinstall macOS" to install the latest version of your lastly installed macOS, then upgrade to macOS Ventura from Software Update or App Store.
- Restart your Mac, boot from a macOS Ventura bootable drive, then install macOS Ventura to Macintosh HD.
Clean Install macOS Ventura: A Comprehensive Tutorial in 2022
If you want to know more details about clean installing macOS Ventura, check out this guide. Read more >>
Please share this post if you find it helpful.