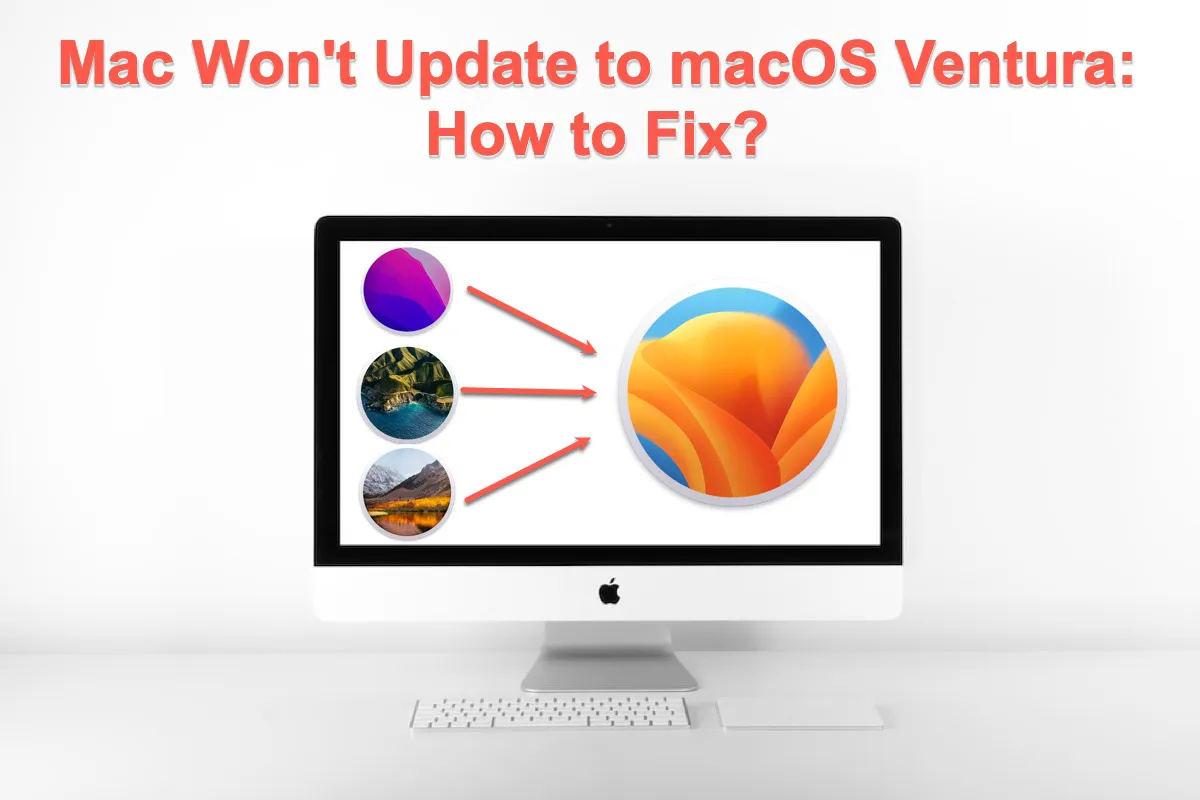
macOS Ventura, being released on 24th October 2022, is a new major operating system that embraces different types of enhancements and improvements compared with macOS Monterey. Some people have already experienced this wonderful OS for a long time, while others haven't yet because they encounter the Mac won't update to Ventura trouble.
Worry is needless. This article will answer "Why won't my Mac update to Ventura?" and give you 9 certain solutions to solve the Mac can't update to Ventura trouble.
When you fail to update to macOS Ventura from the App Store or Software Updates, you can download the macOS Ventura update from: Mac OS Updates Download.
If you fail to update to macOS Tahoe, read: Fix "Mac won't update to macOS Tahoe".
| Quick solutions | Steps |
| Restart your Mac | Apple Menu > restart |
| Remove peripheral devices from Mac | Unplug sound, mouse, keyboard, and second display from your Mac |
| Check internet connection | Launch Terminal and run the macOS NetworkQuality command line |
| Check if the Mac model supports macOS Ventura | Apple Menu > About This Mac |
| Free up Mac for more storage space | Install iBoysoft DiskGeeker > clean junk files |
| Check the Apple server's status | Visit the Apple server website > check if the Apple server works fine |
| Reset NVRAM | Restart your computer > Press the Command + Option + P + R keys together > Release keys 20 seconds later > Update macOS |
| Update Mac to macOS Ventura in macOS Safe Mode | Boot Mac into macOS Safe Mode > Update your Mac to macOS Ventura |
| Update Mac to macOS Ventura in macOS Recovery Mode | Boot Mac into macOS Recovery Mode > Update your Mac to macOS Ventura |
Why won't my Mac update to Ventura?
Many reasons may cause the macOS Ventura update failure, and this article will list them one by one. You can take a quick look and infer which one caused the unsuccessful update. After that, you can try the corresponding method to get it fixed.
- Unknown Mac temp device bugs and errors (The base build is not compatible for this install method)
- Incompatible Mac models
- Poor network connection
- Insufficient storage space for macOS Ventura installation
- Sudden power failure
- Apple servers errors
- NVRAM bugs
We would appreciate your sharing this article with your families and friends on your social platform!
How to fix the trouble that Mac won't update to Ventura?
You will gain 9 solutions to rule out the factors leading to the macOS Ventura failure. If one solution fails to address the macOS Ventura failure issue, do not get frustrated and move to the next one straightforwardly.
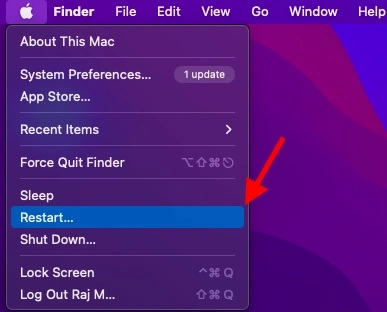
Solution 9: Restart your Mac
A computer reboot can rule out a slew of unknown temp errors and bugs and set your Mac ready for further work. To do so, you need to hit the Apple menu > select Restart and then wait for your Mac to launch again. After that, update your operating system one more time.
Solution 8: Remove all peripheral devices from your Mac
If a Mac restart is unable to make your Ventura update work smoothly, then I guess you can give the peripheral device removals a try. Just unplug the connected devices, such as external hard drives, mouse, external keyboards, headphones, and so on gently from your device and then check if the Mac can't update to Ventura trouble still hovers.

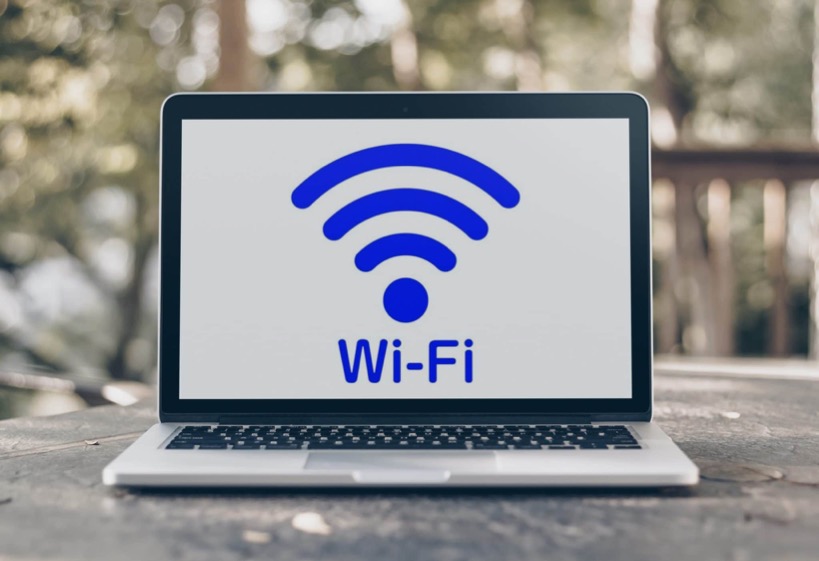
Solution 7: Check the internet connection
If the macOS Ventura process fails, the internet may shut down. To test your internet connection, you can either install software on your Mac or launch macOS NetworkQuality, a network test command. If anything goes wrong, ask the network repair staff to get it fixed.
Solution 6: Check your Mac model
It's acknowledged that Apple drops official support to some old and outdated Mac models every year. When encountering macOS Ventura trouble, check if your Mac model is officially supported by macOS Ventura directly, which matters much here.
How to check the Mac model on your device:
- Click the Apple menu on the upper left corner of your Mac desktop.
- Select About This Mac from the dropdown menu.
- You will see your Mac model under the macOS that you're running in the Overview tab.
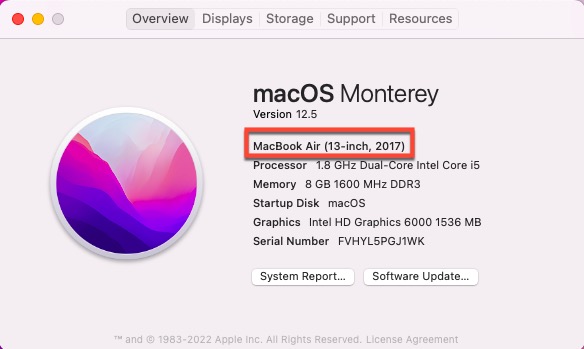
Here is the model list that Apple offers macOS Ventura's official support and you can see if your Mac is listed in it:
- iMac 2017 and later
- iMac Pro 2017
- MacBook Air 2018 and later
- MacBook Pro 2017 and later
- Mac Pro 2019 and Later
- Mac Studio 2022
- Mac Mini 2018 and later
- MacBook 2017 and later
If your Mac model is not listed in these items, you can also take your patience and install macOS Ventura on unsupported Mac using OpenCore Legacy Pachter.
Solution 5: Free up your Mac for enough storage space
The macOS Ventura installer package needs 12GB of storage to house. Insufficient storage space hinders your macOS Ventura installation process so you should make sure that your Mac has enough available space in advance.
To know how much free space your Mac has left, click the Apple menu > About This Mac > Storage.

If the computer lacks sufficient storage space, utilizing iBoysoft DiskGeeker to clean junk files is perfect.
Step 1: Free download and install iBoysoft DiskGeeker on your Mac device.
Step 2: Select a volume from the startup disk, usually labeled as macOS—Data, macOS, Macintosh HD, or Macintosh HD—Data.
Step 3: Click "Clean Junk" from the toolbar. 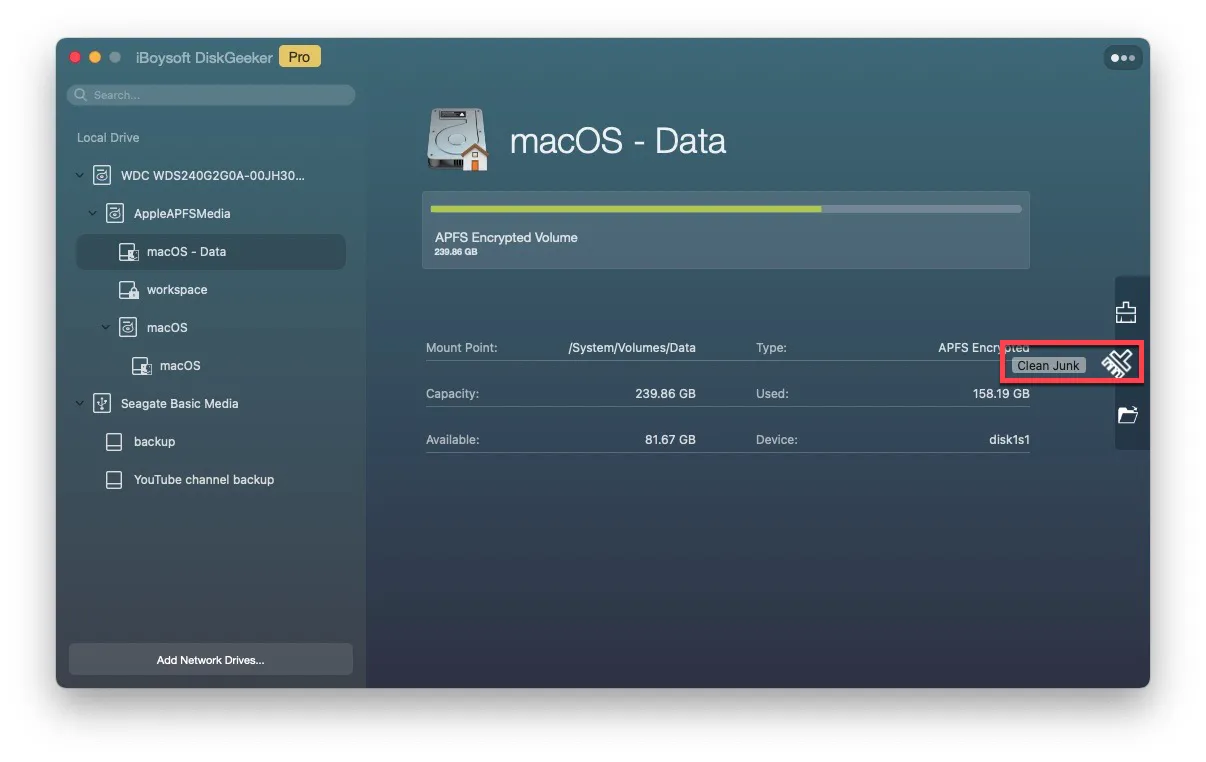
Step 4: Select a folder from the left panel and select the files/folders you want to delete.
Step 5: Click "Clean" and then click "OK". You will fail to clean certain files if you don't have permission to do so.
With enough space, you can update to macOS Ventura without a hitch by then.
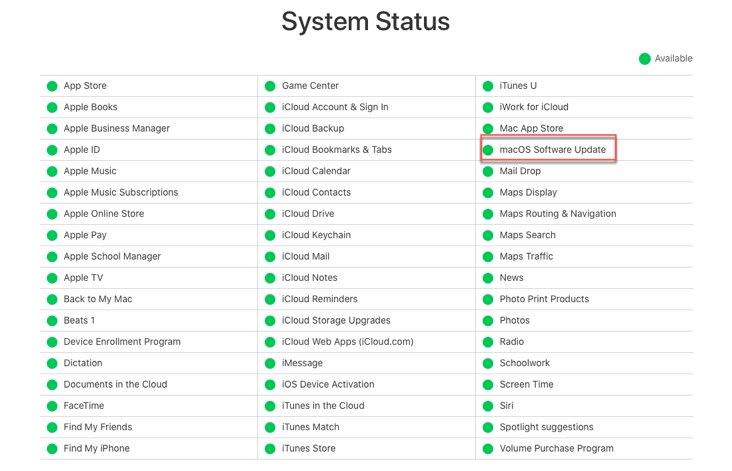
Solution 4: Check Apple servers' status
Too many downloads and updates may keep the Apple Servers busy, which might explain your macOS Ventura failure. The Apple website allows you to check or monitor the status of Apple servers, which indicates OK if it shows a green circle of the Software Update option.
Solution 3: Reset NVRAM
NVRAM, the Non-Volatile Random Access Memory abbreviation, stores your Mac's information like startup disk selection, recent kernel panic, display resolution, sound volume, time zone, and more, enabling your computer to start up quickly and perform properly.
NVRAM might cause the update troubles sometimes and you can reset it in that case.
- Restart your Mac.
- Immediately press and hold the Command + Option + P + R keys together.

- Release the keys 20 seconds later.
- When your Mac reloads, try to update your macOS.
Solution 2: Update your Mac to macOS Ventura in Safe Mode
macOS Safe Mode is a wonderful choice that allows you to force your Mac to run only the indispensable programs, features, and applications to function properly. While other apps, extensions, login items, and more will be removed.
You can utilize it to complete the OS upgrade work with no holdback caused by any apps or processes. Here I will show you how to do it:
Step 1: Boot your Mac device into Safe Mode.
Boot an Intel-based Mac in Safe Mode:
- Shut down your Mac computer and wait for 10 seconds.
- Press the power button to restart your Mac and simultaneously hold down the Shift key.
- Release the Shift key when seeing the login window.
Start an Apple M1 Mac in Safe Mode:
- Shut down your Mac computer and wait for 10 seconds.
- Press down the power button until the startup options and the Options gear icon appear on the screen.
- Choose your startup disk.
- Hold down the Shift key and click Continue in Safe Mode. Then, release the Shift key.
Step 2: Log into your device in macOS Safe Mode and then update to macOS Ventura.
For users running macOS Monterey & Earlier: Go to Apple Logo > System Preferences > Software Update > Download and Install.
For users running macOS Ventura: Go to the Apple Logo > System Settings > General > Software Update > Download and Install.
Solution 1: Update to macOS Ventura in Recovery Mode
Updating your Mac to macOS Ventura in Recovery Mode also works fine and is worth a shot. You can try it to farewell the macOS Ventura update failure on your Mac.
For Apple Silicon Mac users:
Step 1: Shut down your Mac and wait for 10 seconds.
Step 2: Press the power button until you see the startup volumes and Options on the screen.
Step 3: Select the Reinstall MacOS option and tap Continue.
Step 4: Follow the on-screen setup to complete the OS update process.
For Intel-based Mac users:
Step 1: Shut down your Mac.
Step 2: Press the power button to turn on your Mac and then press the Option + ⌘ + R keys together until the spinning globe or the Apple logo appears on the screen.
Step 3: Enter your login details and sign in on your device.
Step 4: Select the Reinstall macOS option and go through the instructions on the screen.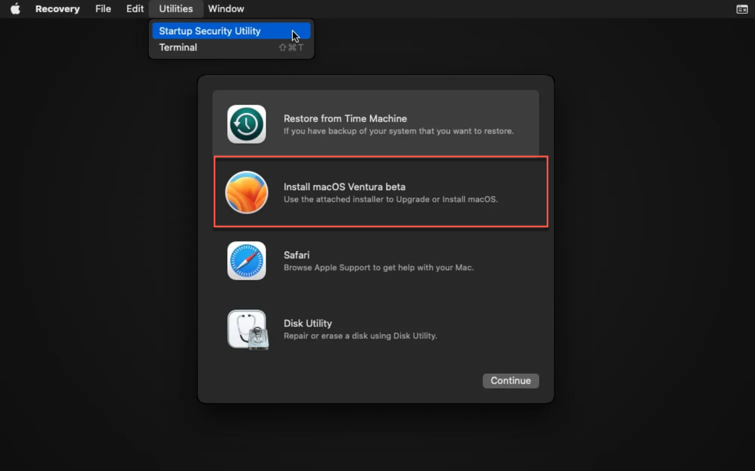
Failed to prepare the software update. Please try again: solved!
On a 16" Intel MBP, but I can't seem to get the 13.1 update to go. Tried turning everything off and even in Safe Mode this happened: Failed to prepare the software update. Please try again. An error occurred while downloading the selected update. Please check your internet connection and try again. Don't have anything crazy installed on this machine. Any ideas?
So many Mac users have complained about the failure of updating to macOS Ventura and the notification saying "Failed to prepare the software update. Please try again: solved!" online, moreover, simple attempts like device reboot, macOS Safe Mode, internet exchange, Disk Utility's First Aid, third-party software uninstall, etc. make no sense here.
In fact, to successfully update macOS Ventura, all you need to do is erase all content and settings on your Mac, and then upgrade macOS with the usual steps. After this move, the update will succeed. Here is how to perform that:
Apple Menu > System Settings > General > Transfer or Reset > Erase All Content and Settings.
Once all content and settings are erased, you can go to Apple Menu > System Settings > General > Software Update > Update Now to finish this desired update.
Conclusion
Trouble with Mac won't update to macOS Ventura happens for different reasons, and this article lists them all. It also gives you 9 ways to fix this trouble. Are you having the same trouble? Try this article now!
If you have updated to macOS Ventura successfully with the help of this tutorial, please share this article with other people!
FAQ about Mac won't update to Ventura
- QWhy won't my Mac update to Ventura?
-
A
There are various reasons may bring your Mac won't update to macOS Ventura, you can have a quick look here: unknown Mac temp device bugs and errors, incompatible Mac models, poor network connection, insufficient storage space for macOS Ventura installation, sudden power off, Apple servers errors, NVRAM bugs, and so forth.
- QIs my Mac too old to update to macOS Ventura?
-
A
macOS Ventura is available for the following Mac models and you can check if your Mac is listed in them: iMac 2017 and later, iMac Pro 2017, MacBook Air 2018 and later, MacBook Pro 2017 and later, Mac Pro 2019 and Later, Mac Studio 2022. Mac Mini 2018 and later, MacBook 2017 and later.
- QmacOS Mojave won't update to Ventura, why?
-
A
The macOS Mojave won't update to Ventura trouble happens due to the old Mac model in large part, making it unsupported by macOS Ventura. You can either renew your Mac device or install macOS Ventura on your unsupported Mac to enjoy Ventura features.
- QHow to install macOS Ventura on an unsupported Mac?
-
A
Here is the comprehensive tutorial to install macOS Ventura on an unsupported Mac:
Step 1: OpenCore Legacy Patcher download and installation.
Step 2: Download macOS Ventura.
Step 3: Prepare an empty storage device.
Step 4: Erase your storage device.
Step 5: Run command lines to make your storage device a bootable installer.
Step 6: Change the OpenCore Legacy Patcher settings for further installation work.
Step 7: Build and Install OpenCore.
Step 8: Run OpenCore and macOS Installer.
Step 9: Install macOS Ventura on your Mac.
Step 10: Boot up macOS Ventura.
Step 11: Download and install OpenCore Legacy Patcher again.
Step 12: Install OpenCore Legacy Patcher into your internal hard disk.