Tips: The latest macOS version is macOS Tahoe 26. If you want to clean install it, follow this guide: How to Fresh or Clean Install macOS Tahoe [Full Guide]
A clean install of macOS can be beneficial in many ways. Here are the common reasons why you might want to perform a fresh (re)install on Mac:
- Update to macOS Sequoia or another version without conflicts.
- Reinstall the Mac operating system to resolve issues, like poor performance, startup problems, a slow Mac, or other misbehavior.
- Clear all files on a Mac that's running out of space or discard all unnecessary files at once.
- Remove all data from your Mac and reset it to factory settings before selling it or giving it away.
- Start afresh with a new OS.
Tips: The most common way to clean install any macOS on Mac computers is by booting from a bootable installer. If you want a fresh install, you can use iBoysoft DiskGeeker to create a bootable USB installer for the macOS version you want to run.
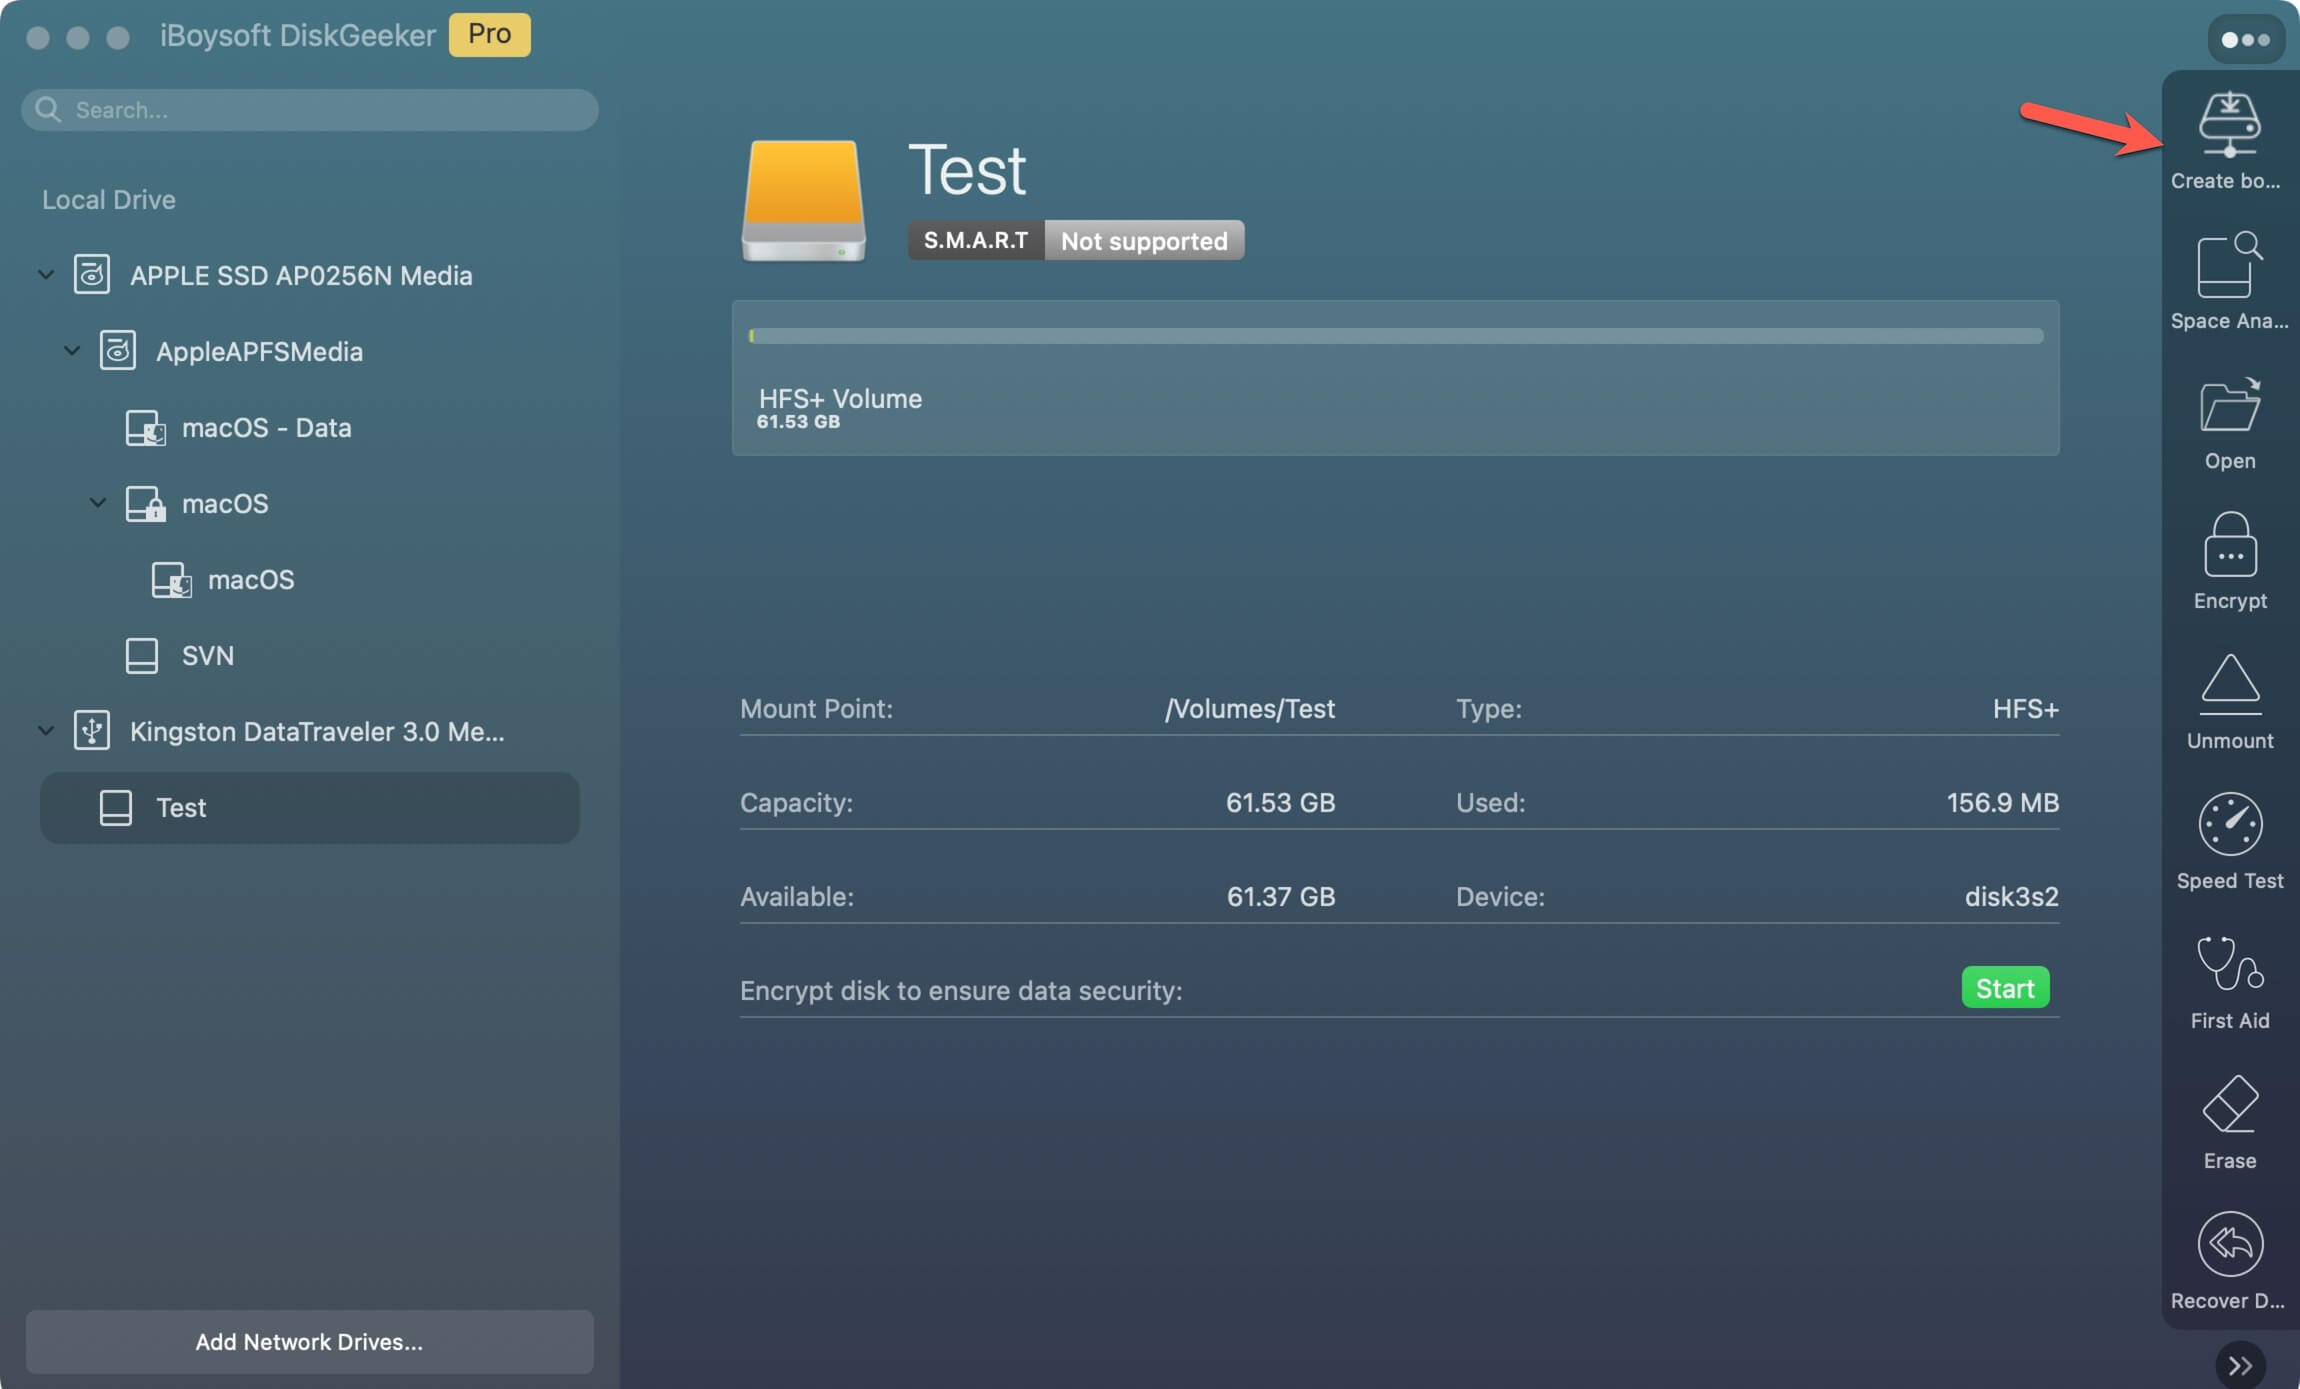
Step 1: Install iBoysoft DiskGeeker and open it.
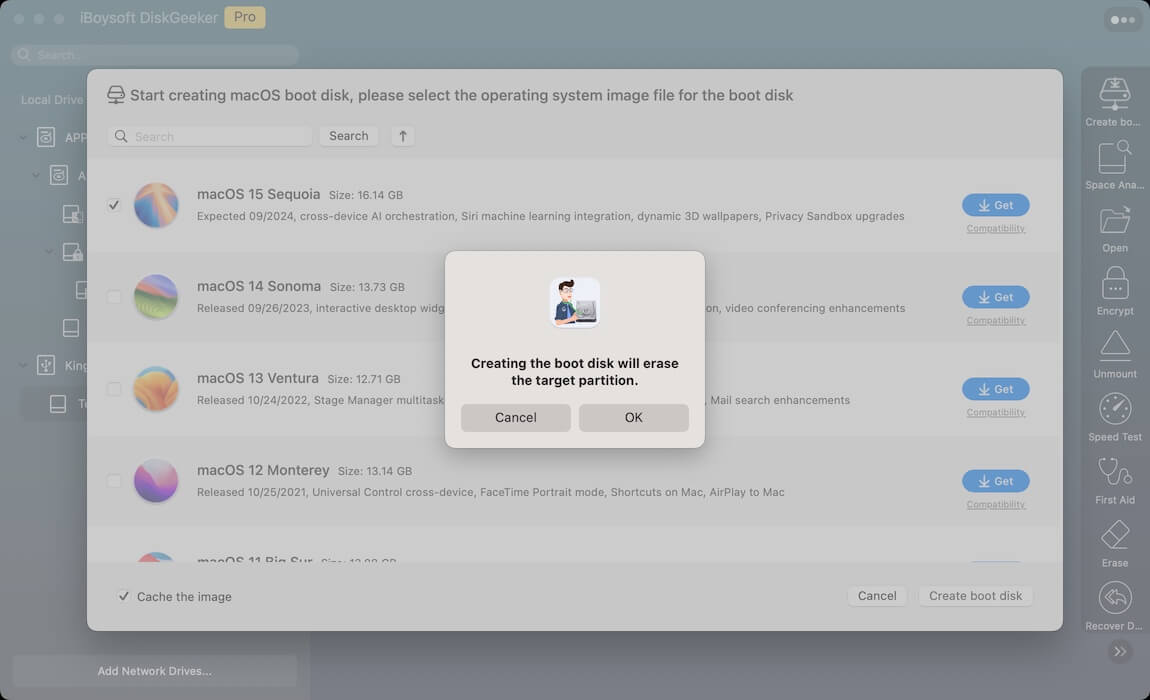
Step 2: Select your external drive and click Create boot disk.
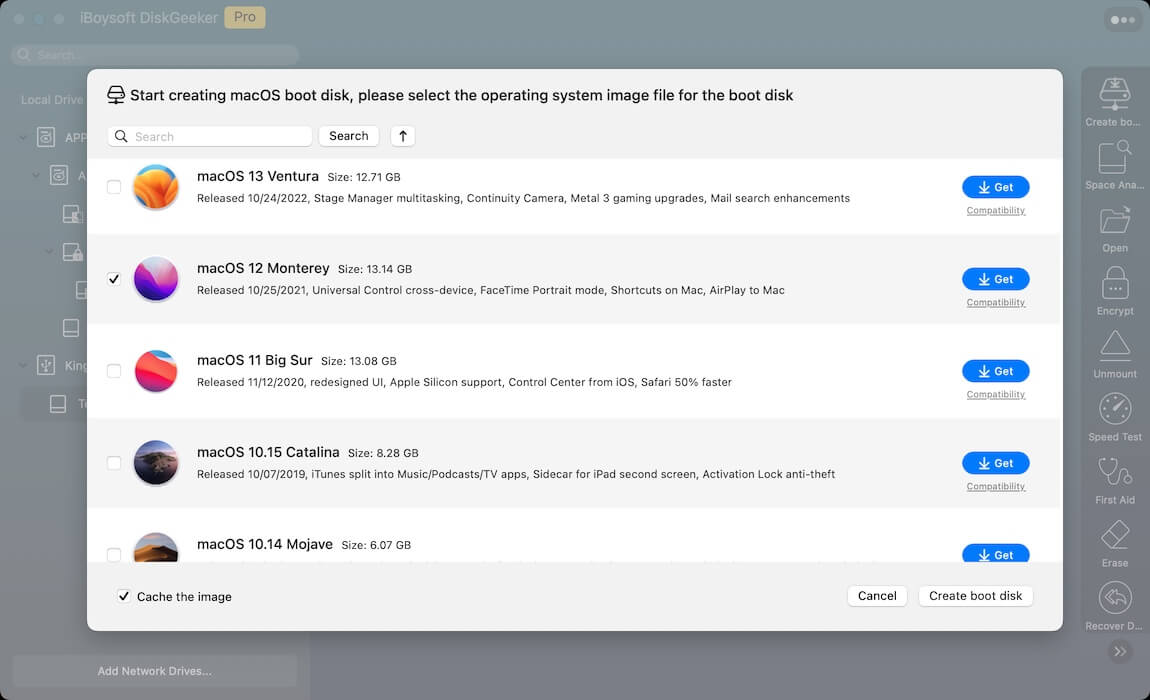
Step 3: Choose the macOS version with which you want to create a boot media and click Create boot disk.

Whatever the reason is, this guide will show you how to clean install macOS from USB or without USB, no matter if it's an Intel-based Mac or an Apple Silicon M1/M2/M3/M4 Mac.
| How to do a clean install of macOS | Difficulty Level | Installed macOS |
| Make a bootable USB installer | High, need to create a bootable USB installer first | Install any compatible macOS (update or reinstall) |
| Erase and reinstall from macOS Recovery | Middle, standard way to fresh reinstall macOS without USB | Reinstall current macOS |
| Use the Erase All Content and Settings option | Low, clean reinstall macOS on T2/M1/M2/M3/M4 Macs running macOS Monterey or later | Reinstall current macOS |
| Use Mac OS Recovery Assistant | Low, clean reinstall macOS without USB or password | Reinstall current macOS |
If you want to update to macOS Tahoe now, follow: How to download and install macOS Tahoe
How to clean install macOS or Mac OS X?
There are four ways to do a clean install of macOS, which essentially means erasing and installing macOS. Three of them apply to all macOS or Mac OS X updates and versions, but the option "Erase All Content and Settings" is only available to macOS Monterey and later versions.
Anyway, whether you're looking to clean install macOS Sequoia, Sonoma, Ventura, Monterey, Big Sur, Catalina, Mojave, High Sierra, or an earlier system like Sierra, El Capitan, or Mavericks, there should be at least three possible methods at your disposal.
Tips: If you're trying to clean install macOS Sequoia, the latest macOS 15, on a Mac that doesn't have macOS 15 installed already, creating a bootable USB is the only way.
Create a bootable installer for macOS easily with iBoysoft DiskGeeker!
Back up your Mac before you clean install macOS Sequoia or earlier
A clean installation of macOS will remove all data on your Mac's internal hard drive. So, make sure you back up files on your Mac before starting. To do this, you can copy the essential files to an external hard drive, upload them to the cloud, or use Time Machine, which backs up almost everything on your Mac, including files, apps, and settings.
Be aware that you probably don't want to restore from a Time Machine backup if you don't want to copy over the settings and preferences from your old system.
Once your data is secured, choose one of the ways below to fresh install Mac OS X or macOS.
Way 1: Clean install macOS from USB bootable installer (Sequoia and earlier)
To clean install macOS from USB, we must first create a bootable USB installer of the macOS version you intend to install. This can be easily achieved with a boot media creator or manually created in Terminal.
Ⓐ Easily create bootable USB installer for macOS on Mac 🌟
#Simple steps#Built-in macOS DMG installers#High success rate
The best way to create a macOS bootable USB installer is to use a guided tool like iBoysoft DiskGeeker.
It stores the DMG installers for popular OS versions, allowing you to make bootable media for macOS Sequoia, macOS Sonoma, macOS Ventura, macOS Monterey, macOS Big Sur, macOS Catalina, macOS Mojave, and macOS High Sierra without preparing the installer first.
For older Mac OSes, you can download the corresponding DMG file and upload it to the tool to make a bootable USB.
With it, you can create a macOS boot drive through a few clicks, needless of command-line utilities. It's a great alternative when Terminal returns the error "Command not found" after executing the command: sudo /applications/install\ macos\ sequoia.app/contents/resources/createinstallmedia --volume /volumes/myvolume.
Here's how to create a macOS bootable installer on Mac:
Step 0: Make ready an external drive with at least 20GB of storage space and back it up. (The drive's capacity must exceed the size of the macOS installer.)
Step 1: Download and install iBoysoft DiskGeeker.
Step 2: Select your external disk and click Create boot disk.
Step 3: Choose the macOS version you want to install.
For macOS High Sierra or later, select the wanted version and click Create boot disk.
For macOS Sierra or earlier, you'll need to download the macOS DMG file first. Then, click Create boot disk followed by Browse Images to upload the DMG file.
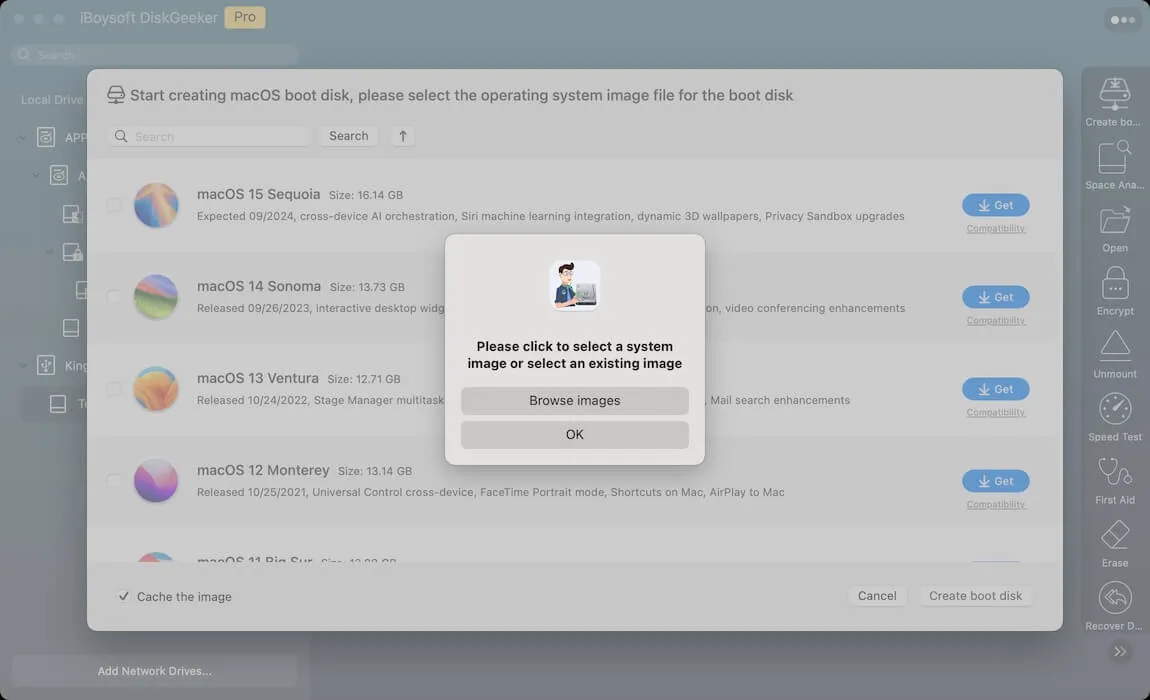
Step 4: Click OK when a message warns you that the process will erase the disk.
Step 5: The tool will start creating the bootable USB automatically.
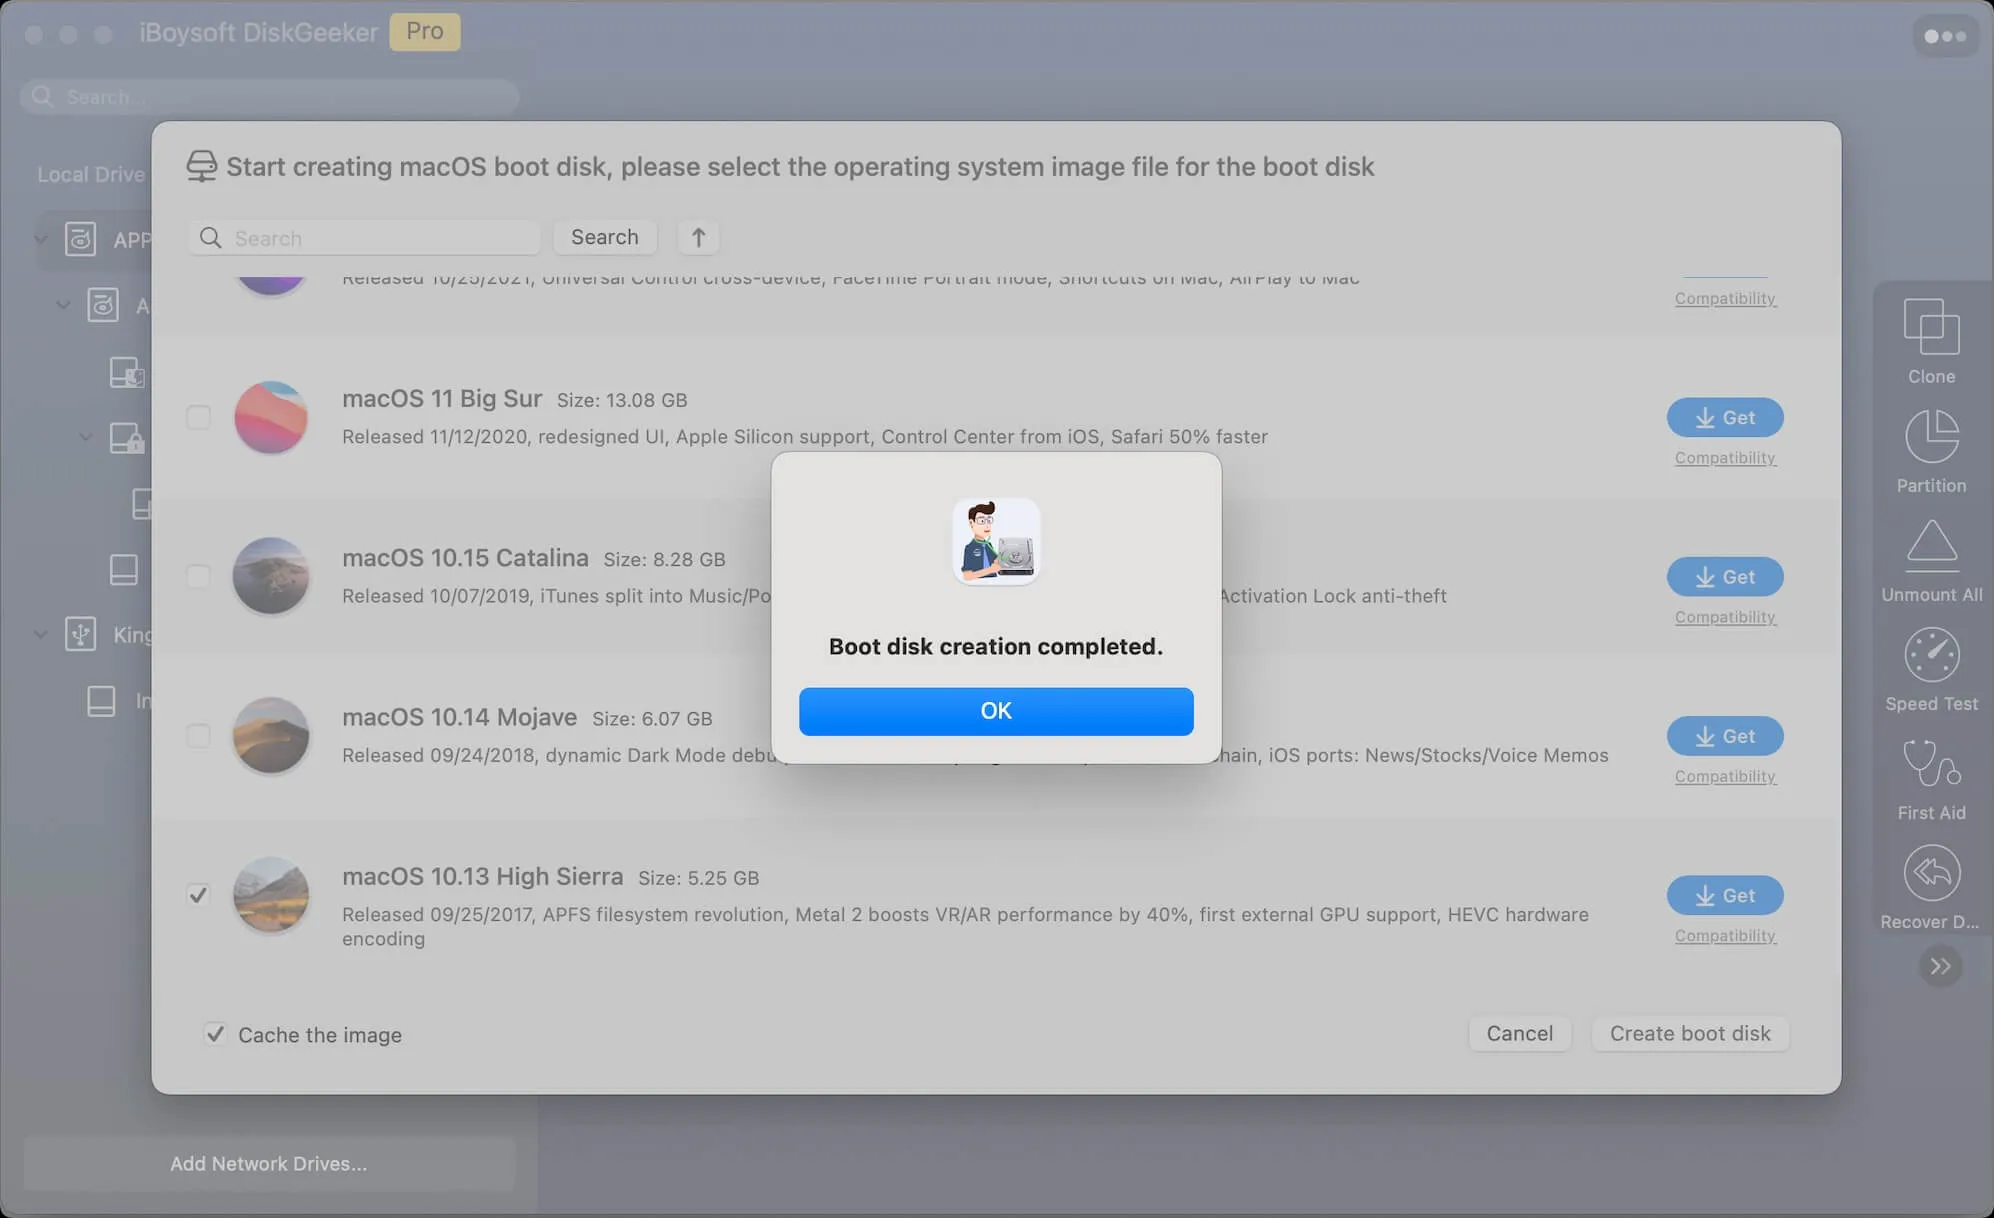
If you're using the in-store DMG file, the tool will download it first, then create the bootable USB.
If you upload a pre-downloaded DMG file, it will start making the boot media immediately.
Isn't it simple to create a bootable USB for macOS? Share this tool!
Ⓑ Create bootable USB installer for macOS manually on Mac
#Run command lines#Complex process#May fail
If you want to create a bootable USB installer for macOS manually, prepare the following items first:
- A USB flash drive or external hard drive with 20 GB or more storage space. (It will be erased to hold the installer, so ensure it's backed up or doesn't contain any valuable data.)
- A Mac that's compatible with your chosen macOS version.
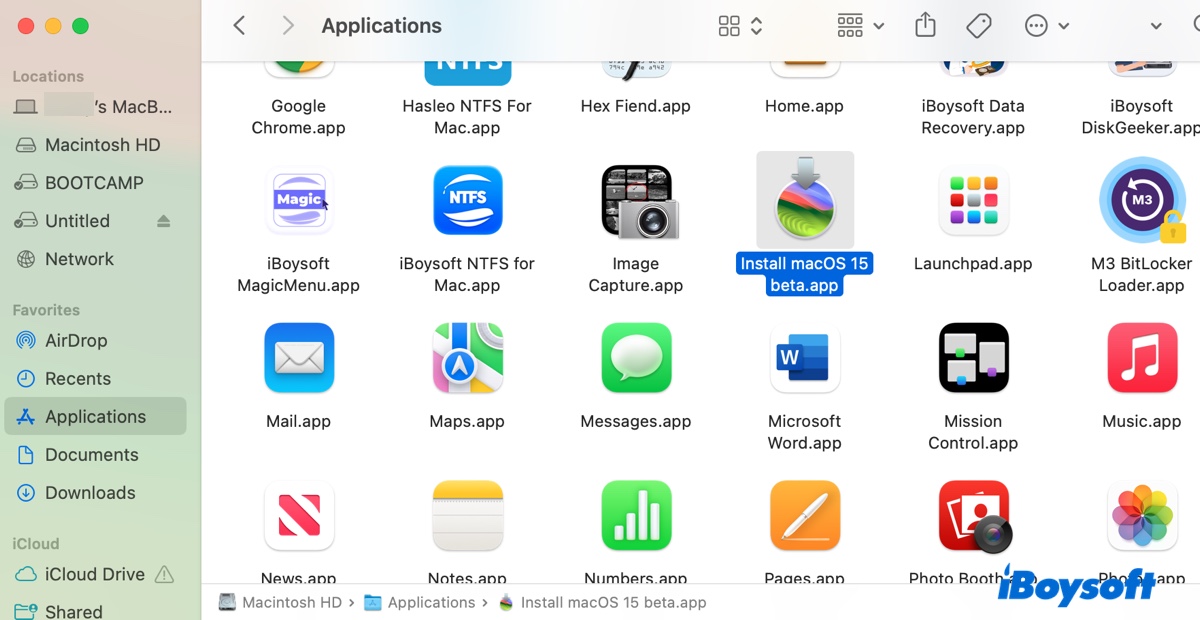
- Download the macOS version in your mind and add the installer (.app) to your Applications folder. (You need to get the installer named "Install macOS Version," such as "Install macOS 15 Beta.")
➢ For macOS Sequoia, you can get the installer from the link below:
This post tells how to install macOS Sequoia Beta from USB, you can follow the detailed steps to create a macOS Sequoia Beta bootable USB to upgrade to Sequoia Beta across multiple Macs or for other reasons.
The Sequoia installer is a PKG file, which you need to install in your Applications folder.
➢ For macOS High Sierra ~ macOS Sonoma, you can get it from the Mac App Store:
The installer from the App Store will be downloaded to your Applications folder directly. It will open automatically after being downloaded. When it does, press Command-Q and choose Quit to close it.
➢ For macOS Sierra and earlier OS X versions, download them through a web browser like Safari:
(To download all old Mac OS versions)
These installers are likely DMG files, which need to be extracted further. Double-click the DMG file to open it, then double-click the .pkg file inside and install it into your Applications folder.
After the installer resides in your Applications folder, take the steps below to make the bootable USB installer and boot from it to clean install macOS.
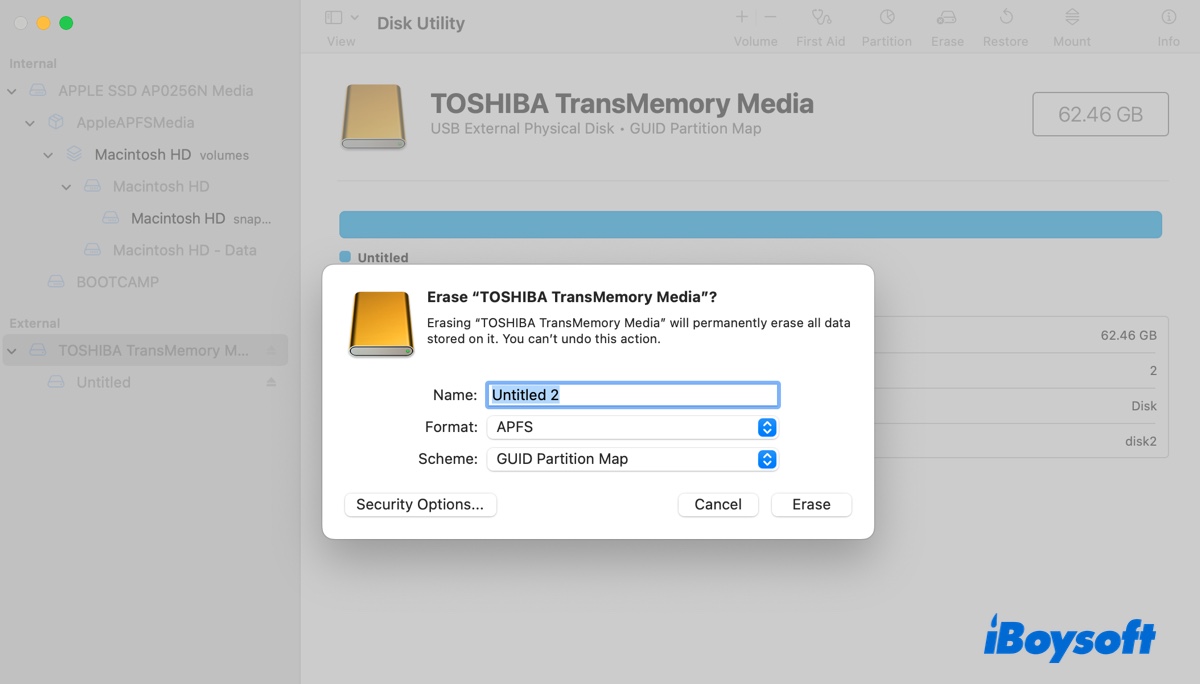
① Format the USB drive that'll hold the installer
- Connect the USB drive to your Mac.
- Open Disk Utility.
- Click View > Show All Devices.
- Select the physical disk, typically named with the manufacturer's name, and click Erase.
- Name the drive MyVolume. (It'll be automatically renamed later.)

- Select Mac OS Extended (Journaled) as the format.
- Keep the Scheme as GUID Partition Map.
- Click Erase again.
② Create a bootable USB installer:
- Open Terminal.
- Enter one of the following commands in Terminal and hit Enter.
macOS Sequoia Beta: sudo /Applications/Install\ macOS\ 15\ Beta.app/Contents/Resources/createinstallmedia --volume /Volumes/MyVolume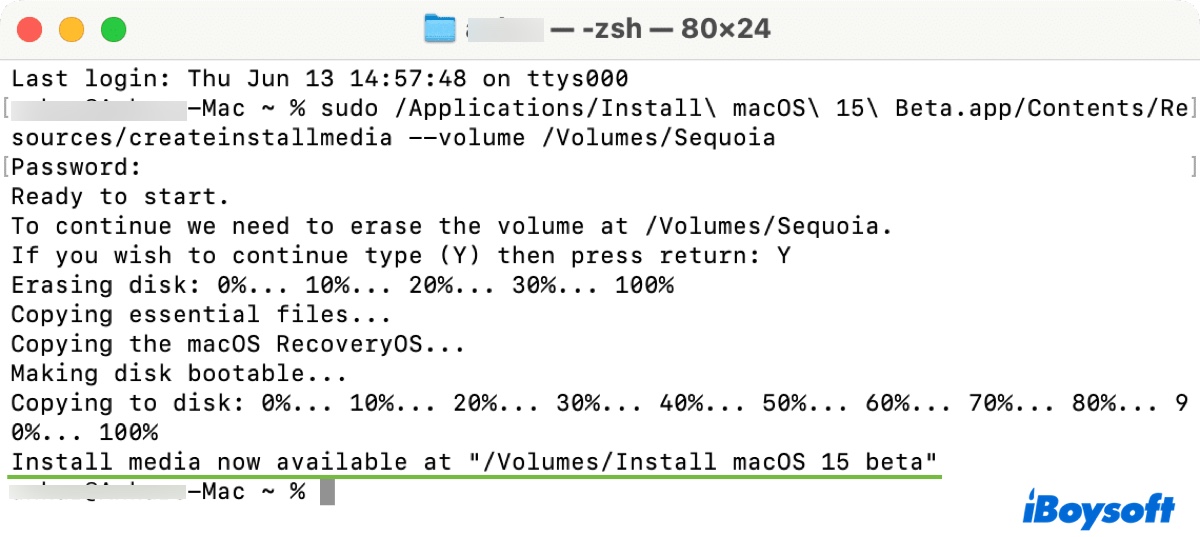 macOS Sequoia public release:sudo /Applications/Install\ macOS\ Sequoia.app/Contents/Resources/createinstallmedia --volume /Volumes/MyVolumemacOS Sonoma: sudo /Applications/Install\ macOS\ Sonoma.app/Contents/Resources/createinstallmedia --volume /Volumes/MyVolume macOS Ventura: sudo /Applications/Install\ macOS\ Ventura.app/Contents/Resources/createinstallmedia --volume /Volumes/MyVolume macOS Monterey: sudo /Applications/Install\ macOS\ Monterey.app/Contents/Resources/createinstallmedia --volume /Volumes/MyVolume macOS Big Sur: sudo /Applications/Install\ macOS\ Big\ Sur.app/Contents/Resources/createinstallmedia --volume /Volumes/MyVolume macOS Catalina: sudo /Applications/Install\ macOS\ Catalina.app/Contents/Resources/createinstallmedia --volume /Volumes/MyVolume macOS Mojave:sudo /Applications/Install\ macOS\ Mojave.app/Contents/Resources/createinstallmedia --volume /Volumes/MyVolume macOS High Sierra:sudo /Applications/Install\ macOS\ High\ Sierra.app/Contents/Resources/createinstallmedia --volume /Volumes/MyVolume macOS Sierra:sudo /Applications/Install\ macOS\ Sierra.app/Contents/Resources/createinstallmedia --volume /Volumes/MyVolume --applicationpath /Applications/Install\ macOS\ Sierra.app OS X El Capitan:sudo /Applications/Install\ OS\ X\ El\ Capitan.app/Contents/Resources/createinstallmedia --volume /Volumes/MyVolume --applicationpath /Applications/Install\ OS\ X\ El\ Capitan.app OS X Yosemite:sudo /Applications/Install\ OS\ X\ El\ Capitan.app/Contents/Resources/createinstallmedia --volume /Volumes/MyVolume --applicationpath /Applications/Install\ OS\ X\ Yosemite.app OS X Mavericks:sudo /Applications/Install\ OS\ X\ El\ Capitan.app/Contents/Resources/createinstallmedia --volume /Volumes/MyVolume --applicationpath /Applications/Install\ OS\ X\ Mavericks.app OS X Mountain Lion:sudo /Applications/Install\ OS\ X\ El\ Capitan.app/Contents/Resources/createinstallmedia --volume /Volumes/MyVolume --applicationpath /Applications/Install\ OS\ X\ Mountain\ Lion.app Mac OS X Lion:sudo /Applications/Install\ OS\ X\ El\ Capitan.app/Contents/Resources/createinstallmedia --volume /Volumes/MyVolume --applicationpath /Applications/Install\ Mac\ OS\ X\ Lion.app
 - Input your administrator login password and hit Enter when prompted. (The password won't appear.)
- Type Y to confirm that you want to erase the volume and hit Enter.
- Then Terminal will start the erase process and show you the message, "Erasing Disk: 0%… 10%… 20%… 30%…100%…"
- Click OK when you see an alert that Terminal would like to access files on a removable volume.
- When you receive the message, "Install media is now available," you'll find the bootable drive having the same as the installer, such as "Install macOS 15 Beta."
- Quit Terminal and eject the bootable USB.
Erase and reinstall macOS from USB
With the bootable USB ready, we can now erase and install macOS from the USB. Follow the steps below:
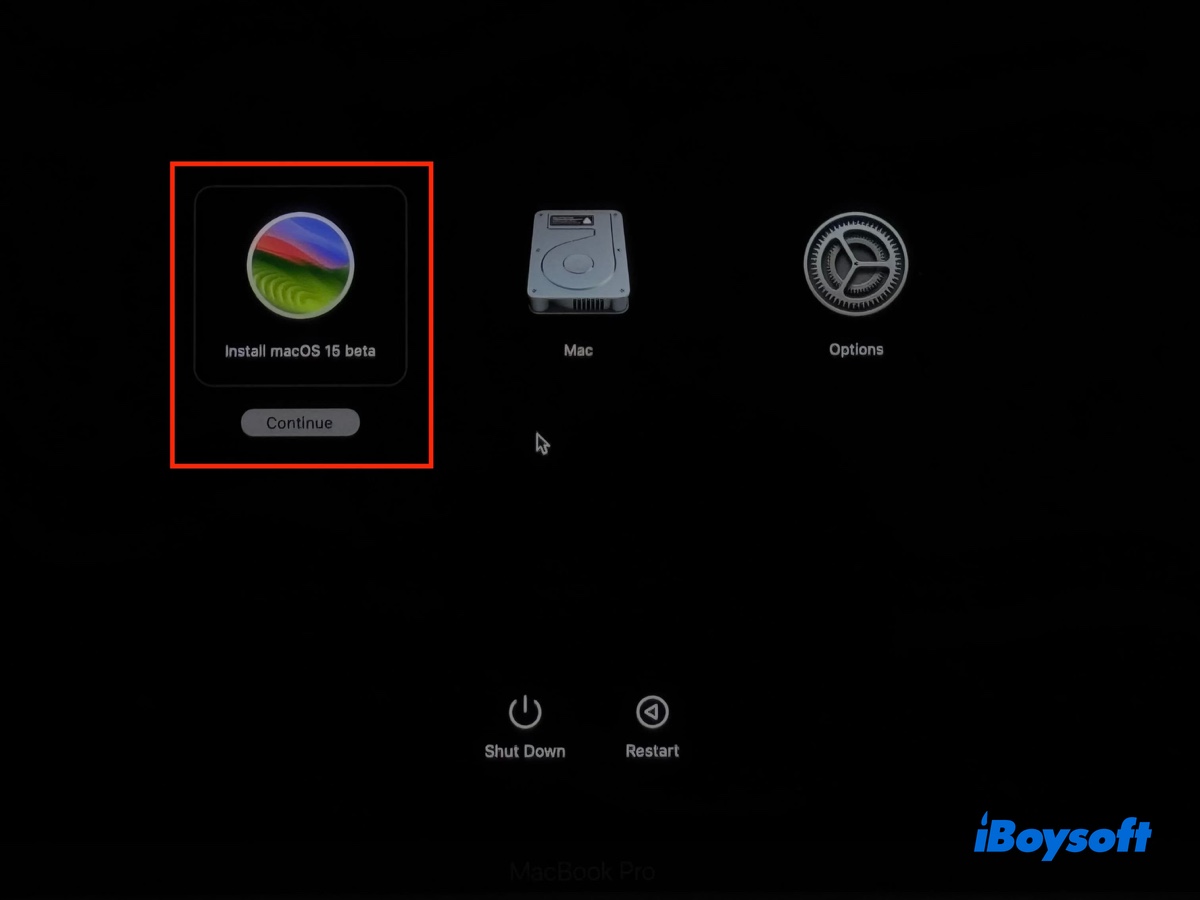
- Turn off the Mac you want to do a fresh install on. (It must be compatible with the macOS you're installing.)
- Plug in the bootable USB.
- Boot into Startup Manager.
On an Intel Mac: Press the power button, then immediately press and hold the Option key.
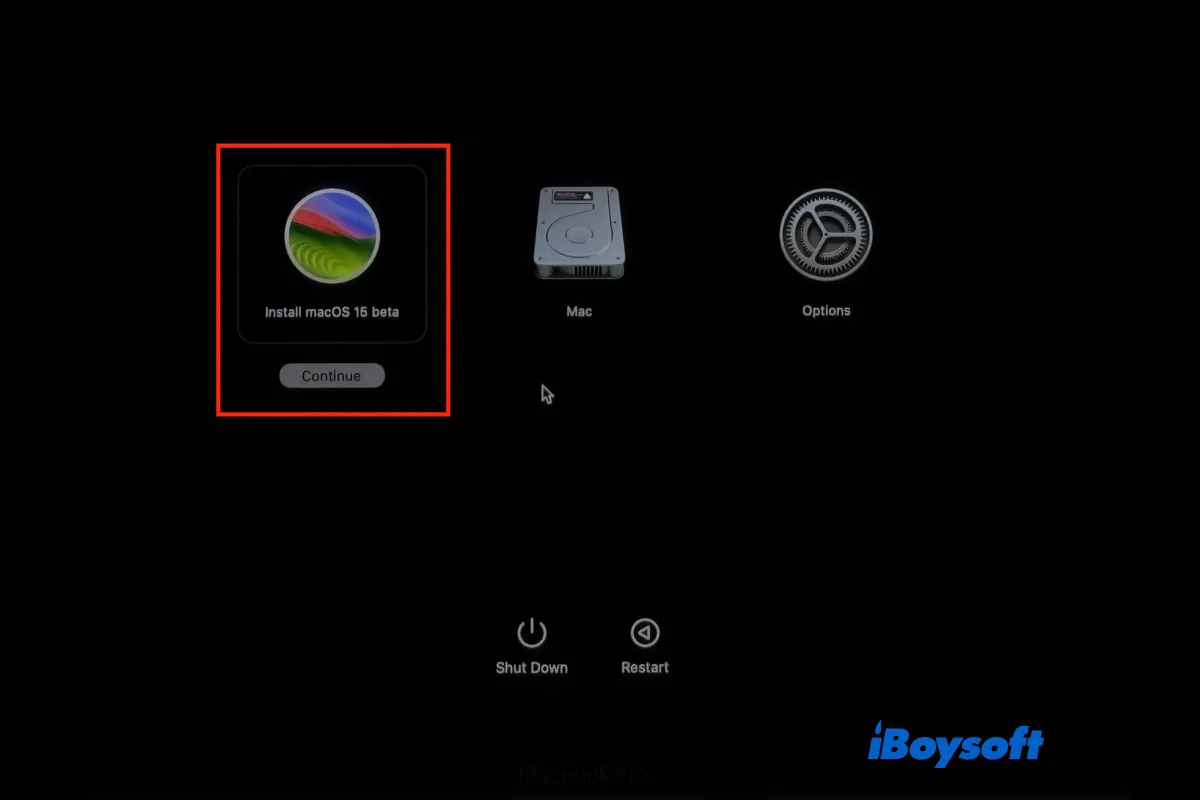
On an M1/M2/M3/M4 Mac: Press and hold the power button until you see "Loading startup options." - When the available startup disks appear, select your USB bootable installer and click the Continue button (on Apple Silicon Macs) or the Up arrow (on Intel Macs).
- Click Disk Utility > Continue.
- Click View > Show All Devices.
- Choose the physical disk of your internal hard drive (e.g., Apple SSD BF6734N Media) and click Erase.
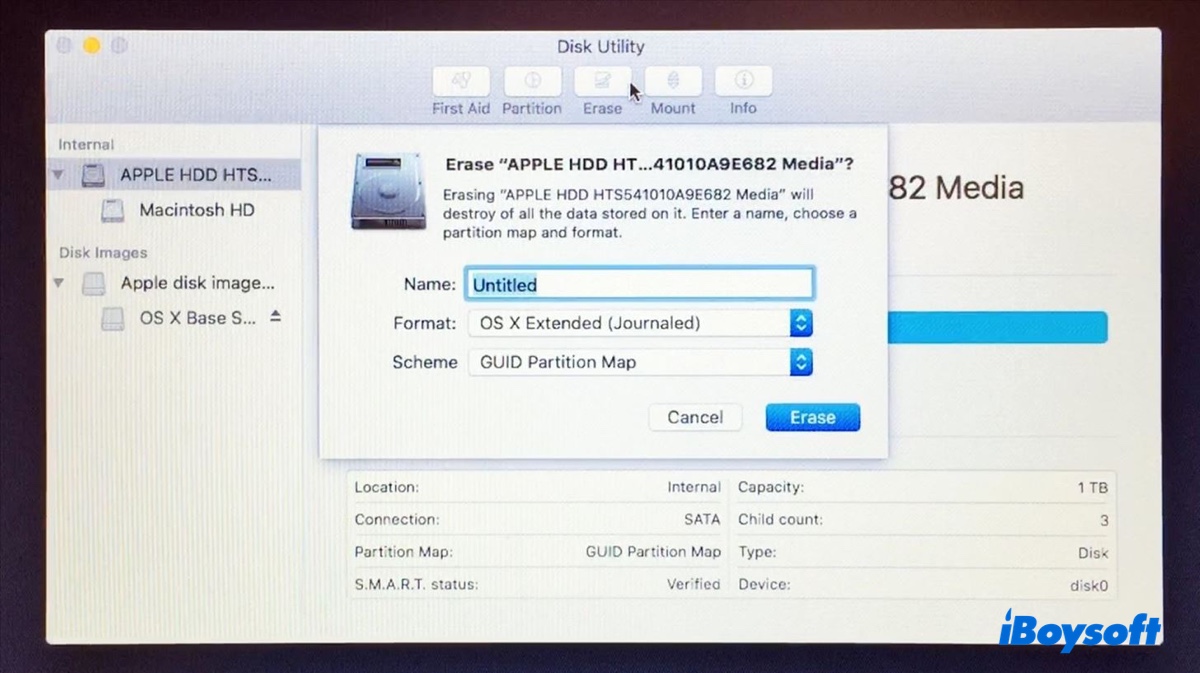
- Name your internal drive Macintosh HD.
- Choose APFS for macOS High Sierra and later; select Mac OS Extended (Journaled) for macOS Sierra and earlier.
- Keep GUID Partition Map as the scheme.
- Click Erase.
- Wait for your startup disk to be erased.
- After the erase process is complete, close Disk Utility and return to the macOS Utilities window.
- Choose "Install macOS version" and click Continue.
- Follow the onscreen instructions to finish the clean install of macOS.
Share these steps to help others learn how to clean install Mac OS X or macOS from USB!
Way 2: Clean install macOS without USB via Recovery Mode
If you want a clean install of the most recent macOS installed on your Mac without a USB installer, you can boot into Recovery Mode. Here's how:
- Boot your Mac into Recovery Mode.
- Choose Disk Utility > Continue.
- Tap View > Show All Devices.
- Choose the physical disk of your internal hard drive (e.g., Apple SSD BF6734N Media) and click Erase.
- Name your internal drive Macintosh HD.
- Choose APFS for macOS High Sierra and later; select Mac OS Extended (Journaled) for macOS Sierra and earlier.
- Keep GUID Partition Map as the scheme.
- Click Erase.
- After your drive is cleaned, quit Disk Utility.
- In the macOS Utilities window, choose "Reinstall macOS version" and click Continue.
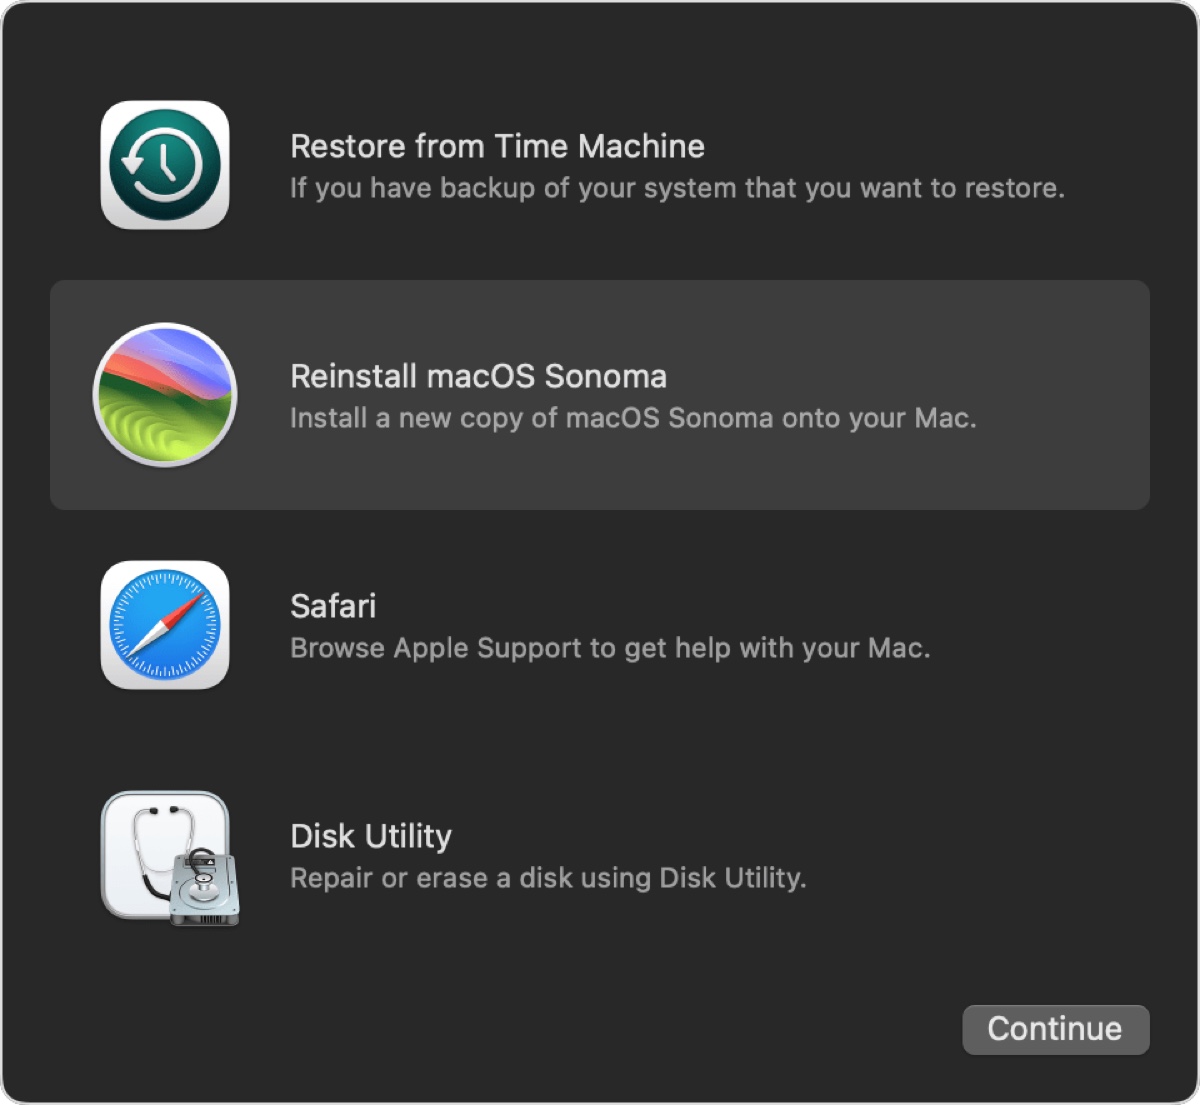
- Follow the instructions on the screen to clean install macOS without USB.
This method is available to all OS versions. Whether you want to clean install macOS Sequoia without USB or another release, it should be helpful.
Way 3: Fresh install macOS without USB via Erase All Content and Settings
Before macOS Monterey, a clean OS install on Mac always requires a bootable USB installer or entering the Recovery Mode. However, the arrival of the option "Erase All Content and Settings" offered a much easier way to reset your Mac. You no longer need to go through the many steps to format your drive, as the system will manage it for you.
Unfortunately, this option isn't available to every Mac. Instead, it's exclusive to T2 Macs and Apple Silicon Macs with the M1, M2, M3, or M4 chips running macOS Monterey or later.
If your Mac is Intel-based, use iBoysoft DiskGeeker to make a boot disk and then boot from it to perform a fresh install.
Tips: If you're not sure what chip your Mac has, go to the Apple menu > About This Mac to find out.
To clean install macOS when running macOS Monterey/Ventura/Sonoma/Sequoia:
- Open Erase All Content and Settings.
On macOS Ventura or later: Open the Apple menu > System Settings > General > Transfer or Reset > Erase All Content and Settings.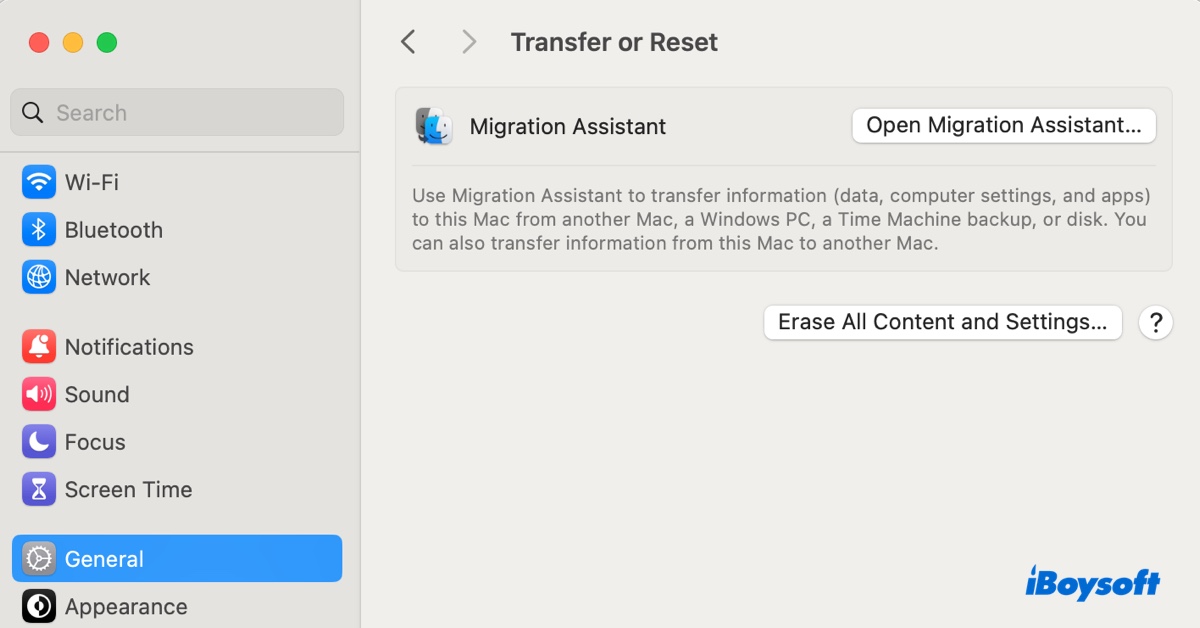
On macOS Monterey: Go to the Apple menu > System Preferences, then click System Preferences > Erase All Content and Settings from the top-left menu bar.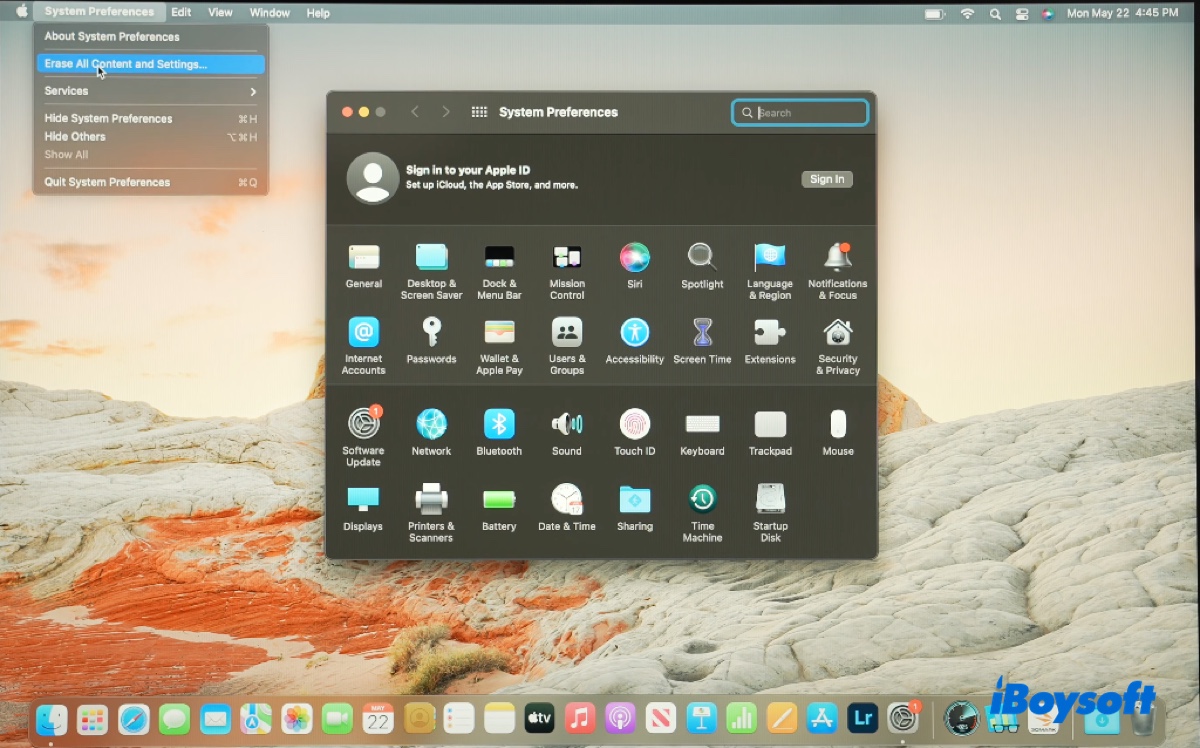
- Enter your password.
- A message will appear to remind you that all data, settings, and apps will be erased from your Mac.
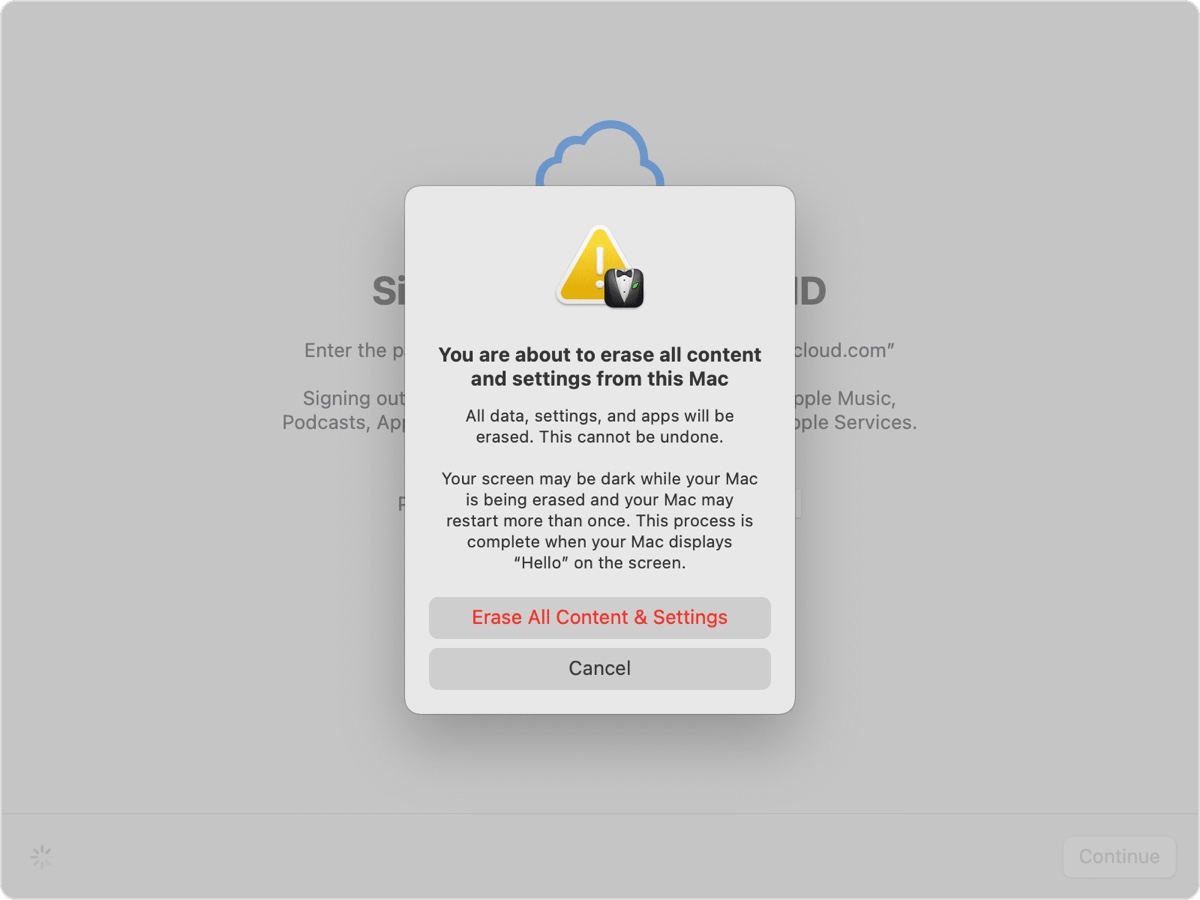
- Click "Erase All Content & Settings" after reading the message.
- Your Mac will restart during the process.
- When it says "Your Mac is activated," click Restart.
- Follow the setup assistant to set up your Mac.
Way 4: Fresh install macOS without USB & password
If you can't clean install macOS with previous methods or you don't have the login password to utilize Disk Utility in Recovery Mode, use Recovery Assistant. To do this:
- Boot into macOS Recovery.
- Select Recovery Assistant > Erase Mac from the top-left corner.
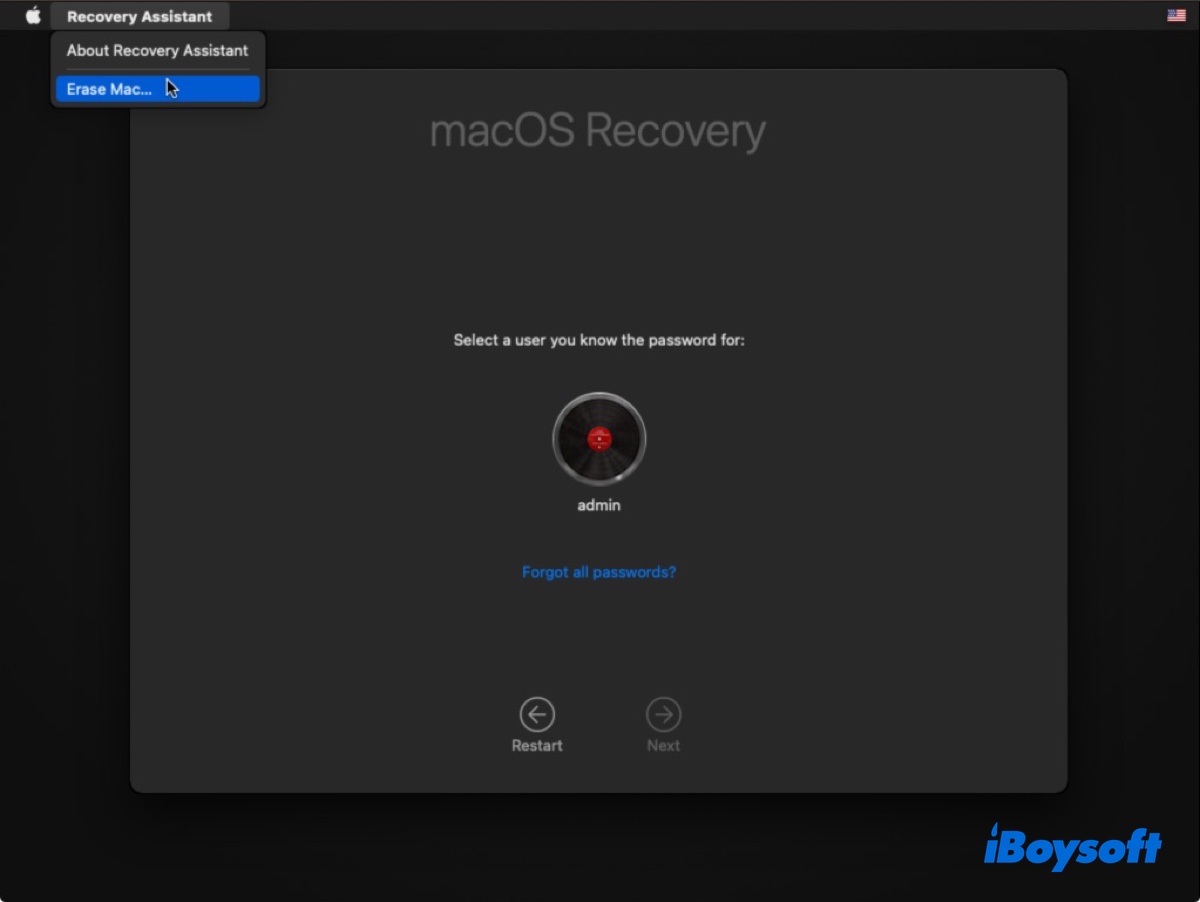
- Go through the steps to format your drive and reinstall macOS.
Now that you know how to do a clean install of macOS, share it to benefit more people!
Is it worth doing a clean install of macOS?
Yes, it's generally worth doing a fresh install of macOS or OS X if your Mac can't boot up or you want to start with a new, trouble-free system without potential app conflicts or any corrupted files.
However, some may argue that clean reinstalling macOS doesn't make much sense if your Mac boots up without issues. The idea is that if your Mac starts up properly, it suggests no issues with the system volume and thus reinstalling macOS won't be much of a help.
This may be true in some way for macOS Big Sur and later, where the system volume is separated from the data volume, is made read-only, and is cryptographically signed and sealed. But it ignores the benefits of erasing the data volume, which may be where the culprit lies. In most cases, when we've exhausted all possible solutions, a fresh install of macOS may be the last resort to set things straight.