A bootable USB installer is not necessary for upgrading or reinstalling macOS, but it can be useful when you can't install macOS through the usual means. For example, you can install macOS from a USB when your Mac won't boot up, when you can't install macOS from Software Update or macOS Recovery Mode, or when you want to downgrade macOS.
Here, we'll show you how to install any macOS from a bootable USB installer. Whether you want to install macOS Sequoia from USB or macOS Sonoma from USB, the general steps are the same, as shown below:
- Before installing macOS from a USB
- Step 1: Format your USB external drive
- Step 2: Create a bootable USB for macOS
- Step 3: Boot Mac from USB installer
- Step 4: Format your internal hard drive (Optional)
- Step 5: Install Mac OS from USB
Tips: If you want to try macOS Tahoe Beta, follow: How to create a macOS Tahoe Beta bootable USB installer and install macOS Tahoe Beta from it?
Before installing macOS from USB
Before performing the macOS installation from a USB, you need to get a few things ready.
First, prepare a USB flash drive or any storage device with 20 GB or more capacity. This drive is used to accommodate the macOS installer, so it must be larger than that. You must also back it up if it contains any essential data.
Second, back up your Mac. Backing up important data is recommended before any macOS installation. If you only want to keep a few documents, you can transfer those files from your Mac to an external drive. However, if you want a complete system backup that allows you to easily restore your entire system or individual files from a specific date and time, create a Time Machine backup on your Mac.
Third, ensure your Mac is plugged into power in case it runs out of battery.
When you're prepared, follow the steps in the following paragraphs to install Mac OS from USB drive.
Tips: The following procedures are for Mac computers. If you only have a Windows PC, read this guide to create the macOS bootable USB installer on Windows.
Step 1: Format your USB external drive
Warning: Formatting a drive will erase all data on it!
Formatting the USB drive can facilitate the installation process, preventing various errors. Ensure your USB disk is connected to your Mac and take the steps below:
- Open Disk Utility.
- Click View > Show All Devices.
- Choose the top layer of your external drive and click Erase.
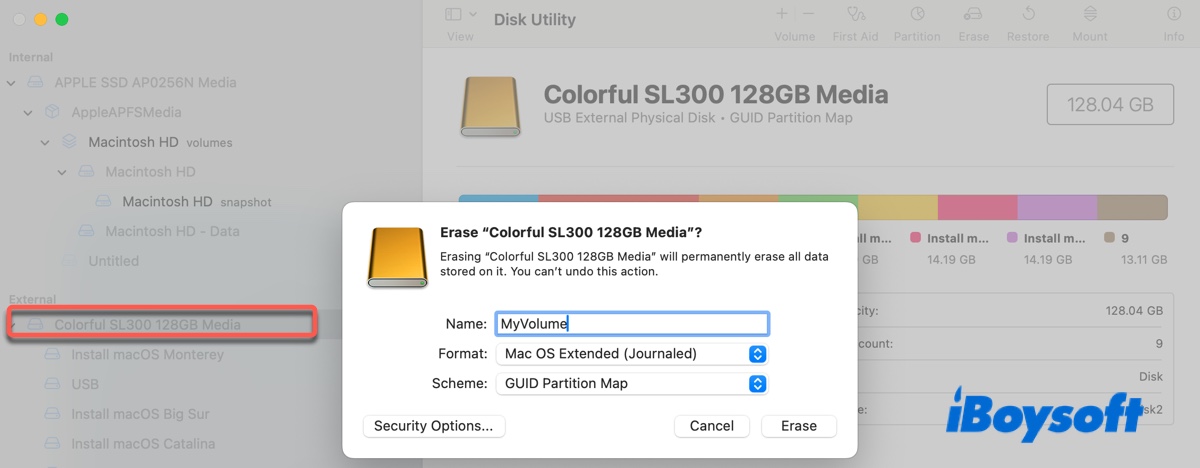
- Name it MyVolume.
- In the Format field, choose Mac OS Extended (Journaled).
- In the Scheme field, choose GUID Partition Map.
- Click Erase.
Step 2: Create a bootable USB for macOS
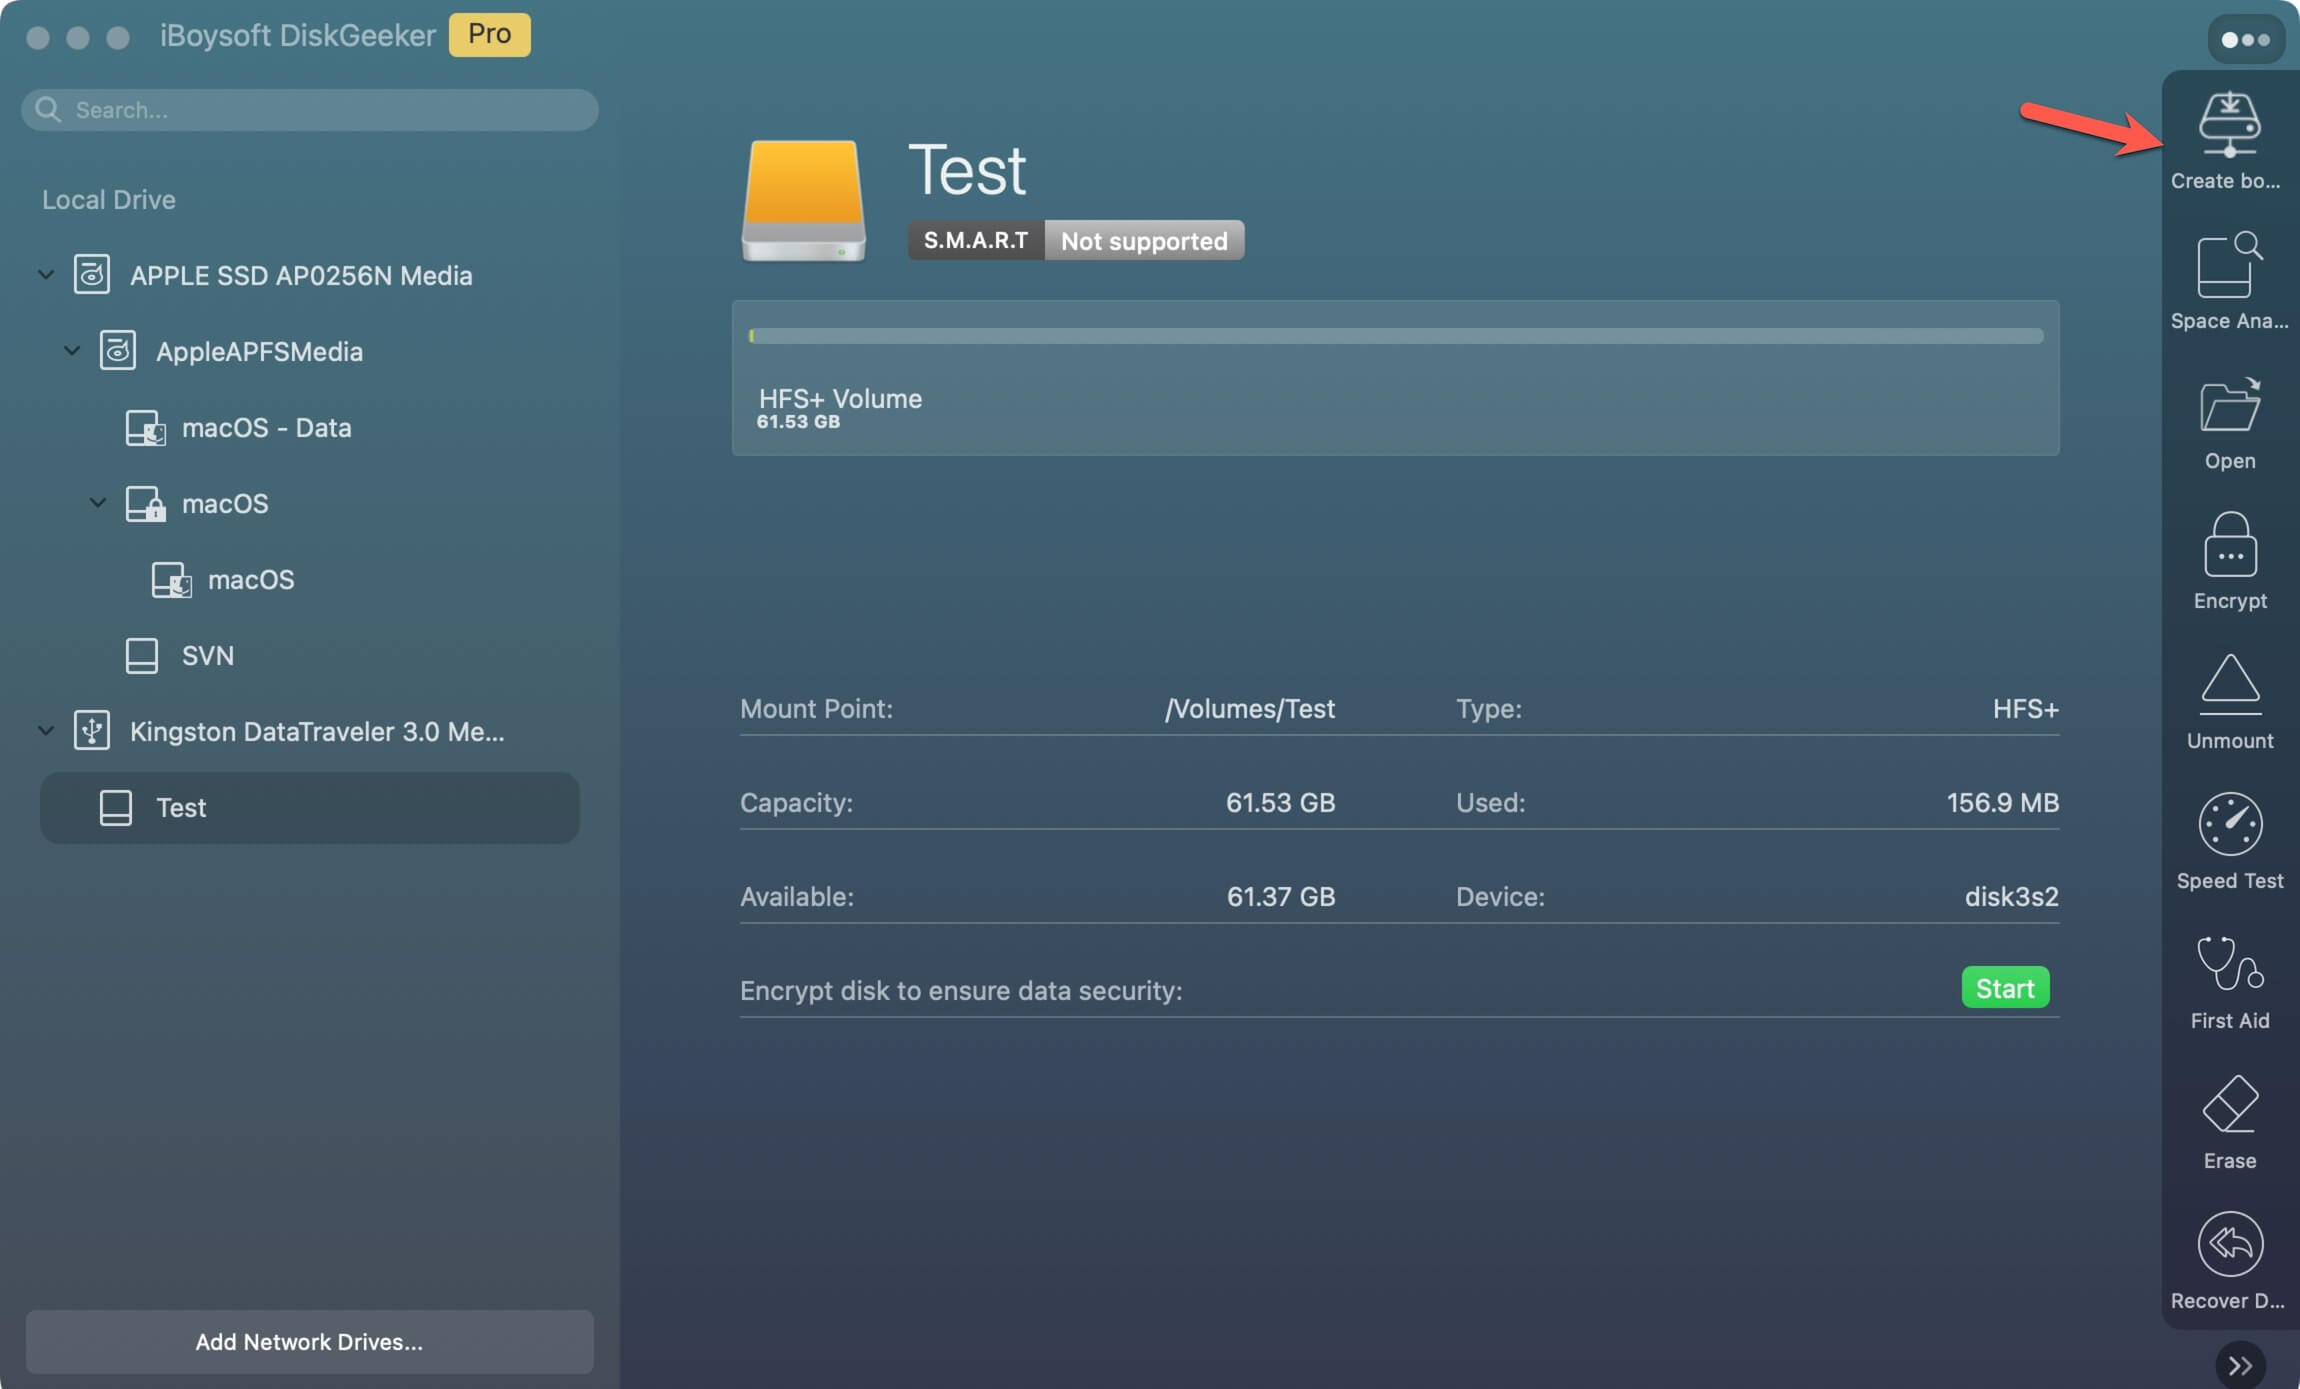
After your external USB drive is formatted, you can create a bootable USB installer easily with iBoysoft DiskGeeker. It doesn't require you to prepare the macOS installer or use complicated commands. Unless you need to install macOS Sierra or an earlier version, for which you must download the related DMG file yourself (download Mac OS DMG here), you can use the macOS DMG files in the app to make a bootable USB.
Step 1: Download and install iBoysoft DiskGeeker.
Step 2: Choose your external drive from the left side and click Create boot disk at the right sidebar. Then click Continue.
Step 3: Choose the macOS DMG file.
If you're installing macOS Sequoia/Sonoma/Ventura/Monterey/Big Sur/Catalina/Mojave/High Sierra from USB, choose the wanted macOS version from the app and click Create boot disk. The app will start to download the macOS installer immediately.
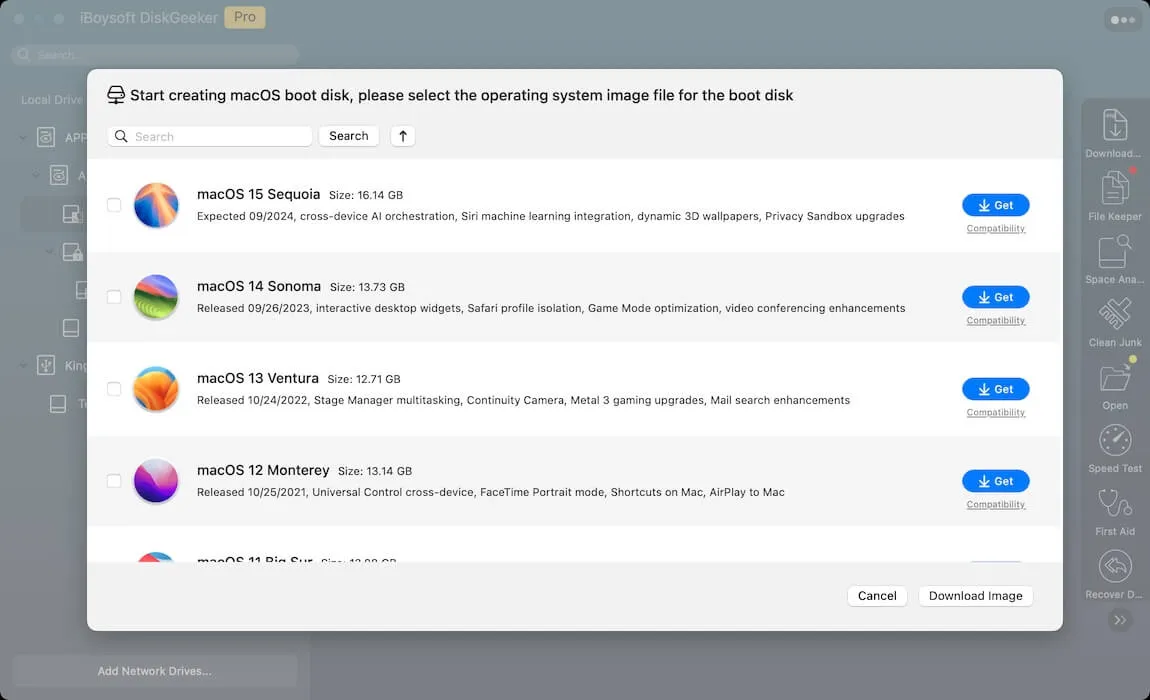
If you're installing macOS Sierra or earlier from USB, click Create boot disk > Browse Images to choose the DMG file you downloaded.
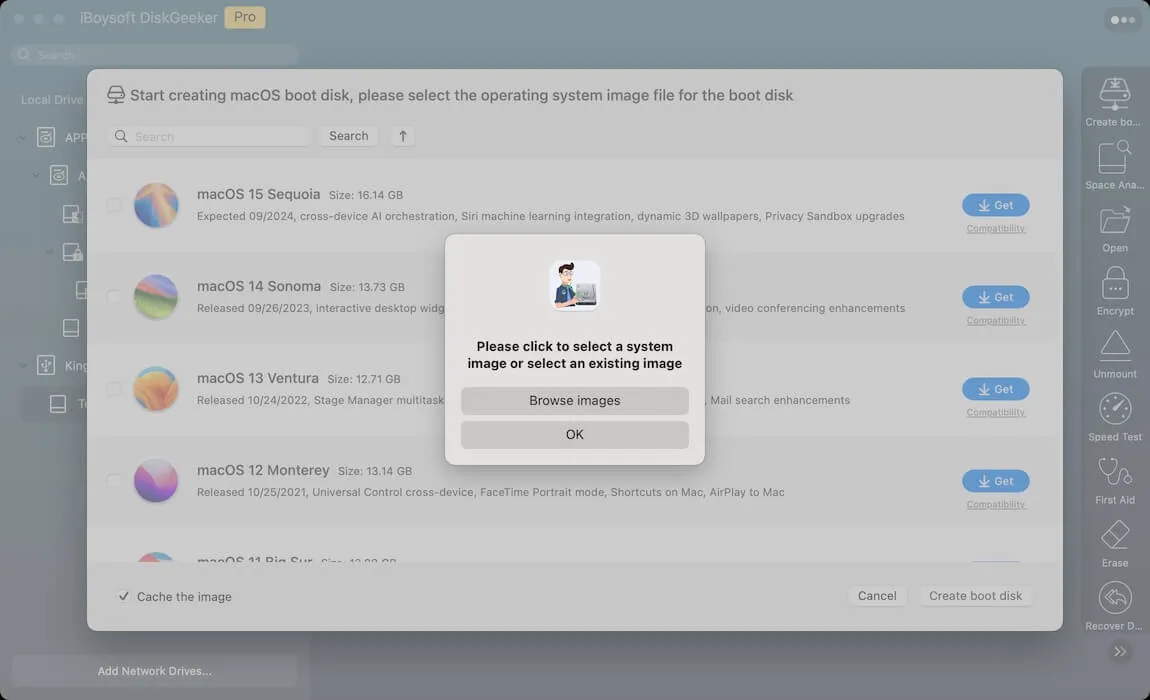
Step 4: Click OK when it says creating the boot disk will erase the target partition. Then wait for the install disk to be created.

With this software, creating a bootable USB for macOS is straightforward. Share it if it's useful!
Nevertheless, if you prefer manually creating the boot disk through commands, use the following steps instead:
- Open Terminal.
- Type the appropriate command and hit Enter to download the macOS installer.

Install macOS Sequoia from USB:sudo /Applications/Install\ macOS\ Sequoia.app/Contents/Resources/createinstallmedia --volume /Volumes/MyVolumeInstall macOS Sonoma from USB:sudo /Applications/Install\ macOS\ Sonoma.app/Contents/Resources/createinstallmedia --volume /Volumes/MyVolumeInstall macOS Ventura from USB:sudo /Applications/Install\ macOS\ Ventura.app/Contents/Resources/createinstallmedia --volume /Volumes/MyVolumeInstall macOS Monterey from USB:sudo /Applications/Install\ macOS\ Monterey.app/Contents/Resources/createinstallmedia --volume /Volumes/MyVolumeInstall macOS Big Sur from USB:sudo /Applications/Install\ macOS\ Big\ Sur.app/Contents/Resources/createinstallmedia --volume /Volumes/MyVolumeInstall macOS Catalina from USB:sudo /Applications/Install\ macOS\ Catalina.app/Contents/Resources/createinstallmedia --volume /Volumes/MyVolumeInstall macOS Mojave from USB:sudo /Applications/Install\ macOS\ Mojave.app/Contents/Resources/createinstallmedia --volume /Volumes/MyVolumeInstall macOS High Sierra from USB:sudo /Applications/Install\ macOS\ High\ Sierra.app/Contents/Resources/createinstallmedia --volume /Volumes/MyVolumeInstall macOS Sierra from USB:sudo /Applications/Install\ macOS\ Sierra.app/Contents/Resources/createinstallmedia --volume /Volumes/MyVolumeInstall OS X El Capitan from USB:sudo /Applications/Install\ OS\ X\ El\ Capitan.app/Contents/Resources/createinstallmedia --volume /Volumes/MyVolume --applicationpath /Applications/Install\ OS\ X\ El\ Capitan.appInstall OS X Yosemite from USB:sudo /Applications/Install\ OS\ X\ Yosemite.app/Contents/Resources/createinstallmedia --volume /Volumes/MyVolume --applicationpath /Applications/Install\ OS\ X\ Yosemite.app --nointeractionInstall OS X Mavericks from USB:sudo /Applications/Install\ OS\ X\ Mavericks.app/Contents/Resources/createinstallmedia --volume /Volumes/MyVolume --applicationpath /Applications/Install\ OS\ X\ Mavericks.app --nointeraction - Enter your admin password and press Enter.
- Type Y and hit Enter.
- Wait until the install media is available.
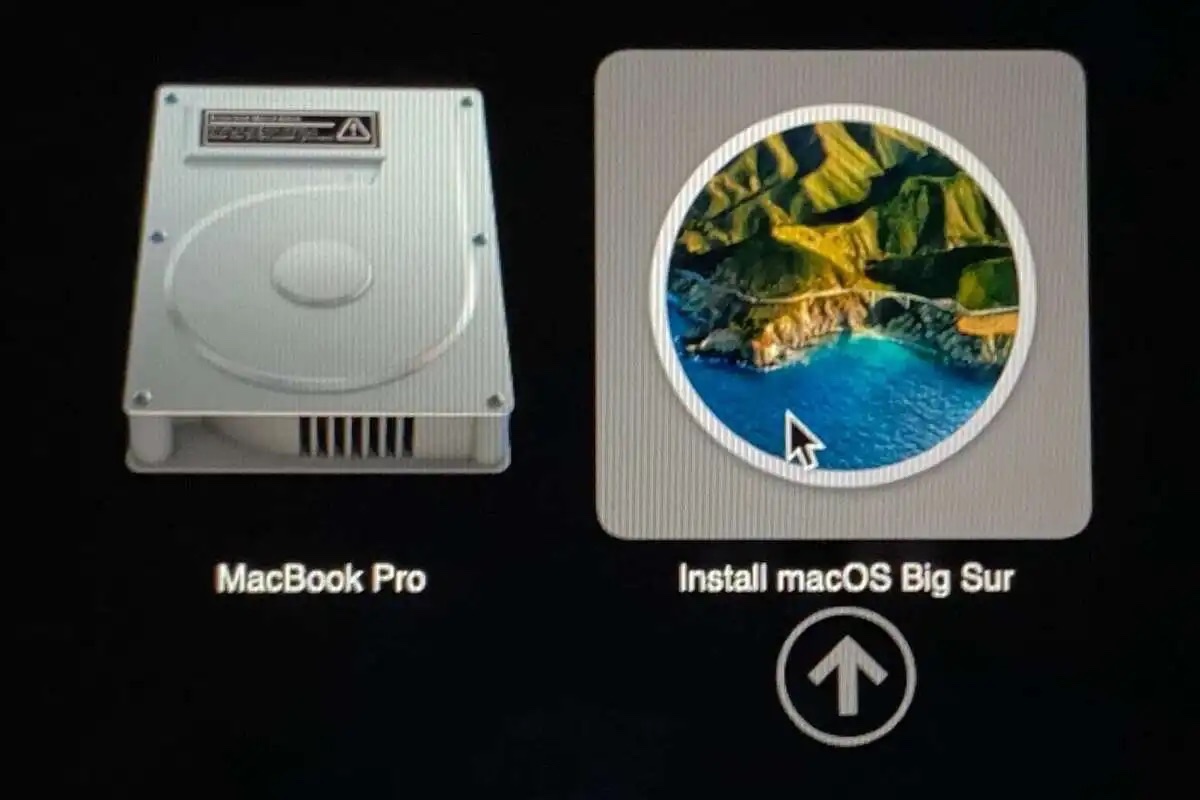
Step 3: Boot Mac from USB installer
Now that you have the bootable USB installer, you can boot your Mac from it to install macOS. Depending on your Mac's processor, you can choose the proper steps for your Mac model.
Notably, if you fail to boot your Mac from the USB, as the macOS Catalina USB installer is not bootable, the macOS bootable installer does not show up in the Startup Manager, or for other reasons, check your creation process from scratch.
On an Intel-based Mac:
- Turn off your Mac.
- Power it on, then immediately hold down the Option key.
- Release the key when seeing the boot menu.
- Choose the boot disk and click the up arrow.
On an Apple Silicon M1/M2/M3/M4 Mac:
- Shut down the Mac.
- Press and hold the Power button until you see the loading startup options.
- Choose the external bootable volume and click Continue.
For more details, check out this article: How to Boot Mac from External Drive? [Intel/T2/M1/M2/M3]
Step 4: Format your internal hard drive (Optional)
Now, you should be in macOS Recovery mode. From here, you can format the internal hard drive for a clean install of macOS. Or skip this step to the final step.
- Click Disk Utility > Continue.
- Click View > Show All Devices.
- Choose the physical disk of your Mac hard drive, which is usually named as Apple SSD xxx media.
- Click Erase.
- Name your drive Macintosh HD.
- Choose APFS as the format if installing macOS High Sierra or later; otherwise, use Mac OS Extended (Journaled).
- Keep the scheme GUID Partition Map.
- Click Erase.
- Exit Disk Utility.
Step 5: Install Mac OS from USB
The last step is to install the OS on your Mac or external drive.
How to install OS from USB on Mac:
- Choose Install macOS xxx and click Continue.
- Click Continue again to set up the installation.
- Agree to the terms and conditions.
- Select the disk where you want to install macOS. (Choose your internal drive if you wish to install macOS on your Mac; Select another external drive connected to your Mac if you want to install macOS on an external drive.)

- Wait while the macOS installation is ongoing.
Conclusion
We've detailed the steps to install any macOS, OS X, or Mac OS X from USB on Mac. After reading it, you should be able to install macOS on a flash drive or any other form of disk. If you find this article useful, share it to help others who can't install Mac OS X from USB.