No matter what I do, I cannot get the Time Machine symbol to show in the menu bar with Sonoma 14.2.1. Yes, I have enabled “show in menu bar” in the System Settings Control Center—numerous times! Have used Disk First Aid on all disks including a new backup disk. I have rebooted the MB Pro. NOTHING that I have done seems to help! How can I get into Time Machine or at least have the symbol shown in the Menu Bar? Many people seem to be having the same problem. Assistance would be very much appreciated!
The Time Machine icon not showing in the menu bar issue not only happens to a certain group of users, in fact, so many users reported that they have experienced this tricky problem on macOS Sonoma, Ventura, Monterey, and earlier macOS versions multiple times.

For the consequences it causes, this issue not only makes Time Machine unreachable but also may result in the Time Machine backups being invisible, in other words, the Time Machine backups can be inaccessible or lost. What's worse, this Time Machine not showing in the menu bar issue can even cut off Time Machine from normal backup working, leading it to fail to back up the critical files you write to the OS.
Each consequence drives people nuts. Yet in no hurry, please. This post is gonna explain how to recover the inaccessible Time Machine backups and make the Time Machine icon appear on the menu bar in detail. Just keep reading!
How to grab the inaccessible Time Machine backups on Mac?
No matter what trouble we are gonna tackle, data safety always is the priority we should take into consideration. Or, any accidental hitting all of a sudden may make the files unrecoverable forever, especially the Time Machine backups that cover so many crucial files on your Mac.
When a file becomes inaccessible, it means that you have no access to it. Yet inaccessible does not equal completely lost, making it still possible to turn it accessible.
It's acknowledged that the longer the time goes by, the lower the data recovery success rate is. Therefore, once the Tima Machine backup is inaccessible, you should perform a backup recovery ASAP.
Having a second backup is a good thing of course, yet if you don't have one, it is not a tough trouble. We will explain how to recover the inaccessible Time Machine backups with the assistance of professional data recovery software here.
iBoysoft Data Recovery Software is the top-recommended data recovery utility in the data recovery market, which has won numerous commendations and praise for its fabulous disk scanning skills and powerful data recovery algorithms.
Its built-in disk scanning function is able to scan for any file traces bit by bit and sector by sector on your machine, plus its data recovery algorithms are capable of recovering deleted or lost files from an unreadable, inaccessible, formatted, corrupted, broken, and even failing internal/external hard drives successfully.
When you lose access to the Time Machine backups on your Mac, you can recover them with the help of iBoysoft Data Recovery Software:
Step 1: Download and install iBoysoft Data Recovery Software on your Mac computer.
Please make sure the internet connection goes well or the download process will fail. Moreover, you should place the software on the partition or volume that hasn't suffered from data loss, or the new app package will overwrite the space occupied by the inaccessible backups, making the data recovery a low success rate.
Step 2: Launch the data recovery software on your Mac computer.
You can choose a way that you prefer to start up iBoysoft Data Recovery Software on your Mac computer:
Option 1: Launch Spotlight Search by pressing the Command + Space keys together and type the name of the data recovery software > Select the data recovery software > Hit Run to launch it.
Option 2: Launch Finder > Applications > iBoysoft Data Recovery Software.
Option 3: Open Launchpad > Switch the interface to find iBoysoft Data Recovery Software > Double-click it to open.
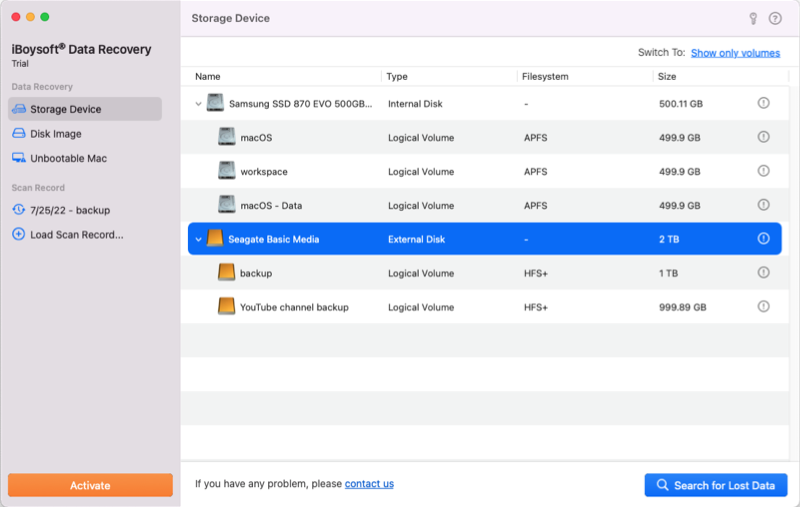
Step 3: Select the partition/volume/disk that stores the inaccessible backups.
When you're in the main interface of iBoysoft Data Recovery Software, you can see that it lists all hard disks one by one, including the connected devices. You just choose the one that stored the backup previously.
Step 4: Click Search for Lost Data to begin the scanning process for lost files.
Once you hit the Search for Lost Data button, the software will begin its disk scanning, which crawls all partitions and volumes for any traces of the inaccessible files. The time it spends depends on the lost files' size. The bigger the files are, the longer the disk scanning process goes on. You just let it work in the background and proceed with your matter. Do not click the X button to quit this software!
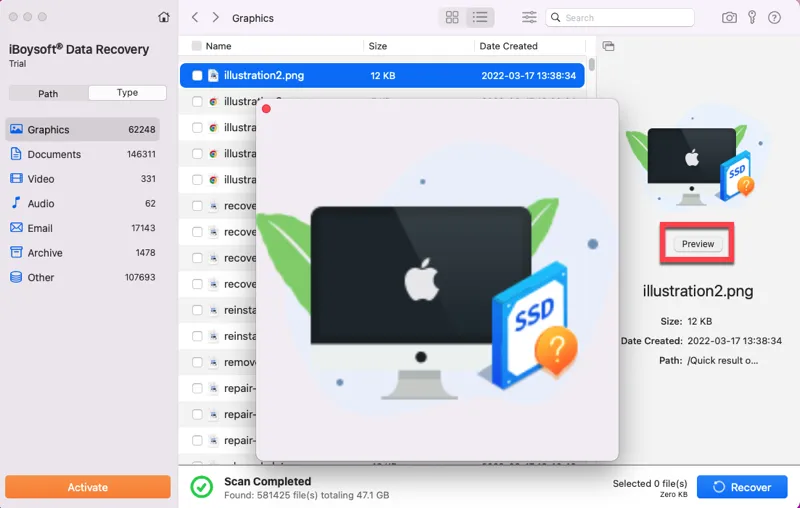
Step 5: Click Preview to check the scanned results brought by the disk scanning process.
When the disk scanning ends, this software will show you a long list of files that it scans, which includes sorts of file types or formats. To save time and effort, you can filter the wanted files with their file names or file formats in the search box and then perform a pre-recovery check. After your check finishes, you can go to recover them.
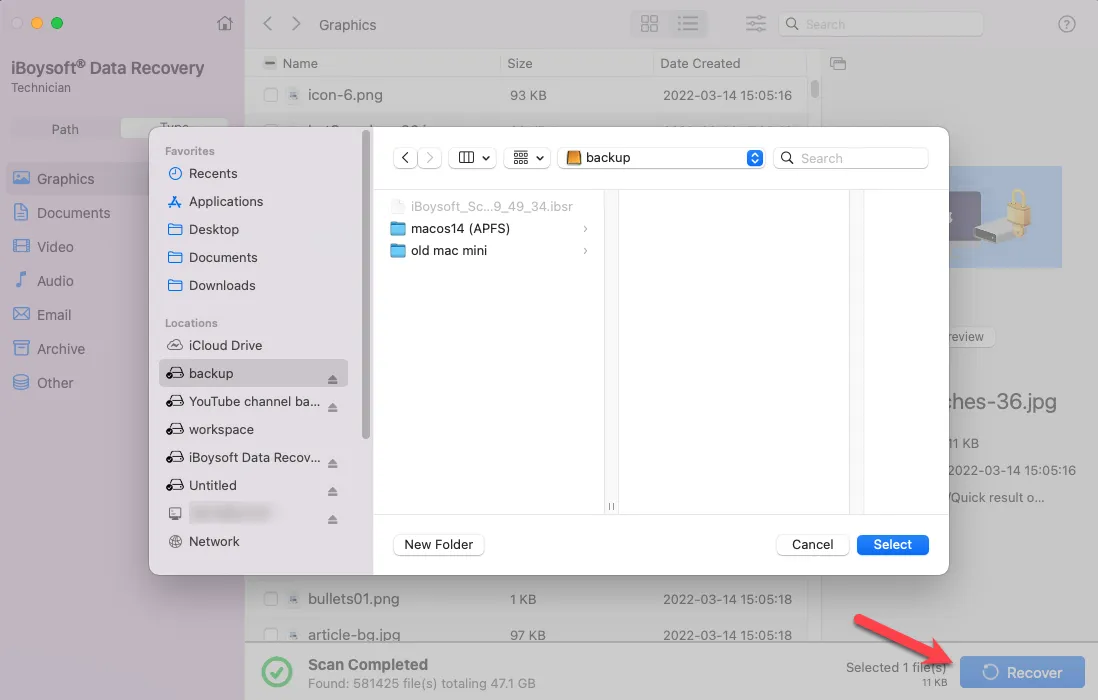
Step 6: Check the desired files and click Recover to restore the Time Machine backups.
At the moment you finish your file check, you can proceed to the final stage -- file recovery. Select the wanted files and click the Recover button to restore the inaccessible Time Machine backups. Do not place the recovered files in the partition/volume where happened data loss, or which might happen unless you ensure the partition/volume is all good. Making a second backup of the recovered files is fairly recommended if possible.
With all backup files at hand, now we can concentrate on how to make the Time Machine icon visible on the menu bar!
If you get the Time Machine backup successfully with the help of this article, kindly share this article on your favorite platform and you'll be much appreciated!
How to fix Time Machine not showing in the menu bar on Mac?
We cannot figure out why the Time Machine icon appears from the menu bar till now, yet we can try the following solutions to get it back to the menu bar one more time!
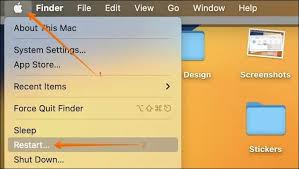
Solution 1: Restart your Mac
No matter what strange behavior happens on your Mac, the first measure that should be performed is to stop it immediately. Just restart your Mac to end any weird issues and make it ready for the next working routine, which also fits the Time Machine icon invisible on the menu bar.
Click the Apple menu on the top left corner of the Mac desktop > click Restart from the dropdown menu > wait for the device to wake up from the restart > check if the Time Machine icon shows on the menu bar.
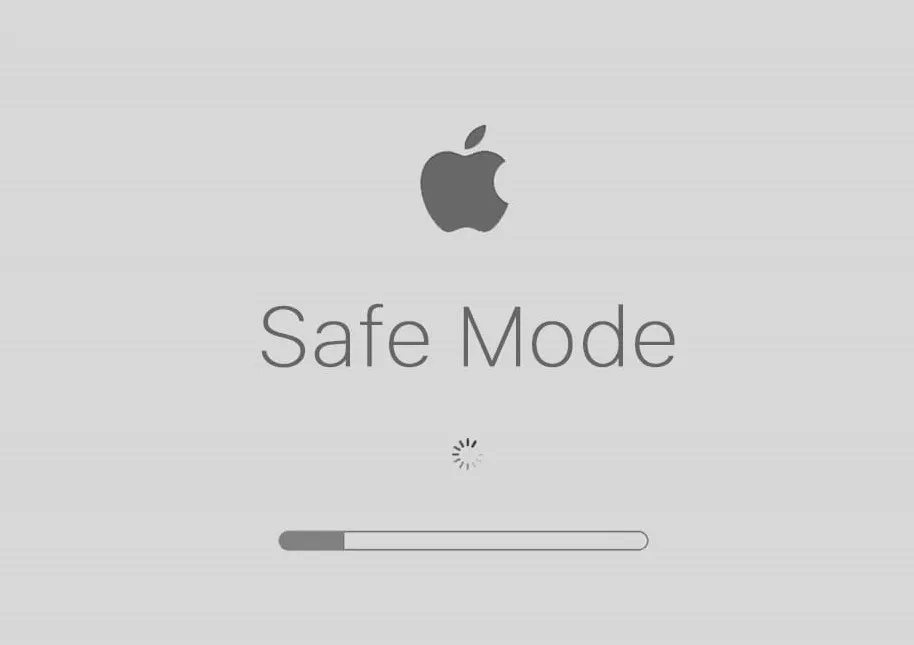
Solution 2: Boot into macOS Safe Mode
macOS Safe Mode is a diagnostic feature that cures sorts of tiny issues hitting your Mac machine. When the Time Machine disappears from the menu bar, you can boot your Mac into macOS Safe Mode to see if anything changes. The steps to boot your Mac into Safe Mode vary according to the Mac model, please follow the one that fits your Mac model:
Boot an Intel-based Mac in Safe Mode:
1. Shut down your Mac computer and wait for 10 seconds.
2. Press the power button to restart your Mac and simultaneously hold down the Shift key.
3. Release the Shift key when seeing the login window.
Start a Mac with an Apple Silicon chip in Safe Mode:
1. Shut down your Mac computer and wait for 10 seconds.
2. Press down the power button until the startup options and the Options gear icon appear on the screen.
3. Choose your startup disk.
4. Hold down the Shift key and click Continue in Safe Mode. Then, release the Shift key.
Solution 3: Set Time Machine to show in the menu bar manually
With the Show in Menu Bar option not checked on your Mac, you cannot see the Time Machine on the menu bar of course. Furthermore, if you have checked already but you cannot see the icon still, you can manually check it one more time here:
For macOS Ventura and macOS Sonoma users:
- Click the Apple menu on the left corner of the Mac desktop.
- Select System Settings and go to Control Center in the sidebar.
- Scroll down to Time Machine, then select Show in Menu Bar from the pull-down menu.
For macOS Monterey and earlier macOS users:
- Click the Apple menu on the left corner of the Mac desktop.
- Select System Preferences and click Dock & Menu Bar.
- Scroll down to Time Machine, then select Show in Menu Bar from the pull-down menu.
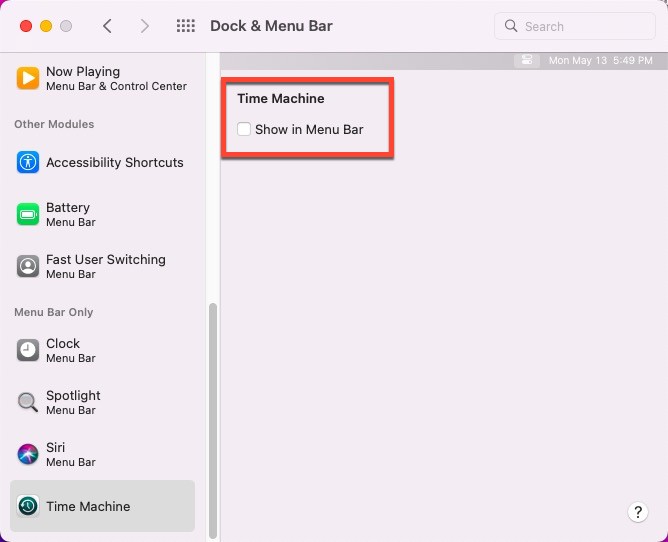
- Then, go to the menu bar to see if Time Machine shows up there.