Taking a screenshot is one of the easiest ways to save and share screen information with others. In different situations, you may have different expectations of a screenshot. Sometimes you want to share the full screen with your friends, sometimes just a single window or a menu. When browsing a web page, you want to take a scrolling screenshot of the full webpage to extract information.
So, how to take a screenshot on Mac? This post covers different ways to capture screenshots on a Mac, including using shortcut keys, built-in utilities, or a professional snipping tool for Mac. Just follow this article and pick up the way you prefer to use it.
Note: If there are shadows around screenshots, you can get rid of them by holding the Option key when you are selecting the area to capture.
Check the quick ways to do a screen grab on Mac:
| Ways | Function |
| Command + Shift + 3 | Capture the entire screen |
| Command + Shift + 4 | Capture a selected area on your screen |
| Command + Shift + 4, then press Space | Crop a specific window or menu |
| Command + Shift + 5 | Launch the Screenshot app on your Mac and can snap the partial or entire screen. |
| Use the Screenshot utility (in Launchpad > Other) | Take a screenshot of a selected area of your screen or the entire screen |
| Use iBoysoft MagicMenu | Right-click to take a screenshot or record the screen on a Mac |
| Use Preview | Take a screenshot for a selection, window, or entire screen |
Updated: On macOS Sequoia, Apple adds weekly permission for screen recording and screenshots, you should allow the desired app to take a screenshot or recording every week and every restart.
How to take a screenshot on Mac/MacBook?
You can either take a snip on a Mac with keyboard shortcuts, a built-in program, or professional third-party tools. Some ways are used to capture the entire screen on a Mac, some are for cropping a partial screen, and some apply to snap the specific window. Here, this post offers you detailed steps of each method.
1. Capture a screenshot on a Mac with shortcuts
The easiest way to take a screenshot on your Mac is to use the shortcut keys. There are 4 shortcuts and each one has different roles in the screenshot.
Command + Shift + 3:
It is used to take full-page screenshots on Mac and capture the entire screen on Mac.
- Open the window of your Mac that you want to print.
- Press and hold these three keys on the keyboard together: Command + Shift + 3.
- The screenshot will be made after you hear a camera shutter sound. And then the captured screen will show as a thumbnail at the lower right corner of your screen.
- Before it's automatically saved, immediately right-click on the screenshot to decide where you want to save it, which program you hope to open it, or whether you just want to delete the screenshot on MacBook.

Command + Shift + 4:
This key combination is used to screenshot a specific area on Mac.
- Make sure the screen is in the interface of the target application, window, or menu bar that you want to capture.
- Press and hold the hotkey of Command + Shift + 4 to take a screenshot. (Command Shift 4 not working on Mac?)
- Drag the crosshair to select the area on the screen to capture.

- The captured portion will appear at the corner of your screen for your next movement as well.
Command + Shift + 4, then press the Space bar:
If you want to take a screenshot of a window or menu, after pressing Shift - Command - 4, press the Space key to lock and select the window or menu.
- Open the window or the menu that you'd like to capture.
- Press and hold the key combinations: Command + Shift + 4, then Space bar.
- You'll see a camera icon replacing the pointer on the screen. Simply move the camera and click on the window or menu that you want to capture.
- The screenshot will appear at the corner of your screen for seconds and then will be automatically saved to your desktop.
Command + Shift + 5:
This shortcut is actually for opening the built-in Screenshot app. You can use this program to crop the full screen or a portion. (Get more details below)
Command + Shift + 6:
It can help you capture the entire Touch Bar of older MacBook Pros.
- Click the Apple log at the upper left of the Mac and choose System Preferences.
- Click the Keyboard option from the menu and choose the Customize Control Strip button at the lower right.
- Then you'll see a list of features that can be completed via the Touch Bar. You need to select and drag the Screenshot down, and off the screen to the Touch Bar.
- Release the Screenshot icon when it's in the Touch Bar and then tap the Done button to finish.
- The next time you want to take screenshots, simply tap the camera icon and you'll see three types of screenshots and the location where the screenshots are saved on your Mac.
Don't know where your screenshots are saved on Mac Monterey, Big Sur, or Catalina? This post will show you where screenshots go on your Mac and how to change where screenshots are saved on your Mac.
2. Take a screenshot on a Mac with the built-in Screenshot app
Except for the keyboard shortcuts mentioned above, the built-in Screenshot application, a screen recorder for Mac, can also be used to grab a screen.
If you want to take a screenshot on your Mac without the keyboard, you can go to Launchpad > Other> Screenshot.
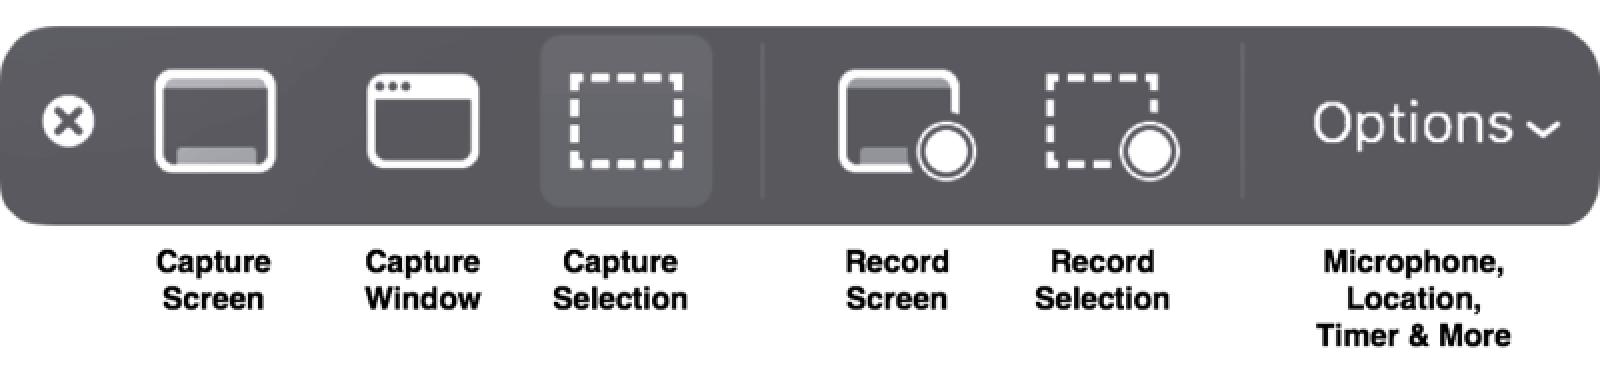
The toolbar provides 3 options for taking screenshots on Mac:
- Capture Screen will take a full-screen screenshot of your Mac.
- Capture Window brings a camera icon for selecting a target window or menu.
- Capture Selection gives you an example area for screenshots before you edit the crop line.
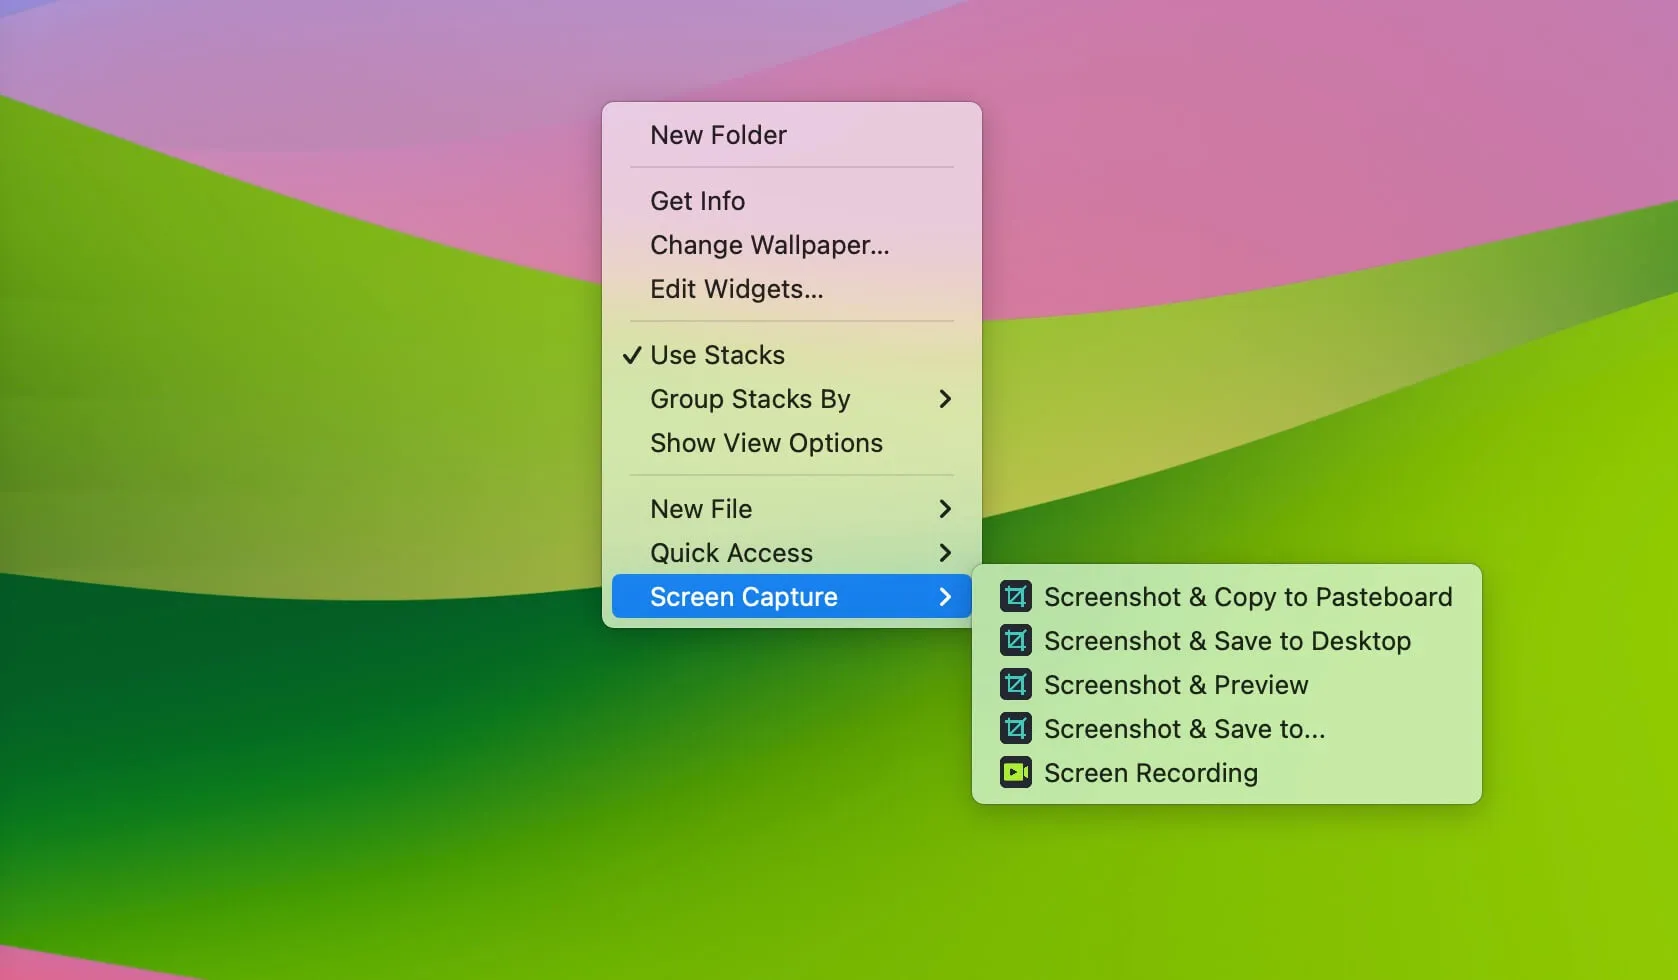
3. Crop a screenshot on Mac with iBoysoft MagicMenu
If you think that it's troublesome to press multiple keys on the keyboard to capture the screen on your Mac or open the Screenshot app in Finder or Launchpad, you can try to use iBoysoft MagicMenu.
This right-click enhancer features various functions including screen capture and screen recording. With it, you can right-click to finish screenshots cropping on your Mac.
Here's how:
- Download, install, and open iBoysoft MagicMenu on your Mac computer.
- Click Extension on the app's main interface, scroll down the list to find Screen Capture, then click the download button next to it. That is to add this feature to your right-click menu.
- Right-click on your screen, choose Screen Capture, and then select the screenshot way and saving destination.
4. Take a screenshot on a Mac with the Preview
Preview is not only an image viewer but also a screen capture tool for Mac. You can use Preview to take a screenshot. If Preview is not working on Mac, try to fix the problem first and then use it to capture a screenshot.
- Launch Preview on Mac.
- Unfold the File list on the top.
- Select Take Screenshot from the list.
- Choose one option to take a screenshot and save it to the desktop.
Take a scrolling screenshot of web pages on a Mac
The general shortcuts to take screenshots on Mac can't satisfy your need for a scrolling screenshot. But there is another method to take a full screenshot of a web page.
- Capture a scrolling screenshot in Chrome with Command.
- Make sure you are on the web page that you want to take a full screenshot, and then right-click your mouse.
- Choose the Inspect button from the menu, which brings up the developer tools of Chrome.
- Press and hold the shortcuts Command + Shift + P to open the command menu.
- Type in "screenshot" and then select the option Capture full-size screenshot. In this way, you get a full and scrolling screenshot on Mac using the command line.

Related articles:
• How to Edit Screenshots on Mac Computers?
• How to Extract Text from Images?
• How to fix the AirDrop not working issue?
• How to zoom in and out on Mac/MacBook?
• How to change the wallpaper on Mac/MacBook?
FAQs about how to take a screenshot on Mac
- QWhat is the easiest way to copy a screenshot on a Mac?
-
A
After taking a screenshot on your Mac, right-click the thumbnail at the bottom right corner of your screen and then select Save to clipboard.
- QWhat are the 3 ways to take a screenshot?
-
A
The common 3 ways to take a screenshot are using three different shortcuts, including Command + Shift + 3 for entire screen capture, Command + Shift + 4 for selection screen cropping, and Command + Shift + 5 for launching the Screenshot app on Mac.