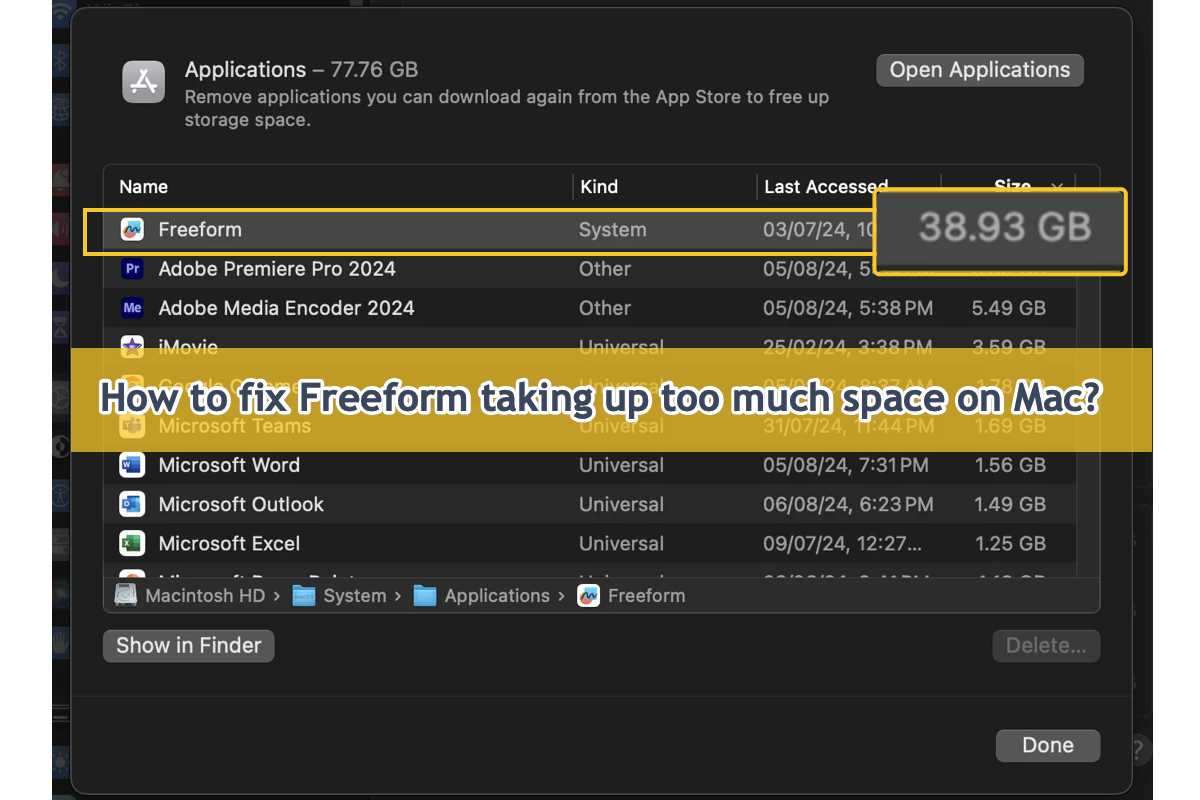
So many users have experienced the issue of Freeform taking up dozens of gigs of hard drive space on Mac, which leaves restricted space for the device to run and work. Even worse, this mass space eater burns out the RAM, heats the machine, and makes the fan sound loud. Just like your Mac computer is on the verge of explosion.
Take it easy, this post guides you to deal with this Freeform eating up too much space on the macOS device by collecting kinds of effective workarounds. You can try the one that fits you most. Let's get started then!
How to fix Freeform eating up too much space:
Why Freeform takes up too much space?
Based on the custom, let's explore why the Freeform app runs out of so much space before running any professional solutions. This way helps a lot when we analyze pertinent workarounds to get the abnormal Freeform function as normal!

- You have created the same size of boards in Freeform. A board file would not take up a huge space size but it is possible if you have created hundreds of or even thousands of board files in this app.
- The space size occupied by Freeform provided by your machine is wrong. Sometimes, your Mac goes wrong when showing you the hard drive space taken up by an app.
- Freeform goes wrong and expands the available space it needs on Mac. Once Freeform behaves abnormally without a clue, it begins swallowing the available space on your machine.
- Mac operating system is problematic. When the operating system malfunctions, it generates kinds of troubles on your machine.
The listed reasons are the most common ones that may result in your Freeform occupying so huge needless space. Yet don't worry, please. You can get everything working normally by trying the following solutions provided by us!
If you find this post informative, please share it with more people on your social platform!
How to fix Freeform taking too much space on Mac?
Since we have explored the possible reasons that may cause Freeform to take up too much space, now we ought to concentrate on how to make Freeform work normally without robbing Mac drive space.
As we cannot determine the final culprit of this issue, the practical solutions vary and this post gathers them all. You can try one solution, once you find it not working in fixing the trouble, move to the next one directly.
Solution 1: Restart your Mac
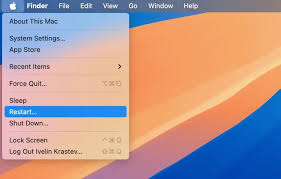
Once your Mac behaves abnormally, you can always give it a restart and make it fully ready for the following working routine. A Mac restart stops any weird program or process running on your machine, and you can use it to terminate the strange error happening on Freeform.
Click the Apple Menu > Restart. When your machine finishes the restart, check if Freeform takes up massive space still.
Solution 2: Relaunch Freeform
Force quit Freeform from the background then relaunch it to see if the space occupied by it turns normal. On a Mac, use Command + Option (Alt) + Esc (Escape) to force quit Freeform. They are a set of keystrokes used to open the Force Quit Applications box, which allows you to select and end unresponsive applications immediately.
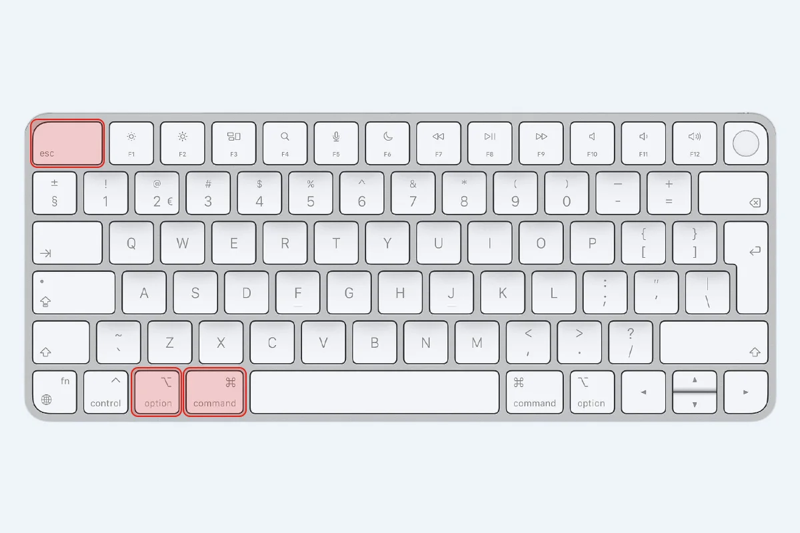
The force quit key combination simplifies the process of opening the Force Quit Applications window. You do not need to open it by going to the Apple menu and selecting "Force Quit".
They are especially critical when the troublesome app freezes your entire Mac and causes the cursor to spin like a beach ball. It allows you to fix the frozen app by force quitting if you don't want to restart your Mac.
Solution 3: Clean Freeform boards
If you do create a bulk of boards in Freeform, it absolutely runs out of the available space on your machine. You can run a professional Mac optimizer here to show the space occupied by kinds of big files or folders so that you can further process them with ease!
iBoysoft MagicMenu stands out among sorts of Mac disk space analyzers with its intuitive interface and thorough space analysis facility. It presents all system data, installed applications, app packages, caches, support folders, user logs, system documents, etc. with a clean and understandable visualization table, manifesting which files or folders are taking up much space on your hard drives.
With it, you can directly click on the big Freeform files and move them to Mac Trash to release much more available space!

Solution 4: Uninstall Freeform from Mac
Yet if you have no important files created in Freeform and find it unnecessary for you, you can remove it from your Mac directly. Since the simple select-and-drag only moves the app to Mac trash while leaving all associated files on your machine, you'd better launch a professional Mac app uninstaller.
Here we recommend a professional Freeform uninstaller for you to carry out the uninstall mission, that is, iBoysoft MagicMenu, the Mac optimizer we mentioned before. This professional utility outweighs other uninstallers and uninstallation workarounds for its one-in-all uninstall feature.
Specifically, it gathers all associated files of an app before the ultimate uninstall, including user files, caches, preferences, install packages, extensions, root files, junks, etc. Once iBoysoft MagicMenu finishes the file gathering, you can choose what files to delete along with the uninstall once and for all, which greatly saves time and effort in searching for the files scattered in different folders and directories.
Here we'll show you how to uninstall Freeform from your Mac completely:
Step 1: Click the Free Download button below to install iBoysoft MagicMenu on your Mac.
Step 2: Launch this handy app uninstaller and search the Uninstall extension in its main window to download. Note that iBoysoft MagicMenu only takes a little space and so does the Uninstall function, which nearly does not influence your Mac.
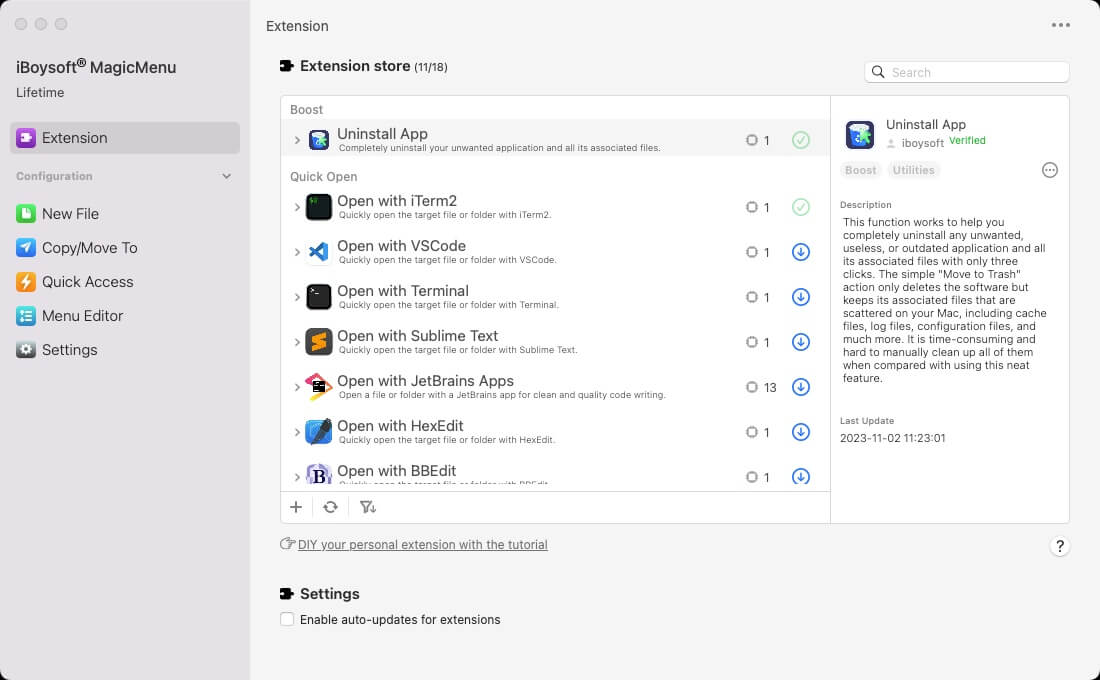
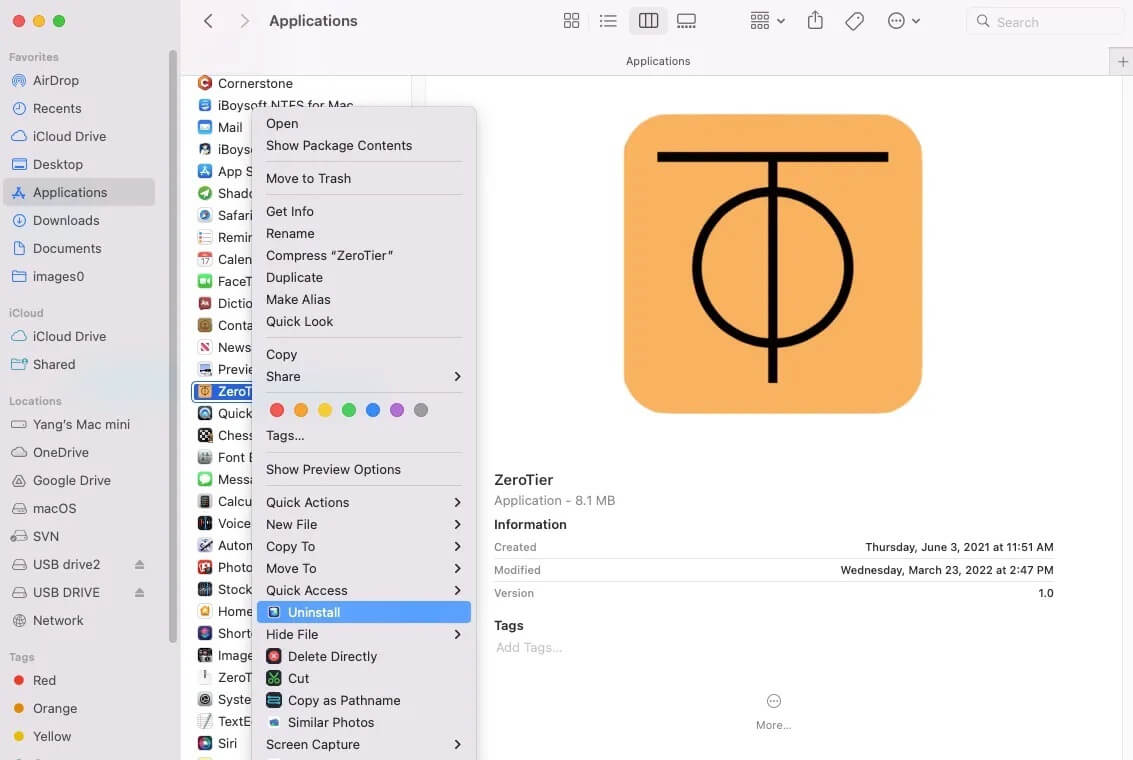
Step 3: Go to Finder > Applications, locate Freeform, then right-click it to select Uninstall from the dropdown menu. (This post takes ZeroTier as an example and the steps to remove Freeform are the same.)
Step 4: Wait for this professional app remover to gather all associated files of the will-be-uninstalled app. Once it finishes, check the useless files to let them be removed along with the app.
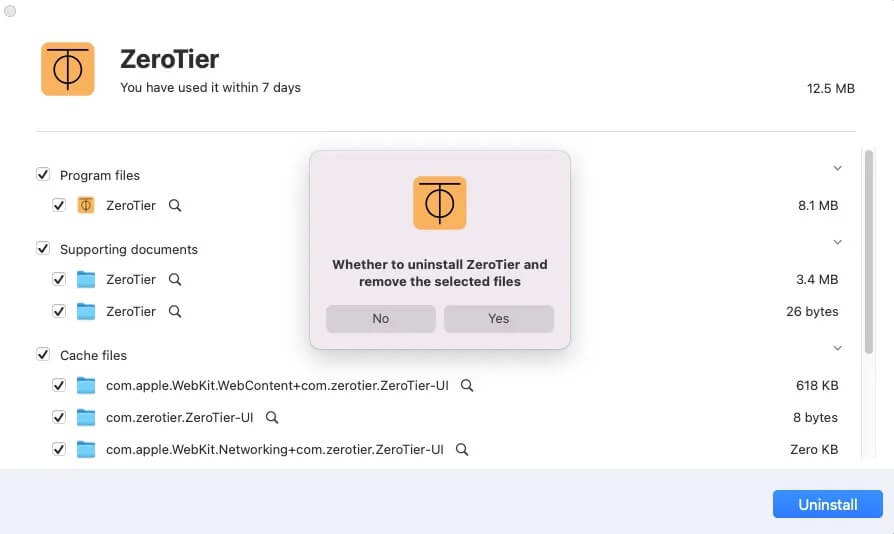
Step 5: Click Uninstall to confirm your actions and initiate the uninstall progress. This progress may take up to several seconds.
Do you see that? You have completed the Minecraft uninstall and associated file removal simultaneously with a few clicks, which is much simpler and easier than the native-built installer on Mac!
Solution 5: Rebuild the Spotlight index
Sometimes, Finder and Spotlight report different space sizes occupied by an app, facing this, you can rebuild the Spotlight index to see if it reports the correct situation.
Step 1: Choose the Apple menu > System Settings.
Step 2: Open Spotlight settings:
- macOS Sequoia or later: Click Spotlight in the sidebar, then scroll down and click the Search Privacy button on the right.
- macOS Sonoma or macOS Ventura: Click Siri & Spotlight in the sidebar, then scroll down and click the Spotlight Privacy button on the right.
Step 3: Drag the disk or folder that you want to index again to the list of locations that Spotlight is prevented from searching. Or click the add button (+) and select the disk or folder to add.
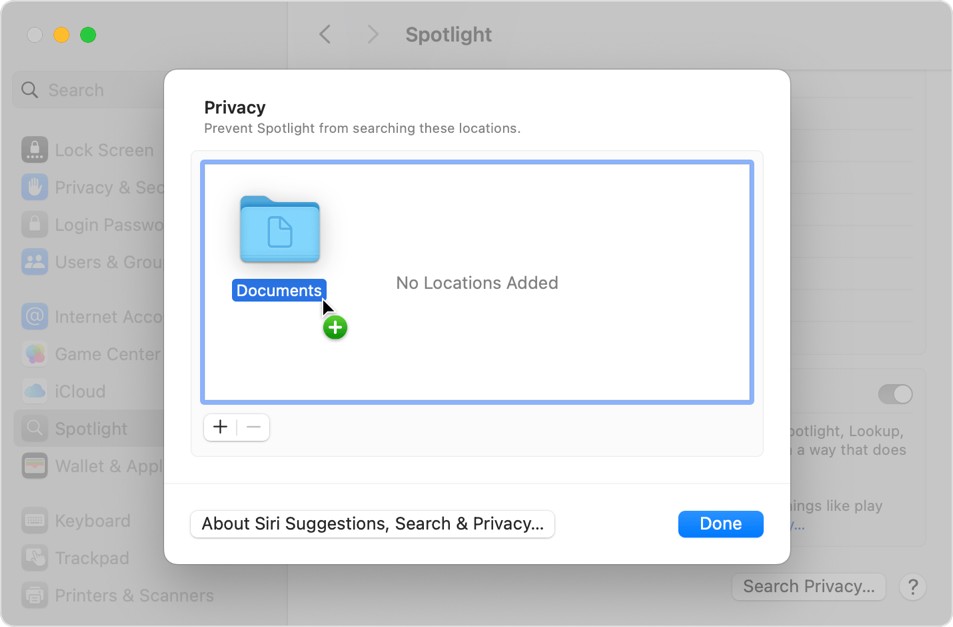
Step 4: From the same list of locations, select the disk or folder that you just added. Then click the remove button (–) to remove it from the list so that it can be reindexed.
Step 5: Click Done, then quit System Settings. Spotlight will reindex the contents of the disk or folder. This can take some time, depending on the amount of information being indexed.
Once the Spotlight index is rebuilt, check if it still notifies you that Freeform takes up too much space.
Solution 6: Reinstall macOS
If you tried all the solutions listed above yet you still see Freeform taking up too much space on your Mac, the final and ultimate method you can rely on is to reinstall macOS.
Step 1: Back up your machine
Although reinstalling macOS does not remove apps and personal data from your machine, it's still recommended to back up your Mac in case any accident happens.
Step 2: Shut down your Mac
From the Apple menu in the corner of your screen, choose Shut Down.
If you can't shut down, press and hold the power button on your Mac for up to 10 seconds until it turns off. (Every Mac has a power button. On notebook computers that have Touch ID, press and hold Touch ID.)
Step 3: Start up from macOS Recovery
Follow the steps below to start your Intel-based Mac in macOS Recovery Mode:
- Completely shut down your Mac and then press the power button or Touch ID button to power on your Mac.
- Hold down the Command + R keys together as soon as Mac starts or you hear the startup chime.
- Keep holding down the keys for a few seconds until you see an Apple logo and release the keys to start your Mac in the Recovery partition.
- You successfully boot into macOS Recovery until you see the utilities window with a few recoveries and troubleshooting features.
Start an Apple M1/M2/M3 Mac in macOS Recovery Mode:
- Completely shut down your Mac.
- Press and hold the Touch ID (the power button) for a few seconds until you see "Loading startup options".
- Click Options next to the Mac's Macintosh HD disk and then click Continue.
- Enter your admin name and password if asked and you will arrive at the Recovery Mode screen.
To learn more details about the macOS Recovery Mode, please watch this video:
Step 4: Reinstall macOS
Now you can reinstall macOS with all preparations being done:
- Select the option to Reinstall macOS.
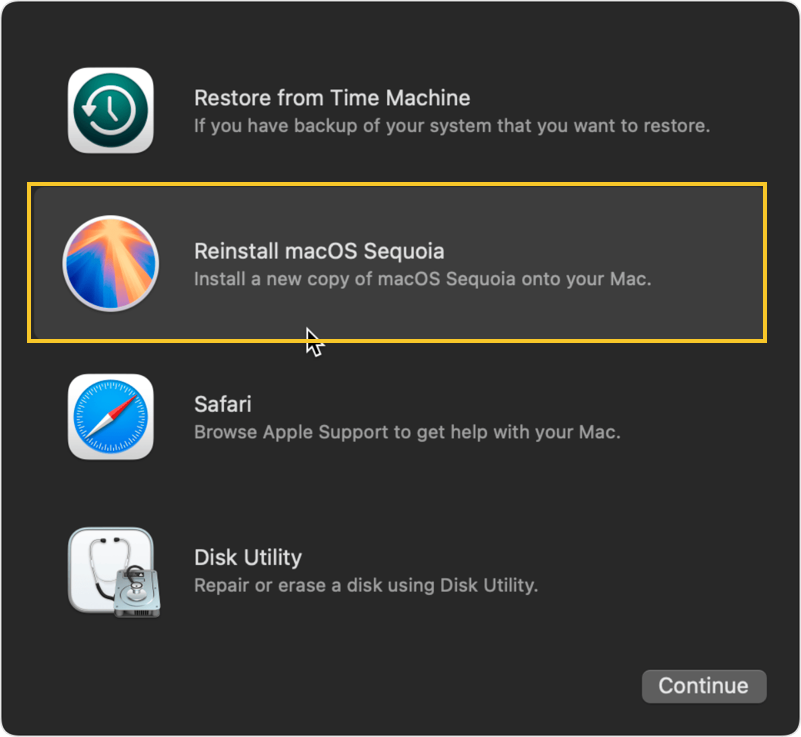
- Click Continue, then follow the onscreen instructions.
- Allow installation to complete without putting your Mac to sleep or closing its lid. Your Mac might restart and show a progress bar several times, and the screen might be empty for minutes at a time.
- When the installation is complete, your Mac might start up with a setup assistant. Follow the steps in the setup assistant.
Kindly share this post with more people if you successfully fix Freeform taking too much space on your Mac machine!
