Whether you want to upgrade to macOS Sonoma or reinstall it, a clean install is usually the most trouble-free way to get the job done. It allows you to install macOS Sonoma from scratch and resolves various installation failures like "not enough space to install macOS Sonoma" and other issues on your Mac.
To perform a fresh install of macOS Sonoma, you can install it from a bootable USB or Recovery Mode, depending on your Mac model and whether macOS Sonoma was the last macOS installed on your Mac.
If you want to install the latest macOS Tahoe, follow: How to Clean Install macOS Tahoe?
If your Mac doesn't support Sonoma, read: Download and install macOS on unsupported Macs
Here's a quick summary of the applicable cases of each method:
| How to do a clean install of macOS Sonoma | Suitable cases | Quick steps |
| Clean install macOS Sonoma without a bootable USB installer | a. Applicable to Intel and T2 Macs when macOS Sonoma is the latest macOS compatible with your Mac or macOS Sonoma is the last macOS installed on your Mac. b. Applicable to M1 and M2 Macs if macOS Sonoma is the last macOS installed on the Mac | 1. Boot into Recovery Mode. 2. Select your startup disk and click Erase. 3. Click "Reinstall macOS Sonoma" and Continue. |
| Clean install macOS Sonoma with a bootable USB installer | Applicable to all compatible Macs | 1. Download the macOS Sonoma full installer. 2. Format the external USB drive as Mac OS Extended (Journaled). 3. Make a macOS Sonoma bootable USB installer in Terminal. 4. Boot from the USB and perform the fresh install of macOS Sonoma. |
Why do you need to clean install macOS Sonoma?
A clean install of macOS Sonoma means erasing your Mac's startup disk and then installing macOS Sonoma. Conducting afresh install of macOS Sonoma is beneficial in multiple ways, including:
Make more free disk space: A clean install clears all personal data on your Mac, which is a great way to get more available disk space if your Mac is almost full.
Improve performance and stability: If your Mac is slow or has problems that can't be fixed by other means, a fresh install of macOS is the best solution, as it removes junk files, malware, and corrupted data that may be causing troubles.
Resolve software conflicts: If your Mac is having problems with certain apps or extensions, a clean install can help you resolve it.
Prepare your Mac for sale: A clean install is a necessary step to get your Mac ready for a new user.
Back up your Mac before the clean install of Sonoma
Prior to a clean install of macOS Sonoma, you need to back up the important data on your Mac. Otherwise, you'll lose all your personal files because a clean install involves drive formatting.
If you have only several folders and files you want to keep, you can copy them to an external drive.
If you want to back up not only documents but also apps, system files, and settings, you can perform a Time Machine backup.
After your data is secured, you can choose one of the following methods to clean install macOS Sonoma.
How to clean install macOS Sonoma without USB?
The easiest way to clean install macOS Sonoma is from Recovery Mode. However, this method doesn't apply to all scenarios. You can't install macOS Sonoma from Recovery Mode if:
- You have an Apple Silicon (M1 or M2) Mac, and macOS Sonoma isn't the last macOS version installed on your Mac.
- Your Mac is Intel-based or has a T2 chip but macOS Sonoma is neither the newest macOS compatible with your Mac nor the last macOS version installed on your Mac.
If you don't fall into the above exceptions, you can take the steps below to clean install macOS Sonoma without USB.
Step 1: Boot into Recovery Mode.
Step 2: Select your startup disk and click Erase.
Step 3: Click "Reinstall macOS Sonoma" and Continue.
Step 1: Boot into Recovery Mode and get to the macOS Utilities window.
For Intel-based and T2 Macs:
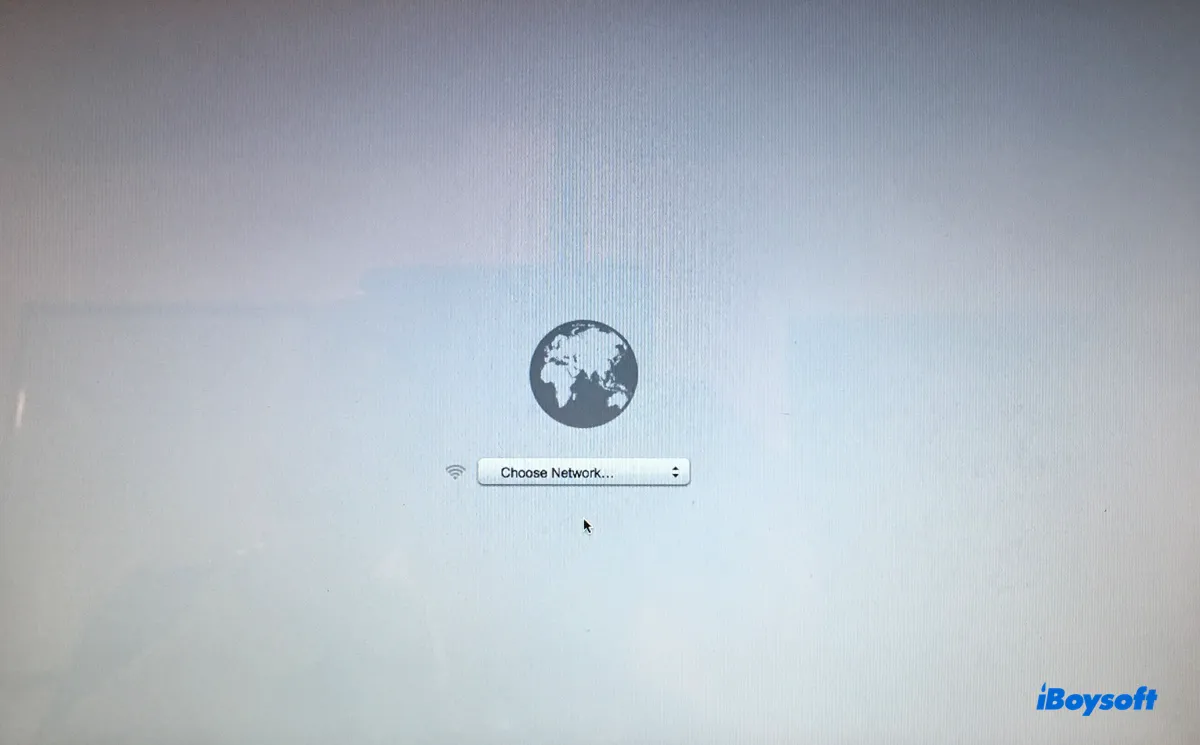
- (If macOS Sonoma is the latest macOS supported by your Mac) To upgrade to macOS Sonoma: Shut down your Mac, press the power button, then immediately press and hold Option + Command + R until you see the spinning globe. Choose a WiFi network and enter its password when prompted.
- (If macOS Sonoma is the last macOS installed on your Mac) To reinstall macOS: Turn off your Mac, press the power button, then immediately press and hold Command + R until you see the Apple logo.
For Apple Silicon (M1 & M2) Macs:
- (If macOS Sonoma is the last macOS installed on your Mac) Shut down your Mac, then press and hold the power button until the "Loading startup options" shows up. After that, click Options > Continue.

If you have enabled FileVault, you'll be asked to select your administrator account and enter the password. Then you should see the macOS Utilities window with four options available, including "Reinstall macOS Sonoma" and "Disk Utility."
Step 2: Format your startup disk in Disk Utility.
- Click Disk Utility and Continue.
- Click View > Show All Devices.
- Select the top-level physical disk and click the Erase button.
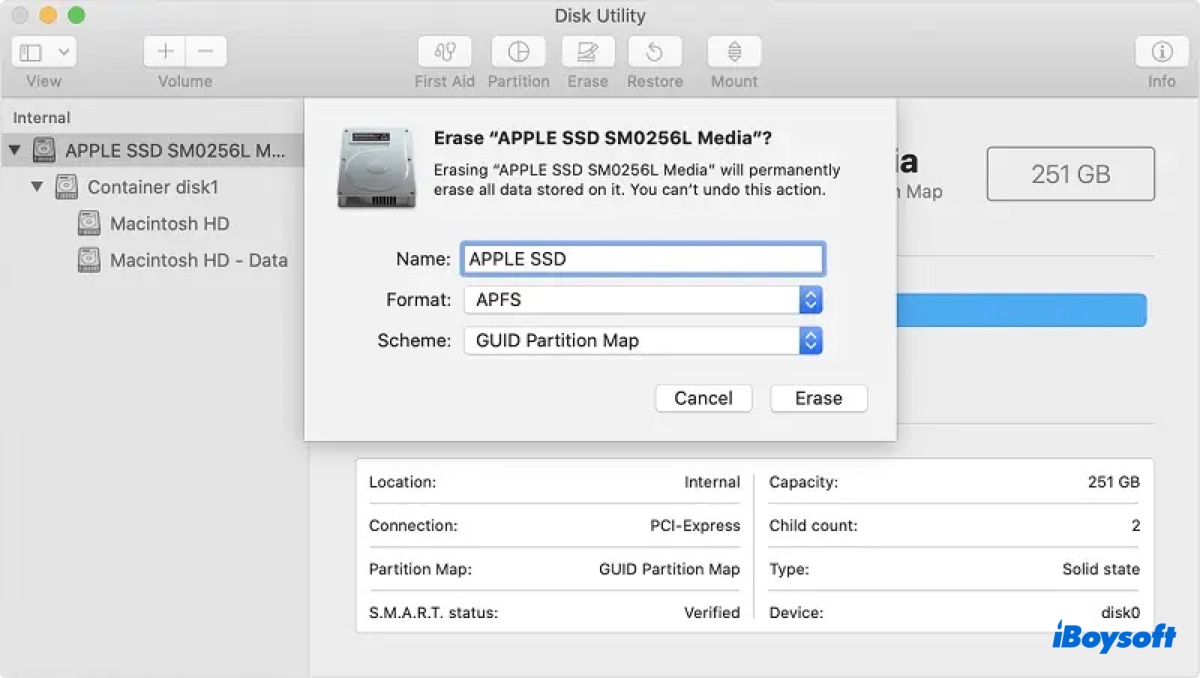
- Name your internal drive(e.g., Macintosh HD).
- Choose APFS as the format.
- Keep GUID Partition Map as the scheme.
- Click Erase.
Step 3: Install macOS Sonoma.
After your Mac's startup disk is erased, you can close Disk Utility and return to the macOS Utilities window. From there, select "Reinstall macOS Sonoma" and click Continue, then follow the onscreen instructions to complete the installation.
Please share this post to help others clean install macOS Sonoma from Recovery Mode.
How to clean install macOS Sonoma with USB?
Another way to do a clean install of macOS Sonoma is by using a macOS Sonoma bootable USB installer. This method is available to all Mac models that are compatible with macOS 14 Sonoma.
Step 1: Download the macOS Sonoma full installer.
Step 2: Format the external USB drive as Mac OS Extended (Journaled).
Step 3: Make a macOS Sonoma bootable USB installer in Terminal.
Step 4: Boot from the USB and perform the fresh install of macOS Sonoma.
Step 1: Download the macOS Sonoma full installer.
The first step is to download the macOS Sonoma full installer from App Store or through the links in this Apple page. Note that your Mac must be compatible with macOS Sonoma; otherwise, you can't download the installer.
Step 2: Format the external USB drive as Mac OS Extended (Journaled).
Prepare a USB drive with at least 16GB of available storage and format it as Mac OS Extended (Journaled) with the steps below. (Ensure data on the drive is backed up before formatting it.)
- Launch Disk Utility.
- Select your USB drive and click Erase.
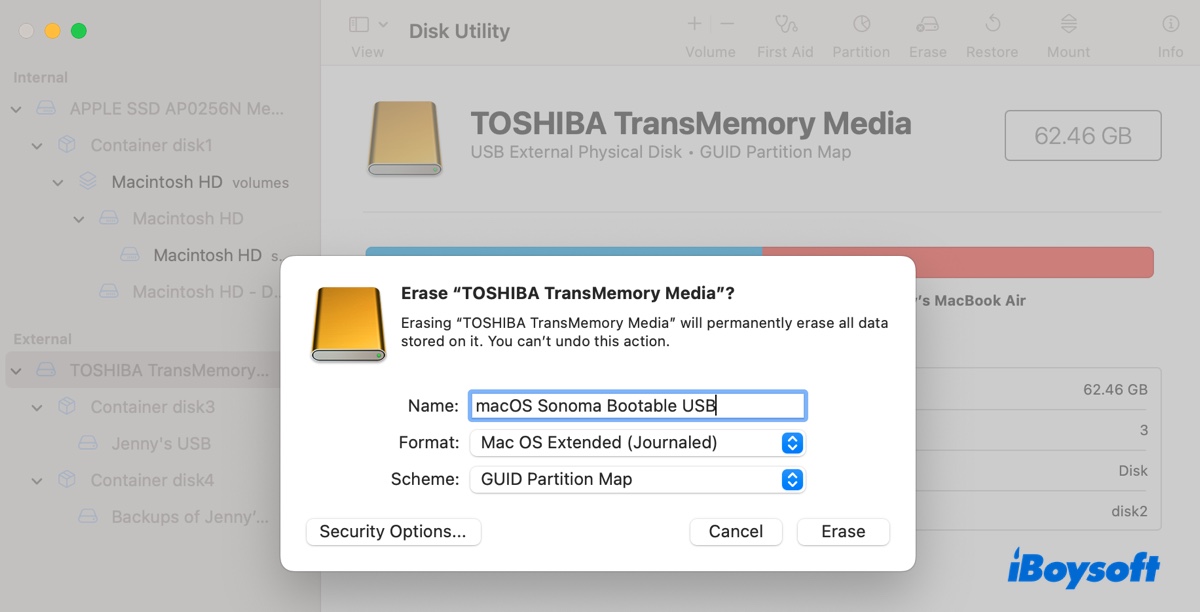
- Name the drive.
- Choose Mac OS Extended (Journaled) as its format.
- Click Erase.
Step 3: Make a macOS Sonoma bootable USB installer in Terminal.
- Ensure the USB drive is connected to your Mac.
- Open Terminal.
- Type the command below into Terminal and press Enter.sudo /Applications/Install\ macOS\ Sonoma.app/Contents/Resources/createinstallmedia --volume /Volumes/MyVolume
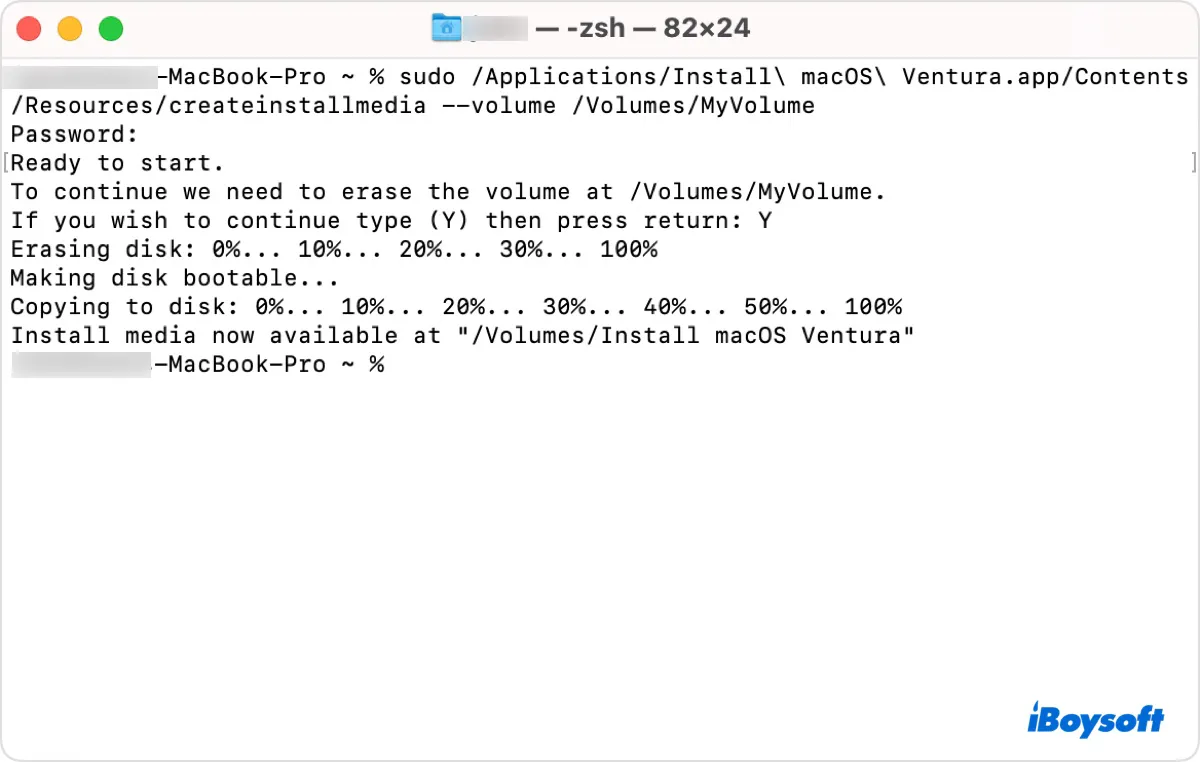
(Replace MyVolume with the real name of your USB drive or volume. For instance, if the name of the drive is Bootable USB, the command should be: sudo /Applications/Install\ macOS\ Sonoma.app/Contents/Resources/createinstallmedia --volume /Volumes/Bootable\ USB) - Enter your administrator password and press Enter.(The password won't show up as you are typing.)
- Type Y and hit Enter when prompted to confirm that you want to erase the volume.
- Click OK if you see an alert that Terminal wants to access files on a removable volume.
- Once you see the message "Installation media now available at "Volumes/Install macOS Sonoma," you're good to go.
- Quit Terminal.
Step 4: Boot from the USB and perform the fresh install of macOS Sonoma.
It's time to fresh install macOS Sonoma from the USB bootable installer.
For Intel-based and T2 Macs: (T2 Mac users need to change Startup Security Utility to allow booting from removable media first.)
- Ensure your Mac is connected to the internet and the USB installer is plugged in.
- Shut down your Mac.
- Turn on your Mac, then immediately press and hold the Option key.
- Release the key when a dark screen appears with bootable volumes.
- Select the volume with the macOS Sonoma bootable installer and click the onscreen arrow.
- Choose "Install macOS Sonoma" from the Utilities window and click Continue.
- Continue to install Sonoma from scratch.
For Apple Silicon (M1 & M2) Macs:
- Ensure your Mac is connected to the internet and the USB installer is plugged in.
- Shut down your Mac.
- Press and hold the power button until you see the bootable volumes.
- Select the volume with the macOS Sonoma bootable installer and click Continue.
- When the macOS Sonoma installer opens, follow the instructions on the screen to install Sonoma.
Now that you know how to fresh install macOS Sonoma from USB and Recovery Mode, don't forget to share the steps with others.
Also Read:
How to Install macOS Sonoma on Unsupported Mac with OCLP?
How to (Re)Install macOS from USB on Mac?

Wondering about the known macOS Sonoma issues, problems, and bugs? Read this post to learn about the issues you may encounter after installing macOS Sonoma and the solutions to fix them.