I'm looking for a way to fresh install macOS Sequoia after discussing in the MacRumors community. I know that I can upgrade to macOS Sequoia from Software Update in System Settings or the App Store, but the two ways install Sequoia over the top of my existing OS, which may cause conflicts, installation failures, or impact Sequoia performance. So, how to clean install macOS Sequoia on Mac?.
Yeah, clean install macOS Sequoia is to install macOS Sequoia from scratch rather than covering your current macOS. Setting files, old system cache files, app cache files, and other data you don't need won't remain on your Mac after a clean macOS installation.
It can reduce the possibility of encountering macOS Sequoia update issues, bringing fluency and unobstructed macOS installation, well performance, stability of the macOS 15, and much more free disk space.
So, a clean macOS Sequoia installation is necessary. Let's move to check the steps below.
If you want to clean install the latest macOS Tahoe, read: How to Clean Install macOS Tahoe?
Tips: Clean install macOS 15 from macOS Recovery Mode will erase all contents on your Mac. If you clean install Sequoia just due to your worry about the limited disk storage space will prevent you from installing macOS Sequoia successfully, you don't have to.
You can use iBoysoft DiskGeeker to clear up junk files on your Mac, such as system cache files, user caches, unwanted downloads, etc., and then quickly upgrade your Mac from the App Store or Software Update. This disk management tool has a well-designed junk file cleaning feature that can search for all useless files on your Mac for one-click deletion.
Preparations before a clean install of macOS Sequoia
You need to do two things before cleanly installing macOS Sequoia on your Mac.
1. Back up your Mac
If you only have several important files, simply copy them to your external hard drive. If you want to back up most of the files, including apps, documents, downloads, etc., on your Mac, we suggest you back up your Mac with Time Machine.
2. Check your Mac model compatibility
Of course, before erasing Mac and installing macOS Sequoia, it is necessary to check the hardware compatibility.
macOS 15 Sequoia is supported by the following Mac models:
- MacBook Air (2020 and later)
- MacBook Pro (2018 and later)
- iMac (2019 and later)
- iMac Pro (2017)
- Mac mini (2018 and later)
- Mac Pro (2019 and later)
- Mac Studio (2022 and later)
Note: If your Mac isn't compatible with macOS Sequoia, follow:
Step 1: Download macOS on Unsupported Macs.
Step 2: Install macOS on Unsupported Macs.
How to clean install macOS Sequoia from Recovery Mode
A clean install of macOS Sequoia from Recovery Mode is the easiest and most common way. It only has three steps:
- Boot your Mac into Recovery Mode.
- Erase the startup disk in Disk Utility.
- Click "Reinstall macOS Sequoia" from the recovery utilities window.
Step 1: Boot your Mac into Recovery Mode
On an Apple Silicon Mac:
- Shut down your Mac.
- Press and hold down the power button (Touch ID) until you see the startup options window.
- Select Options and click Continue.
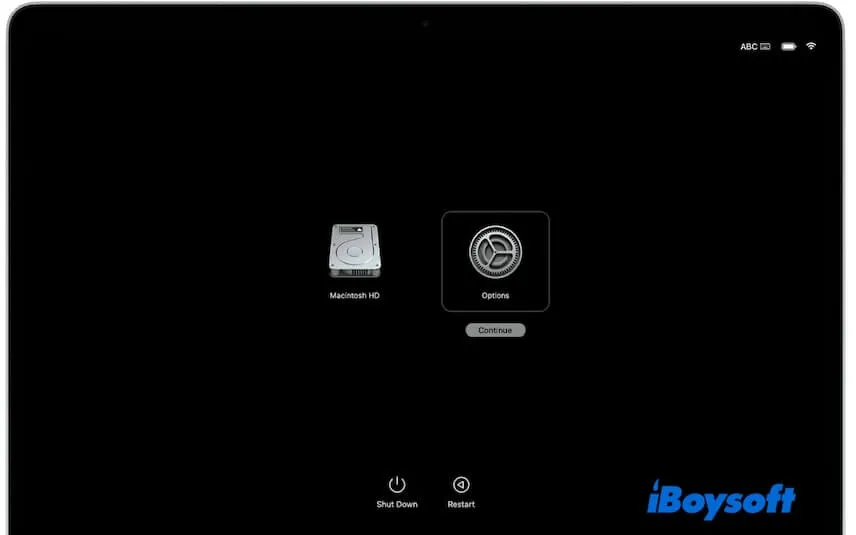
- Enter the admin password if asked.
On an Intel-based Mac:
- Restart your Mac and press down the Option - Command - R keys on your keyboard.
This key combination is to start up your Mac from Recovery Mode over the internet and allow you to reinstall or upgrade to macOS Sequoia. - Release the keys until you see the startup screen.
- Select a volume and enter the admin password if asked.
- Ensure your network is well-connected.
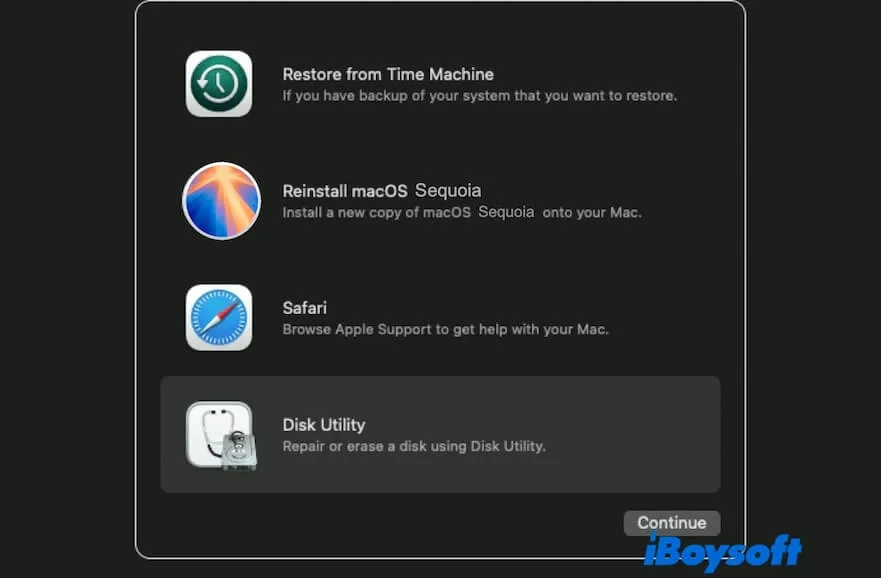
Step 2: Erase the startup disk in Disk Utility
- Select Disk Utility > Continue on the utilities window.
- Select the startup disk (Macintosh HD volume group) on the sidebar and click Erase.
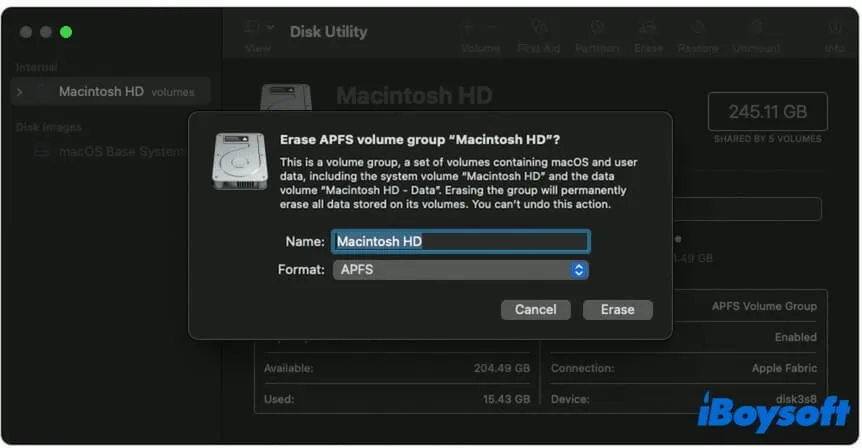
- Enter Macintosh HD as the name and choose APFS as the format.
- Click Erase. If you see the Erase Volume Group button, click it instead.
Step 3: Click "Reinstall macOS Sequoia" from the recovery utilities window
- After erasing Macintosh HD, go back to the utilities window in Recovery Mode.
- Select Reinstall macOS Sequoia.

- Follow the on-screen instructions to cleanly install macOS 15.
Share the way to erase and install a Mac from Recovery Mode.
How to clean install macOS Sequoia with a USB bootable drive
Different clean install macOS Sequoia from Recovery mode, refresh install macOS 15 with a bootable USB installer, will install the system on the USB.
Thus, although it is simpler to clean install macOS Sequoia from Recovery Mode, creating a bootable macOS Sequoia USB installer to boot up your Mac becomes your rescue when you are in these situations.
- Don't want to erase your Mac.
- Clean install macOS Sequoia on multiple Macs.
- Run macOS Sequoia for temporary tests.
- Failed to enter macOS Recovery Mode.
- Get stuck on reinstalling macOS Sequoia from Recovery Mode.
- Seek the latest operating system for your old MacBook.
I have tried a clean install of macOS Sequoia in Recovery Mode, but I received the "installation requires downloading important content" error when trying to reinstall. How can clean install macOS 15? - A case from Reddit
Here are the steps to cleanly install macOS Sequoia with a USB drive:
- Download the macOS Sequoia full installer. Or, download a specific update of macOS Sequoia you want.
- Create a bootable macOS Sequoia USB installer.
- Boot your Mac from the installer to install macOS from the USB boot drive
Note: The traditional way to create a bootable USB installer is complicated and prone to fail, as it requires running Terminal. Why not switch to a quicker and simpler way? With iBoysoft DiskGeeker, only a few clicks will help you create a bootable macOS Sequoia USB installer.
1. Free download, install, and open iBoysoft DiskGeeker and connect an empty external drive.
2. Select a volume on the disk and click Create boot disk > Continue. 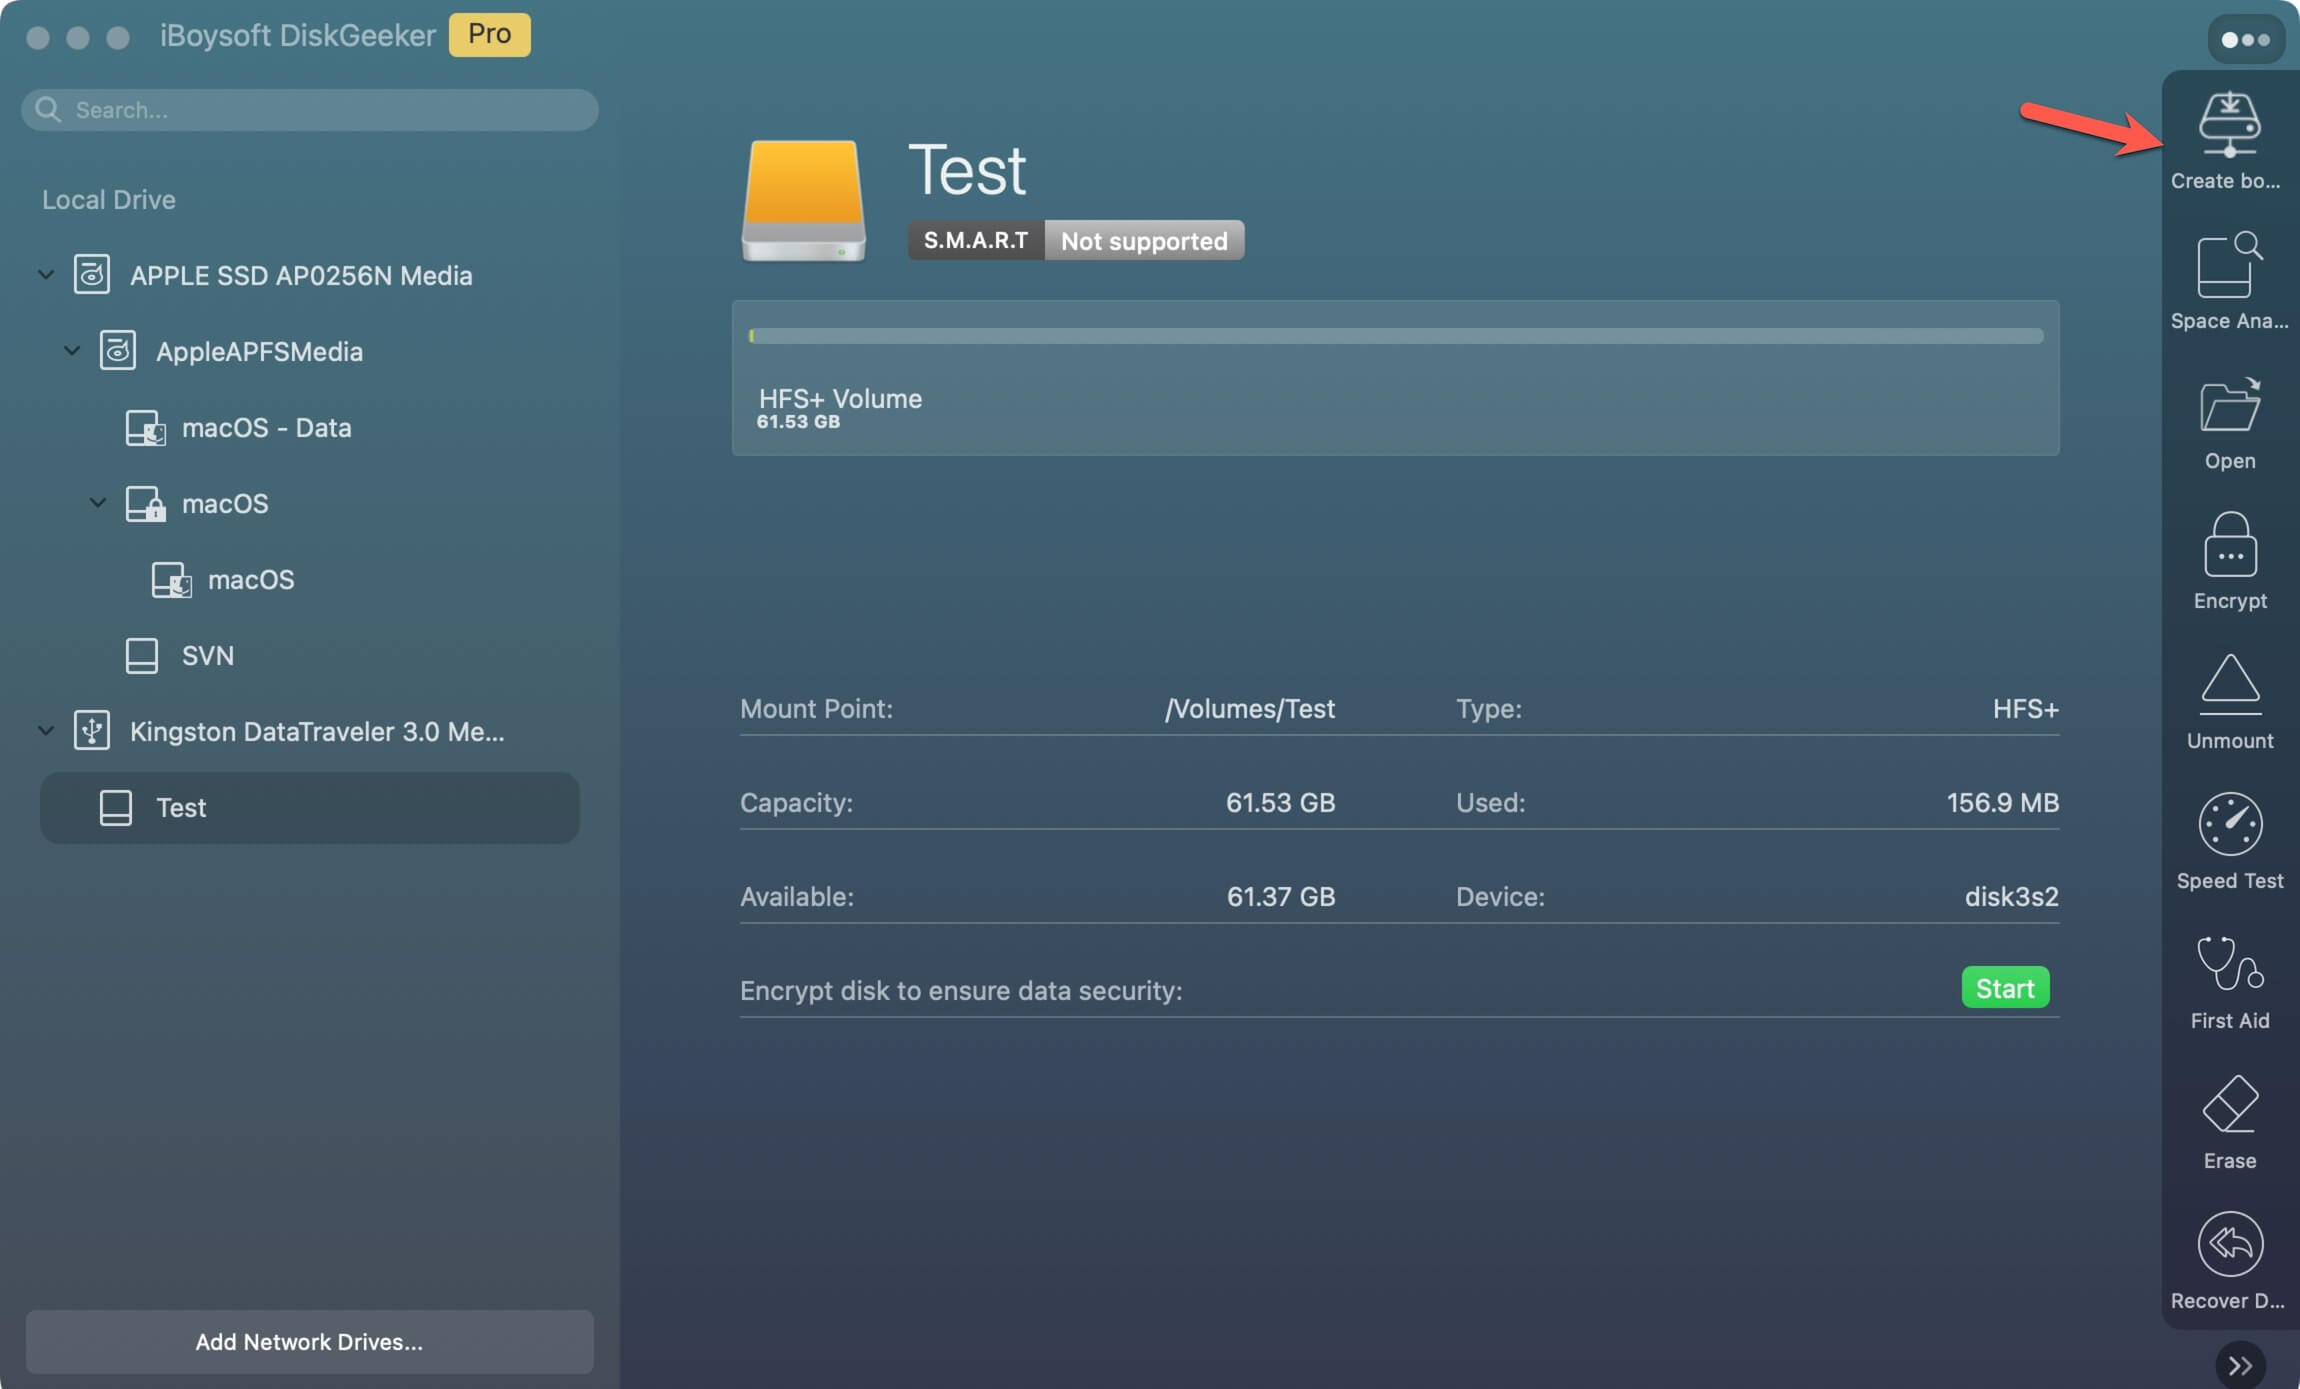
3. Select macOS Sequoia, click Create boot disk > OK, and wait for the macOS Sequoia DMG installer to download. 
4. Click OK on the prompt to start creating the bootable installer for macOS Sequoia. This process will finish quickly.
Step 1: Download the macOS Sequoia full installer
Visit the Apple macOS download page to download the macOS Sequoia full installer on your Mac.
Usually, when the download process is complete, a pop-up will ask you to continue to install macOS Sequoia on your Mac. Stop the installation by clicking Install macOS Sequoia on the menu bar > Quit Install macOS.
The macOS Sequoia installer will remain in the Applications folder in Finder.
Step 2: Create a bootable macOS Sequoia USB installer
- Prepare a USB drive with at least 32GB in size and format it to Mac OS Extended in Disk Utility on your Mac.
- Open Terminal from Launchpad > Other.
- Enter the following command into Terminal. Replace "MyVolume" in the command with the name of your USB drive.
sudo /Applications/Install\ macOS\ Sequoia.app/Contents/Resources/createinstallmedia --volume /Volumes/MyVolume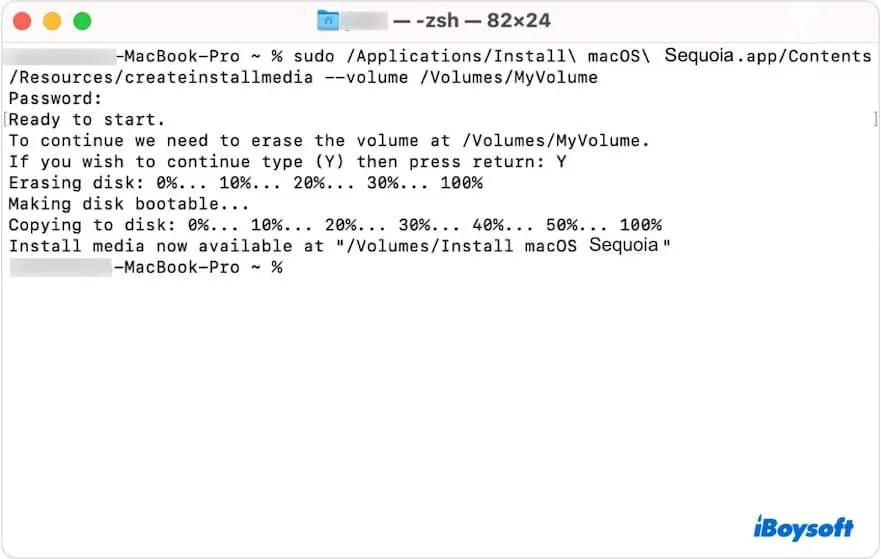
- Press Return.
- Type your administrator password and press Return.
- Enter Y if it warns you that the process will erase the USB drive and press Return.
- Quit Terminal when you see the "Copy complete and Done" notification.
Step 3: Boot Mac from the bootable USB installer to cleanly install macOS 15
Now, you can use the bootable USB drive to install macOS Sequoia cleanly and start up your Mac from the USB.
Note: If you have a Mac with an Apple T2 chip, you need to change the security settings first. Or else, your Mac won't boot from an external bootable media. Simply boot your Mac in Recovery Mode, choose Utilities on the menu bar > Startup Security Utility, and check "Allow booting from external media."
To boot your Mac from the USB, you can go to System Settings > General > Startup Disk, choose the bootable USB drive, and click the Restart button.
Or, you can follow these steps:
- Connect the USB drive to your Mac and ensure your Mac is connected to the internet.
- Turn off your Mac.
- For an Apple Silicon Mac, press and hold the power button until the startup volumes appear. For an Intel-based Mac, press the power button to turn on the Mac and immediately hold the Option key until you see the startup volumes.
- Select the bootable macOS Sequoia USB drive and click Continue.
- Follow the instructions to install macOS Sequoia from scratch.
If you prefer to follow a video to clean install macOS Sequoia on your Mac, here it is:

Share this post with others who are looking for steps to cleanly install macOS Sequoia.