Can't partition SD card on Mac? You may experience different errors or barriers when partitioning a hard drive on Mac, such as an SD card, USB drive, external hard drive, or internal SSD on Mac.
Here, we will elaborate on the common "grayed out" issues regarding partition-related buttons in Disk Utility, such as the Partition button, the ( +/- ) button showing after clicking Partition, or the grayed out ( - ) delete button.
Why can't I partition my SD card/USB drive/hard drive on Mac?
Many factors may result in your external storage devices, such as SD card, USB flash drive, hard drive, etc, and the internal SSD falling to be partitioned on Mac. Here are the common ones:
- The external disk doesn't have the correct partition map.
- You are trying to partition a disk formatted as ExFAT, FAT32, or NTFS.
- The SD card or USB drive is physically locked.
- The partition you want to delete is the first partition stored on the disk.
- You attempt to partition a startup disk on a regular boot.
- Time Machine snapshots are interfering with the partition.
Warning: If you can add a new partition without changing the format of the current partition, you won't lose data during partitioning. However, if you want to delete a partition or need to change the format of the existing partition to add new partitions, you will lose data on the partition to be modified. It's advisable to back up your data before proceeding, regardless of whether you add or delete partitions on Mac.
Please share the information to benefit others!
Can't partition SD card/USB drive/hard drive on Mac: Partition button grayed out
If the Partition button is grayed out after selecting the SD card/USB drive/hard drive on Mac, it means that Disk Utility doesn't allow you to partition the disk. This can happen due to the following reasons:
- The volume instead of the disk is selected.
- The disk backs up to Time Machine.
- The disk has MBR (Master Boot Record) as the partition table.
Usually, there are two ways to fix the "Partition" button greyed out on Mac when modifying an SD card/USB drive/hard drive.
Way 1: Partition the disk
The first thing you should try is to select the disk to partition. To do this, open Disk Utility, click the View icon at the top left, and choose "Show All Devices."
This way, the disk will show up, and you can select it to check whether the Partition button works now. If the external hard drive won't partition on Mac, move on to the solutions below.
Way 2: Erase the offending disk with GUID Partition Map
If the first solution doesn't work, you can enable the "Partition" button on Mac by erasing the whole disk with GUID Partition Map. Since erasing the disk will delete all data on it, it's essential to secure the critical files to another storage device beforehand. You can do this by dragging and dropping.
But you may fail to copy the files from a Time Machine backup disk this way, as many have reported. In this case, you can use the Restore feature in Disk Utility to transfer the files to another drive, as guided below.
How to transfer your Time Machine backups to a different drive: (Skip this part if you have secured the files or don't need them anymore.)
- Go to System Preferences > Time Machine.
- Turn off "Back Up Automatically."
- Insert the temporary storage device that contains no essential files into your Mac.
- Open Disk Utility from the Applications > Utilities folder.
- Select the temporary disk and click Erase.
- Format it with the same file system as your Time Machine backup disk and choose GUID Partition Map.
- Ensure the drive that needs to be partitioned is also plugged in.
- Select the temporary drive and click Restore at the top menubar.
- On the "Restore from" drop-down box, select the Time Machine backup disk.
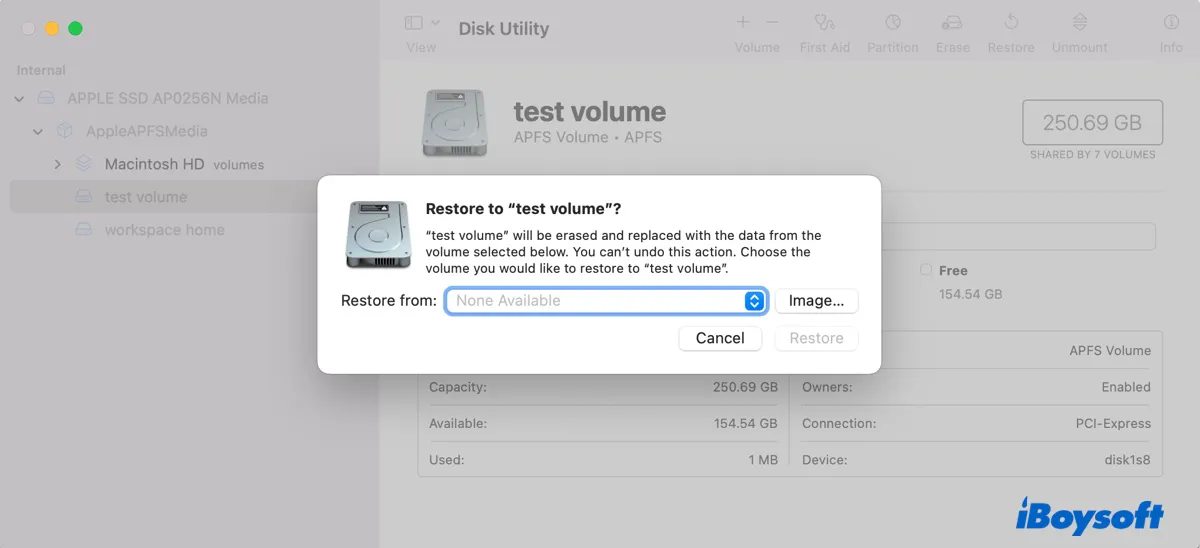
- Click Restore and wait for the process to complete.
- Check the files copied over to the temporary drive.
Now that your data is safe, you can reformat the drive in Disk Utility to enable the "Partition" button and then repartition it.
Steps to try if you can't partition external disk on Mac:
- Keep the disk you want to partition connected.
- Open Disk Utility from the Applications > Utilities folder.
- Click View > Show All Devices.
- Select the disk and click Erase.
- Name the drive, choose Mac OS Extended (Journaled), and select GUID Partition Map as the Scheme.
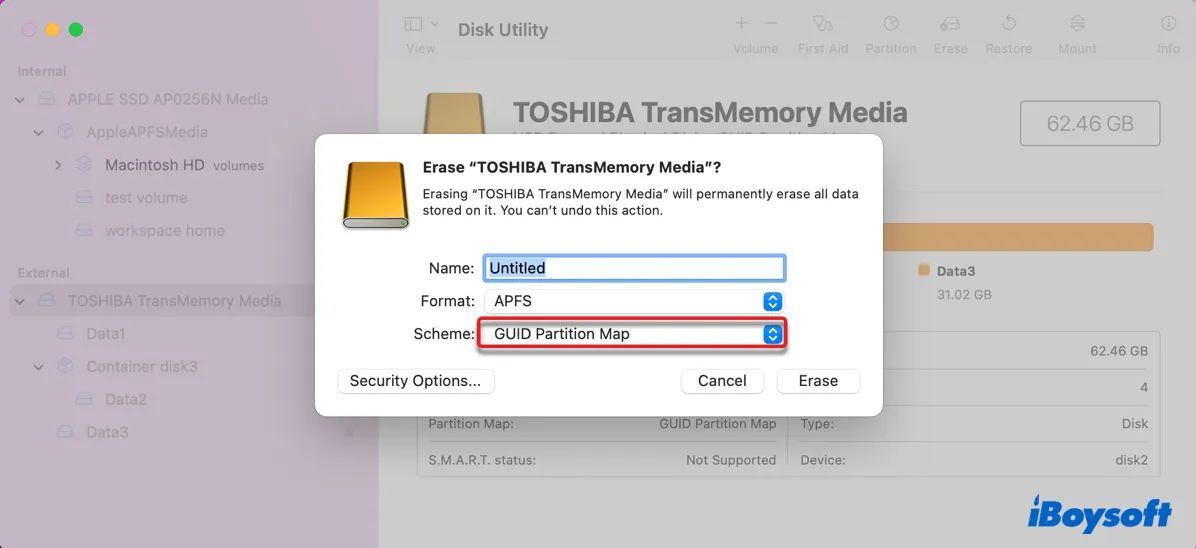
- Click Erase.
- Wait for the erase process to complete.
Once the drive is erased, you will see one partition under the disk. To create more partitions, follow the steps below:
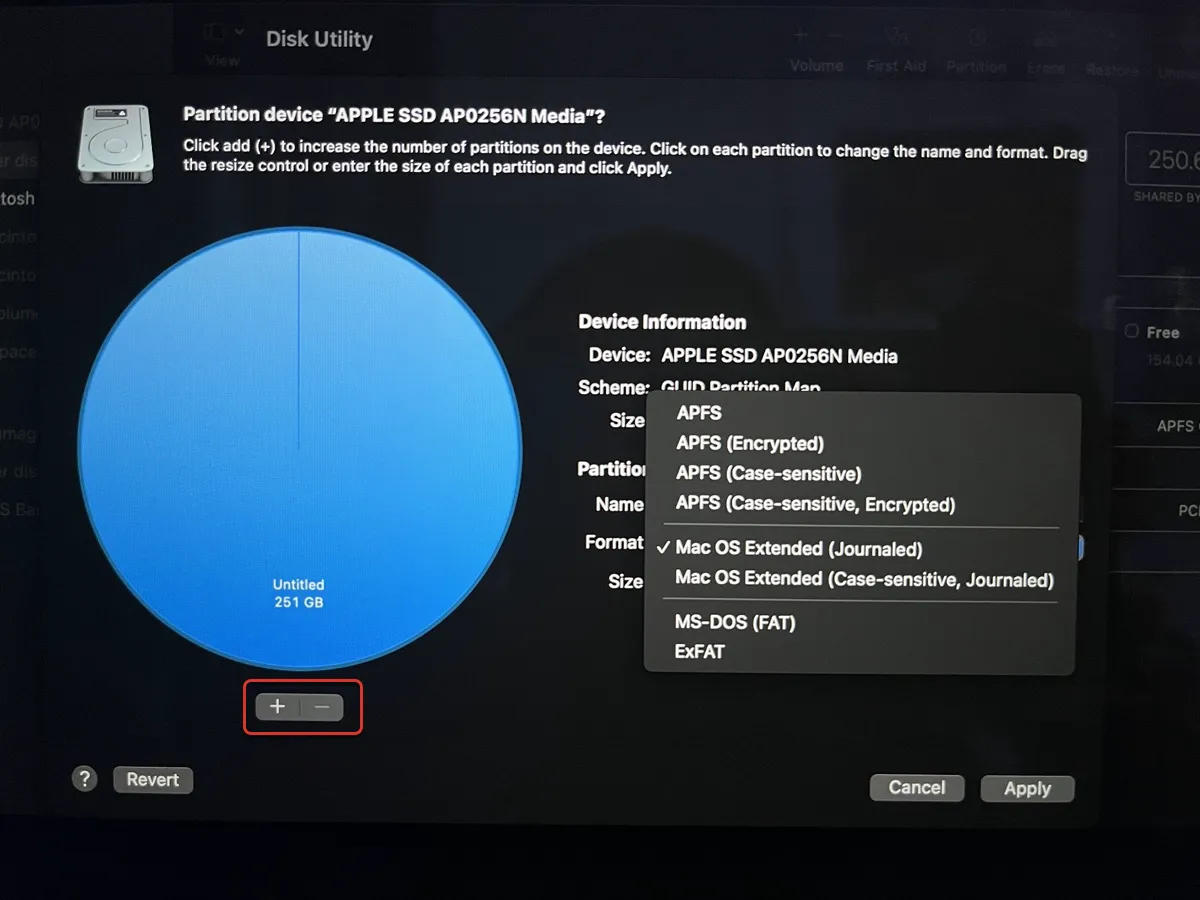
- Select the disk again in Disk Utility and then click the enabled Partition button at the top.
- Click the ( + ) button beneath the pie chart.
- Move the resize control to decide the size of each partition.
- Choose the wanted file system for each partition.
- Click Apply > Partition.
Way 3: Partition SD card/USB drive/hard drive on Mac with Terminal
Alternatively, you can partition your disk on Mac using the built-in utility Terminal as guided below.
How to partition an SD card/USB drive/external hard drive on Mac with Terminal:
- Launch Terminal from the Applications > Utilities folder.
- Type in the command below and press Enter to list all devices connected to your Mac.diskutil list
- Note down the disk identifier of the drive you want to partition, such as disk2.
- Input the command below and hit Enter to create partitions on the drive. (You need to replace the variables in the following examples with yours.)
- Example 1: suppose you want to partition disk2 with a single Mac OS Extended (Journaled) partition named Data. The command will be:diskutil partitionDisk disk2 1 GPT JHFS+ Data 100%Example 2: suppose you want to partition disk2 into 2 partitions with APFS and ExFAT named Data1 and Data2, respectively. And divide the disk space into two parts, 25% for the APFS partition and the rest for the ExFAT partition. The command will be:
diskutil partitionDisk disk2 2 GPT APFS Data1 25% ExFAT Data2 RExample 3: suppose you want to partition disk2 into 3 partitions with Mac OS Extended (Journaled), APFS, and ExFAT named Data1, Data2, and Data3 respectively. Then assign Data1 and Data2 each 25% of the disk space, and the remainder for Data3. The command will be:diskutil partitionDisk disk2 3 GPT JHFS+ Data1 25% APFS Data2 25% ExFAT Data3 R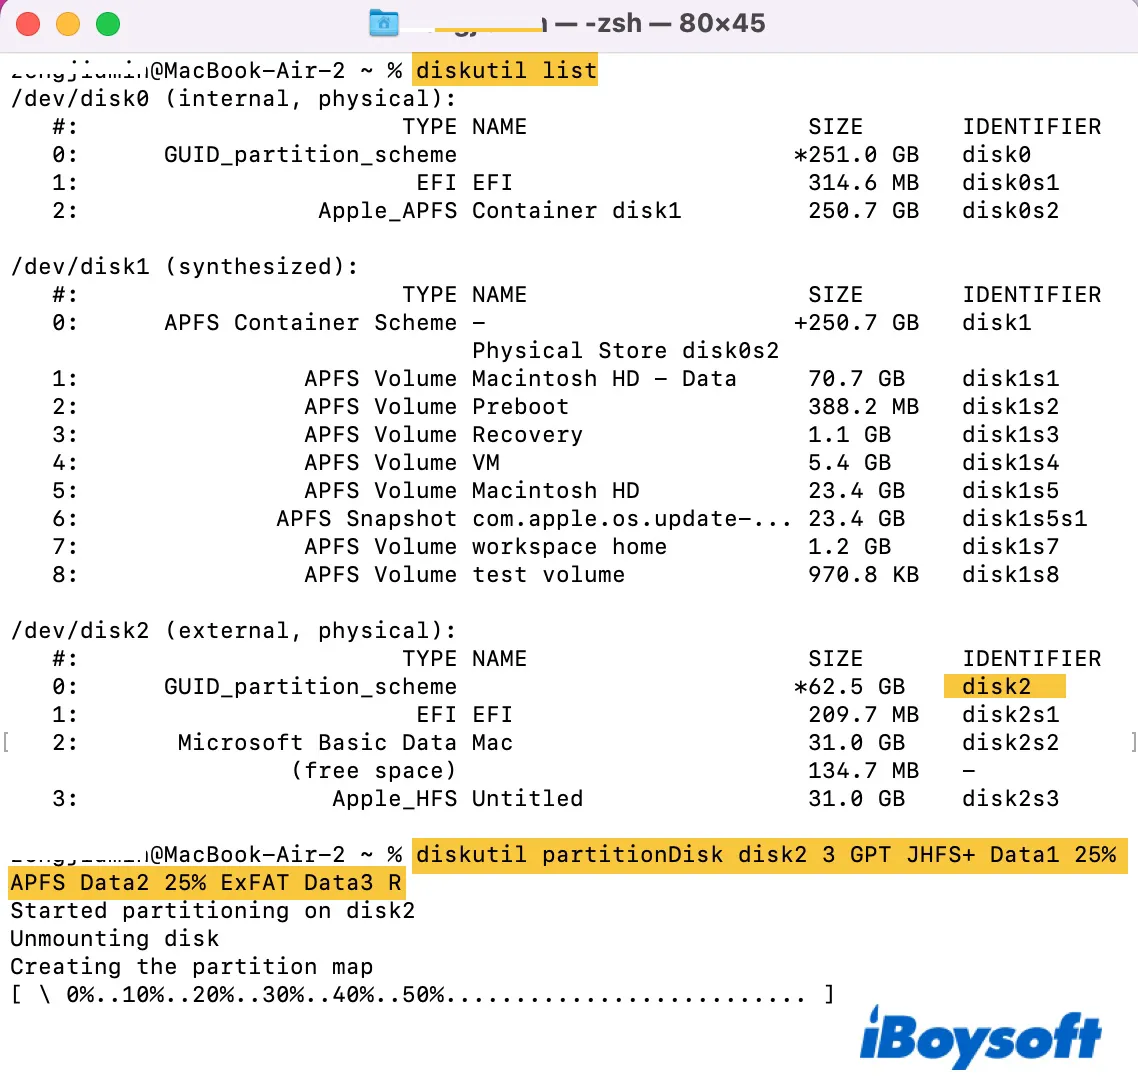
It may take a few minutes for the process to finish if you are creating multiple partitions.
You've known what to do when an external hard drive won't partition on Mac now. Don't forget to share it to help more people.
External hard drive won't partition on Mac: ( +/- ) button grayed out in Disk Utility
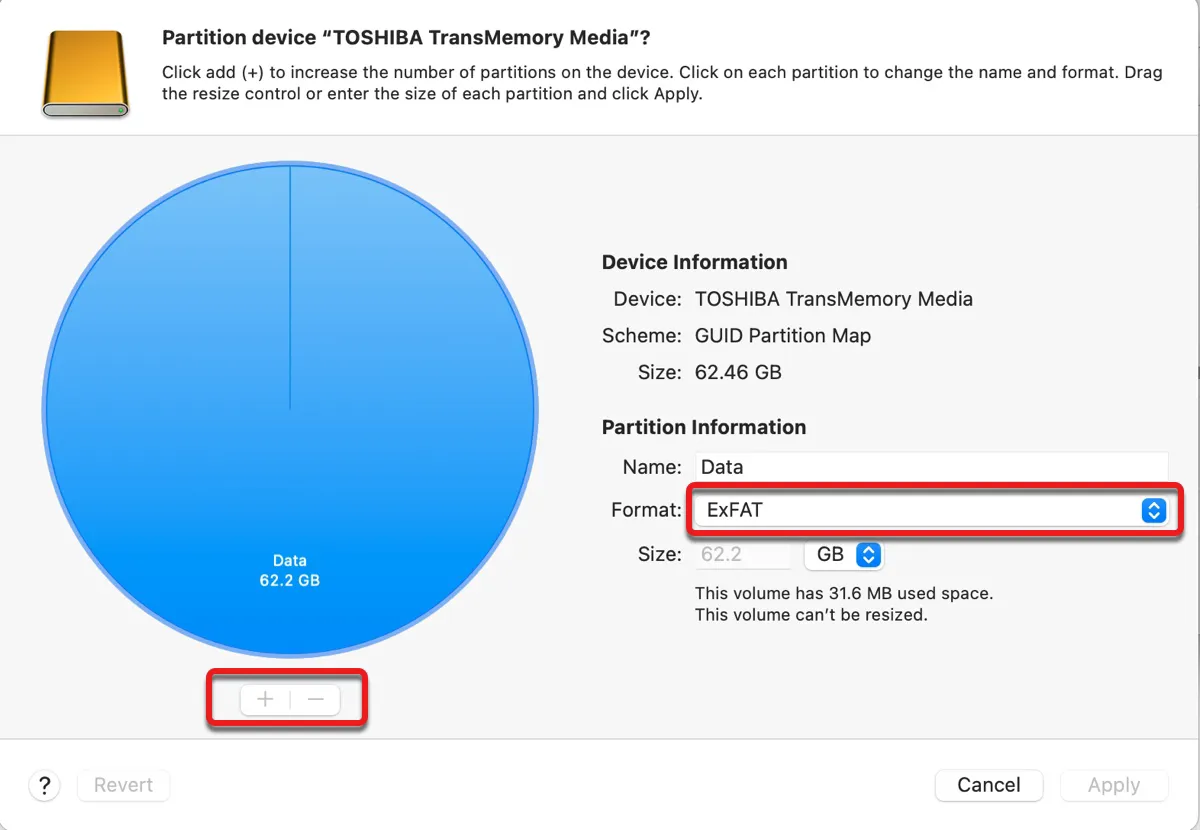
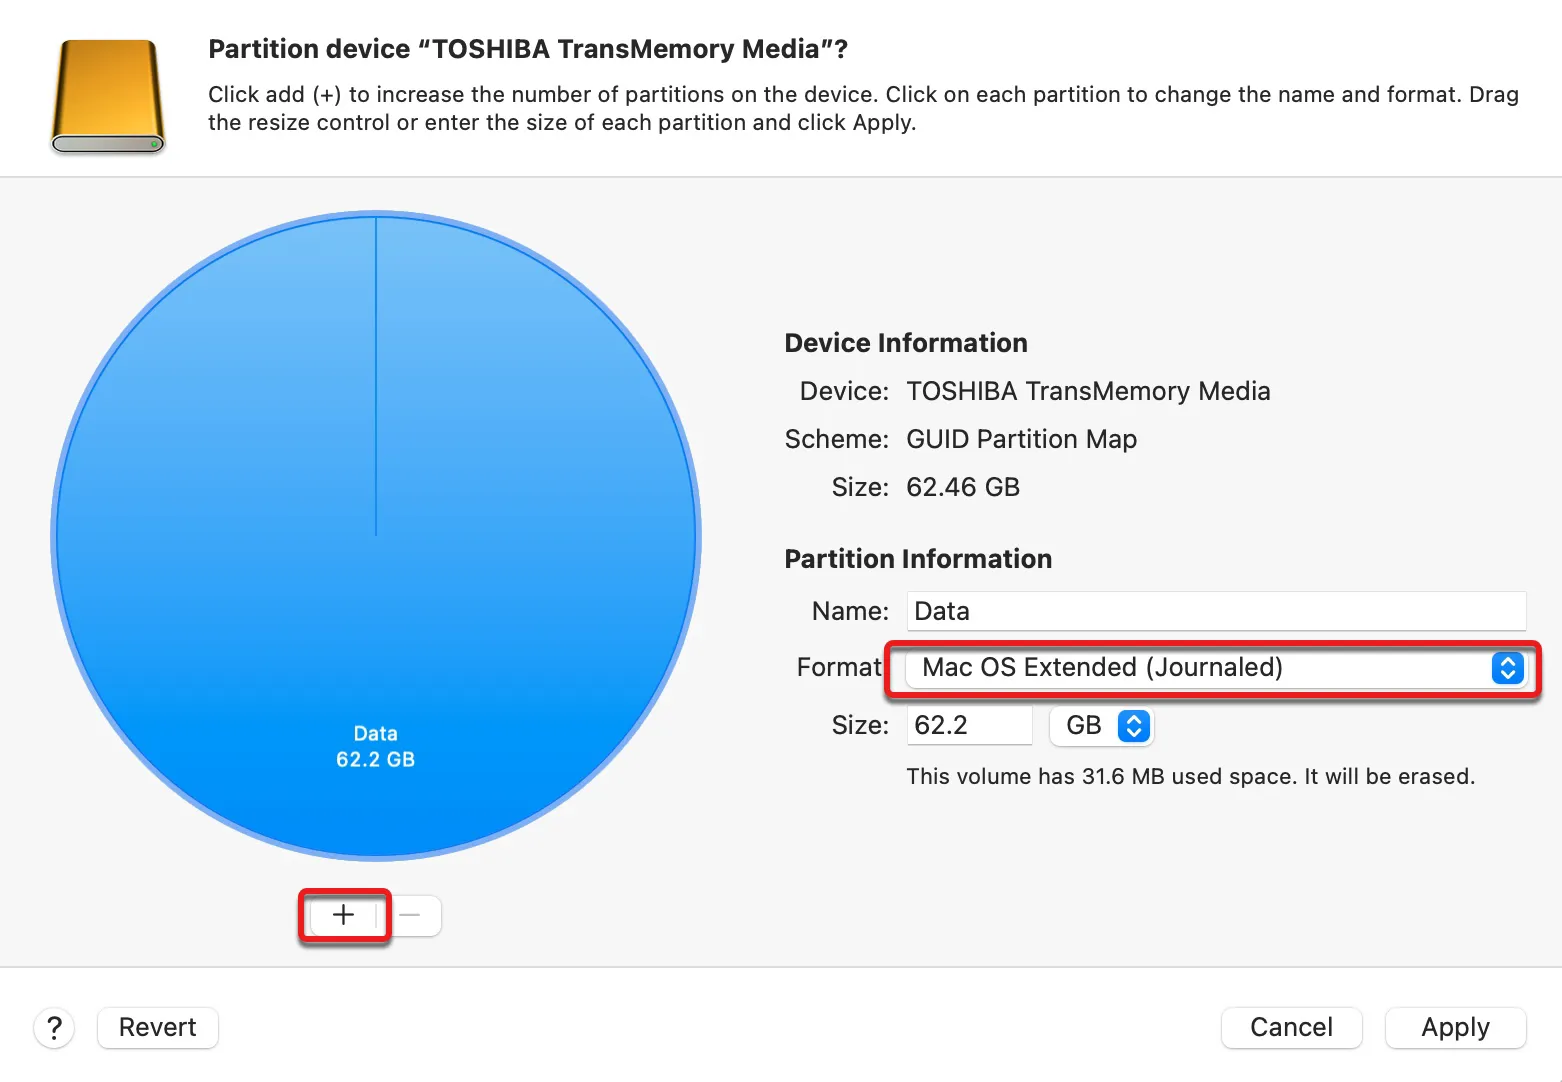
If the drive is formatted as MS-DOS (FAT) or ExFAT, you can't resize the partition as the ( +/- ) button will be grayed out. When that happens, you can activate the ( +/- ) button by changing the file system to a native Mac format like Mac OS Extended (Journaled). Then you can click the ( + ) button to add a new partition and select any file system.
In conclusion, an external hard drive won't partition on Mac if it's formatted with ExFAT or MS-DOS (FAT). If you want to create several partitions on a disk and have one formatted as ExFAT or MS-DOS (FAT), you need to erase the disk with a native macOS format and then add an ExFAT or MS-DOS (FAT) partition.
If you experience other errors, such as "Couldn't unmount disk 69888" when repartitioning a drive, try erasing the disk again and repeat the partitioning later. If you still can't partition external disk on Mac, repair the drive with Disk Utility First Aid, and then partition the drive again.
Note: MS-DOS (FAT) is Mac's way of writing FAT32. You can still use FAT32 in Terminal commands.
Can't partition SSD on Mac (internal): Can't resize APFS container
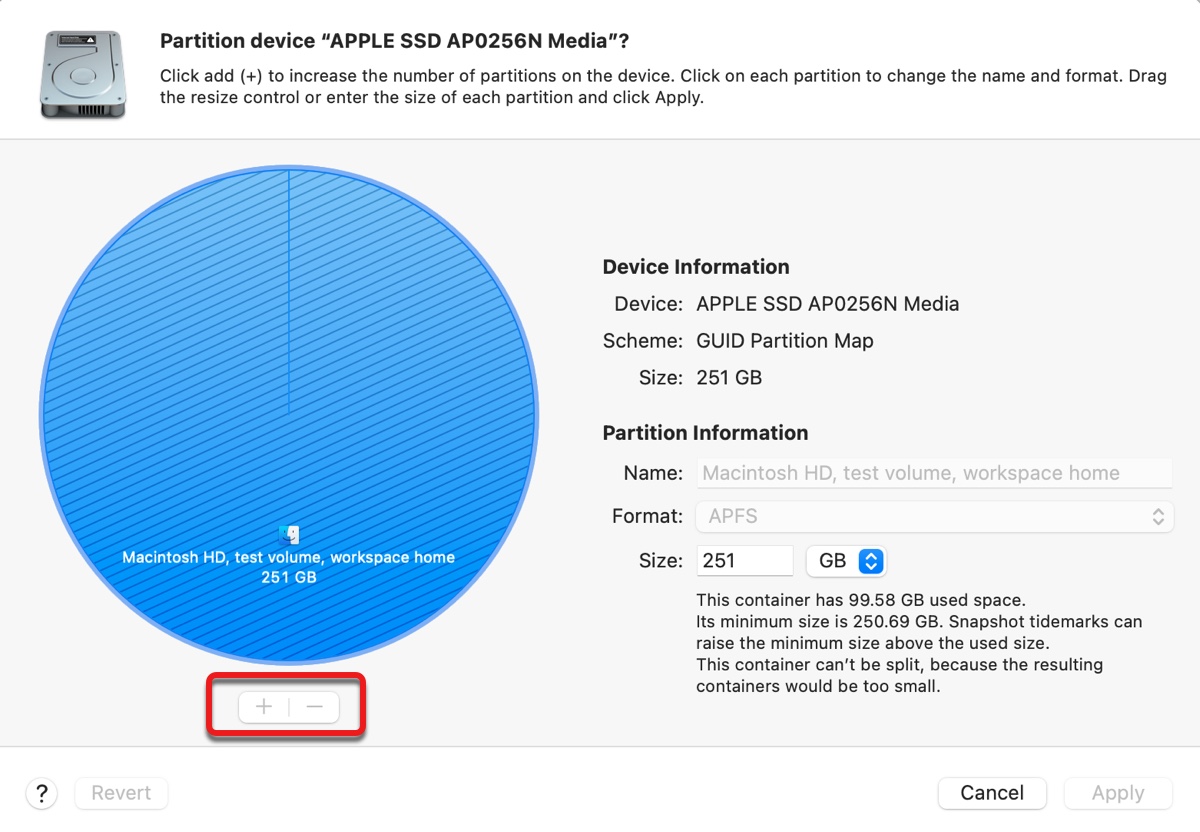
If you select your internal SSD or an APFS volume in Disk Utility and click Partition, you will find that the ( +/- ) button, the Name field, and the Format box are all grayed out, which makes you unable to partition the internal SSD.
Disk Utility also details the APFS container at the bottom right, including the minimum size of an APFS container, which is your whole disk space, and that the container cannot be split because the resulting containers would be too small.
Here are the solutions to try if you can't partition SSD on Mac:
Use Mac Recovery Mode
The truth is that you can't partition your internal hard drive when you are booted from it, so you need to boot into macOS Recovery to partition the SSD on Mac. It's worth mentioning that you need to choose another format to activate the ( + ) button after restarting in Recovery Mode. Once the partition is added, you can change back the format.
Warning: Adding a partition on the startup disk will likely erase data on the current partition, so don't forget to back up with Time Machine first. Also, you need to reinstall macOS afterward to use it.
- Boot into Mac Recovery Mode.
- Select Disk Utility and click Continue.
- Click View > Show All Devices.
- Select the SSD and click Partition at the top.
- Click the Format drop-down box and select another native Mac file system, such as Mac OS Extended (Journaled).
- Click the ( + ) button below the pie chart.
- Select "Add Partition."
- Two partitions will appear.
- Select one partition and move the resize control on the pie chart to decide the size of each partition.
- Choose the proper format.
- Click Apply.
If you can't partition hard drive on Mac even in macOS Recovery, proceed to the next fix.
Partition internal SSD with Terminal
Running Terminal commands is usually the way to go if you can't partition SSD on Mac using the Disk Utility app. You can follow the instructions below to reclaim free space or repartition the SSD.
- Boot into Mac Recovery Mode.
- Click Utilities > Terminal from the top menubar.
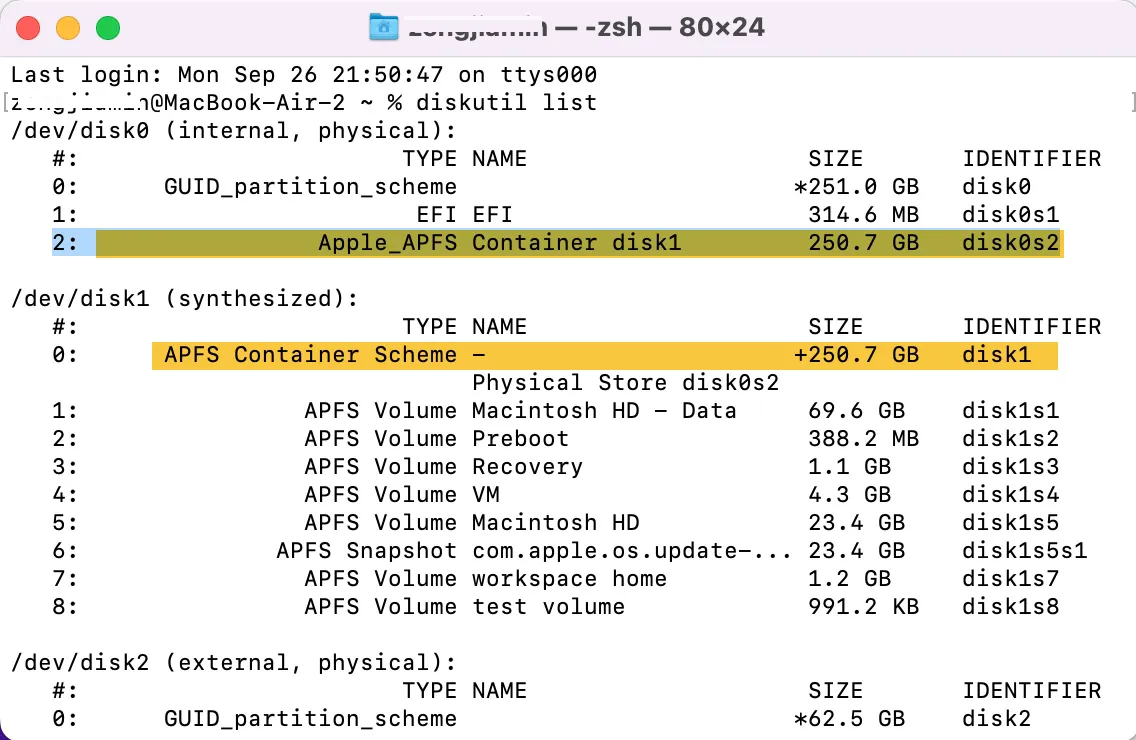
- Execute the command below to find out the container's name and where it resides. diskutil list
- In the following example, the APFS container's synthesized identifier is disk1 and resides at disk0s2.
If you have a "free space" partition taking up space, you can run the command below to reclaim the space and merge APFS containers: (Replace disk 1 with your container's synthesized identifier if it's different.)
diskutil apfs resizecontainer disk1 0
If you want to shrink the APFS container and create a new partition, continue with the steps below:
- Run the command below to shrink the APFS container and add a new partition.sudo diskutil apfs resizeContainer identifier shrinked_container_size file_system new_partition_name new_partition_sizeTo shrink a 1TB APFS container (disk0s2) to 500GB and create another 500GB partition named Extra & formatted with Mac OS Extended (Journaled), the command should be:
sudo diskutil apfs resizeContainer disk0s2 500g jhfs+ Extra 500g
Suppose the command ends with the following errors, then you need to take a few more steps to delete all Time Machine snapshots.
- APFS Container Resize error code is 49187. Error: -69606: A problem occurred while resizing APFS Container structures.
- Error: -69521: Your APFS Container resize request is below the APFS-system-imposed minimal container size (perhaps caused by APFS Snapshot usage by Time Machine)
- Error: -69531: There is not enough free space in the APFS Container for this
operation due to APFS limits or APFS tidemarks (perhaps caused by APFS Snapshot
usage by Time Machine)
Delete Time Machine local snapshots
- Open Terminal from the Applications > Utilities folder.
- Run the command below to check if you have Time Machine local snapshots.tmutil listlocalsnapshots /
- Copy and paste the following command to delete all Time Machine snapshots.
tmutil listlocalsnapshots / \
| cut -d. -f4 \
| xargs -n1 tmutil deletelocalsnapshots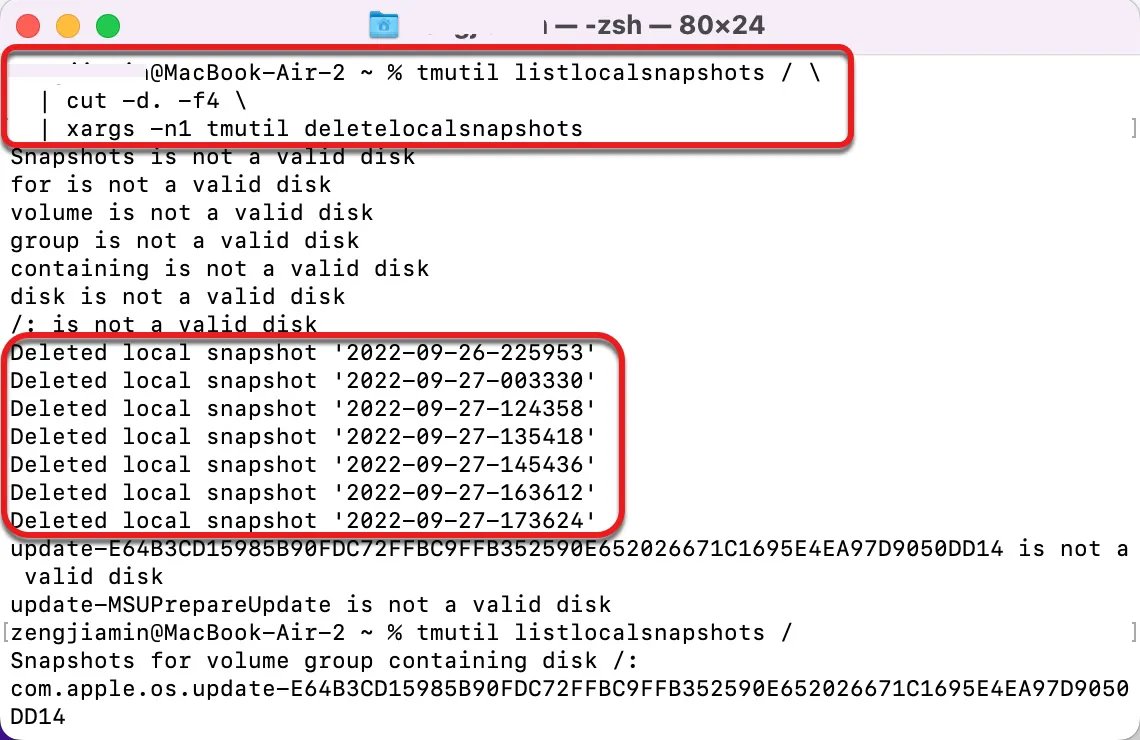
Note: You shouldn't shrink the APFS container on the macOS side to allocate more space for the Boot Camp partition if it's already created. Instead, back up your Boot Camp Partition, remove it using Boot Camp Assistant, reboot, then start over by using Boot Camp Assistant to create the new Boot Camp partition in the size required.
You should have partitioned the SSD on Mac now. If so, please share this post to benefit more users.
macOS can't partition USB drive: ( - ) delete button grayed out in Disk Utility
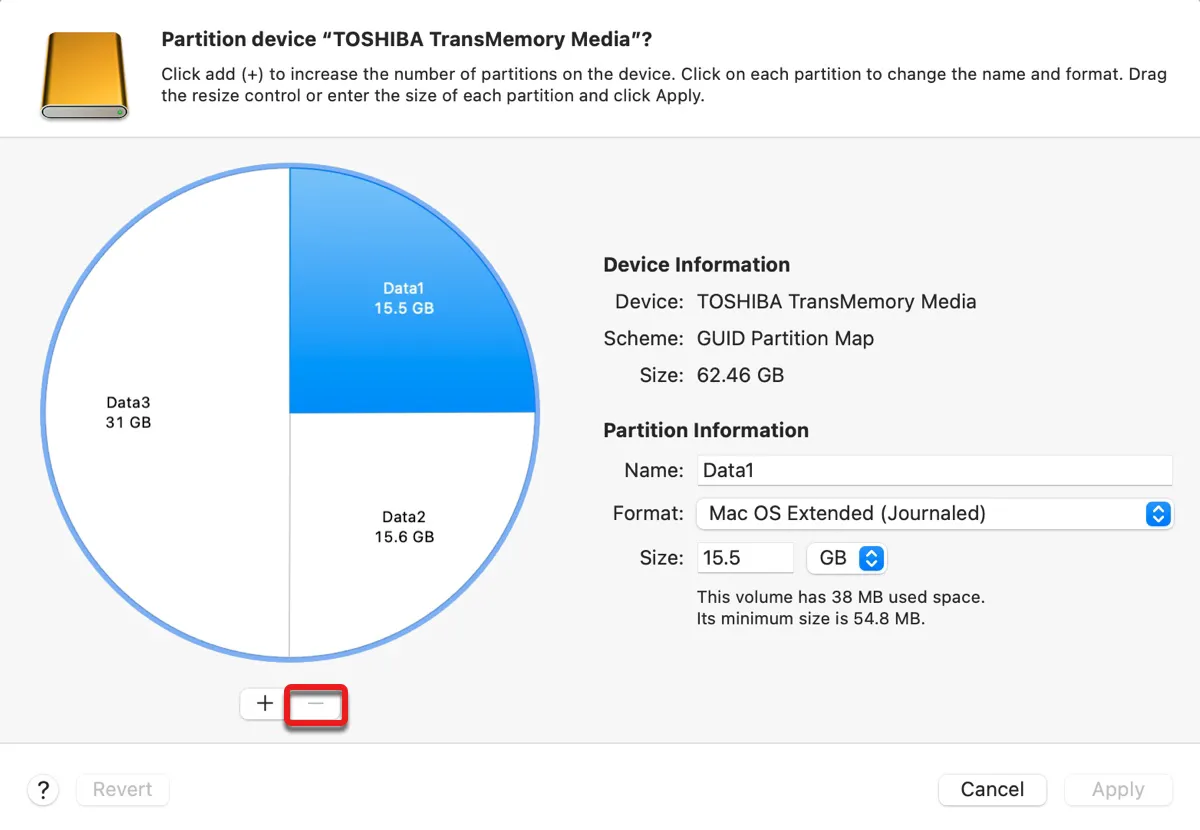
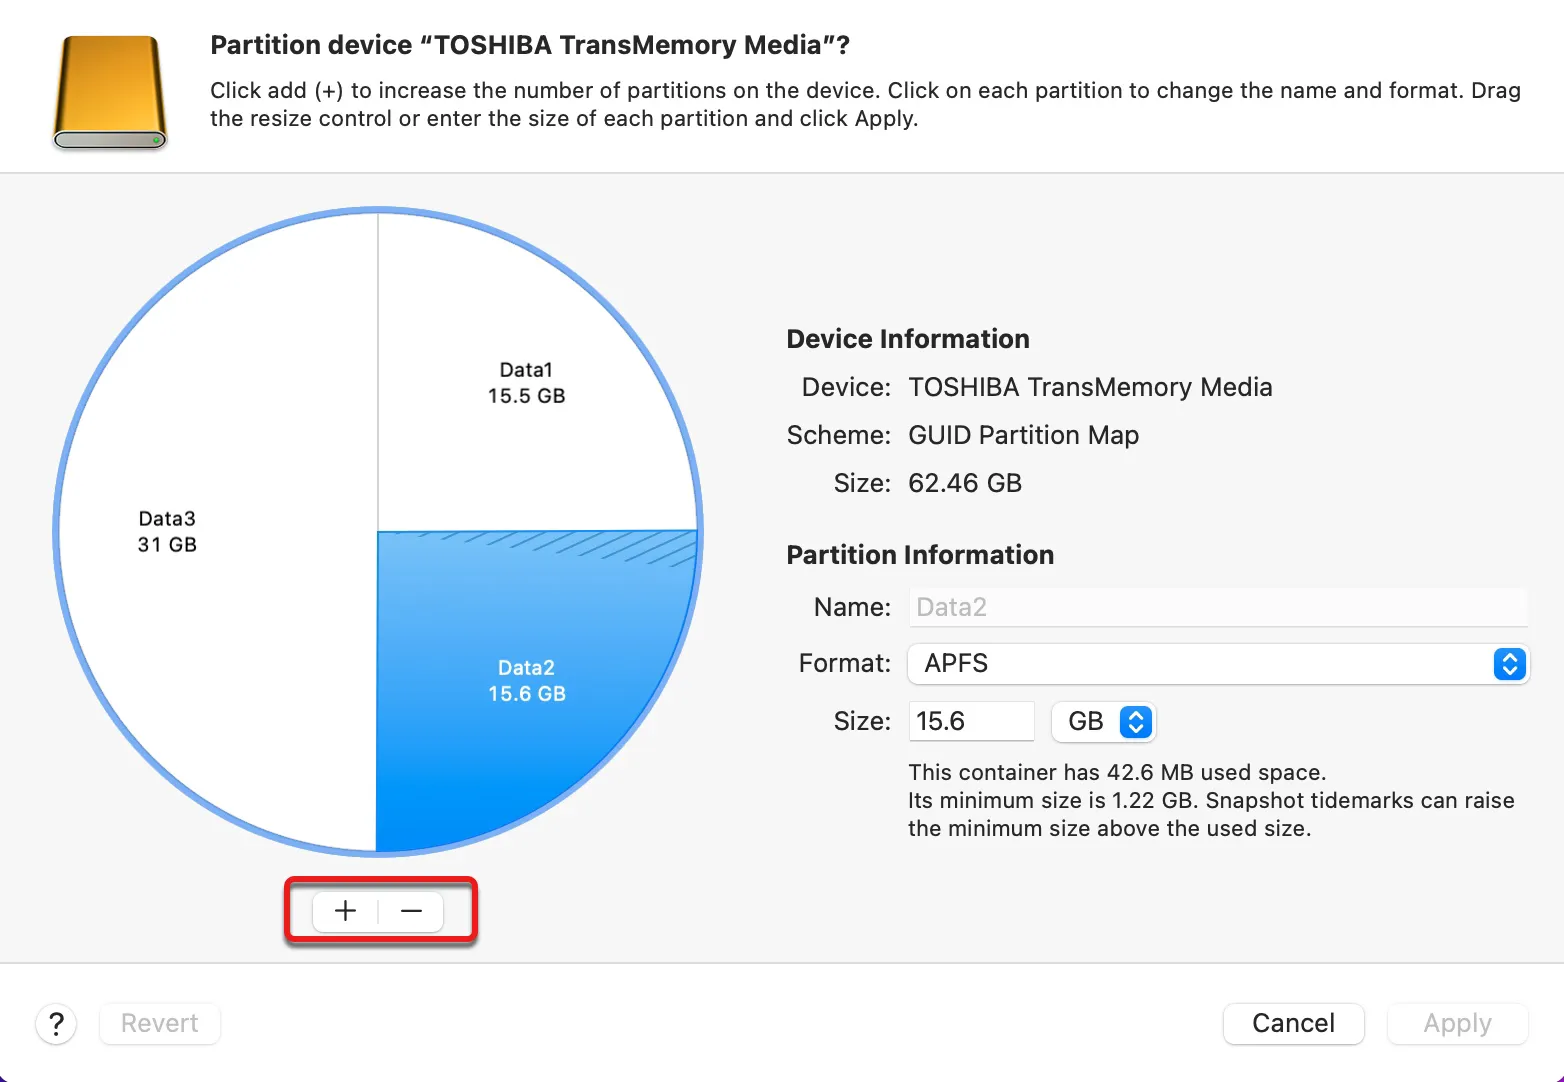
If you can't delete a partition on an external hard drive on Mac, the delete button is likely grayed out in Disk Utility. This usually isn't an error but a result of selecting the first partition on the drive.
Unlike the pie chart in Disk Utility presented, partitions are stored linearly. The rule is that one can't delete the first partition on the disk but is free to delete the rest.
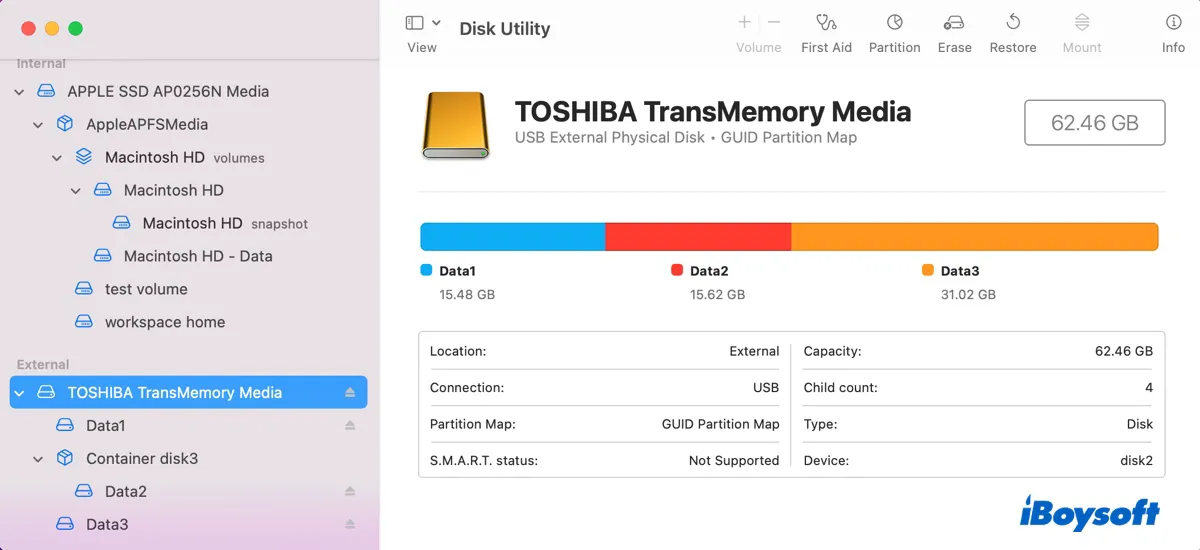
You can check the order of your partitions by running diskutil list in Terminal. Take my disk as an example. The diskutil command shows that Data1 is the first partition, which, when selected for partitioning in Disk Utility, has a grayed-out delete button.
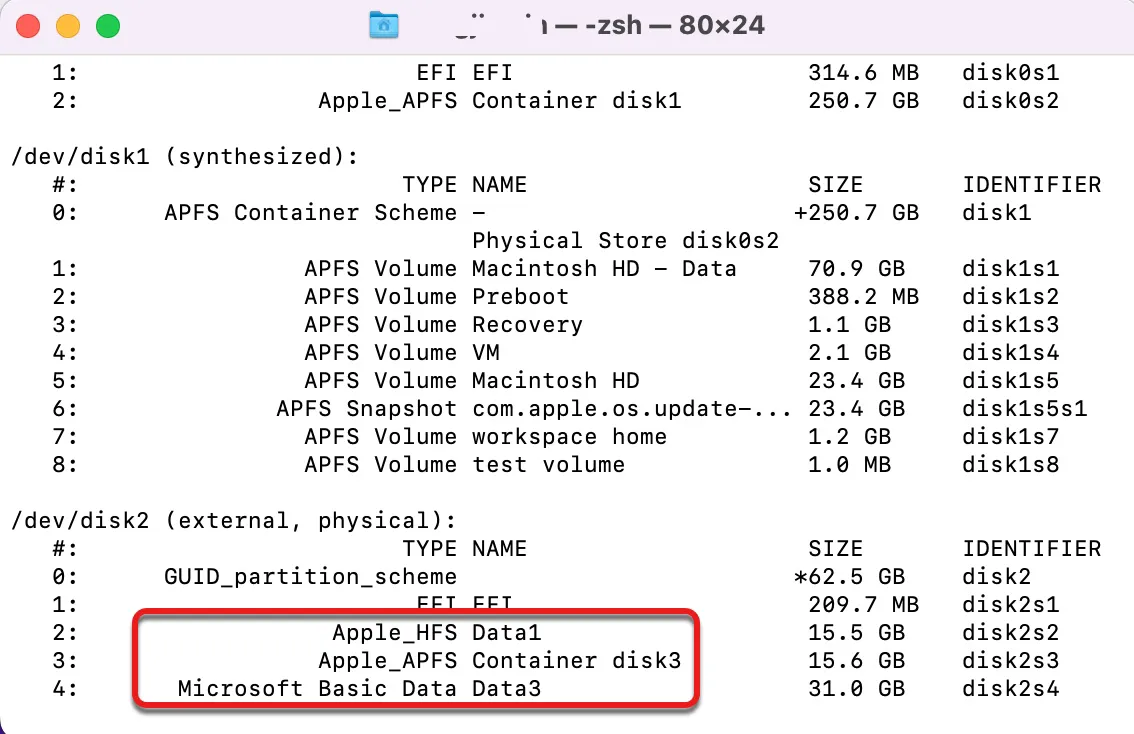
However, the other 2 partitions can be deleted correctly.
If you must delete the first partition, you can back up files on all partitions and erase the whole disk.
If you can't partition an internal disk because of the disabled delete button, you can retry in macOS Recovery or after booting from USB.
If you are deleting a partition in order to enlarge the partition that comes before it, but the delete button won't work, you can merge the two partitions in Terminal:
Note: If two partitions are to be merged, they must be sequential, and the contents are only preserved for the first partition.
- Back up data on the partitions you want to merge.
- Launch Terminal from the Applications > Utilities folder.
- Execute the following command to see all partitions on your external disk.diskutil list
- Locate the identifier of the partition you want to delete (let's call it partition1) and the one you want to enlarge (partition2).
- Run the following command to merge them. (Replace the variables with yours.) diskutil mergePartitions file_system name identifier_of_partition1 identifier_of_partition2For instance, if you want to delete disk2s3 and combine its space to the partition before it disk2s2 and name the new partition NewPartition formatted as JHFS+.diskutil mergePartitions JHFS+ NewPartition disk2s2 disk2s3
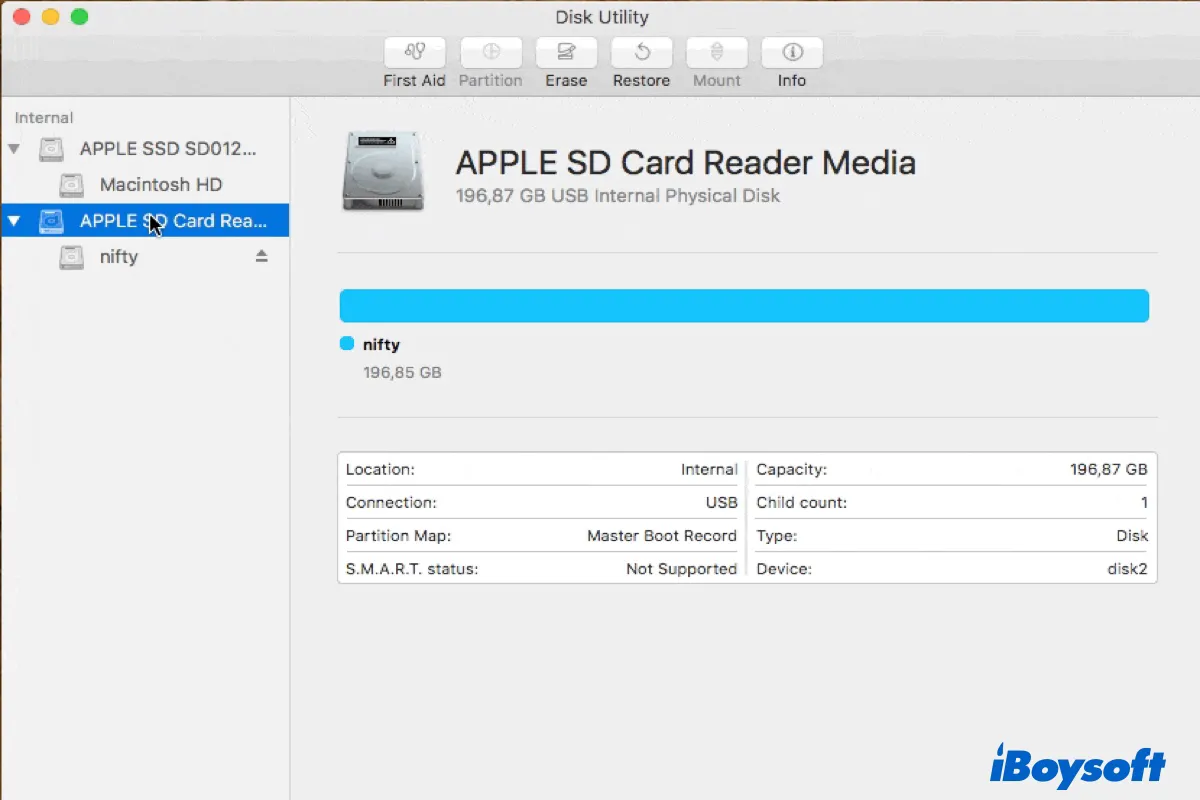
Can't partition SD card on Mac: Most Disk Utility options grayed out
If you can't partition SD cards on Mac because the "Erase," "Partition," and "First Aid" buttons are all grayed out in Disk Utility, the card is likely locked and read-only. To enable write access to it, you need to check the physical lock switch and unlock SD card if the switch is on.
It may occur to you that the lock switch gets flipped when being pushed into the slot, and it will flip back to unlock when you pull it out. In this case, you can insert the card but push it to the opposite side of where the switch is to allow a better connection.
If you can't partition a drive on Mac due to error codes, check out the following guides:
• [Fixed] 'Couldn't Open Device 69877' on Mac When Erasing Mac/USB/SD Card
• Fix Mac Error 'Couldn't Unmount Disk 69888' on Internal & External disk
Please share this post if you find it useful.