Computer users use external hard drives such as the popular WD My Passport to expand disk space, transfer files between devices, back up important files, boot from the drive when MacBook won't turn on, etc. And sometimes, you may need to format WD My Passport for Mac, and this post is a detailed tutorial.
Why you need to format WD My Passport for Mac
Some Mac users have complained that the WD My Passport is read-only on Mac, and they can't transfer files to WD My Passport from Mac. Such a problem may be caused by read-only permission, drive corruption or the incompatibility of the file system between the external drive and the Mac operating system. And the last one is the main and most common reason causing the WD My Passport external hard drive unusable on Mac.
Given that Windows is still the most widely used operating system, some popular hard drive manufacturers such as Western Digital format the drives with NTFS(New Technology File System, a file system developed by Microsoft and applied to Windows operating system) when shipping out. That is to say, most WD My Passport external hard drives come with the NTFS, the default file system.
However, macOS gives limited support for NTFS format, you can read NTFS on Mac, but can't write to NTFS-formatted WD My Passport on Mac such as the "My Passport won't let me add files on Mac" error, which is inconvenient for whom need to move to back and forward between Mac and Windows systems. Then reformatting WD My Passport for Mac is a quick resort to making the drive compatible with macOS. You can choose a macOS-supported file system, including FAT32, exFAT, Mac OS Extended, and APFS.
Besides, you may want to format WD My Passport for Mac to create a bootable installer for macOS, fix corrupted external hard drive on Mac, free up disk space, etc., then you can follow the steps below.
If you think this post is informative, you can share it with more people!
How to use WD My Passport on Mac without formatting
Hold on! Don't rush to format WD My Passport for Mac if the cause is cross-platform incompatibility, especially if you have used the drive for a while and store some important files on it. Due to that reformatting the external hard drive will remove all the contents from it and you will lose all your files.
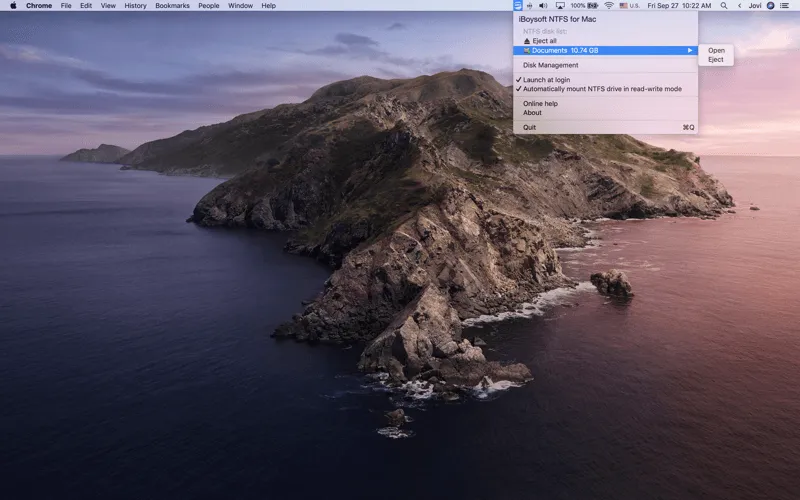
Therefore, we recommend using an NTFS for Mac tool in the first place to solve the incompatibility issue instead of formatting WD My Passport for Mac. Such NTFS for Mac software helps you have full read and write access to NTFS drives on Mac without restrictions. Among these tools, iBoysoft NTFS for Mac stands out.
iBoysoft NTFS for Mac automatically mounts the NTFS drive in read-write mode on your Mac and enables you to manage NTFS files directly. You can freely move, copy, edit, add, and delete files on the NTFS drives on Mac. It also delivers a fast file-transferring speed and adds some disk management features.
Best NTFS for Mac by iBoysoft
How to use iBoysoft NTFS for Mac:
- Download and install iBoysoft NTFS for Mac.
- Connect your NTFS-formatted WD My Passport to the Mac with a USB cable.
- iBoysoft NTFS for Mac auto mounts NTFS partitions in read-write mode. Now, you can open and modify files on the drive.
- Eject the NTFS drive from Mac after using.
Are you able to access NTFS WD My Passport on Mac with this tool? Share it to help more people!
How to format WD My Passport for Mac
If performing a clean reformatting is exactly what you need, then you can find detailed steps in this part. We will show you how to format WD My Passport for Mac on different platforms, including macOS and Windows.
Format WD My Passport on Mac
You can straightforwardly convert NTFS to FAT32 or other macOS-support formats with the macOS built-in Disk Utility app. This app also enables you to erase AFPS volume, add APFS volume to install a different macOS version, delete APFS volume, run First Aid to check and repair disk, etc. Here's how to reformat WD My Passport on Mac with the Disk Utility application:
- Connect the external WD My Passport to your Mac with a USB cable.
- Launch Disk Utility from Finder > Applications > Utilities.
- Tap on the View button and choose Show All Devices.
- Locate and find WD My Passport on the left menu.
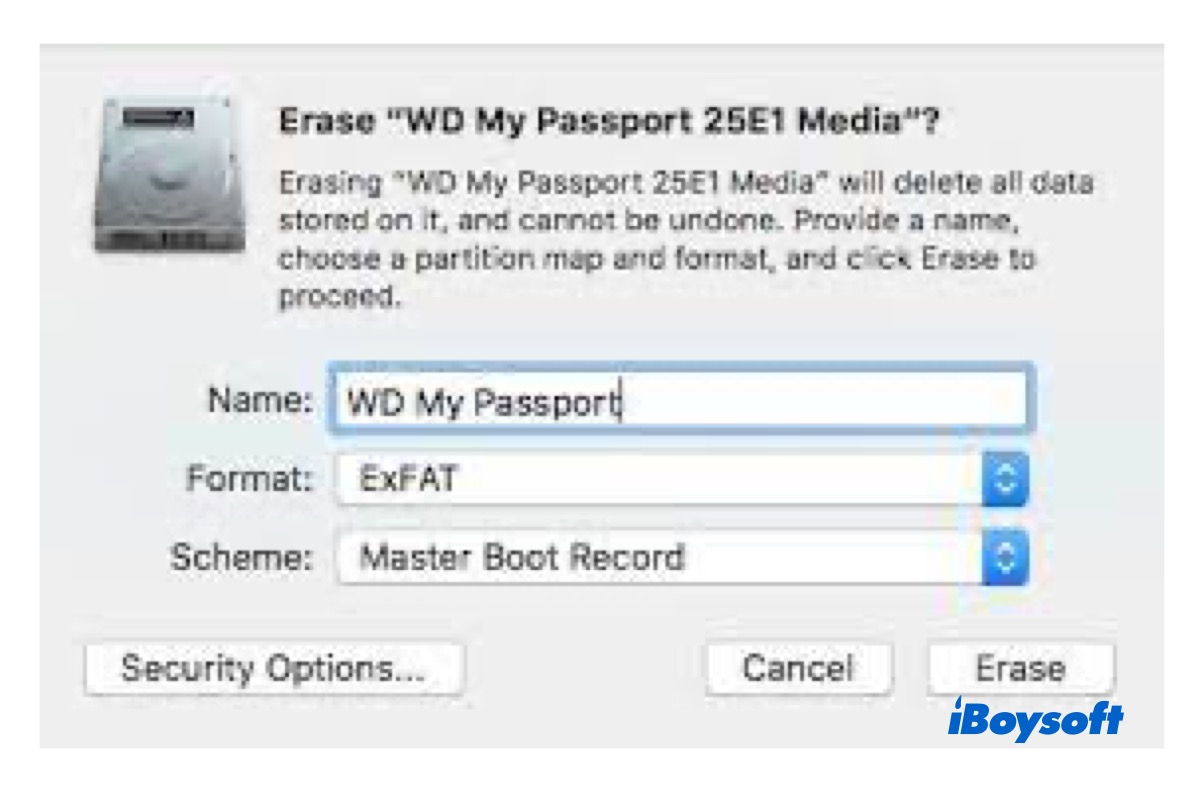
- Click on the Erase tab on the top of the Disk Utility window.
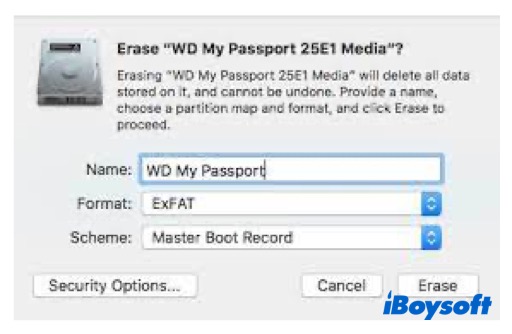
Rename the drive and select a format and scheme for the external hard drive. Choose Mac OS Extended for macOS 10.12 and earlier versions, and choose APFS for macOS 10.13 and later versions. In addition to macOS native file systems, if you want to use the external hard drive on both Mac and Windows systems, choose either FAT32 or exFAT which works on both operating systems.
Format WD My Passport on Windows
If there is only a Windows PC available to use, you can also format WD My Passport for Mac there by using File Explorer, Disk Management, and Diskpart utility.
Format WD My Passport via File Explorer:
- Open File Explorer on your computer.
- Find and select the WD My Passport in File Explorer and choose Format.
- Select the format as FAT32 or exFAT to be compatible with macOS.
- Tick the box Quick Format.
- Click the Start button and wait for the formatting process done.
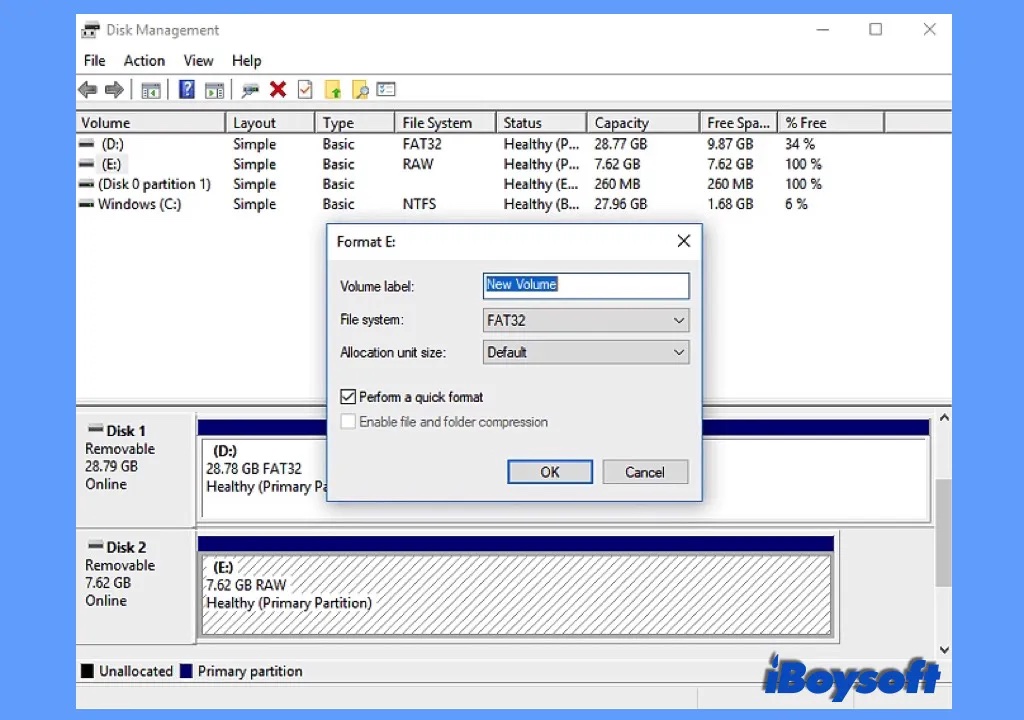
Format WD My Passport with Disk Management:
- Head to This PC/My Computer on the desktop and then choose Manage.
- Under the Storage tab, choose Disk Management.
- Right-click the WD My Passport in Disk Management and select Format.
- Choose FAT32 or exFAT and set the volume label and allocation unit size.
- Tick the box Perform a quick format and click OK.
Format WD My Passport using Diskpart:
- Search for command prompt, right click and run as Administrator.
- Enter diskpart and press Enter.
- Type list volume and press Enter to list all partitions and drives.
- Type select Volume #(replace # with the disk number of your WD My Passport) and press Enter.
- Now format the drive with FAT, type 'format fs=exfat', and press Enter.
- Type exit and hit Enter.
Successfully format WD My Passport for Mac? Share it with your families and friends!
Unfortunately, you have mistakenly formatted your WD My Passport where you have stored crucial files on the external hard drive and no backup available. The last resort to retrieving lost data is using professional data recovery software. You can try iBoysoft Data Recovery for Mac to get lost data back.
Conclusion
If it is due to the NTFS compatibility issue that you want to format WD My Passport for Mac, you can try an NTFS for Mac tool to get the issue solved without data loss. For other reasons, you can easily format the external hard drive on Mac or Windows system and assign a format macOS supports such as APFS, Mac OS Extended, FAT32, and exFAT. By the way, you'd better back up the drive before formatting it in case you want to retrieve some files back.
Also read: Will Formatting My Mac Make It Faster? Here Comes Answer