Downloading and installing macOS Tahoe 26 Beta on your Mac allows you to explore the latest features before the official release in September 2025. However, beta versions often come with bugs, performance issues, or compatibility problems. (Follow: macOS Tahoe Beta bugs & fixes)
If you're looking to downgrade from macOS Tahoe Beta to the stable macOS Sequoia or an earlier version, this guide will walk you through every step to uninstall macOS Tahoe 26 Beta. (You can also upgrade Tahoe Beta to the final public one with this tutorial.)
Tips: Performing a clean install of macOS Tahoe will also remove the beta version and install the public version. You can follow this macOS Tahoe database to get the full installer: macOS Tahoe Download.
Before installing the macOS Tahoe public version, learn more about whether to install macOS Tahoe:
Preparation for successfully uninstalling macOS 26 Beta
Before you remove macOS Tahoe 26 Beta, consider the following:
- Uninstalling requires erasing your startup disk, which deletes everything on your Mac.
- You must back up your data to avoid permanent loss.
- A bootable installer of a stable macOS version is required to reinstall the system. (Create a macOS Tahoe bootable USB installer)
This process works for downgrading macOS Tahoe to earlier versions and upgrading to the public macOS 26 Tahoe if compatible with your Mac. Let's do the necessary preparations first:
*1: Close macOS Tahoe 26 Beta updates (Must)
For uninstalling macOS 26 Beta and reverting to a public macOS version or an early one, the first step is to opt your Mac out of Apple's macOS Beta Program. This will prevent your device from receiving future beta updates. Here's how to remove the macOS Tahoe beta profile from your Mac:
- Apple menu > System Settings.
- Find and click General > Software Updates.
- Tap the circle button near Beta Updates.
- Tap the expand box next to Beta Updates, then choose Off > Done.
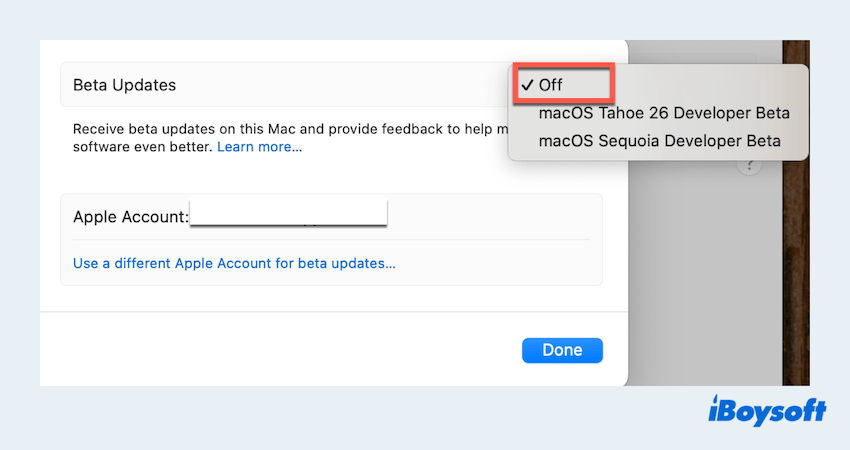
It won't display any Beta updates and will always automatically install the official macOS updates.
*2: Back up Mac to avoid data loss (Must)
The uninstalling/upgrading/downgrading process involves erasing your startup disk, which will permanently delete all files, apps, and system settings on your Mac. So, before you proceed with this action, backing up your data is absolutely essential.
While Apple's Time Machine can create a basic backup, it may not always be the fastest or most flexible solution, especially when restoring to an earlier macOS version. iBoysoft DiskGeeker for Mac offers you a better alternative, which supports cloning the whole startup disk with a quicker transfer speed. You can:
- Download and open iBoysoft DiskGeeker for Mac. (Make sure you connect the external drive to the Mac.)
- Expand Internal Drive and choose your user data volume ("Macintosh HD - Data" or "macOS - Data)" on the left sidebar.
- Click the Clone icon from the right toolbar.
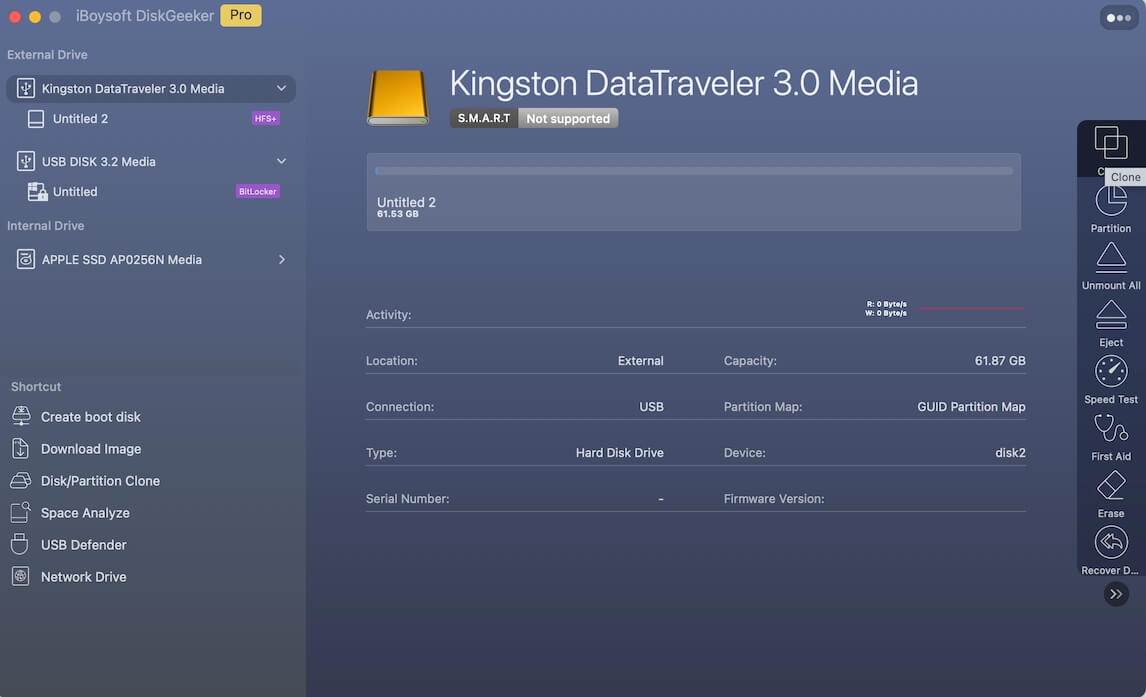
- Select the connected external as your target disk, then tap Start Cloning > OK.
So easy and convenient, why not try and share it now~
*3: Create a bootable installer for a version (Optional)
After uninstalling macOS Tahoe Beta, if the version of macOS you wish to reinstall isn't accessible through macOS Recovery Mode or a Time Machine backup, you can create a bootable macOS installer manually.
- Connect another 16 GB+ USB drive to your Mac.
- Download the installer from the App Store to get the DMG file.
- Format it as Mac OS Extended (Journaled) using Disk Utility in the Utilities folder of Finder.
- Open Terminal and run this command (adjust for your macOS version):
sudo /Applications/Install\ macOS\ Sonoma.app/Contents/Resources/createinstallmedia --volume /Volumes/MyUSB
(Replace MyUSB with your USB's actual name.)
If you can't download it from the App Store or Software Update, use iBoysoft DiskGeeker for Mac, which needs no Terminal commands, less time, and effort during macOS installer creation.
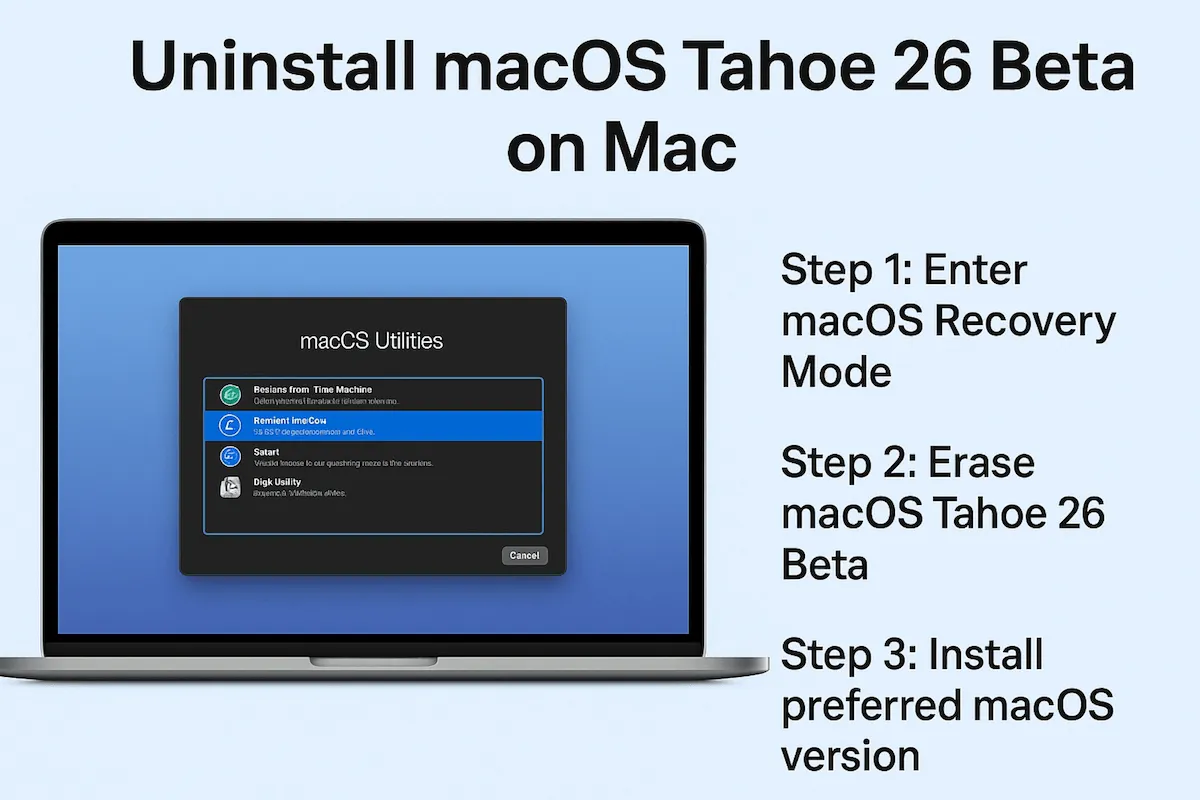
How to uninstall macOS Tahoe 26 Beta
Once you've backed up your Mac, you can safely move forward with uninstalling macOS Tahoe Beta without risking data loss. Whether you're planning to downgrade macOS, the latest public release, or an older version, this section has you covered.
Step 1: Boot into macOS Recovery Mode
To begin, you'll need to boot your Mac into macOS Recovery Mode:
On Intel-based Macs
Restart your Mac and immediately hold Command + R until the Apple logo or spinning globe appears. (Maybe it can be Option + Command + R or Option + Shift + Command + R keys)
On Apple Silicon (M1/M2/M3) Macs
Shut down your Mac completely. Then press and hold the Power button until you see "Loading startup options." Select Options and click Continue > Select the startup disk > Next > Account > Next > Continue.
Step 2: Erase macOS Tahoe 26 Beta
Next, you'll need to erase the current beta operating system from your startup disk.
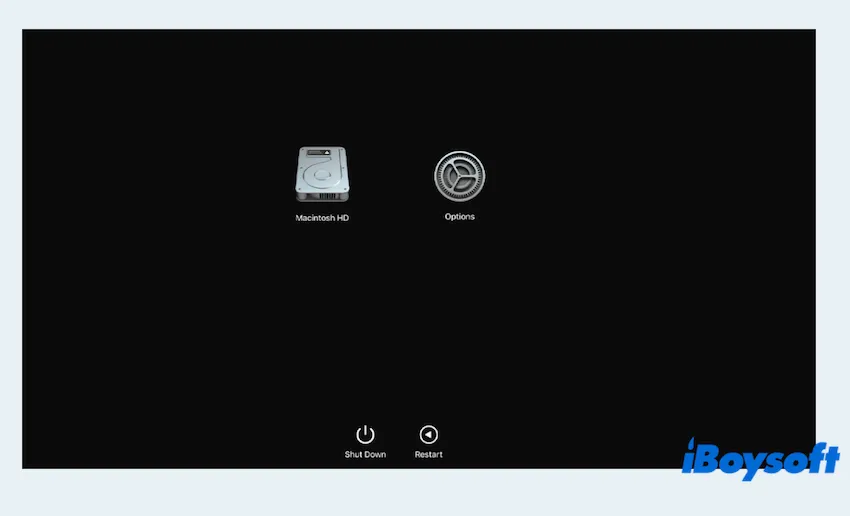
- In the macOS Utilities window, choose Disk Utility.
- Select your startup disk (usually named Macintosh HD) from the sidebar.
- Click Erase at the top of the window.
- Set the format to APFS and the name to something like Mac HD > Erase.
- Wait and quit Disk Utility.
- If applicable, repeat this step for the Data volume under the same drive.
- Click Erase to confirm.
Warning: This step will remove macOS Tahoe 26 Beta and all data from the drive. Be sure your backup is complete before continuing.
Step 3: Install your preferred macOS version
With macOS Tahoe Beta removed, you're ready to install a clean, stable version of macOS. You have three options:
Option 1: Reinstall a stable macOS version via bootable installer
If you've already created a bootable macOS installer in the preparation above, insert the USB drive:
- Restart your Mac and hold Option during boot.
- Select the USB drive with the installer.
- Follow the on-screen instructions to install your chosen macOS version.
Option 2: Restore from a Backup drive
If you've previously backed up your Mac using Time Machine or iBoysoft DiskGeeker for Mac.
- In the macOS Utilities window, select Restore from Time Machine Backup.
- Choose the backup source and date.
- Proceed with the restoration to bring your Mac back to its previous state.
Or you can connect the drive you cloned with iBoysoft DiskGeeker for Mac, Utilities > Disk Utility > Continue > Select the startup drive > Restore > Select your cloned drive next to Restore From > Restore to > Restore.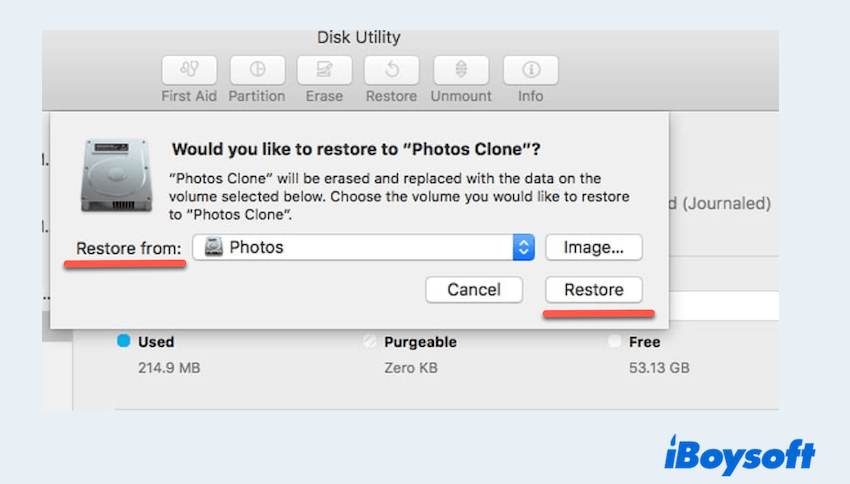
Option 3: Use macOS Recovery to install the latest public macOS
If you didn't prepare a bootable installer:
- From the macOS Utilities window, select Reinstall macOS...
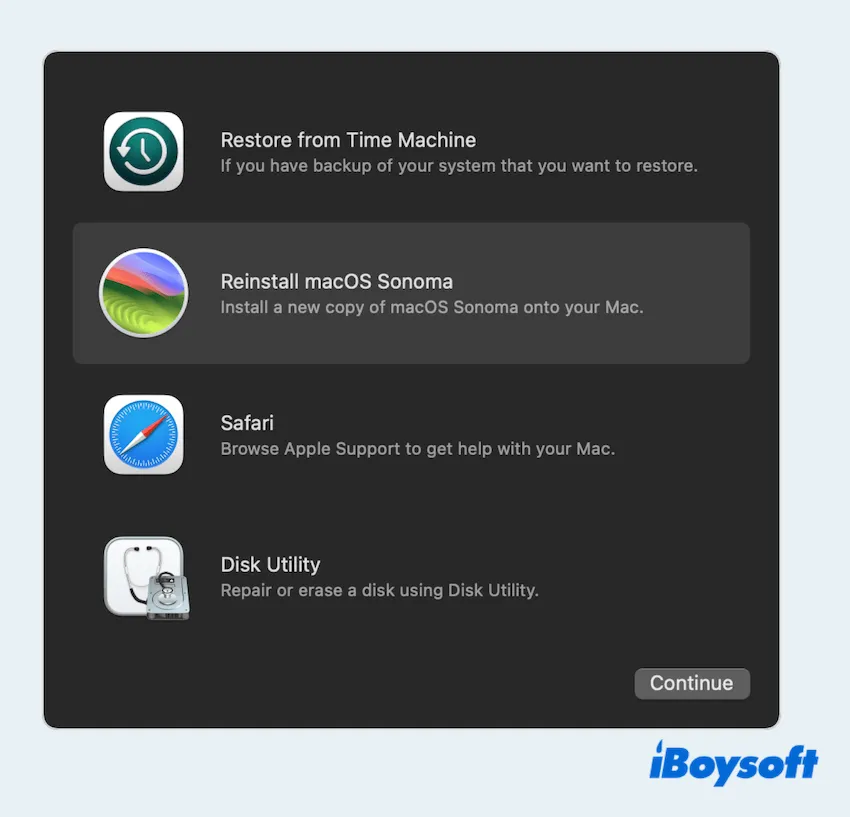
- This will install the latest stable macOS version compatible with your Mac.
It seems very complex to uninstall macOS Tahoe 26 Beta, but with a solid backup and the right installer with iBoysoft DiskGeeker for Mac, it's manageable. Whether you're switching back to Sonoma or another version, these steps will help you restore a stable, reliable macOS experience.
Share this helpful post to help more users~