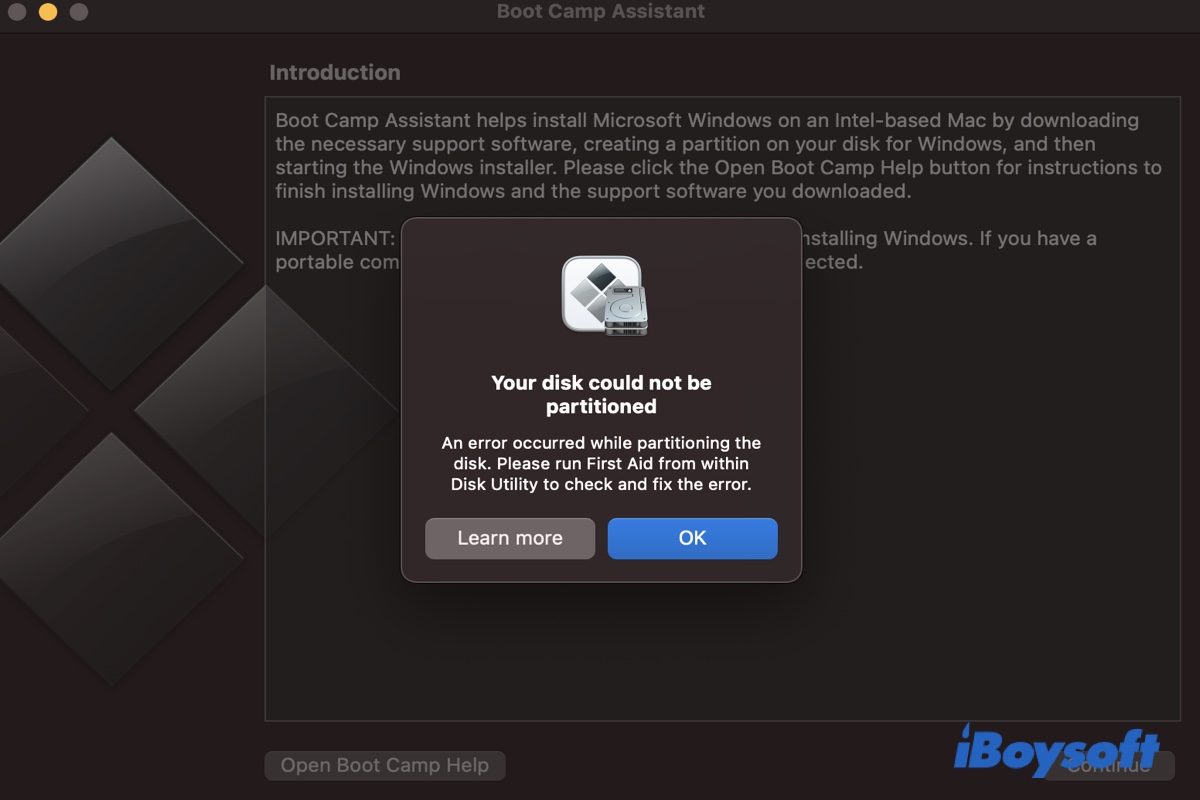
While many users managed to install Windows on Mac smoothly, some may encounter various problems, such as Boot Camp stuck on "Partitioning Disk" or the error we will address today, "Your disk could not be partitioned. An error occurred while partitioning the disk. Please run First Aid from within Disk Utility to check and fix the error."
The error doesn't seem related to a specific macOS version, as you may find "Your disk could not be partitioned." on Monterey, Big Sur, Catalina, etc. You may run into this issue due to disk errors or insufficient space for Boot Camp. Here, we will summarize the ways to fix "Your disk could not be partitioned." on Boot Camp.
You can share these fixes with your favorite platform by clicking the button below.
Fix 1: Repair your disk with Disk Utility
You might have followed the warning torun First Aid to check and repair disk errors that may cause "Your disk could not be partitioned." on Boot Camp. If so, make sure you are doing it from macOS Recovery. Otherwise, follow the steps below to verify your startup disk's health and repair its data structures if needed:
- Restart your Mac in Mac Recovery Mode.
- Select Disk Utility and click Continue.
- In Disk Utility, click View > Show All Devices from the menu bar.
- You should now see your available disk and storage device in the order of startup disk > container > volumes.
- Select the last volume of your startup disk(In this case, Macintosh HD - Data) and click First Aid.
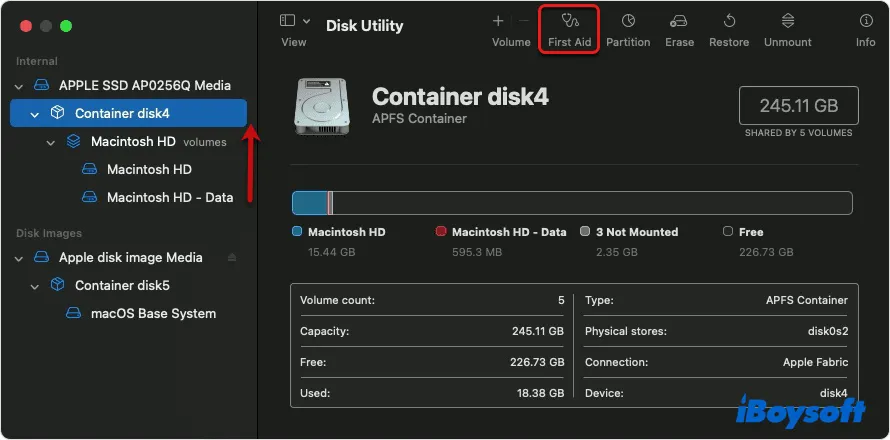
- Wait for First Aid to complete, then continue with the next volume above it until the startup disk gets repaired.
If Disk Utility found no error, it means that the issue isn't caused by errors on your Mac hard drive. You can continue with Fix 3.
If Disk Utility can't repair your startup disk, try running the fsck command in Single User mode, as we will describe next, or back up your Mac and perform a clean macOS reinstall.
Fix 2: Run the fsck command to fix corruption
The fsck (file system check) command can verify the consistency of your Mac's file system and perform the necessary repairs. Running the command line tool fsck in Single User Mode is often the next choice if Disk Utility wasn't able to repair your drive. Note that the way to boot into Single User Mode differs on different Macs.
To perform the fsck check on Intel Macs with the T2 chip and Apple Silicon Macs, Apple recommends using Terminal in Recovery Mode.
On Intel Macs with the T2 chip:
- Shut down your Mac.
- Turn on your Mac and immediately hold down Command + R until you see the Apple logo.
- Type in your password if asked.
- Click Disk Utility, then Continue.
- Select your startup disk from the left side and click Mount.
- Exit Disk Utility.
- Click Utilities > Terminal from the top menu bar.
On Apple Silicon Macs:
- Turn off your Mac.
- Press and hold the power button until "Loading startup options" shows up.
- Click Options > Continue.
- Select your account and click Next.
- Enter your password and click Continue.
- Click Utilities > Terminal from the top menu bar.
On Intel Macs without the T2 chip:
- Turn off your Mac and wait a few seconds.
- Power on your Mac and immediately press and hold Command + S.
- Release the keys when you see lots of texts with a black background.
- Wait for the texts to stop scrolling.
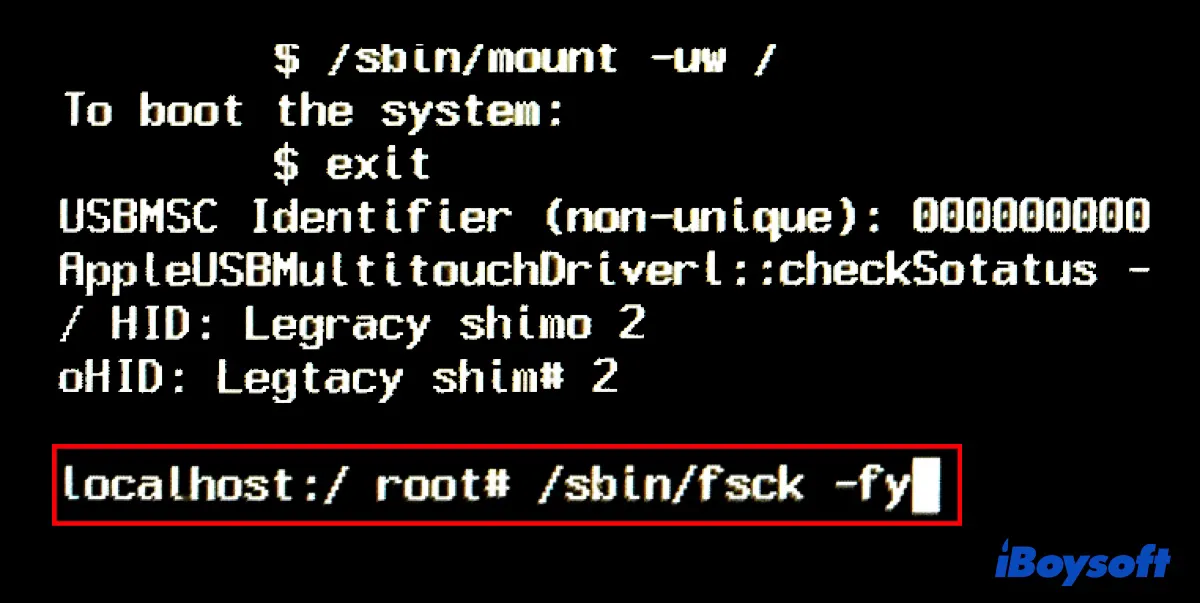
Once you are in Single User Mode, you can carry on the steps below to fix the boot drive:
- Type in the following command and hit Enter./sbin/fsck -fy
- After fsck finishes repairing your drive, you can type the command below, and press Enter to restart your Mac.reboot
You can then open Boot Camp Assistant and try installing Windows again. If Boot Camp still pops up "Your disk could not be partitioned." on Big Sur, continue reading the fixes below.
Fix 3: Remove unallocated free space
Besides checking and repairing your Mac hard drive, Apple also suggests you check for unallocated free space and remove it, if any, to deal with "Your disk could not be partitioned." on Monterey or other macOS. This way, you make the free space available to be partitioned with Boot Camp.
- Open Disk Utility from the Applications > Utilities folder.
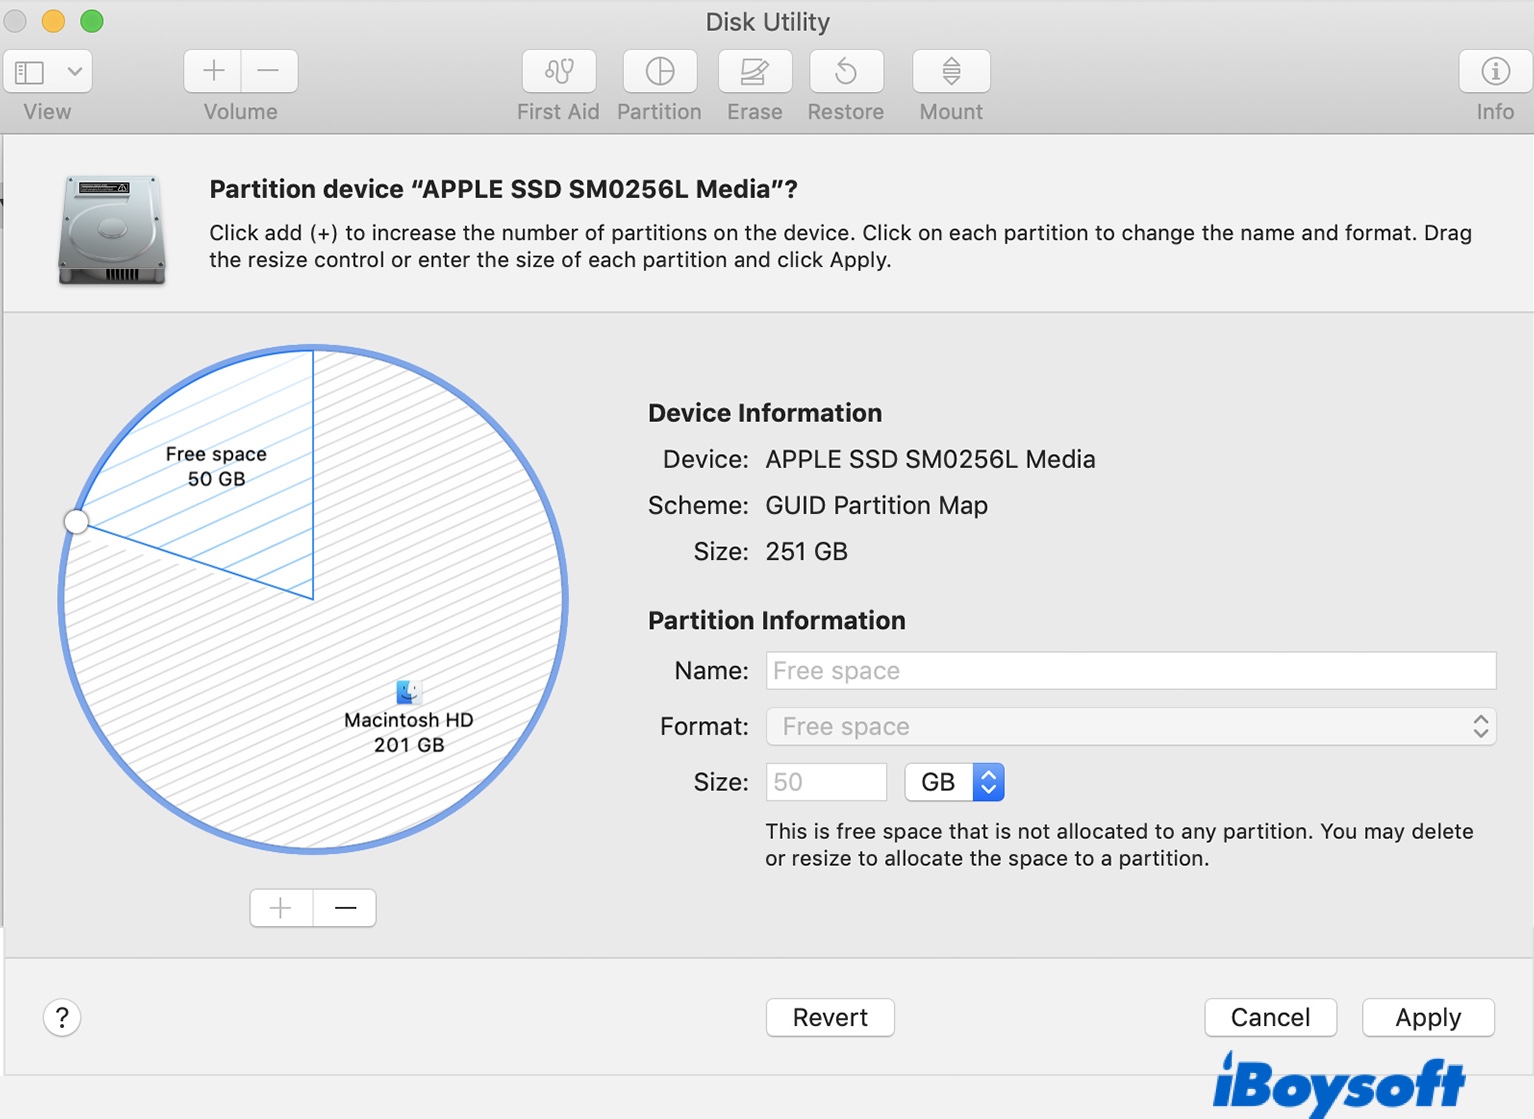
- Select your startup disk from the left sidebar, then click Partition.
- If you see a section of the pie chart labeled "Free space," select it and click the ( - ) button beneath the chart to remove it.
- Quit Disk Utility.
Retry with Boot Camp Assistant to see if the issue persists. If it still gives "Your disk could not be partitioned." on Big Sur/Monterey, move on to the next fix.
Fix 4: Troubleshoot the issue by creating a FAT partition
Since Boot Camp doesn't offer details about the error "Your disk could not be partitioned. An error occurred while partitioning the disk," we can manually create a FAT32 partition of the same size as you intended with Boot Camp to get more information. After all, this is essentially what Boot Camp failed to do.
How to troubleshoot "Your disk could not be partitioned." on Catalina/Big Sur/Monterey:
- Launch Disk Utility from the Applications > Utilities folder.
- Select your startup disk from the left side and click Partition.
- Click the ( + ) button below the pie chart and click Add Partition.
- Enter a name in the Name field. (E.g., Boot Camp)
- In the Format pop-up menu, choose MS-DOS (FAT).
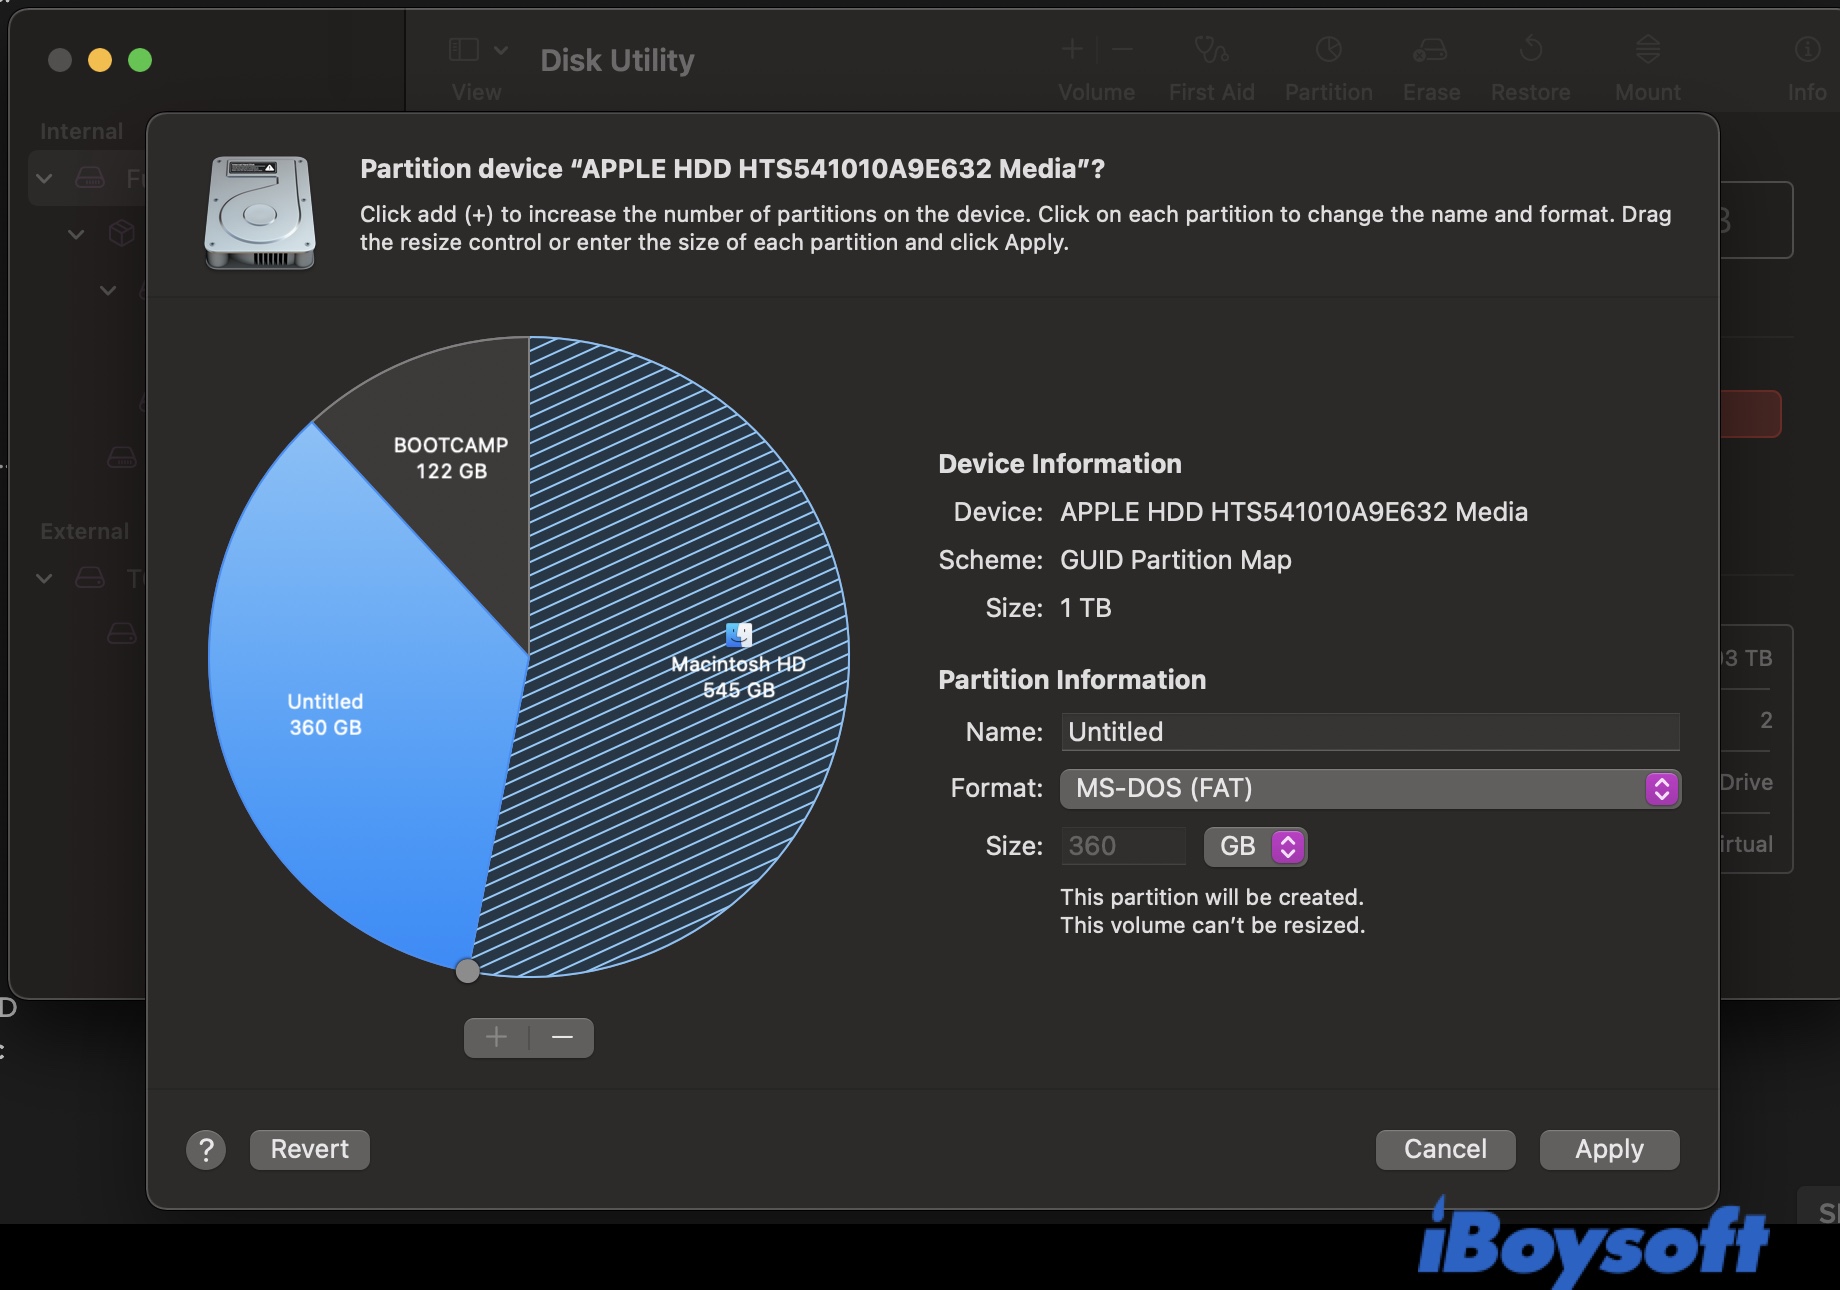
- In the box next to Size, enter the same size as you wanted for the failed Boot Camp partition.
- Click Appy.
When Disk Utility finishes partitioning your Mac hard drive, it will likely fail but displays more information about the error. You can Google the error to find more specific instructions on solving the issue, then use Boot Camp to partition your disk again. We will list some common solutions below, so keep reading.
Fix 5: Delete your local snapshots
Often time, Disk Utility won't let you erase the drive but shows the error "APFS Container Resize error code is 49153 Error: -69606: A problem occurred while resizing APFS Container structures."
If you have Time Machine enabled, it's likely making snapshots that prevent you from partitioning your Mac and Boot Camp Says Not Enough Space But It Isn't. In which case, you can turn off the automatic backup of Time Machine and delete the local snapshots to fix it.
How to terminate "Your disk could not be partitioned." on Catalina/Big Sur/Monterey:
- Open the Apple menu > System Preferences.
- Select Time Machine.
- Uncheck the box next to "Back Up Automatically."
- Open Terminal from the Application > Utilities folder.
- Type in the following command and press Enter to list the local snapshots you have.tmutil listlocalsnapshots /
- Copy and paste the command below and hit Enter to delete all local snapshots.for d in $(tmutil listlocalsnapshotdates | grep "-"); do sudo tmutil deletelocalsnapshots $d; done
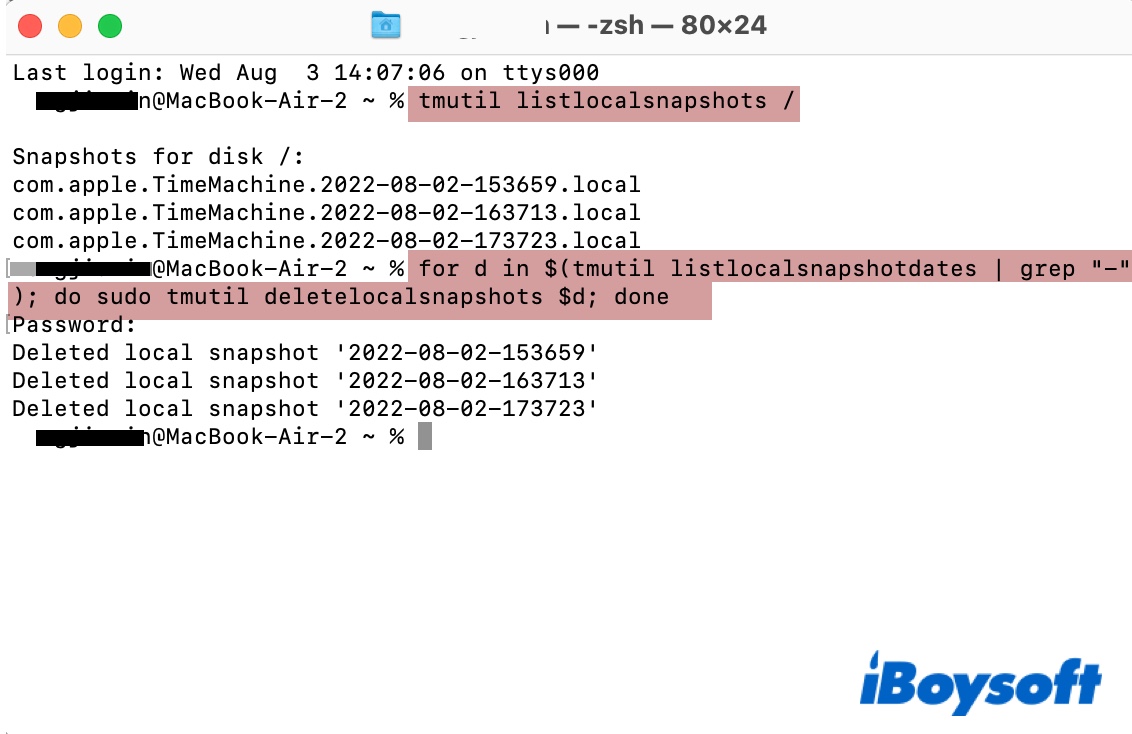
- Type in your account password and hit Enter.
It may take a few minutes if you have many local snapshots. Once all local snapshots are deleted, run Boot Camp to check whether the warning shows up. If you have resolved the issue with the methods we mentioned above, don't forget to share them with your friends.
Fix 6: Turn off FileVault
You may also come across the error "APFS Container Resize error code is 49187. A problem occurred while resizing APFS Container structures. : (-69606)." when creating the test FAT32 partition. If that happens, you need to check and disable FileVault as it may interfere with Boot Camp.
- Go to the Apple menu > System Preferences.
- Click Security & Privacy > FileVault.
- Tap the yellow padlock and enter your account password.
- Click "Turn Off FileVault."
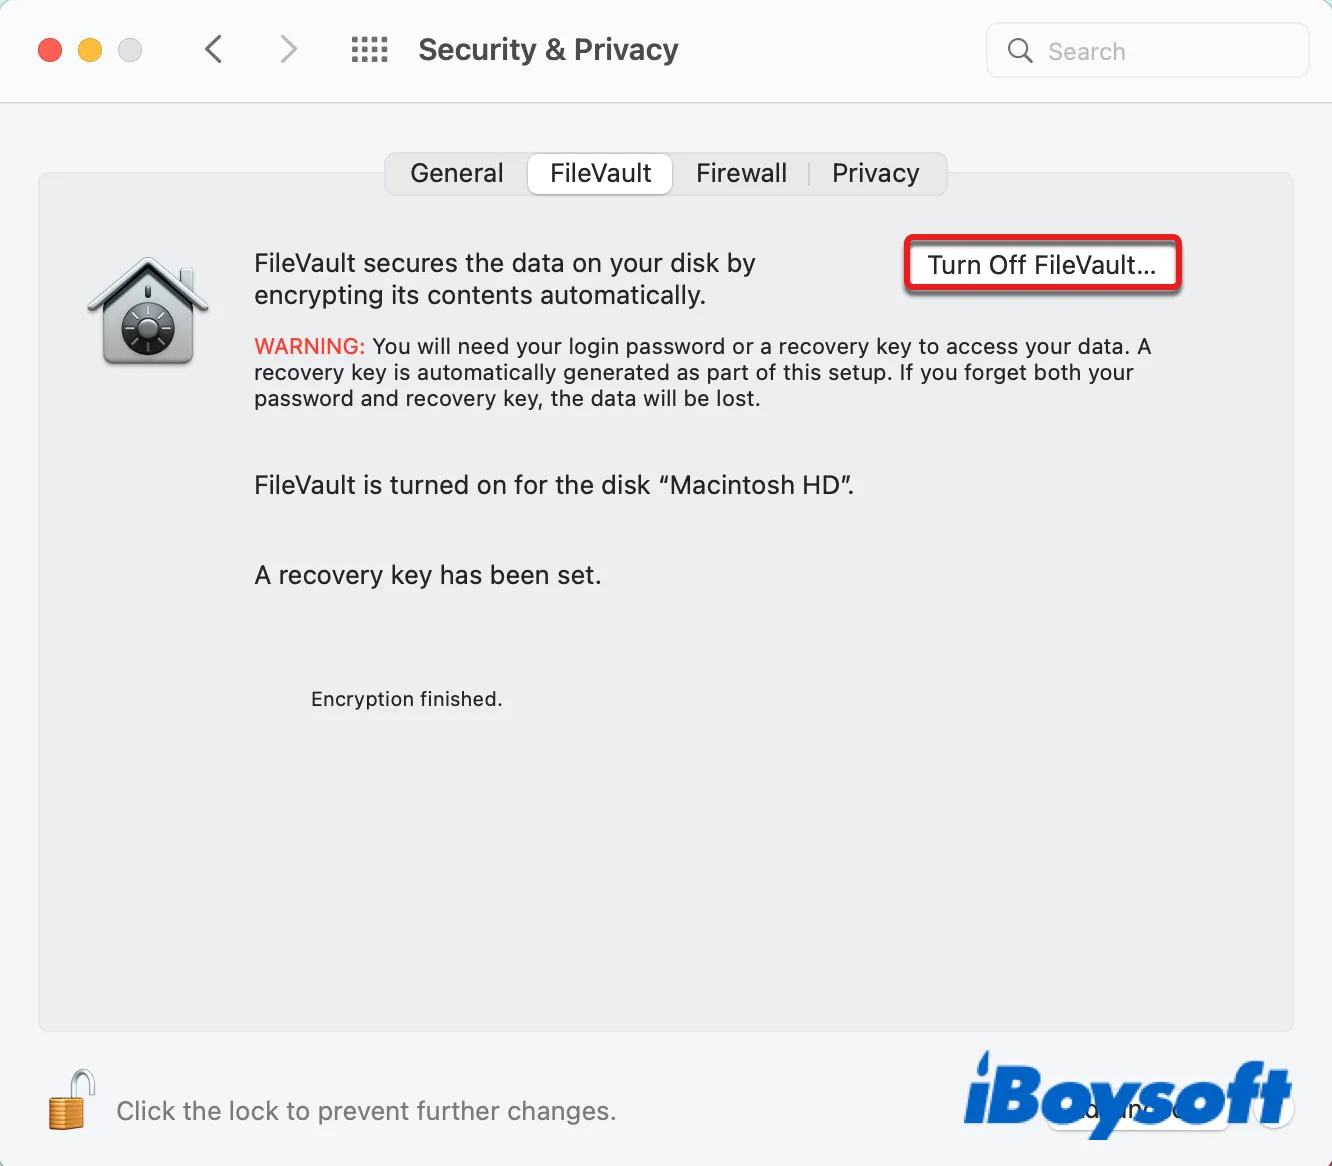
- Enter your account password to unlock the drive.
- Click "Turn off Encryption."
Suppose you still receive "Your disk could not be partitioned." on Boot Camp; try our next trick.
Fix 7: Turn off Optimize Mac Storage
If you back up your Mac with iCloud, you might have enabled "Optimize Mac Storage" to save space on your Mac. When it's on, files you haven't viewed for a while will be kept in purgeable space, which should be removed by the operating system when the space is needed.
However, macOS may fail to release the purgeable space on Mac when you need the space to create a Windows partition and cause the error "Your disk could not be partitioned. An error occurred while partitioning the disk." So, it's advisable to turn off "Optimize Mac Storage" before using Boot Camp and re-enable it when things are done.
- Go to the Apple menu > System Preferences.
- Click Apple ID > iCloud.
- Uncheck the box next to "Optimize Mac Storage."
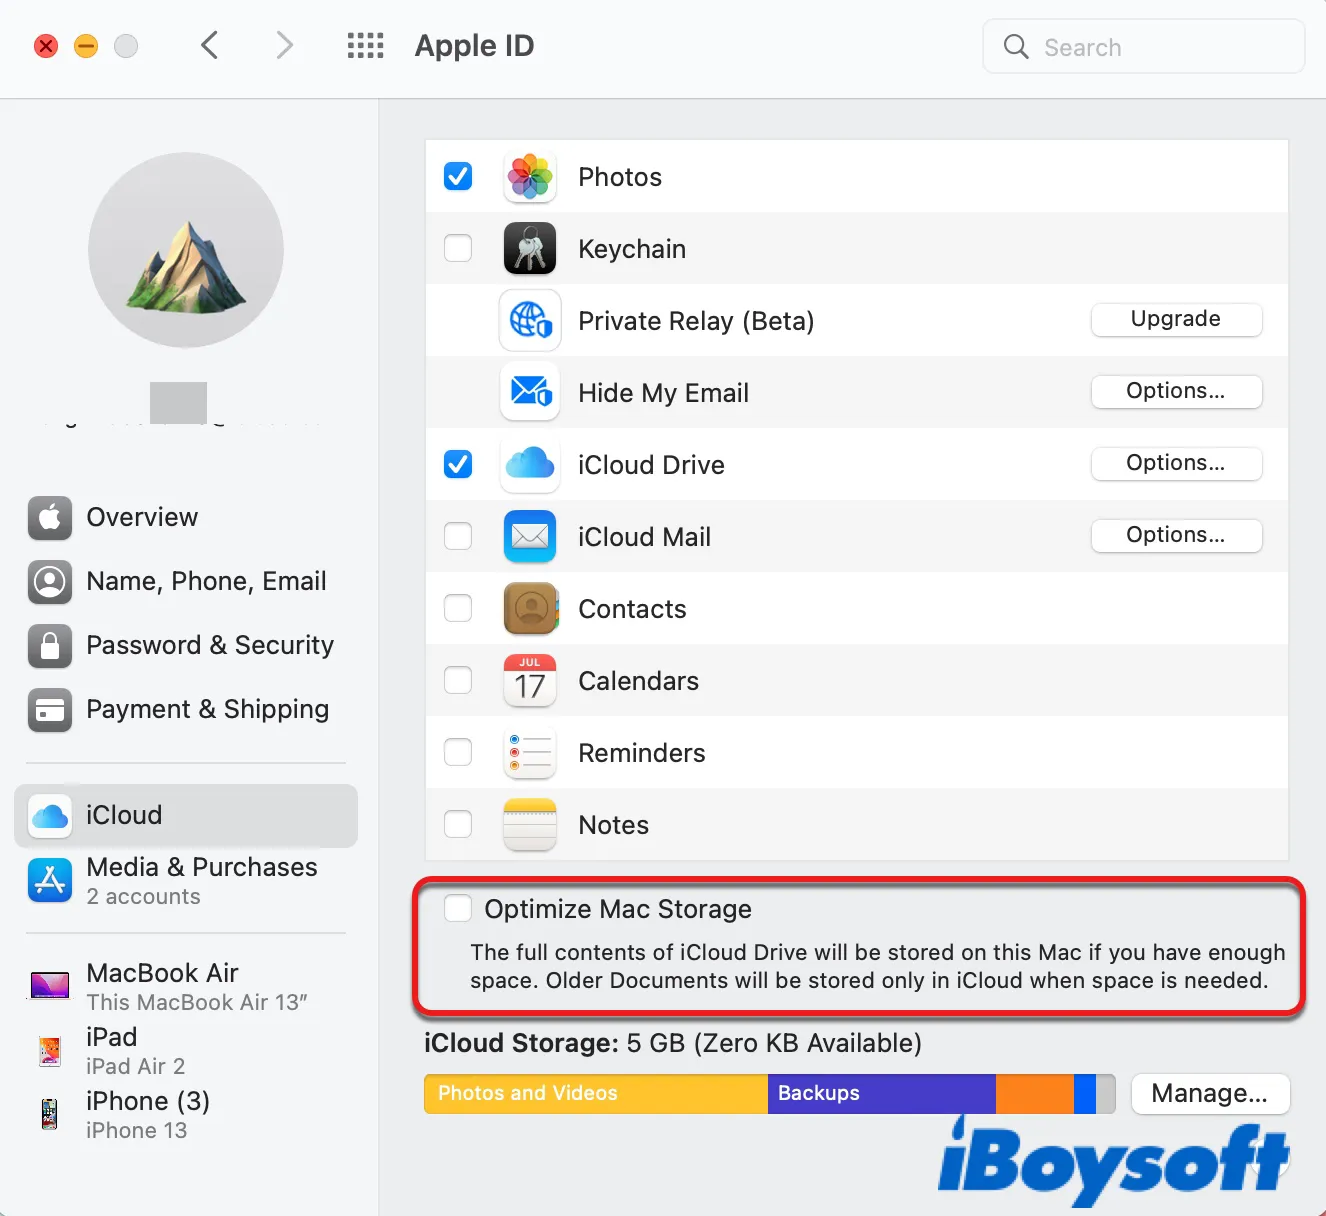
If, unfortunately, this fix didn't stop Mac from showing "Your disk could not be partitioned." on Boot Camp, proceed to the next solution.
Fix 8: Downgrade/upgrade macOS
If you are not running the latest macOS, consider updating to the newest available version and installing Windows on it. Doing this can fix certain bugs in your current operating system that may result in the Boot Camp partition error and equip it with more security patches. You can check the available update in System Preferences > Software Update.
Nevertheless, if you are using the latest macOS and none of the above solutions managed to resolve the issue, you can downgrade the macOS you are currently running to an earlier version. For instance, if you get "your disk could not be partitioned." on Monterey, you can downgrade from Monterey to Catalina as Big Sur may be buggy on Intel CPUs.
What to Do If You Can't Partition SD Card/USB Drive/Hard Drive on Mac?
This post discusses various solutions to try if you can't partition an SD card, a USB drive, an internal SSD, or an external hard drive on Mac. Read more >>
Did these solutions help you get rid of the warning, "Your disk could not be partitioned. An error occurred while partitioning the disk."? Please share it with your friends.