If you have installed the macOS Ventura beta to test out its new features or prepare your apps for its compatibility, you may want to uninstall it now and go back to a stable version for various reasons.
The biggest might be the Ventura issues or bugs that are affecting your workflow. You may also want to uninstall macOS Ventura if you prefer the familiarity of a previous release. We'll show you how to do that below.
If you want to get rid of the beta version, you can either restore from a Time Machine backup made on a previous macOS version or erase the startup disk and reinstall macOS Monterey or the macOS version your Mac came with. Sometimes, you may need to do both. We will combine these steps into a cohesive process to help you effectively remove the macOS Ventura beta.
Step 1: Delete the macOS Ventura beta profile.
The first thing to do is unenroll your device from the Apple Beta Software Program so that you no longer receive the beta updates.
How to delete beta profile on Mac:
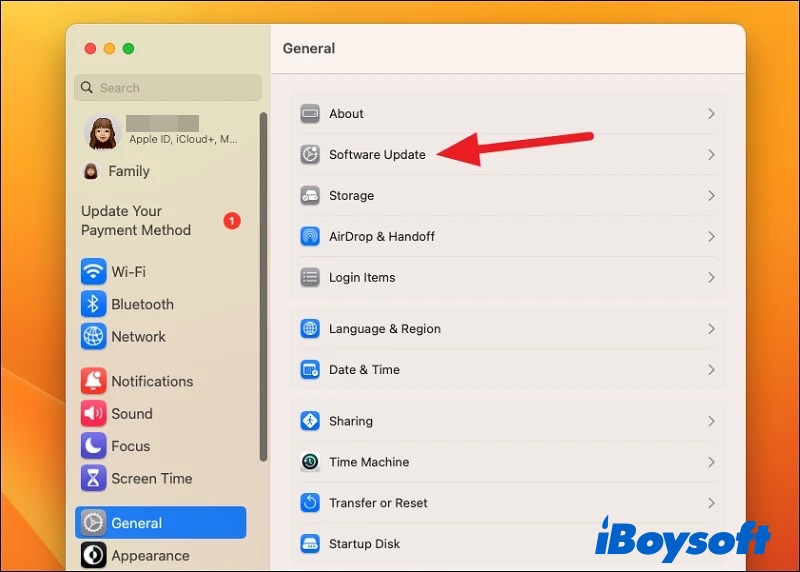
- Open System Settings.
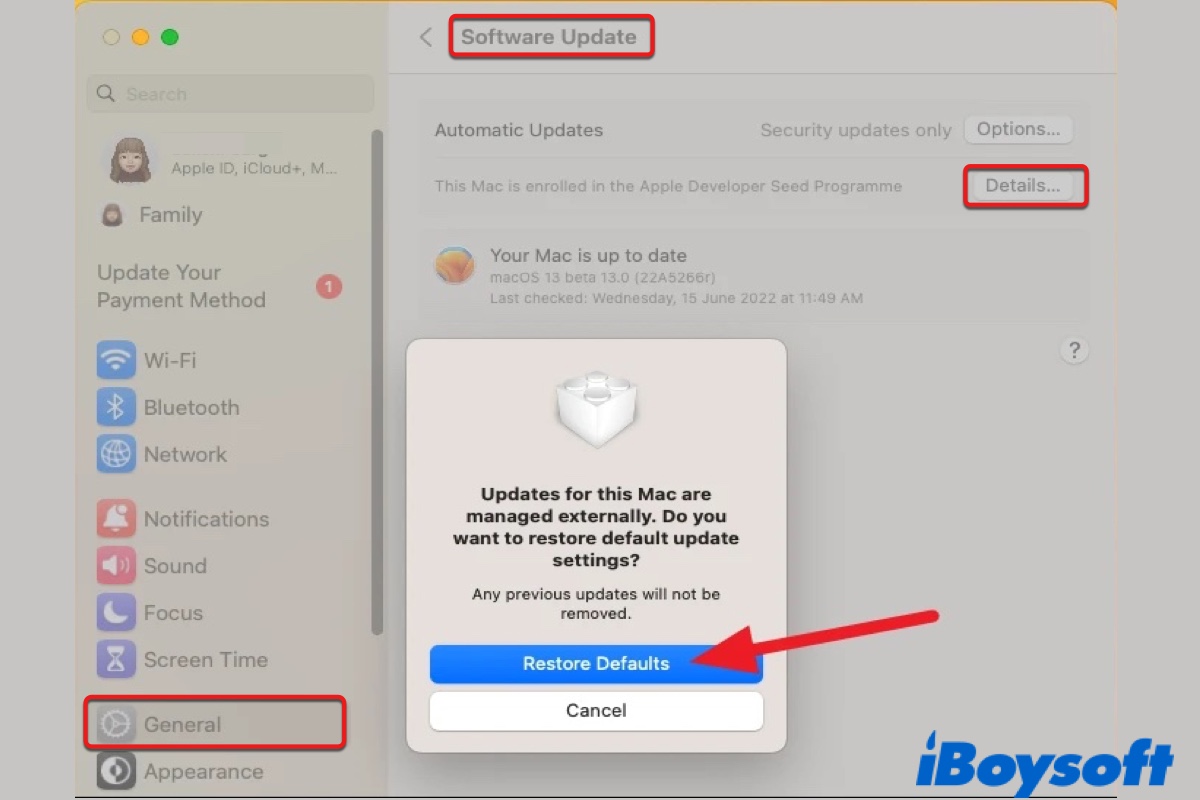
- Select General > Software Update.
- Click "Details..." next to the message saying, "This Mac is enrolled in the Apple Beta Software Program."
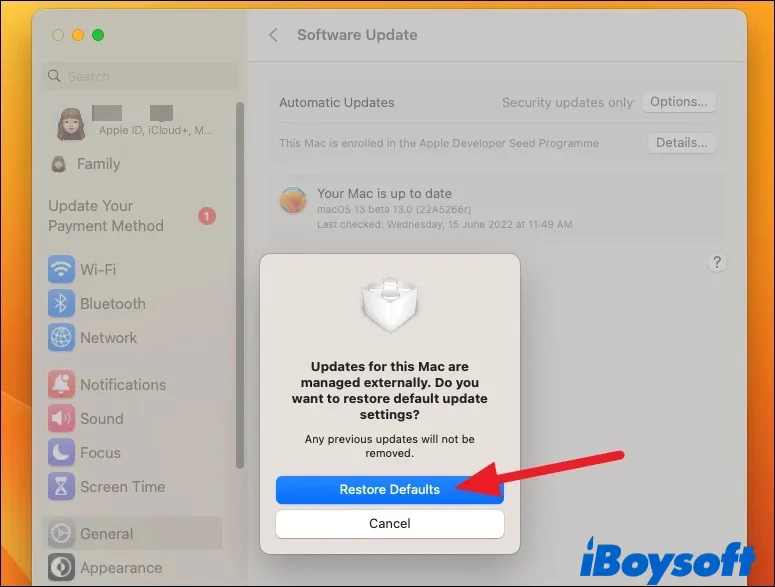
- Click "Restore Defaults" when a dialog asks whether you want to restore default update settings.
- Enter your login password to unlock the Software Update preferences.
After going through these steps to delete the macOS Beta Profile, you have stopped the macOS Ventura beta updates from arriving on your Mac and restored the default update settings.
However, the macOS beta itself is still on your Mac. So, your next step is to remove the beta software from your Mac and reinstall a stable version. But before that, make sure your Mac has been backed up.
Find this helpful? You can share this post with a simple click.
Step 2: Back up data on your Mac.
To efficiently downgrade macOS Ventura beta to macOS Monterey or a previous macOS version of your choice, you likely need to erase your Mac hard drive, which will delete all your files. That's why you need to back up your Mac before getting started.
Suppose you have a Time Machine backup created before installing the macOS Ventura beta. Then, you only need to copy off the files you have made changes after the backup to another external storage device (not your Time Machine backup disk).
Unfortunately, if you do not have a Time Machine backup of a previous macOS available, you can't restore your data and settings even if you can make one now. That's because the backup made on the macOS Ventura beta won't be compatible with macOS Monterey as you can't restore from a Time Machine backup created on a later macOS version. But you can at least transfer the crucial files to an external drive.
Step 3: Restore from the Time Machine backup. (Optional)
If you have backed up your Mac with Time Machine prior to your Ventura beta fling, you can try reverting to the state where the backup is made without erasing your Mac hard drive first.
Note that restoring from the Time Machine backup will erase all data on your Mac. So, ensure the essential files not included in the backup are safe. Then follow these steps:
- Open Settings and click your name at the top.
- Scroll down to "Find My Mac."
- Toggle it off.
- Go back a page and scroll down to click "Sign Out."
- Shut down your Mac.
- Boot your Mac into Recovery Mode.
On an Intel Mac: Press the power button, then immediately hold down Command + R until you see the Apple logo.
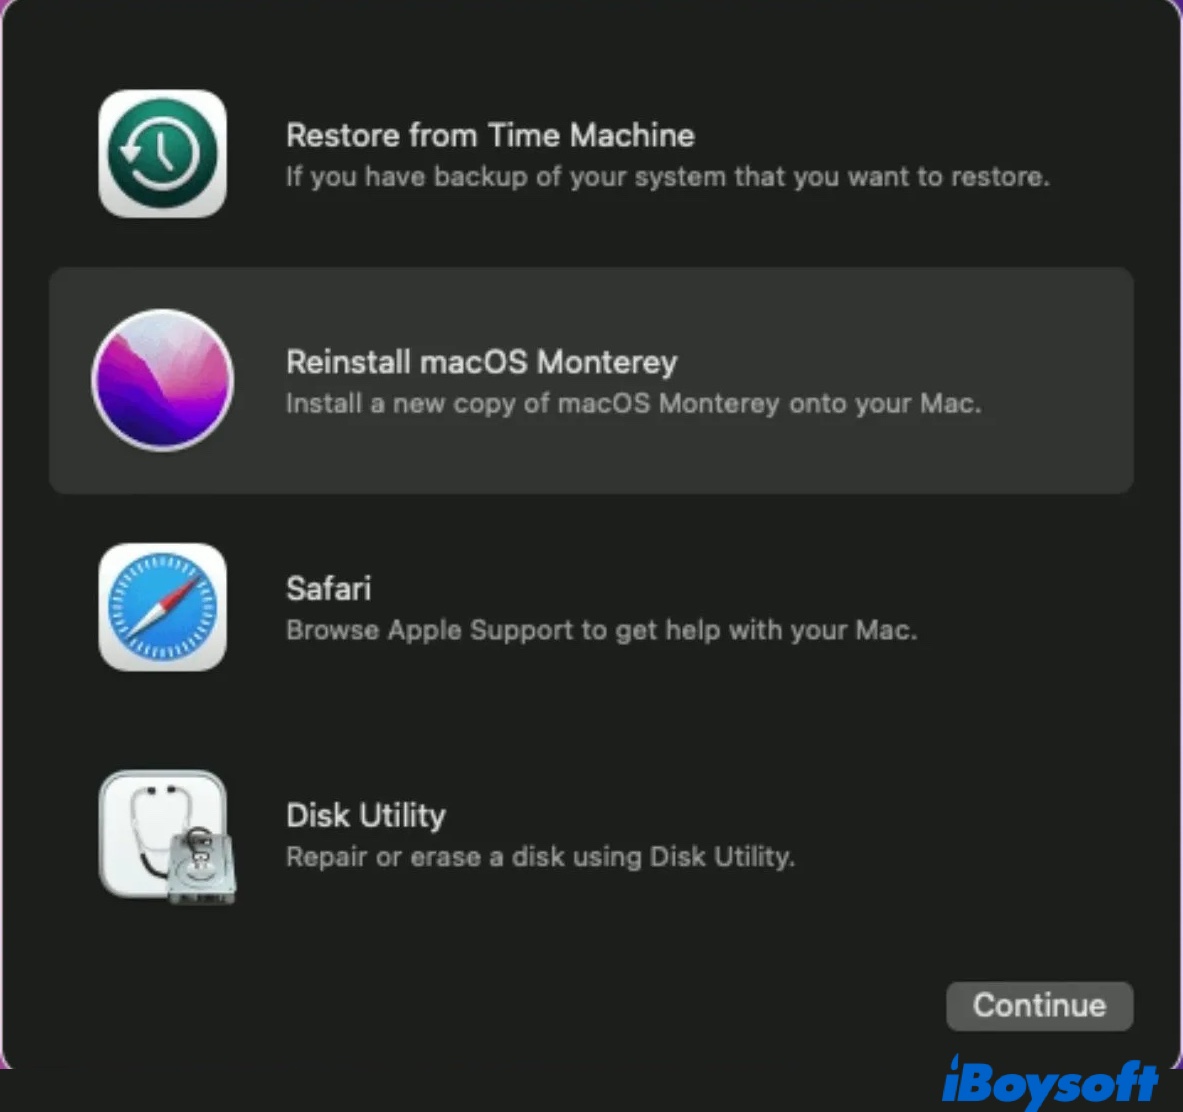
On an M1 Mac: Press and hold the power button until the Loading startup options screen appears. Then click Options > Continue. - Select "Restore from Time Machine" and continue with the onscreen instructions.
Suppose your Mac doesn't allow you to restore from the Time Machine backup but pops up the message, "You must use Migration Assistant to transfer data from this backup. Reinstall macOS if necessary and then use Migration Assistant to transfer data from your backup." In that case, you must follow the steps below to erase your Mac and reinstall macOS.
Step 4: Erase your Mac hard drive and reinstall macOS Monterey or the original macOS.
You might have noticed that you are only given the option to reinstall the macOS Ventura beta in macOS Recovery. To get the option to "Reinstall macOS Monterey or other stable versions, you need to erase the startup disk, which can also prevent potential installation failures from happening when downgrading macOS Ventura beta.
Erasing the startup disk can only be performed in Recovery Mode, which requires different ways to enter on Intel and M1 Mac. On an Intel Mac, there are two Recovery Modes - Local Recovery and Internet Recovery.
The former one only allows you to reinstall the last installed macOS on your Mac, which is likely the macOS Ventura beta. Therefore, we will be using Internet Recovery here to erase the startup disk and reinstall macOS.
There are two ways to enter Internet Recovery, which offers you different macOS versions to reinstall.
- Option-Command-R: Reinstall the latest version of macOS compatible with your Intel Mac.
- Shift-Option-Command-R: Reinstall the macOS that came with your Mac or the closest available.
Note: You can try using Option-Command-R first. Then switch to the other one if it fails to take you to macOS Monterey after cleaning the startup disk.
An M1 Mac has only one way to boot into Recovery, which lets you reinstall the last official version of macOS installed on your Mac after erasing the Mac hard drive.
Ensure your Mac has a stable internet connection and is plugged into power, then follow the steps below to erase the startup disk:
- Reboot your Mac into Recovery mode.
On an Intel Mac: Press the power button, then immediately hold down the chosen keyboard combination until you see the Apple logo.
On an M1 Mac: Press and hold the power button until the Loading startup options screen appears. Then click Options > Continue. - Choose Disk Utility.
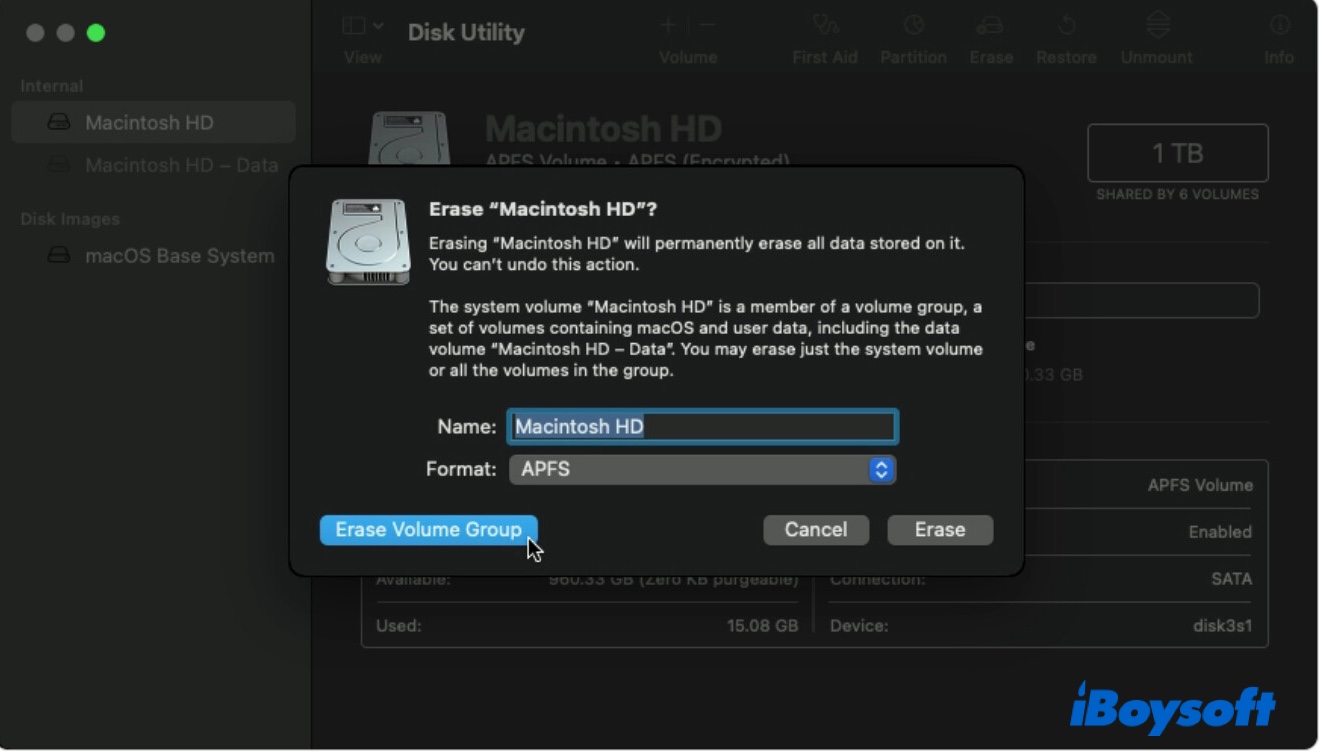
- Select Macintosh HD (or whatever name you gave to your boot volume) from the left side.
- Keep the name and format.
- Choose "Erase Volume Group" if you see the option. Otherwise, choose "Erase."
- Click "Reinstall macOS (Monterey)."
- Follow the prompts to install the macOS.
- Use Migration Assistant to bring all your data back from a Time Machine disk if you have one.
Have you managed to uninstall the macOS Ventura beta and downgrade it to macOS Monterey or another version yet? If so, congratulations! You can share these steps with your friends by clicking the button below.
If you still can't get your Mac back to normal from the macOS beta, you can reinstall macOS from a bootable installer.
Step 5: Create a macOS bootable installer.
The good thing about using a bootable installer is that it enables you to install the macOS that came with your Mac and any later releases your Mac is compatible with. To create the bootable installer for Mac, you need a spare USB flash drive or other secondary volumes with at least 14 GB of available storage formatted as Mac OS Extended.
Since the external USB will be erased, ensure it doesn't have crucial data on it or the volume you want to use. Then you can follow these steps to prepare the bootable installer.
- Download the macOS installer from Apple Store or this document.
- If the installer prompts you to install, click "Install macOS Monterey" from the top-left menu bar and choose "Quit Install macOS."
- Ensure the installer is in your Applications folder.
- Plug the USB into your Mac.
- Open Disk Utility from the Applications > Utilities folder.
- Select the USB disk or volume from the left side.
- Click Erase.
- Give it a name and change the format into Mac OS Extended (Journaled).
- Click Erase again.
- Open Terminal from the Applications > Utilities folder.
- Input the following command after revising based on your case and hit Enter.sudo /Applications/Install\ macOS\ Monterey.app/Contents/Resources/createinstallmedia --volume /Volumes/MyVolume
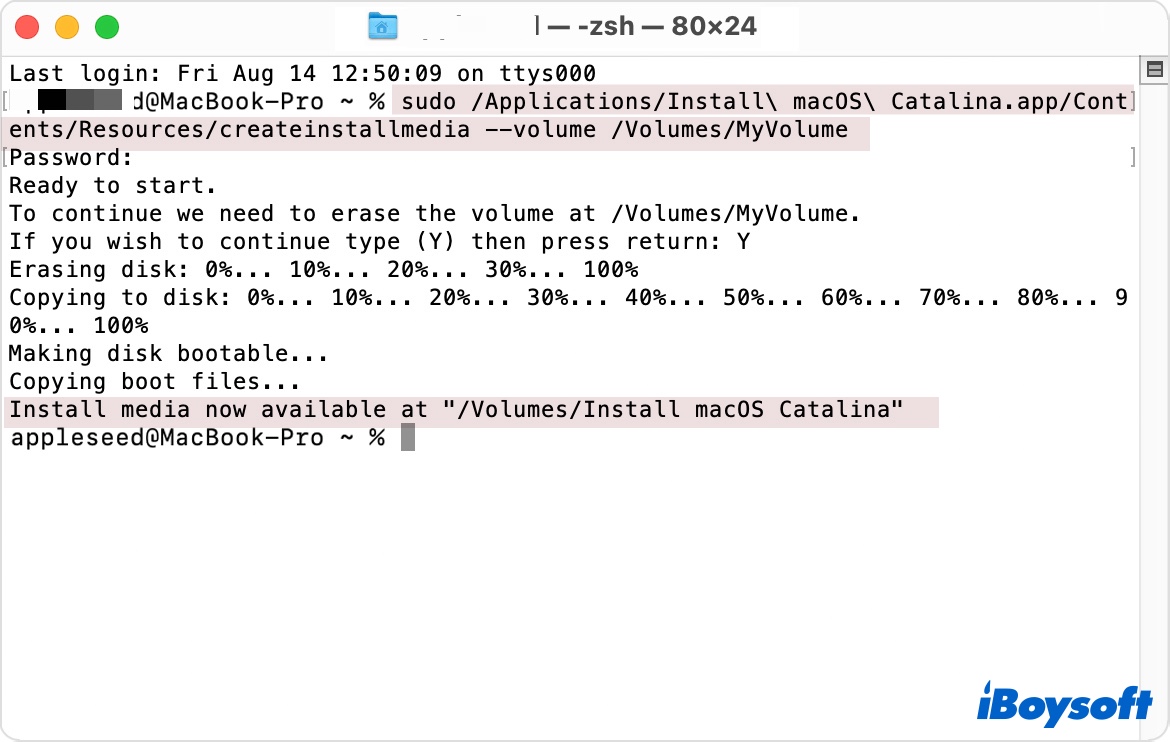
Replace Monterey with the macOS you want to install and MyVolume with your USB's name. If the macOS version has two words, separate them with a backslash (\). For instance, my command for installing Big Sur on the Volume named USB will be:sudo /Applications/Install\ macOS\ Big\ Sur.app/Contents/Resources/createinstallmedia --volume /Volumes/USB - Type your administrator password and hit Enter.
- Type Y and press Enter to confirm you want to erase the disk.
- Click OK if an alert saying that Terminal would like to access files on a removable volume.
- When done, your USB or the volume used will be renamed as the installer you download, such as Install macOS Monterey.
- Quit Terminal and eject the disk.
- Turn off your Mac.
Now that the bootable installer is created, you can continue with the next step to boot from the USB and reinstall macOS.
Step 6: Boot from the bootable installer and reinstall macOS.
The steps to boot from the bootable installer differ on M1 and Intel Macs. Note that you need to reduce the security in Startup Security Utility to allow booting from external storage devices if you are using a T2 Mac. Besides, ensure your Mac is connected to the internet because it's needed to get firmware and other information specific to your Mac model.
On an M1 Mac:
- Connect the bootable installer to your Mac.
- Press and hold the power button until you see the startup options window.
- Select the volume containing the bootable installer and click Continue.
- Follow the onscreen instructions and select Macintosh HD as the disk you want to install the macOS.
On an Intel Mac:
- Connect the bootable installer to your Mac.
- Power on your Mac and immediately press and hold the Option key.
- Release the key when a dark screen shows your bootable volumes.
- Select the volume containing the bootable installer and click the up arrow.
- Choose your language if asked.
- Follow the onscreen instructions and select Macintosh HD as the disk you want to install the macOS.
This post is a complete tutorial on how to uninstall the macOS Sonoma Beta on Mac. You can follow the detailed steps in this post to restore your Mac to the latest public macOS or an older version without losing data.
Now that you know how to uninstall beta software from Mac, please share this post to help more Mac users.
FAQs about how to uninstall macOS Ventura
- QHow do I remove Ventura from my Mac?
-
A
There are six steps to remove Ventura from your Mac:
Step 1: Delete the macOS Ventura beta profile.
Step 2: Back up data on your Mac.
Step 3: Restore from the Time Machine backup. (Optional)
Step 4: Erase your Mac hard drive and reinstall macOS Monterey or the original macOS.
Step 5: Create a macOS bootable installer.
Step 6: Boot from the bootable installer and reinstall macOS.
- QHow to downgrade Ventura to Monterey without losing data?
-
A
If you have a Time Machine backup made on macOS Monterey, you can downgrade Ventura to it without losing data by simply restoring from it on macOS Recovery. Just be reminded that you still need to back up everything you've done after the the upgrade.
If you don't have a Time Machine backup yet, you can create one now and restore from it after downgrading Ventura to Monterey with steps in this article to avoid data loss.
- QHow to remove Install macOS Ventura from Launchpad?
-
A
Usually, if you hold down the Option key, a delete ( x ) button will appear and allow you to remove the apps in Launchpad. But this doesn't seem to work with the Install macOS Ventura app.
To remove the Install macOS Ventura app, you need to navigate to the Applications folder and move it to Trash.
- QIs macOS Ventura safe?
-
A
Yes, it's safe to install macOS Ventura as long as your Mac is compatible with it.