Sometimes, it is necessary or even a must to format Macintosh hard drive:
- Fail to reinstall macOS or want a clean reinstallation.
- Erase all contents to prepare Mac for sale, exchange, or donate the Mac.
- Reset M1 Mac to factory settings.
- Convert the file system of the Macintosh hard drive.
- Troubleshoot errors such as "This Volume is Not Formatted as APFS" on the drive.
Therefore, this post will elaborate on how to format Macintosh hard drive, providing detailed steps to follow.
Macintosh hard drive overview
Macintosh is often abbreviated as Mac and is used to describe the line of Apple computing products, including MacBook Pro/Air, iMac, and Mac Pro/mini. Macintosh hard drive refers to the internal hard drive or SSD that comes with the device and has long been named Macintosh HD by default. Besides, Macintosh hard drive is also the default startup disk on Macs.
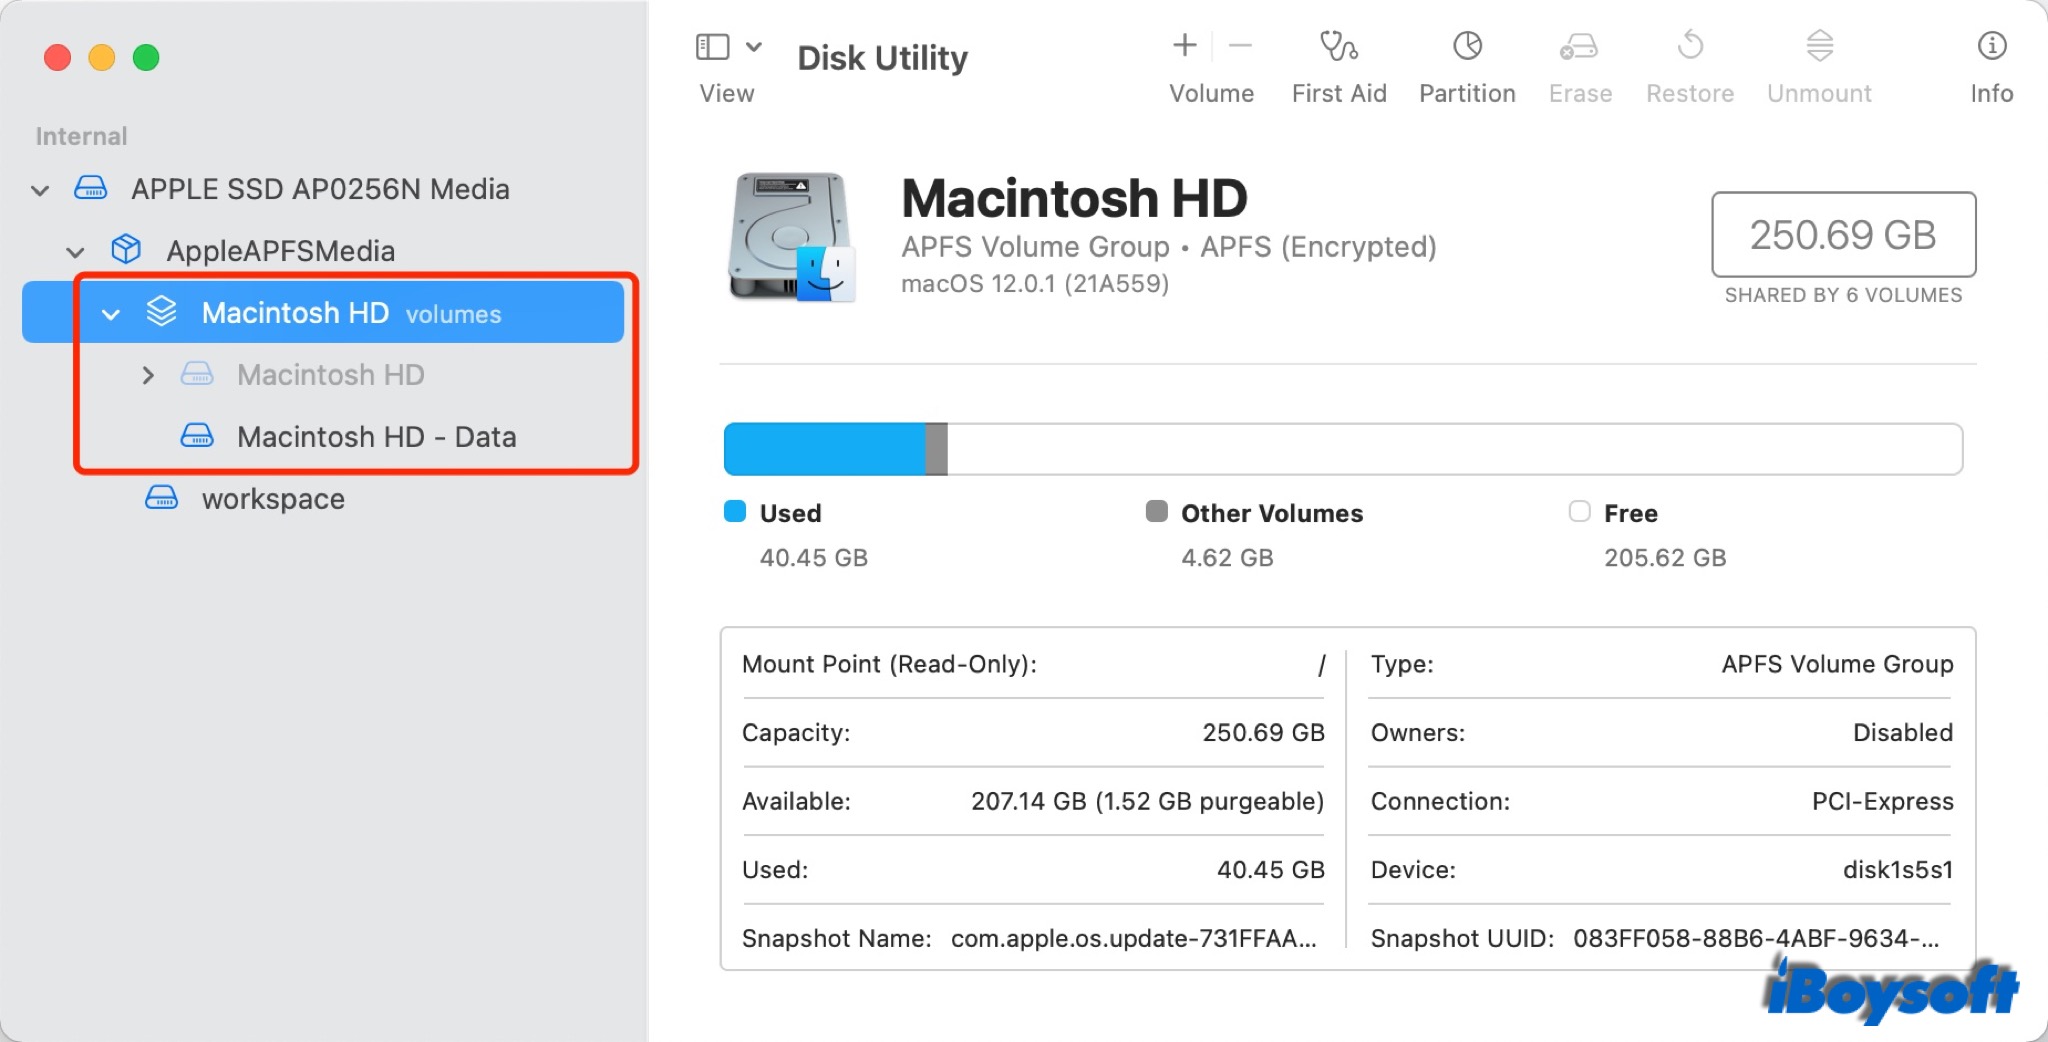
On classic Mac OS, the icon of Macintosh HD locates at the top right corner of the desktop. However, recent versions of macOS hide this from new users by default. You can find your Macintosh hard drive by heading to Launchpad > Other > Disk Utility. From the sidebar of the window, Macintosh HD is displayed there.
It should be noted that from macOS 10.15 Catalina, the internal hard drive of a Mac is segregated into two separate entities, namely Macintosh HD and Macintosh HD - Data. The read-only Macintosh HD stores the operating system files and applications only, while the read-write Macintosh HD - Data stores user data such as documents, videos, photos, and audio. You need to format the whole Macintosh hard drive instead of secondary volumes to remove all contents.
Preparations before formatting
Don't rush to the detailed steps for formatting Macintosh HD. To ensure a smooth and successful format process on your Mac devices, you need to prepare:
- Back up important files or the whole drive. You must be aware that formatting Macintosh HD will erase all the data stored on the drive. Therefore, to avoid losing important files, backup Mac with Time Machine and restore it after formatting.
- Keep your Mac charged during the process. Depending on how many files you have stored on the Macintosh HD, it takes a few minutes to dozens of minutes to complete formatting. A sudden power leakage will disrupt the process and fail to format the drive so you have to do it again.
How to format Macintosh step by step
With essential preparations done, now we can proceed to the specific steps for formatting Macintosh hard drive on your device. Follow the steps carefully.
Step 1. Boot Mac into macOS Recovery Mode
It is not allowed to format Macintosh hard drive - the startup disk when it is in use. You have to boot the Mac into Recovery Mode to perform drive formatting. And the steps to enter into macOS Recovery are different depending on the Mac model.
On an Intel Mac: Turn on your Mac, then immediately press and hold the Command + R keys until you see an Apple logo or other image appear on the screen.
On an Apple silicon Mac: Press and hold the power button to turn on your Mac, don't release your finger until you see the startup options window. Select Options, then click Continue.
Step 2. Get into Disk Utility
From the utilities window, select Disk Utility and click Continue.

Step 3. Select Macintosh HD in Disk Utility
From the sidebar of Disk Utility, find the Macintosh hard drive named Macintosh HD or Home HD, or a custom name. As aforementioned, on macOS Catalina and later versions, the Macintosh hard drive is divided into two volumes, Macintosh HD and Macintosh HD - Data. You need to delete the data volume and other volumes you added to the drive.
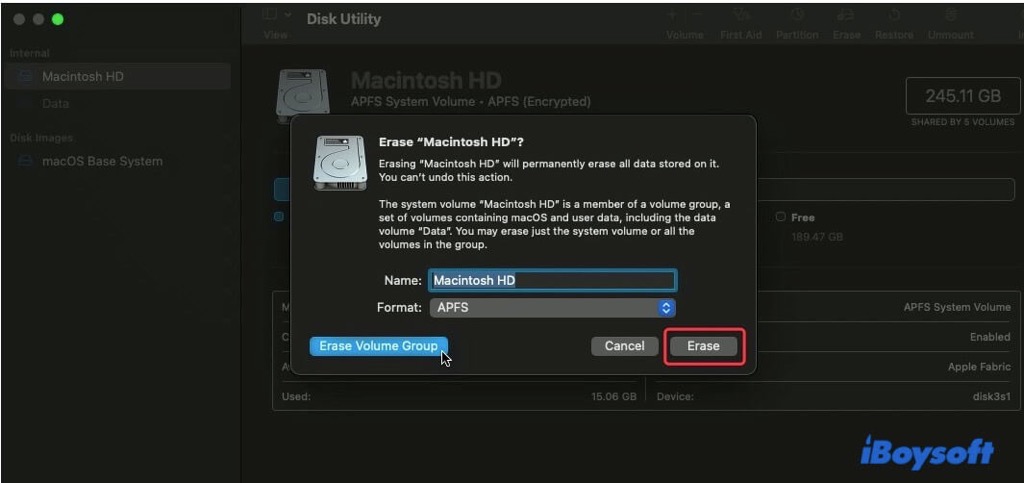
Then select Macintosh HD and click Erase on the toolbar.
Note: You shouldn't delete or erase the disk image called macOS Base System because it's the recovery partition from which you can access basic utilities like Disk Utility.
Step 4. Specify a name and format
A new window pops up on the screen, asking for assigning a new name and format for the Macintosh hard drive. You can enter the name you prefer or keep the default name: Macintosh HD. Then click the Format box to display available options of the file system, choose APFS for Mac computers using macOS 10.13 or later, and choose Mac OS Extended for Mac computers using macOS 10.12 or earlier.
Then click Erase, or Erase Volume Group if appears.
Step 5. Quit Disk Utility and reinstall macOS
Waiting for the process to complete, tap Disk Utility from the menu bar and click Quit Disk Utility to get back to the macOS utilities window. Then click Reinstall macOS > continue, and select the Macintosh HD you formatted as the destination to install the new macOS. After the reinstallation finish, you can follow the onscreen instructions to set up the Mac.
Wrap it up
For whatever reason you want to format Macintosh HD, this stepwise tutorial can help you. Once again, back up crucial files stored on your drive in advance. After formatting Macintosh, you can get a brand-new drive to use. However, it is not recommended to format drive frequently to prevent excessive SSD wear on your M1 Mac.
If Disk Utility fails to format Macintosh HD, read: [Complete Guide] Disk Utility Won't Let You Erase Hard Drives
In you're interested in will formatting Macintosh HD make your Mac faster, read: Will Formatting My Mac Make It Faster? Here Comes Answer